rear Seat Ibiza ST 2015 Owner's manual
[x] Cancel search | Manufacturer: SEAT, Model Year: 2015, Model line: Ibiza ST, Model: Seat Ibiza ST 2015Pages: 248, PDF Size: 4.77 MB
Page 5 of 248
Table of Contents
Table of Contents
The e s
senti
als . . . . . . . . . . . . . . . . . . . . . . . . 5
Exterior view . . . . . . . . . . . . . . . . . . . . . . . . . . . . 5
Exterior view . . . . . . . . . . . . . . . . . . . . . . . . . . . . 6
Interior view (left guide) . . . . . . . . . . . . . . . . . . 7
Interior view (right-hand drive) . . . . . . . . . . . . . 8
How it works . . . . . . . . . . . . . . . . . . . . . . . . . . . . 9
Opening and closing . . . . . . . . . . . . . . . . . . . . . 9
Before driving . . . . . . . . . . . . . . . . . . . . . . . . . . . 12
Airbags . . . . . . . . . . . . . . . . . . . . . . . . . . . . . . . . 14
Child seats . . . . . . . . . . . . . . . . . . . . . . . . . . . . . 16
Starting the vehicle . . . . . . . . . . . . . . . . . . . . . . 20
Lights and visibility . . . . . . . . . . . . . . . . . . . . . . 21
Easy Connect . . . . . . . . . . . . . . . . . . . . . . . . . . . 24
Driver information system . . . . . . . . . . . . . . . . . 25
Journey data . . . . . . . . . . . . . . . . . . . . . . . . . . . . 29
Cruise control . . . . . . . . . . . . . . . . . . . . . . . . . . . 34
Warning lamps . . . . . . . . . . . . . . . . . . . . . . . . . . 35
Gearbox lever . . . . . . . . . . . . . . . . . . . . . . . . . . . 37
Air conditioning . . . . . . . . . . . . . . . . . . . . . . . . . 39
Level control . . . . . . . . . . . . . . . . . . . . . . . . . . . . 40
Emergencies . . . . . . . . . . . . . . . . . . . . . . . . . . . . 44
Fuses . . . . . . . . . . . . . . . . . . . . . . . . . . . . . . . . . . 44
Bulbs . . . . . . . . . . . . . . . . . . . . . . . . . . . . . . . . . . 45
Action in the event of a puncture . . . . . . . . . . . 45
Changing a wheel . . . . . . . . . . . . . . . . . . . . . . . 47
Snow chains . . . . . . . . . . . . . . . . . . . . . . . . . . . . 50
Emergency towing of the vehicle . . . . . . . . . . . 51
How to jump start . . . . . . . . . . . . . . . . . . . . . . . . 52
Changing the windscreen wiper blades . . . . . . 54
Safety . . . . . . . . . . . . . . . . . . . . . . . . . . . . . . . . 56
Safe driving . . . . . . . . . . . . . . . . . . . . . . . . . . . . 56
Safety first! . . . . . . . . . . . . . . . . . . . . . . . . . . . . . 56
Advice about driving . . . . . . . . . . . . . . . . . . . . . 56 Correct position for passengers . . . . . . . . . . . . 57
Pedal area . . . . . . . . . . . . . . . . . . . . . . . . . . . . . . 61
Seat belts
. . . . . . . . . . . . . . . . . . . . . . . . . . . . . . 61
Why wear a seat belt? . . . . . . . . . . . . . . . . . . . . 61
How to properly adjust your seatbelt . . . . . . . . 64
Belt pretensioners* . . . . . . . . . . . . . . . . . . . . . . 65
Airbag system . . . . . . . . . . . . . . . . . . . . . . . . . . 66
Brief introduction . . . . . . . . . . . . . . . . . . . . . . . . 66
Airbag safety instructions . . . . . . . . . . . . . . . . . 69
Deactivating airbags . . . . . . . . . . . . . . . . . . . . . 70
Transporting children safely . . . . . . . . . . . . . . . 72
Safety for children . . . . . . . . . . . . . . . . . . . . . . . 72
Child seats . . . . . . . . . . . . . . . . . . . . . . . . . . . . . 73
Emergencies . . . . . . . . . . . . . . . . . . . . . . . . . . 75
Self-help . . . . . . . . . . . . . . . . . . . . . . . . . . . . . . . 75
Emergency equipment . . . . . . . . . . . . . . . . . . . . 75
Tyre repair . . . . . . . . . . . . . . . . . . . . . . . . . . . . . . 76
Changing the windscreen wiper blades . . . . . . 78
Towing or tow-starting . . . . . . . . . . . . . . . . . . . . 79
Fuses and bulbs . . . . . . . . . . . . . . . . . . . . . . . . . 81
Fuses . . . . . . . . . . . . . . . . . . . . . . . . . . . . . . . . . . 81
Changing bulbs . . . . . . . . . . . . . . . . . . . . . . . . . 83
Single headlight bulb change . . . . . . . . . . . . . . 84
Double headlight bulb change . . . . . . . . . . . . . 85
Changing the AFS headlight bulbs . . . . . . . . . . 87
Changing the fog light bulbs . . . . . . . . . . . . . . . 88
Changing the tail light bulbs . . . . . . . . . . . . . . . 89
Changing the side and interior bulbs . . . . . . . . 91
Operation . . . . . . . . . . . . . . . . . . . . . . . . . . . . . 95
Controls and displays . . . . . . . . . . . . . . . . . . . . 95
General instrument panel . . . . . . . . . . . . . . . . . 94
Instruments and warning/control lamps . . . . . 96
Instruments . . . . . . . . . . . . . . . . . . . . . . . . . . . . 96
Warning and indication lamps . . . . . . . . . . . . . 100
Introduction to the Easy Connect system* . . . . 107
System settings (CAR)* . . . . . . . . . . . . . . . . . . . 107 Communications and multimedia
. . . . . . . . . . . 108
Steering wheel controls* . . . . . . . . . . . . . . . . . . 108
Multimedia . . . . . . . . . . . . . . . . . . . . . . . . . . . . . 112
Opening and closing . . . . . . . . . . . . . . . . . . . . . 112
Central locking system . . . . . . . . . . . . . . . . . . . . 112
Keys . . . . . . . . . . . . . . . . . . . . . . . . . . . . . . . . . . . 116
Radio frequency remote control* . . . . . . . . . . . 117
Anti-theft alarm* . . . . . . . . . . . . . . . . . . . . . . . . 118
Boot hatch . . . . . . . . . . . . . . . . . . . . . . . . . . . . . 120
Electric windows . . . . . . . . . . . . . . . . . . . . . . . . . 120
Tilting panoramic roof* . . . . . . . . . . . . . . . . . . . 122
Lights and visibility . . . . . . . . . . . . . . . . . . . . . . 123
Lights . . . . . . . . . . . . . . . . . . . . . . . . . . . . . . . . . 123
Interior lights . . . . . . . . . . . . . . . . . . . . . . . . . . . 128
Visibility . . . . . . . . . . . . . . . . . . . . . . . . . . . . . . . 128
Windscreen wiper and rear window wiper sys-
tems . . . . . . . . . . . . . . . . . . . . . . . . . . . . . . . . . . 129
R
ear view mirrors . . . . . . . . . . . . . . . . . . . . . . . . 131
Seats and head restraints . . . . . . . . . . . . . . . . . 132
Adjusting the seat and head restraints . . . . . . 132
Seat functions . . . . . . . . . . . . . . . . . . . . . . . . . . 134
Transport and practical equipment . . . . . . . . . 136
Practical equipment . . . . . . . . . . . . . . . . . . . . . . 136
Luggage compartment . . . . . . . . . . . . . . . . . . . . 139
Roof rack/roof luggage rack* . . . . . . . . . . . . . . 142
Air conditioning . . . . . . . . . . . . . . . . . . . . . . . . . 144
Heating, ventilation and cooling . . . . . . . . . . . . 144
Heating and fresh air . . . . . . . . . . . . . . . . . . . . . 146
Air conditioning* . . . . . . . . . . . . . . . . . . . . . . . . 148
Climatronic* . . . . . . . . . . . . . . . . . . . . . . . . . . . . 150
Driving . . . . . . . . . . . . . . . . . . . . . . . . . . . . . . . . 152
Address . . . . . . . . . . . . . . . . . . . . . . . . . . . . . . . . 152
Starting and stopping the engine . . . . . . . . . . . 153
Braking and parking . . . . . . . . . . . . . . . . . . . . . 156
Manual gearbox . . . . . . . . . . . . . . . . . . . . . . . . . 159
Automatic gearbox* . . . . . . . . . . . . . . . . . . . . . . 159
Run-in and economical driving . . . . . . . . . . . . . 165
Driving abroad . . . . . . . . . . . . . . . . . . . . . . . . . . 168 3
Page 6 of 248
Table of Contents
Driver assistance systems . . . . . . . . . . . . . . . . . 169
Braking and stability systems . . . . . . . . . . . . . . 169
Start-Stop System* . . . . . . . . . . . . . . . . . . . . . . . 173
Tiredness detection (break recommenda-
tion)* . . . . . . . . . . . . . . . . . . . . . . . . . . . . . . . . . .
175
P ark
ing aid . . . . . . . . . . . . . . . . . . . . . . . . . . . . . 176
Rear Assist “Rear View Camera”* . . . . . . . . . . . 181
Cruise speed* (cruise control - GRA) . . . . . . . . . 184
“SEAT Drive Profile” system . . . . . . . . . . . . . . . . 185
Towing bracket device and trailer . . . . . . . . . . . 187
Driving with a trailer . . . . . . . . . . . . . . . . . . . . . . 187
Retrofitting a towing bracket* . . . . . . . . . . . . . . 188
Advice . . . . . . . . . . . . . . . . . . . . . . . . . . . . . . . . 190
Care and maintenance . . . . . . . . . . . . . . . . . . . . 190
Accessories and modifications to the vehi-
cle
. . . . . . . . . . . . . . . . . . . . . . . . . . . . . . . . . . . . 190
Care and cleaning . . . . . . . . . . . . . . . . . . . . . . . 191
Care of the vehicle exterior . . . . . . . . . . . . . . . . 192
Caring for the vehicle interior . . . . . . . . . . . . . . 197
Checking and refilling levels . . . . . . . . . . . . . . . 199
Fuel . . . . . . . . . . . . . . . . . . . . . . . . . . . . . . . . . . . 199
Petrol . . . . . . . . . . . . . . . . . . . . . . . . . . . . . . . . . . 200
Diesel . . . . . . . . . . . . . . . . . . . . . . . . . . . . . . . . . 200
Working in the engine compartment . . . . . . . . 201
Engine oil . . . . . . . . . . . . . . . . . . . . . . . . . . . . . . 204
Cooling system . . . . . . . . . . . . . . . . . . . . . . . . . . 207
Brake fluid . . . . . . . . . . . . . . . . . . . . . . . . . . . . . 208
Windscreen washer reservoir . . . . . . . . . . . . . . 209
Vehicle battery . . . . . . . . . . . . . . . . . . . . . . . . . . 209
Wheels . . . . . . . . . . . . . . . . . . . . . . . . . . . . . . . . 212
Wheels and tyres . . . . . . . . . . . . . . . . . . . . . . . . 212
Winter service . . . . . . . . . . . . . . . . . . . . . . . . . . . 215
Technical data . . . . . . . . . . . . . . . . . . . . . . . . 217
Technical specifications . . . . . . . . . . . . . . . . . . 217
Important information . . . . . . . . . . . . . . . . . . . . 217
Information on fuel consumption . . . . . . . . . . . 218 Driving with a trailer . . . . . . . . . . . . . . . . . . . . . . 219
Wheels . . . . . . . . . . . . . . . . . . . . . . . . . . . . . . . . 219
Engine data . . . . . . . . . . . . . . . . . . . . . . . . . . . . . 221
Dimensions . . . . . . . . . . . . . . . . . . . . . . . . . . . . . 233
Index . . . . . . . . . . . . . . . . . . . . . . . . . . . . . . . . . 235
4
Page 11 of 248
The essentials
How it works
Openin g and c
lo
sing
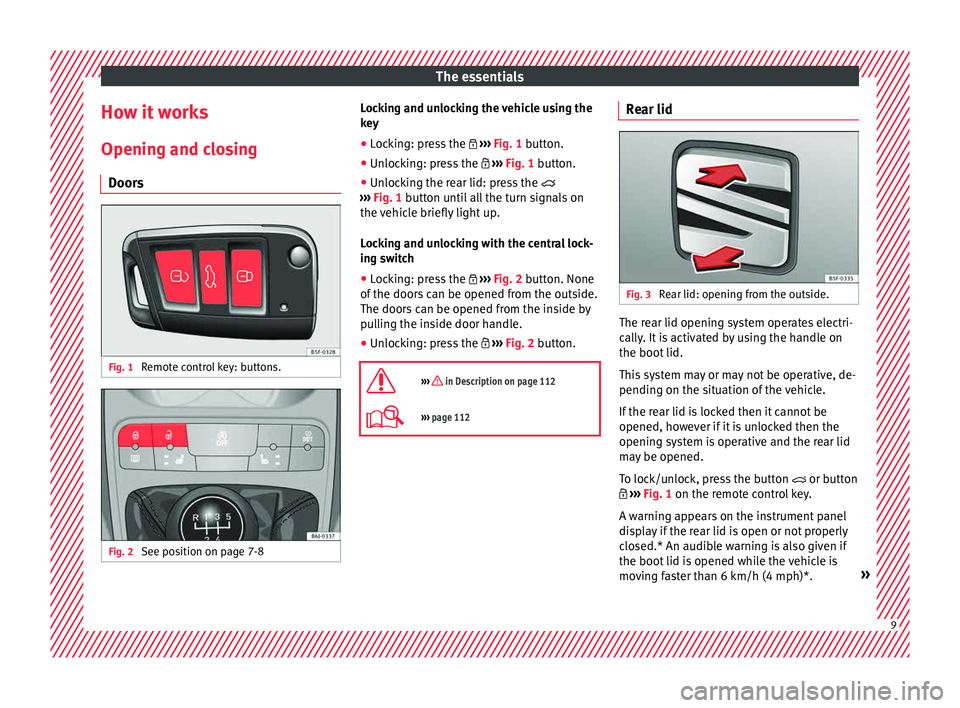
Doors Fig. 1
Remote control key: buttons. Fig. 2
See position on page 7-8 Locking and unlocking the vehicle using the
k
ey
● Loc
king: press the ›››
Fig. 1 button.
● Unlocking: press the ›››
Fig. 1 button.
● Unlocking the rear lid: press the
›››
Fig. 1 button until all the turn signals on
the vehicle briefly light up.
Locking and unlocking with the central lock-
ing switch
● Locking: press the ›››
Fig. 2 button. None
of the doors can be opened from the outside.
The doors can be opened from the inside by
pulling the inside door handle.
● Unlocking: press the ›››
Fig. 2 button.
››› in Description on page 112
››› page 112 Rear lid
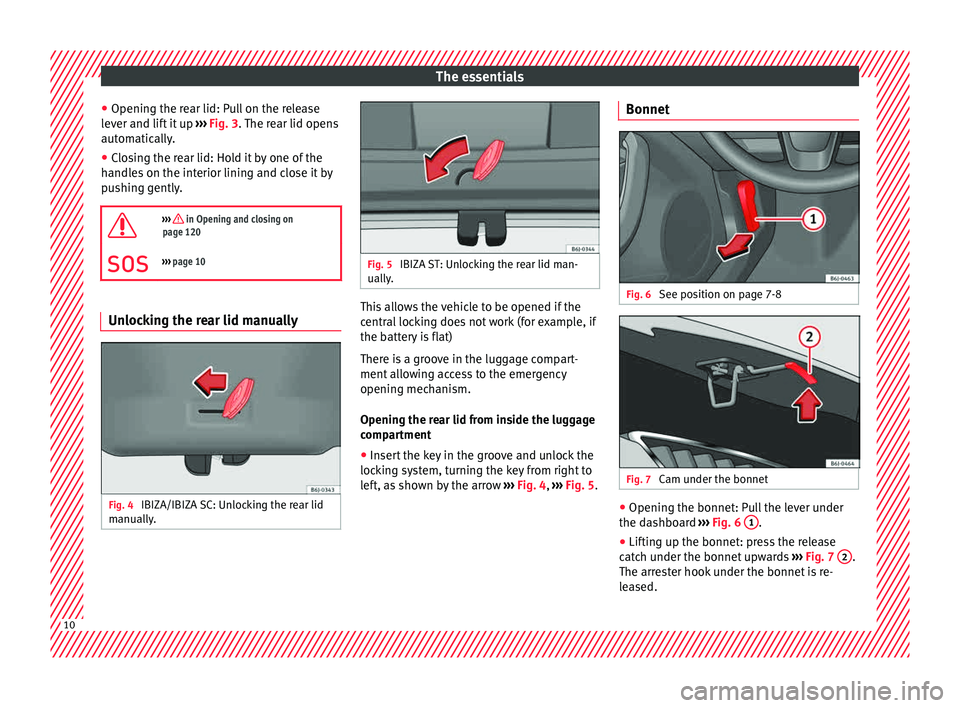
Fig. 3
Rear lid: opening from the outside. The rear lid opening system operates electri-
c
al
ly
. It is activated by using the handle on
the boot lid.
This system may or may not be operative, de-
pending on the situation of the vehicle.
If the rear lid is locked then it cannot be
opened, however if it is unlocked then the
opening system is operative and the rear lid
may be opened.
To lock/unlock, press the button or button
››› Fig. 1 on the remote control key.
A warning appears on the instrument panel
display if the rear lid is open or not properly
closed.* An audible warning is also given if
the boot lid is opened while the vehicle is
moving faster than 6 km/h (4 mph)*. » 9
Page 12 of 248
The essentials
● Openin g the r
e
ar lid: Pull on the release
lever and lift it up ››› Fig. 3. The rear lid opens
automatically.
● Closing the rear lid: Hold it by one of the
handle
s on the interior lining and close it by
pushing gently.
››› in Opening and closing on
page 120
››› page 10 Unlocking the rear lid manually
Fig. 4
IBIZA/IBIZA SC: Unlocking the rear lid
m anual
ly
. Fig. 5
IBIZA ST: Unlocking the rear lid man-
ually . This allows the vehicle to be opened if the
c
entr
al
locking does not work (for example, if
the battery is flat)
There is a groove in the luggage compart-
ment allowing access to the emergency
opening mechanism.
Opening the rear lid from inside the luggage
compartment
● Insert the key in the groove and unlock the
lockin
g system, turning the key from right to
left, as shown by the arrow ››› Fig. 4, ››› Fig. 5. Bonnet
Fig. 6
See position on page 7-8 Fig. 7
Cam under the bonnet ●
Opening the bonnet: Pull the lever under
the d ashbo
ard ››› Fig. 6 1 .
● Lifting up the bonnet: press the release
c at
c
h under the bonnet upwards ››› Fig. 7 2 .
The arr es
ter hook under the bonnet is re-
leased. 10
Page 13 of 248
The essentials
● Rel
e
ase the bonnet stay and secure it in
the fixture designed for this in the bonnet.
››› in safety notes for work in the en-
gine compartment on page 202
››› page 201 Electric windows*
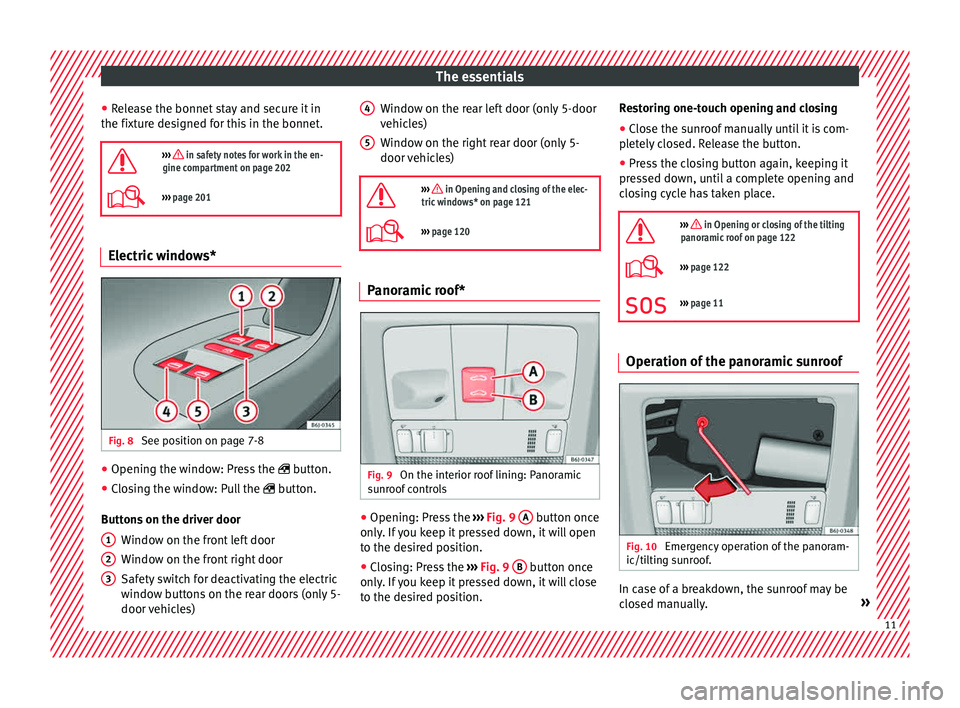
Fig. 8
See position on page 7-8 ●
Opening the window: Press the butt
on.
● C
losing the window: Pull the button.
B
uttons on the driver door Window on the front left door
Window on the front right door
Safety switch for deactivating the electric
window buttons on the rear doors (only 5-
door vehicles)
1 2
3 Window on the rear left door (only 5-door
v
ehic
l
es)
Window on the right rear door (only 5-
door vehicles)
››› in Opening and closing of the elec-
tric windows* on page 121
››› page 120 Panoramic roof*
Fig. 9
On the interior roof lining: Panoramic
s u
nr
oof controls ●
Opening: Press the ››
›
Fig. 9 A button once
on ly
. If
you keep it pressed down, it will open
to the desired position.
● Closing: Press the ›››
Fig. 9 B button once
on ly
. If
you keep it pressed down, it will close
to the desired position. 4 5 Restoring one-touch opening and closing
●
Close the sunroof manually until it is com-
p l
et
ely closed. Release the button.
● Press the closing button again, keeping it
pres
sed down, until a complete opening and
closing cycle has taken place.
››› in Opening or closing of the tilting
panoramic roof on page 122
››› page 122
››› page 11 Operation of the panoramic sunroof
Fig. 10
Emergency operation of the panoram-
ic/ti ltin
g s
unroof. In case of a breakdown, the sunroof may be
c
lo sed m
anually. » 11
Page 14 of 248
The essentials
● Remo
v
e the plastic cover by inserting a
screwdriver into the rear section.
● Insert an Allen key (4 mm) into the opening
as f
ar as possible and close the sunroof.
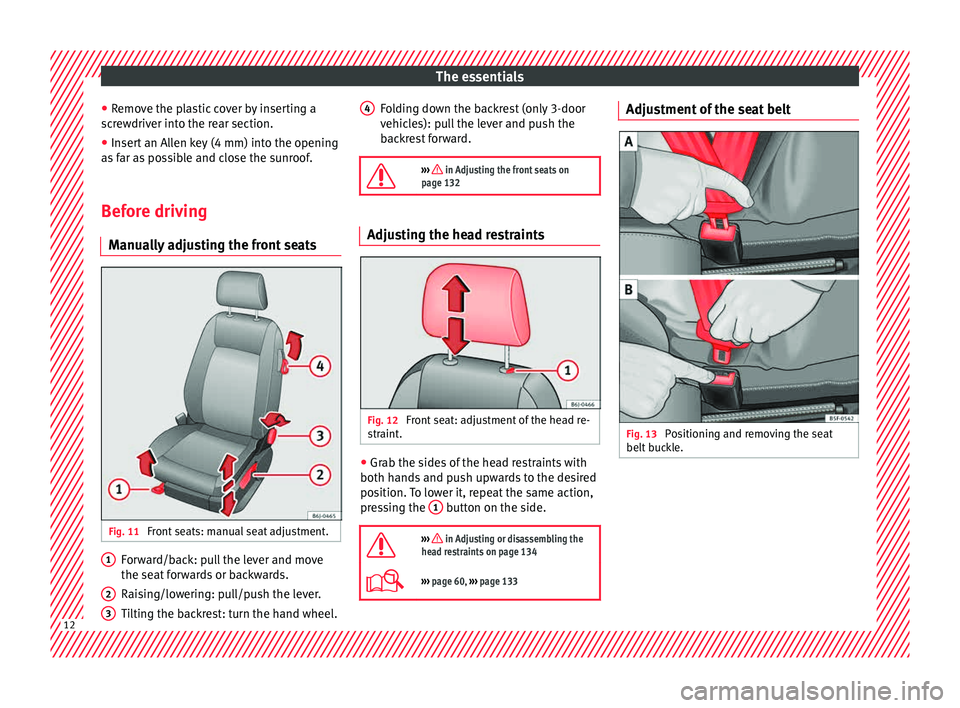
Before driving Manual
ly adjusting the front seats Fig. 11
Front seats: manual seat adjustment. Forward/back: pull the lever and move
the se
at
f
orwards or backwards.
Raising/lowering: pull/push the lever.
Tilting the backrest: turn the hand wheel.
1 2
3 Folding down the backrest (only 3-door
v
ehic
l
es): pull the lever and push the
backrest forward.
››› in Adjusting the front seats on
page 132 Adjusting the head restraints
Fig. 12
Front seat: adjustment of the head re-
s tr aint
. ●
Grab the sides of the head restraints with
both h and
s
and push upwards to the desired
position. To lower it, repeat the same action,
pressing the 1 button on the side.
››› in Adjusting or disassembling the
head restraints on page 134
››› page 60, ››› page 133 4
Adjustment of the seat belt
Fig. 13
Positioning and removing the seat
belt b
uc
kle. 12
Page 17 of 248
The essentials
● Inser
t
the key into the slot provided in the
deactivation switch.
● Approximately ¾ of the length of the key
remain
s inserted (the maximum).
● Turn the key, changing its position to .
Do not for
ce it. If you have difficulty, ensure
that you have inserted the key as far as it will
go.
● Finally, check the control lamp on the in-
strument p
anel where it shows
the following should appear .
››› in Deactivation of front passenger
front airbag* on page 71
››› page 70 Side airbags*
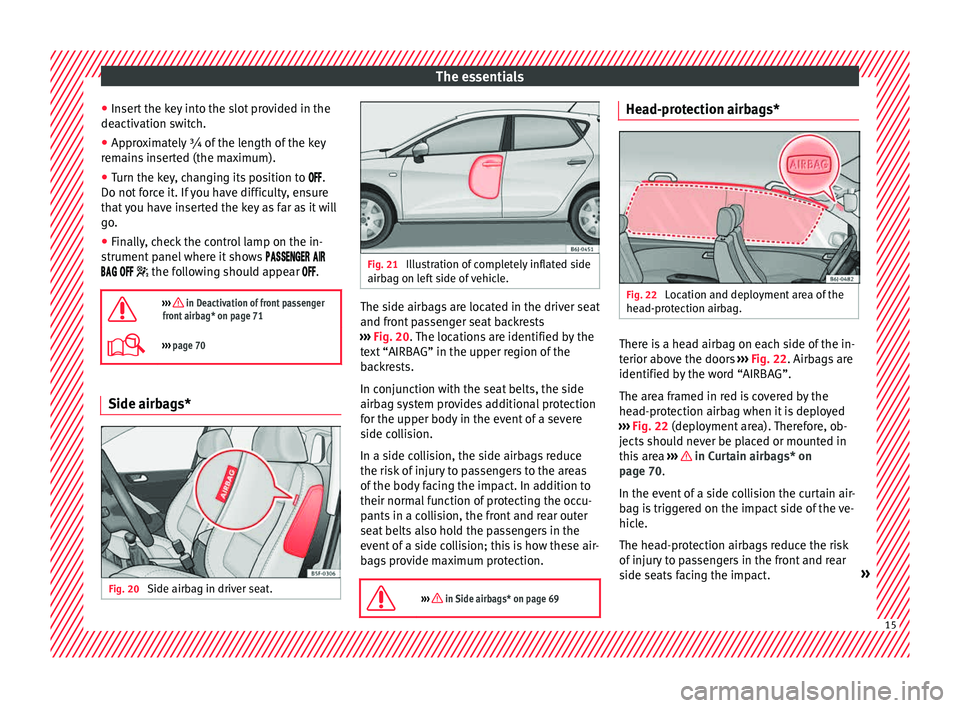
Fig. 20
Side airbag in driver seat. Fig. 21
Illustration of completely inflated side
airbag on l ef
t side of vehicle. The side airbags are located in the driver seat
and fr
ont
p
assenger seat backrests
››› Fig. 20. The locations are identified by the
text “AIRBAG” in the upper region of the
backrests.
In conjunction with the seat belts, the side
airbag system provides additional protection
for the upper body in the event of a severe
side collision.
In a side collision, the side airbags reduce
the risk of injury to passengers to the areas
of the body facing the impact. In addition to
their normal function of protecting the occu-
pants in a collision, the front and rear outer
seat belts also hold the passengers in the
event of a side collision; this is how these air-
bags provide maximum protection.
››› in Side airbags* on page 69 Head-protection airbags*
Fig. 22
Location and deployment area of the
he a
d-pr
otection airbag. There is a head airbag on each side of the in-
t
erior abo
v
e the doors ››› Fig. 22. Airbags are
identified by the word “AIRBAG”.
The area framed in red is covered by the
head-protection airbag when it is deployed
››› Fig. 22 (deployment area). Therefore, ob-
jects should never be placed or mounted in
this area ››› in Curtain airbags* on
p ag
e 70
.
In the event of a side collision the curtain air-
bag is triggered on the impact side of the ve-
hicle.
The head-protection airbags reduce the risk
of injury to passengers in the front and rear
side seats facing the impact. » 15
Page 18 of 248
The essentials
››› in Curtain airbags* on page 70 Child seats
Important
information regarding the
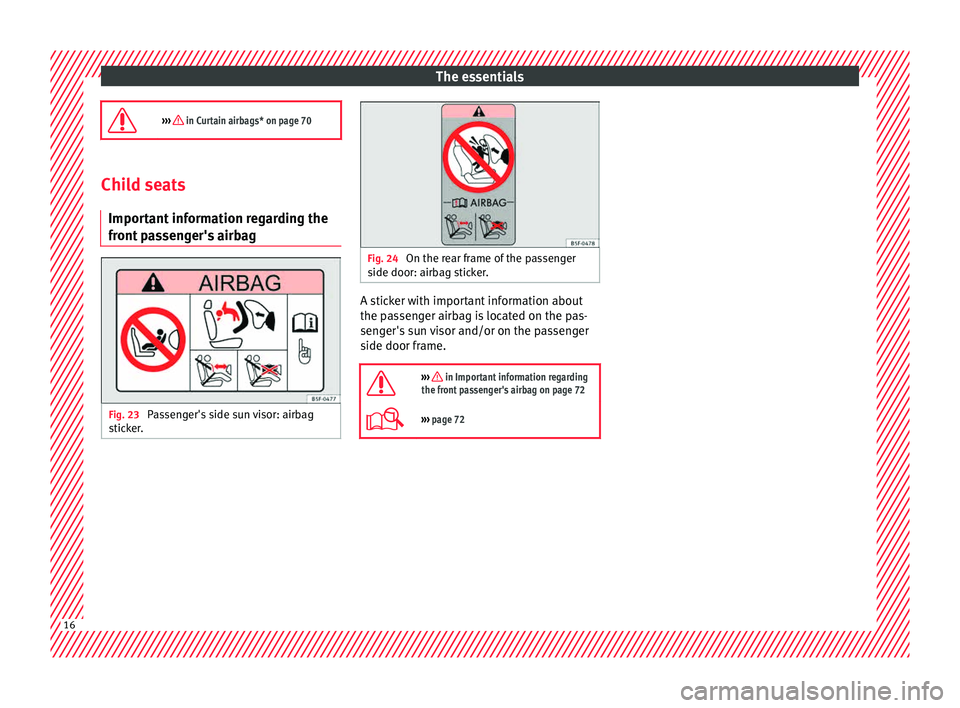
front passenger's airbag Fig. 23
Passenger's side sun visor: airbag
s tic
k
er. Fig. 24
On the rear frame of the passenger
side door: airb ag s
ticker. A sticker with important information about
the p
a
s
senger airbag is located on the pas-
senger's sun visor and/or on the passenger
side door frame.
››› in Important information regarding
the front passenger's airbag on page 72
››› page 72 16
Page 19 of 248
The essentials
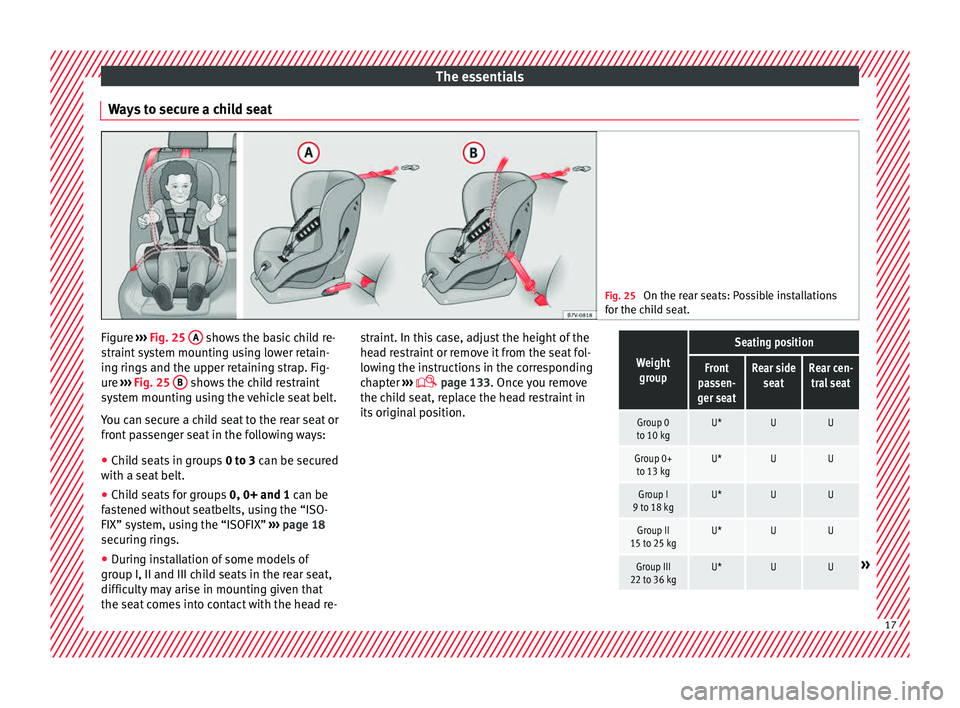
Ways to secure a child seat Fig. 25
On the rear seats: Possible installations
for the c hi
ld seat. Figure
›››
Fig. 25
A shows the basic child re-
s tr
aint
system mounting using lower retain-
ing rings and the upper retaining strap. Fig-
ure ››› Fig. 25 B shows the child restraint
sy s
t
em mounting using the vehicle seat belt.
You can secure a child seat to the rear seat or
front passenger seat in the following ways:
● Child seats in groups 0 to 3 c
an be secured
with a seat belt.
● Child seats for groups 0, 0+ and 1 can be
fa
stened without seatbelts, using the “ISO-
FIX” system, using the “ISOFIX” ››› page 18
securing rings.
● During installation of some models of
group I, II and III chi
ld seats in the rear seat,
difficulty may arise in mounting given that
the seat comes into contact with the head re- straint. In this case, adjust the height of the
head r
estraint or remove it from the seat fol-
lowing the instructions in the corresponding
chapter ›››
page 133. Once you remove
the child seat, replace the head restraint in
its original position.
Weight group
Seating position
Front
passen-
ger seatRear side seatRear cen-tral seat
Group 0
to 10 kgU*UU
Group 0+ to 13 kgU*UU
Group I
9 to 18 kgU*UU
Group II
15 to 25 kgU*UU
Group III
22 to 36 kgU*UU» 17
Page 20 of 248
The essentials
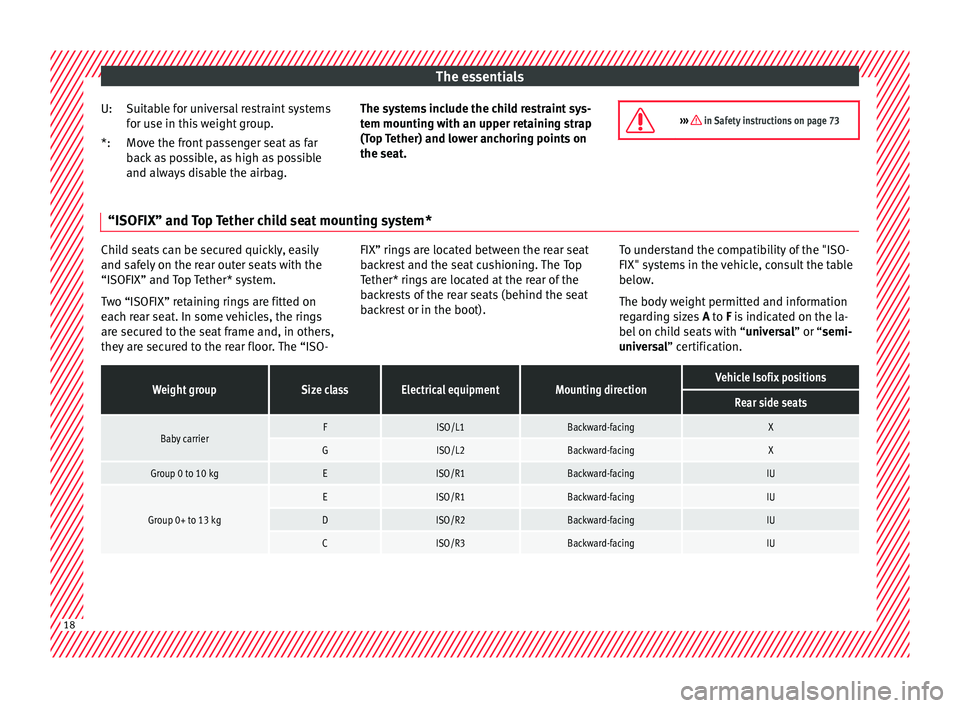
Suitable for universal restraint systems
f or u
se in thi
s weight group.
Move the front passenger seat as far
back as possible, as high as possible
and always disable the airbag.
U:
*:
The systems include the child restraint sys-
tem mountin
g with an upper retaining strap
(Top Tether) and lower anchoring points on
the seat. ››› in Safety instructions on page 73“ISOFIX” and Top Tether child seat mounting system*
Child seats can be secured quickly, easily
and saf
ely
on the rear outer seats with the
“ISOFIX” and Top Tether* system.
Two “ISOFIX” retaining rings are fitted on
each rear seat. In some vehicles, the rings
are secured to the seat frame and, in others,
they are secured to the rear floor. The “ISO- FIX” rings are located between the rear seat
back
rest and the seat cushioning. The Top
Tether* rings are located at the rear of the
backrests of the rear seats (behind the seat
backrest or in the boot). To understand the compatibility of the "ISO-
FIX" syst
ems in the vehicle, consult the table
below.
The body weight permitted and information
regarding sizes A to F is indicated on the la-
bel on child seats with “ universal” or “semi-
universal” certification.
Weight groupSize classElectrical equipmentMounting directionVehicle Isofix positions
Rear side seats
Baby carrierFISO/L1Backward-facingX
GISO/L2Backward-facingX
Group 0 to 10 kgEISO/R1Backward-facingIU
Group 0+ to 13 kg
EISO/R1Backward-facingIU
DISO/R2Backward-facingIU
CISO/R3Backward-facingIU 18