led Seat Leon 5D 2013 Manual Online
[x] Cancel search | Manufacturer: SEAT, Model Year: 2013, Model line: Leon 5D, Model: Seat Leon 5D 2013Pages: 339, PDF Size: 4.8 MB
Page 265 of 339
263
Checking and refilling levels
The windscreen washer reservoir contains the cleaning fluid for the wind-
screen, the rear window and the headlight washer system* ⇒ Fig. 158. Res-
ervoir capacity: ⇒ page 323.
To prevent the nozzles from becoming blocked with chalk deposits, fill res-
ervoir with water with a low calcium content (distilled water). Always add
washer fluid to the water (with anti-freeze additive in winter).
CAUTION
● Never put radiator anti-freeze or other additives into the windscreen
washer fluid.
● Never use washer fluid which contains paint thinners or solvents as it
can damage the paintwork.
Cleaning and changing the wiper blades of the windscreen
and rear window
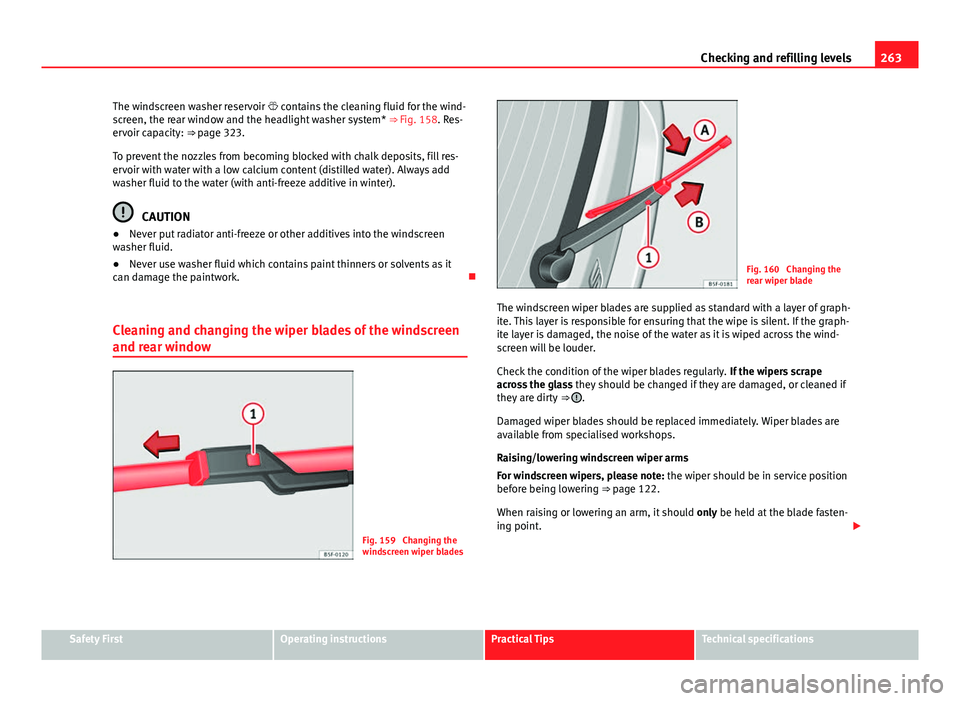
Fig. 159 Changing the
windscreen wiper blades
Fig. 160 Changing the
rear wiper blade
The windscreen wiper blades are supplied as standard with a layer of graph-
ite. This layer is responsible for ensuring that the wipe is silent. If the graph-
ite layer is damaged, the noise of the water as it is wiped across the wind-
screen will be louder.
Check the condition of the wiper blades regularly. If the wipers scrape
across the glass they should be changed if they are damaged, or cleaned if
they are dirty ⇒
.
Damaged wiper blades should be replaced immediately. Wiper blades are
available from specialised workshops.
Raising/lowering windscreen wiper arms
For windscreen wipers, please note: the wiper should be in service position
before being lowering ⇒ page 122. When raising or lowering an arm, it should only be held at the blade fasten-
ing point.
Safety FirstOperating instructionsPractical TipsTechnical specifications
Page 267 of 339
265
Wheels and tyres
Wheels and tyres
Wheels
General notes
– When driving with new tyres, be especially careful during the
first 500 km (300 miles).
– If you have to drive over a kerb or similar obstacle, drive very
slowly and as near as possible at a right angle to the obstacle.
– Check from time to time if the tyres are damaged (punctures,
cuts, cracks or dents). Remove any foreign objects embedded in
the treads.
– Damaged wheels and tyres must be replaced immediately.
– Keep grease, oil and fuel off the tyres.
– Replace any missing valve caps as soon as possible.
– Mark the wheels before taking them off so that they rotate in
the same direction when put back.
– When removed, the wheels or tyres should be stored in a cool,
dry and preferably dark place.
New tyres
New tyres do not give maximum grip straight away and should therefore be
“run in” by driving carefully and at moderate speeds for about the first 500
km (300 miles). This will also increase the useful life of the tyres. The tread depth of new tyres may
vary, according to the type and make of
tyre and the tread pattern.
Concealed damage
Damage to tyres and rims is often not readily visible. If you notice unusual
vibration or the car pulling to one side, this may indicate that one of the
tyres is damaged. Reduce speed immediately if there is any reason to sus-
pect that damage may have occurred. Inspect the tyres for damage. If no ex-
ternal damage is visible, drive slowly and carefully to the nearest special-
ised workshop and have the car inspected.
Tyres with directional tread pattern
An arrow on the tyre sidewall indicates the direction of rotation on single
drive tyres. Always note the direction of rotation indicated when mounting
the wheel. This guarantees optimum grip and helps to avoid aquaplaning,
excessive noise and wear.
Retrofitting Accessories
If you wish to change or fit wheels, rims or wheel trims, we recommend that
you consult with a SEAT Official Service centre for advice regarding current
techniques.
Useful life of tyres
Correct inflation pressures and sensible driving habits will
increase the useful life of your tyres.
– Check tyre pressure at least once a month, and also prior to any
long trip.
Safety FirstOperating instructionsPractical TipsTechnical specifications
Page 270 of 339

268Wheels and tyres
To ensure that the wear is equal on all tyres the wheels should be changed
round from time to time according to the system ⇒ Fig. 162. The useful life
of all the tyres will then be about the same time.
Replacing wheels and tyres
It is important to use the correct wheels and tyres when re-
placement is necessary.
– All four wheels must be fitted with tyres of the same type, size
(rolling circumference) and preferably the same tread pattern.
– Tyres should be replaced at least in pairs and not individually
(i.e. both front tyres or both rear tyres together).
– Do not use tyres whose effective size exceeds the dimensions
of the factory-approved makes of tyre.
– If you wish to fit the vehicle with rims or tyres that are different
to those installed in manufacture, it is advisable to consult a
SEAT Official Service before purchasing them.
The tyres and wheel rims are an essential part of the vehicle's design. The
tyres and rims approved by SEAT are specially matched to the characteris-
tics of the vehicle and make a major contribution to good roadholding and
safe handling ⇒
.
The sizes of the rims and tyres approved for your vehicle are listed in the
vehicle documentation (e.g. EC Certificate of Conformity or COC docu-
ment 1)
). The vehicle documentation varies depending on the country of resi-
dence. A knowledge of tyre designations makes it easier to choose the correct
tyres. The following wording can be read on the sides of the tyre:
205/55 R16 91V
This contains the following information:
205Tyre width in mm55Height/width ratio in %RTyre construction: Radial16Rim diameter in inches91Load rating codeVSpeed index
The manufacturing date is also indicated on the tyre sidewall (possibly only
on the inner side of the wheel): DOT... 2212...
means that the tyre was produced in the 22nd week of 2012.
Please note that with some types of tyre, the actual tyre size can differ from
the nominal size marked on the tyre (for instance 205/55 R 16 91 W), and
there may be significant differences in the contours of the tyres, even
though the tyres are marked with the same nominal size designation.
When replacing the tyres, it is therefore important to make sure that the
actual size of the new tyres does not exceed the dimensions of the factory-
approved makes of tyre.
Failure to observe this requirement can affect the clearance needed for the
tyres. This could result in contact between the tyres and suspension com-
ponents or bodywork causing damage. The brake lines could also be dam-
aged and vehicle safety could be severely impaired ⇒
.
1)
COC = certificate of conformity
Page 274 of 339
272Accessories and modifications to the vehicle
Accessories and modifications to the vehicle
Accessories, replacement parts and repairs
Always ask your dealer or specialist retailer for advice be-
fore purchasing accessories and replacement parts.
Your vehicle is designed to offer a high standard of active and passive safe-
ty. For this reason, we recommend that you ask a SEAT Official Service for
advice before fitting accessories or replacement parts. Your SEAT Official
Service has the latest information from the manufacturer and can recom-
mend accessories and replacement parts which are suitable for your re-
quirements. They can also answer any questions you might have regarding
official regulations.
We recommend you to use only SEAT accessories and Genuine SEAT parts ®
.
SEAT has tested these parts and accessories for suitability, reliability and
safety. SEAT Official Services have the necessary experience and facilities to
ensure that the parts are installed correctly and professionally.
Any retro-fitted equipment which has a direct effect on the vehicle and/or
the way it is driven e.g. cruise control system or electronically-controlled
suspension, must bear the e mark (the European Union's authorisation
symbol) and be approved for use in the vehicle in question.
If any additional electrical components are fitted which do not serve to con-
trol the vehicle itself (for instance a refrigerator box, laptop or ventilator fan,
etc.), these must bear the mark (manufacturer conformity declaration in
the European Union).
WARNING
Accessories, for example telephone holders or cup holders, should never
be fitted on the covers, or within the working range of the airbags. Other-
wise, there is a danger of injury if the airbag is triggered in an accident.
Technical modifications
Modifications must always be carried out according to our
specifications.
Unauthorised modifications to the electronic components, software, wiring
or data transfer in the vehicle may cause malfunctioning. Due to the way the
electronic components are linked together in networks, other indirect sys-
tems may be affected by the faults. This can seriously impair safety, lead to
excessive wear of components, and also invalidate your vehicle registration
documents.
You will appreciate that your SEAT dealership cannot be held liable for any
damage caused by modifications and/or work performed incorrectly.
We recommend that all work should be performed by a SEAT Official Service
using Genuine SEAT parts
®
.
WARNING
Incorrectly performed modifications or other work on your vehicle can
lead to malfunctions and cause accidents.
Radio transmitters and business equipment
Radio transmitters (fixed installation)
Any retrofit installations of radio transmitters in the vehicle require prior ap-
proval. SEAT generally authorises in-vehicle installations of approved types
of radio transmitters provided that:
Page 275 of 339
273
Accessories and modifications to the vehicle
● the aerial is installed correctly.
● the aerial is installed on the exterior of the vehicle (and shielded cables
are used together with non-reflective aerial trimming).
● the effective transmitting power does not exceed 10 Watts at the aerial
base.
A SEAT Official Service and specialised workshop will be able to inform you
about options for installing and operating radio transmitters with a higher
transmitting power.
Mobile radio transmitters
Commercial mobile telephones or radio equipment might interfere with the
electronics of your vehicle and cause malfunctions. This may be due to:
● no external aerial
● external aerial incorrectly installed
● transmitting power more than 10 W
You must, therefore, do not operate portable mobile telephones or radio
equipment inside the vehicle without a properly installed external aerial
⇒
.
Please note also that the maximum range of the equipment can only be ach-
ieved with an external aerial.
Business equipment
Retrofit installation of business or private equipment in the vehicle is per-
mitted, provided the equipment cannot interfere with the driver's immedi-
ate control of the vehicle and that any such equipment carries the mark.
Any retrofit equipment that could influence the driver's control of the vehi-
cle must have a type approval for your vehicle and must carry the e mark.
WARNING
Mobile telephones or radio equipment which is operated inside the vehi-
cle without a properly installed external aerial can create excessive mag-
netic fields that could cause a health hazard.
Note
● The posterior fitting of electric and electronic equipment in this vehicle
affects its licence type and could lead to the withdrawal of the vehicle regis-
tration document under certain circumstances.
● Please use the mobile telephone/radio operating instructions.
Safety FirstOperating instructionsPractical TipsTechnical specifications
Page 277 of 339
275
Emergencies
Tyre repair kit
What to do first
– Please observe the important safety notes ⇒ page 274.
– Apply the handbrake.
– Manual gearbox: Select first gear.
– Automatic gearbox: Move the selector lever to P.
– Check whether a repair is possible using the tyre repair kit
⇒ page 275.
Using the tyre repair kit
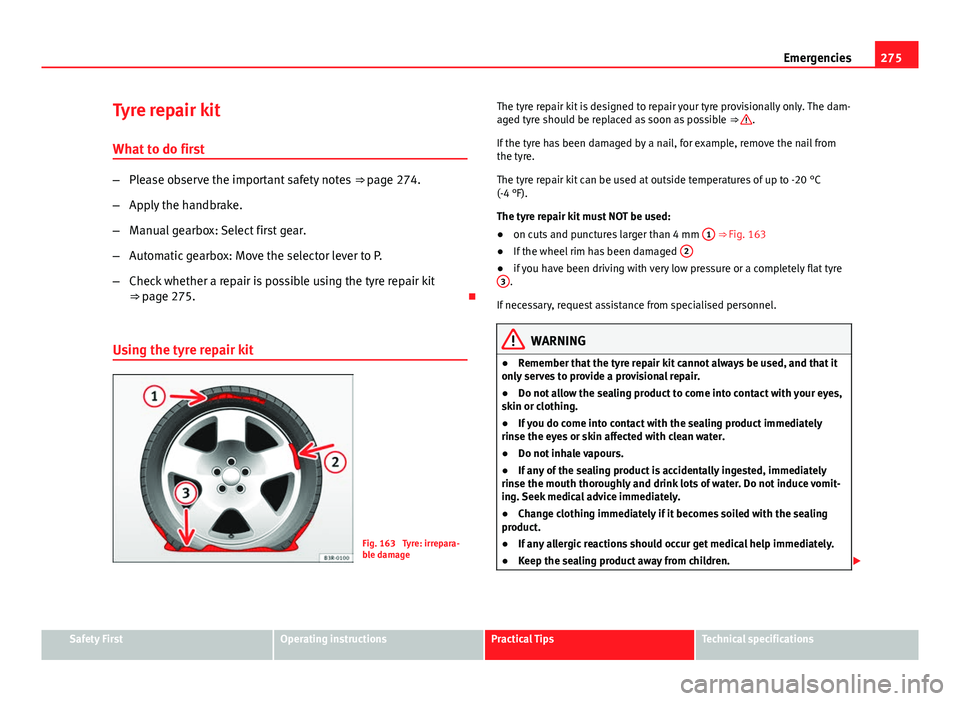
Fig. 163 Tyre: irrepara-
ble damage The tyre repair kit is designed to repair your tyre provisionally only. The dam-
aged tyre should be replaced as soon as possible
⇒
.
If the tyre has been damaged by a nail, for example, remove the nail from
the tyre.
The tyre repair kit can be used at outside temperatures of up to -20 °C
(-4 °F).
The tyre repair kit must NOT be used:
● on cuts and punctures larger than 4 mm 1
⇒ Fig. 163
● If the wheel rim has been damaged 2
●
if you have been driving with very low pressure or a completely flat tyre
3.
If necessary, request assistance from specialised personnel.
WARNING
● Remember that the tyre repair kit cannot always be used, and that it
only serves to provide a provisional repair.
● Do not allow the sealing product to come into contact with your eyes,
skin or clothing.
● If you do come into contact with the sealing product immediately
rinse the eyes or skin affected with clean water.
● Do not inhale vapours.
● If any of the sealing product is accidentally ingested, immediately
rinse the mouth thoroughly and drink lots of water. Do not induce vomit-
ing. Seek medical advice immediately.
● Change clothing immediately if it becomes soiled with the sealing
product.
● If any allergic reactions should occur get medical help immediately.
● Keep the sealing product away from children.
Safety FirstOperating instructionsPractical TipsTechnical specifications
Page 279 of 339
277
Emergencies
Note
Do not use the compressor for longer than 6 minutes at a time, as it could
overheat. Once it has cooled down, the compressor may be used again.
After changing a wheel
– Attach the “max label. 80 km/h” from the tyre repair kit on the
instrument panel, clearly within driver's field of view.
– Stop the vehicle after 10 minutes driving and check the tyre
pressure.
– If tyre pressure is less than 1.3 bar, the tyre is too badly dam-
aged. Do not carry on driving!
WARNING
After repairing a tyre please note the following points:
● Do not drive faster than 80 km/h.
● Avoid heavy acceleration, hard braking and fast cornering.
● Vehicle handling could be impaired.
● If the tyre is very damaged, seek professional assistance.
For the sake of the environment
You can dispose of the used bottle of sealing compound at a SEAT Official
Service.
Note
After repairing a tyre, remember to purchase a new bottle of sealing com-
pound from a SEAT Official Service or a specialised workshop. Changing a wheel
What to do first
Before changing the wheel, the following preliminary steps
are required. – Please observe the important safety notes ⇒ page 274.
– Apply the handbrake.
– Manual gearbox: Select first gear.
– Automatic gearbox: Move the selector lever to P.
– When towing a trailer: Unhitch the trailer from your vehicle.
– Have the vehicle tool kit ⇒ page 274 and the spare wheel ready
⇒ page 282.
WARNING
If you change the wheel on a slope, block the wheel on the opposite side
of the car with a stone or similar to prevent the vehicle from moving.
Safety FirstOperating instructionsPractical TipsTechnical specifications
Page 289 of 339
287
Emergencies
Note
● Please observe legal requirements when doing so.
● Switch on the hazard warning lights of both vehicles. However, observe
any regulations to the contrary.
● The tow rope must not be twisted. Otherwise the front towline anchor-
age could be pulled off the vehicle.
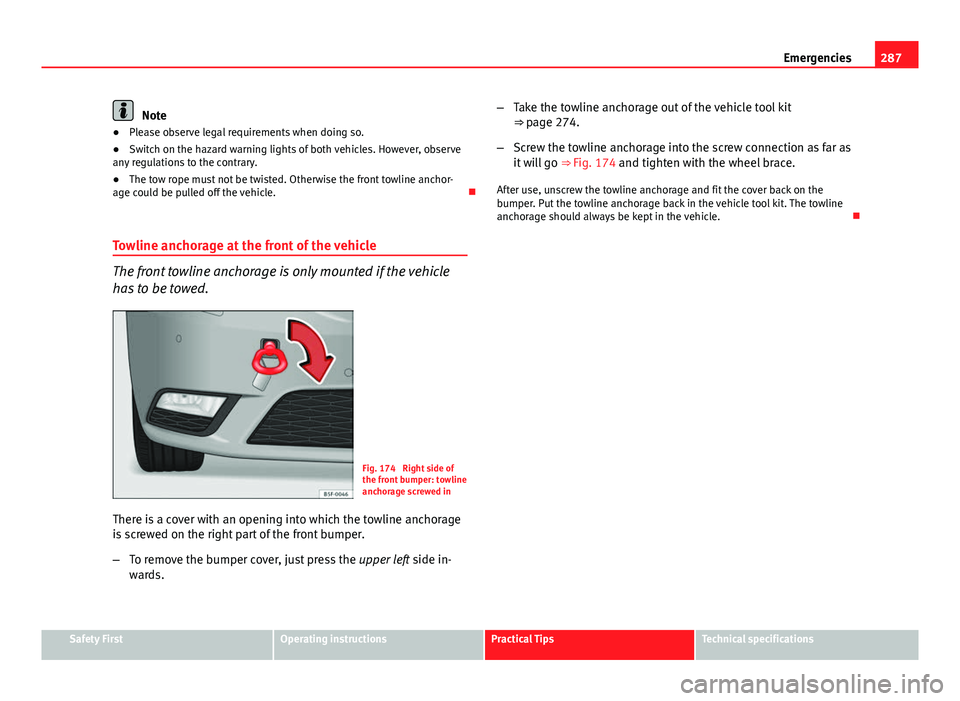
Towline anchorage at the front of the vehicle
The front towline anchorage is only mounted if the vehicle
has to be towed.
Fig. 174 Right side of
the front bumper: towline
anchorage screwed in
There is a cover with an opening into which the towline anchorage
is screwed on the right part of the front bumper.
– To remove the bumper cover, just press the upper left side in-
wards. –
Take the towline anchorage out of the vehicle tool kit
⇒ page 274.
– Screw the towline anchorage into the screw connection as far as
it will go ⇒ Fig. 174 and tighten with the wheel brace.
After use, unscrew the towline anchorage and fit the cover back on the
bumper. Put the towline anchorage back in the vehicle tool kit. The towline
anchorage should always be kept in the vehicle.
Safety FirstOperating instructionsPractical TipsTechnical specifications
Page 293 of 339

291
Fuses and bulbs
Fuses and bulbs Fuses
Introduction
Due to the constant update of vehicles, fuse assignments depending on
equipment and the use of the same fuse for various electrical components,
at the time of printing this manual it is not possible to provide an up-to-date
summary of the electrical components fuse positions. For detailed informa-
tion about the fuse positions, please consult a Technical Service.
In general, a fuse can be assigned to various electrical components. Like-
wise, an electrical component can be protected by several fuses.
Only replace fuses when the cause of the problem has been solved. If a
newly inserted fuse blows after a short time, you must have the electrical
system checked by a specialised workshop as soon as possible.
Additional information and warnings:
● Working in the engine compartment ⇒ page 251
WARNING
The high voltages in the electrical system can give serious electrical
shocks, causing burns and even death!
● Never touch the electrical wiring of the ignition system.
● Take care not to cause short circuits in the electrical system.
WARNING
Using unsuitable fuses, repairing fuses or bridging a current circuit with-
out fuses can cause a fire and serious injury.
● Never use a fuse with a higher value. Only replace fuses with a fuse of
the same amperage (same colour and markings) and size.
● Never repair a fuse.
● Never replace a fuse by a metal strip, staple or similar.
CAUTION
● To avoid damage to the vehicles electric system, before replacing a fuse
turn off the ignition, the lights and all electrical elements and remove the
keys from the ignition.
● If you replace a fuse with higher-rating fuse, you could cause damage to
another part of the electrical system.
● Protect the fuse boxes when open to avoid the entry of dust or humidity.
Dirt and humidity inside fuse boxes can cause damage to the electrical sys-
tem.
Note
● One single consumer could have more than one fuse.
● Several consumers could run over one single fuse.
Safety FirstOperating instructionsPractical TipsTechnical specifications
Page 295 of 339
293
Fuses and bulbs
Note
In the vehicle, there are more fuses than those indicated in this chapter.
These should only be changed by a specialised workshop.
Replacing a blown fuse
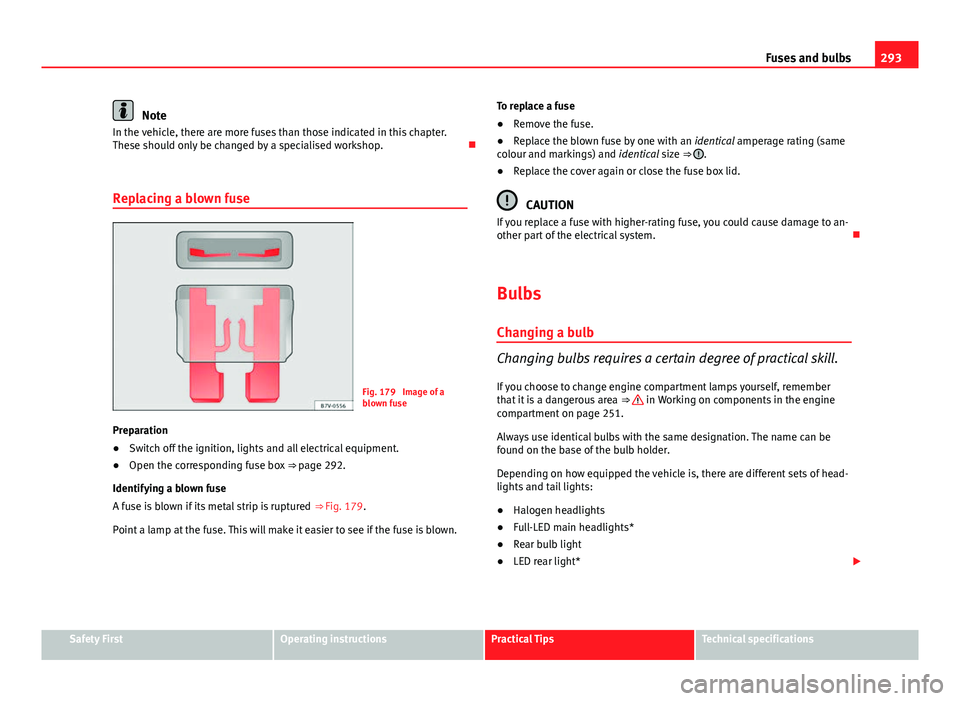
Fig. 179 Image of a
blown fuse
Preparation
● Switch off the ignition, lights and all electrical equipment.
● Open the corresponding fuse box ⇒ page 292.
Identifying a blown fuse
A fuse is blown if its metal strip is ruptured ⇒ Fig. 179.
Point a lamp at the fuse. This will make it easier to see if the fuse is blown. To replace a fuse
●
Remove the fuse.
● Replace the blown fuse by one with an identical amperage rating (same
colour and markings) and identical size ⇒
.
● Replace the cover again or close the fuse box lid.
CAUTION
If you replace a fuse with higher-rating fuse, you could cause damage to an-
other part of the electrical system.
Bulbs
Changing a bulb
Changing bulbs requires a certain degree of practical skill. If you choose to change engine compartment lamps yourself, remember
that it is a dangerous area ⇒
in Working on components in the engine
compartment on page 251.
Always use identical bulbs with the same designation. The name can be
found on the base of the bulb holder.
Depending on how equipped the vehicle is, there are different sets of head-
lights and tail lights:
● Halogen headlights
● Full-LED main headlights*
● Rear bulb light
● LED rear light*
Safety FirstOperating instructionsPractical TipsTechnical specifications