led Seat Leon 5D 2013 Manual PDF
[x] Cancel search | Manufacturer: SEAT, Model Year: 2013, Model line: Leon 5D, Model: Seat Leon 5D 2013Pages: 339, PDF Size: 4.8 MB
Page 238 of 339
236Trailer
Retrofitting a towing bracket*
It is possible to fit a towing bracket to the rear of the vehicle.
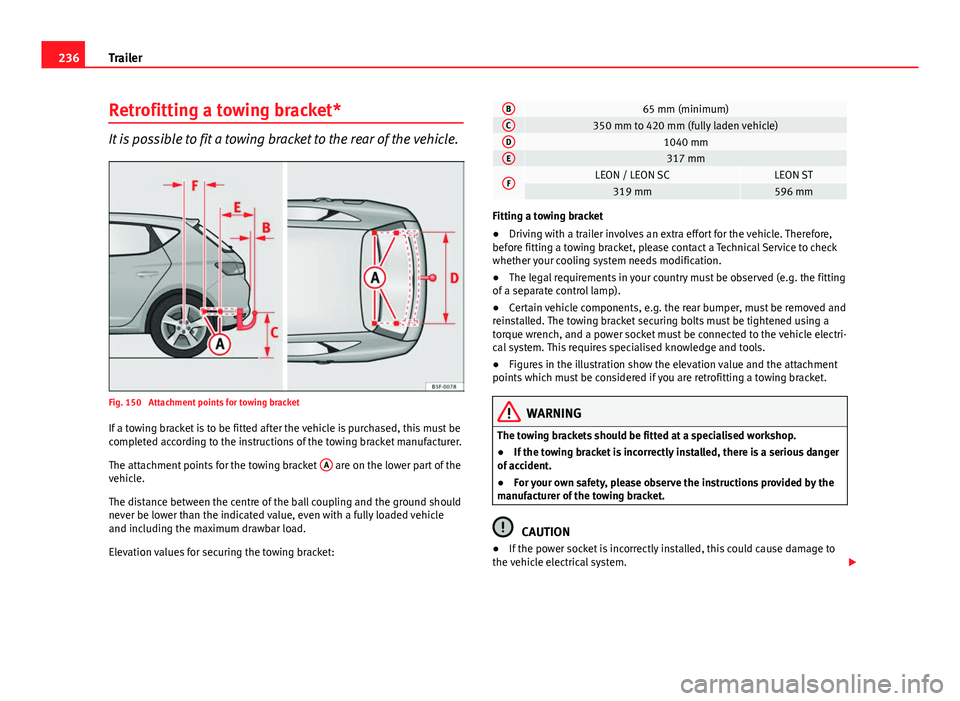
Fig. 150 Attachment points for towing bracket
If a towing bracket is to be fitted after the vehicle is purchased, this must be
completed according to the instructions of the towing bracket manufacturer.
The attachment points for the towing bracket A
are on the lower part of the
vehicle.
The distance between the centre of the ball coupling and the ground should
never be lower than the indicated value, even with a fully loaded vehicle
and including the maximum drawbar load.
Elevation values for securing the towing bracket:
B65 mm (minimum)C350 mm to 420 mm (fully laden vehicle)D1040 mmE317 mm
FLEON / LEON SCLEON ST319 mm596 mm
Fitting a towing bracket
● Driving with a trailer involves an extra effort for the vehicle. Therefore,
before fitting a towing bracket, please contact a Technical Service to check
whether your cooling system needs modification.
● The legal requirements in your country must be observed (e.g. the fitting
of a separate control lamp).
● Certain vehicle components, e.g. the rear bumper, must be removed and
reinstalled. The towing bracket securing bolts must be tightened using a
torque wrench, and a power socket must be connected to the vehicle electri-
cal system. This requires specialised knowledge and tools.
● Figures in the illustration show the elevation value and the attachment
points which must be considered if you are retrofitting a towing bracket.
WARNING
The towing brackets should be fitted at a specialised workshop.
● If the towing bracket is incorrectly installed, there is a serious danger
of accident.
● For your own safety, please observe the instructions provided by the
manufacturer of the towing bracket.
CAUTION
● If the power socket is incorrectly installed, this could cause damage to
the vehicle electrical system.
Page 243 of 339
241
Care and cleaning
Carbon components
The carbon parts on your vehicle have a painted surface. They do not need
any special care and are cleaned just like any other painted part
⇒ page 238.
Paint damage
Minor damage to the paint, such as scratches or stone chips, should be
touched up without delay before the metal starts to corrode. Suitable touch-
up brushes or sprays for your car can be obtained from a SEAT Official Serv-
ice.
The number of the original paint finish on the vehicle is given on the data
sticker ⇒ page 305.
If corrosion is already visible it must be thoroughly removed by a special-
ised workshop.
Windows
Clear vision is an essential safety factor.
The windscreen must not be cleaned with insect remover or wax, otherwise
the windscreen wipers will not function properly (juddering).
Traces of rubber, oil, grease or silicone can be removed with a window
cleaning solution or a silicone remover. Wax residue can only be removed
with a special cleaner. Your SEAT Official Service will be able to provide you
with more detailed information.
The windows should also be cleaned on the inside at regular intervals. Use a separate cloth or chamois to dry the windows. Cloths used for waxing
and polishing contain residues that will cause smears on the glass.
WARNING
Do not use water-repellent coatings on the windscreen. In bad visibility
conditions (e.g. in the rain, dark or with a low sun), these coatings may
cause dazzle: risk of accident! Such coatings can also cause the wind-
screen wiper blades to make noise.
CAUTION
● Remove snow and ice from windows and exterior mirrors with a plastic
scraper only. To avoid scratches caused by dirt on the glass, the scraper
should only be pushed in one direction and not moved to and fro.
● The heating element for the rear window is located on the inner side of
the window. To avoid damaging them, do not apply stickers to the heating
elements.
● Never use warm or hot water to remove snow and ice from windows and
mirrors. This could cause the glass to crack!
Rims
The wheels require regular attention to preserve their appearance. It is im-
portant to remove road salt and brake dust by washing the wheels at regu-
lar intervals, otherwise the finish will be impaired.
After washing, the wheels should only be cleaned with an "acid-free" clean-
ing agent for alloy wheels. This is available from SEAT Official Services and
specialist retailers. Never leave the cleaning agent on the rims for any lon-
ger than specified in the instructions before rinsing it off. If the wheel clean-
er fluid contains acid it can attack the surfaces of the wheel bolts.
Safety FirstOperating instructionsPractical TipsTechnical specifications
Page 245 of 339
243
Care and cleaning
sponge. If the stains are difficult to remove, a washing paste can be applied
directly onto the stain and worked into the fabric. The surface will then have
to be wiped with clear water to remove any residue left by the paste. To do
so, use a damp cloth or sponge and then dab the stain with an absorbent
cloth.
Remove chocolate or make-up stains with a cleaning paste (for e.g., soft
soap). Then remove the soap with water (wet sponge).
A spirit-based cleaner can be used to remove grease, oil, lipstick or ball
point pen. Then dab the dissolved grease or colour particles off with an ab-
sorbent cloth or similar. You may also have to treat the stain once more us-
ing washing paste and water.
If the covers or textile trim panels are badly soiled we recommend that you
have them cleaned by a professional cleaning company with a shampoo
and spray.
Note
Open Velcro fasteners on clothes can damage the seat upholstery. Make
sure that Velcro fasteners are closed.
Natural leather
SEAT does everything possible to preserve the genuine qual-
ities of this natural product. General information
Our range of leathers is large. The main type used is nappa in various forms,
that is, leather with a smooth surface in various different colours.
The amount of dye used determines the appearance and properties of leath-
er. If the leather is left in a more natural state, it retains its typical natural
napped appearance and confers excellent all-weather properties to the
seats. Fine veins, healed scars, insect bites, wrinkles and a subtle variation in shading remain visible; these are the characteristic features of genuine
natural leather.
Natural napped leather does not have a protective surface coating of dye. It
is therefore somewhat more prone to damage. This should be borne in mind
if children or pets often travel in the car, or if there are other factors that
could lead to damage.
Types of leather with a coloured surface coating are likely to be more resist-
ant to damage. This has a great advantage for day-to-day use. However, this
means that the typical natural characteristics of the surface are less appa-
rent, though this does not affect quality.
Cleaning and care
Due to the natural properties of the specially selected hides employed, the
finished leather has a certain sensitivity to grease and dirt, etc. so a degree
of care is required in everyday use and when looking after the leather. Dark
clothing (especially if damp or incorrectly dyed) may stain leather uphols-
tery. Dust and grit in the pores and seams can scratch and damage the sur-
face. Therefore leather should be cleaned at regular intervals, depending on
the actual amount of use. When they have been in use for a certain time,
your car seats will acquire a typical and unmistakable patina. This is charac-
teristic for leather as a natural product and is a sign of genuine quality.
To maintain the value of natural leather you should note the following
points:CAUTION
● Avoid exposing leather to direct sunlight for long periods, otherwise it
may tend to lose some of its colour. If the car is left for a prolonged period
in the bright sun, it is best to cover the leather.
● Sharp-edged objects on clothing, such as belts, zip fasteners, rivets or
similar, can also leave permanent scratches and rough marks on the surface
of the leather.
Safety FirstOperating instructionsPractical TipsTechnical specifications
Page 249 of 339
247
Checking and refilling levels
● Only use fuel additives that have been approved by SEAT. Octane boost-
ing or anti-knock additives may contain metal additives that could seriously
damage the engine or the catalytic converter. These additives must not be
used.
● High engine speed and full throttle can damage the engine when using
petrol with an octane rating lower than the correct grade for the engine.
Note
● You may use petrol with a high octane number than the one recommen-
ded for your engine.
● In those countries where unleaded petrol is not available, you may refuel
with a fuel with a low lead content.
Diesel Fuel
Please note the information on the inside of the fuel tank
flap.
We recommend the use of Diesel fuel which complies to European standard
EN 590. If diesel fuel which meets European standard EN 590 is not availa-
ble, the Cetane number (CZ) must, at minimum, be 51. If the engine is
equipped with a particulate filter, the sulphur content of the fuel must be
below 50 parts per million.
Winter-grade diesel
Summer fuel becomes thicker in winter and it is more difficult to start the
engine. For this reason petrol stations in some countries also offer winter
diesel with improved fluidity when cold.
CAUTION
● The vehicle is not designed for the use of biodiesel (FAME fuel). The fuel
system would be damaged if you used biodiesel.
● Do not mix fuel additives, the so-called “thinners”, petrol or similar ad-
ditives with diesel fuel.
● If poor-quality diesel fuel is used, it may be necessary to drain the fuel
filter more frequently than is specified in the Service Plan. We recommend
having this done by a specialised workshop. If water is allowed to collect in
the filter, this can cause engine performance problems.
Natural gas
Natural gas
Natural gas, in addition to others, can be in compressed or liquid form.
Liquefied natural gas (LNG) is the result of heavy cooling of natural gas.
Therefore its volume is considerably reduced compared with compressed
natural gas (CNG). In vehicles with a natural gas engine, liquefied natural
gas cannot be directly refilled, given that the gas would expand excessively
in the vehicle gas tank.
Therefore, vehicles with a natural gas engine must only be refuelled using
compressed natural gas ⇒
.
Natural gas quality and consumption
Natural gas is divided into the groups H and L depending on its quality.
Gas type H has a superior heating power and inferior nitrogen and carbon
dioxide content than type L. The higher the heating power of the natural
gas, the lower the consumption will be.
However, the heating power and the proportion of nitrogen and carbon di-
oxide can fluctuate within the quality groups. Therefore, vehicle consump-
tion can also vary, even when using one type of gas only.
Safety FirstOperating instructionsPractical TipsTechnical specifications
Page 251 of 339
249
Checking and refilling levels
– Place the cap in the housing on the hinge of the open flap
⇒ Fig. 151.
Closing the fuel tank cap
– Screw on the tank cap clockwise until it you hear it click into po-
sition.
– Close the tank flap. Make sure you hear it click into place.
If the automatic filler nozzle is operated correctly, it will switch itself off as
soon as the fuel tank is “full”. Do not try to put in more fuel after the nozzle
cuts out, as this will fill the expansion chamber in the fuel tank.
The correct fuel grade for your vehicle is given on a sticker on the inside of
the fuel tank flap. Further notes on fuel can be found at ⇒ page 246.
The capacity of the fuel tank is listed in the vehicle technical specifications
⇒ page 323.
WARNING
Fuel is highly flammable and can cause serious burns and other injuries.
● Do not smoke when filling the fuel tank or a canister. Naked flames
are forbidden in the vicinity due to the risk of explosion.
● Observe legislation governing the use, storage and carrying of a
spare fuel canister in the vehicle.
WARNING (Continued)
● For safety reasons we do not recommend carrying a spare fuel canis-
ter in the vehicle. In an accident the canister could be damaged and could
leak.
● If, in exceptional circumstances, you have to carry a spare fuel canis-
ter, please observe the following points:
–Never fill fuel into the spare fuel canister if it is inside or on top of
the vehicle. An electrostatic charge could build up during filling, caus-
ing the fuel vapour to ignite. Danger of explosion. Always place the
canister on the ground to fill it.
– Insert the filling nozzle as far as possible into the spare fuel canis-
ter.
– If the spare fuel canister is made of metal, the filling nozzle must
be in contact with the canister during filling. This helps prevent an
electrostatic charge building up.
– Never spill fuel in the vehicle or in the luggage compartment. Fuel
vapour is explosive. Risk of fatal accident!
CAUTION
● If any fuel is spilt onto the vehicle, it should be removed immediately. It
could otherwise damage the paintwork.
● Never run the tank completely dry. An irregular fuel supply could cause
misfiring. As a result, unburnt fuel could enter the exhaust system and dam-
age the catalytic converter.
● When filling the fuel tank after having run it completely dry on a vehicle
with a diesel engine , the ignition must be switched on for at least 30 sec-
onds before starting the engine. When you then start the engine it may take
longer than normal (up to one minute) for the engine to start firing. This is
because air needs to be bled from the fuel system while starting.
Safety FirstOperating instructionsPractical TipsTechnical specifications
Page 255 of 339

253
Checking and refilling levels
WARNING
Never open the bonnet if you see steam or drips of coolant being re-
leased from the engine compartment. Failure to comply could result in
burns. Wait until no steam or coolant can be seen before opening the
bonnet.
Closing the bonnet
– Slightly raise the bonnet.
– Release the bonnet stay before pressing it back into its support.
– Carefully close the bonnet.
– Press the bonnet down until it locks into place.
– Make sure that the bonnet catches onto its clasp. Do not press
down too hard ⇒
.
WARNING
● For safety reasons the bonnet must always be completely closed
when the vehicle is moving. Therefore, after closing the bonnet, always
check that the locking element is properly engaged. This is the case if
the bonnet is flush with the adjacent body panels.
● Should you notice that the bonnet is not safely secured when the ve-
hicle is moving, stop the vehicle immediately and close the bonnet. Fail-
ure to do so could result in an accident.
Engine oil
General notes
The engine comes with a special, multi-grade oil that can be used all year
round.
Because the use of high-quality oil is essential for the correct operation of
the engine and its long useful life, when topping up or changing oil, use on-
ly those oils that comply with VW standards.
The specifications (VW standards) set out in the following page should ap-
pear on the container of the service oil; when the container displays the
specific standards for petrol and diesel engines together, it means that the
oil can be used for both types of engines.
We recommend that the oil change, indicated in the Maintenance Pro-
gramme, be performed by a Technical Service or a specialised workshop.
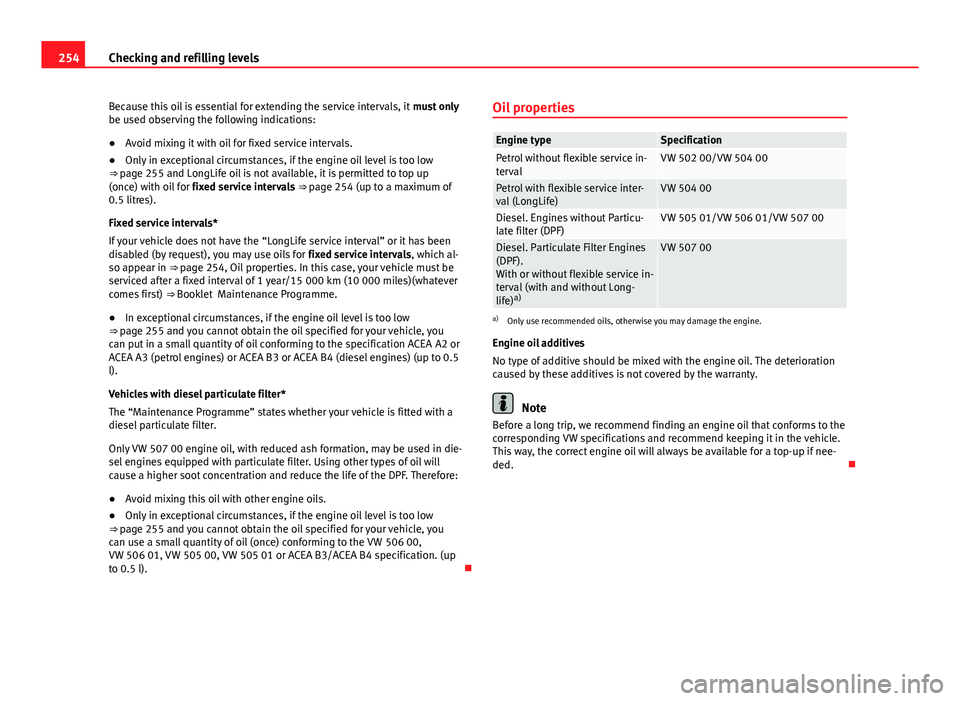
The correct oil specifications for your engine are listed in the ⇒ page 254,
Oil properties.
Service intervals
Service intervals can be flexible (LongLife service) or fixed (dependent on
time/distance travelled).
If the PR code that appears on the back of the “Maintenance Programme”
booklet is PR QI6, this means that your vehicle has the LongLife service pro-
grammed. If it lists the codes QI1, QI2, QI3, QI4 or QI7, the interval service
is dependent on time/distance travelled.
Flexible service intervals (LongLife service intervals*)
Special oils and processes have been developed which, depending on the
characteristics and individual driving profiles, enable the extension of the
oil change service (LongLife service intervals).
Safety FirstOperating instructionsPractical TipsTechnical specifications
Page 256 of 339
254Checking and refilling levels
Because this oil is essential for extending the service intervals, it must only
be used observing the following indications:
● Avoid mixing it with oil for fixed service intervals.
● Only in exceptional circumstances, if the engine oil level is too low
⇒ page 255 and LongLife oil is not available, it is permitted to top up
(once) with oil for fixed service intervals ⇒ page 254 (up to a maximum of
0.5 litres).
Fixed service intervals*
If your vehicle does not have the “LongLife service interval” or it has been
disabled (by request), you may use oils for fixed service intervals, which al-
so appear in ⇒ page 254, Oil properties. In this case, your vehicle must be
serviced after a fixed interval of 1 year/15 000 km (10 000 miles)(whatever
comes first) ⇒ Booklet Maintenance Programme.
● In exceptional circumstances, if the engine oil level is too low
⇒ page 255 and you cannot obtain the oil specified for your vehicle, you
can put in a small quantity of oil conforming to the specification ACEA A2 or
ACEA A3 (petrol engines) or ACEA B3 or ACEA B4 (diesel engines) (up to 0.5
l).
Vehicles with diesel particulate filter*
The “Maintenance Programme” states whether your vehicle is fitted with a
diesel particulate filter.
Only VW 507 00 engine oil, with reduced ash formation, may be used in die-
sel engines equipped with particulate filter. Using other types of oil will
cause a higher soot concentration and reduce the life of the DPF. Therefore:
● Avoid mixing this oil with other engine oils.
● Only in exceptional circumstances, if the engine oil level is too low
⇒ page 255 and you cannot obtain the oil specified for your vehicle, you
can use a small quantity of oil (once) conforming to the VW 506 00,
VW 506 01, VW 505 00, VW 505 01 or ACEA B3/ACEA B4 specification. (up
to 0.5 l). Oil properties
Engine typeSpecificationPetrol without flexible service in-
tervalVW 502 00/VW 504 00
Petrol with flexible service inter-
val (LongLife)VW 504 00
Diesel. Engines without Particu-
late filter (DPF)VW 505 01/VW 506 01/VW 507 00
Diesel. Particulate Filter Engines
(DPF).
With or without flexible service in-
terval (with and without Long-
life)
a)VW 507 00
a)
Only use recommended oils, otherwise you may damage the engine.
Engine oil additives
No type of additive should be mixed with the engine oil. The deterioration
caused by these additives is not covered by the warranty.
Note
Before a long trip, we recommend finding an engine oil that conforms to the
corresponding VW specifications and recommend keeping it in the vehicle.
This way, the correct engine oil will always be available for a top-up if nee-
ded.
Page 259 of 339

257
Checking and refilling levels
WARNING
Only change the engine oil yourself if you have the specialist knowledge
required!
● Before opening the bonnet, read and observe the warnings
⇒ page 251.
● Wait for the engine to cool down. Hot oil may cause burn injuries.
● Wear eye protection to avoid injuries, such as acid burns, caused by
splashes of oil.
● When removing the oil drain plug with your fingers, keep your arm
horizontal to help prevent oil from running down your arm.
● Wash your skin thoroughly if it comes into contact with engine oil.
● Engine oil is poisonous! Used oil must be stored in a safe place out of
the reach of children.
CAUTION
No additives should be used with engine oil. This could result in engine
damage. Any damage caused by the use of such additives would not be
covered by the factory warranty.
For the sake of the environment
● Because of the disposal problems, the necessary special tools and spe-
cialist knowledge required, we recommend that you have the engine oil and
filter changed by a Technical Service.
● Never pour oil down drains or into the ground.
● Use a suitable container when draining the used oil. It must be large
enough to hold all the engine oil. Cooling system
Engine coolant specifications
The engine cooling system is supplied from the factory with a specially trea-
ted mixture of water and, at least, 40 % of the additive G 13 (TLVW 774 J).
The engine coolant additive is recognisable by its purple colour. This mix-
ture of water and additive gives the necessary frost protection down to
-25°C (-13 °F) and protects the light alloy parts of the cooling system
against corrosion. It also prevents scaling and considerably raises the boil-
ing point of the coolant.
To protect the engine cooling system, the percentage of additive must al-
ways be at least 40 %, even in warm climates where anti-freeze protection is
not required.
If greater frost protection is required in very cold climates, the proportion of
additive can be increased. However, the percentage of additive should not
exceed 60 %, as this would reduce the frost protection and, in turn, de-
crease the cooling capacity.
When the coolant is topped up, use a mixture of distilled water and, at
least, 40 % of the G 13 or G 12 plus-plus (TL-VW 774 G) additive (both are
purple) to obtain an optimum anticorrosion protection ⇒
. The mixture of
G 13 with G 12 plus (TL-VW 774 F), G 12 (red) or G 11 (green-blue) engine
coolants will significantly reduce the anticorrosion protection and should,
therefore be avoided ⇒
.
Safety FirstOperating instructionsPractical TipsTechnical specifications
Page 260 of 339

258Checking and refilling levels
WARNING
If there is not enough anti-freeze in the coolant system, the engine may
fail leading to serious damage.
● Please make sure that the percentage of additive is correct with re-
spect to the lowest expected ambient temperature in the zone in which
the vehicle is to be used.
● When the outside temperature is very low, the coolant could freeze
and the vehicle would be immobilised. In this case, the heating would
not work either and inadequately dressed passengers could die of cold.
CAUTION
The original additives should never be mixed with coolants which are not
approved by SEAT. Otherwise, you run the risk of causing severe damage to
the engine and the engine cooling system.
● If the fluid in the expansion tank is not purple but is, for example,
brown, this indicates that the G 13 additive has been mixed with an inade-
quate coolant. The coolant must be changed as soon as possible if this is
the case! This could result in serious faults and engine damage.
For the sake of the environment
Coolants and additives can contaminate the environment. If any fluids are
spilled, they should be collected and correctly disposed of, with respect to
the environment. Topping up coolant
Top up coolant when the level is below the MIN (minimum)
mark.
Fig. 156 Engine com-
partment: Coolant expan-
sion tank cap
Checking coolant level
– Park the vehicle in a horizontal position.
– Switch the ignition off
– Read off the coolant level on coolant expansion tank. When the
engine is cold, the coolant level should be between the marks.
When the engine is hot, it may be slightly above the upper
mark.
Topping up coolant
– Wait for the engine to cool down.
– Cover the coolant expansion tank cap with a cloth and carefully
unscrew it to the left ⇒
.
Page 262 of 339

260Checking and refilling levels
WARNING
● Brake fluid should be stored in the closed original container in a safe
place out of reach of children. Risk of poisoning!
● If the brake fluid is left in the system for too long and the brakes are
subjected to heavy use, vapour bubbles may form in the brake system.
This would seriously affect the efficiency of the brakes and the safety of
the vehicle. This may cause an accident.
CAUTION
Brake fluid should not come into contact with the vehicle paintwork, as it is
abrasive.
Battery General information
The battery is located in the engine compartment and is almost mainte-
nance-free. It is checked as part of the Inspection Service. Nevertheless,
check the terminals are clean and have the correct tightening torque, espe-
cially in summer and winter.
Disconnecting the battery
The battery should only be disconnected in exceptional cases. When the
battery is disconnected, some of the vehicle's functions are “lost” ( ⇒ table
on page 260). These functions will require resetting after the battery is re-
connected.
Deactivate the anti-theft alarm* before you disconnect the battery Other-
wise the alarm will be triggered.
effectReprogrammingOne-touch function of the electric
windows⇒ page 104, One-touch opening and
closing*
Remote control keyIf the vehicle does not respond to the
key, they should be synchronised
⇒ page 91
Digital clock⇒ page 63
ESC warning lampAfter driving for a few metres, the
warning lamp goes out again.
If the vehicle is not used for long periods
The vehicle has a system for monitoring the current consumption when the
engine is left unused for long periods of time ⇒ page 226. Some functions,
such as the interior lights, or the remote door opening, may be temporarily
disabled to prevent the battery from running flat. These functions will come
back on as soon as the ignition is switched on and the engine started.
Winter conditions
During the winter, the starting power may be reduced, and if necessary, the
battery should be charged ⇒
in Important safety warnings for handling a
vehicle battery on page 261
Important safety warnings for handling a vehicle battery
All work on batteries requires specialist knowledge. Please refer to a SEAT
Official Service or a workshop specialising in batteries: risk of burns or ex-
ploding battery!
The battery must not be opened. Never try to change the fluid level of the
battery. Explosive gas is released from the battery that could cause an ex-
plosion.