engine SKODA FABIA 2000 1.G / 6Y Service Manual
[x] Cancel search | Manufacturer: SKODA, Model Year: 2000, Model line: FABIA, Model: SKODA FABIA 2000 1.G / 6YPages: 86, PDF Size: 3.58 MB
Page 41 of 86

Downloaded from www.Manualslib.com manuals search engine FABIA 2000➤Inspection and Maintenance
GearboxEdition 07.03
S00.5301.12.2002-4 page 1 02
02-4 Gearbox
Gearbox/Final drive: Check the oil level
and top it if necessary
5 speed gearbox 002
Gearbox oil specification: G50 SAE 75W90 (synthetic oil)
–Unscrew plug for inspecting gear oil -arrow-.
The oil is at the correct level if the gear is filled up to the
lower edge of the oil filler hole.
–Tighten plug -arrow-, 25 Nm.
When topping up, pay attention to the following
points:
–Unscrew plug for inspecting gear oil -arrow-.
–Pour in gear oil up to lower edge of the filler hole.
–Screw in plug -arrow-.
–Start engine, engage a gear and allow gearbox to ro-
tate for about 2 minutes.
–Switch off engine, unscrew plug -arrow- and top up
gear oil to lower edge of the filler hole.
–Tighten plug -arrow-, 25 Nm.
5 speed gearbox 02R
Gearbox oil specification: G50 SAE 75W90 (synthetic oil)
–Remove noise insulation panel -arrows-.
–Unscrew plug for inspecting gear oil -arrow-.
The oil is at the correct level if the gear is filled up to the
lower edge of the oil filler hole.
–Tighten plug -arrow-, 30 Nm.
When topping up, pay attention to the following
points:
–Unscrew plug for inspecting gear oil -arrow-.
–Pour in gear oil up to lower edge of the filler hole.
–Screw in plug -arrow-.
–Start engine, engage a gear and allow gearbox to ro-
tate for about 2 minutes.
–Switch off engine, unscrew plug -arrow- and top up
gear oil to lower edge of the filler hole.
–Tighten plug -arrow-, 30 Nm.
5 speed gearbox 02T
Special tools, test and measuring equipment and
auxiliary items required
♦Socket wrench insert -T30023 (3357)-
S34-0408
S10-0101
S34-0498
Page 42 of 86
Downloaded from www.Manualslib.com manuals search engine FABIA 2000➤Inspection and Maintenance
GearboxEdition 07.03
S00.5301.12.2002-4 page 2 02
Gearbox oil specification: G50 SAE 75W90 (synthetic
oil).
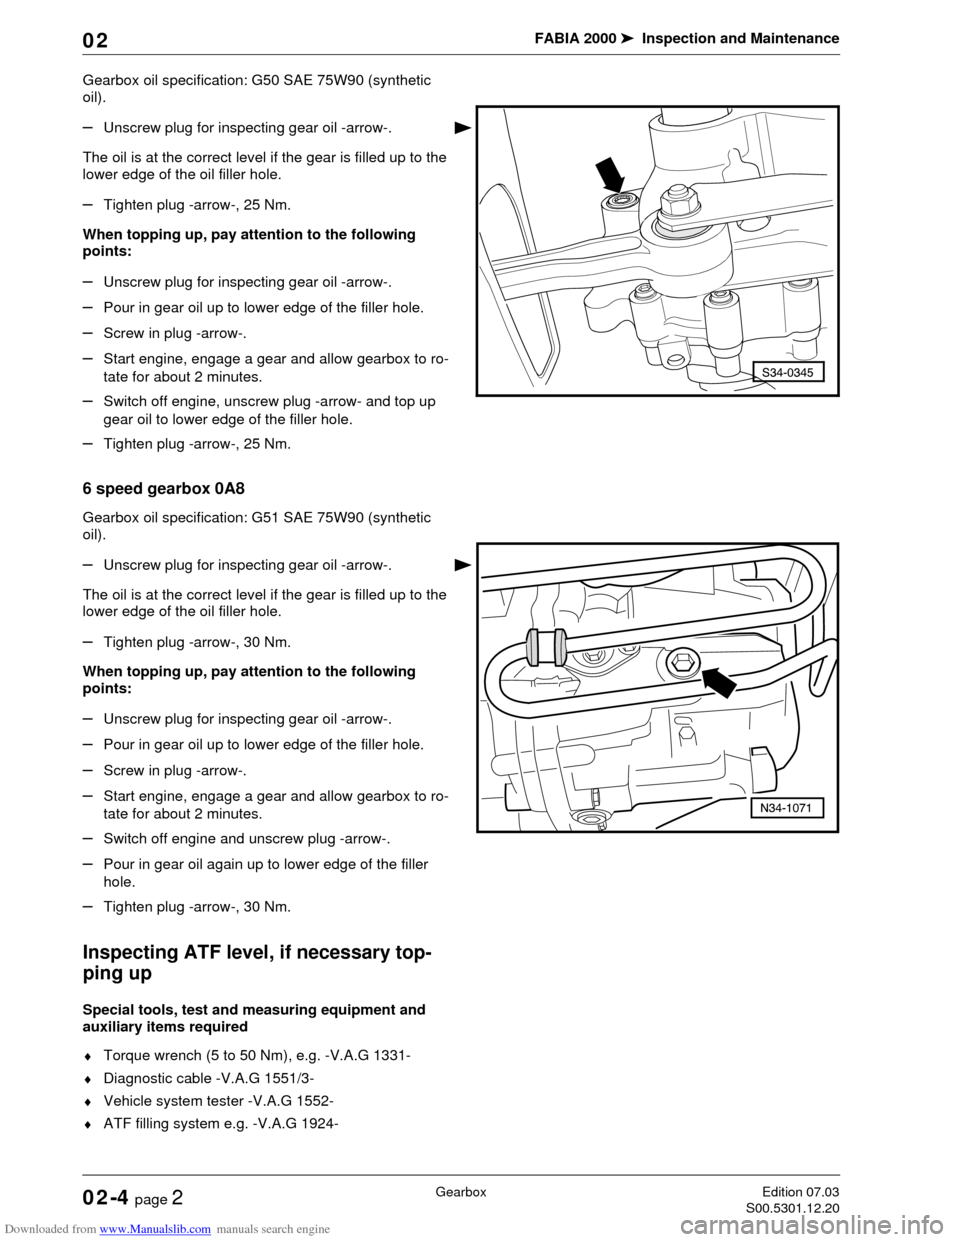
–Unscrew plug for inspecting gear oil -arrow-.
The oil is at the correct level if the gear is filled up to the
lower edge of the oil filler hole.
–Tighten plug -arrow-, 25 Nm.
When topping up, pay attention to the following
points:
–Unscrew plug for inspecting gear oil -arrow-.
–Pour in gear oil up to lower edge of the filler hole.
–Screw in plug -arrow-.
–Start engine, engage a gear and allow gearbox to ro-
tate for about 2 minutes.
–Switch off engine, unscrew plug -arrow- and top up
gear oil to lower edge of the filler hole.
–Tighten plug -arrow-, 25 Nm.
6 speed gearbox 0A8
Gearbox oil specification: G51 SAE 75W90 (synthetic
oil).
–Unscrew plug for inspecting gear oil -arrow-.
The oil is at the correct level if the gear is filled up to the
lower edge of the oil filler hole.
–Tighten plug -arrow-, 30 Nm.
When topping up, pay attention to the following
points:
–Unscrew plug for inspecting gear oil -arrow-.
–Pour in gear oil up to lower edge of the filler hole.
–Screw in plug -arrow-.
–Start engine, engage a gear and allow gearbox to ro-
tate for about 2 minutes.
–Switch off engine and unscrew plug -arrow-.
–Pour in gear oil again up to lower edge of the filler
hole.
–Tighten plug -arrow-, 30 Nm.
Inspecting ATF level, if necessary top-
ping up
Special tools, test and measuring equipment and
auxiliary items required
♦Torque wrench (5 to 50 Nm), e.g. -V.A.G 1331-
♦Diagnostic cable -V.A.G 1551/3-
♦Vehicle system tester -V.A.G 1552-
♦ATF filling system e.g. -V.A.G 1924-
Page 43 of 86
Downloaded from www.Manualslib.com manuals search engine FABIA 2000➤Inspection and Maintenance
GearboxEdition 07.03
S00.5301.12.2002-4 page 3 02
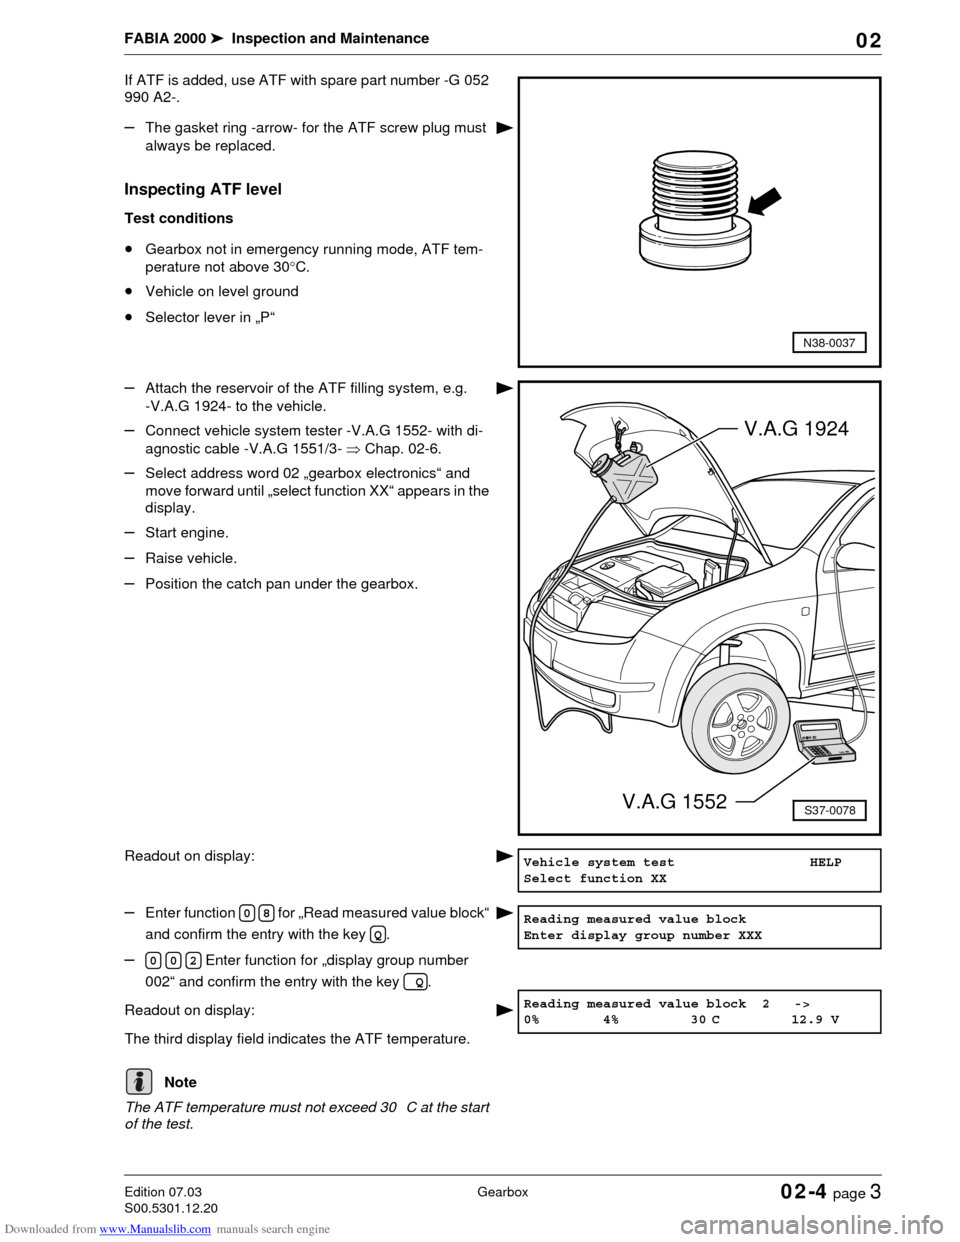
If ATF is added, use ATF with spare part number -G 052
990 A2-.
–The gasket ring -arrow- for the ATF screw plug must
always be replaced.
Inspecting ATF level
Test conditions
•Gearbox not in emergency running mode, ATF tem-
perature not above 30°C.
•Vehicle on level ground
•Selector lever in „P“
–Attach the reservoir of the ATF filling system, e.g.
-V.A.G 1924- to the vehicle.
–Connect vehicle system tester -V.A.G 1552- with di-
agnostic cable -V.A.G 1551/3- ⇒Chap. 02-6.
–Select address word 02 „gearbox electronics“ and
move forward until „select function XX“ appears in the
display.
–Start engine.
–Raise vehicle.
–Position the catch pan under the gearbox.
Readout on display:
–Enter function for „Read measured value block“
and confirm the entry with the key .
– Enter function for „display group number
002“ and confirm the entry with the key .
Readout on display:
The third display field indicates the ATF temperature.
The ATF temperature must not exceed 30 C at the start
of the test.
N38-0037
S37-0078
V.A.G 1924
V.A.G 1552
Vehicle system test HELP
Select function XX
Reading measured value block
Enter display group number XXX 08
Q
002
Q
Reading measured value block 2 ->
0% 4% 30 C 12.9 V
Note
Page 44 of 86
Downloaded from www.Manualslib.com manuals search engine FABIA 2000➤Inspection and Maintenance
GearboxEdition 07.03
S00.5301.12.2002-4 page 4 02
–Bring ATF to test temperature.
Test temperature: 35 C to 45 C
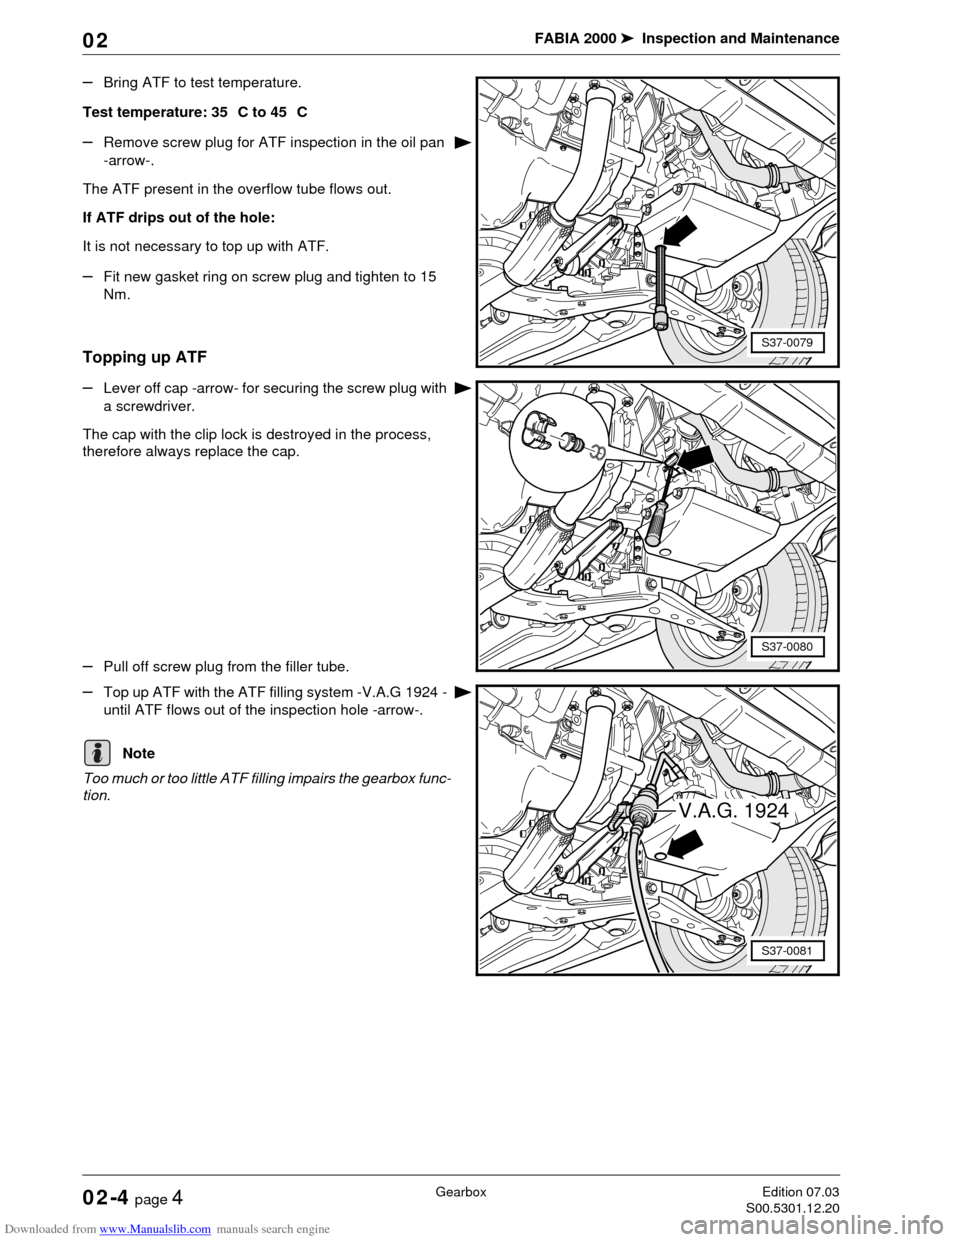
–Remove screw plug for ATF inspection in the oil pan
-arrow-.
The ATF present in the overflow tube flows out.
If ATF drips out of the hole:
It is not necessary to top up with ATF.
–Fit new gasket ring on screw plug and tighten to 15
Nm.
Topping up ATF
–Lever off cap -arrow- for securing the screw plug with
a screwdriver.
The cap with the clip lock is destroyed in the process,
therefore always replace the cap.
–Pull off screw plug from the filler tube.
–Top up ATF with the ATF filling system -V.A.G 1924 -
until ATF flows out of the inspection hole -arrow-.
Too much or too little ATF filling impairs the gearbox func-
tion.
S37-0079
S37-0080
V.A.G. 1924
S37-0081
Note
Page 45 of 86
Downloaded from www.Manualslib.com manuals search engine FABIA 2000➤Inspection and Maintenance
GearboxEdition 07.03
S00.5301.12.2002-4 page 5 02
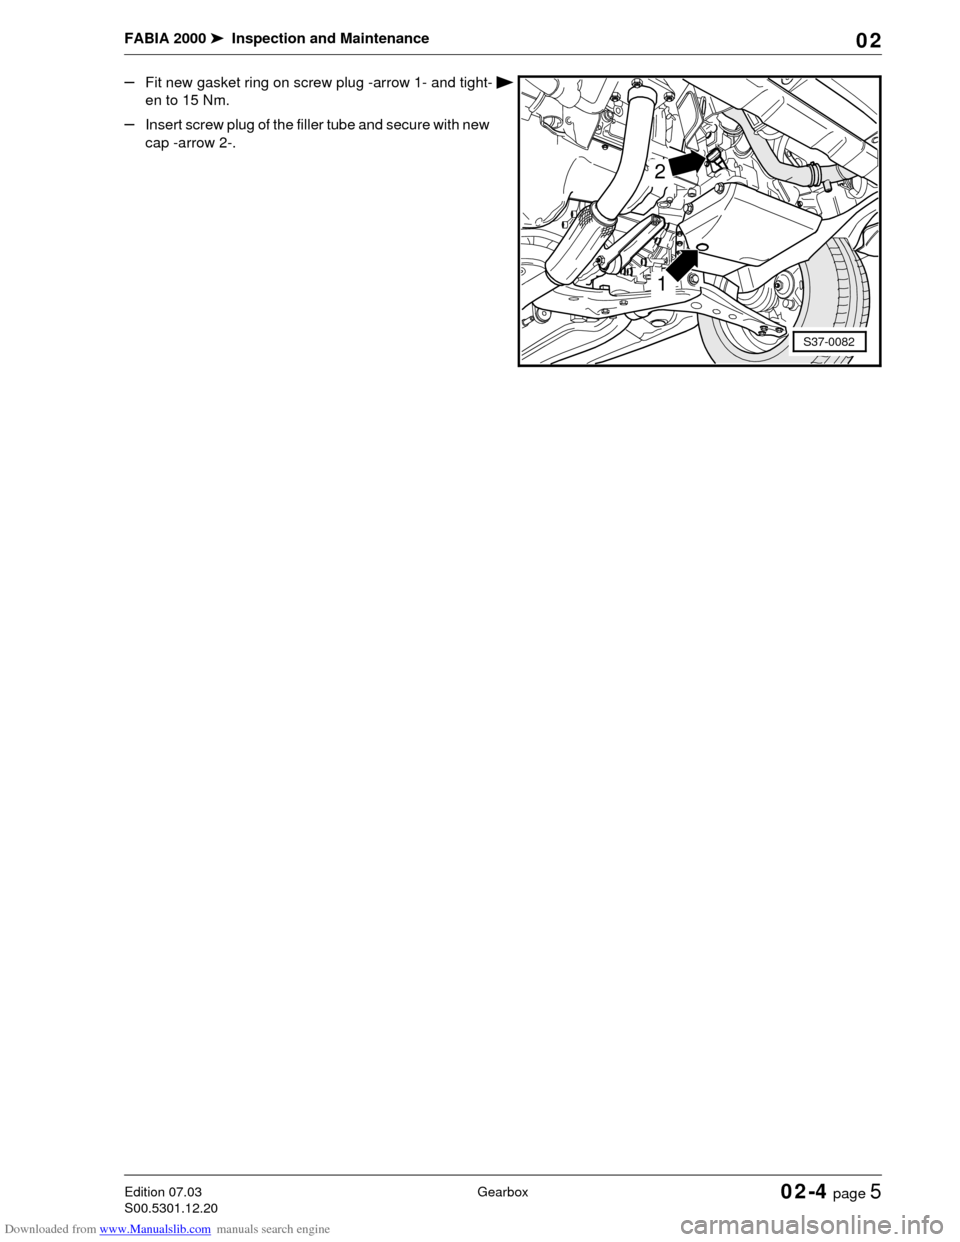
–Fit new gasket ring on screw plug -arrow 1- and tight-
en to 15 Nm.
–Insert screw plug of the filler tube and secure with new
cap -arrow 2-.
1
2
S37-0082
Page 46 of 86

Downloaded from www.Manualslib.com manuals search engine FABIA 2000➤Inspection and Maintenance
GearboxEdition 07.03
S00.5301.12.2002-4 page 6 02
Page 47 of 86
Downloaded from www.Manualslib.com manuals search engine FABIA 2000➤Inspection and Maintenance
ChassisEdition 02.04
S00.5301.13.2002-5 page 1 02
02-5 Chassis
Inspecting thickness of front and rear
brake pads/linings
Front disc brake pads:
For a better assessment of the residual pad thickness re-
move wheels. Do not mix up wheels (mark).
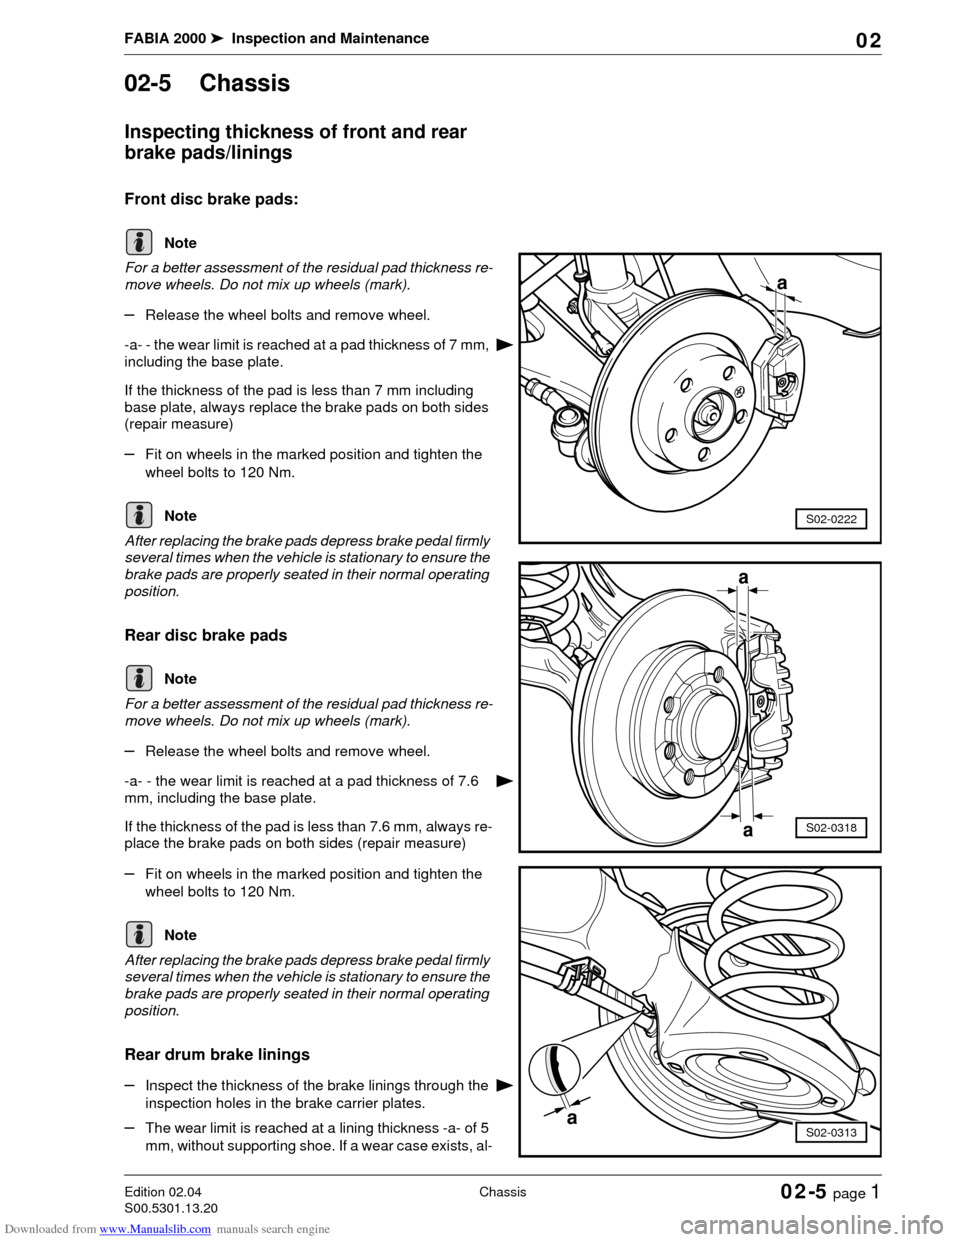
–Release the wheel bolts and remove wheel.
-a- - the wear limit is reached at a pad thickness of 7 mm,
including the base plate.
If the thickness of the pad is less than 7 mm including
base plate, always replace the brake pads on both sides
(repair measure)
–Fit on wheels in the marked position and tighten the
wheel bolts to 120 Nm.
After replacing the brake pads depress brake pedal firmly
several times when the vehicle is stationary to ensure the
brake pads are properly seated in their normal operating
position.
Rear disc brake pads
For a better assessment of the residual pad thickness re-
move wheels. Do not mix up wheels (mark).
–Release the wheel bolts and remove wheel.
-a- - the wear limit is reached at a pad thickness of 7.6
mm, including the base plate.
If the thickness of the pad is less than 7.6 mm, always re-
place the brake pads on both sides (repair measure)
–Fit on wheels in the marked position and tighten the
wheel bolts to 120 Nm.
After replacing the brake pads depress brake pedal firmly
several times when the vehicle is stationary to ensure the
brake pads are properly seated in their normal operating
position.
Rear drum brake linings
–Inspect the thickness of the brake linings through the
inspection holes in the brake carrier plates.
–The wear limit is reached at a lining thickness -a- of 5
mm, without supporting shoe. If a wear case exists, al-
Note
a
S02-0222Note
Note
S02-0318
a
a
Note
S02-0313a
Page 48 of 86
Downloaded from www.Manualslib.com manuals search engine FABIA 2000➤Inspection and Maintenance
ChassisEdition 02.04
S00.5301.13.2002-5 page 2 02
ways replace the brake linings on both sides (repair
measure).
Avoid soiling from brake fluid or grease flowing out.
Inspecting brake system for leaks and
damage
–Inspect master brake cylinder, brake servo unit (for
ABS: hydraulic unit), brake pressure regulator, brake
calipers for leaks and damage.
–Inspect brake hoses for twisting.
–Ensure that the brake hoses do not touch any parts of
the vehicle when the steering is turned to full left or full
right lock.
–Inspect the brake hoses for porous and brittle points.
Inspect the brake hoses and brake lines for chafing
points.
–Inspect the brake connections and attachments to en-
sure they are correctly fitted, free of leaks and corro-
sion.
Changing brake fluid (every 2 years)
Special tools, test and measuring equipment and
auxiliary items required
♦Extraction device
♦Brake pedal support, e.g. - V.A.G 1869/2-
Use only fresh genuine brake fluid FMVSS 571.116 DOT
4.
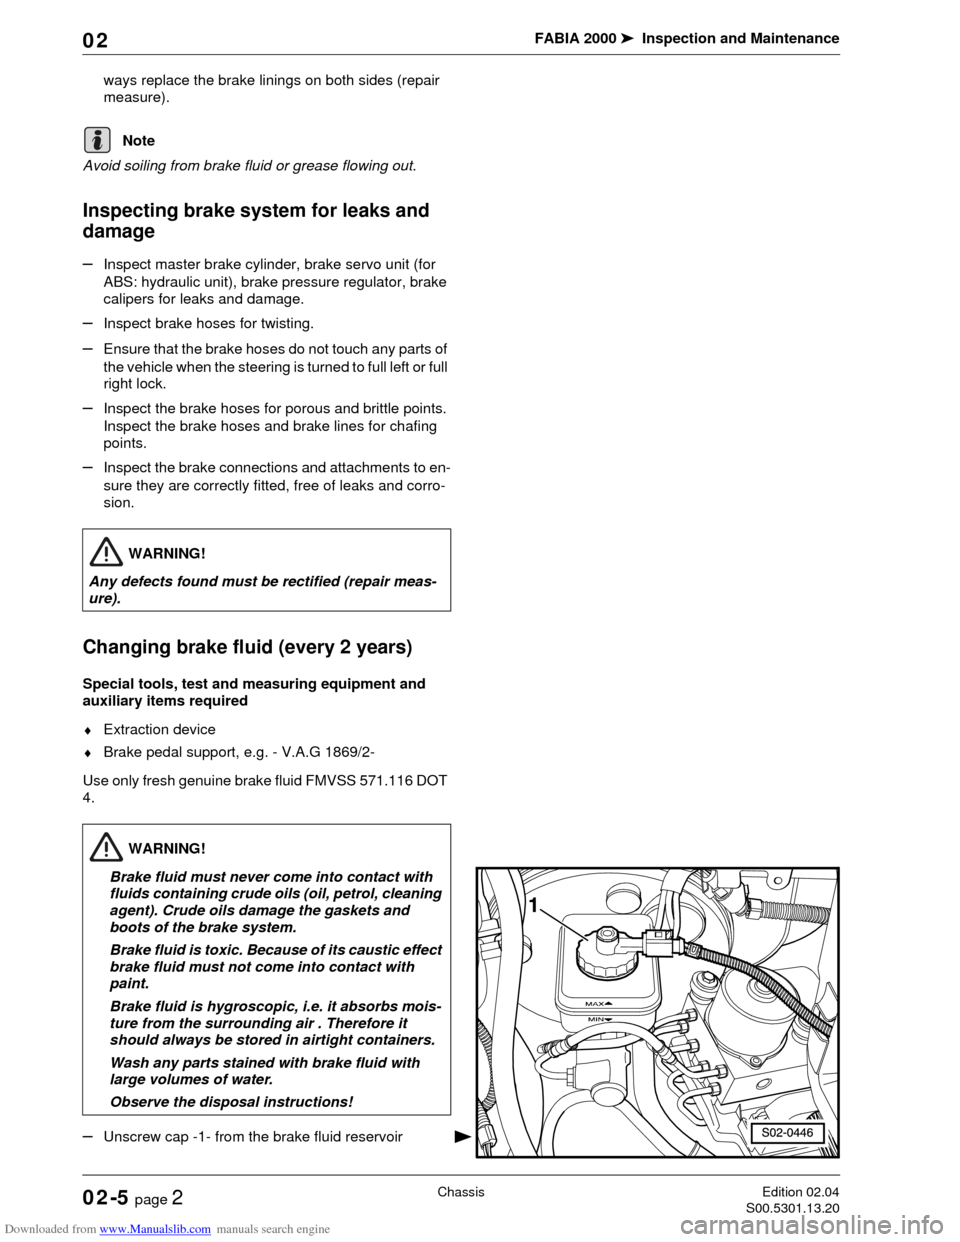
–Unscrew cap -1- from the brake fluid reservoir
Note
WARNING!
Any defects found must be rectified (repair meas-
ure).
WARNING!
Brake fluid must never come into contact with
fluids containing crude oils (oil, petrol, cleaning
agent). Crude oils damage the gaskets and
boots of the brake system.
Brake fluid is toxic. Because of its caustic effect
brake fluid must not come into contact with
paint.
Brake fluid is hygroscopic, i.e. it absorbs mois-
ture from the surrounding air . Therefore it
should always be stored in airtight containers.
Wash any parts stained with brake fluid with
large volumes of water.
Observe the disposal instructions!
Page 49 of 86
Downloaded from www.Manualslib.com manuals search engine FABIA 2000➤Inspection and Maintenance
ChassisEdition 02.04
S00.5301.13.2002-5 page 3 02
–Remove strainer and clean.
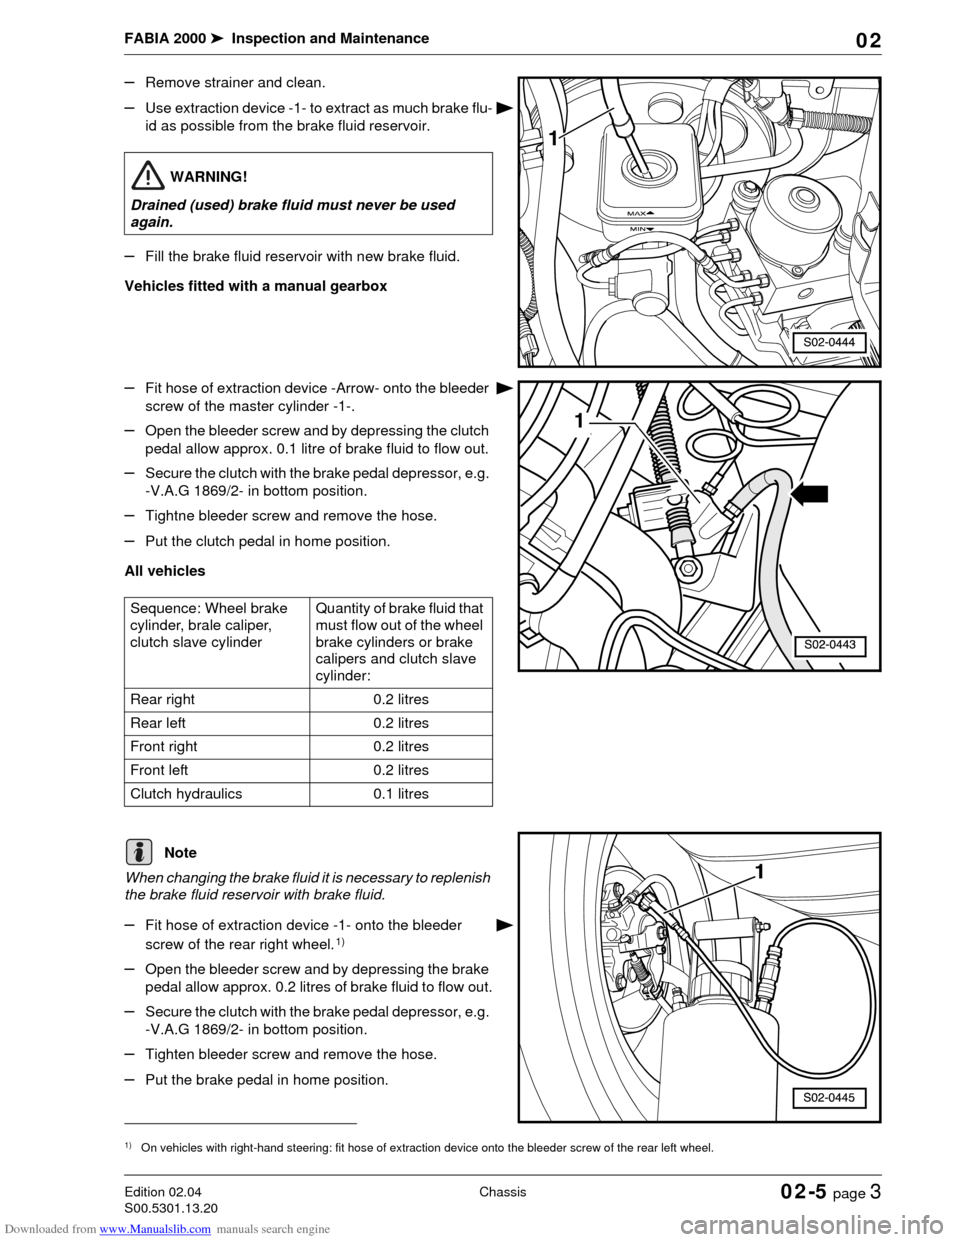
–Use extraction device -1- to extract as much brake flu-
id as possible from the brake fluid reservoir.
–Fill the brake fluid reservoir with new brake fluid.
Vehicles fitted with a manual gearbox
–Fit hose of extraction device -Arrow- onto the bleeder
screw of the master cylinder -1-.
–Open the bleeder screw and by depressing the clutch
pedal allow approx. 0.1 litre of brake fluid to flow out.
–Secure the clutch with the brake pedal depressor, e.g.
-V.A.G 1869/2- in bottom position.
–Tightne bleeder screw and remove the hose.
–Put the clutch pedal in home position.
All vehicles
When changing the brake fluid it is necessary to replenish
the brake fluid reservoir with brake fluid.
–Fit hose of extraction device -1- onto the bleeder
screw of the rear right wheel.
1)
–Open the bleeder screw and by depressing the brake
pedal allow approx. 0.2 litres of brake fluid to flow out.
–Secure the clutch with the brake pedal depressor, e.g.
-V.A.G 1869/2- in bottom position.
–Tighten bleeder screw and remove the hose.
–Put the brake pedal in home position.
WARNING!
Drained (used) brake fluid must never be used
again.
Sequence: Wheel brake
cylinder, brale caliper,
clutch slave cylinderQuantity of brake fluid that
must flow out of the wheel
brake cylinders or brake
calipers and clutch slave
cylinder:
Rear right 0.2 litres
Rear left 0.2 litres
Front right 0.2 litres
Front left 0.2 litres
Clutch hydraulics 0.1 litres
1)On vehicles with right-hand steering: fit hose of extraction device onto the bleeder screw of the rear left wheel.
Note
Page 50 of 86
Downloaded from www.Manualslib.com manuals search engine FABIA 2000➤Inspection and Maintenance
ChassisEdition 02.04
S00.5301.13.2002-5 page 4 02
–Repeat the procedure for all wheels in the following
sequence: rear left, front right and front left.
1)
–Insert strainer in the brake fluid reservoir and fill with
brake fluid up to the specified level.
–Inspect pedal position and idle travel at brake pedal.
Idle travel: max. 1/3 of pedal travel.
Vehicles with ABS or ABS/EDL:
A road test on such models must be carried out after
bleeding the brake system. While doing so perform at
least one ABS adjustment!
Inspecting the brake fluid level
Use only fresh genuine brake fluid FMVSS 571.116 DOT
4.
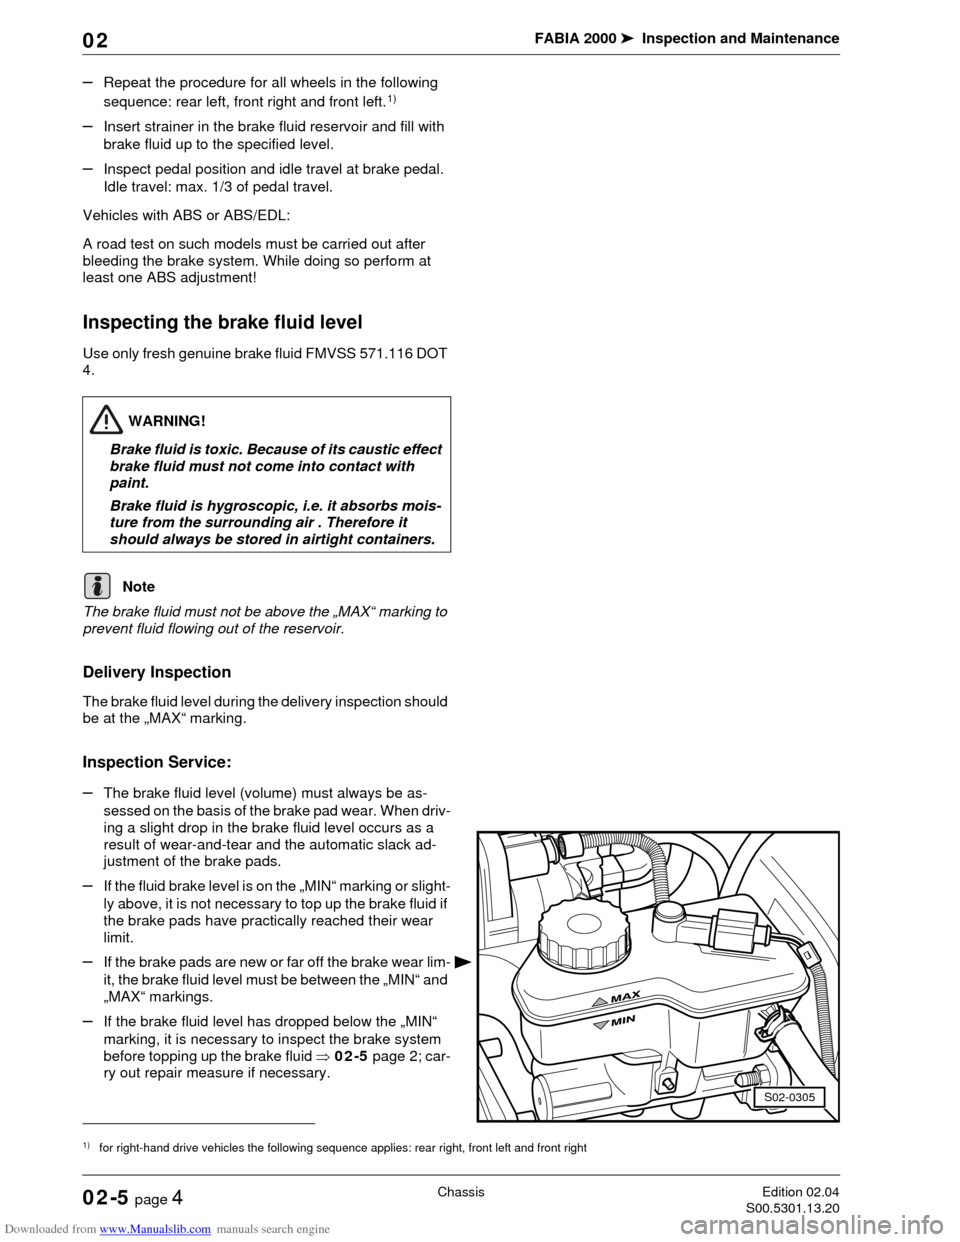
The brake fluid must not be above the „MAX“ marking to
prevent fluid flowing out of the reservoir.
Delivery Inspection
The brake fluid level during the delivery inspection should
be at the „MAX“ marking.
Inspection Service:
–The brake fluid level (volume) must always be as-
sessed on the basis of the brake pad wear. When driv-
ing a slight drop in the brake fluid level occurs as a
result of wear-and-tear and the automatic slack ad-
justment of the brake pads.
–If the fluid brake level is on the „MIN“ marking or slight-
ly above, it is not necessary to top up the brake fluid if
the brake pads have practically reached their wear
limit.
–If the brake pads are new or far off the brake wear lim-
it, the brake fluid level must be between the „MIN“ and
„MAX“ markings.
–If the brake fluid level has dropped below the „MIN“
marking, it is necessary to inspect the brake system
before topping up the brake fluid ⇒02-5 page 2; car-
ry out repair measure if necessary.
1)for right-hand drive vehicles the following sequence applies: rear right, front left and front right
WARNING!
Brake fluid is toxic. Because of its caustic effect
brake fluid must not come into contact with
paint.
Brake fluid is hygroscopic, i.e. it absorbs mois-
ture from the surrounding air . Therefore it
should always be stored in airtight containers.
Note
S02-0305