engine SKODA FABIA 2000 1.G / 6Y Repair Manual
[x] Cancel search | Manufacturer: SKODA, Model Year: 2000, Model line: FABIA, Model: SKODA FABIA 2000 1.G / 6YPages: 86, PDF Size: 3.58 MB
Page 51 of 86

Downloaded from www.Manualslib.com manuals search engine FABIA 2000➤Inspection and Maintenance
ChassisEdition 02.04
S00.5301.13.2002-5 page 5 02
Track rod ends: Inspect play, correct at-
tachment and joint boots
–Raise vehicle (wheel clear of the ground) and inspect
play by moving the track rods and wheels. Clearance:
There must not be any play present.
–Inspect attachment.
–Inspect seals for damage and correct installation.
Inspecting tyres (including spare wheel)
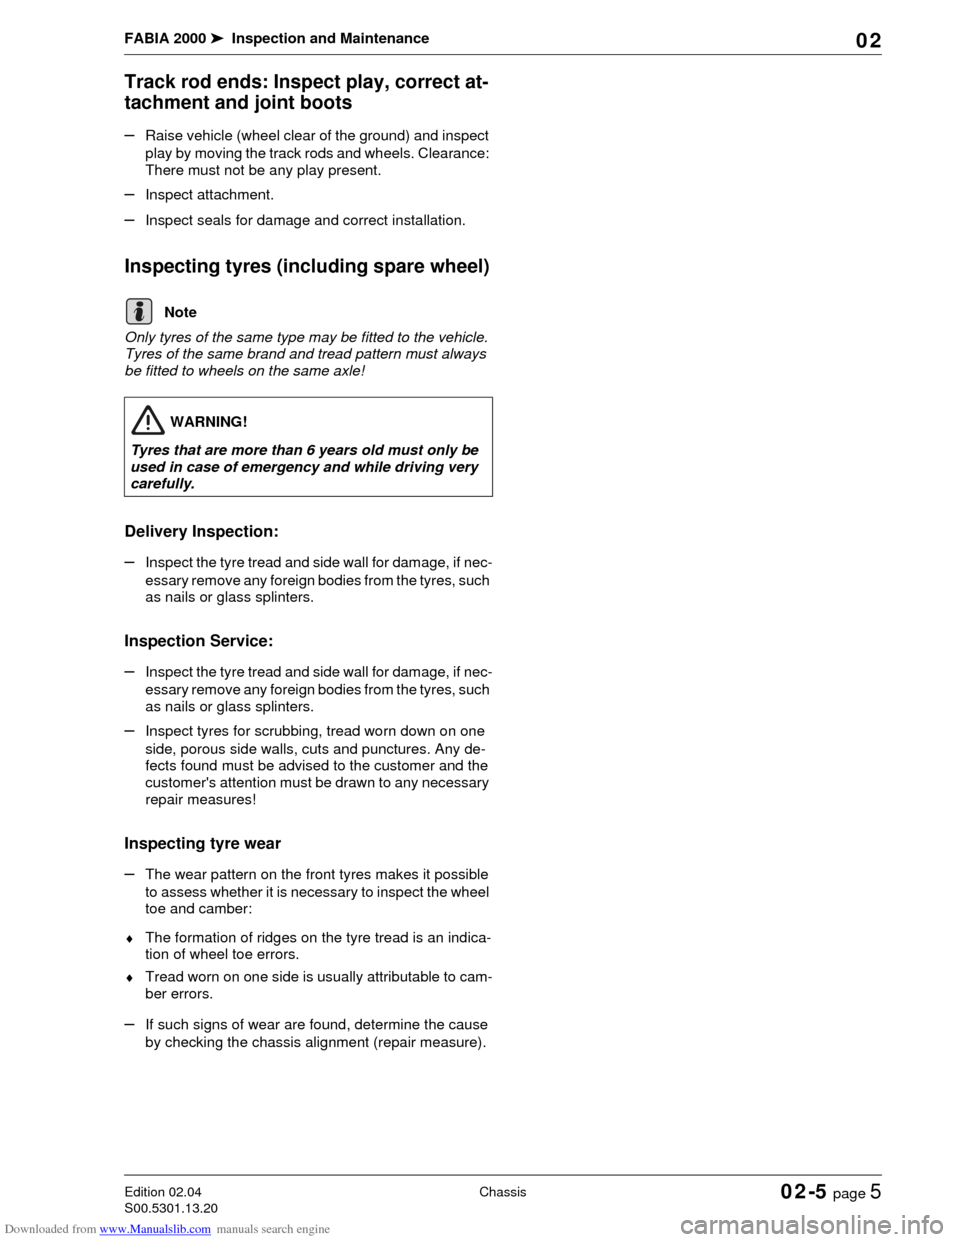
Only tyres of the same type may be fitted to the vehicle.
Tyres of the same brand and tread pattern must always
be fitted to wheels on the same axle!
Delivery Inspection:
–Inspect the tyre tread and side wall for damage, if nec-
essary remove any foreign bodies from the tyres, such
as nails or glass splinters.
Inspection Service:
–Inspect the tyre tread and side wall for damage, if nec-
essary remove any foreign bodies from the tyres, such
as nails or glass splinters.
–Inspect tyres for scrubbing, tread worn down on one
side, porous side walls, cuts and punctures. Any de-
fects found must be advised to the customer and the
customer's attention must be drawn to any necessary
repair measures!
Inspecting tyre wear
–The wear pattern on the front tyres makes it possible
to assess whether it is necessary to inspect the wheel
toe and camber:
♦The formation of ridges on the tyre tread is an indica-
tion of wheel toe errors.
♦Tread worn on one side is usually attributable to cam-
ber errors.
–If such signs of wear are found, determine the cause
by checking the chassis alignment (repair measure).
Note
WARNING!
Tyres that are more than 6 years old must only be
used in case of emergency and while driving very
carefully.
Page 52 of 86

Downloaded from www.Manualslib.com manuals search engine FABIA 2000➤Inspection and Maintenance
ChassisEdition 02.04
S00.5301.13.2002-5 page 6 02
Inspecting the tyre tread depth (includ-
ing spare wheel) and entering
This value may differ in individual countries as a result of
differing statutory requirements.
If the tyre tread depth is close to the legal minimum, in
other words if no further tread exists at the points around
the circumference of the tyre at which the 1.6 mm high
wear indicators are positioned, the customer should be
informed of the necessary repair measures.
Tightening wheel bolts to specific torque
Special tools, test and measuring equipment and
auxiliary items required
♦Torque wrench
Tightening torque for steel and light alloy wheels 120 Nm.
Inspecting the tyre inflation pressure (in-
cluding spare wheel) and correcting the
tyre inflation pressure if necessary
Special tools, test and measuring equipment and
auxiliary items required
♦Tyre inflation pressure tester
♦The tyre inflation pressures are indicated on a stick-
er,which is affixed to the inside of the fuel filler flap.
♦The tyre inflation pressures indicated on the sticker
apply only to the tyres when cold. Do not reduce the
higher inflation pressure of warm tyres.
♦If winter tyres are fitted, the relevant tyre inflation pres-
sure should be increased by 0.2 bar/20 kPa.
Tyre inflation pressure table
The instructions in the Workshop Repairs Manual always
have priority over those for the vehicle.
FABIA
Note
Note
Engine TyresTyre inflation pressure (kPa/bar)
Partial load Full load
Front axle Rear axle Front axle Rear axle
1.0 ltr./37 kW
1.2 ltr./40 kW
1.2 ltr./47 kW
1.4 ltr./44 kW
1.4 ltr./50 kW
1.4 ltr./55 kW
1.4 ltr./74 kW
2.0 ltr./85 kW155/80 R13 230/2,3 220/2,2 230/2,3 250/2,5
165/70 R14 210/2,1 200/2,0 210/2,1 260/2,6
185/60 R14 220/2,2 200/2,0 230/2,3 270/2,7
185/55 R15 210/2,1 200/2,0 220/2,2 270/2,7
195/50 R15 210/2,1 210/2,1 230/2,4 270/2,8
205/45 R16 220/2,2 200/2,0 240/2,4 280/2,8
Page 53 of 86

Downloaded from www.Manualslib.com manuals search engine FABIA 2000➤Inspection and Maintenance
ChassisEdition 02.04
S00.5301.13.2002-5 page 7 02
FABIA COMBI1.9 ltr./47 kW SDI
1.4 ltr./55 kW TDI
PD165/70 R14 220/2,2 200/2,0 240/2,4 280/2,8
185/60 R14 210/2,1 190/1,9 230/2,3 270/2,7
185/55 R15 210/2,1 200/2,0 220/2,2 270/2,7
195/50 R15 210/2,1 200/2,0 220/2,2 270/2,7
205/45 R16 220/2,2 200/2,0 240/2,4 280/2,8
1.9 ltr./74 kW TDI185/60 R14 230/2,3 210/2,1 250/2,5 280/2,8
185/55 R15 210/2,1 200/2,0 220/2,2 270/2,7
195/50 R15 230/2,3 210/2,1 250/2,5 280/2,8
205/45 R16 220/2,2 200/2,0 240/2,4 280/2,8
1.9 ltr./96 kW TDI
PD205/45 R16 230/2,3 220/2,2 250/2,5 280/2,8
185/55 R15 230/2,3 210/2,1 250/2,5 280/2,8 Engine TyresTyre inflation pressure (kPa/bar)
Partial load Full load
Front axle Rear axle Front axle Rear axle
Engine TyresTyre inflation pressure (kPa/bar)
Partial load Full load
Front axle Rear axle Front axle Rear axle
1.2 ltr./40 kW
1.2 ltr./47 kW
1.4 ltr./44 kW
1.4 ltr./50 kW
1.4 ltr./55 kW
1.4 ltr./74 kW
2.0 ltr./85 kW165/70 R14 220/2,2 210/2,1 220/2,2 280/2,8
185/60 R14 220/2,2 210/2,1 230/2,3 280/2,8
185/55 R15 220/2,2 210/2,1 230/2,3 280/2,8
195/50 R15 210/2,1 220/2,2 230/2,3 280/2,8
205/45 R16 220/2,2 210/2,1 240/2,4 280/2,8
1.9 ltr./47 kW SDI
1.4 ltr./55 kW TDI
PD165/70 R14 230/2,3 210/2,1 230/2,3 300/3,0
185/60 R14 220/2,2 210/2,1 220/2,2 290/2,9
185/55 R15 220/2,2 210/2,1 230/2,3 280/2,8
195/50 R15 210/2,1 230/2,3 230/2,3 280/2,8
205/45 R16 220/2,2 220/2,2 250/2,5 280/2,8
Page 54 of 86

Downloaded from www.Manualslib.com manuals search engine FABIA 2000➤Inspection and Maintenance
ChassisEdition 02.04
S00.5301.13.2002-5 page 8 02
FABIA SEDAN1.9 ltr./74 kW TDI185/60 R14 220/2,2 220/2,2 230/2,3 290/2,9
185/55 R15 220/2,2 210/2,1 230/2,3 280/2,8
195/50 R15 220/2,2 230/2,3 230/2,3 280/2,8
205/45 R16 220/2,2 220/2,2 250/2,5 280/2,8
Engine TyresTyre inflation pressure (kPa/bar)
Partial load Full load
Front axle Rear axle Front axle Rear axle
1.2 ltr./40 kW
1.2 ltr./47 kW
1.4 ltr./44 kW
1.4 ltr./50 kW
1.4 ltr./55 kW
1.4 ltr./74 kW
2.0 ltr./85 kW165/70 R14 220/2,2 210/2,1 220/2,2 280/2,8
185/60 R14 220/2,2 210/2,1 230/2,3 280/2,8
185/55 R15 220/2,2 210/2,1 230/2,3 280/2,8
195/50 R15 210/2,1 220/2,2 230/2,3 280/2,8
205/45 R16 220/2,2 210/2,1 240/2,4 280/2,8
1.9 ltr./47 kW SDI
1.4 ltr./55 kW TDI
PD165/70 R14 230/2,3 210/2,1 230/2,3 300/3,0
185/60 R14 220/2,2 210/2,1 220/2,2 290/2,9
185/55 R15 220/2,2 210/2,1 230/2,3 280/2,8
195/50 R15 210/2,1 230/2,3 230/2,3 280/2,8
205/45 R16 220/2,2 220/2,2 250/2,5 280/2,8
1.9 ltr./74 kW TDI185/60 R14 220/2,2 220/2,2 230/2,3 290/2,9
185/55 R15 220/2,2 210/2,1 230/2,3 280/2,8
195/50 R15 220/2,2 230/2,3 230/2,3 280/2,8
205/45 R16 220/2,2 220/2,2 250/2,5 280/2,8 Engine TyresTyre inflation pressure (kPa/bar)
Partial load Full load
Front axle Rear axle Front axle Rear axle
Page 55 of 86

Downloaded from www.Manualslib.com manuals search engine FABIA 2000➤Inspection and Maintenance
Electrical SystemEdition 09.04
S00.5301.14.2002-6 page 1 02
02-6 Electrical System
Power windows: Inspecting positioning
If the battery is diconnected the power windows forget
their current position.
Test conditions:
•All car doors closed
The inspection procedure is carried out from the outside
Close window with the car key using the convenience
closing system.
–Turn car key into close position and hold until all the
windows are closed.
–After closing the windows hold the key in the close po-
sition for approximately another 3 seconds.
Electrical components: Check for proper
operation
–Inspect lighting, main headlights, headlight beam con-
trol, fog lights, turn signal lights, hazard warning light
system, tail lights, rear fog lights, reversing lights,
brake lights, parking light control for brightness and
proper operation.
–Inspect interior lights, illuminated storage compart-
ment, illuminated ashtray for proper operation.
–Airbag warning lamps: Check operation ⇒Chapter
02-7.
–Inspect warning buzzer, onboard computer, all switch-
es in centre console as well as on the dash panel and
horn for proper operation.
–Inspect power windows, exterior mirrors (heated and
electrically adjustable), central locking system, infra-
red remote control and convenience closing system
for proper operation
–Inspect heating of front seats for proper operation.
–Inspect radio for proper reception and absence of in-
terference, also inspect speakers ⇒02-6 page 2.
Battery: Testing no-load voltage
Special tools, test and measuring equipment and
auxiliary items required
♦Multimeter (e.g. -V.A.G 1526 A-)
Prior to the measurement the vehicle must have been in
the no-load state for at least two hours (no engine starts,
no charging or discharging of battery).
The following procedure applies to measuring the battery
voltage in the no-load state (after at least two hours):
–With the battery installed measure the voltage be-
tween the terminals (ignition switched off).
Page 56 of 86

Downloaded from www.Manualslib.com manuals search engine FABIA 2000➤Inspection and Maintenance
Electrical SystemEdition 09.04
S00.5301.14.2002-6 page 2 02
If the tester indicates a voltage of 12.5 Volts or more, the
battery is O.K.
If the voltage is less than 12.5 Volts determine the cause
(repair measure).
Battery: Inspecting electrolyte level, top-
ping up with distilled water if necessary
This procedure is not valid for batteries with the sign
„Magic eye“. Test procedure for these batteries
⇒Electrical System; Rep. Gr. 27.
–Inspect electrolyte level:
–The electrolyte level must be between the „MIN“ and
„MAX“ markings.
–Top up the battery with distilled water up to the „MAX“
marking if necessary.
Before disconnecting the battery determine the code of
radio sets fitted with anti-theft coding.
Radio: Check for proper operation
Precise information on how to operate the radio should
be obtained from the operating instructions before in-
specting proper operation of the radio set.
–Switch radio set on and off.
–Operate the volume control.
–Carry out station programming1).
–Inspect station search1).
–Inspect cassette player (insert cassette and play) 1).
–Inspect activation of the anti-theft code of the radio 1).
Setting clock
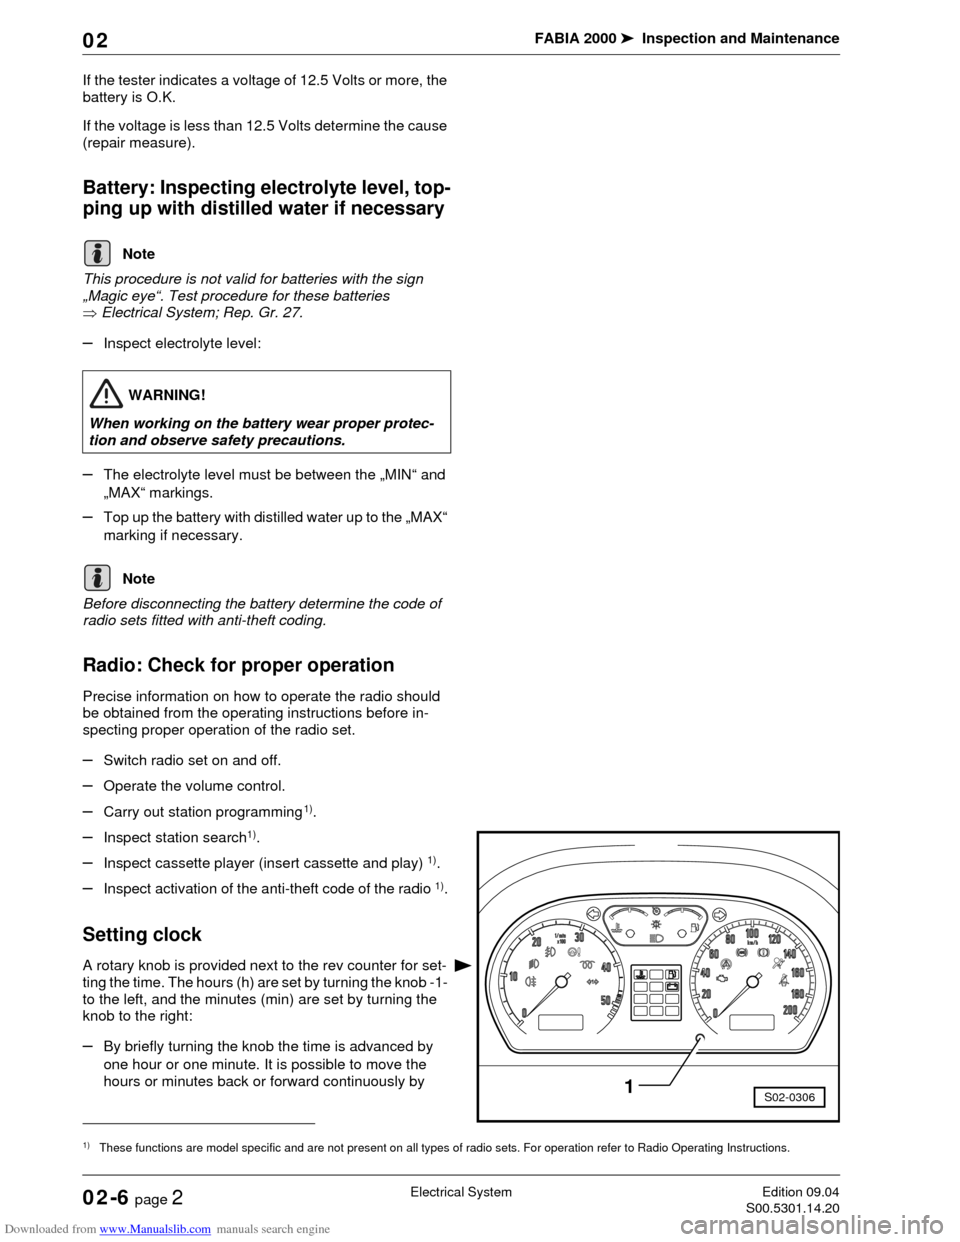
A rotary knob is provided next to the rev counter for set-
ting the time. The hours (h) are set by turning the knob -1-
to the left, and the minutes (min) are set by turning the
knob to the right:
–By briefly turning the knob the time is advanced by
one hour or one minute. It is possible to move the
hours or minutes back or forward continuously by
Note
WARNING!
When working on the battery wear proper protec-
tion and observe safety precautions.
1)These functions are model specific and are not present on all types of radio sets. For operation refer to Radio Operating Instructions.
Note
S02-03061
Page 57 of 86

Downloaded from www.Manualslib.com manuals search engine FABIA 2000➤Inspection and Maintenance
Electrical SystemEdition 09.04
S00.5301.14.2002-6 page 3 02
holding the knob in the left or right position respective-
ly.
Connect vehicle system tester and inter-
rogate fault memory
The stored faults can be read out with vehicle system
tester -V.A.G 1552-, -V.A.G 1551-, or -V.A.S. 5051-.
♦The following description relates to vehicle system
tester -V.A.G 1552- using program card 6.0.
♦The use of vehicle diagnosis, measurement and infor-
mation system -V.A.S 5051- or fault read-out scan
tool -V.A.G 1551- with the program card version 9 is
similar. (A minor deviation on the display read-out is
possible).
Special tools, test and measuring equipment and
auxiliary items required
♦Vehicle system tester -V.A.G 1552 -
♦Diagnostic cable -V.A.G 1551/3, 3A, 3B oder 3C-
Test conditions
•Battery voltage at least 9 V.
•All fuses OK.
•Earth connections between the engine (on gearbox
housing) and body (below the battery) must be O.K.
–Apply handbrake.
–Gearbox: Put the lever into Neutral.
–Automatic gearbox: Move selector lever into position
„P“ or „N“.
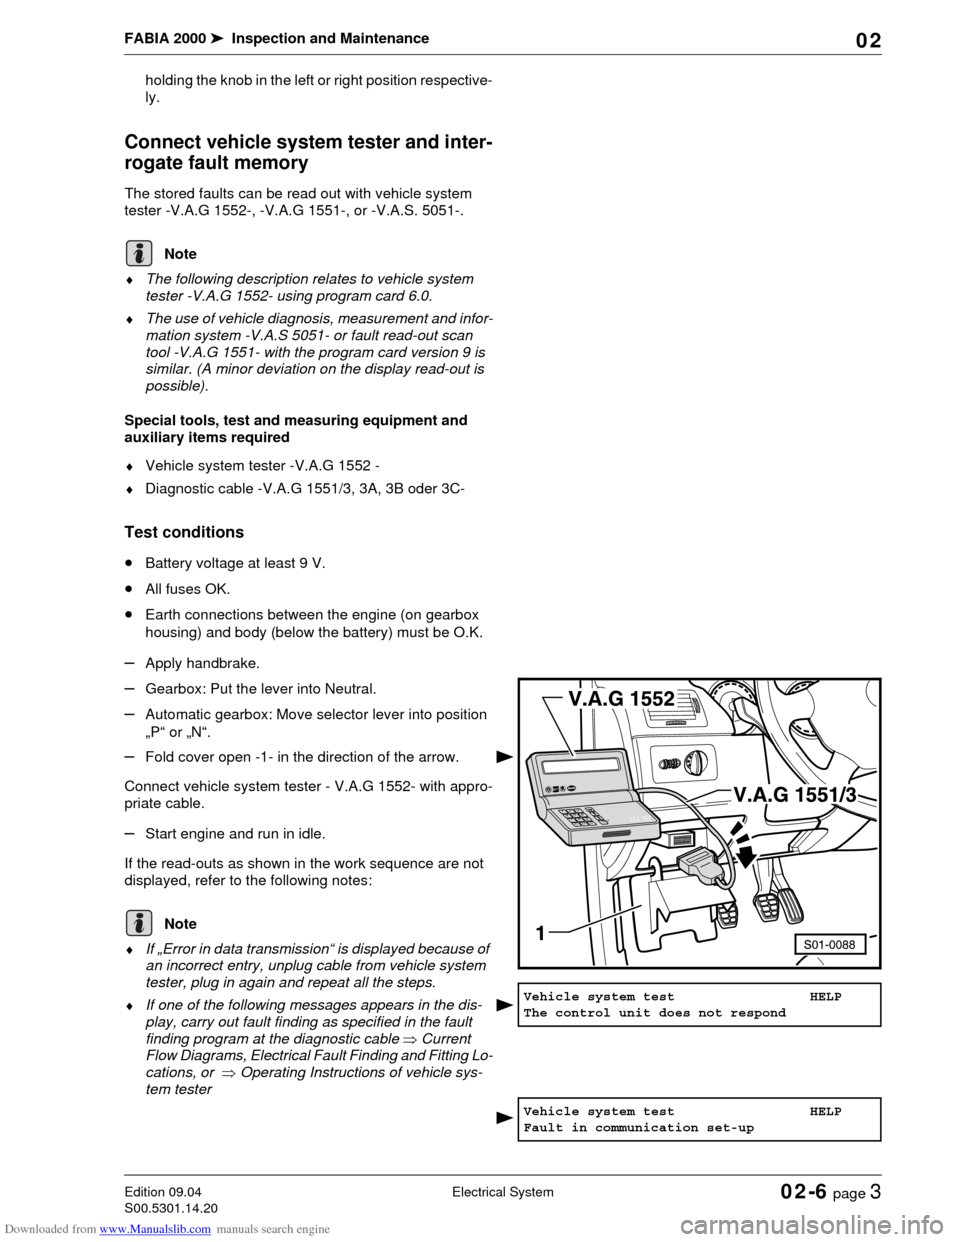
–Fold cover open -1- in the direction of the arrow.
Connect vehicle system tester - V.A.G 1552- with appro-
priate cable.
–Start engine and run in idle.
If the read-outs as shown in the work sequence are not
displayed, refer to the following notes:
♦If „Error in data transmission“ is displayed because of
an incorrect entry, unplug cable from vehicle system
tester, plug in again and repeat all the steps.
♦If one of the following messages appears in the dis-
play, carry out fault finding as specified in the fault
finding program at the diagnostic cable ⇒Current
Flow Diagrams, Electrical Fault Finding and Fitting Lo-
cations, or ⇒Operating Instructions of vehicle sys-
tem tester
Note
1552V.A.
G
.H
E
LPQ O C9 8 76 5 43 2 1
Note
Vehicle system test HELP
The control unit does not respond
Vehicle system test HELP
Fault in communication set-up
Page 58 of 86

Downloaded from www.Manualslib.com manuals search engine FABIA 2000➤Inspection and Maintenance
Electrical SystemEdition 09.04
S00.5301.14.2002-6 page 4 02
Operate the vehicle system tester by referring to the
read-out on the display:
Read out on display:
–Enter 00 for address word „Automatic test sequence“
and confirm with .
The automatic test sequence is carried out with address
word 00, i.e. the fault memory of all self-diagnosable sys-
tems in the vehicle is interrogated.
If a control unit responds with its identification, the display
will show the number of faults stored in the memory or
„No fault detected!“ Eventuell gespeicherte Fehler eines
Systems werden nacheinander angezeigt.
Any faults stored for one of the systems are displayed in
sequence.
If faults are stored, it is necessary to carry out a repair
measure. Displayed faults are to be entered.
–Switch off ignition.
The vehicle system tester -V.A.G 1552 - may have to re-
main connected for the exhaust emission test and for re-
setting the service interval display.
Resetting service interval display (SID)
QG0
If the due date of a service is reached, the service event
appears in the short journey counter below the speedom-
eter as a flashing display, after the ignition is switched on.
The service event also continues flashing for about 60
seconds after the engine is started.
The following displays are possible:
OIL - Oil change service
INSP - Inspection Service
The service event is shown on the indicator when the
service interval has been reached.
The service interval display should be adapted when car-
rying out the Delivery Inspection or during every Inspec-
tion Service.
The following intervals are set when adapting the service
interval display (SID):
Vehicle system test HELP
K cable does not connect to earth
Vehicle system test HELP
K cable does not connect to pos. term.
Vehicle system test HELP
Enter address word XX
Q
Note
Service event Nominal value
(distance)Nominal value
(time)
OIL 15 000 km -
INSP 30 000 km 365 days
Page 59 of 86

Downloaded from www.Manualslib.com manuals search engine FABIA 2000➤Inspection and Maintenance
Electrical SystemEdition 09.04
S00.5301.14.2002-6 page 5 02
Resetting service interval display (SID) with
-V.A.G 1552- (QG0)
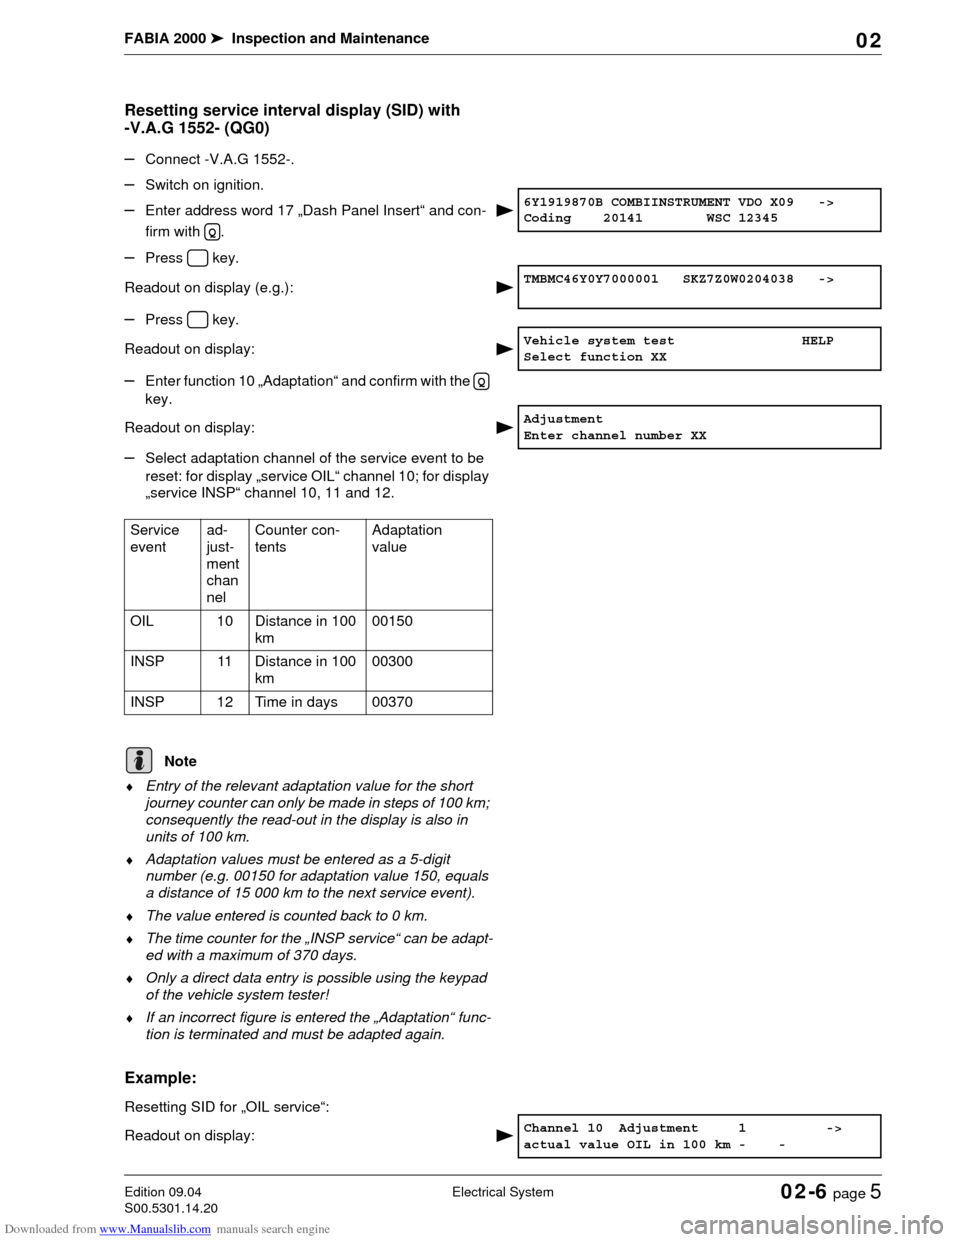
–Connect -V.A.G 1552-.
–Switch on ignition.
–Enter address word 17 „Dash Panel Insert“ and con-
firm with .
–Press key.
Readout on display (e.g.):
–Press key.
Readout on display:
–Enter function 10 „Adaptation“ and confirm with the
key.
Readout on display:
–Select adaptation channel of the service event to be
reset: for display „service OIL“ channel 10; for display
„service INSP“ channel 10, 11 and 12.
♦Entry of the relevant adaptation value for the short
journey counter can only be made in steps of 100 km;
consequently the read-out in the display is also in
units of 100 km.
♦Adaptation values must be entered as a 5-digit
number (e.g. 00150 for adaptation value 150, equals
a distance of 15 000 km to the next service event).
♦The value entered is counted back to 0 km.
♦The time counter for the „INSP service“ can be adapt-
ed with a maximum of 370 days.
♦Only a direct data entry is possible using the keypad
of the vehicle system tester!
♦If an incorrect figure is entered the „Adaptation“ func-
tion is terminated and must be adapted again.
Example:
Resetting SID for „OIL service“:
Readout on display:
6Y1919870B COMBIINSTRUMENT VDO X09 ->
Coding 20141 WSC 12345
Q
TMBMC46Y0Y7000001 SKZ7Z0W0204038 ->
Vehicle system test HELP
Select function XX
Q
Adjustment
Enter channel number XX
Service
eventad-
just-
ment
chan
nelCounter con-
tentsAdaptation
value
OIL 10 Distance in 100
km00150
INSP 11 Distance in 100
km00300
INSP 12 Time in days 00370
Note
Channel 10 Adjustment 1 ->
actual value OIL in 100 km - -
Page 60 of 86

Downloaded from www.Manualslib.com manuals search engine FABIA 2000➤Inspection and Maintenance
Electrical SystemEdition 09.04
S00.5301.14.2002-6 page 6 02
„in 100 km“ = adaptation value x100
The current read-out of the short journey counter for the
OIL service is displayed (is still 100 km in our example
until the next OIL service).
–Press key.
Readout on display:
The short journey counter must be reset to 150 (equals
15 000 km) for setting the SID for the OIL service.
–Enter adaptation value 00150.
Readout on display:
–Confirm the entry with key .
Read-out on display after entering adaptation value
00150:
–Confirm the entry with key .
Readout on display:
–Confirm the entry with key .
Readout on display:
–Press key.
Readout on display:
–Enter 06 for „End output“.
Readout on display:
–Confirm the entry with key .
–Observe short journey counter.
–Switch off ignition.
After switching off the ignition the short journey counter
display should show the entered service interval for a
short time.
–Switch on ignition.
After switching on the ignition the short journey counter
display does not show a service interval.
The service interval display is now reset.
–Switch off ignition.
–Switch off -V.A.G 1552-.
Resetting service interval display (SID) without
-V.A.G 1552- (QG0)
After completing the service work, the appropriate serv-
ice message „OIL“ or „INSP“ must be reset.
Note
Channel 10 Adaptation 1
Enter adjustment value XXXXX
Channel 10 adjustment 1 Q
Enter adaptation value 00150
Q
Channel 10 adjustment 150 Q
actual value OIL in 100 km - -
Q
Channel 10 adjustment 15 Q
Store changed value?
Q
Channel 10 Adjustment 150 ->
Changed value stored
Vehicle system test HELP
Select function XX
Vehicle system test HELP
06 End output
Q