Car seat SKODA FABIA 2009 2.G / 5J Owner's Manual
[x] Cancel search | Manufacturer: SKODA, Model Year: 2009, Model line: FABIA, Model: SKODA FABIA 2009 2.G / 5JPages: 259, PDF Size: 31.99 MB
Page 4 of 259
Contents3
Using the system
Safety
Driving Tips
General Maintenance
Breakdown assistance
Technical Data
ContentsLayout of this Owner's Manual
(explanations)
. . . . . . . . . . . . . . . . . . . . . . . . . .
Using the system
. . . . . . . . . . . . . . . . . . . . . .
Cockpit
. . . . . . . . . . . . . . . . . . . . . . . . . . . . . . . . . . . . . . . .
General view . . . . . . . . . . . . . . . . . . . . . . . . . . . . . . . . .
The brief instruction
. . . . . . . . . . . . . . . . . . . . . . . . . .
Basic functions and important information . . . . .
Instruments and Indicator/Warning Lights
. . .
General view of the instrument cluster . . . . . . . . .
Engine revolutions counter . . . . . . . . . . . . . . . . . . . .
Coolant temperature gauge* . . . . . . . . . . . . . . . . . .
Fuel gauge . . . . . . . . . . . . . . . . . . . . . . . . . . . . . . . . . . .
Counter for distance driven . . . . . . . . . . . . . . . . . . .
Service Interval Display . . . . . . . . . . . . . . . . . . . . . . .
Digital clock . . . . . . . . . . . . . . . . . . . . . . . . . . . . . . . . . .
Multi-functional indicator (onboard computer)*
Information display* . . . . . . . . . . . . . . . . . . . . . . . . . .
Auto Check Control . . . . . . . . . . . . . . . . . . . . . . . . . . .
Warning lights . . . . . . . . . . . . . . . . . . . . . . . . . . . . . . . .
Unlocking and locking
. . . . . . . . . . . . . . . . . . . . . . . .
Key . . . . . . . . . . . . . . . . . . . . . . . . . . . . . . . . . . . . . . . . . .
Locking . . . . . . . . . . . . . . . . . . . . . . . . . . . . . . . . . . . . . .
Child safety lock . . . . . . . . . . . . . . . . . . . . . . . . . . . . . .
Central locking system* . . . . . . . . . . . . . . . . . . . . . . .
Remote control* . . . . . . . . . . . . . . . . . . . . . . . . . . . . . .
Anti-theft alarm system* . . . . . . . . . . . . . . . . . . . . . .
Interior monitor* and towing protection
monitoring* . . . . . . . . . . . . . . . . . . . . . . . . . . . . . . . . . .
Electrical power windows* . . . . . . . . . . . . . . . . . . . .
Electric sliding/tilting roof* . . . . . . . . . . . . . . . . . . . .
Lights and Visibility
. . . . . . . . . . . . . . . . . . . . . . . . . . .
Lights . . . . . . . . . . . . . . . . . . . . . . . . . . . . . . . . . . . . . . . .
Interior lighting . . . . . . . . . . . . . . . . . . . . . . . . . . . . . . .
Visibility . . . . . . . . . . . . . . . . . . . . . . . . . . . . . . . . . . . . .
Windshield wiper and wash system . . . . . . . . . . . .
Rear mirror . . . . . . . . . . . . . . . . . . . . . . . . . . . . . . . . . .
Seats and Storage
. . . . . . . . . . . . . . . . . . . . . . . . . . . . .
Front seats . . . . . . . . . . . . . . . . . . . . . . . . . . . . . . . . . . .
Head restraints . . . . . . . . . . . . . . . . . . . . . . . . . . . . . . .
Heating the front seats* . . . . . . . . . . . . . . . . . . . . . . .
Rear seats . . . . . . . . . . . . . . . . . . . . . . . . . . . . . . . . . . . .
Pedals . . . . . . . . . . . . . . . . . . . . . . . . . . . . . . . . . . . . . . .
luggage compartment . . . . . . . . . . . . . . . . . . . . . . . .
Variable loading floor* (Combi) . . . . . . . . . . . . . . . .
Net partition* (Combi) . . . . . . . . . . . . . . . . . . . . . . . .
Bicycle carrier* . . . . . . . . . . . . . . . . . . . . . . . . . . . . . . .
The roof rack* . . . . . . . . . . . . . . . . . . . . . . . . . . . . . . . .
Front cup holder . . . . . . . . . . . . . . . . . . . . . . . . . . . . .
Rear cup holder* . . . . . . . . . . . . . . . . . . . . . . . . . . . . .
Note holder . . . . . . . . . . . . . . . . . . . . . . . . . . . . . . . . . .
Ashtray* . . . . . . . . . . . . . . . . . . . . . . . . . . . . . . . . . . . . .
Cigarette lighter* and power sockets* . . . . . . . . . .
Storage compartments . . . . . . . . . . . . . . . . . . . . . . . .
Heating and air conditioning system
. . . . . . . . .
Air outlet vents . . . . . . . . . . . . . . . . . . . . . . . . . . . . . . .
Recirculated air mode . . . . . . . . . . . . . . . . . . . . . . . .
Heating . . . . . . . . . . . . . . . . . . . . . . . . . . . . . . . . . . . . . .
Climatic (semi-automatic air conditioning
system)* . . . . . . . . . . . . . . . . . . . . . . . . . . . . . . . . . . . . .
Climatronic (automatic air conditioning)* . . . . . .
Starting-off and Driving
. . . . . . . . . . . . . . . . . . . . . . .
Setting steering wheel position* . . . . . . . . . . . . . . .
Ignition lock . . . . . . . . . . . . . . . . . . . . . . . . . . . . . . . . . . Starting the engine . . . . . . . . . . . . . . . . . . . . . . . . . . .
Switching off the engine . . . . . . . . . . . . . . . . . . . . . .
Shifting (manual gearbox) . . . . . . . . . . . . . . . . . . . . .
Handbrake . . . . . . . . . . . . . . . . . . . . . . . . . . . . . . . . . . .
Parking aid* . . . . . . . . . . . . . . . . . . . . . . . . . . . . . . . . . .
Cruise control system (CCS)* . . . . . . . . . . . . . . . . . .
Automatic gearbox
. . . . . . . . . . . . . . . . . . . . . . . . . . .
6-speed automatic gearbox* . . . . . . . . . . . . . . . . . .
Communication
. . . . . . . . . . . . . . . . . . . . . . . . . . . . . .
Operating the radio . . . . . . . . . . . . . . . . . . . . . . . . . . .
Radio and mobile phone operation . . . . . . . . . . . .
Universal telephone preinstallation with voice
control* . . . . . . . . . . . . . . . . . . . . . . . . . . . . . . . . . . . . .
Inserting the mobile phone with the adapter* . .
Mobile phone operation . . . . . . . . . . . . . . . . . . . . . .
Voice commands . . . . . . . . . . . . . . . . . . . . . . . . . . . . .
Enter PIN code . . . . . . . . . . . . . . . . . . . . . . . . . . . . . . .
Dial number . . . . . . . . . . . . . . . . . . . . . . . . . . . . . . . . .
Repeat last call . . . . . . . . . . . . . . . . . . . . . . . . . . . . . . .
Phone voice phonebook* . . . . . . . . . . . . . . . . . . . . .
Bluetooth®* . . . . . . . . . . . . . . . . . . . . . . . . . . . . . . . . .
Mobile phones and two-way radio system . . . . .
Input AUX-IN* . . . . . . . . . . . . . . . . . . . . . . . . . . . . . . .
CD changer* . . . . . . . . . . . . . . . . . . . . . . . . . . . . . . . . .
Safety
. . . . . . . . . . . . . . . . . . . . . . . . . . . . . . . . . . . . . .
Passive Safety
. . . . . . . . . . . . . . . . . . . . . . . . . . . . . . . . .
Basic information . . . . . . . . . . . . . . . . . . . . . . . . . . . .
Correct seated position . . . . . . . . . . . . . . . . . . . . . . .
Seat belts
. . . . . . . . . . . . . . . . . . . . . . . . . . . . . . . . . . . . . .
Why seat belts? . . . . . . . . . . . . . . . . . . . . . . . . . . . . . .
The physical principle of a frontal collision . . . . . 6
7
8
8
9
9
15
15
15
16
16
17
17
19
19
22
24
26
36
36
38
38
39
43
45
46
46
4951
51
55
57
58
60
62
62
63
64
65
67
67
72
74
76
79
80
81
81
81
82
83
89
89
89
90
92
95
99
99
100100
102
102
103
104
104
107
107
112
112
113
114
115
116
117
117
118
118
119
121
122
123
123
127
127
127
128
132
132
133
s3f4.1.book Page 3 Thursday, June 18, 2009 11:07 AM
Page 5 of 259
Contents 4Important safety information regarding the use of seat
belts . . . . . . . . . . . . . . . . . . . . . . . . . . . . . . . . . . . . . . . . .
How are seat belts correctly fastened? . . . . . . . . . .
Belt tensioner . . . . . . . . . . . . . . . . . . . . . . . . . . . . . . . . Airbag system
. . . . . . . . . . . . . . . . . . . . . . . . . . . . . . . . .
Description of the airbag system . . . . . . . . . . . . . . .
Front airbags . . . . . . . . . . . . . . . . . . . . . . . . . . . . . . . . .
Side airbags* . . . . . . . . . . . . . . . . . . . . . . . . . . . . . . . . .
Head airbags* . . . . . . . . . . . . . . . . . . . . . . . . . . . . . . . .
Deactivating airbags . . . . . . . . . . . . . . . . . . . . . . . . . .
Transporting children safely
. . . . . . . . . . . . . . . . . .
What you should know about transporting children!
Child seat . . . . . . . . . . . . . . . . . . . . . . . . . . . . . . . . . . . .
Attaching a child seat using the “ISOFIX” system*
Attaching child seat using the “Top Tether” system
Driving Tips
. . . . . . . . . . . . . . . . . . . . . . . . . . . . . .
Intelligent Technology
. . . . . . . . . . . . . . . . . . . . . . . .
Electronic stability programme (ESP)* . . . . . . . . . .
Brakes . . . . . . . . . . . . . . . . . . . . . . . . . . . . . . . . . . . . . . .
Brake booster . . . . . . . . . . . . . . . . . . . . . . . . . . . . . . . .
Antilock brake system (ABS)* . . . . . . . . . . . . . . . . . .
Brake Assist* . . . . . . . . . . . . . . . . . . . . . . . . . . . . . . . . .
Electrohydraulic power steering . . . . . . . . . . . . . . .
Tyre inflation pressure-control system* . . . . . . . . .
Diesel particle filter* (diesel engine) . . . . . . . . . . . .
Driving and the Environment
. . . . . . . . . . . . . . . . .
The first 1 500 kilometres and then afterwards . .
Catalytic converter . . . . . . . . . . . . . . . . . . . . . . . . . . . .
Driving in an economical and environmentally
conscious manner . . . . . . . . . . . . . . . . . . . . . . . . . . . .
Environmental compatibility . . . . . . . . . . . . . . . . . . .
Motoring abroad . . . . . . . . . . . . . . . . . . . . . . . . . . . . .
Avoiding damage to your vehicle . . . . . . . . . . . . . .
To w i n g a t r a i l e r
. . . . . . . . . . . . . . . . . . . . . . . . . . . . . . . .
Towing a trailer . . . . . . . . . . . . . . . . . . . . . . . . . . . . . . .
General Maintenance
. . . . . . . . . . . . . . .
Taking care of your vehicle and cleaning the
vehicle
. . . . . . . . . . . . . . . . . . . . . . . . . . . . . . . . . . . . . . . . .
General . . . . . . . . . . . . . . . . . . . . . . . . . . . . . . . . . . . . . .
Care of the exterior of vehicle . . . . . . . . . . . . . . . . . .
Care of the interior of vehicle . . . . . . . . . . . . . . . . . .
Fuel
. . . . . . . . . . . . . . . . . . . . . . . . . . . . . . . . . . . . . . . . . . . .
Petrol . . . . . . . . . . . . . . . . . . . . . . . . . . . . . . . . . . . . . . . .
Diesel . . . . . . . . . . . . . . . . . . . . . . . . . . . . . . . . . . . . . . . .
Refuelling . . . . . . . . . . . . . . . . . . . . . . . . . . . . . . . . . . . .
Inspecting and replenishing
. . . . . . . . . . . . . . . . . .
Engine compartment . . . . . . . . . . . . . . . . . . . . . . . . .
Engine oil . . . . . . . . . . . . . . . . . . . . . . . . . . . . . . . . . . . .
Cooling system . . . . . . . . . . . . . . . . . . . . . . . . . . . . . . .
Brake fluid . . . . . . . . . . . . . . . . . . . . . . . . . . . . . . . . . . .
Battery . . . . . . . . . . . . . . . . . . . . . . . . . . . . . . . . . . . . . . .
Windshield washer system . . . . . . . . . . . . . . . . . . . .
Wheels and Tyres
. . . . . . . . . . . . . . . . . . . . . . . . . . . . . .
Wheels . . . . . . . . . . . . . . . . . . . . . . . . . . . . . . . . . . . . . .
Accessories, changes and replacement of partsAccessories and replacement parts . . . . . . . . . . . . .
Technical changes . . . . . . . . . . . . . . . . . . . . . . . . . . . .
Vehicles of the group N1 . . . . . . . . . . . . . . . . . . . . . .Breakdown assistance
. . . . . . . . . . . . . .
Breakdown assistance
. . . . . . . . . . . . . . . . . . . . . . . .
First-aid box* and Warning triangle* . . . . . . . . . . .
Fire extinguisher* . . . . . . . . . . . . . . . . . . . . . . . . . . . . .
Vehicle tool kit . . . . . . . . . . . . . . . . . . . . . . . . . . . . . . . .
Tyre repair kit* . . . . . . . . . . . . . . . . . . . . . . . . . . . . . . . .
Spare wheel* . . . . . . . . . . . . . . . . . . . . . . . . . . . . . . . . .
Changing a wheel . . . . . . . . . . . . . . . . . . . . . . . . . . . . .
Jump-starting . . . . . . . . . . . . . . . . . . . . . . . . . . . . . . . .
Tow-starting and towing vehicle . . . . . . . . . . . . . . .
Fuses and light bulbs
. . . . . . . . . . . . . . . . . . . . . . . . . .
Electric fuses . . . . . . . . . . . . . . . . . . . . . . . . . . . . . . . . .
Bulbs . . . . . . . . . . . . . . . . . . . . . . . . . . . . . . . . . . . . . . . .
Technical Data
. . . . . . . . . . . . . . . . . . . . . . . . . .
Technical Data
. . . . . . . . . . . . . . . . . . . . . . . . . . . . . . . . .
General information . . . . . . . . . . . . . . . . . . . . . . . . . . .
Used abbreviations . . . . . . . . . . . . . . . . . . . . . . . . . . .
Performances . . . . . . . . . . . . . . . . . . . . . . . . . . . . . . . . .
Weight . . . . . . . . . . . . . . . . . . . . . . . . . . . . . . . . . . . . . . .
Identification details . . . . . . . . . . . . . . . . . . . . . . . . . .
Fuel consumption according to the regulations
(99/100/EU) . . . . . . . . . . . . . . . . . . . . . . . . . . . . . . . . . .
Dimensions . . . . . . . . . . . . . . . . . . . . . . . . . . . . . . . . . .
Engine oil specifications . . . . . . . . . . . . . . . . . . . . . . .
1.2 ltr./44 kW - EU 4/EU 2DDK . . . . . . . . . . . . . . . . .
1.2 ltr./51 kW - EU 4/EU 2DDK . . . . . . . . . . . . . . . . .
1.4 ltr./63 kW - EU 4/EU 2DDK . . . . . . . . . . . . . . . . .
1.6 ltr./77 kW - EU 4/EU 2DDK . . . . . . . . . . . . . . . . .
1.4 ltr./51 kW TDI PD - EU 4 . . . . . . . . . . . . . . . . . . . .
1.4 ltr./59 kW TDI PD - EU 4 . . . . . . . . . . . . . . . . . . . .
1.9 ltr./77 kW TDI°PD - EU°4 . . . . . . . . . . . . . . . . . . .
Fabia - Vehicles of the group N1 . . . . . . . . . . . . . . . .
Fabia Combi - Vehicles of the group N1 . . . . . . . . .
Index
. . . . . . . . . . . . . . . . . . . . . . . . . . . . . . . . . . . . . . . . 133
134
136
138
138
139
142
143
145
147
147
150
153
154
155
155
155
158
158
159
159
160
160
162
163
163
164
164
167
168
169
170
170173
173
173
173
178
181
181
181
182
184
184
187
189
191
192
197
198
198
204
204
204
204
205
205
205
205
206
206
206
207
211
213216
216
221
227
227
227
227
227
227
227
228
229
230
231
233
235
237
239
241
243
245
246
247
s3f4.1.book Page 4 Thursday, June 18, 2009 11:07 AM
Page 9 of 259
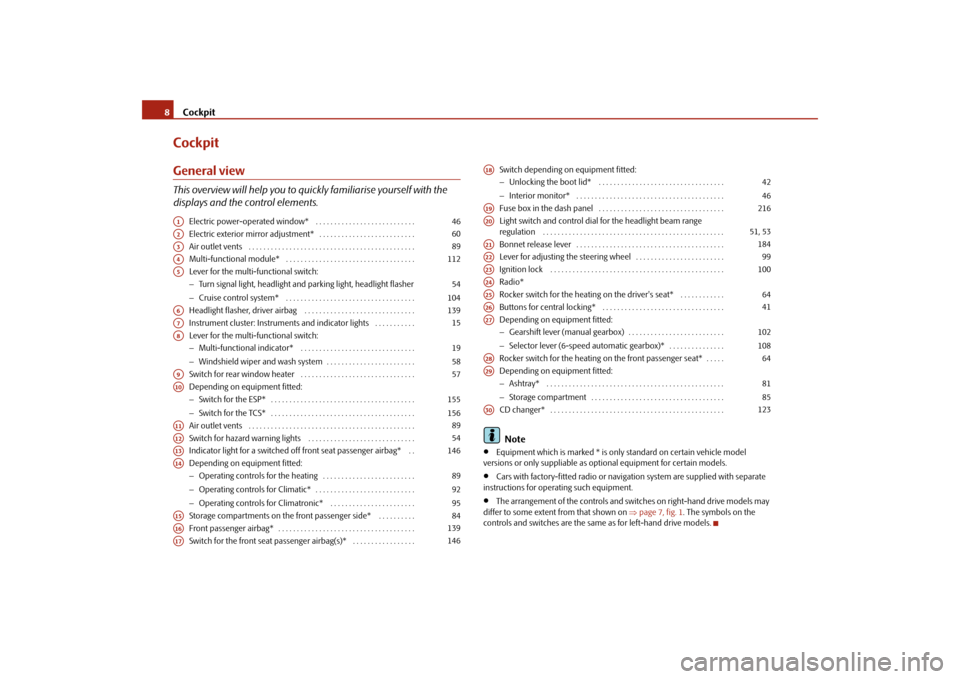
Cockpit 8CockpitGeneral viewThis overview will help you to quickly familiarise yourself with the
displays and the control elements.
Electric power-operated window* . . . . . . . . . . . . . . . . . . . . . . . . . . .
Electric exterior mirror adjustment* . . . . . . . . . . . . . . . . . . . . . . . . . .
Air outlet vents . . . . . . . . . . . . . . . . . . . . . . . . . . . . . . . . . . . . . . . . . . . . .
Multi-functional module* . . . . . . . . . . . . . . . . . . . . . . . . . . . . . . . . . . .
Lever for the multi-functional switch:
−Turn signal light, headlight and parking light, headlight flasher
−Cruise control system* . . . . . . . . . . . . . . . . . . . . . . . . . . . . . . . . . . .
Headlight flasher, driver airbag . . . . . . . . . . . . . . . . . . . . . . . . . . . . . .
Instrument cluster: Instruments and indicator lights . . . . . . . . . . .
Lever for the multi-functional switch:
−Multi-functional indicator* . . . . . . . . . . . . . . . . . . . . . . . . . . . . . . .
−Windshield wiper and wash system . . . . . . . . . . . . . . . . . . . . . . . .
Switch for rear window heater . . . . . . . . . . . . . . . . . . . . . . . . . . . . . . .
Depending on equipment fitted:
−Switch for the ESP* . . . . . . . . . . . . . . . . . . . . . . . . . . . . . . . . . . . . . . .
−Switch for the TCS* . . . . . . . . . . . . . . . . . . . . . . . . . . . . . . . . . . . . . . .
Air outlet vents . . . . . . . . . . . . . . . . . . . . . . . . . . . . . . . . . . . . . . . . . . . . .
Switch for hazard warning lights . . . . . . . . . . . . . . . . . . . . . . . . . . . . .
Indicator light for a switched off front seat passenger airbag* . .
Depending on equipment fitted:
−Operating controls for the heating . . . . . . . . . . . . . . . . . . . . . . . . .
−Operating controls for Climatic* . . . . . . . . . . . . . . . . . . . . . . . . . . .
−Operating controls for Climatronic* . . . . . . . . . . . . . . . . . . . . . . .
Storage compartments on the front passenger side* . . . . . . . . . .
Front passenger airbag* . . . . . . . . . . . . . . . . . . . . . . . . . . . . . . . . . . . . .
Switch for the front seat passenger airbag(s)* . . . . . . . . . . . . . . . . .Switch depending on equipment fitted:
−Unlocking the boot lid* . . . . . . . . . . . . . . . . . . . . . . . . . . . . . . . . . .
−Interior monitor* . . . . . . . . . . . . . . . . . . . . . . . . . . . . . . . . . . . . . . . .
Fuse box in the dash panel . . . . . . . . . . . . . . . . . . . . . . . . . . . . . . . . . .
Light switch and control dial for the headlight beam range
regulation . . . . . . . . . . . . . . . . . . . . . . . . . . . . . . . . . . . . . . . . . . . . . . . . .
Bonnet release lever . . . . . . . . . . . . . . . . . . . . . . . . . . . . . . . . . . . . . . . .
Lever for adjusting the steering wheel . . . . . . . . . . . . . . . . . . . . . . . .
Ignition lock . . . . . . . . . . . . . . . . . . . . . . . . . . . . . . . . . . . . . . . . . . . . . . .
Radio*
Rocker switch for the heating on the driver's seat* . . . . . . . . . . . .
Buttons for central locking* . . . . . . . . . . . . . . . . . . . . . . . . . . . . . . . . .
Depending on equipment fitted:
−Gearshift lever (manual gearbox) . . . . . . . . . . . . . . . . . . . . . . . . . .
−Selector lever (6-speed automatic gearbox)* . . . . . . . . . . . . . . .
Rocker switch for the heating on the front passenger seat* . . . . .
Depending on equipment fitted:
−Ashtray* . . . . . . . . . . . . . . . . . . . . . . . . . . . . . . . . . . . . . . . . . . . . . . . .
−Storage compartment . . . . . . . . . . . . . . . . . . . . . . . . . . . . . . . . . . . .
CD changer* . . . . . . . . . . . . . . . . . . . . . . . . . . . . . . . . . . . . . . . . . . . . . . .
Note
•
Equipment which is marked * is only standard on certain vehicle model
versions or only suppliable as optional equipment for certain models.
•
Cars with factory-fitted radio or navigation system are supplied with separate
instructions for operating such equipment.
•
The arrangement of the controls and switches on right-hand drive models may
differ to some extent from that shown on ⇒page 7, fig. 1. The symbols on the
controls and switches are the same as for left-hand drive models.
A1
46
A2
60
A3
89
A4
112
A5
54
104
A6
139
A7
15
A8
19
58
A9
57
A10
155
156
A11
89
A12
54
A13
146
A14
89
92
95
A15
84
A16
139
A17
146
A18
42
46
A19
216
A20
51, 53
A21
184
A22
99
A23
100
A24A25
64
A26
41
A27
102
108
A28
64
A29
81
85
A30
123
s3f4.1.book Page 8 Thursday, June 18, 2009 11:07 AM
Page 28 of 259
Instruments and Indicator/Warning Lights27
Using the system
Safety
Driving Tips
General Maintenance
Breakdown assistance
Technical Data
WARNING
•
If you do not pay attention to the warning lights coming on and the corre-
sponding descriptions and warning notes, this may result in severe body
injuries or major vehicle damage.
•
The engine compartment of your car is a hazardous area. There is a risk
of injuries, scalding, accidents and fire when working in the engine
compartment, e.g. inspecting and replenishing oil and other fluids. It is also
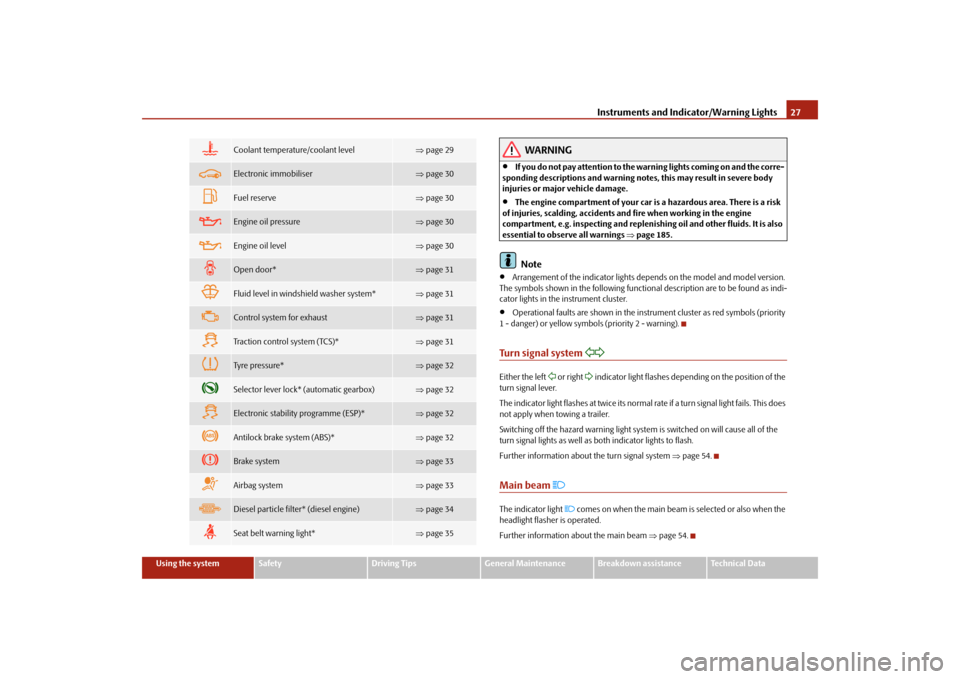
essential to observe all warnings ⇒page 185.Note
•
Arrangement of the indicator lights depends on the model and model version.
The symbols shown in the following functional description are to be found as indi-
cator lights in the instrument cluster.
•
Operational faults are shown in the instrument cluster as red symbols (priority
1 - danger) or yellow symbols (priority 2 - warning).
Turn signal system
Either the left
or right
indicator light flashes depending on the position of the
turn signal lever.
The indicator light flashes at twice its normal rate if a turn signal light fails. This does
not apply when towing a trailer.
Switching off the hazard warning light system is switched on will cause all of the
turn signal lights as well as both indicator lights to flash.
Further information about the turn signal system ⇒page 54.
Main beam
The indicator light
comes on when the main beam is selected or also when the
headlight flasher is operated.
Further information about the main beam ⇒page 54.
Coolant temperature/coolant level
⇒page 29
Electronic immobiliser
⇒page 30
Fuel reserve
⇒page 30
Engine oil pressure
⇒page 30
Engine oil level
⇒page 30
Open door*
⇒page 31
Fluid level in windshield washer system*
⇒page 31
Control system for exhaust
⇒page 31
Traction control system (TCS)*
⇒page 31
Tyre pressure*
⇒page 32
Selector lever lock* (automatic gearbox)
⇒page 32
Electronic stability programme (ESP)*
⇒page 32
Antilock brake system (ABS)*
⇒page 32
Brake system
⇒page 33
Airbag system
⇒page 33
Diesel particle filter* (diesel engine)
⇒page 34
Seat belt warning light*
⇒page 35
s3f4.1.book Page 27 Thursday, June 18, 2009 11:07 AM
Page 44 of 259
Unlocking and locking43
Using the system
Safety
Driving Tips
General Maintenance
Breakdown assistance
Technical Data
•
Do not press on the rear window when closing the boot lid, it could crack
- risk of injury!Note
•
After closing the boot lid, it is automatically locked within 1 seconds and
the anti-theft alarm system* is activated. This applies only if the vehicle was
locked before closing the boot lid.
•
The function of the hand grip above the licence plate is deactivated when
starting off or as of a speed of more than 5 km/hour for vehicles with central
locking. The function of the hand grip is activated again when the vehicle has
stopped and a door is opened.
•
Hold the boot lid when opening.
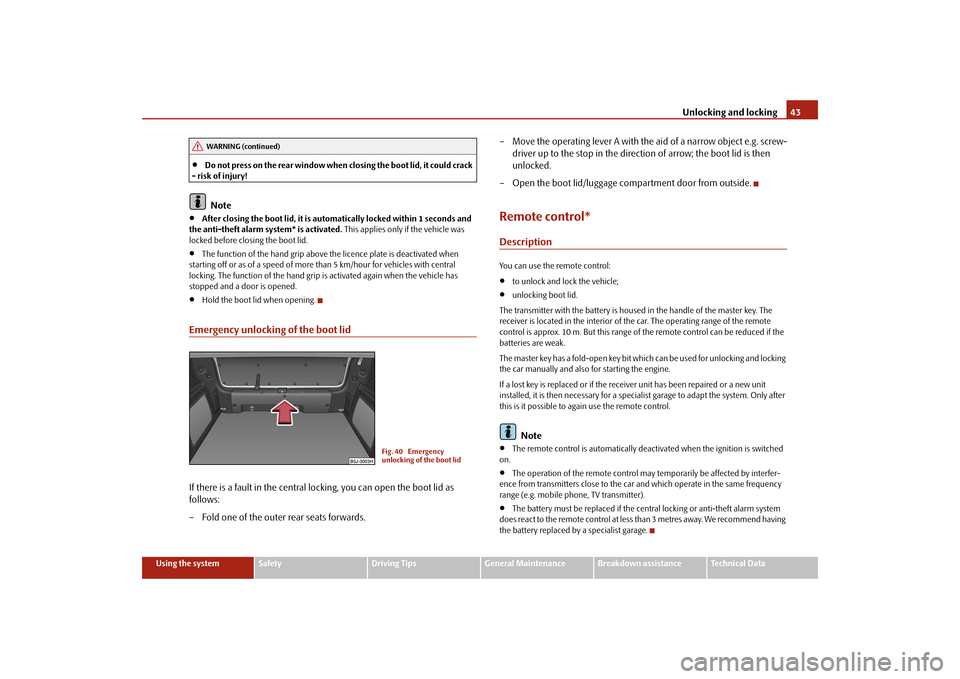
Emergency unlocking of the boot lidIf there is a fault in the central locking, you can open the boot lid as
follows:
– Fold one of the outer rear seats forwards.– Move the operating lever A with the aid of a narrow object e.g. screw-
driver up to the stop in the direction of arrow; the boot lid is then
unlocked.
– Open the boot lid/luggage compartment door from outside.
Remote control*DescriptionYou can use the remote control:•
to unlock and lock the vehicle;
•
unlocking boot lid.
The transmitter with the battery is housed in the handle of the master key. The
receiver is located in the interior of the car. The operating range of the remote
control is approx. 10 m. But this range of the remote control can be reduced if the
batteries are weak.
The master key has a fold-open key bit which can be used for unlocking and locking
the car manually and also for starting the engine.
If a lost key is replaced or if the receiver unit has been repaired or a new unit
installed, it is then necessary for a specialist garage to adapt the system. Only after
this is it possible to again use the remote control.Note
•
The remote control is automatically deactivated when the ignition is switched
on.
•
The operation of the remote control may temporarily be affected by interfer-
ence from transmitters close to the car and which operate in the same frequency
range (e.g. mobile phone, TV transmitter).
•
The battery must be replaced if the central locking or anti-theft alarm system
does react to the remote control at less than 3 metres away. We recommend having
the battery replaced by a specialist garage.
WARNING (continued)
Fig. 40 Emergency
unlocking of the boot lid
s3f4.1.book Page 43 Thursday, June 18, 2009 11:07 AM
Page 48 of 259
Unlocking and locking47
Using the system
Safety
Driving Tips
General Maintenance
Breakdown assistance
Technical Data
The power windows operate only when ignition is switched on.
Opening a window
– A window is opened by pres sing lightly on the respective butto n in the
door. The process stops when one releases the button.
– Additionally you can open the window automatically (fully opened) by
pressing the button up to the stop. Renewed pressing of the button
causes the window to stop immediately.
Closing a window
– A window is closed through pulling lightly on the respective button in
the door. The closing process stops when one releases the button.
– Additionally you can close the window automatically (fully closed) by
pulling the button up to the stop. Renewed pulling of the button
causes the window to stop immediately.The buttons for the individual windows are located in the operating part in the
driver's door ⇒page 46, fig. 43, front passenger door and in the rear doors*.
If the buttons for the rear doors are deactivated, the indicator light
in the safety
switch lights up.
The buttons for power windows in the operating part in the driver's door
Button for the power window in the driver's door
Button for the power window in the front passenger's door
Button for the power window in the rear door on the right*
Button for the power window in the rear door on the left*
Safety pushbutton*
Safety pushbutton*
You can deactivate the buttons for power windows at rear doors by pressing the
safety pushbutton ⇒page 46, fig. 43. The buttons for power windows at rear
doors are activated again by pressing the safety pushbutton again.
WARNING
•
If you lock the vehicle from the outside, do not leave any person in the
vehicle since it is no longer possible to open the windows from the inside in
an emergency.
•
The system is fitted with a force limiter. If there is an obstacle, the closing
process is stopped and the window goes down by several centimeters. You
should then take particular care when closing the windows! You may other-
wis e suf fe r se v e re inj uri es a s a re s ult of g e tt ing a n ar m , for e xa m ple , ja m m e d
in the window!
•
It is recommended to deactivate the electrically operated power
windows in the rear doors (safety pushbutton) ⇒page 46, fig. 43 when
children are being transported on the rear seats.
•
In the event of a freezing up of the windscreen, first of all eliminate the ice
⇒page 176 and then operate the power windows otherwise the power
window mechanism could be damaged.Note
•
After switching the ignition off, it is still possible to open or close the windows
for a further 10 minutes. The automatic closing and opening functions will not
operate during this time. The power windows are switched off completely once you
open the driver or front passenger door.
•
When driving always use the existing heating, air conditioning and ventilation
system for ventilating the interior of the vehicle. If the windows are opened, dust as
well as other dirt can get into the vehicle and in addition the wind noise is more at
certain speeds.
Force limiter of the power windowsThe electrically operated power windows are fitted with a force limiter. It reduces
the risk of bruises or injuries when closing the windows.
If there is an obstacle, the closing process is stopped and the window goes down by
several centimeters.
AS
AAABACADAS
AS
AS
AS
s3f4.1.book Page 47 Thursday, June 18, 2009 11:07 AM
Page 64 of 259
Seats and Storage63
Using the system
Safety
Driving Tips
General Maintenance
Breakdown assistance
Technical Data
Adjusting height of seat*
– Lift the seat if required by pulling or pumping lever upwards.
– Lower the seat if required by pushing or pumping lever down-
wards.
Adjust the angle of the seat backrest
– Relieve any pressure on the seat backrest (do not lean on it) and turn
the handwheel to adjust the angle of the backrest.The driver's seat should be adjusted in such a way that the pedals can be fully
pressed to the floor with slightly bent legs.
The seat backrest on the driver's seat should be adjusted in such a way that the
upper point of the steering wheel can be easily reached with slightly bent arms.
WARNING
•
Only adjust the driver seat when the vehicle is stationary - risk of injury!
•
Take care when adjusting the seat! Adjusting the seat without care can
lead to bruises or injuries.
•
The seat backrests must not be angled too far back when driving other-
wise this will affect proper operation of the seat belts and of the airbag
system - risk of injury!
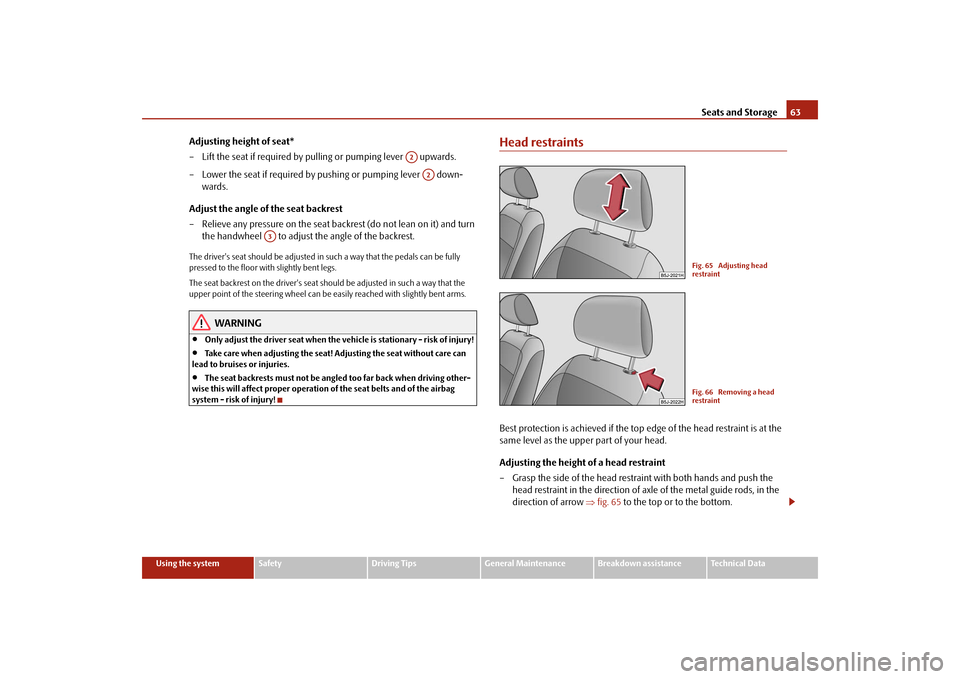
Head restraintsBest protection is achieved if the top edge of the head restraint is at the
same level as the upper part of your head.
Adjusting the height of a head restraint
– Grasp the side of the head restraint with both hands and push the
head restraint in the direction of axle of the metal guide rods, in the
direction of arrow ⇒fig. 65 to the top or to the bottom.
A2
A2
A3
Fig. 65 Adjusting head
restraintFig. 66 Removing a head
restraint
s3f4.1.book Page 63 Thursday, June 18, 2009 11:07 AM
Page 68 of 259
Seats and Storage67
Using the system
Safety
Driving Tips
General Maintenance
Breakdown assistance
Technical Data
PedalsYou should use only footmats which do not obstruct the movement of the pedals
and have an anti-slip protection.
We recommend only to use footmats from Škoda genuine accessories offered by
your Škoda dealer.
Operation of the pedals must not be hindered!
WARNING
•
Greater pedal distances may be needed when there is a fault in the brake
system.
•
Do not place any footmats or other additional floor coverings in the area
of the pedals in order to ensure that all the pedals can be fully depressed and
are able to return unobstructed to their initial position - risk of accident!
•
There must be no objects on the floor which could roll under the pedals.
You would then no longer be able to apply the brakes, operate the clutch or
accelerator - risk of accident!
luggage compartmentLoading the luggage compartmentPlease observe the following in the interest of having good handling char-
acteristics of your vehicle:
– Distribute the items of luggage as evenly as possible.
– Place heavy objects as far forward as possible.
– Attach the items of luggage to the lashing eyes or the fixing net*
⇒page 68.In the event of an accident, there is such a high kinetic energy which is produced by
small and light objects that they can cause severe injuries. The magnitude of the kinetic energy depends on the speed at which the vehicle is travelling and on the
weight of the object. The speed at which the vehicle is travelling is in this case the
more significant factor.
Example: In the event of a frontal collision at a speed of 50 km/h, an unsecured
object with a weight of 4.5 kg produces an energy, which corresponds to 20 times
its own weight. This means that it results in a weight of approx. 90 kg. You can
imagine the injuries that can occur, if this “bullet” is flying through the interior
compartment and hits an occupant.
WARNING
•
Store the objects in the luggage compartment and attach them to the
lashing eyes.
•
Loose objects in the passenger compartment can be thrown forward
during a sudden manoeuvre or in case of an accident and can injure the
occupants or other oncoming traffic. This risk is still increased, if the objects
which are flying around are hit by a deployed airbag. In this case, the objects
which are thrown back can injure the occupants - hazard.
•
Please note that the handling properties of your vehicle may be affected
when transporting heavy objects as a result of the displacement of the
centre of gravity. The speed and style of driving must be adjusted accord-
ingly.
•
The items carried in the luggage compartment should be stored in such
a way that no objects are able to slip forward if there are any sudden driving
or braking manoeuvres undertaken - risk of injury!
•
When transporting fastened objects which are sharp and dangerous in
the luggage compartment enlarged by folding the rear seats forward or
removing the rear seats, ensure the safety of the passengers transported on
the other rear seats ⇒page 130, “Correct seated position for the occupants
on the rear seats”.
•
If the rear seats next to the folded forward seat are occupied, ensure
maximum safety, e.g. by placing the goods to be transported in such a way
that a folding back of the seat is prevented in case of a rear collision.
•
Never drive with the boot lid fully opened or slightly ajar otherwise
exhaust gases may get into the interior of the vehicle - risk of poisoning!
s3f4.1.book Page 67 Thursday, June 18, 2009 11:07 AM
Page 73 of 259
Seats and Storage 72
Removing
– Have the foldable luggage compartment cover removed to transport
bulky goods by pressing the slider from the side in the direction of
arrow and removing the cover in the direction of arrow
⇒page 71, fig. 81.
WARNING
No objects should be placed on the luggage compartment cover, the vehicle
occupants could be endangered if there is sudden braking or the vehicle
collides with something.
Caution
Please ensure that the heating elements of the rear window heater and the foldable
luggage compartment cover are not damaged as a result of objects transported in
this area.Variable loading floor* (Combi)Remove variable loading floor
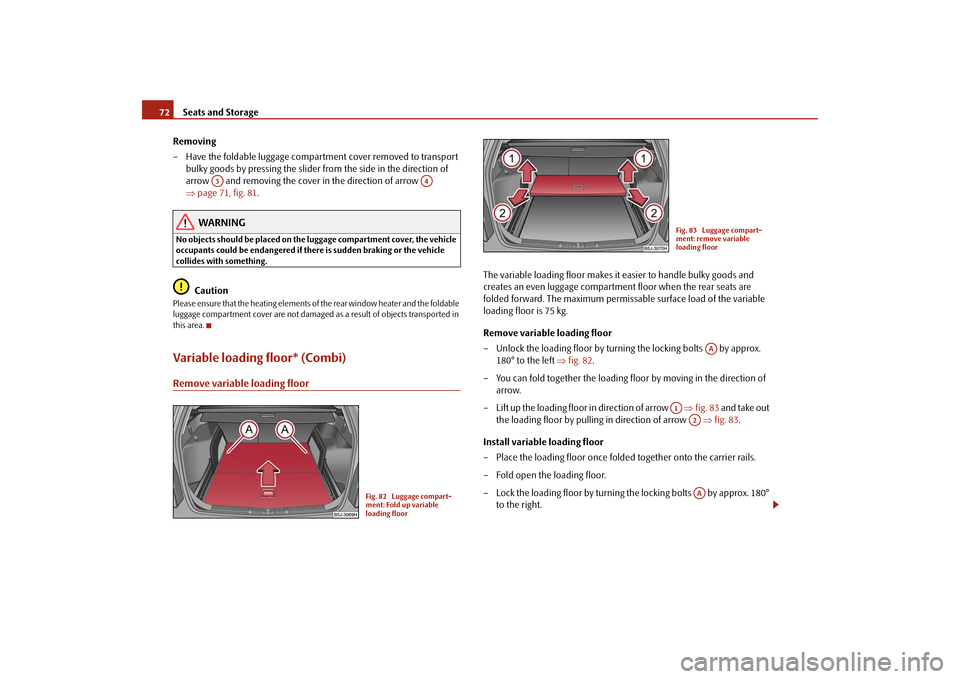
The variable loading floor makes it easier to handle bulky goods and
creates an even luggage compartment floor when the rear seats are
folded forward. The maximum permissable surface load of the variable
loading floor is 75 kg.
Remove variable loading floor
– Unlock the loading floor by turning the locking bolts by approx.
180° to the left ⇒fig. 82.
– You can fold together the loading floor by moving in the direction of
arrow.
– Lift up the loading floor in direction of arrow ⇒fig. 83 and take out
the loading floor by pulling in direction of arrow ⇒fig. 83.
Install variable loading floor
– Place the loading floor once folded together onto the carrier rails.
– Fold open the loading floor.
– Lock the loading floor by turning the locking bolts by approx. 180°
to the right.
A3
A4
Fig. 82 Luggage compart-
ment: Fold up variable
loading floor
Fig. 83 Luggage compart-
ment: remove variable
loading floor
AA
A1
A2AA
s3f4.1.book Page 72 Thursday, June 18, 2009 11:07 AM
Page 74 of 259
Seats and Storage73
Using the system
Safety
Driving Tips
General Maintenance
Breakdown assistance
Technical Data
WARNING
Pay attention when installing that the carrier rails and the variable loading
floor are correctly fixed, otherwise the occupants are at risk.
Note
If the variable loading floor* is installed ⇒page 72 in the luggage compartment, no
flexible storage compartment or fixing net* ⇒page 69 can be installed.Remove carrier rails
Install carrier rails
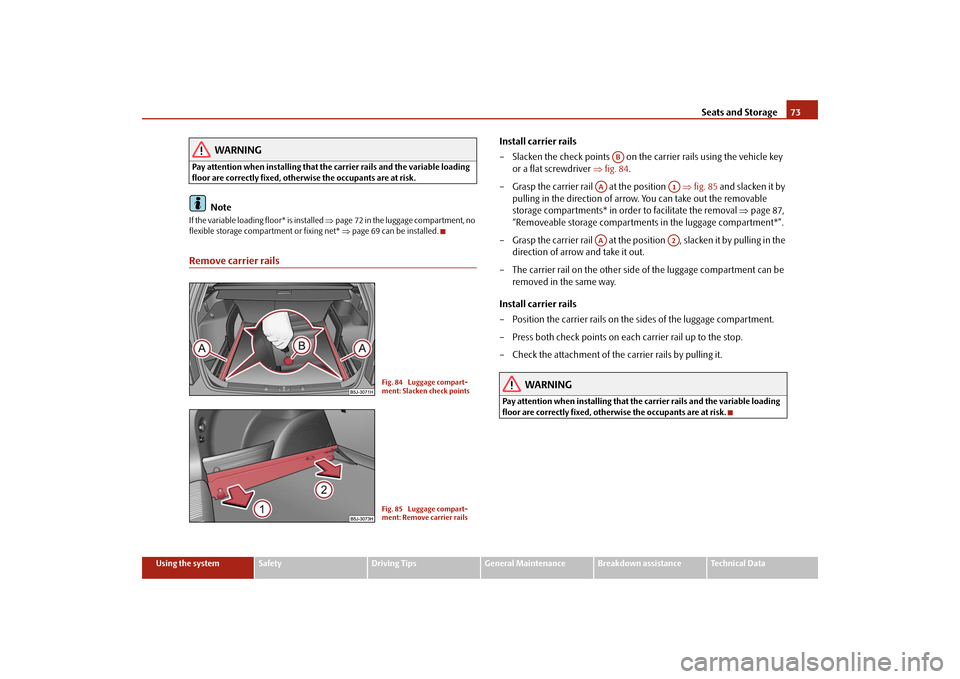
– Slacken the check points on the carrier rails using the vehicle key
or a flat screwdriver ⇒fig. 84.
– Grasp the carrier rail at the position ⇒fig. 85 and slacken it by
pulling in the direction of arrow. You can take out the removable
storage compartments* in order to facilitate the removal ⇒page 87,
“Removeable storage compartments in the luggage compartment*”.
– Grasp the carrier rail at the position , slacken it by pulling in the
direction of arrow and take it out.
– The carrier rail on the other side of the luggage compartment can be
removed in the same way.
Install carrier rails
– Position the carrier rails on the sides of the luggage compartment.
– Press both check points on each carrier rail up to the stop.
– Check the attachment of the carrier rails by pulling it.
WARNING
Pay attention when installing that the carrier rails and the variable loading
floor are correctly fixed, otherwise the occupants are at risk.
Fig. 84 Luggage compart-
ment: Slacken check pointsFig. 85 Luggage compart-
ment: Remove carrier rails
AB
AA
A1
AA
A2
s3f4.1.book Page 73 Thursday, June 18, 2009 11:07 AM