airbag SKODA FABIA 2014 2.G / 5J Owner's Guide
[x] Cancel search | Manufacturer: SKODA, Model Year: 2014, Model line: FABIA, Model: SKODA FABIA 2014 2.G / 5JPages: 197, PDF Size: 13.56 MB
Page 67 of 197
Seats and storage
Front seats
Introduction
This chapter contains information on the following subjects:
Adjusting the front seats - Version 1
65
Adjusting the front seats - Variant 2
65
Front seat heating
66
The driver's seat should be adjusted in such a way that the pedals can be fully
pressed to the floor with slightly bent legs.
The seat backrest on the driver's seat should be adjusted in such a way that the upper point of the steering wheel can be easily reached with slightly bent
arms.
Correct adjustment of the seats is particularly important for the following rea-
sons.
› Reaching the controls safely and quickly.
› A relaxed and fatigue-free body position.
› Achieving the maximum protection offered by the seat belts and the airbag
system.
WARNING■ Only adjust the driver's seat when the vehicle is stationary – there is the
risk of an accident.■
Caution when adjusting the seat! You may suffer injuries or bruises as a
result of adjusting the seat without paying proper attention.
■
Never carry more people than the number of seats in the vehicle.
■
Do not transport any objects on the front passenger seat other than ob-
jects (e.g. child safety seat) intended for this purpose – there is the risk of
an accident.
Note
After a certain time, play can develop within the adjustment mechanism of the
backrest angle.Adjusting the front seats - Version 1Fig. 54
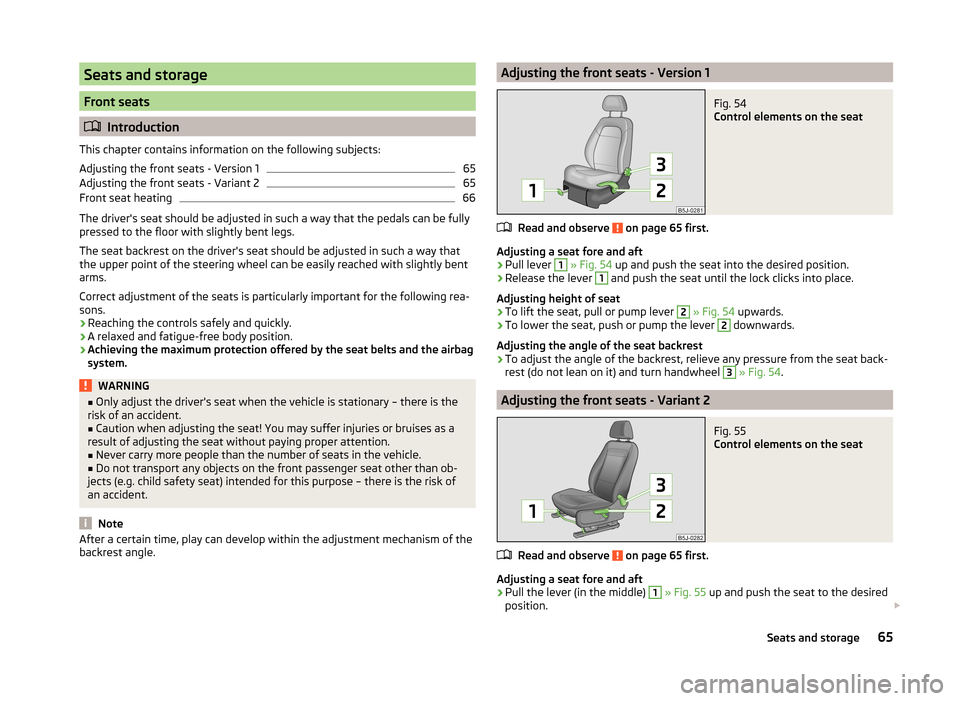
Control elements on the seat
Read and observe on page 65 first.
Adjusting a seat fore and aft
›
Pull lever
1
» Fig. 54 up and push the seat into the desired position.
›
Release the lever
1
and push the seat until the lock clicks into place.
Adjusting height of seat
›
To lift the seat, pull or pump lever
2
» Fig. 54 upwards.
›
To lower the seat, push or pump the lever
2
downwards.
Adjusting the angle of the seat backrest
›
To adjust the angle of the backrest, relieve any pressure from the seat back-
rest (do not lean on it) and turn handwheel
3
» Fig. 54 .
Adjusting the front seats - Variant 2
Fig. 55
Control elements on the seat
Read and observe on page 65 first.
Adjusting a seat fore and aft
›
Pull the lever (in the middle)
1
» Fig. 55 up and push the seat to the desired
position.
65Seats and storage
Page 71 of 197
Example: In the event of a frontal collision at a speed of 50 km/h, an object
weighing 4.5 kg produces energy corresponding to 20 times its own weight.
This means that it results in a weight of approx. 90 kg “ ”.WARNING■ Store the objects in the boot and attach them to the lashing eyes.■Loose objects can be thrown forward during a sudden manoeuvre or in
case of an accident and can injure the occupants or other road users.■
Loose objects could hit a deployed airbag and injure occupants – there is
a risk of death.
■
Please note that the handling properties of the vehicle may be affected
when transporting heavy objects as the centre of gravity can be shifted –
there is a risk of an accident. The speed and style of driving must be adjus-
ted accordingly.
■
If the items of luggage or objects are attached to the lashing eyes with
unsuitable or damaged lashing straps, injuries can occur in the event of
braking manoeuvres or accidents. To prevent items of luggage from being
thrown forward, always use suitable lashing straps which must be firmly at-
tached to the lashing eyes.
■
Items carried in the luggage compartment must be stowed in such a way
that no objects are able to slip forward under sudden driving manoeuvres
or braking – there is a risk of injury.
■
When transporting fastened objects which are sharp and dangerous in
the boot that has been enlarged by folding the rear seats forward, ensure
the safety of the passengers transported on the other rear seats » page 9,
Correct seated position of the rear seat passengers .
■
If the rear seat next to the folded forward seat is occupied, ensure maxi-
mum safety, e.g. by placing the goods to be transported in such a way that
the seat is prevented from folding back in case of a rear collision.
■
Never drive with the tailgate fully opened or slightly ajar otherwise ex-
haust gases may get into the interior of the vehicle – risk of poisoning.
■
Under no circumstances, should the permissible axle loads and permissi-
ble gross weight of the vehicle be exceeded – there is the risk of an acci-
dent.
■
Never transport people in the boot!
CAUTION
Please ensure that the heating elements for the rear window heater are not
damaged as a result of abrasive objects.NoteTyre pressure must be adjusted to the load » page 151, Tyre service life .
Class N1 vehicles
Read and observe
and on page 69 first.
On class N1 vehicles, which are not fitted with a protective grille, a lashing set
which complies with the standard EN 12195 (1 - 4) must be used for fastening
the load.
The proper functioning of the electrical system is essential for the safe opera-
tion of the vehicle. It is important to ensure that it is not damaged during mod-
ifications or when loading or unloading the luggage compartment.
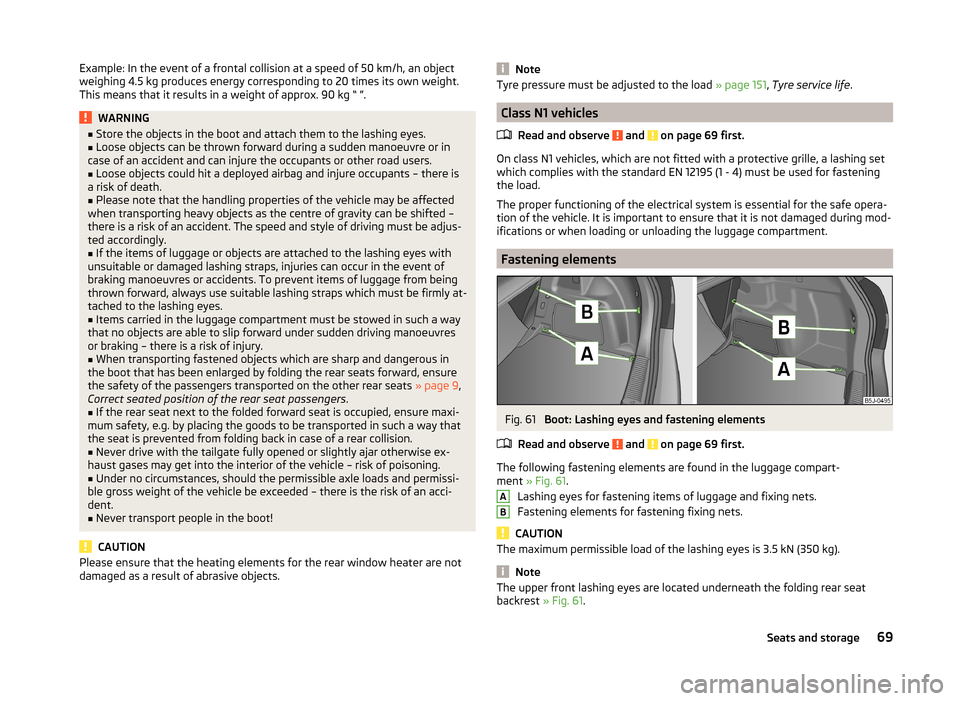
Fastening elements
Fig. 61
Boot: Lashing eyes and fastening elements
Read and observe
and on page 69 first.
The following fastening elements are found in the luggage compart-
ment » Fig. 61 .
Lashing eyes for fastening items of luggage and fixing nets.
Fastening elements for fastening fixing nets.
CAUTION
The maximum permissible load of the lashing eyes is 3.5 kN (350 kg).
Note
The upper front lashing eyes are located underneath the folding rear seat
backrest » Fig. 61.AB69Seats and storage
Page 82 of 197
■Connecting electrical components when the engine is not running will drain
the battery of the vehicle – there is a risk of the battery discharging.■
Only use matching plugs to avoid damaging the power socket.
■
Only use accessories that have been tested for electromagnetic compatibility
in accordance with the applicable directives.
■
Switch off the devices connected to the power sockets before you switch
the ignition on or off and before starting the engine, to avoid damage from
voltage fluctuations.
■
Observe the operating instructions for the connected devices!
Clothes hook
Read and observe
on page 78 first.
The clothes hooks are located on the handle of the headliner above each of
the rear doors.
WARNING■ Ensure that any clothes hanging from the hooks do not impair your vision
to the rear.■
Only use the hooks for hanging light items of clothing and ensure that
there are no heavy or sharp-edged objects in the pockets.
■
Do not use clothes hangers for hanging up items of clothing otherwise
this may reduce the effectiveness of head airbags.
CAUTION
The maximum permissible load of the hooks is 2 kg.
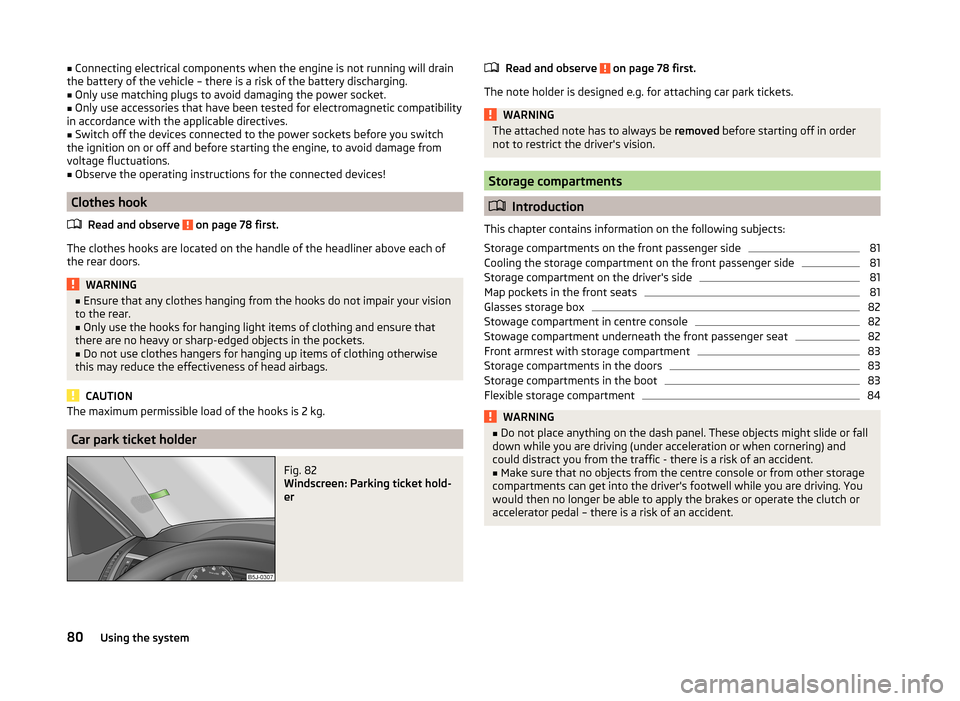
Car park ticket holder
Fig. 82
Windscreen: Parking ticket hold-
er
Read and observe on page 78 first.
The note holder is designed e.g. for attaching car park tickets.
WARNINGThe attached note has to always be removed before starting off in order
not to restrict the driver's vision.
Storage compartments
Introduction
This chapter contains information on the following subjects:
Storage compartments on the front passenger side
81
Cooling the storage compartment on the front passenger side
81
Storage compartment on the driver's side
81
Map pockets in the front seats
81
Glasses storage box
82
Stowage compartment in centre console
82
Stowage compartment underneath the front passenger seat
82
Front armrest with storage compartment
83
Storage compartments in the doors
83
Storage compartments in the boot
83
Flexible storage compartment
84WARNING■ Do not place anything on the dash panel. These objects might slide or fall
down while you are driving (under acceleration or when cornering) and
could distract you from the traffic - there is a risk of an accident.■
Make sure that no objects from the centre console or from other storage
compartments can get into the driver's footwell while you are driving. You
would then no longer be able to apply the brakes or operate the clutch or
accelerator pedal – there is a risk of an accident.
80Using the system
Page 85 of 197
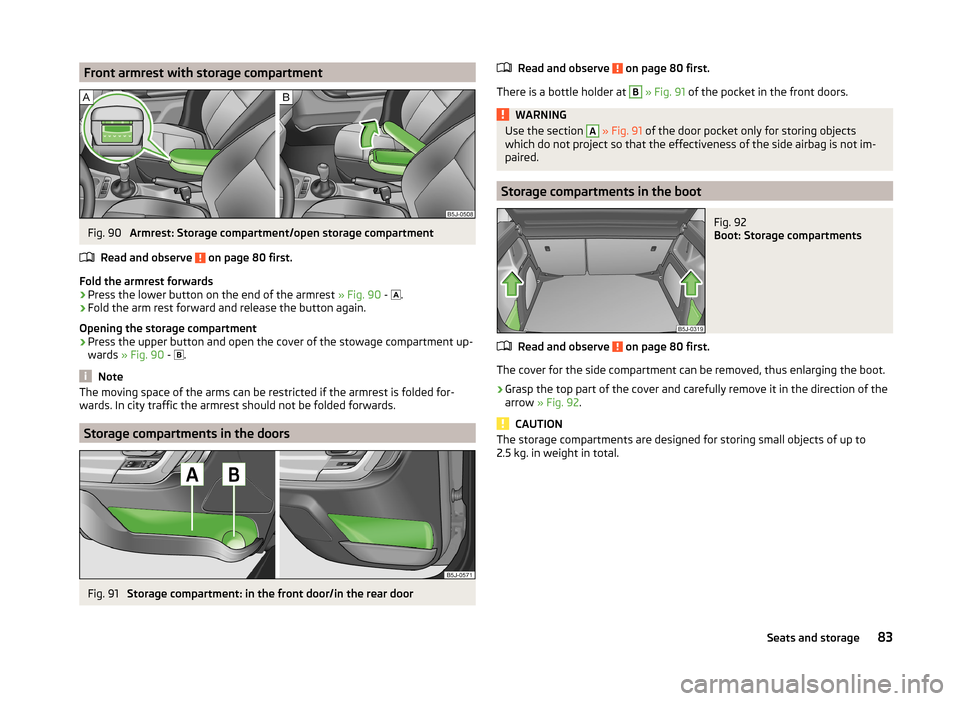
Front armrest with storage compartmentFig. 90
Armrest: Storage compartment/open storage compartment
Read and observe
on page 80 first.
Fold the armrest forwards
›
Press the lower button on the end of the armrest » Fig. 90 -
.
›
Fold the arm rest forward and release the button again.
Opening the storage compartment
›
Press the upper button and open the cover of the stowage compartment up-
wards » Fig. 90 -
.
Note
The moving space of the arms can be restricted if the armrest is folded for-
wards. In city traffic the armrest should not be folded forwards.
Storage compartments in the doors
Fig. 91
Storage compartment: in the front door/in the rear door
Read and observe on page 80 first.
There is a bottle holder at
B
» Fig. 91 of the pocket in the front doors.
WARNINGUse the section A » Fig. 91 of the door pocket only for storing objects
which do not project so that the effectiveness of the side airbag is not im-
paired.
Storage compartments in the boot
Fig. 92
Boot: Storage compartments
Read and observe on page 80 first.
The cover for the side compartment can be removed, thus enlarging the boot.
›
Grasp the top part of the cover and carefully remove it in the direction of the
arrow » Fig. 92 .
CAUTION
The storage compartments are designed for storing small objects of up to
2.5 kg. in weight in total.83Seats and storage
Page 95 of 197
WARNING (Continued)■The national regulations for using a mobile phone in a vehicle must be
observed.■
If a mobile phone or a two-way radio system is operated in a vehicle with-
out an external aerial or an external aerial which has been installed incor-
rectly, this can increase the strength of the electromagnetic field inside the
vehicle.
■
Two-way radio systems, mobile phones or mounts must not be installed
on airbag covers or within the immediate deployment range of the airbags.
■
Never leave a mobile phone on a seat, on the dash panel or in another
area, from which it can be thrown during a sudden braking manoeuvre, an
accident or a collision - risk of injury.
■
The Bluetooth ®
function must be switched off by a specialist workshop
before the vehicle is transported by air.
Note
■ We recommend that mobile phones and two-way radio systems be installed
in the a vehicle by a specialist workshop.■
Not all mobile phones that enable Bluetooth ®
communication are compatible
with the universal telephone preinstallation GSM II. You can ask a ŠKODA Part-
ner whether your telephone is compatible with the GSM II universal telephone
fitting.
■
The range of the Bluetooth ®
connection to the hands-free system is restric-
ted to the vehicle interior. The range is dependent on local factors, e.g. obsta-
cles between the devices and mutual interferences with other devices. If your
mobile phone is in a jacket pocket, for example, this can lead to difficulties
when establishing a connection with the hands-free-system or transferring
data.
Introductory information
The universal telephone preinstallation GSM II (hands-free system) includes a
convenience mode for the mobile phone via voice control, the multifunction
steering wheel, the adapter, radio or the navigation system.
The universal telephone preinstallation GSM II comprises the following func-
tions.
› Phone Phonebook
» page 93.
› Convenience operation of the telephone via the multifunction steering
wheel » page 94 .
›Managing telephone calls via the adapter
» page 95.
› Telephone operation in the MAXI DOT display
» page 96.
› Voice control of the telephone
» page 97.
› Music playback from the telephone or other multimedia units
» page 98.
All communication between a mobile phone and your vehicle's hands-free sys-
tem is established with the help of Bluetooth ®
technology. The adapter serves
only for charging the telephone and for transmitting the signal to the vehicle's
external aerial.
Note
The following guidelines must be observed » page 92, Mobile phones and two-
way radio systems .
Phone Phonebook
A phone phonebook is part of the hands-free system. This phone phonebook
can be used depending on the type of mobile phone.
After the first connection of the telephone, the system begins to load the
phone book from the phone and the SIM card into the memory of the control
unit.
Each time the telephone has established a new connection with the hands-
free system, an update of the relevant phone book is performed. The updating
can take a few minutes. During this time the phone book, which was stored af-
ter the last update was completed, is available. Newly stored telephone num-
bers are only shown after the updating has ended.
The update is interrupted if a telephone event (e.g. incoming or outgoing call,
voice control dialogue) occurs during the updating procedure. After the tele-
phone event has ended, the updating starts anew.
The internal phonebook provides 2 500 free memory locations. Each contact can contain up to 4 numbers.
If the number of contacts loaded exceeds 2 500, the phone book is not com-
plete.
93Communication and multimedia
Page 128 of 197
General Maintenance
Car care
Services, modifications and technical alterations
Introduction
This chapter contains information on the following subjects:
ŠKODA Original Parts
126
ŠKODA Original Accessories
127
Spoiler
127
Airbags
127
The instructions and guidelines issued by ŠKODA AUTO a.s. must be observed
when making any modifications, repairs or technical changes to your vehicle.
Compliance with these guidelines and instructions is in the interest of the
roadworthiness and technical condition of your vehicle. The vehicle will comply
with road traffic regulations following the modifications, repairs and technical
changes.
Always consult a ŠKODA Partner before buying accessories or parts, or before
carrying out any modifications, repairs or technical alterations to your vehicle.
WARNING■ Work not properly performed on your vehicle can lead to faults - there is a
risk of an accident resulting in serious injury.■
We recommend only having these modifications and technical changes
performed by a specialist garage.
■
Interference on the electronic components and their software can lead to
operational faults. This interference can also impair not directly affected
systems because of the networking of the electronic components. The op-
erational safety of the vehicle may be at significant risk and parts may suf-
fer increased wear.
■
The ŠKODA Partner cannot assume any liability for products which have
not been approved by ŠKODA AUTO a.s. even though these may be prod-
ucts with a type approval or have been approved by a nationally recognised
testing laboratory.
WARNING■ We advise you only to use ŠKODA Original Accessories and ŠKODA Origi-
nal Parts which have been expressly approved for use on your vehicle. Reli-
ability, safety and suitability for your vehicle are guaranteed with these.■
ŠKODA Original Accessories and ŠKODA Original Parts can be purchased
from a ŠKODA Partner who will also fit the purchased parts correctly.
For the sake of the environment
Technical documents regarding changes carried out on the vehicle must be
kept by the vehicle user, in order to be handed over to the recyclers later. This
ensures that vehicle recycling is in accordance with environmental regulations.
Note
Any damage caused by technical alterations made without the approval of the
manufacturer is excluded from the » Service schedule warranty.
ŠKODA Original Parts
Read and observe
on page 126 first.
We recommend the use of ŠKODA Genuine Parts for your vehicle, since these
parts are approved by ŠKODA AUTO a.s. They correspond exactly to ŠKODA
AUTO a.s. specifications in respect of design, dimensional accuracy and materi-
al and are identical to the components used in the batch production.
ŠKODA AUTO a.s. can guarantee the safety, suitability, and long life of these
products. We therefore recommend that you only use ŠKODA Genuine Parts.
ŠKODA AUTO a.s. supplies the market with a complete range of ŠKODA Genu-
ine Parts not only while the model is still in production but with wear-and-tear
parts for at least 15 years after the end of series production and with all other
vehicle parts for at least 10 years.
ŠKODA service partners are liable for any defects in ŠKODA original parts for a
period of 2 years after sale in accordance with materials defect liability under
the law unless otherwise agreed in the purchase agreement. You should keep
the confirmed warranty certificate and the receipt for these components for
this period, so that the commencement of the warranty term may be verified.
Body repairs
ŠKODA vehicles are designed so that if the body suffers damage, it is only nec-
essary to replace those parts which are in fact damaged.
126General Maintenance
Page 129 of 197
Before you decide to have damaged body parts replaced, however, you should
first contact your specialist garage to determine whether or not such parts can
also be repaired. Repairs to body parts are usually cheaper.
ŠKODA Original Accessories
Read and observe
on page 126 first.
You should note the following if you wish to fit accessories to your vehicle:
We recommend that you use ŠKODA Genuine Accessories in your vehicle.
ŠKODA AUTO a.s. offers a warranty on the reliability, safety and suitability for
your particular vehicle of these accessories. Although we constantly monitor
the market, we are not able to assess or offer a warranty on other products
even though in some instances such products may have a type approval or
may have been approved by a nationally recognised approval authority.
All accessory products go through a fastidious process of technical develop-
ment (technical tests) and quality inspection (customer tests), and only if all
tests are positive does the product become a ŠKODA Genuine Accessory.
Our ŠKODA Genuine Accessories service also provides expert advice and pro-
fessional fitting if requested by the customer.
ŠKODA Service Partners are liable for any defects in ŠKODA Genuine Parts for a period of 2 years after installation or delivery in accordance with materials de-
fect liability legislation, unless otherwise agreed in the purchase contract or in
any other agreements. You should keep the confirmed warranty certificate and
the receipt for these accessories for this period, so that the commencement of
the warranty term may be verified.
In addition, ŠKODA Service Partners also stock a range of suitable car care
products as well as those parts which are subject to natural wear and tear,
such as tyres, batteries, bulbs and wiper blades.
Note
The accessories authorized by ŠKODA AUTO a.s. will be offered by the ŠKODA
Partners in all countries where ŠKODA AUTO a.s. has a sales and service net- work. This will usually be in the form of a printed catalogue of Original ŠKODA
Accessories, in the form of separate printed brochures or in the form of offers
for ŠKODA Genuine Accessories on the ŠKODA Partner's website.Spoiler
Read and observe
on page 126 first.
The following instructions shall be observed if your new vehicle is equippedwith a spoiler fitted to the front bumper in combination with the spoiler on the
tailgate.
› For safety reasons the vehicle must only ever be equipped with a spoiler on
the front bumper in combination with the associated spoiler on the tailgate.
› A spoiler cannot be fitted alone on the front bumper nor in combination with-
out a spoiler on the tailgate or in combination with an inappropriate spoiler
on the tailgate.
› We recommend that you consult a ŠKODA Service Partner for any repairs, re-
placement, fitting or removal of spoilers.
WARNINGWork not properly performed on the spoilers on your vehicle can result in
faults - there is a risk of an accident and serious injury.
Airbags
Read and observe
on page 126 first.
The system components for the airbag system may be found in the front
bumper, doors, front seats, the roof lining or in the bodywork.
WARNINGAny work on the airbag system including the installation and removal of
system components due to other repair work (e.g. removal of the steering
wheel) must only be carried out by a specialist garage.■
Adjustments, repairs and modifications which have been carried out un-
professionally can cause damage, operational faults, and can also seriously
impair the effectiveness of airbag system – there is the risk of an accident
and fatal injury.
■
The airbag system must be replaced if an airbag has been deployed. Air-
bag modules cannot be repaired.
127Car care
Page 130 of 197
WARNINGObserve the following instructions for the airbag system.■It is prohibited to tamper with individual parts of the airbag system as this
might result in the airbag being deployed.■
Never install any airbag parts into the vehicle that have been removed
from old cars or have been recycled.
■
Never fit damaged airbag parts to a vehicle. The airbags may then not be
triggered properly or not at all in the event of an accident.
■
No modifications of any kind must be made to parts of the airbag system.
WARNING■ A change in the suspension of the vehicle including the use of non-ap-
proved wheels and tyre combinations can alter the functioning of the air-
bag system - there is a risk of accident and fatal injury.■
Never make any changes to the front bumper or bodywork.
Washing the car
Introduction
This chapter contains information on the following subjects:
Washing by hand
128
Automatic car wash systems
129
Washing with a high-pressure cleaner
129
The best protection for your vehicle against harmful environmental influences
is frequent washing.
How often the vehicle should be washed depends, for example, on the follow-
ing factors.
› Frequency of use.
› Parking situation (garage, under trees, etc.).
› Season of the year.
› Weather conditions.
› Environmental influences.
The longer insect residues, bird droppings, tree sap, road and industrial dust,
tar, soot particles, road salt and other aggressive deposits remain adhering to
the paintwork of your vehicle, the more detrimental their destructive effect
can be. High temperatures, such as those caused by intensive sun's rays, ac-
centuate this caustic effect.
It is essential to also thoroughly clean the underside of the vehicle at the end
of the winter.WARNING■ Washing your vehicle in the winter: water and ice in the brake system can
affect the braking efficiency – there is the risk of an accident.■
Only wash the vehicle when the ignition is switched off – there is the risk
of an accident.
CAUTION
Do not wash your vehicle in bright sunlight – there is a risk of paint damage.
For the sake of the environment
Only wash the vehicle at washing bays intended for this purpose.
Washing by hand
Read and observe
and on page 128 first.
Soften the dirt with plenty of water and rinse as much as you can of this off.
Clean the vehicle with a soft sponge, a washing glove or a washing brush .
Work from the top to the bottom - starting with the roof.
Only use a car shampoo for stubborn dirt.
Wash out the sponge or washing glove thoroughly at short intervals.
Clean wheels, door sills and similar parts last. Use a second sponge for such
areas.
Give the vehicle a good rinse after washing it and dry it off using a chamois
leather.
CAUTION
■ When washing the car by hand, protect your hands and arms from sharp-
edged metal parts (e.g. when cleaning the underfloor, the inside of the wheel
housings or the wheel trims, etc.) - There is a risk of cuts!■
Only apply slight pressure when cleaning the vehicle's paintwork.
128General Maintenance
Page 187 of 197
Index
A
Abroad Driving abroad
113
Unleaded petrol113
ABS115
warning light38
Accessories126
Adjusting Belt height
13
Exterior mirrors64
Head restraints68
Steering wheel8
Adjusting the seats7
Adjustment Headlight beam
56
Seats65
Adjustments and technical changes Spoiler
127
Adjustments and technical modifications Airbags
127
Aerial129
See windows131
Airbag14
Adjustments and impairment of the airbag sys- tem
127
Deactivating18
Deployment14
Front airbag15
Head airbag17
Side airbag16
Switching off the front passenger airbag18
Airbag system14
Air conditioning Operation
88
Air conditioning system Air outlets85
Climatronic90
Manual air conditioning system87
Air outlets85
Alarm49
Anti-theft alarm system49
Operation49
Trailer125
Antilock Braking System115
Armrest83
Ashtray78
ASR115
warning light38
Assist systems ABS
38, 115
ASR38, 115
Cruise control system117
EDS and XDS115
ESC38, 114
Parking aid116
START-STOP118
Auto Check Control34
Automatic gearbox Selector lever-emergency unlocking
108
Starting-off and driving107
Tiptronic106
Automatic load deactivation149
Automatic transmission105
Kickdown107
Malfunction107
Selector lever lock106
Using the selector lever105
AUX99
Avoiding damage to the vehicle Driving through water
112
Avoiding damage to your vehicle112
B
Back-up wheel
155
Ball head Check fitting
122
Fitting122
Ready position121
Removing123
Belts10
Belt tensioners13
Bicycle carrier75
Bonnet Closing
139
Opening139
Boot Cover
70
Emergency unlocking51
Fastening elements69
Fixing nets70
Folding hooks70
see Boot lid50
Unlocking the boot lid51
Boot lid50
automatic locking51
Brake assist114
Brake booster103
Brake fluid145
Changing145
Checking145
Display messages36
Brakes Brake booster
103
Brake fluid145
Handbrake104
Indicator light36
Running in109
Braking Information for braking
103
Breakdown kit163
185Index
Page 188 of 197

BulbsChanging170
In the rear light174
Button in the driver's door Electrical power windows
51
C
Car care
126
Jack132
Washing128
Car computer see Multifunction display
29
Caring for paintwork130
Car park ticket holder80
Carrier76
Central locking button47
Central locking system45
lock47
unlock47
Changing Brake fluid
145
Bulbs170
Bulbs in the rear light174
Engine oil143
Foglight bulb (Scout, RS)173
Foglights and daytime running lights bulbs173
Front parking light bulb172
Front turn signal bulb172
Fuses168
Fuses in the dash panel168
Fuses in the engine compartment170
High beam bulb - halogen projector headlights 172
Licence plate light bulb
174
Low beam and high beam bulb - halogen head- lights
171
Low beam and high beam bulb - halogen pro- jector headlights
172
Wheels159
Changing a wheel Preparation160
Removing and fitting a wheel160
Subsequent steps160
Charging a vehicle battery148
Check Fit ball head properly
122
Checking Battery electrolyte level
147
Brake fluid145
Coolant level144
Engine oil142
Oil level142
Windscreen washer fluid140
Children and safety19
Child safety Side airbag
21
Child safety lock44
Child safety seat Use of child safety seats
21
Child seat Classification
21
ISOFIX22
on the front passenger seat20
TOP TETHER23
Use of ISOFIX child seats22
Chrome parts refer to Taking care of your vehicle
130
Cigarette lighter79
Cleaning126
Alcantara134
Covers on electrically heated seats134
Fabrics134
Headlight lenses131
Natural leather133
Plastic parts130
Synthetic leather134
Wheels132
Climatronic90
Automatic mode91
Control elements90
Controlling the blower91
Defrosting windscreen92
Recirculated air mode91
Setting the temperature91
Clock28
Clothes hook80
Cockpit 12-volt power outlet
79
Ashtray78
Cigarette lighter79
General view25
Lighting59
Storage compartments80
Compartments80
Computer see Multifunction display
29
Convenience turn signal57
Coolant143
Checking144
Display messages37
Replenishing144
Warning light37
Coolant temperature gauge display
27
Correct seated position7
Driver7
Front passenger8
Notes9
Rear seats9
Counter for distance driven28
Cruise control system117
Cupholders78
D
DAY LIGHT see Daylight running lights
56
Daylight running lights56
186Index