key SKODA FABIA 2014 2.G / 5J Owner's Manual
[x] Cancel search | Manufacturer: SKODA, Model Year: 2014, Model line: FABIA, Model: SKODA FABIA 2014 2.G / 5JPages: 197, PDF Size: 13.56 MB
Page 12 of 197

Seat belts
Wearing seat belts
Introduction
Fig. 3
Driver wearing seat belt
This chapter contains information on the following subjects:
The physical principle of a frontal collision
11
Fastening and unfastening seat belts
12
Belt height adjustment on the front seats
13
Seat belts that are fastened correctly offer good protection in the event of an
accident. They reduce the risk of an injury and increase the chance of survival
in the event of a major accident.
Correctly fastened seat belts hold occupants of the car in the correct seated
position » Fig. 3.
The seat belts reduce the kinetic energy (energy of motion) to a considerable
extent. They also prevent uncontrolled movements which, in turn, may well re-
sult in severe injuries.
The occupants of a vehicle who have fastened and correctly adjusted their
seat belt benefit greatly from the fact that the kinetic energy is absorbed by
the belts as much as possible.
The structure of the front end of the vehicle and other passive safety meas-
ures, such as the airbag system, also contribute to reducing the kinetic energy
in the best possible way. The energy produced is thus absorbed and there is
less risk of injury.
Particular safety aspects must be observed when transporting children in the
vehicle » page 19 , Transporting children safely .
WARNING■
Fasten your seat belt before each journey - even when driving in town!
This also applies to the people seated at the rear – there is a risk of injury.■
Expectant women must also always wear a seat belt. This is the only way
of ensuring optimal protection for the unborn child » page 12, Fastening
and unfastening seat belts .
■
The maximum protection which seat belts can offer is only achieved if you
are correctly seated » page 7, Correct and safe seated position .
■
The seat backrests of the front seats must not be tilted too far to the rear
otherwise the seatbelts can lose their effectiveness.
WARNINGInformation on the correct routing of the belt■Always ensure that the webbing of the seat belts is properly routed. Seat
belts which are not correctly adjusted can themselves cause injuries even
in minor accidents.■
Adjust the height of the belt in such a way that the shoulder part of the
belt is roughly positioned across the middle of your shoulder - on no ac-
count across your neck.
■
A seat belt which is hanging too loose can result in injuries as your body is
moved forward by the kinetic energy produced in an accident and is then
suddenly held firm by the belt.
■
The belt must not run across solid or fragile objects (e.g. spectacles, ball-
point pens, keys, etc.). Such objects can cause injury.
WARNINGInformation on dealing with the safety belts■The belt webbing must not be jammed in-between at any point or twis-
ted, or chafe against any sharp edges.■
Make sure you do not catch the seat belt in the door when closing it.
WARNINGInformation on the proper use of the safety belts■Never use a seatbelt to secure two persons (not even children). Nor may
the seat belt be placed over a child who is sitting on the lap of another pas-
senger. 10Safety
Page 16 of 197

Airbag system
Description of the airbag system
Introduction
This chapter contains information on the following subjects:
System description
14
Airbag deployment
14WARNING■ An airbag can only offer you optimal protection in combination with a fas-
tened seat belt.■
The airbag is not a substitute for the seat belt, but instead forms part of
the complete passive vehicle safety concept.
■
To ensure passengers are protected with the greatest possible effect
when the airbag is deployed, the front seats must be correctly adjusted to
match the body size » page 7, Correct and safe seated position .
■
If you do not fasten the seat belts when driving, lean too far forward or
adopt an incorrect seated position, you are exposing yourself to increased
risk of injury in the event of an accident.
WARNINGInformation on the use of the airbag system■If there is a fault, the airbag system must be checked by a specialist ga-
rage immediately. Otherwise, there is a risk of the airbag not being activa-
ted in the event of an accident.■
No modifications of any kind must be made to parts of the airbag system.
■
Any work on the airbag system including the installation and removal of
system components due to other repair work (e.g. removal of the steering
wheel) must only be carried out by a specialist garage.
■
Never make any changes to the front bumper or bodywork.
■
It is prohibited to tamper with individual parts of the airbag system as this
might result in the airbag being deployed.
■
The protective function of the airbag system is sufficient for only one ac-
cident. The airbag system must then be replaced if the airbag has been de-
ployed.
System description
Read and observe
on page 14 first.
The functional status of the airbag system is indicated by the
indicator light
in the instrument cluster » page 40.
When the airbags are deployed they fill with gas and inflate.
A grey white or red, non-harmful gas is released when the airbag is inflated.
This is perfectly normal and is not an indication of a fire in the vehicle.
The airbag system consists – depending on the vehicle equipment – of the
following modules.
› Electronic control unit.
› Front airbag for the driver and the front passenger
» page 15.
› Side airbags
» page 16.
› Head airbags
» page 17.
› Airbag indicator light in the instrument cluster
» page 40.
› Key switch for the front passenger airbag
» page 18.
› Warning light for front passenger airbag deactivation in dash panel cen-
tre » page 18 .
Note
■
The airbag system needs no maintenance during its working life.■If you sell your vehicle, provide the complete vehicle documentation to the
new owner. Please note that the information relating to the possibility of de-
activating the front passenger airbag must be included!■
When disposing of vehicle or parts of the airbag system, it is important to
comply with the national legal requirements.
Airbag deployment
Read and observe
on page 14 first.
The airbags inflate in fractions of a second and at a high speed in order to be
able to offer that additional protection in the event of an accident.
The airbag system is only functional when the ignition is switched on.
In certain accident situations, the several airbags may be deployed simultane-
ously.
The airbags are not deployed in the case of minor frontal and side collisions,
rear-end collisions, tilting of the vehicle and vehicle rollover.
14Safety
Page 20 of 197

Deactivating airbags
Deactivating an airbag should be considered only in the following cases, for
example.
› When using a child seat on the front passenger seat, in which the child has
its back to the vehicle's direction of travel (in some countries this must be in
the direction of travel due to different legal regulations applying) » page 19,
Transporting children safely .
› If it is not possible to maintain a distance of at least 25 cm between the mid-
dle of the steering wheel and chest, despite the driver's seat being correctly
adjusted.
› If special attachments are required in the area of the steering wheel because
of a physical disability.
› If other seats have been installed (e.g. orthopaedic seats without side air-
bags).
The front passenger airbag can be switched off with the key-operated
switch » page 18 .
We recommend that you ask a ŠKODA Service Partner to switch off any other
airbags.
Monitoring the airbag system
The functionality of the airbag system is monitored electronically even if one
of the airbags is switched off.
Airbag was switched off using diagnostic equipment
› The
warning light lights up for approximately 3 seconds after the ignition
is switched on and then flashes again for approximately 12 seconds.
Front passenger airbag switched off with the key switch in the storage com-
partment
› The
warning light comes on for about 3 seconds after the ignition has
been switched on.
› The
3
» Fig. 12 on page 18 warning light comes on when the ignition
is switched on.
Note
■ The national regulations for switching off airbags must be observed.■A ŠKODA Service Partner will be able to inform you which airbags in your ve-
hicle can/must be deactivated.Switching off the front passenger airbagFig. 12
Key-operated switch for the front passenger airbag/warning light
for front seat passenger airbag deactivation
Only the front passenger airbag is deactivated with the key switch.
Switching off
›
Switch off the ignition.
›
Open the passenger door.
›
Fold the key bit out completely for the radio key » .
›
Carefully insert the key into the key slot in the key switch as far as the stop.
›
Use the key to turn the slot of the key switch into position
2
» Fig. 12 OFF .
›
Pull the key out of the slot in the key switch » .
›
Close the passenger door.
›
Check whether the
3
1)
warning light in the
mes-
sage in the centre of the dash panel lights up after the ignition has been
switched on.
Switching on
›
Switch off the ignition.
›
Open the passenger door.
›
Fold the key bit out completely for the radio key » .
›
Carefully insert the key into the key slot in the key switch as far as the stop.
›
Use the key to turn the slot of the key switch into position
1
» Fig. 12 ON .
›
Pull the key out of the slot in the key switch » .
›
Close the passenger door.
1)
The
airbag warning light comes on for a few seconds after the ignition is switched on, goes out for
about 1 second and then comes on again.
18Safety
Page 21 of 197

›Check whether the 3
warning light in the mes-
sage in the centre of the dash panel does not light up after the ignition is
switched on.WARNING■ The driver is responsible for whether the airbag is switched on or switch-
ed off.■
Only switch off the airbag when the ignition is switched off! Otherwise a
fault can occur in the system for deactivating the airbag.
■
If the
warning light flashes, the front passenger airbag will not be
deployed in the event of an accident. Have the airbag system checked by a
specialist garage immediately.
■
The key cannot be inserted in the key switch while driving.
■ Shocks can cause the key to turn in the slot and trigger the airbag!
■ The airbag can be triggered unexpectedly in an accident - it may result
in injury or death!
CAUTION
An insufficiently folded out key bit can damage the key switch!Transporting children safely
Child seat
Introduction
This chapter contains information on the following subjects:
Use of a child seat on the front passenger seat
20
Child safety and side airbag
21
Classification of child seats
21
Use of child seats fastened with a seat belt
21
Children are generally safer on the rear seats than on the front passenger
seat.
In contrast to adults, the muscles and bone structure of children are not yet
fully developed. Thus children are exposed to increased risk of injury.
Children should be transported in accordance with the relevant statutory pro-
visions.
Child seats that comply with the ECE-R 44 standard must be used. The ECE-R
standard stands for: Economic Commission for Europe - Regulation.
Child seats that comply with the ECE-R 44 standard have a test seal that can-
not be removed: a large E within a circle with the test number below.
WARNING■ The national legal requirements must be observed when using child
seats.■
One should never carry children, and also not babies! - on one's lap.
■
Never leave children unattended in the vehicle. Certain outside climatic
conditions can cause life-threatening temperatures in the vehicle.
■
The child must be secured in the vehicle throughout the journey. Other-
wise, in the event of an accident, the child would be thrown through the
vehicle and as a result may suffer fatal injuries, and also injure other occu-
pants.
■
Children are exposed to an increased risk of injury in the event of an acci-
dent if they lean forward or adopt an incorrect seated position when the
vehicle is moving. This particularly applies to children who are transported
on the front passenger seat as they can suffer severe, or even fatal injuries
if the airbag system is deployed!
19Transporting children safely
Page 27 of 197
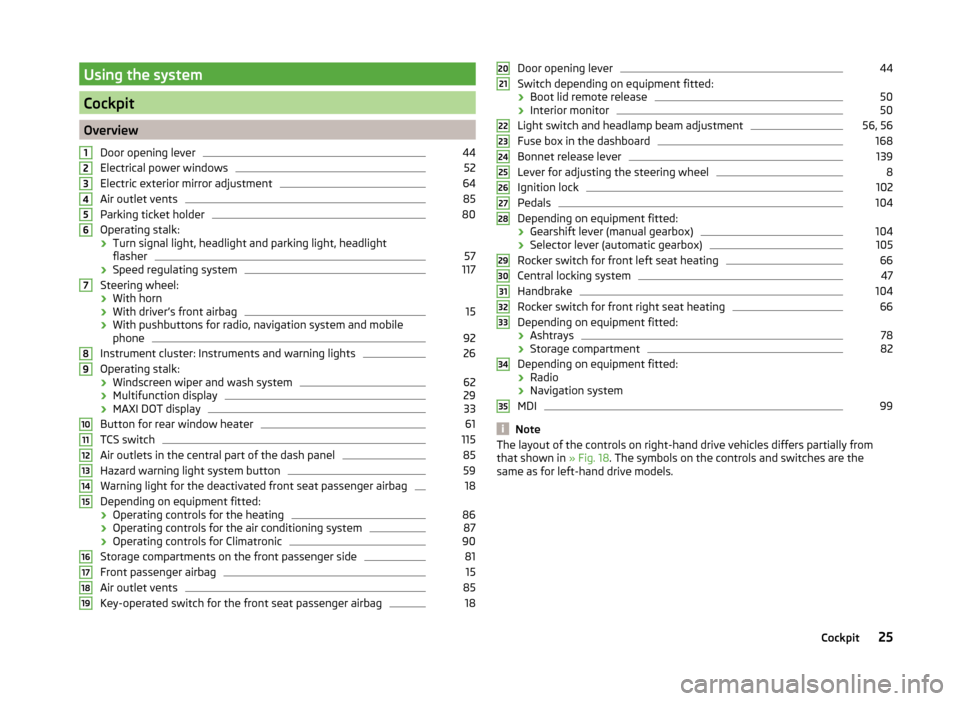
Using the system
Cockpit
OverviewDoor opening lever
44
Electrical power windows
52
Electric exterior mirror adjustment
64
Air outlet vents
85
Parking ticket holder
80
Operating stalk:
› Turn signal light, headlight and parking light, headlight
flasher
57
› Speed regulating system
117
Steering wheel:
› With horn
› With driver’s front airbag
15
›With pushbuttons for radio, navigation system and mobile
phone
92
Instrument cluster: Instruments and warning lights
26
Operating stalk:
› Windscreen wiper and wash system
62
›Multifunction display
29
›MAXI DOT display
33
Button for rear window heater
61
TCS switch
115
Air outlets in the central part of the dash panel
85
Hazard warning light system button
59
Warning light for the deactivated front seat passenger airbag
18
Depending on equipment fitted:
› Operating controls for the heating
86
›Operating controls for the air conditioning system
87
›Operating controls for Climatronic
90
Storage compartments on the front passenger side
81
Front passenger airbag
15
Air outlet vents
85
Key-operated switch for the front seat passenger airbag
1812345678910111213141516171819Door opening lever44
Switch depending on equipment fitted:
› Boot lid remote release
50
›Interior monitor
50
Light switch and headlamp beam adjustment
56, 56
Fuse box in the dashboard
168
Bonnet release lever
139
Lever for adjusting the steering wheel
8
Ignition lock
102
Pedals
104
Depending on equipment fitted:
› Gearshift lever (manual gearbox)
104
›Selector lever (automatic gearbox)
105
Rocker switch for front left seat heating
66
Central locking system
47
Handbrake
104
Rocker switch for front right seat heating
66
Depending on equipment fitted:
› Ashtrays
78
›Storage compartment
82
Depending on equipment fitted:
› Radio
› Navigation system
MDI
99
Note
The layout of the controls on right-hand drive vehicles differs partially from
that shown in » Fig. 18. The symbols on the controls and switches are the
same as for left-hand drive models.2021222324252627282930313233343525Cockpit
Page 30 of 197
CAUTIONNever drive until the fuel tank is completely empty! The irregular supply of fuel
can cause misfiring. This can result in considerable damage to parts of the en-
gine and the exhaust system.
Counter for distance driven
Read and observe
on page 26 first.
The distance which you have driven with your vehicle is shown in km. In some
countries the measuring unit “mile” is used.
Daily trip counter (trip)
The trip counter indicates the distance you have driven since it was last reset -
in steps of 100 metres or 1/10 of a mile.
Reset trip meter
The meter can be reset by pressing and holding button
6
» Fig. 19 on page 26 .
Odometer
The odometer indicates the total distance in kilometres or miles which the ve-
hicle has been driven.
Note
If the second speed display is enabled on vehicles with a segment display, this
speed will be shown instead of the odometer.
Digital clock
Read and observe
on page 26 first.
The clock is set with buttons
5
and
6
» Fig. 19 on page 26 .
Select the display that you wish to change with the button
5
and carry out
the change with the button
6
.
In vehicles equipped with the MAXI DOT display, it is also possible to set the
clock in the Time menu » page 34.
Display of the second speed
Read and observe
on page 26 first.
The display can show the current speed in mph 1)
.
This feature is provided for driving in countries with different units for speed.
MAXI DOT display
The display of the second speed can be set in the Settings menu
item » page 34 , Settings .
Segment display
›
Press the
5
» Fig. 19 on page 26 key repeatedly, until the odometer display
flashes » page 28 .
›
Press the
6
key while the display is flashing.
The second speed is displayed instead of the odometer.
Display of the second speed can be disabled in the same way.
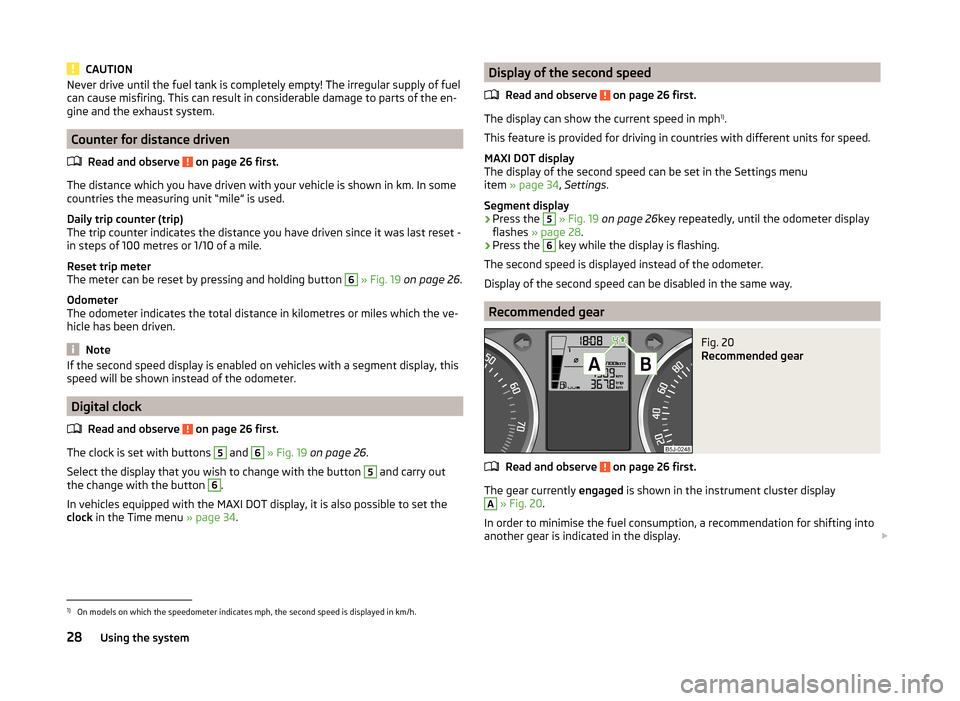
Recommended gear
Fig. 20
Recommended gear
Read and observe on page 26 first.
The gear currently engaged is shown in the instrument cluster display
A
» Fig. 20 .
In order to minimise the fuel consumption, a recommendation for shifting into
another gear is indicated in the display.
1)
On models on which the speedometer indicates mph, the second speed is displayed in km/h.
28Using the system
Page 42 of 197
In order to clean the filter, and where traffic conditions permit » , the vehicle
should be driven at an even speed of at least 60 km/h at engine speeds of 1
800 - 2 500 rpm for at least 15 minutes or until the warning light goes out with
the 4th or 5th gear engaged (automatic gearbox: position S).
The
warning light only goes out once the diesel particulate filter has been
successfully cleaned.
If the filter is not properly cleaned, the warning light
does not go out and
the warning light
begins to flash.
The following message is shown in the MAXI DOT display. Diesel particulate filter: Log book!
The engine control unit allows the vehicle to run in emergency mode. After
switching the ignition off and on again the indicator light, the indicator light
also lights up.
Seek help from a specialist garage.WARNING■ The diesel particulate filter reaches very high temperatures - there is a
fire hazard and serious injury could be caused. Therefore, never stop the
vehicle at places where the underside of your vehicle can come into contact
with flammable materials such as dry grass, undergrowth, leaves, spilled
fuel or such like.■
Always adjust your speed to suit weather, road, region and traffic condi-
tions. The recommendations indicated by the warning light must not tempt
you to disregard the national regulations for road traffic.
CAUTION
As long as the warning light lights up, one must take into account an in-
creased fuel consumption and in certain circumstances a power reduction of
the engine.
Note
■ We recommend avoiding regularly driving short distances to assist the com-
bustion process of the soot particles in the filter.■
Using diesel fuel with an increased sulphur content can considerably reduce
the service life of the filter. A ŠKODA Service Partner will be able to tell you
which countries use diesel fuel with a high sulphur content.
■
If the engine is turned off during the filter cleaning process or shortly after-
wards, the cooling fan may turn on automatically for a few minutes.
Fuel reserve
Read and observe
on page 35 first.
The indicator light
will come on if the fuel level is less than 7 litres.
An audible signal sounds as a warning signal.
The following message is shown in the MAXI DOT display.
Please refuel. Range: ... km
Note
The text in the MAXI DOT display only goes out after the vehicle has been re-
fuelled and driven a short distance.
Airbag system
Read and observe
on page 35 first.
If the warning light lights up, there is a fault in the airbag system.
The following message is shown in the MAXI DOT display. Error: Airbag
The operational capability of the airbag system is monitored electronically,
even if one of the airbags is switched off.
If a front, side or head airbag or belt tensioner has been switched off using
the vehicle system tester:
› The
warning light comes on for around 4 seconds after the ignition is
switched on and then flashes for approximately another 12 seconds at 2 sec-
ond intervals.
The following message is shown in the MAXI DOT display. Airbag/belt tensioner deactivated.
If the front passenger's front airbag was switched off using the key-operat-
ed switch on the side of the dash panel on the passenger side:
› The
warning light comes on for around 4 seconds after the ignition has
been switched on.
› switching off the airbag is indicated in the middle of the dash panel by the
lighting up of the yellow indicator light in display
» page 18 .
40Using the system
Page 44 of 197
Selector lever lockRead and observe
on page 35 first.
If the warning light
lights up, operate the brake pedal. This is necessary to
be able to move the selector lever from position P or N » page 106 .
Main beam
Read and observe
on page 35 first.
The warning light
comes on when the main beam or headlight flasher are
selected » page 57 .
Unlocking and locking
Unlocking and locking
Introduction
This chapter contains information on the following subjects:
Vehicle key
42
Replacing the battery in the remote control key
43
Child safety lock
44
Opening/closing the door
44
Locking/unlocking the vehicle without central locking
45
Emergency locking of the doors
45
Vehicle key
Fig. 25
Key: without/with remote control
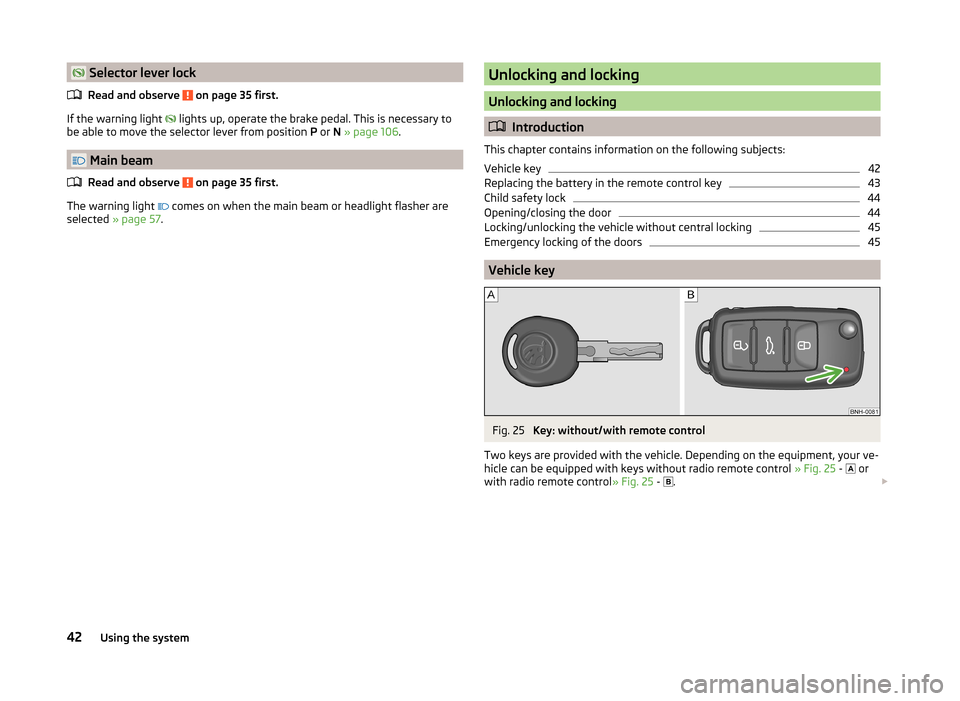
Two keys are provided with the vehicle. Depending on the equipment, your ve-
hicle can be equipped with keys without radio remote control » Fig. 25 -
or
with radio remote control » Fig. 25 -
.
42Using the system
Page 45 of 197
WARNING■Never leave the key in the vehicle when you exit the vehicle. Unauthor-
ized persons, such as children, for example, could lock the car, turn on the
ignition or start the engine - there is the danger of injury and accidents oc-
curring!■
When leaving the vehicle, never leave people who are not completely in-
dependent, such as children, unattended in the vehicle. The children might,
for example, release the handbrake or take the vehicle out of gear. The
vehicle could then start to move – risk of accident! These individuals would
possibly not be able to leave the vehicle on their own or to help them-
selves. At very high or very low temperatures can be fatal!
CAUTION
■ Each key contains electronic components; therefore it must be protected
against moisture and severe shocks.■
Keep the groove of the keys absolutely clean. Impurities (textile fibres, dust,
etc.) have a negative effect on the functionality of the locking cylinder and ig-
nition lock.
■
Operation of the remote control may temporarily be affected by interference
from transmitters close to the car operating in the same frequency range (e.g.
mobile phone, TV transmitter).
■
The battery must be replaced if the central locking only reacts to the remote
control at less than 3 metres away » page 43.
Note
■
When leaving the vehicle, always check if this is locked.■Please contact a specialist garage if you lose a key as they can obtain a new
one for you.Replacing the battery in the remote control keyFig. 26
Remote control key: Remove cover/remove battery
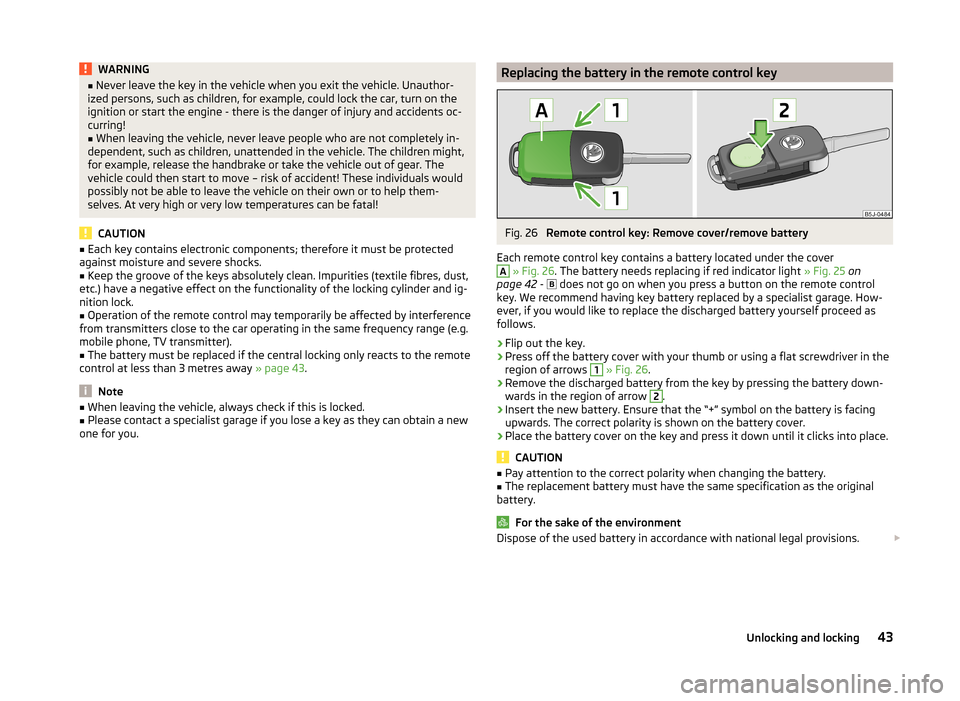
Each remote control key contains a battery located under the cover
A
» Fig. 26 . The battery needs replacing if red indicator light » Fig. 25 on
page 42 -
does not go on when you press a button on the remote control
key. We recommend having key battery replaced by a specialist garage. How-
ever, if you would like to replace the discharged battery yourself proceed as
follows.
›
Flip out the key.
›
Press off the battery cover with your thumb or using a flat screwdriver in the
region of arrows
1
» Fig. 26 .
›
Remove the discharged battery from the key by pressing the battery down-
wards in the region of arrow
2
.
›
Insert the new battery. Ensure that the “+” symbol on the battery is facing upwards. The correct polarity is shown on the battery cover.
›
Place the battery cover on the key and press it down until it clicks into place.
CAUTION
■ Pay attention to the correct polarity when changing the battery.■The replacement battery must have the same specification as the original
battery.
For the sake of the environment
Dispose of the used battery in accordance with national legal provisions. 43Unlocking and locking
Page 46 of 197
Note■The system has to be synchronised, if the vehicle cannot be unlocked or
locked with the remote control key after replacing the battery » page 49.■
Replacing the battery in the key a glued decorative cover requires the cover
to be destroyed. A replacement cover can be purchased from a ŠKODA Partner.
Child safety lock
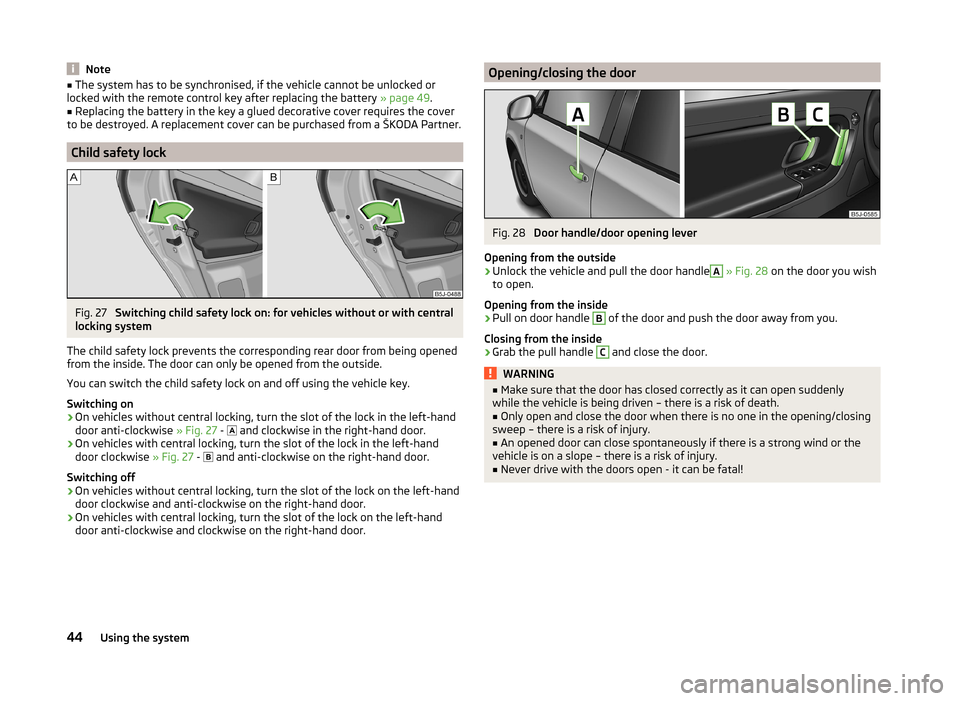
Fig. 27
Switching child safety lock on: for vehicles without or with central
locking system
The child safety lock prevents the corresponding rear door from being opened
from the inside. The door can only be opened from the outside.
You can switch the child safety lock on and off using the vehicle key.
Switching on
›
On vehicles without central locking, turn the slot of the lock in the left-hand
door anti-clockwise » Fig. 27 -
and clockwise in the right-hand door.
›
On vehicles with central locking, turn the slot of the lock in the left-hand
door clockwise » Fig. 27 -
and anti-clockwise on the right-hand door.
Switching off
›
On vehicles without central locking, turn the slot of the lock on the left-hand
door clockwise and anti-clockwise on the right-hand door.
›
On vehicles with central locking, turn the slot of the lock on the left-hand
door anti-clockwise and clockwise on the right-hand door.
Opening/closing the doorFig. 28
Door handle/door opening lever
Opening from the outside
›
Unlock the vehicle and pull the door handle
A
» Fig. 28 on the door you wish
to open.
Opening from the inside
›
Pull on door handle
B
of the door and push the door away from you.
Closing from the inside
›
Grab the pull handle
C
and close the door.
WARNING■ Make sure that the door has closed correctly as it can open suddenly
while the vehicle is being driven – there is a risk of death.■
Only open and close the door when there is no one in the opening/closing
sweep – there is a risk of injury.
■
An opened door can close spontaneously if there is a strong wind or the
vehicle is on a slope – there is a risk of injury.
■
Never drive with the doors open - it can be fatal!
44Using the system