seat adjustment SKODA FABIA 2014 2.G / 5J Owner's Manual
[x] Cancel search | Manufacturer: SKODA, Model Year: 2014, Model line: FABIA, Model: SKODA FABIA 2014 2.G / 5JPages: 197, PDF Size: 13.56 MB
Page 12 of 197

Seat belts
Wearing seat belts
Introduction
Fig. 3
Driver wearing seat belt
This chapter contains information on the following subjects:
The physical principle of a frontal collision
11
Fastening and unfastening seat belts
12
Belt height adjustment on the front seats
13
Seat belts that are fastened correctly offer good protection in the event of an
accident. They reduce the risk of an injury and increase the chance of survival
in the event of a major accident.
Correctly fastened seat belts hold occupants of the car in the correct seated
position » Fig. 3.
The seat belts reduce the kinetic energy (energy of motion) to a considerable
extent. They also prevent uncontrolled movements which, in turn, may well re-
sult in severe injuries.
The occupants of a vehicle who have fastened and correctly adjusted their
seat belt benefit greatly from the fact that the kinetic energy is absorbed by
the belts as much as possible.
The structure of the front end of the vehicle and other passive safety meas-
ures, such as the airbag system, also contribute to reducing the kinetic energy
in the best possible way. The energy produced is thus absorbed and there is
less risk of injury.
Particular safety aspects must be observed when transporting children in the
vehicle » page 19 , Transporting children safely .
WARNING■
Fasten your seat belt before each journey - even when driving in town!
This also applies to the people seated at the rear – there is a risk of injury.■
Expectant women must also always wear a seat belt. This is the only way
of ensuring optimal protection for the unborn child » page 12, Fastening
and unfastening seat belts .
■
The maximum protection which seat belts can offer is only achieved if you
are correctly seated » page 7, Correct and safe seated position .
■
The seat backrests of the front seats must not be tilted too far to the rear
otherwise the seatbelts can lose their effectiveness.
WARNINGInformation on the correct routing of the belt■Always ensure that the webbing of the seat belts is properly routed. Seat
belts which are not correctly adjusted can themselves cause injuries even
in minor accidents.■
Adjust the height of the belt in such a way that the shoulder part of the
belt is roughly positioned across the middle of your shoulder - on no ac-
count across your neck.
■
A seat belt which is hanging too loose can result in injuries as your body is
moved forward by the kinetic energy produced in an accident and is then
suddenly held firm by the belt.
■
The belt must not run across solid or fragile objects (e.g. spectacles, ball-
point pens, keys, etc.). Such objects can cause injury.
WARNINGInformation on dealing with the safety belts■The belt webbing must not be jammed in-between at any point or twis-
ted, or chafe against any sharp edges.■
Make sure you do not catch the seat belt in the door when closing it.
WARNINGInformation on the proper use of the safety belts■Never use a seatbelt to secure two persons (not even children). Nor may
the seat belt be placed over a child who is sitting on the lap of another pas-
senger. 10Safety
Page 15 of 197

Belt height adjustment on the front seatsFig. 7
Front seat: Seat belt height ad-
juster
Read and observe on page 10 first.
The seat belt height adjuster makes it possible to adjust the routing of the
front seat belts in the area of the shoulder to the body size.
›
Press the height adjuster and move up or down in the desired direc-
tion » Fig. 7 .
›
Then pull firmly on the belt to ensure that the seat belt height adjuster has
correctly locked in place.
Inertia reel and belt pretensioners
Introduction
This chapter contains information on the following subjects:
Inertia reel
13
Belt tensioners
13
Inertia reel
Each seat belt is equipped with an inertia reel.
The seat belt can move freely when it is pulled slowly. The seat belt is locked
by the inertia reel when it is pulled suddenly.
The belts also lock under full braking, under acceleration, when driving down-
hill and when cornering.
WARNINGIf the seat belt does not lock when it is pulled sharply, have it inspected im-
mediately by a specialist garage.Belt tensioners
Safety for the driver and front passenger wearing their seat belts is enhanced
by the belt tensioners fitted to the inertia reels of the front three-point seat
belts.
The three-point seat belts are automatically tensioned in the event of a frontal
collision of a certain severity. The belt tensioners can also be deployed if the
seat belts are not fastened.
The seat belts are automatically tensioned in the event of a collision of a cer-
tain severity.
Belt tensioners are not activated in the event of minor frontal collisions, side
and rear-end collisions, in the case of a rollover and also not in accidents in
which no major forces are produced from the front.WARNING■ Any work on the belt tensioner system including removal and installation
of system components because of other repair work, must only be carried
out by a specialist garage.■
The protective function of the system is only adequate for a single acci-
dent. If the belt tensioners have been deployed, it is then necessary to re-
place the entire system.
Note
■ Smoke is generated when the belt tensioners are deployed. This is not an in-
dication of a fire in the vehicle.■
When disposing of the vehicle or parts of the belt tensioner system, it is im-
portant to comply with national legal requirements. ŠKODA service partners
are familiar with these regulations and will be able to provide you with de-
tailed information.
13Seat belts
Page 27 of 197
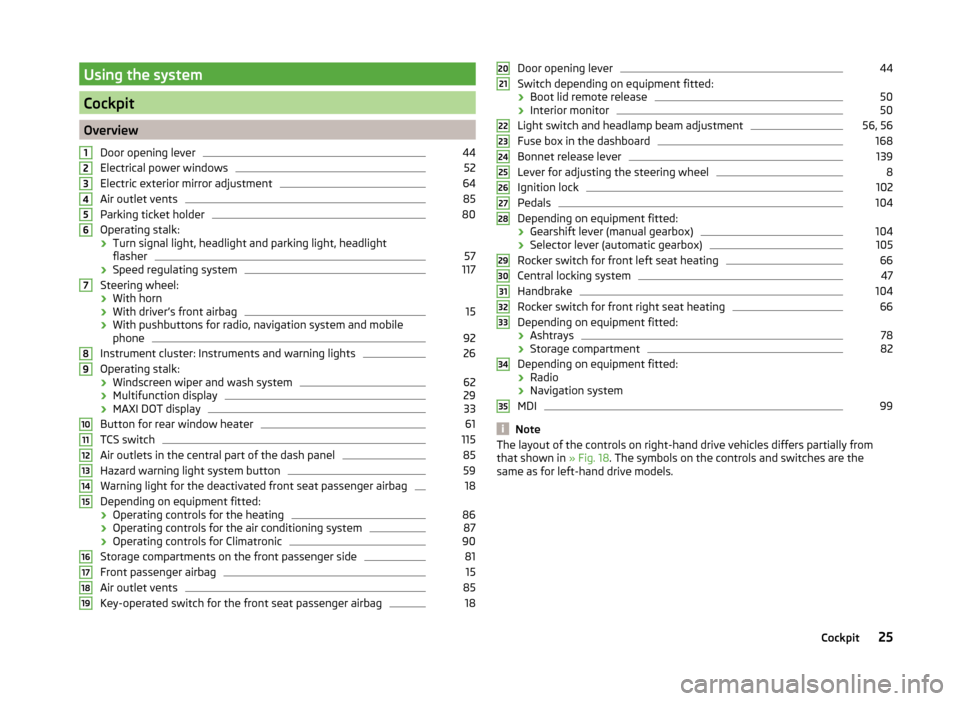
Using the system
Cockpit
OverviewDoor opening lever
44
Electrical power windows
52
Electric exterior mirror adjustment
64
Air outlet vents
85
Parking ticket holder
80
Operating stalk:
› Turn signal light, headlight and parking light, headlight
flasher
57
› Speed regulating system
117
Steering wheel:
› With horn
› With driver’s front airbag
15
›With pushbuttons for radio, navigation system and mobile
phone
92
Instrument cluster: Instruments and warning lights
26
Operating stalk:
› Windscreen wiper and wash system
62
›Multifunction display
29
›MAXI DOT display
33
Button for rear window heater
61
TCS switch
115
Air outlets in the central part of the dash panel
85
Hazard warning light system button
59
Warning light for the deactivated front seat passenger airbag
18
Depending on equipment fitted:
› Operating controls for the heating
86
›Operating controls for the air conditioning system
87
›Operating controls for Climatronic
90
Storage compartments on the front passenger side
81
Front passenger airbag
15
Air outlet vents
85
Key-operated switch for the front seat passenger airbag
1812345678910111213141516171819Door opening lever44
Switch depending on equipment fitted:
› Boot lid remote release
50
›Interior monitor
50
Light switch and headlamp beam adjustment
56, 56
Fuse box in the dashboard
168
Bonnet release lever
139
Lever for adjusting the steering wheel
8
Ignition lock
102
Pedals
104
Depending on equipment fitted:
› Gearshift lever (manual gearbox)
104
›Selector lever (automatic gearbox)
105
Rocker switch for front left seat heating
66
Central locking system
47
Handbrake
104
Rocker switch for front right seat heating
66
Depending on equipment fitted:
› Ashtrays
78
›Storage compartment
82
Depending on equipment fitted:
› Radio
› Navigation system
MDI
99
Note
The layout of the controls on right-hand drive vehicles differs partially from
that shown in » Fig. 18. The symbols on the controls and switches are the
same as for left-hand drive models.2021222324252627282930313233343525Cockpit
Page 58 of 197
Parking and low beam lightsFig. 40
Dash panel: Light switch
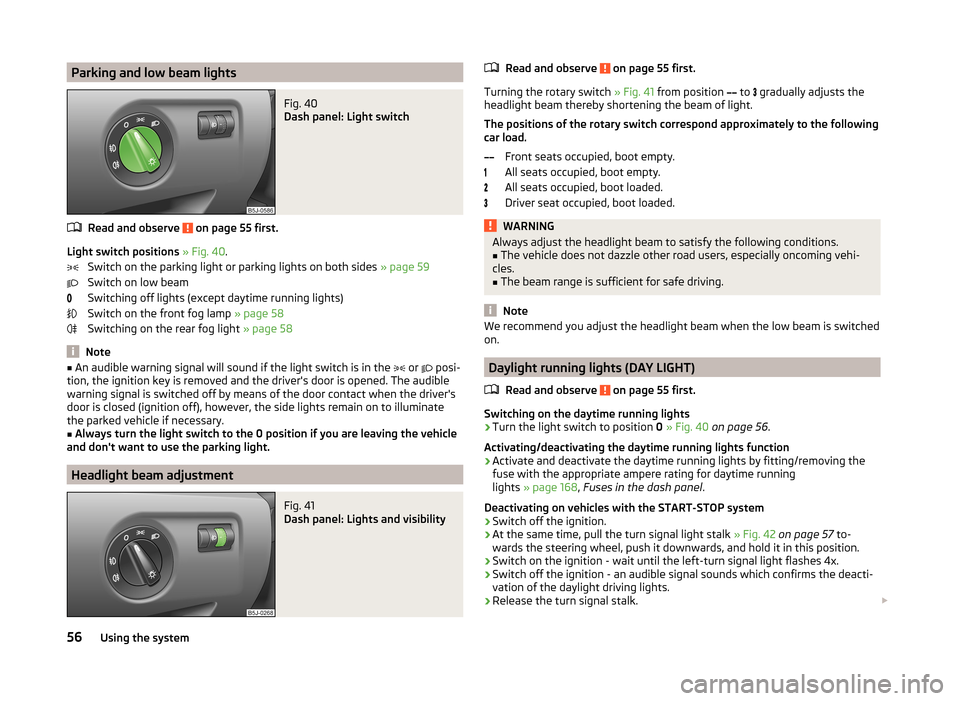
Read and observe on page 55 first.
Light switch positions » Fig. 40 .
Switch on the parking light or parking lights on both sides » page 59
Switch on low beam
Switching off lights (except daytime running lights)
Switch on the front fog lamp » page 58
Switching on the rear fog light » page 58
Note
■
An audible warning signal will sound if the light switch is in the or posi-
tion, the ignition key is removed and the driver's door is opened. The audible
warning signal is switched off by means of the door contact when the driver's
door is closed (ignition off), however, the side lights remain on to illuminate
the parked vehicle if necessary.■
Always turn the light switch to the 0 position if you are leaving the vehicle
and don't want to use the parking light.
Headlight beam adjustment
Fig. 41
Dash panel: Lights and visibility
Read and observe on page 55 first.
Turning the rotary switch » Fig. 41 from position
to
gradually adjusts the
headlight beam thereby shortening the beam of light.
The positions of the rotary switch correspond approximately to the following
car load.
Front seats occupied, boot empty.
All seats occupied, boot empty.
All seats occupied, boot loaded.
Driver seat occupied, boot loaded.
WARNINGAlways adjust the headlight beam to satisfy the following conditions.■The vehicle does not dazzle other road users, especially oncoming vehi-
cles.■
The beam range is sufficient for safe driving.
Note
We recommend you adjust the headlight beam when the low beam is switched
on.
Daylight running lights (DAY LIGHT)
Read and observe
on page 55 first.
Switching on the daytime running lights
›
Turn the light switch to position 0 » Fig. 40 on page 56 .
Activating/deactivating the daytime running lights function
›
Activate and deactivate the daytime running lights by fitting/removing the
fuse with the appropriate ampere rating for daytime running
lights » page 168 , Fuses in the dash panel .
Deactivating on vehicles with the START-STOP system
›
Switch off the ignition.
›
At the same time, pull the turn signal light stalk » Fig. 42 on page 57 to-
wards the steering wheel, push it downwards, and hold it in this position.
›
Switch on the ignition - wait until the left-turn signal light flashes 4x.
›
Switch off the ignition - an audible signal sounds which confirms the deacti-
vation of the daylight driving lights.
›
Release the turn signal stalk.
56Using the system
Page 67 of 197
Seats and storage
Front seats
Introduction
This chapter contains information on the following subjects:
Adjusting the front seats - Version 1
65
Adjusting the front seats - Variant 2
65
Front seat heating
66
The driver's seat should be adjusted in such a way that the pedals can be fully
pressed to the floor with slightly bent legs.
The seat backrest on the driver's seat should be adjusted in such a way that the upper point of the steering wheel can be easily reached with slightly bent
arms.
Correct adjustment of the seats is particularly important for the following rea-
sons.
› Reaching the controls safely and quickly.
› A relaxed and fatigue-free body position.
› Achieving the maximum protection offered by the seat belts and the airbag
system.
WARNING■ Only adjust the driver's seat when the vehicle is stationary – there is the
risk of an accident.■
Caution when adjusting the seat! You may suffer injuries or bruises as a
result of adjusting the seat without paying proper attention.
■
Never carry more people than the number of seats in the vehicle.
■
Do not transport any objects on the front passenger seat other than ob-
jects (e.g. child safety seat) intended for this purpose – there is the risk of
an accident.
Note
After a certain time, play can develop within the adjustment mechanism of the
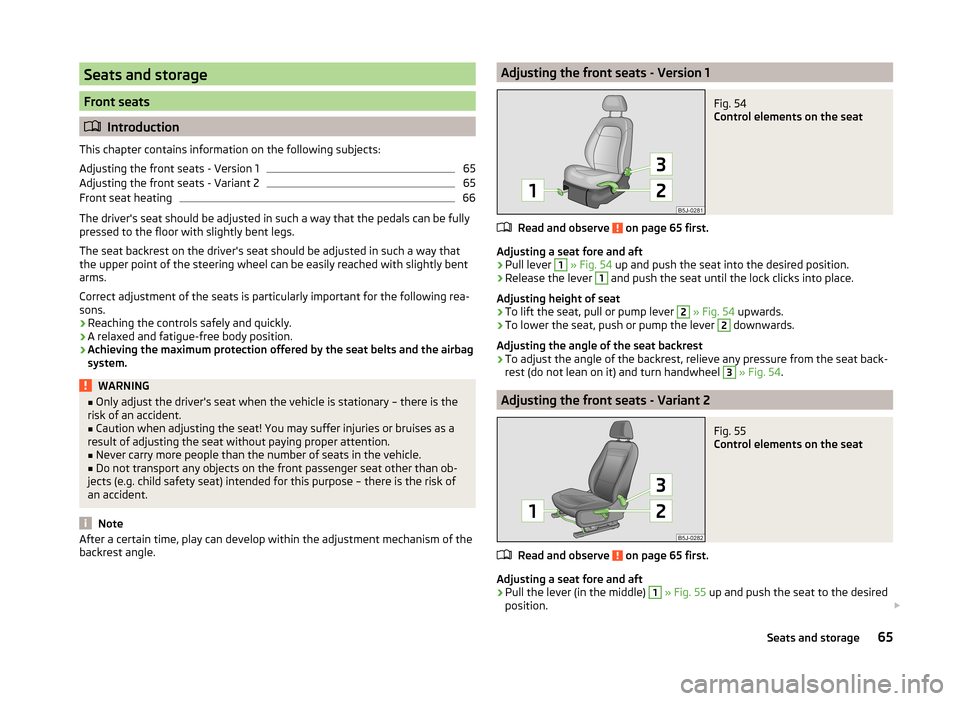
backrest angle.Adjusting the front seats - Version 1Fig. 54
Control elements on the seat
Read and observe on page 65 first.
Adjusting a seat fore and aft
›
Pull lever
1
» Fig. 54 up and push the seat into the desired position.
›
Release the lever
1
and push the seat until the lock clicks into place.
Adjusting height of seat
›
To lift the seat, pull or pump lever
2
» Fig. 54 upwards.
›
To lower the seat, push or pump the lever
2
downwards.
Adjusting the angle of the seat backrest
›
To adjust the angle of the backrest, relieve any pressure from the seat back-
rest (do not lean on it) and turn handwheel
3
» Fig. 54 .
Adjusting the front seats - Variant 2
Fig. 55
Control elements on the seat
Read and observe on page 65 first.
Adjusting a seat fore and aft
›
Pull the lever (in the middle)
1
» Fig. 55 up and push the seat to the desired
position.
65Seats and storage
Page 129 of 197
Before you decide to have damaged body parts replaced, however, you should
first contact your specialist garage to determine whether or not such parts can
also be repaired. Repairs to body parts are usually cheaper.
ŠKODA Original Accessories
Read and observe
on page 126 first.
You should note the following if you wish to fit accessories to your vehicle:
We recommend that you use ŠKODA Genuine Accessories in your vehicle.
ŠKODA AUTO a.s. offers a warranty on the reliability, safety and suitability for
your particular vehicle of these accessories. Although we constantly monitor
the market, we are not able to assess or offer a warranty on other products
even though in some instances such products may have a type approval or
may have been approved by a nationally recognised approval authority.
All accessory products go through a fastidious process of technical develop-
ment (technical tests) and quality inspection (customer tests), and only if all
tests are positive does the product become a ŠKODA Genuine Accessory.
Our ŠKODA Genuine Accessories service also provides expert advice and pro-
fessional fitting if requested by the customer.
ŠKODA Service Partners are liable for any defects in ŠKODA Genuine Parts for a period of 2 years after installation or delivery in accordance with materials de-
fect liability legislation, unless otherwise agreed in the purchase contract or in
any other agreements. You should keep the confirmed warranty certificate and
the receipt for these accessories for this period, so that the commencement of
the warranty term may be verified.
In addition, ŠKODA Service Partners also stock a range of suitable car care
products as well as those parts which are subject to natural wear and tear,
such as tyres, batteries, bulbs and wiper blades.
Note
The accessories authorized by ŠKODA AUTO a.s. will be offered by the ŠKODA
Partners in all countries where ŠKODA AUTO a.s. has a sales and service net- work. This will usually be in the form of a printed catalogue of Original ŠKODA
Accessories, in the form of separate printed brochures or in the form of offers
for ŠKODA Genuine Accessories on the ŠKODA Partner's website.Spoiler
Read and observe
on page 126 first.
The following instructions shall be observed if your new vehicle is equippedwith a spoiler fitted to the front bumper in combination with the spoiler on the
tailgate.
› For safety reasons the vehicle must only ever be equipped with a spoiler on
the front bumper in combination with the associated spoiler on the tailgate.
› A spoiler cannot be fitted alone on the front bumper nor in combination with-
out a spoiler on the tailgate or in combination with an inappropriate spoiler
on the tailgate.
› We recommend that you consult a ŠKODA Service Partner for any repairs, re-
placement, fitting or removal of spoilers.
WARNINGWork not properly performed on the spoilers on your vehicle can result in
faults - there is a risk of an accident and serious injury.
Airbags
Read and observe
on page 126 first.
The system components for the airbag system may be found in the front
bumper, doors, front seats, the roof lining or in the bodywork.
WARNINGAny work on the airbag system including the installation and removal of
system components due to other repair work (e.g. removal of the steering
wheel) must only be carried out by a specialist garage.■
Adjustments, repairs and modifications which have been carried out un-
professionally can cause damage, operational faults, and can also seriously
impair the effectiveness of airbag system – there is the risk of an accident
and fatal injury.
■
The airbag system must be replaced if an airbag has been deployed. Air-
bag modules cannot be repaired.
127Car care
Page 171 of 197
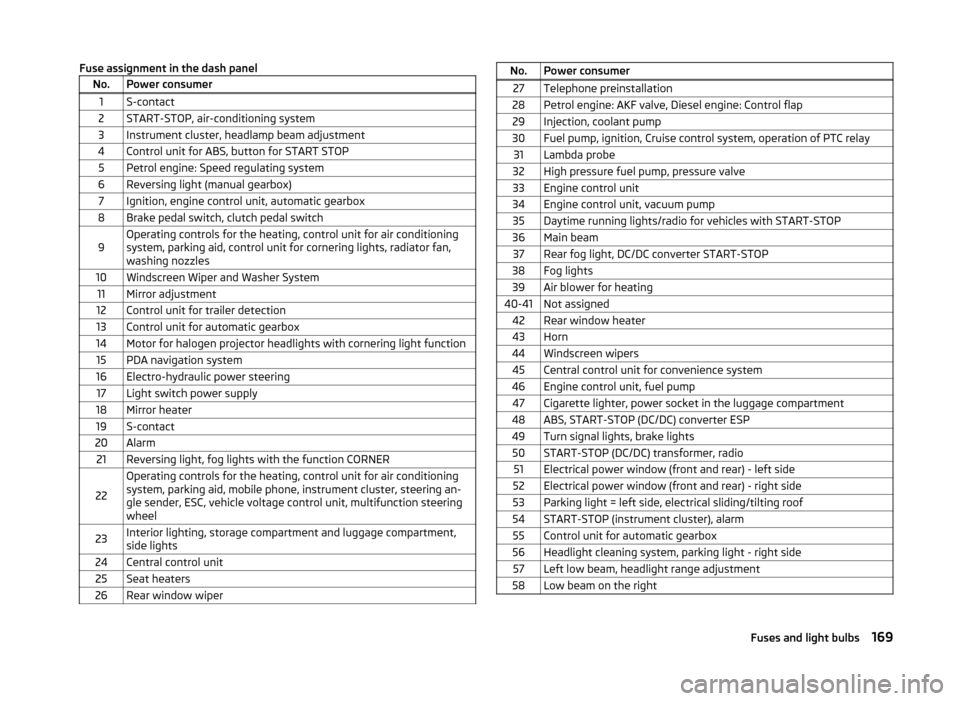
Fuse assignment in the dash panelNo.Power consumer1S-contact2START-STOP, air-conditioning system3Instrument cluster, headlamp beam adjustment4Control unit for ABS, button for START STOP5Petrol engine: Speed regulating system6Reversing light (manual gearbox)7Ignition, engine control unit, automatic gearbox8Brake pedal switch, clutch pedal switch9Operating controls for the heating, control unit for air conditioning
system, parking aid, control unit for cornering lights, radiator fan,
washing nozzles10Windscreen Wiper and Washer System11Mirror adjustment12Control unit for trailer detection13Control unit for automatic gearbox14Motor for halogen projector headlights with cornering light function15PDA navigation system16Electro-hydraulic power steering17Light switch power supply18Mirror heater19S-contact20Alarm21Reversing light, fog lights with the function CORNER
22
Operating controls for the heating, control unit for air conditioning
system, parking aid, mobile phone, instrument cluster, steering an-
gle sender, ESC, vehicle voltage control unit, multifunction steering
wheel23Interior lighting, storage compartment and luggage compartment,
side lights24Central control unit25Seat heaters26Rear window wiperNo.Power consumer27Telephone preinstallation28Petrol engine: AKF valve, Diesel engine: Control flap29Injection, coolant pump30Fuel pump, ignition, Cruise control system, operation of PTC relay31Lambda probe32High pressure fuel pump, pressure valve33Engine control unit34Engine control unit, vacuum pump35Daytime running lights/radio for vehicles with START-STOP36Main beam37Rear fog light, DC/DC converter START-STOP38Fog lights39Air blower for heating40-41Not assigned42Rear window heater43Horn44Windscreen wipers45Central control unit for convenience system46Engine control unit, fuel pump47Cigarette lighter, power socket in the luggage compartment48ABS, START-STOP (DC/DC) converter ESP49Turn signal lights, brake lights50START-STOP (DC/DC) transformer, radio51Electrical power window (front and rear) - left side52Electrical power window (front and rear) - right side53Parking light = left side, electrical sliding/tilting roof54START-STOP (instrument cluster), alarm55Control unit for automatic gearbox56Headlight cleaning system, parking light - right side57Left low beam, headlight range adjustment58Low beam on the right169Fuses and light bulbs
Page 187 of 197
Index
A
Abroad Driving abroad
113
Unleaded petrol113
ABS115
warning light38
Accessories126
Adjusting Belt height
13
Exterior mirrors64
Head restraints68
Steering wheel8
Adjusting the seats7
Adjustment Headlight beam
56
Seats65
Adjustments and technical changes Spoiler
127
Adjustments and technical modifications Airbags
127
Aerial129
See windows131
Airbag14
Adjustments and impairment of the airbag sys- tem
127
Deactivating18
Deployment14
Front airbag15
Head airbag17
Side airbag16
Switching off the front passenger airbag18
Airbag system14
Air conditioning Operation
88
Air conditioning system Air outlets85
Climatronic90
Manual air conditioning system87
Air outlets85
Alarm49
Anti-theft alarm system49
Operation49
Trailer125
Antilock Braking System115
Armrest83
Ashtray78
ASR115
warning light38
Assist systems ABS
38, 115
ASR38, 115
Cruise control system117
EDS and XDS115
ESC38, 114
Parking aid116
START-STOP118
Auto Check Control34
Automatic gearbox Selector lever-emergency unlocking
108
Starting-off and driving107
Tiptronic106
Automatic load deactivation149
Automatic transmission105
Kickdown107
Malfunction107
Selector lever lock106
Using the selector lever105
AUX99
Avoiding damage to the vehicle Driving through water
112
Avoiding damage to your vehicle112
B
Back-up wheel
155
Ball head Check fitting
122
Fitting122
Ready position121
Removing123
Belts10
Belt tensioners13
Bicycle carrier75
Bonnet Closing
139
Opening139
Boot Cover
70
Emergency unlocking51
Fastening elements69
Fixing nets70
Folding hooks70
see Boot lid50
Unlocking the boot lid51
Boot lid50
automatic locking51
Brake assist114
Brake booster103
Brake fluid145
Changing145
Checking145
Display messages36
Brakes Brake booster
103
Brake fluid145
Handbrake104
Indicator light36
Running in109
Braking Information for braking
103
Breakdown kit163
185Index
Page 190 of 197
Refuelling136
Unleaded petrol136
fuel consumption177
Fuel consumption109
Fuses Assignment
168
Changing168
Colour coding168
G
Gear Recommended gear
28
Gearbox Display messages
34
Gear changing Gear stick
104
General view Cockpit
25
Glow plug system Warning light
39
GSM92
H
Handbrake
104
Hazard warning light system59
Head airbag17
Headlight cleaning system Headlight cleaning system
63
Headlights171
Driving abroad113
Headlight cleaning system63
Head restraint68
Storing in the seat squabs68
Heating Deicing the windows
87
Exterior mirrors64
Operating86
Operation86
Rear window61
Recirculated air mode87
Seats66
Heating and air conditioning84
Hill hold control114
Horn25
I
Ignition
102
Ignition lock102
Immobilizer101
Individual settings locking
46
unlocking46
Inertia reel13
Instrument cluster26
Overview26
see instrument cluster26
Interior monitor50
ISOFIX22
J
Jack
159
Maintenance132
Jacking points Raise vehicle
161
Jump-starting164, 165
L
Light Beam adjustment
56
Cockpit59
Headlight flash57
Lights55
Cockpit60
Daylight running56
Fog lights58
Foglights with the CORNER function58
Halogen projector headlights with cornering light function
57
Hazard warning light system59
Low beam lights56
Main beam lights57
Parking lights56, 59
Rear fog light58
Replacing bulbs170
Switching on and off56
Tourist lights58
Turn signals57
warning lights35
Lock Central locking system
47
Locking Emergency locking
45
Remote control48
without central locking45
Locking and unlocking from the inside47
Low beam lights56
Luggage compartment Class N1 vehicles
69
Lighting61
Retractable luggage compartment cover (Fabia Estate)
71
Variable loading floor72
M
Main beam
57
Maintenance111
Decorative films131
Manual air conditioning Recirculated air mode
89
Manual gear changing see Gear changing
104
MAXI DOT Main menu
33
see MAXI DOT display33
Settings34
MAXI DOT display33
maximum allowable weights
176
188Index
Page 192 of 197

SeatAdjusting65
Seat belt warning light
36
Seat belts10
Belt tensioners13
Cleaning134
fastening and unfastening12
Height adjustment13
Seatbelts Inertia reels
13
Seat belts The physical principle of a frontal collision
11
Seats folding forward
66
Head restraints68
Heating66
Removing the seats67
Seats and storage65
see Automatic gearbox Manual gear shifting on the multifunction steering wheel
106
Selector lever see Using the selector lever
105
Service display32
Service intervals126
Setting Heating
87
Manual air conditioning system89
Manually dimmed rear-view mirror64
Setting the clock Clock
28
Shifting gears Driving and saving energy
109
Side airbag16
Sliding/tilting roof53
Comfort operation54
Emergency operation55
Opening and raising54
Operation54
Sliding/tilting sunroof Closing54
Snow chains157
Spare wheel155
Speedometer27
Speed symbol see Wheels
152
Spoiler127
Stalk Main beam
57
Turn signals57
START-STOP118
Operating conditions for the system118
operation119
system-related automatic start-up119
START-STOPP Manually deactivating/activating the system
119
Starting and stopping the engine101
Starting engine Jump-starting
164
Starting the engine102
Jump-starting165
START STOP Information messages
119
Jump-starting166
Steering wheel8
Storage80
Storage Compartment Lighting
60
Storage compartments80
Sun visors61
Switching lights on and off56
Switching off the engine102
Synthetic leather134
T
Tailgate
50
Taking care of the vehicle Natural leather133
Seat belts134
Taking care of your vehicle Automatic car wash system
129
Chrome parts130
Cleaning the wheels132
Door lock cylinders131
Headlight lenses131
High-pressure cleaner129
Plastic parts130
Washing by hand128
Wash system129
Technical data176
Telephone92
Tiptronic106
Tire Explanation of the labelling
152
see wheels152
Tire size152
see wheels152
Tools159
TOP TETHER23
Tourist lights58
Towing166
Towing a trailer120
Towing device Description
121
Drawbar load120
Use and care123
Towing eye Front
167
Rear167
Towing protection50
Traction Control System (ASR)115
Trailer120, 124
Loading124
Towing a trailer124
190Index