emergency towing SKODA FABIA 2014 2.G / 5J Owner's Manual
[x] Cancel search | Manufacturer: SKODA, Model Year: 2014, Model line: FABIA, Model: SKODA FABIA 2014 2.G / 5JPages: 197, PDF Size: 13.56 MB
Page 6 of 197
Do-it-yourself
Emergency equipment, and self-help158
Emergency equipment
158
Changing a wheel
159
Tyre repair
162
Jump-starting
164
Towing the vehicle
166
Fuses and light bulbs
168
Fuses
168
Bulbs
170
Technical data
Technical data
176
Vehicle data
176
Index
4Table of Contents
Page 48 of 197
Warning light in the driver's door
After locking the vehicle, the warning light flashes for around 2 seconds in
quick succession, afterwards it begins to flash evenly at longer intervals.
If the vehicle is locked and the safe securing system » page 46 is not operat-
ing, the warning light in the driver door flashes for about 2 seconds fast, goes
out and starts to flash evenly at longer intervals after about 30 seconds.
If the indicator light first flashes fast for about 2 seconds, then lights up for
about 30 seconds continuously and then flashes slowly, there is a fault in the
central locking system or in the interior monitor and in the towing protec-
tion » page 50 . Seek help from a specialist garage.
Convenience operation of windows
The windows can be opened and closed when unlocking and locking the vehi-
cle » page 53 .
CAUTION
If the safe securing system is activated » page 46, the door opening lever and
the central locking buttons do not operate.
Note
■ In the event of an accident in which the airbags are deployed, the locked
doors are automatically unlocked in order to enable rescuers to gain access to
the vehicle.■
Upon failure of the central locking system the key can only be used for lock-
ing and unlocking the driver's door. The other doors and the boot lid can be
manually locked or unlocked. ■ Emergency locking of the door » page 45.
■ Emergency unlocking of the boot lid » page 51.
Individual settings
Read and observe
on page 46 first.
Opening a single door
This selection function makes it possible to only unlock the driver's door. The other doors remain locked and are only unlocked when the command is repea-
ted.
Automatic locking and unlocking
All the doors and the boot lid are locked automatically once the car reaches a
speed of about 15 km/h.
If the ignition key is withdrawn, the car is then automatically unlocked again.
In addition, it is possible for the driver or front passenger to unlock the car by
pressing the central locking button
» page 47 .
The doors can be unlocked and opened from the inside by a single pull on the
opening lever of the respective door.
Note
Individual settings can be applied in a specialist workshop.
Safe securing
Read and observe
on page 46 first.
The central locking system is equipped with a safe securing system. The door
locks are blocked automatically if the vehicle is locked from the outside. It is
then not possible to open the doors with the door handle, either from the in-
side or from the outside.
You will be informed that the safe securing system is activated after the vehi-
cle is locked by the CHECK DEADLOCK message on the instrument cluster dis-
play. On vehicles equipped with the MAXI DOT display, the display shows
Check deadlock. Log book!
Switching off
Opening can take place in one of the following ways.
›
By locking twice within 2 seconds.
›
By disabling the interior monitoring » page 50, Interior monitor and towing
protection .
If the vehicle is locked and the safe securing system is switched off, the door can be opened separately from the inside by a single pull on the opening lever.
Switching on
The safelock switches on automatically the next time the vehicle is locked and
unlocked.
Switch-on display
The warning light flashes for around 2 seconds in quick succession, afterwards
it begins to flash evenly at longer intervals.
Switch-off display
The indicator light in the driver door flashes for about 2 seconds fast, goes out
and starts to flash regularly at longer intervals after about 30 seconds.
46Using the system
Page 52 of 197
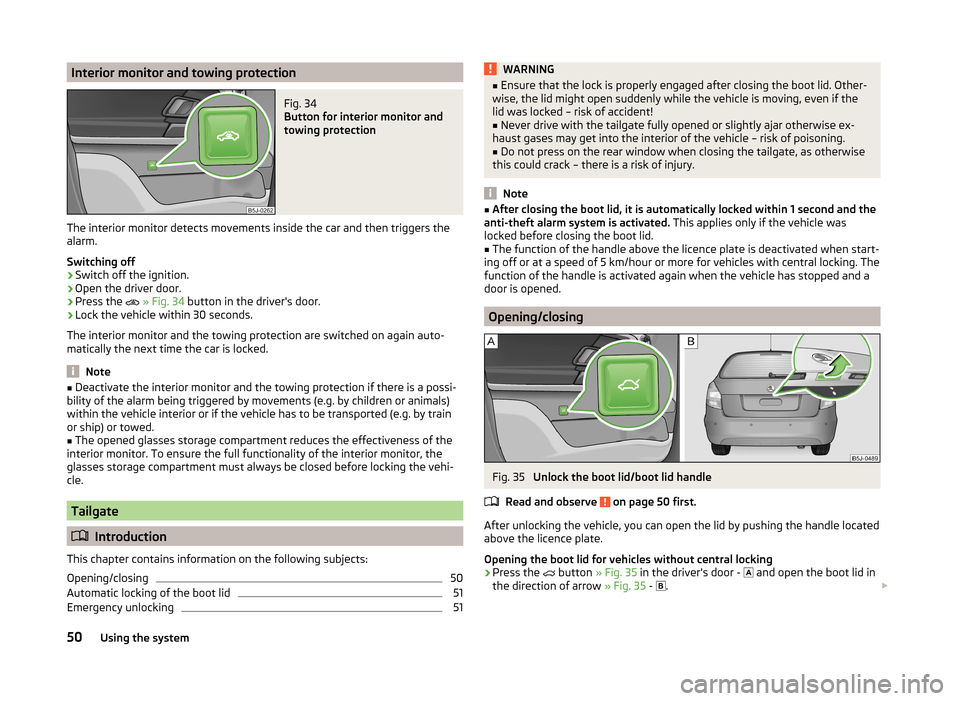
Interior monitor and towing protectionFig. 34
Button for interior monitor and
towing protection
The interior monitor detects movements inside the car and then triggers the
alarm.
Switching off
›
Switch off the ignition.
›
Open the driver door.
›
Press the
» Fig. 34 button in the driver's door.
›
Lock the vehicle within 30 seconds.
The interior monitor and the towing protection are switched on again auto-
matically the next time the car is locked.
Note
■ Deactivate the interior monitor and the towing protection if there is a possi-
bility of the alarm being triggered by movements (e.g. by children or animals)
within the vehicle interior or if the vehicle has to be transported (e.g. by train
or ship) or towed.■
The opened glasses storage compartment reduces the effectiveness of the
interior monitor. To ensure the full functionality of the interior monitor, the
glasses storage compartment must always be closed before locking the vehi-
cle.
Tailgate
Introduction
This chapter contains information on the following subjects:
Opening/closing
50
Automatic locking of the boot lid
51
Emergency unlocking
51WARNING■ Ensure that the lock is properly engaged after closing the boot lid. Other-
wise, the lid might open suddenly while the vehicle is moving, even if the
lid was locked – risk of accident!■
Never drive with the tailgate fully opened or slightly ajar otherwise ex-
haust gases may get into the interior of the vehicle – risk of poisoning.
■
Do not press on the rear window when closing the tailgate, as otherwise
this could crack – there is a risk of injury.
Note
■ After closing the boot lid, it is automatically locked within 1 second and the
anti-theft alarm system is activated. This applies only if the vehicle was
locked before closing the boot lid.■
The function of the handle above the licence plate is deactivated when start-
ing off or at a speed of 5 km/hour or more for vehicles with central locking. The
function of the handle is activated again when the vehicle has stopped and a
door is opened.
Opening/closing
Fig. 35
Unlock the boot lid/boot lid handle
Read and observe
on page 50 first.
After unlocking the vehicle, you can open the lid by pushing the handle located
above the licence plate.
Opening the boot lid for vehicles without central locking
›
Press the
button » Fig. 35 in the driver's door -
and open the boot lid in
the direction of arrow » Fig. 35 -
.
50Using the system
Page 161 of 197
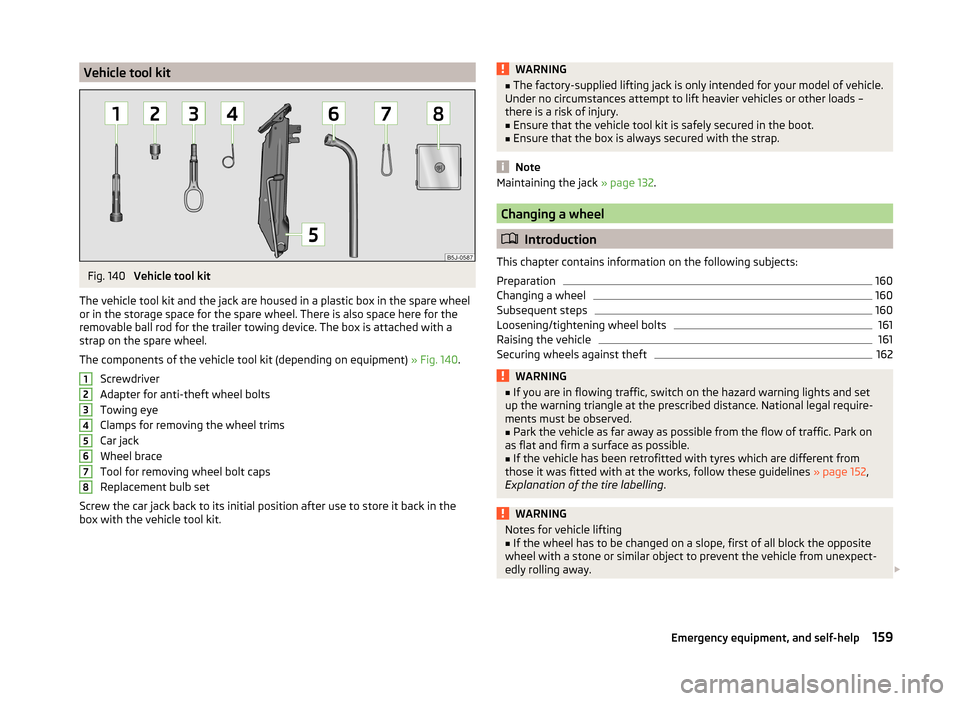
Vehicle tool kitFig. 140
Vehicle tool kit
The vehicle tool kit and the jack are housed in a plastic box in the spare wheel
or in the storage space for the spare wheel. There is also space here for the
removable ball rod for the trailer towing device. The box is attached with a
strap on the spare wheel.
The components of the vehicle tool kit (depending on equipment) » Fig. 140.
Screwdriver
Adapter for anti-theft wheel bolts
Towing eye
Clamps for removing the wheel trims
Car jack
Wheel brace
Tool for removing wheel bolt caps
Replacement bulb set
Screw the car jack back to its initial position after use to store it back in the
box with the vehicle tool kit.
12345678WARNING■ The factory-supplied lifting jack is only intended for your model of vehicle.
Under no circumstances attempt to lift heavier vehicles or other loads –
there is a risk of injury.■
Ensure that the vehicle tool kit is safely secured in the boot.
■
Ensure that the box is always secured with the strap.
Note
Maintaining the jack » page 132.
Changing a wheel
Introduction
This chapter contains information on the following subjects:
Preparation
160
Changing a wheel
160
Subsequent steps
160
Loosening/tightening wheel bolts
161
Raising the vehicle
161
Securing wheels against theft
162WARNING■ If you are in flowing traffic, switch on the hazard warning lights and set
up the warning triangle at the prescribed distance. National legal require-
ments must be observed.■
Park the vehicle as far away as possible from the flow of traffic. Park on
as flat and firm a surface as possible.
■
If the vehicle has been retrofitted with tyres which are different from
those it was fitted with at the works, follow these guidelines » page 152,
Explanation of the tire labelling .
WARNINGNotes for vehicle lifting■If the wheel has to be changed on a slope, first of all block the opposite
wheel with a stone or similar object to prevent the vehicle from unexpect-
edly rolling away. 159Emergency equipment, and self-help
Page 169 of 197
Note■We recommend using a tow rope from ŠKODA Original Accessories available
from a ŠKODA Partner.■
Towing another vehicle requires a certain amount of practice. Both drivers
should be familiar with the particular points about towing a vehicle. Unskilled
drivers should not attempt to tow in another vehicle or to be towed in.
■
When towing, respect the national legal provisions, especially those which
relate to the identification of the towing vehicle and the vehicle being towed.
■
The tow rope must not be twisted as it may in certain circumstances result in
the front towing eye being unscrewed out of your vehicle.
Front towing eye
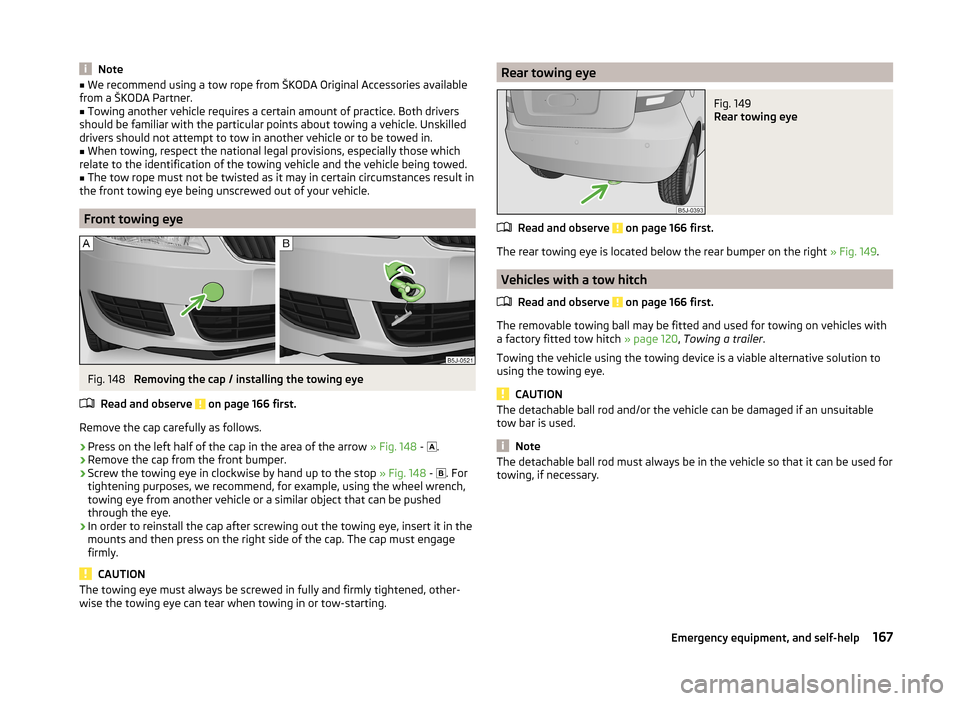
Fig. 148
Removing the cap / installing the towing eye
Read and observe
on page 166 first.
Remove the cap carefully as follows.
›
Press on the left half of the cap in the area of the arrow » Fig. 148 -
.
›
Remove the cap from the front bumper.
›
Screw the towing eye in clockwise by hand up to the stop
» Fig. 148 -
. For
tightening purposes, we recommend, for example, using the wheel wrench,
towing eye from another vehicle or a similar object that can be pushed
through the eye.
›
In order to reinstall the cap after screwing out the towing eye, insert it in the
mounts and then press on the right side of the cap. The cap must engage
firmly.
CAUTION
The towing eye must always be screwed in fully and firmly tightened, other-
wise the towing eye can tear when towing in or tow-starting.Rear towing eyeFig. 149
Rear towing eye
Read and observe on page 166 first.
The rear towing eye is located below the rear bumper on the right » Fig. 149.
Vehicles with a tow hitch
Read and observe
on page 166 first.
The removable towing ball may be fitted and used for towing on vehicles with
a factory fitted tow hitch » page 120, Towing a trailer .
Towing the vehicle using the towing device is a viable alternative solution to
using the towing eye.
CAUTION
The detachable ball rod and/or the vehicle can be damaged if an unsuitable
tow bar is used.
Note
The detachable ball rod must always be in the vehicle so that it can be used for
towing, if necessary.167Emergency equipment, and self-help
Page 189 of 197
De-icing rear window61
Deactivating airbags18
Decorative films131
Delayed locking of the boot lid see boot lid
51
Diesel refer to Fuel
137
Diesel fuel Operation in winter
137
Diesel particulate filter39
display messages39
Digital clock28
Dipstick142
Display Service interval
32
Distance driven28
Door Child safety lock
44
Closing44
Indicator light for an open door36
Opening44
Doors Emergency locking
45
driving emissions
177
fuel consumption177
Driving Abroad
113
Driving through water on streets112
Maximum speed179
Driving economically Economical gear changing
109
Driving through water112
E
Economical and environmentally friendly driv- ing
109
Economical driving Anticipation in driving109
Ballast111
Driving at full throttle110
Idling110
Regular maintenance111
Saving energy111
Short distances110
Tyre pressure110
EDS115
Electrical power windows Button in the driver's door
51, 52
Button in the rear door52
Central locking system53
Electric power windows Operational faults
53
Electric sliding/tilting roof53
Electronic Differential Lock115
Electronic immobilizer101
Emergency Changing a wheel
159
Hazard warning light system59
Jump-starting164, 165
locking of the doors45
Selector lever-unlocking108
Sliding/tilting roof55
Towing the vehicle166
Towing the vehicle using the tow hitch167
Tyre repair162
Unlocking the boot lid51
Emergency equipment Fire extinguisher
158
First aid kit158
Jack159
Vehicle tool kit159
Warning triangle158
Emissions177
Engine Running in
108
Starting and stopping the engine101
Starting the engine102
Switching off the engine102
Engine compartment138
Brake fluid145
Coolant144
Overview140
Vehicle battery145
Engine number176
Engine oil141
Capacity141
Changing143
Checking142
Replenishing143
Specifications141
Warning light36
Engine revolutions counter27
Environment109
Environmental compatibility111
Environmentally friendly driving109
ESC Function
114
warning light38
F
Films
131
Fire extinguisher158
First aid kit158
Flashers57
Fog lights58
Footmats104
see Footmats104
Front airbag15
Front seats65
Fuel135
Diesel137
Fuel gauge27
gauge27
refer to Fuel135
187Index
Page 192 of 197

SeatAdjusting65
Seat belt warning light
36
Seat belts10
Belt tensioners13
Cleaning134
fastening and unfastening12
Height adjustment13
Seatbelts Inertia reels
13
Seat belts The physical principle of a frontal collision
11
Seats folding forward
66
Head restraints68
Heating66
Removing the seats67
Seats and storage65
see Automatic gearbox Manual gear shifting on the multifunction steering wheel
106
Selector lever see Using the selector lever
105
Service display32
Service intervals126
Setting Heating
87
Manual air conditioning system89
Manually dimmed rear-view mirror64
Setting the clock Clock
28
Shifting gears Driving and saving energy
109
Side airbag16
Sliding/tilting roof53
Comfort operation54
Emergency operation55
Opening and raising54
Operation54
Sliding/tilting sunroof Closing54
Snow chains157
Spare wheel155
Speedometer27
Speed symbol see Wheels
152
Spoiler127
Stalk Main beam
57
Turn signals57
START-STOP118
Operating conditions for the system118
operation119
system-related automatic start-up119
START-STOPP Manually deactivating/activating the system
119
Starting and stopping the engine101
Starting engine Jump-starting
164
Starting the engine102
Jump-starting165
START STOP Information messages
119
Jump-starting166
Steering wheel8
Storage80
Storage Compartment Lighting
60
Storage compartments80
Sun visors61
Switching lights on and off56
Switching off the engine102
Synthetic leather134
T
Tailgate
50
Taking care of the vehicle Natural leather133
Seat belts134
Taking care of your vehicle Automatic car wash system
129
Chrome parts130
Cleaning the wheels132
Door lock cylinders131
Headlight lenses131
High-pressure cleaner129
Plastic parts130
Washing by hand128
Wash system129
Technical data176
Telephone92
Tiptronic106
Tire Explanation of the labelling
152
see wheels152
Tire size152
see wheels152
Tools159
TOP TETHER23
Tourist lights58
Towing166
Towing a trailer120
Towing device Description
121
Drawbar load120
Use and care123
Towing eye Front
167
Rear167
Towing protection50
Traction Control System (ASR)115
Trailer120, 124
Loading124
Towing a trailer124
190Index