rear view mirror SKODA KODIAQ 2016 1.G User Guide
[x] Cancel search | Manufacturer: SKODA, Model Year: 2016, Model line: KODIAQ, Model: SKODA KODIAQ 2016 1.GPages: 344, PDF Size: 58.96 MB
Page 226 of 344
After switching the ignition on and off, the systems remains activated / deacti-
vated depending on the setting prior to switching off the ignition.
The brake function can also be deactivated once with the function surface
» Fig. 270 on page 222 .
Rear traffic alert and wizard for “Blind spot”Monitoring
Introduction
Fig. 273
Installation location of the radar
sensors
This chapter contains information on the following subjects:
Rear Traffic Alert- Operation
225
Wizard for “Blind Spot”Monitoring - Operation
225
Wizard for “Blind Spot”Monitoring - driving situations and warnings
225
Activation / deactivation
226
Malfunctions
226
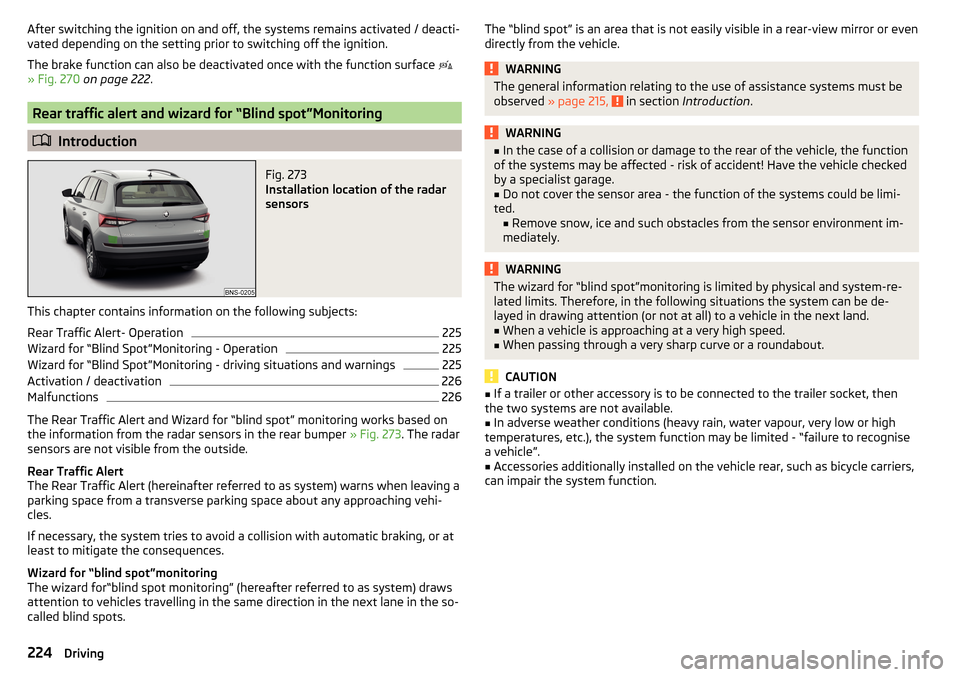
The Rear Traffic Alert and Wizard for “blind spot” monitoring works based on
the information from the radar sensors in the rear bumper » Fig. 273. The radar
sensors are not visible from the outside.
Rear Traffic Alert
The Rear Traffic Alert (hereinafter referred to as system) warns when leaving a
parking space from a transverse parking space about any approaching vehi-
cles.
If necessary, the system tries to avoid a collision with automatic braking, or at
least to mitigate the consequences.
Wizard for “blind spot”monitoring
The wizard for“blind spot monitoring” (hereafter referred to as system) draws
attention to vehicles travelling in the same direction in the next lane in the so-
called blind spots.
The “blind spot” is an area that is not easily visible in a rear-view mirror or even
directly from the vehicle.WARNINGThe general information relating to the use of assistance systems must be
observed » page 215, in section Introduction .WARNING■
In the case of a collision or damage to the rear of the vehicle, the function
of the systems may be affected - risk of accident! Have the vehicle checked
by a specialist garage.■
Do not cover the sensor area - the function of the systems could be limi-
ted. ■ Remove snow, ice and such obstacles from the sensor environment im-
mediately.
WARNINGThe wizard for “blind spot”monitoring is limited by physical and system-re-
lated limits. Therefore, in the following situations the system can be de-
layed in drawing attention (or not at all) to a vehicle in the next land.■
When a vehicle is approaching at a very high speed.
■
When passing through a very sharp curve or a roundabout.
CAUTION
■ If a trailer or other accessory is to be connected to the trailer socket, then
the two systems are not available.■
In adverse weather conditions (heavy rain, water vapour, very low or high
temperatures, etc.), the system function may be limited - “failure to recognise
a vehicle”.
■
Accessories additionally installed on the vehicle rear, such as bicycle carriers,
can impair the system function.
224Driving
Page 228 of 344
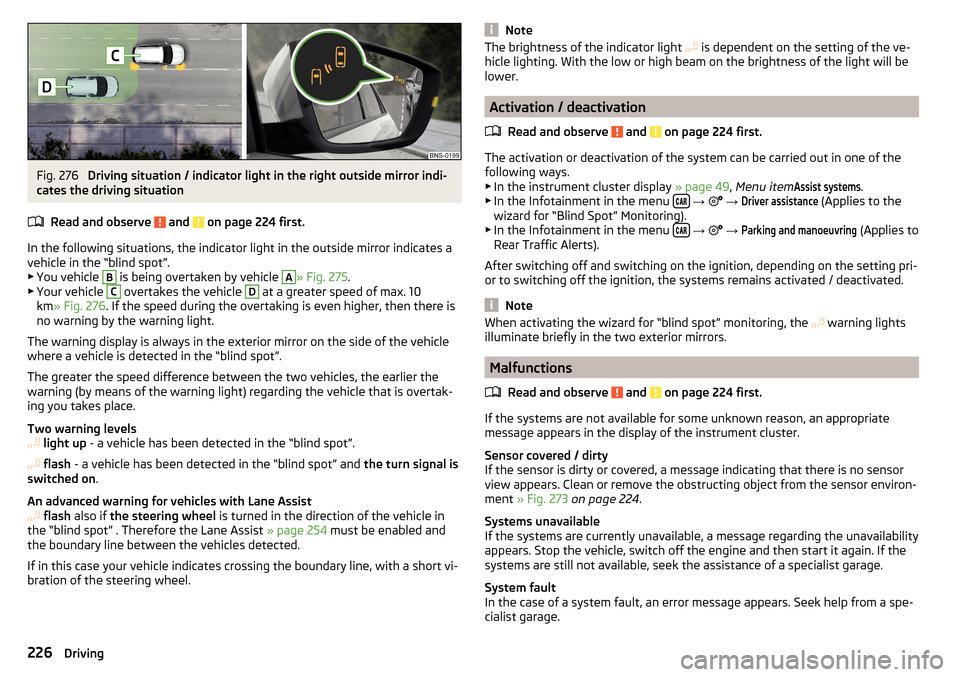
Fig. 276
Driving situation / indicator light in the right outside mirror indi-
cates the driving situation
Read and observe
and on page 224 first.
In the following situations, the indicator light in the outside mirror indicates avehicle in the “blind spot”.
▶ You vehicle
B
is being overtaken by vehicle
A
» Fig. 275 .
▶ Your vehicle
C
overtakes the vehicle
D
at a greater speed of max. 10
km » Fig. 276 . If the speed during the overtaking is even higher, then there is
no warning by the warning light.
The warning display is always in the exterior mirror on the side of the vehicle where a vehicle is detected in the “blind spot”.
The greater the speed difference between the two vehicles, the earlier the
warning (by means of the warning light) regarding the vehicle that is overtak-
ing you takes place.
Two warning levels
light up - a vehicle has been detected in the “blind spot”.
flash - a vehicle has been detected in the “blind spot” and the turn signal is
switched on .
An advanced warning for vehicles with Lane Assist
flash also if the steering wheel is turned in the direction of the vehicle in
the “blind spot” . Therefore the Lane Assist » page 254 must be enabled and
the boundary line between the vehicles detected.
If in this case your vehicle indicates crossing the boundary line, with a short vi-
bration of the steering wheel.
NoteThe brightness of the indicator light is dependent on the setting of the ve-
hicle lighting. With the low or high beam on the brightness of the light will be
lower.
Activation / deactivation
Read and observe
and on page 224 first.
The activation or deactivation of the system can be carried out in one of the
following ways. ▶ In the instrument cluster display » page 49, Menu item
Assist systems
.
▶ In the Infotainment in the menu
→
→
Driver assistance
(Applies to the
wizard for “Blind Spot” Monitoring).
▶ In the Infotainment in the menu
→
→
Parking and manoeuvring
(Applies to
Rear Traffic Alerts).
After switching off and switching on the ignition, depending on the setting pri-
or to switching off the ignition, the systems remains activated / deactivated.
Note
When activating the wizard for “blind spot” monitoring, the warning lights
illuminate briefly in the two exterior mirrors.
Malfunctions
Read and observe
and on page 224 first.
If the systems are not available for some unknown reason, an appropriate
message appears in the display of the instrument cluster.
Sensor covered / dirty
If the sensor is dirty or covered, a message indicating that there is no sensor
view appears. Clean or remove the obstructing object from the sensor environ-
ment » Fig. 273 on page 224 .
Systems unavailable
If the systems are currently unavailable, a message regarding the unavailability
appears. Stop the vehicle, switch off the engine and then start it again. If the
systems are still not available, seek the assistance of a specialist garage.
System fault
In the case of a system fault, an error message appears. Seek help from a spe-
cialist garage.
226Driving
Page 233 of 344
WARNING■The general information relating to the use of assistance systems must
be observed » page 215, General information .■
The system detects obstacles. The auxiliary boxes and lines are displayed
by the system, regardless of the area around the vehicle. The driver must
judge for themselves whether the vehicle can park safely in the selected
parking space.
■
The camera may not be soiled or obscured, otherwise the system function
will be significantly affected - there is a risk of an accident. For information
on cleaning » page 271.
CAUTION
■
The camera image is distorted by contrast with eyesight. For this reason, the
screen display is only of limited use for estimating distances to following vehi-
cles.■
Objects that are located directly beside the corners of the vehicle may be
outside the field of view of the cameras and may therefore not be displayed on
the screen.
■
Some items, such as thin posts, chain link fences, grilles or uneven road sur-
faces may not be properly displayed in terms of screen resolution.
■
In a vehicle damaged in the area of one of the cameras, the respective cam-
era can possibly deviate from the correct position. If this is the case, have the
sensor checked by a specialist garage.
CAUTION
The objects shown on the screen can be closer or even further away than they
appear. This is especially the case in the following situations.■
Protruding objects, such as the rear of a truck and the like.
■
When driving from a horizontal surface into a slope or a depression.
■
When driving from a slope or a depression onto a horizontal surface.
Operating principleFig. 284
Installation locations of cameras for area detection
Read and observe
and on page 231 first.
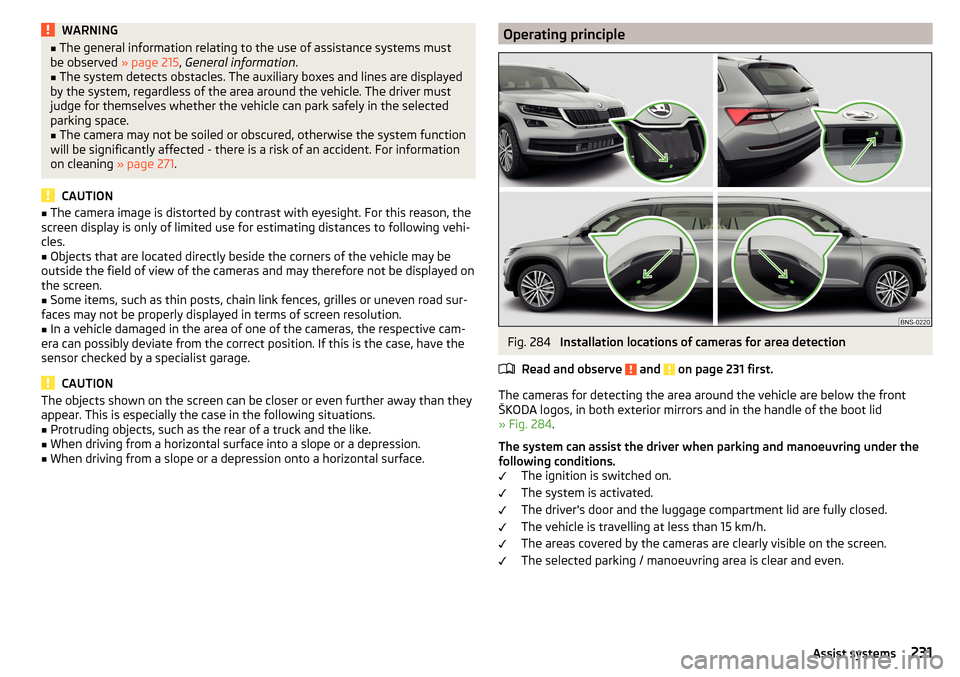
The cameras for detecting the area around the vehicle are below the front
ŠKODA logos, in both exterior mirrors and in the handle of the boot lid
» Fig. 284 .
The system can assist the driver when parking and manoeuvring under the
following conditions. The ignition is switched on.
The system is activated.
The driver's door and the luggage compartment lid are fully closed.
The vehicle is travelling at less than 15 km/h.
The areas covered by the cameras are clearly visible on the screen.
The selected parking / manoeuvring area is clear and even.
231Assist systems
Page 241 of 344

Manoeuvring trailerFig. 295
Display of the instrument cluster: Manoeuvring trailer
Read and observe
and on page 237 first.
Trailer manoeuvring
›
Select reverse gear or move the selector lever into position R.
›
Ensure that the vehicle/trailer combination is at a standstill.
›
Release the steering wheel and press
the button.
The steering is taken over by the system.
The symbol of the control button for the exterior mirror is shown in the display
» Fig. 295 -
.
›
Tilt the adjusting knob for the exterior mirror
» page 76, Exterior mirrors to
left or right according to the required direction of travel of trailer.
The display shows the silhouette of the vehicle rear with trailer in top view
» Fig. 295 -
.
The actual position of the trailer is indicated by the silhouette
2
.
The target position of the trailer is indicated by the contour
3
.
›
Tilt the knob for the adjusting exterior mirror to adjust the trailer contour
3
to the target position.
›
Observe the direct vicinity of the vehicle and reverse carefully.
The set angle of articulation can be further corrected while reversing by tilting
the adjusting knob for the side mirrors.
›
Stop the vehicle/trailer combination in the required position.
If a forward gear is engaged or the D / S mode set, the system is deactivated.
To align the vehicle/trailer combination (trailer and vehicle in a line), tilt the ad-
justing knob for the exterior mirror in the direction of arrow 1 » Fig. 295 . The
trailer contour 3
pivots to the position
4
.
›
Carefully reverse and drive forwards until the desired position of the vehicle
combination is achieved.
Note
The outer mirror surfaces cannot be adjusted while the system is active.
Automatic brake intervention
Read and observe
and on page 237 first.
The systems is deactivated and an automatic braking intervention takes place
in the following situations.
▶ If, during the manoeuvring, the button is pressed, the driver's door is
opened or the steering wheel is gripped.
▶ If the angle between the vehicle and trailer is assessed by the system as too
large during the manoeuvring procedure.
▶ If a specific speed is assessed by the system as too high during the manoeu-
vring procedure due to the current angle between the vehicle and trailer and
the driver does not react to the warning braking intervention.
Cruise Control System
Introduction
This chapter contains information on the following subjects:
Operation
240
Operation description
240
The Cruise Control System (CCS) maintains a set speed without you having to
actuate the accelerator pedal. The state where the CCS maintains the speed is
referred to hereinafter as the control.
WARNING■
The general information relating to the use of assistance systems must
be observed » page 215, in section Introduction .■
After pressing the clutch pedal, no interrupted control occurs! For exam-
ple, if a different gear is engaged and the clutch pedal is released, control is
continued.
239Assist systems
Page 265 of 344
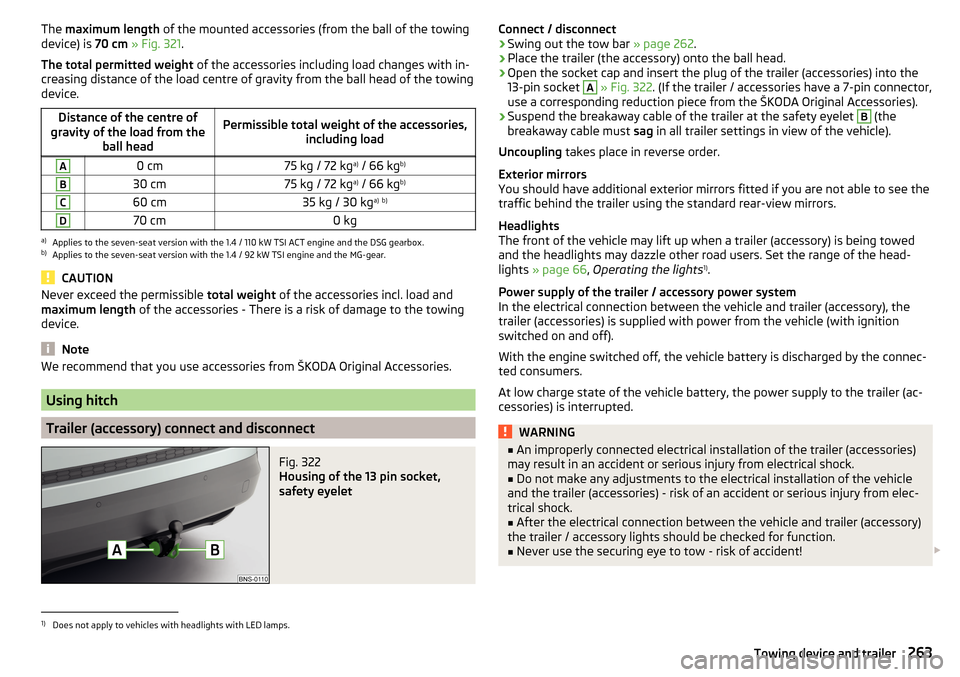
The maximum length of the mounted accessories (from the ball of the towing
device) is 70 cm » Fig. 321 .
The total permitted weight of the accessories including load changes with in-
creasing distance of the load centre of gravity from the ball head of the towing
device.Distance of the centre of
gravity of the load from the ball headPermissible total weight of the accessories, including loadA0 cm75 kg / 72 kga)
/ 66 kg b)B30 cm75 kg / 72 kg a)
/ 66 kg b)C60 cm35 kg / 30 kg a)
b)D70 cm0 kga)
Applies to the seven-seat version with the 1.4 / 110 kW TSI ACT engine and the DSG gearbox.
b)
Applies to the seven-seat version with the 1.4 / 92 kW TSI engine and the MG-gear.
CAUTION
Never exceed the permissible
total weight of the accessories incl. load and
maximum length of the accessories - There is a risk of damage to the towing
device.
Note
We recommend that you use accessories from ŠKODA Original Accessories.
Using hitch
Trailer (accessory) connect and disconnect
Fig. 322
Housing of the 13 pin socket,
safety eyelet
Connect / disconnect›Swing out the tow bar » page 262.›
Place the trailer (the accessory) onto the ball head.
›
Open the socket cap and insert the plug of the trailer (accessories) into the
13-pin socket
A
» Fig. 322 . (If the trailer / accessories have a 7-pin connector,
use a corresponding reduction piece from the ŠKODA Original Accessories).
›
Suspend the breakaway cable of the trailer at the safety eyelet
B
(the
breakaway cable must sag in all trailer settings in view of the vehicle).
Uncoupling takes place in reverse order.
Exterior mirrors
You should have additional exterior mirrors fitted if you are not able to see the
traffic behind the trailer using the standard rear-view mirrors.
Headlights
The front of the vehicle may lift up when a trailer (accessory) is being towed
and the headlights may dazzle other road users. Set the range of the head-
lights » page 66 , Operating the lights 1)
.
Power supply of the trailer / accessory power system
In the electrical connection between the vehicle and trailer (accessory), the
trailer (accessories) is supplied with power from the vehicle (with ignition
switched on and off).
With the engine switched off, the vehicle battery is discharged by the connec-
ted consumers.
At low charge state of the vehicle battery, the power supply to the trailer (ac-
cessories) is interrupted.
WARNING■ An improperly connected electrical installation of the trailer (accessories)
may result in an accident or serious injury from electrical shock.■
Do not make any adjustments to the electrical installation of the vehicle
and the trailer (accessories) - risk of an accident or serious injury from elec-
trical shock.
■
After the electrical connection between the vehicle and trailer (accessory)
the trailer / accessory lights should be checked for function.
■
Never use the securing eye to tow - risk of accident!
1)
Does not apply to vehicles with headlights with LED lamps.
263Towing device and trailer
Page 274 of 344
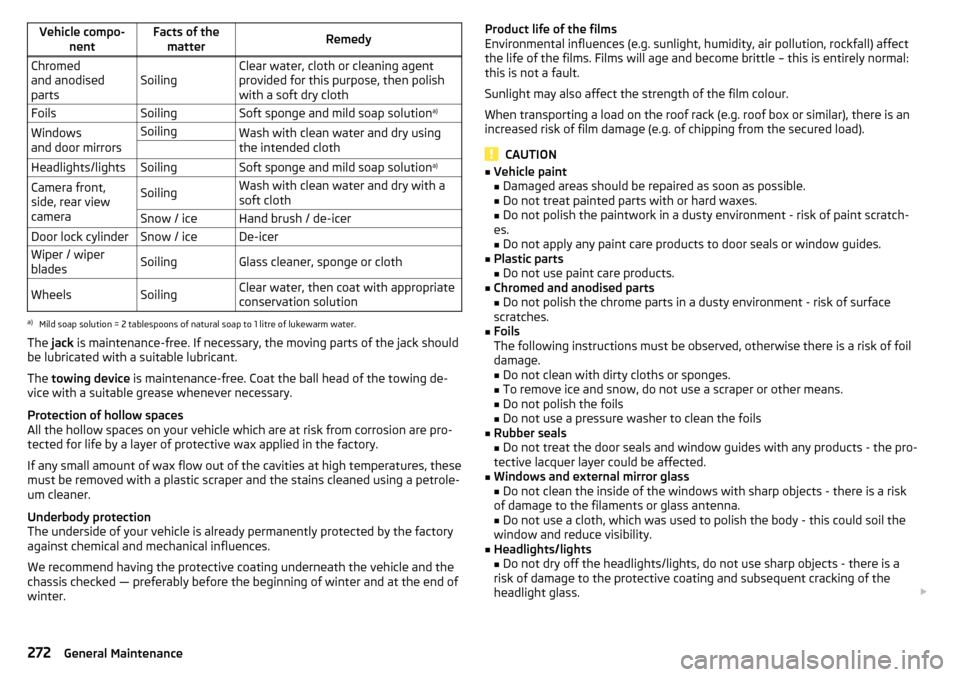
Vehicle compo-nentFacts of thematterRemedyChromed
and anodised
partsSoilingClear water, cloth or cleaning agent
provided for this purpose, then polish
with a soft dry clothFoilsSoilingSoft sponge and mild soap solution a)Windows
and door mirrorsSoilingWash with clean water and dry using
the intended cloth Headlights/lightsSoilingSoft sponge and mild soap solution a)Camera front,
side, rear view
cameraSoilingWash with clean water and dry with a
soft clothSnow / iceHand brush / de-icerDoor lock cylinderSnow / iceDe-icerWiper / wiper
bladesSoilingGlass cleaner, sponge or clothWheelsSoilingClear water, then coat with appropriate
conservation solutiona)
Mild soap solution = 2 tablespoons of natural soap to 1 litre of lukewarm water.
The jack is maintenance-free. If necessary, the moving parts of the jack should
be lubricated with a suitable lubricant.
The towing device is maintenance-free. Coat the ball head of the towing de-
vice with a suitable grease whenever necessary.
Protection of hollow spaces
All the hollow spaces on your vehicle which are at risk from corrosion are pro-
tected for life by a layer of protective wax applied in the factory.
If any small amount of wax flow out of the cavities at high temperatures, these
must be removed with a plastic scraper and the stains cleaned using a petrole-
um cleaner.
Underbody protection
The underside of your vehicle is already permanently protected by the factory
against chemical and mechanical influences.
We recommend having the protective coating underneath the vehicle and the
chassis checked — preferably before the beginning of winter and at the end of winter.
Product life of the films
Environmental influences (e.g. sunlight, humidity, air pollution, rockfall) affect
the life of the films. Films will age and become brittle – this is entirely normal:
this is not a fault.
Sunlight may also affect the strength of the film colour.
When transporting a load on the roof rack (e.g. roof box or similar), there is an
increased risk of film damage (e.g. of chipping from the secured load).
CAUTION
■ Vehicle paint
■ Damaged areas should be repaired as soon as possible.
■ Do not treat painted parts with or hard waxes.
■ Do not polish the paintwork in a dusty environment - risk of paint scratch-
es. ■ Do not apply any paint care products to door seals or window guides.■
Plastic parts
■ Do not use paint care products.
■
Chromed and anodised parts
■ Do not polish the chrome parts in a dusty environment - risk of surface
scratches.
■
Foils
The following instructions must be observed, otherwise there is a risk of foil
damage.
■ Do not clean with dirty cloths or sponges.
■ To remove ice and snow, do not use a scraper or other means.
■ Do not polish the foils
■ Do not use a pressure washer to clean the foils
■
Rubber seals
■ Do not treat the door seals and window guides with any products - the pro-
tective lacquer layer could be affected.
■
Windows and external mirror glass
■ Do not clean the inside of the windows with sharp objects - there is a risk
of damage to the filaments or glass antenna. ■ Do not use a cloth, which was used to polish the body - this could soil the
window and reduce visibility.
■
Headlights/lights ■ Do not dry off the headlights/lights, do not use sharp objects - there is a
risk of damage to the protective coating and subsequent cracking of the
headlight glass.
272General Maintenance
Page 328 of 344
Genuine parts267
Glasses compartment92
Google Earth ™180, 189
Google Street View ™180
GPS178
Graphical driving recommendations193
H
Hazard warning light system
70
HBA217
Headrests83
Heating109, 110
Air distribution control113
Mirrors76
Seats85
Steering wheel86
Windscreen and rear window72
HHC217
High-beam assistant41
High beam Light Assist
68
Hill Descent Assistant219
Hill Start Assist (HHC)217
hitch263
Hitch261
home address137
Home address185
Hook102
Horn31
I
I-PAD holder
99
I-Size28
Ignition lock203
Images Display
134
main menu151
Operation152
safe removal of the data source132
Select Image Source151
Set to134
Image viewer151
Immobiliser202
import Destinations (online)
188
Objectives (vCard)187
POI categories187
POI categories (online)179, 188
Routes (online)196
Import contacts134
In-car communication126
Inertia reels18
Information about the towing process298
information call118
Information call164
Information system43
Gear recommendation44
MAXI DOT display48
Multifunction display46
Service interval display49
infotainment Description Amundsen
121
bolero122
Columbus121
swing122
Infotainment language131, 139
Infotainment menus126
infotainment online118
Infotainment operation124
Infotainment screen124
Infotainment operation using an application in the external device
127
Infotainment Overview121
Infotainment Restart125
Infotainment screen131, 138
Areas124
Important information123
keyboard125
Maintenance123
Operation124
Input screen Language characters
139
Input screen with keyboard125
Instrument cluster32
Vehicle condition45
Warning lights33
interior light71
Interior lighting71
Ambient lighting72
Interior monitor58
Intermediate target192
Internet171
ISOFIX27
J
Jack
291
- fit295
Journey47
Jukebox149
Jump-starting297, 298
K
KESSY Ignition on / off
203
Starting engine / Stopping203
Unlocking / locking53
key Ignition on / off
203
Starting engine / Stopping203
Key Changing battery
300, 301
Take out emergency key53
keyboard125
key CAR201
326Index
Page 333 of 344
Radio station143
Preset buttons143
Radio station logos143
Update133
radio stations Select channels and search
142
Raising the vehicle295
Rear fog light69
Warning light36
Rear seats80
Rear traffic alert224
Rear Traffic Alert Activation / deactivation
226
Malfunctions226
Operation225
Rear View Camera227
Rear view mirror75
Rear window - heating72
Record waypoints197
Refill Windscreen washer fluid
280
refilling AdBlue
277
Refilling Coolant
282
Engine oil281
Reflective vest290
Refuelling275
Fuel275
Register online services ŠKODA Connect133, 139
Regulation Headlight beam
66
Remote control Changing battery
300
Synchronisation process57
Unlocking/locking52
Remote transfer of SIM data163
Removable light106
Changing batteries302
Removable through-loading bag95
Repairs and technical alterations266
Replace Battery
301
Replacing Bulbs
308
Fuses305
Windscreen wiper blades304
Reset counter for distance driven (trip)43
restaurant184
Reversible belt tensioners18
Rims285
Road Signs infotainment display
191
Roller blind See luggage compartment cover
103
Roof Load
108
Roof racks108
route new route
196
Online Route Import196
route list196
Route192
Store route194
Route calculation192
Trailer towing193
Route details194
Route information194
route list196
Route options136
rSAP163
Data Connection171
Run-in Engine
212
Running in Brake pads
206
Tyres285
S
SafeLock
54
Safe removal of the data source132, 139
Safety12
Airbag19
Child safety23
Child seats23
Correct seated position12
Headrests83
I-Size28
ISOFIX27
TOP TETHER28
SAFE, SAFELOCK See SafeLock
54
Save radio Save channel
143
Saving electrical energy212
Saving fuel212
Screen see Infotainment screen
123
Screen display124
SD card148
Safe removal139
search aim
182
Gas station184
Online goals182
parking spot184
restaurant184
Seat belt height adjustment
16
Warning light35, 39
Seat belts15
Belt tensioners18
fastening and unfastening17
Inertia reels18
Seat electrical adjustment78
331Index