technical data SKODA OCTAVIA 2008 2.G / (1Z) Owner's Manual
[x] Cancel search | Manufacturer: SKODA, Model Year: 2008, Model line: OCTAVIA, Model: SKODA OCTAVIA 2008 2.G / (1Z)Pages: 304, PDF Size: 17.69 MB
Page 240 of 304
Wheels and Tyres239
Using the systemSafetyDriving TipsGeneral MaintenanceBreakdown assistanceTechnical Data
WARNING
•You must have your tyres replaced with new ones at the latest when the
wear indicators have been worn do wn. The legally permissible minimum
tread depth should be observed.
•Worn tyres do not provide the necessary adhesion to the road surface at
high speeds on wet roads. One could experience “aquaplaning” (uncon-
trolled movements of the vehicle - “swimming” on a wet road surface).
Changing wheels around
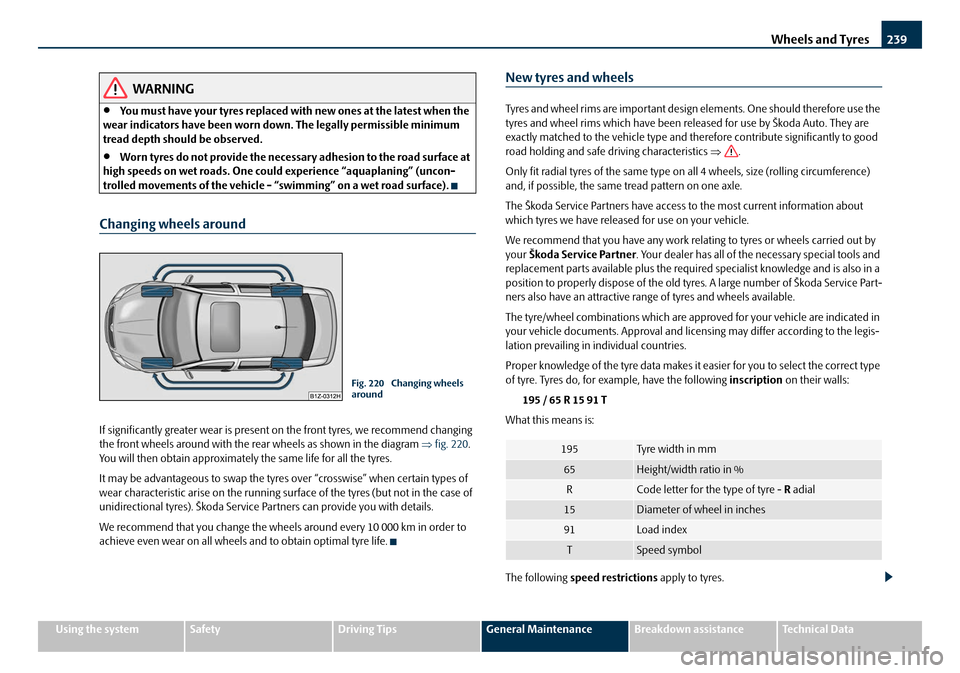
If significantly greater wear is present on the front tyres, we recommend changing
the front wheels around with the rear wheels as shown in the diagram ⇒fig. 220 .
You will then obtain approximately the same life for all the tyres.
It may be advantageous to swap the tyre s over “crosswise” when certain types of
wear characteristic ar ise on the running surface of the tyres (but not in the case of
unidirectional tyres). Škoda Service Pa rtners can provide you with details.
We recommend that you change the wheels around every 10 000 km in order to
achieve even wear on all wheels and to obtain optimal tyre life.
New tyres and wheels
Tyres and wheel rims are important design elements. One should therefore use the
tyres and wheel rims which have been released for use by Škoda Auto. They are
exactly matched to the vehicl e type and therefore contribu te significantly to good
road holding and safe driving characteristics ⇒.
Only fit radial tyres of the same type on all 4 wheels, size (rolling circumference)
and, if possible, the same tread pattern on one axle.
The Škoda Service Partners have access to the most current information about
which tyres we have released for use on your vehicle.
We recommend that you have any work rela ting to tyres or wheels carried out by
your Škoda Service Partner . Your dealer has all of th e necessary special tools and
replacement parts available plus the required specialist knowledge and is also in a
position to properly dispose of the old tyres. A large number of Škoda Service Part-
ners also have an attractive range of tyres and wheels available.
The tyre/wheel combinations which are appr oved for your vehicle are indicated in
your vehicle documents. Approval and lice nsing may differ according to the legis-
lation prevailing in individual countries.
Proper knowledge of the tyre data makes it easier for you to select the correct type
of tyre. Tyres do, for example, have the following inscription on their walls:
195 / 65 R 15 91 T
What this means is:
The following speed restrictions apply to tyres.
Fig. 220 Changing wheels
around
195Tyre wid th i n m m
65Height/width ratio in %
RCode letter for the type of tyre - R adial
15Diameter of wheel in inches
91Load index
TSpeed symbol
20A5Facelift.book Page 239 Saturday, September 6, 2008 2:13 PM
Page 242 of 304
Wheels and Tyres241
Using the systemSafetyDriving TipsGeneral MaintenanceBreakdown assistanceTechnical Data
•The wheel bolts must be clean and must turn easily. However, they must
never be treated with grease or oil.
•If the wheel bolts are tightened to a too low tightening torque, the rim
can lossen when the car is moving - risk of accident! A tightening torque
which is too high can damage the bolts and threads and this can result in
permanent deformation of the contact surfaces on the rims.
Caution
The prescribed tightening torque of the wheel bolts for steel and light alloy wheels
is 120 Nm.
Winter tyres
The handling of your vehicle will be significantly improved when driving on wintry
roads if you fit winter tyres. Summer tyres do not offer the same grip on ice, snow
and at temperatures below 7 °C because of their construction (width, rubber blend,
tread pattern). This partic ularly applies to vehicles which are equipped with low-
profile tyres or high-speed tyres (code index H or V on wall of tyre).
Winter tyres must be mounted on all four wheels to obtain the best handling char-
acteristics.
You must only fit those types of winter tyre which are approved for your vehicle. The
permissible sizes of winter tyres are stated in your vehicle documents. Approvals
may differ because of national legislation.
Please remember that the tyres should be in flated to 20 kPa (0.2 bar) more than is
the case for summer tyres ⇒page 237.
Winter tyres no longer offer the same winter performance once the tyre tread has
worn down to a depth of about 4 mm.
Ageing also causes winter tyres to lose most of their winter performance properties
- even in cases where the remaining tread depth is still clearly more than 4 mm.
Speed restrictions apply to winter tyres as well as to summer tyres ⇒page 239,
⇒ . You can fit winter tyres of a lower speed ca
tegory to your vehicle provided that you
also do not drive faster than the permissible maximum speed for such tyres, even
if the possible maximum speed of your vehicle is higher. The corresponding tyre
category can damage the tyres when exceeding the permissible maximum speed.
Please pay attention to the notes if you decide to fit winter tyres ⇒page 237.
You can also fit so-called “all-year tyres” instead of winter tyres.
Please contact your specialist garage if there are any points which are not clear who
will be able to provide you with information regarding the maximum speed for your
tyres.
WARNING
You must on no account drive your car at more than the permissible
maximum speed for your winter tyres - risk of an accident resulting from
tyre damage and loss of control over your car.
For the sake of the environment
Fit your summer tyres on again in good ti me since summer tyres offer you better
grip and handling on roads which are free of snow and ice as well as ar tempera-
tures below 7 °C - the braking distance is shorter, there is less tyre noise, tyre wear
is reduced and fuel consumption is reduced.
Note
Please observe the various differing legal requirements regarding tyres.
Unidirectional tyres*
The direction of rotation of the tyres is marked by arrows on the wall of the tyre.
This indicates the direction of rotation of the tyre, and it is essential that the tyres
are fitted on to run in this direction. Only then are the tyres able to provide the
optimal properties in terms of grip, lo w noise, wear-and-tear and aquaplaning.
Should it be necessary to fit on a spare wheel in exceptional cases with a tyre not
dedicated to the running dire ction or in opposite running direction, please adopt a
WARNING (continued)
20A5Facelift.book Page 241 Saturday, September 6, 2008 2:13 PM
Page 244 of 304
Accessories, changes and replacement of parts243
Using the systemSafetyDriving TipsGeneral MaintenanceBreakdown assistanceTechnical Data
Accessories, changes and replacement of parts
Accessories and replacement parts
Škoda vehicles have been built according to the latest discoveries in safety engi-
neering. Thus one should no t change the condition in which the vehicle was deliv-
ered from the manufacturer without some thought.
The following guidelines should be observed when a vehicle is to be retrofitted with
accessories, have technical ch anges made to it or a par t has to be replaced at some
time in the future.
•Advise should always be obtained from a Škoda Service Partner before buying
any accessories and before making any technical changes ⇒.
•This is particularly the case when acce ssories are bought in a foreign country.
•Škoda Genuine Accessories which have b een released for use and Skoda orig-
inal parts can be obtained from Škoda Se rvice Partners. They will install them
professionally and correctly.
•All Škoda original accessories which are listed in the catalogue of original acces-
sories such as tilting roofs, spoile rs, wheel rims etc. are homologized.
•Radios, aerials and other electrical access ories should only be installed by an
authorised workshop.
•The guidelines issued by Škoda Auto a.s. must be observed when making tech-
nical changes.
•This is to ensure that no technical damage occurs to the vehicle, that travelling
and operating safety are maintained and that the chnages are permissible. Škoda
Service Partners undertake this work professionally or refer it to an specialist
company in special cases.
Any damage which is done caused by technical changes made without
consulting a Skoda a.s. dealer is excluded from the guarantee.
WARNING
•We advise you, in your own interest, to only use Škoda Genuine Accesso-
ries and Škoda original parts which have been expressly approved for use on your Škoda. Reliability, safety and su
itabiliity have been established for
these Škoda original parts.
•We cannot guarantee suitability of installation into your vehicle of other
products despite keeping a constant ey e on market developments (also not
in the case where there is an attestation or permission can be produced).
Technical changes
Interference on the electronic components and their software can lead to opera-
tional faults. This interference can also impair not directly affected systems because
of the networking of the electronic co mponents. This means that the operating
safety of your vehicle can be considerably jeopardized, a greater wear of vehicle
parts can occur and finally the vehi cle registration documents expire.
We trust that you will understand that yo ur Škoda Service Partner cannot be liable
for damage resulting from unprofessional work.
We therefore recommend that you have a ll work carried out with Škoda original
parts at your authorised Škoda Service Partners.
WARNING
Work or modifications on your vehicle, which have been carried out unpro-
fessionally, can cause operational faults - risk of accident!
WARNING (continued)
20A5Facelift.book Page 243 Saturday, September 6, 2008 2:13 PM
Page 246 of 304

Breakdown assistance245
Using the systemSafetyDriving TipsGeneral MaintenanceBreakdown assistanceTechnical Data
Breakdown assistance
Breakdown assistance
First-aid box* and Warning triangle* (Octavia)
The first-aid box* is attached by a strap to the right-hand side of the luggage
compartment
The warning triangle can be at tached to the trim panel of the rear wall with rubber
straps ⇒fig. 221 .
If you wish to equip your ve hicle additionally with a warning triangle, please contact
a specialist garage.
Note
Pay attention to the use-by-date of the contents of the first-aid box.
First-aid box* and warning triangle* (Estate car)
For vehicles of the type es tate car the first-aid box and the warning triangle are
housed in a compartment on the right si de in the luggage compartment. You can
open the compartment by turning the locks in the direction of arrow ⇒fig. 222 .
If you wish to equip your ve hicle additionally with a warn ing triangle, please contact
a specialist garage.
Note
Pay attention to the use-by-date of the contents of the first-aid box.
Fire extinguisher*
The fire extinguisher is attached with straps in a holder under the driver seat.
Please read carefully the instructions which are atta ched to the fire extin-
guisher.
Fig. 221 Placing of the
warning triangle (Octavia)Fig. 222 Placing of the
warning triangle (Estate car)
20A5Facelift.book Page 245 Saturday, September 6, 2008 2:13 PM
Page 248 of 304

Breakdown assistance247
Using the systemSafetyDriving TipsGeneral MaintenanceBreakdown assistanceTechnical Data
compartment in such a way that the side of the bag rests on the right side of the
luggage compartment and on the seat backrest.
Spare wheel*
The spare wheel lies in a well under the floor covering of the luggage compartment
and is fixed in place using special screws
⇒fig. 224 .
Before removing the spare wheel, you must take out the box with the vehicle tool
kit box ⇒page 246, fig. 223 .
One should check the inflation pressure in the spare wheel (at best when generally
checking the tyre air pressures - see sign on the fuel filler flap ⇒ page 237) to
ensure that the spare wheel is always ready to use.
Temporary spare wheel
A warning label displayed on the rim of the temporary spare wheel indicates that
your vehicle is equipped with a temporary spare wheel.
Please observe the following notes when driving with a temporary spare wheel:
•After fitting on the wheel, the warning stic ker must not be concealed (e.g. by the
wheel trim).
•Do not drive with this spare wheel at more than 80 km/h - risk of accident. Avoid
accelerating at full throttle, sharp braking and fast cornering.
•The inflation pressure for this spare wheel is identical to the inflation pressure
of the standard tyres. The temporary spar e wheel R 18 must have an inflation pres-
sure of 420 kPa (4.2 bar)!
•Use this spare wheel only to reach the nearest specialist garage as it is not
intended for continuous use.
•No other summer or winter tyres must be mounted on the rim of the spare
wheel R 18.
Changing a wheel
Preliminary work
The following steps should be carried out before actually changing the
wheel.
– If it is necessary to change a wheel, park the vehicle as far away as possible from the traffic flow. The place you choose should be level.
–Have all the occupants get out. While changing a wheel, the occu-
pants of the vehicle should not stan d on the road (e.g. behind a crash
barrier).
– Apply the handbrake firmly.
–Engage 1st gear or if your vehicle is fitted with an automatic gearbox,
position the selector lever into position P .
– If a trailer is coupled, uncouple it.
– Take the vehicle tool kit ⇒ page 246 and the spare wheel*
⇒ page 247 out of the luggage compartment.
WARNING
•If you find yourself in flowing traffic switch on the hazard warning lights
system and place the warning triangle on the side of the road at the
prescribed distance from your vehicle while observing all national legal
Fig. 224 Luggage compart-
ment: Spare wheel
20A5Facelift.book Page 247 Saturday, September 6, 2008 2:13 PM
Page 250 of 304
Breakdown assistance249
Using the systemSafetyDriving TipsGeneral MaintenanceBreakdown assistanceTechnical Data
Note
•If you find, when changing the wheel, that the wheel bolts are corroded and
difficult to turn, the bolts mu st be replaced before checking the tightening torque.
•Drive cautiously and only at a moderate speed to a workshop where the tight-
ening torque can be checked.
Full wheel trim*
Pulling off
– Hook the clamp found in the vehicle tool kit into the reinforced edge of the full wheel trim.
– Push the wheel key through the clamp, support the wheel key at the tyre and pull off the wheel trim.
Installing
– First press the full wheel trim onto the wheel at the valve opening provided. Then press the full wheel trim into the wheel in such a way
that its entire circumference locks correctly in place.
Caution
•Use the pressure of your hand, do not knock on the full wheel trim! Heavy
knocks mainly on the points where the full wheel trim has not been inserted into
the wheel, can result in damage to the guide and centering elements of the full
wheel trim.
•First check for yourself that the th eft-deterrent wheel bolt is located
⇒ page 251 in the hole in the area of the valve before fitting the full wheel trim onto
a steel wheel which is attached with a theft-deterrent wheel bolt.
Wheel bolts with caps*
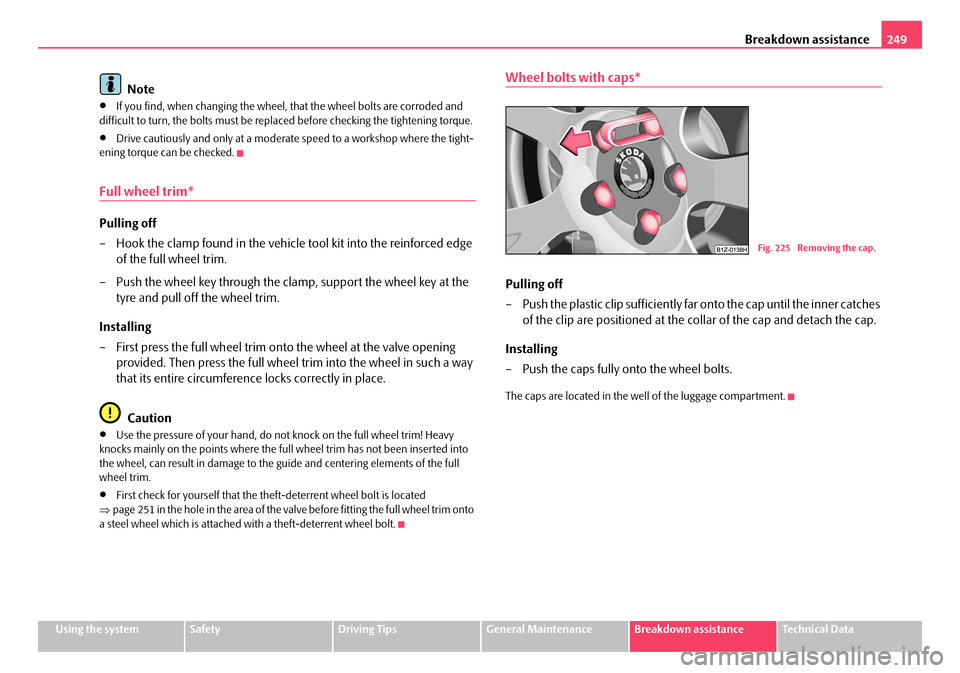
Pulling off
– Push the plastic clip sufficiently fa r onto the cap until the inner catches
of the clip are positioned at the collar of the cap and detach the cap.
Installing
– Push the caps fully onto the wheel bolts.
The caps are located in the we ll of the luggage compartment.
Fig. 225 Removing the cap.
20A5Facelift.book Page 249 Saturday, September 6, 2008 2:13 PM
Page 252 of 304
Breakdown assistance251
Using the systemSafetyDriving TipsGeneral MaintenanceBreakdown assistanceTechnical Data
Raise vehicle
You have to raise the vehicle with a lifting jack in order to be able to
take off the wheel.
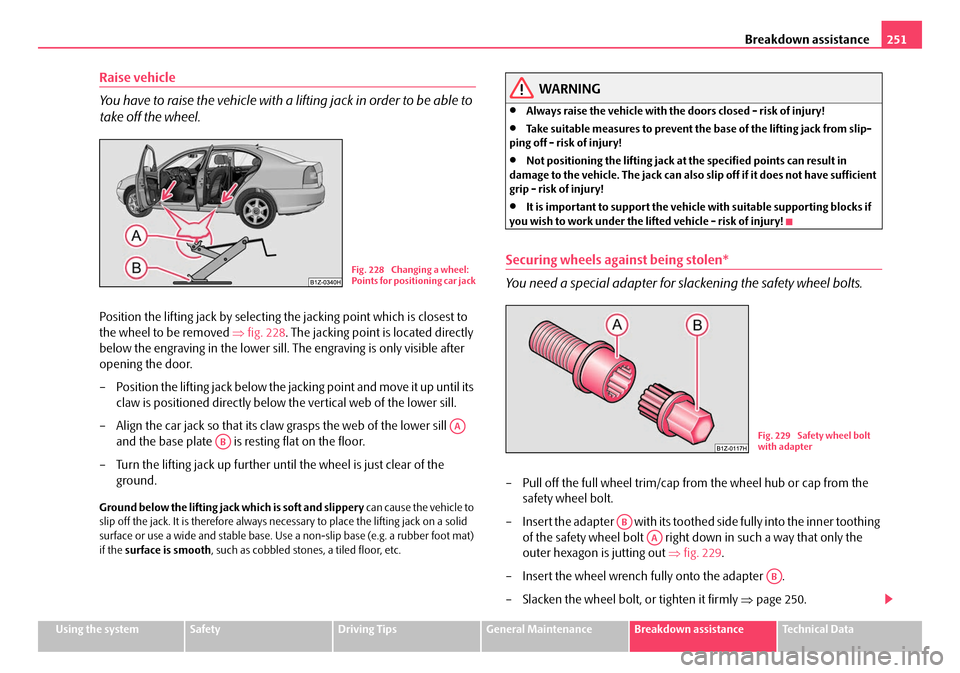
Position the lifting jack by selecting the jacking point which is closest to
the wheel to be removed ⇒fig. 228 . The jacking point is located directly
below the engraving in the lower sill. The engraving is only visible after
opening the door.
– Position the lifting jack below the jacking point and move it up until its claw is positioned directly below the vertical web of the lower sill.
– Align the car jack so that its claw grasps the web of the lower sill and the base plate is resting flat on the floor.
– Turn the lifting jack up further until the wheel is just clear of the ground.
Ground below the lifting jack which is soft and slippery can cause the vehicle to
slip off the jack. It is therefore always ne cessary to place the lifting jack on a solid
surface or use a wide and stable base. Use a non-slip base (e.g. a rubber foot mat)
if the surface is smooth , such as cobbled stones, a tiled floor, etc.
WARNING
•Always raise the vehicle with the doors closed - risk of injury!
•Take suitable measures to prevent the base of the lifting jack from slip-
ping off - risk of injury!
•Not positioning the lifting jack at the specified points can result in
damage to the vehicle. The jack can also sl ip off if it does not have sufficient
grip - risk of injury!
•It is important to support the vehicle with suitable supporting blocks if
you wish to work under the lifted vehicle - risk of injury!
Securing wheels against being stolen*
You need a special adapter for slackening the safety wheel bolts.
– Pull off the full wheel trim/cap from the wheel hub or cap from the safety wheel bolt.
– Insert the adapter with its toothed side fully into the inner toothing of the safety wheel bolt right down in such a way that only the
outer hexagon is jutting out ⇒fig. 229 .
– Insert the wheel wrench fully onto the adapter .
– Slacken the wheel bolt, or tighten it firmly ⇒page 250.
Fig. 228 Changing a wheel:
Points for positioning car jack
AA
ABFig. 229 Safety wheel bolt
with adapter
AB
AA
AB
20A5Facelift.book Page 251 Saturday, September 6, 2008 2:13 PM
Page 254 of 304
Breakdown assistance253
Using the systemSafetyDriving TipsGeneral MaintenanceBreakdown assistanceTechnical Data
Start engine
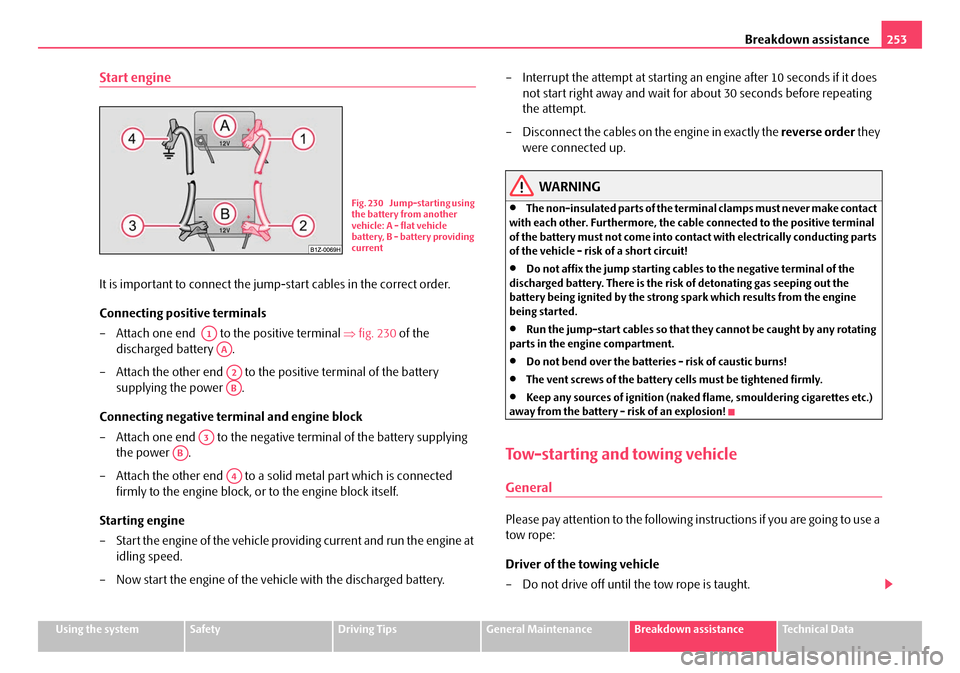
It is important to connect the jump -start cables in the correct order.
Connecting positive terminals
– Attach one end to the positive terminal ⇒fig. 230 of the
discharged battery .
– Attach the other end to the positive terminal of the battery supplying the power .
Connecting negative term inal and engine block
– Attach one end to the negative terminal of the battery supplying
the power .
– Attach the other end to a solid metal part which is connected firmly to the engine block, or to the engine block itself.
Starting engine
– Start the engine of the vehicle providing current and run the engine at idling speed.
– Now start the engine of the vehicle with the discharged battery. – Interrupt the attempt at starting an engine after 10 seconds if it does
not start right away and wait for about 30 seconds before repeating
the attempt.
– Disconnect the cables on the engine in exactly the reverse order they
were connected up.
WARNING
•The non-insulated parts of the terminal clamps must never make contact
with each other. Furthermore, the cable connected to the positive terminal
of the battery must not come into contact with electrically conducting parts
of the vehicle - risk of a short circuit!
•Do not affix the jump starting cables to the negative terminal of the
discharged battery. There is the risk of detonating gas seeping out the
battery being ignited by the strong spark which results from the engine
being started.
•Run the jump-start cables so that th ey cannot be caught by any rotating
parts in the engine compartment.
•Do not bend over the batteries - risk of caustic burns!
•The vent screws of the battery cells must be tightened firmly.
•Keep any sources of ignition (naked flame, smouldering cigarettes etc.)
away from the battery - risk of an explosion!
Tow-starting and towing vehicle
General
Please pay attention to the following in structions if you are going to use a
tow rope:
Driver of the towing vehicle
– Do not drive off until the tow rope is taught.
Fig. 230 Jump-starting using
the battery from another
vehicle: A - flat vehicle
battery, B - battery providing
current
A1
AA
A2
AB
A3
AB
A4
20A5Facelift.book Page 253 Saturday, September 6, 2008 2:13 PM
Page 256 of 304

Breakdown assistance255
Using the systemSafetyDriving TipsGeneral MaintenanceBreakdown assistanceTechnical Data
Carefully remove the cover as follows.
– Insert the fingers in the opening ⇒page 254, fig. 231 .
– By pulling in the direction of arrow , first of all slacken the cover in the upper area on the side to the fog lights.
– Afterwards, also slacken the cover on the other side in the direction of arrow and remove it.
– Screw in the towing eye anticlockwise down to the stop ⇒fig. 232 and
tighten up using the wheel wrench (push the wheel wrench through
eye).
– The cover can be reinstalled after screwing out the towing eye starting on the side of the marking. Then press the cover closed on the side to
the fog lights. The cover must engage firmly.
Rear towing eye
– Take the cover out of the bumper ⇒fig. 233.
– Screw in the towing eye anticlockwise down to the stop ⇒ fig. 234 and
tighten up using the wheel wrench (push the wheel wrench through
eye).
– The cover can be reinstalled after sc rewing out the towing eye starting
on the upper side of the cover. The cover must engage firmly.
Fig. 232 Front bumper:
Installing the towing eye
AA
A1
A2
Fig. 233 Rear bumper:
Removing cover
Fig. 234 Rear bumper:
Installing the towing eye
20A5Facelift.book Page 255 Saturday, September 6, 2008 2:13 PM
Page 258 of 304
Fuses and light bulbs257
Using the systemSafetyDriving TipsGeneral MaintenanceBreakdown assistanceTechnical Data
Fuses and light bulbs
Electric fuses
Replacing fuses
Defect fuses must be replaced.
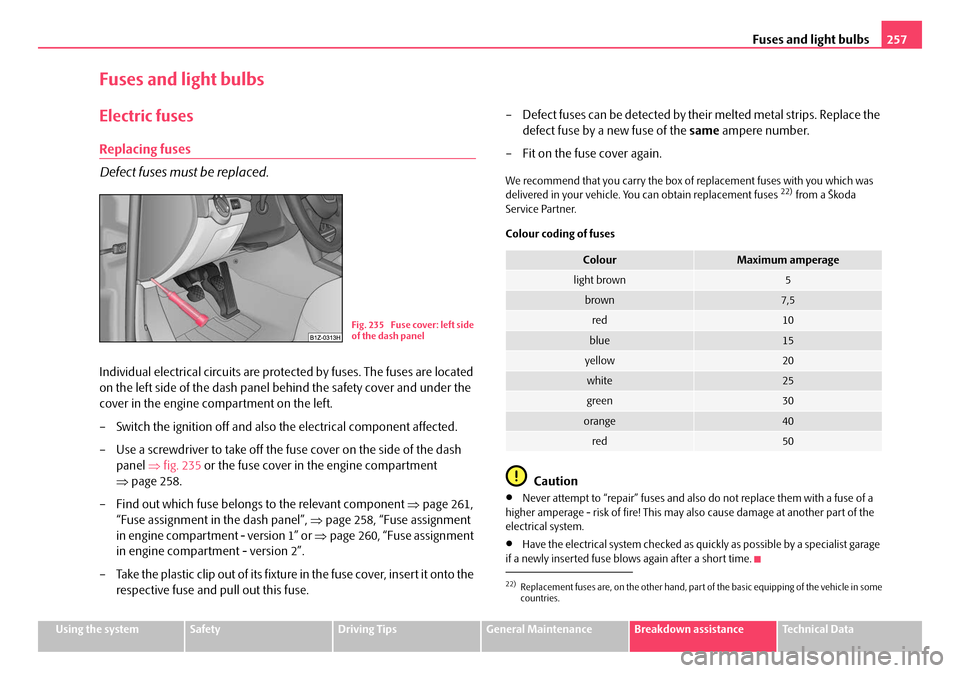
Individual electrical circuits are protected by fuses. The fuses are located
on the left side of the dash panel behind the safety cover and under the
cover in the engine compartment on the left.
– Switch the ignition off and also the electrical component affected.
– Use a screwdriver to take off the fuse cover on the side of the dash panel ⇒fig. 235 or the fuse cover in the engine compartment
⇒ page 258.
– Find out which fuse belongs to the relevant component ⇒page 261,
“Fuse assignment in the dash panel”, ⇒page 258, “Fuse assignment
in engine compartment - version 1” or ⇒page 260, “Fuse assignment
in engine compartment - version 2”.
– Take the plastic clip out of its fixture in the fuse cover, insert it onto the respective fuse and pull out this fuse. – Defect fuses can be detected by their melted metal strips. Replace the
defect fuse by a new fuse of the same ampere number.
– Fit on the fuse cover again.
We recommend that you carry the box of replacement fuses with you which was
delivered in your vehicle. You can obtain replacement fuses 22) from a Škoda
Service Partner.
Colour coding of fuses
Caution
•Never attempt to “repair” fuses and also do not replace them with a fuse of a
higher amperage - risk of fire! This may also cause damage at another part of the
electrical system.
•Have the electrical system checked as quickly as possible by a specialist garage
if a newly inserted fuse blows again after a short time.
Fig. 235 Fuse cover: left side
of the dash panel
22)Replacement fuses are, on the other hand, part of the basic equipping of the vehicle in some
countries.
ColourMaximum amperage
light brown5
brown7,5
red10
blue15
yellow20
white25
green30
orange40
red50
20A5Facelift.book Page 257 Saturday, September 6, 2008 2:13 PM