refuelling SKODA OCTAVIA TOUR 2009 1.G / (1U) Owner's Manual
[x] Cancel search | Manufacturer: SKODA, Model Year: 2009, Model line: OCTAVIA TOUR, Model: SKODA OCTAVIA TOUR 2009 1.G / (1U)Pages: 226, PDF Size: 13.11 MB
Page 5 of 226
Contents
4Driving Tips
. . . . . . . . . . . . . . . . . . . . . . . . . . . . . .
Intelligent Technology
. . . . . . . . . . . . . . . . . . . . . . . .
Electronic stability programme (ESP)* . . . . . . . . . .
Brakes . . . . . . . . . . . . . . . . . . . . . . . . . . . . . . . . . . . . . . .
Brake booster . . . . . . . . . . . . . . . . . . . . . . . . . . . . . . . .
Antilock brake system (ABS)* . . . . . . . . . . . . . . . . . .
Brake Assist* . . . . . . . . . . . . . . . . . . . . . . . . . . . . . . . . .
Driving and the Environment
. . . . . . . . . . . . . . . . .
The first 1 500 kilometres and then afterwards . .
Catalytic converter . . . . . . . . . . . . . . . . . . . . . . . . . . . .
Driving in an economical and environmentally
conscious manner . . . . . . . . . . . . . . . . . . . . . . . . . . . .
Environmental compatibility . . . . . . . . . . . . . . . . . . .
Motoring abroad . . . . . . . . . . . . . . . . . . . . . . . . . . . . .
Avoiding damage to your vehicle . . . . . . . . . . . . . .
To w i n g a t r a i l e r
. . . . . . . . . . . . . . . . . . . . . . . . . . . . . . . .
Towing a trailer . . . . . . . . . . . . . . . . . . . . . . . . . . . . . . .
Detachable towing device* . . . . . . . . . . . . . . . . . . . .
General Maintenance
. . . . . . . . . . . . . . .
Taking care of your ve hicle and cleaning the
vehicle
. . . . . . . . . . . . . . . . . . . . . . . . . . . . . . . . . . . . . . . . .
General . . . . . . . . . . . . . . . . . . . . . . . . . . . . . . . . . . . . . .
Care of the exterior of vehicle . . . . . . . . . . . . . . . . . .
Care of the interior of vehicle . . . . . . . . . . . . . . . . . .
Fuel
. . . . . . . . . . . . . . . . . . . . . . . . . . . . . . . . . . . . . . . . . . . .
Petrol . . . . . . . . . . . . . . . . . . . . . . . . . . . . . . . . . . . . . . . .
Diesel . . . . . . . . . . . . . . . . . . . . . . . . . . . . . . . . . . . . . . .
Refuelling . . . . . . . . . . . . . . . . . . . . . . . . . . . . . . . . . . . .
Emergency release of fuel filler flap . . . . . . . . . . . .
Inspecting and replenishing
. . . . . . . . . . . . . . . . . .
Engine compartment . . . . . . . . . . . . . . . . . . . . . . . . .
Engine oil . . . . . . . . . . . . . . . . . . . . . . . . . . . . . . . . . . . .
Cooling system . . . . . . . . . . . . . . . . . . . . . . . . . . . . . . .
Brake fluid . . . . . . . . . . . . . . . . . . . . . . . . . . . . . . . . . . . Battery . . . . . . . . . . . . . . . . . . . . . . . . . . . . . . . . . . . . . . .
Windshield washer system . . . . . . . . . . . . . . . . . . . .
Wheels and Tyres
. . . . . . . . . . . . . . . . . . . . . . . . . . . . . .
Wheels . . . . . . . . . . . . . . . . . . . . . . . . . . . . . . . . . . . . . .
Accessories, changes and replacement of partsAccessories and replacement parts . . . . . . . . . . . . .
Technical changes . . . . . . . . . . . . . . . . . . . . . . . . . . . .Breakdown assistance
. . . . . . . . . . . . . .
Breakdown assistance
. . . . . . . . . . . . . . . . . . . . . . . .
First-aid box*, Warning triangle* and bulb set . . .
Fire extinguisher* . . . . . . . . . . . . . . . . . . . . . . . . . . . . .
Vehicle tool kit . . . . . . . . . . . . . . . . . . . . . . . . . . . . . . . .
Spray for repairing a tyre* . . . . . . . . . . . . . . . . . . . . .
Tyre repair kit* . . . . . . . . . . . . . . . . . . . . . . . . . . . . . . . .
Spare wheel . . . . . . . . . . . . . . . . . . . . . . . . . . . . . . . . . .
Changing a wheel . . . . . . . . . . . . . . . . . . . . . . . . . . . . .
Jump-starting . . . . . . . . . . . . . . . . . . . . . . . . . . . . . . . .
Tow-starting and towing vehicle . . . . . . . . . . . . . . .
Fuses and light bulbs
. . . . . . . . . . . . . . . . . . . . . . . . . .
Electric fuses . . . . . . . . . . . . . . . . . . . . . . . . . . . . . . . . .
Bulbs . . . . . . . . . . . . . . . . . . . . . . . . . . . . . . . . . . . . . . . .
Technical Data
. . . . . . . . . . . . . . . . . . . . . . . . . .
Technical Data
. . . . . . . . . . . . . . . . . . . . . . . . . . . . . . . . .
General information . . . . . . . . . . . . . . . . . . . . . . . . . .
Used abbreviations . . . . . . . . . . . . . . . . . . . . . . . . . . .
Performances . . . . . . . . . . . . . . . . . . . . . . . . . . . . . . . .
Weight . . . . . . . . . . . . . . . . . . . . . . . . . . . . . . . . . . . . . . .
Identification details . . . . . . . . . . . . . . . . . . . . . . . . . .
Fuel consumption according to the regulations
(99/100/EU) . . . . . . . . . . . . . . . . . . . . . . . . . . . . . . . . . .
Dimensions . . . . . . . . . . . . . . . . . . . . . . . . . . . . . . . . . .
1.4 ltr./55 kW - EU4 . . . . . . . . . . . . . . . . . . . . . . . . . . .
1.6 ltr./75 kW - EU4/EU2 DDK . . . . . . . . . . . . . . . . . .
1.8 ltr./110 kW - EU4/EU3D . . . . . . . . . . . . . . . . . . . . 1.9 ltr./66 kW TDI - EU3 . . . . . . . . . . . . . . . . . . . . . . . .
1.9 ltr./74 kW TDI PD - EU4 . . . . . . . . . . . . . . . . . . . .
Vehicles of the Octavia Combi group N1 . . . . . . . .
Vehicles of the Octavia Combi group - Vehicles for
reconstruction . . . . . . . . . . . . . . . . . . . . . . . . . . . . . . . .
Index
. . . . . . . . . . . . . . . . . . . . . . . . . . . . . . . . . . . . . . . .
133
133
133
135
136
137
137
139
139
140
140
143
144
144
145
145
147
149
149
149
149
154
157
157
157
158
159
161
161
164
167
169 170
174
175
175
181
181
181
183
183
183
183
184
184
184
185
185
190
191
194
194
197
203
203
203
203
203
203
203
204
205
206
208
210212
214
216
216
217
s2ig.book Page 4 Monday, November 10, 2008 11:20 AM
Page 15 of 226
The brief instruction
14 Safety switch
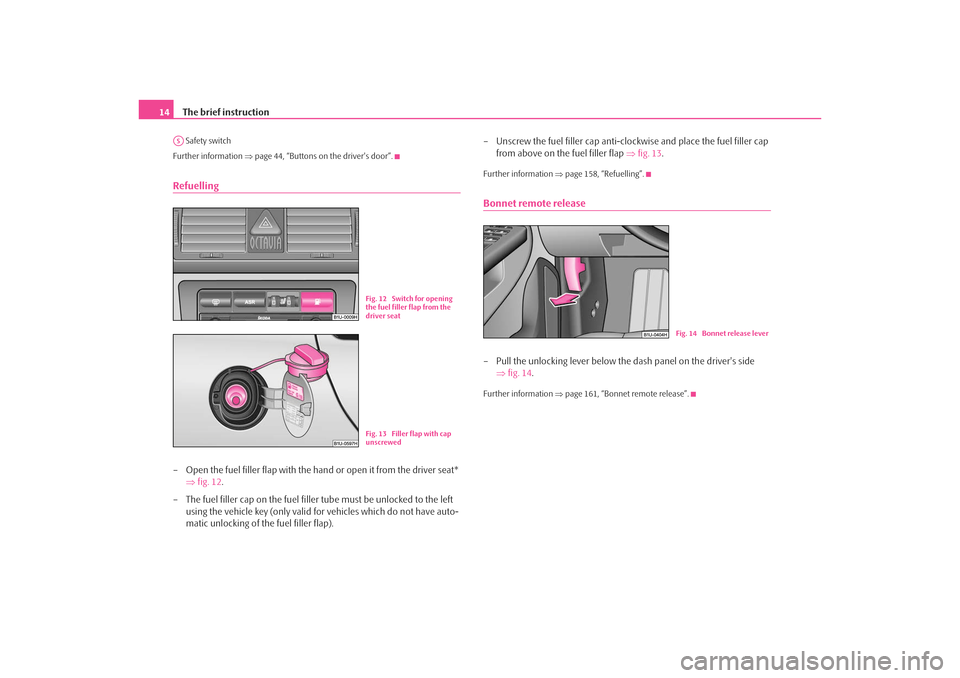
Further information ⇒page 44, “Buttons on the driver's door”.Refuelling– Open the fuel filler flap with the hand or open it from the driver seat*
⇒fig. 12 .
– The fuel filler cap on the fuel fille r tube must be unlocked to the left
using the vehicle key (only valid for vehicles which do not have auto-
matic unlocking of the fuel filler flap). – Unscrew the fuel filler cap anti-clo
ckwise and place the fuel filler cap
from above on the fuel filler flap ⇒fig. 13 .
Further information ⇒page 158, “Refuelling”.Bonnet remote release– Pull the unlocking lever below the dash panel on the driver's side
⇒fig. 14 .Further information ⇒page 161, “Bonnet remote release”.
AS
Fig. 12 Switch for opening
the fuel filler flap from the
driver seatFig. 13 Filler flap with cap
unscrewed
Fig. 14 Bonnet release lever
s2ig.book Page 14 Monday, November 10, 2008 11:20 AM
Page 32 of 226
Instruments and Indicator/Warning Lights31
Using the system
Safety
Driving Tips
General Maintenance
Breakdown assistance
Technical Data
obtain professional assistance from a specialist garage, otherwise it could lead to
severe engine damage.
If the coolant is within the specified
range, the increased temperature may be
caused by an operating problem at the coolant fan. Check the fuse for the coolant
fan, replace it if necessary ⇒page 195, “Fuse assignment in engine compartment -
version 1” or ⇒ page 196, “Fuse assignment in en gine compartment - version 2”.
Do not continue driving if the warning light does not go off although the fluid is at
the correct level and also the fuse of the fa n is in proper order. Contact a specialist
garage to obtain assistance.
Please also refer to the additional instructions ⇒page 167, “Cooling system”.
The following text will be displayed in the information display*: STOP CHECK COOLANT SERVICE MANUAL
WARNING
•
If you must stop for technical reasons, then park the vehicle at a safe
distance from the traffic and switch off the engine and switch on the hazard
warning light system ⇒page 51.
•
Take care when opening the coolant expansion bottle. If the engine is
hot, the cooling system is pressurized - risk of scalding! It is best to allow the
engine to cool down before removing the cap.
•
Do not touch the coolant fan The coolant fan may switch on automati-
cally even if the ignition is off.
Thickness of the brake pads*
The warning light
comes on for a few seconds when the ignition is switched on.
If the warning light comes on, contact a specialist garage immediately and have
the brake pads on all of the wheels inspected.
A peep sounds as an addi tional warning signal.
The following text will be displayed in the information display*: CHECK BRAKE PADS
Windshield washer fluid level*
The warning light
comes on when the ignition is switched on if there is insuffi-
cient fluid in the windshield washer system. Top up with liquid ⇒page 174.
A peep sounds as an additional warning signal.
The following text will be displayed in the information display*: TOP UP WASH FLUID
Fuel reserve
The warning light
comes on, if the fuel level is still below 7 litres.
A peep sounds as an additional warning signal.
The following text will be displayed in the information display*: PLEASE REFUEL
Note
The Text in the information display* goes out only after refuelling and driving a
short distance.Engine oil
The warning light
lights up red (low oil pressure)
The warning light comes on for a few seconds when the ignition is switched on
3).
Stop the vehicle and switch the engine off if the warning light does not go off
within a few seconds after switching on the ignition or flashes while driving. Check
the oil level and top up with oil as necessary ⇒page 165.
3 peeps sound as an additional warning signal.
3)The warning light on vehicles fitted with information display does not come on after
switching the ignition on, but only if a fault exists or the engine oil level is too low.
s2ig.book Page 31 Monday, November 10, 2008 11:20 AM
Page 58 of 226
Lights and Visibility57
Using the system
Safety
Driving Tips
General Maintenance
Breakdown assistance
Technical Data
Cleaning of the headlights occurs for a
pproximately 1 second about 3 seconds after
actuation of the lever in position ⇒page 55, fig. 55 .
You should remove stubborn dirt (such as insect residues) from the headlight
lenses at regular intervals, for example when refuelling. Please refer to the
following guidelines ⇒ page 152, “The headlight lenses”.
You should remove any snow from the fixt ures of the washer nozzles and clear ice
in winter with a de-icing spray in order to ensure proper operation of the cleaning
system.
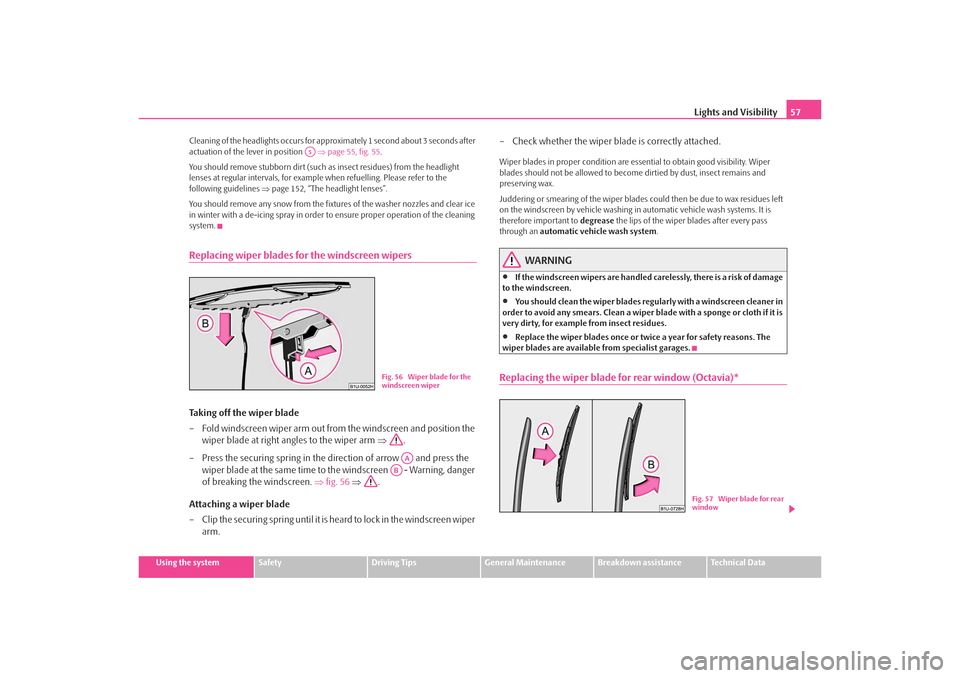
Replacing wiper blades fo r the windscreen wipersTaking off the wiper blade
– Fold windscreen wiper arm out from the windscreen and position the
wiper blade at right angles to the wiper arm ⇒.
– Press the securing spring in the direction of arrow and press the wiper blade at the same time to th e windscreen - Warning, danger
of breaking the windscreen. ⇒fig. 56 ⇒ .
Attaching a wiper blade
– Clip the securing spring until it is heard to lock in the windscreen wiper
arm. – Check whether the wiper blade is correctly attached.
Wiper blades in proper condition are esse
ntial to obtain good visibility. Wiper
blades should not be allowed to become dirtied by dust, insect remains and
preserving wax.
Juddering or smearing of the wiper blades could then be due to wax residues left
on the windscreen by vehicle washing in automatic vehicle wash systems. It is
therefore important to degrease the lips of the wiper blades after every pass
through an automatic vehicle wash system .
WARNING
•
If the windscreen wipers are handled carelessly, there is a risk of damage
to the windscreen.
•
You should clean the wiper blades regularly with a windscreen cleaner in
order to avoid any smears. Clean a wiper blade with a sponge or cloth if it is
very dirty, for example from insect residues.
•
Replace the wiper blades once or twice a year for safety reasons. The
wiper blades are available from specialist garages.
Replacing the wiper blade for rear window (Octavia)*
A5
Fig. 56 Wiper blade for the
windscreen wiper
AA
AB
Fig. 57 Wiper blade for rear
window
s2ig.book Page 57 Monday, November 10, 2008 11:20 AM
Page 98 of 226
Starting-off and Driving97
Using the system
Safety
Driving Tips
General Maintenance
Breakdown assistance
Technical Data
Starting the engine after the fuel tank has run dry
It may take longer than normal to start the
engine after refuelling if the fuel tank has
run completely dry - up to one minute. This is because the fuel system must first of
all be filled while the attempting to start the engine.
Switching off the engine– The engine can be switched off by turning the ignition key from posi- tion into ⇒page 95, fig. 105 .
WARNING
•
Never switch off the engine before the vehicle is stationary - risk of acci-
dent!
•
The brake booster only operates when the engine is running. Greater
physical effort for braking is required when engine is switched off. Because
if you do not stop as normal, this can cause an accident and severe injuries.Caution
you should not switch the engine off right away at the end of your journey after the
engine has been operated for a lengthy period at high loads but should be allowed
it to run at idling speed for about 2 minutes . This prevents any accumulation of heat
when the engine is switched off.
Note
•
The radiator fan may continue running fo r a further 10 minutes or so after the
engine and the ignition have been switched off. The coolant fan may, however, also
switch on again after some time if the coolant temperature rises because of an
accumulation of heat in the engine or if the engine is warm and the engine
compartment is additionally heated by strong sunlight.
•
This is why particular care is required when carrying out any work in the engine
compartment ⇒page 162, “Working in the engine compartment”.
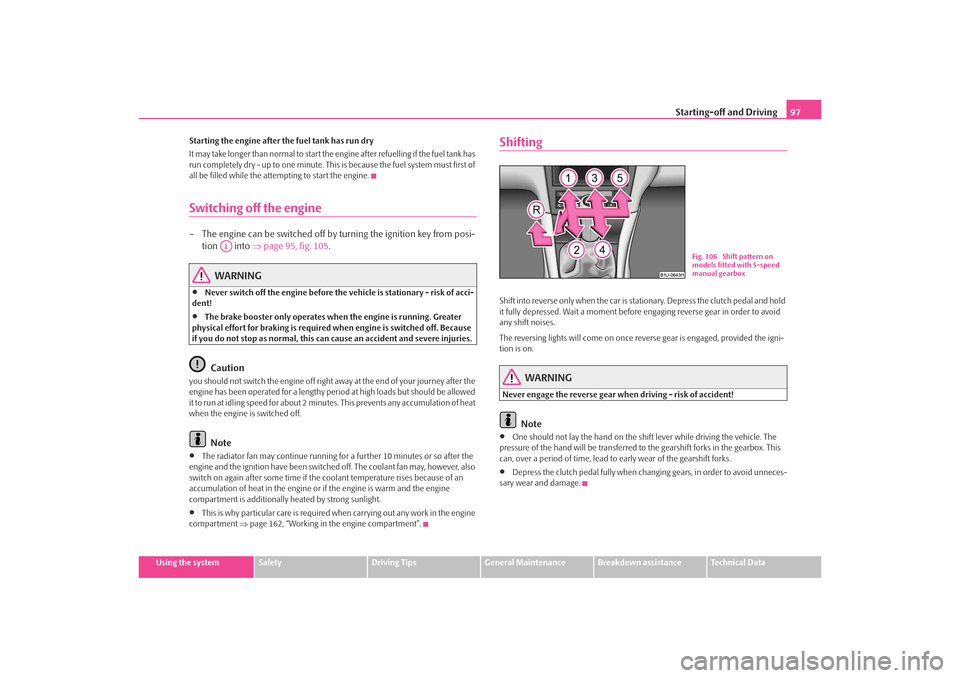
ShiftingShift into reverse only when the car is stationary. Depress the clutch pedal and hold
it fully depressed. Wait a moment before engaging reverse gear in order to avoid
any shift noises.
The reversing lights will come on once re verse gear is engaged, provided the igni-
tion is on.
WARNING
Never engage the reverse gear when driving - risk of accident!
Note
•
One should not lay the hand on the shift lever while driving the vehicle. The
pressure of the hand will be transferred to the gearshift forks in the gearbox. This
can, over a period of time, lead to early wear of the gearshift forks.
•
Depress the clutch pedal fully when changing gears, in order to avoid unneces-
sary wear and damage.
A1
Fig. 106 Shift pattern on
models fitted with 5-speed
manual gearbox
s2ig.book Page 97 Monday, November 10, 2008 11:20 AM
Page 158 of 226
Fuel157
Using the system
Safety
Driving Tips
General Maintenance
Breakdown assistance
Technical Data
FuelPetrolGrades of petrolThere are various grades of petrol. Please read in order to know which grade of
petrol your vehicle requires. You will also find the same information affixed to the
inside of the fuel filler flap of your vehicle ⇒page 158.
A distinction is made between unleaded an d leaded petrol. All Škoda vehicles with
petrol engines are equipped with a catalyti c converter and must therefore be only
driven with unleaded petrol . Unleaded petrol complies with the standard
DINEN228 .
The individual grades of petr ol are distinguished by their octane number (RON).
Please adopt the following procedure if the grade of petrol which you normally use
is not be available in exceptional circumstances:•
Engines which need unleaded premium petrol 95 RON can also be run on
unleaded regular petrol 91 RON. This does, however, result in a slight loss in
performance.
•
Engines which need unleaded premium plus petrol 98 RON can also be run
on unleaded regular petrol 95 RON. This does, however, result in a slight loss in
performance. You can in exceptional circumstances also use unleaded regular
petrol of 91 RON in the event that neithe r unleaded premium petrol of 98 RON nor
95 RON is available. Refuel as soon as possible with unleaded premium plus of 98
RON or unleaded premium petrol of 95 RON.
If, in an emergency, the only fuel availa ble is one which has a lower octane number
than that required by the engine then only drive at medium engine speeds and
lower engine loadings.
You can make unlimited use of fuel whic h has a higher octane number than that
required by the engine. There will, howeve r, be no advantages gained by this in
terms of engine performance and fuel consumption! The handling, performance and life of your engine are determined to a significant
extent by the quality of the fuel.
Do not use any petrol additives. Use a fuel
complying with the standard.
You can find further information on refuelling ⇒page 158, “Refuelling”.
Caution
•
Filling the tank even only once with lead ed petrol will result in the catalytic
converter being destroyed.
•
Operating the engine with petrol of a lo w octane number can result in engine
damage at high revolutions or severe engine loading.
DieselDiesel fuelYour vehicle can be operated with diesel fuel, which complies with the standard
DIN EN 590 .
Fuel additives
You must not use fuel additives, so-called “flow improvers” (petrol and similar
products) in diesel fuel.
If the quality of the diesel fuel is poor, it is then necessary to drain the fuel filter
more often than stated in the Service schedule.
You can find information on refuelling ⇒page 158, “Refuelling”.
Caution
•
Use fuel which complies with the standard DIN EN 590. Filling the tank even
only once, which does not comply with th e standard, can result in damage to the
fuel system.
•
Water which has collected in the fuel fi lter can result in engine problems.
s2ig.book Page 157 Monday, November 10, 2008 11:20 AM
Page 159 of 226
Fuel
158•
Your vehicle is not adapted for use of biof uel (RME), therefore this fuel must not
be refuelled and driven. Using this fuel (R ME) can lead to damage to the engine or
the fuel system.
Operation in winterWinter-grade diesel fuel
A different grade of diesel fuel is available at filling stations in winter than during the
summer. Using “summer-grade diesel fuel” at temperatures below 0°C can result
in operational problems because the diesel becomes viscous as a result of paraffin
separation.
It is therefore the case that DIN EN 590 prescribes diesel fuel class for certain
periods of the year which can also be pu rchased at the corresponding time during
the year. “Winter-grade diesel fuel” will still operate properly even at a temperature
of -20°C.
It is often the case in countries with diff erent climatic conditions that diesel fuels
available have a different temperature characteristic. The specialist garages and
filling stations in the country concerned wi ll be able to provide you with informa-
tion regarding the diesel fuels available.
Prewarming fuel
The vehicle is fitted with a fuel filter prewarming system. This secures operation of
a vehicle using diesel fuel down to an environmental temperature of -25°C.
Caution
It is not permitted to add the various fuel additives on the market, including petrol,
to diesel fuel in order to improve its flow properties.
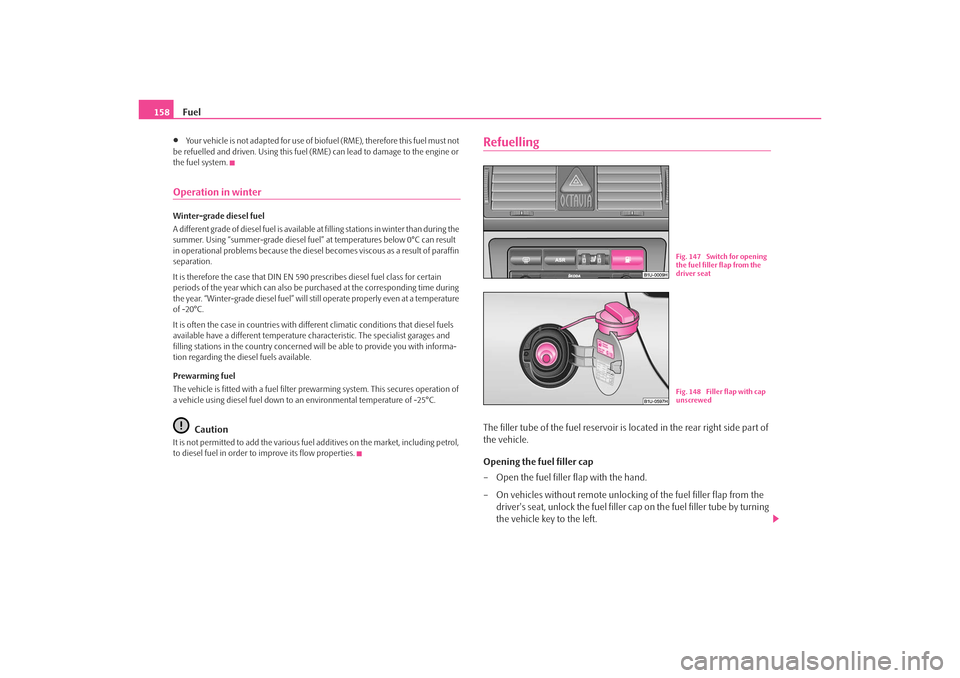
RefuellingThe filler tube of the fuel reservoir is located in the rear right side part of
the vehicle.
Opening the fuel filler cap
– Open the fuel filler flap with the hand.
– On vehicles without remote unlocking of the fuel filler flap from the
driver's seat, unlock the fuel filler cap on the fuel filler tube by turning
the vehicle key to the left.
Fig. 147 Switch for opening
the fuel filler flap from the
driver seatFig. 148 Filler flap with cap
unscrewed
s2ig.book Page 158 Monday, November 10, 2008 11:20 AM
Page 160 of 226
Fuel159
Using the system
Safety
Driving Tips
General Maintenance
Breakdown assistance
Technical Data
– Unscrew the fuel filler cap anti-cl ockwise and place the fuel filler cap
from above on the fuel filler flap ⇒page 158, fig. 148 .
Closing fuel filler cap
– Screw on the cap by turning it to the right until it is heard to lock.
– On vehicles without remote unlocking of the fuel filler flap from the driver's seat, lock the fuel filler cap on the fuel filler tube by turning the
vehicle key to the right and withdraw the key.
– Press the fuel tank flap closed.
Open the fuel filler flap from the driver's seat*
– Press the switch to open the fuel filler flap ⇒page 158, fig. 147 .
– Unscrew the fuel filler cap anti-cl ockwise and place the fuel filler cap
from above on the fuel filler flap ⇒page 158, fig. 148 .
Closing fuel filler cap
– Screw on the cap by turning it to the right until it is heard to lock.
– Press the fuel tank flap closed.The correct grade of fuel for your vehicle as well as the tyre size and inflation pres-
sures are stated on a sticker affixed to the inside of the fuel filler flap. Further infor-
mation on fuel ⇒page 157, “Fuel”.
The fuel tank has a capacity of about 55 litres.
WARNING
Pay attention to any legal requirements if you do carry a spare canister in the
vehicle. We do not recommend carrying any fuel canisters in your vehicle for
safety reasons. The canister can be da maged in the event of an accident and
fuel may leak out.
Caution
•
Before refuelling it is necessary to switch off the auxiliary heating system (auxil-
iary heating and ventilation) *.
•
Remove any fuel which has spilled onto the paintwork of your vehicle immedi-
ately - risk of paint damage!
•
Vehicles fitted with catalytic converter should never be allowed to let the fuel
tank to run completely empty. An irregular supply of fuel to the engine can result in
misfiring and unburnt fuel may get into the exhaust system, which may result in
overheating and damage to the catalytic converter.
•
Make sure that the valve is not pressed into the filler tube when inserting the
pump nozzle into the filler tube. Otherwis e you are unintentionally filling up the
volume, which in case of heat can cause an expansion of the fuel. This can lead to
an overflow of fuel or damage to parts of the fuel reservoir.
•
The fuel tank is full just as soon as the pump nozzle switches off for the first
time, provided the nozzle has been operated properly. Do not continue refuelling
- otherwise the expansio n volume is filled up.
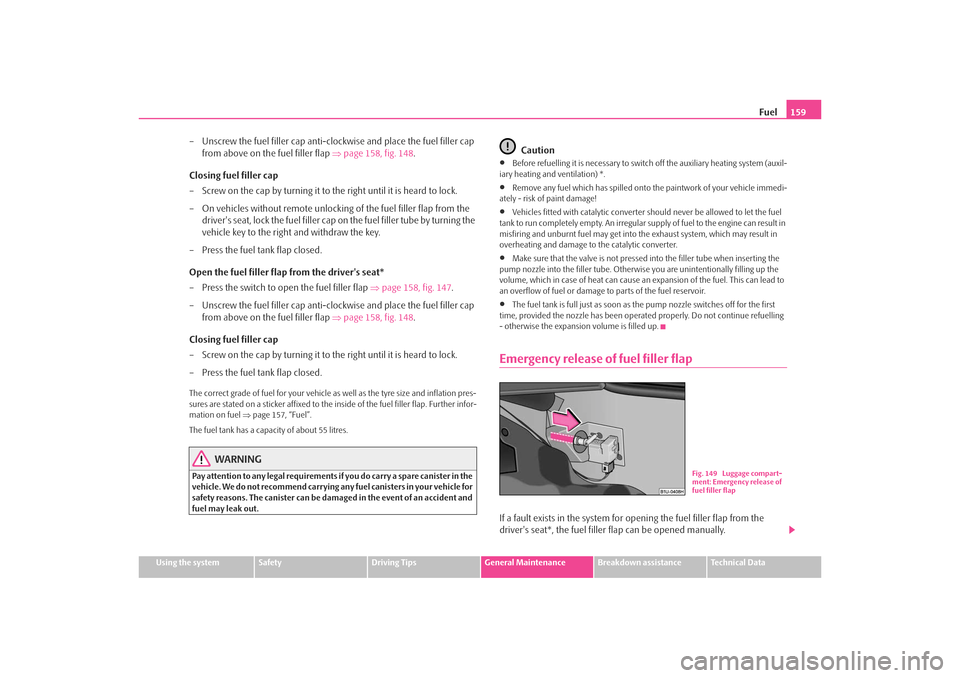
Emergency release of fuel filler flapIf a fault exists in the system for opening the fuel filler flap from the
driver's seat*, the fuel filler flap can be opened manually.
Fig. 149 Luggage compart-
ment: Emergency release of
fuel filler flap
s2ig.book Page 159 Monday, November 10, 2008 11:20 AM
Page 221 of 226
Index
220lock
Central locking system . . . . . . . . . . . . . . . . . . . . . 39
Locking . . . . . . . . . . . . . . . . . . . . . . . . . . . . . . . . . . . 37, 38 Remote control . . . . . . . . . . . . . . . . . . . . . . . . . . . 42
Locking and unlocking from inside . . . . . . . . . . . . . 40
Low beam . . . . . . . . . . . . . . . . . . . . . . . . . . . . . . . . . . . 49 Warning light . . . . . . . . . . . . . . . . . . . . . . . . . . . . . 29
Lugagge . . . . . . . . . . . . . . . . . . . . . . . . . . . . . . . . . . . . . 41
Luggage compartment . . . . . . . . . . . . . . . . . . . . . 41, 68 Lashing eyes . . . . . . . . . . . . . . . . . . . . . . . . . . . . . . 68
Luggage compartment door Lighting . . . . . . . . . . . . . . . . . . . . . . . . . . . . . . . . . . 54
Luggage rack . . . . . . . . . . . . . . . . . . . . . . . . . . . . . . . . . 75MMain beam . . . . . . . . . . . . . . . . . . . . . . . . . . . . . . . . 49, 52 Warning light . . . . . . . . . . . . . . . . . . . . . . . . . . . . . 29
Manual gearbox . . . . . . . . . . . . . . . . . . . . . . . . . . . . . . 97
Manual shifting of gears . . . . . . . . . . . . . . . . . . . . . . . 97
Memory for the on-board computer . . . . . . . . . . . 20
Mobile phone . . . . . . . . . . . . . . . . . . . . . . . . . . . 103, 104
Motoring abroad . . . . . . . . . . . . . . . . . . . . . . . . . . . . 144
Multifunction steering wheel . . . . . . . . . . . . . . . . . 102
Multi-functional indicator . . . . . . . . . . . . . . . . . . . . . 19NNavigation system . . . . . . . . . . . . . . . . . . . . . . . . . . . . 26
Note holder . . . . . . . . . . . . . . . . . . . . . . . . . . . . . . . . . . 77
OOil . . . . . . . . . . . . . . . . . . . . . . . . . . . . . . . . . . . . . . . . . 164 Warning light . . . . . . . . . . . . . . . . . . . . . . . . . . . . . . 31
Oil dipstick . . . . . . . . . . . . . . . . . . . . . . . . . . . . . . . . . 165
Onboard computer . . . . . . . . . . . . . . . . . . . . . . . . . . . . 19
Open door Warning light . . . . . . . . . . . . . . . . . . . . . . . . . . . . . . 32
Opening a single door . . . . . . . . . . . . . . . . . . . . . . . . . 38
Operation in winter Battery . . . . . . . . . . . . . . . . . . . . . . . . . . . . . . . . . . 172
Biodiesel . . . . . . . . . . . . . . . . . . . . . . . . . . . . . . . . 158
De-icing windows . . . . . . . . . . . . . . . . . . . . . . . 152
Outside temperature . . . . . . . . . . . . . . . . . . . . . . . . . . 21
Overview of the engine compartment . . . . . . . . . 163PPaint . . . . . . . . . . . . . . . . . . . . . . . . . . . . . . . . . . . . . . . 151
Paint damage . . . . . . . . . . . . . . . . . . . . . . . . . . . . . . . 151
Parking . . . . . . . . . . . . . . . . . . . . . . . . . . . . . . . . . . . . . . . 98
Parking aid rear . . . . . . . . . . . . . . . . . . . . . . . . . . . . . . . . . . . . . . . 98
Parking light . . . . . . . . . . . . . . . . . . . . . . . . . . . . . . . . . . 52
Parking the vehicle . . . . . . . . . . . . . . . . . . . . . . . . . . . . 98
Passive Safety . . . . . . . . . . . . . . . . . . . . . . . . . . . . . . . 105
Pedals . . . . . . . . . . . . . . . . . . . . . . . . . . . . . . . . . . . . . . . . 67
Petrol . . . . . . . . . . . . . . . . . . . . . . . . . . . . . . . . . . . . . . 157
Petrol engines Starting the engine . . . . . . . . . . . . . . . . . . . . . . . . . 96
Polishing . . . . . . . . . . . . . . . . . . . . . . . . . . . . . . . . . . . 151
Power window . . . . . . . . . . . . . . . . . . . . . . . . . . . . . . . . 44 Power windows
Button in front passenger door and in rear doors45
Buttons on the driver's door . . . . . . . . . . . . . . . . 44
Central locking system . . . . . . . . . . . . . . . . . . . . . 45
RRadiator fan . . . . . . . . . . . . . . . . . . . . . . . . . . . . . . . . . 169
Rear armrest . . . . . . . . . . . . . . . . . . . . . . . . . . . . . . . . . 81
Rear fog light . . . . . . . . . . . . . . . . . . . . . . . . . . . . . . . . . 50 Warning light . . . . . . . . . . . . . . . . . . . . . . . . . . . . . 29
Rear window heater . . . . . . . . . . . . . . . . . . . . . . . . . . . . . . . . . . . . 54
Rear window heater . . . . . . . . . . . . . . . . . . . . . . . . . . . 54
Rear-view mirror Exterior mirror . . . . . . . . . . . . . . . . . . . . . . . . . . . . 58
Interior mirror . . . . . . . . . . . . . . . . . . . . . . . . . . . . . 58
Recharge battery . . . . . . . . . . . . . . . . . . . . . . . . . . . . . 172
Refuelling . . . . . . . . . . . . . . . . . . . . . . . . . . . . . . . . . . . 158
Remote control . . . . . . . . . . . . . . . . . . . . . . . . . . . . . . . 41 Synchronisation . . . . . . . . . . . . . . . . . . . . . . . . . . . 42
Replacing fuses . . . . . . . . . . . . . . . . . . . . . . . . . . . . . . 194
Replacing the wiper blades . . . . . . . . . . . . . . . . . . . . 57
Roof aerial . . . . . . . . . . . . . . . . . . . . . . . . . . . . . . . . . . 150
Running in the car . . . . . . . . . . . . . . . . . . . . . . . . . . . 139SSafe securing . . . . . . . . . . . . . . . . . . . . . . . . . . . . . . . . . 38
Safety . . . . . . . . . . . . . . . . . . . . . . . . . . . . . . . . . . . . . . . 105
Safety information Engine compartment . . . . . . . . . . . . . . . . . . . . . 162
s2ig.book Page 220 Monday, November 10, 2008 11:20 AM