steering SKODA SUPERB 2014 2.G / (B6/3T) Owner's Guide
[x] Cancel search | Manufacturer: SKODA, Model Year: 2014, Model line: SUPERB, Model: SKODA SUPERB 2014 2.G / (B6/3T)Pages: 246, PDF Size: 17.16 MB
Page 145 of 246
The following modes can be selected with the selector lever » Fig. 138.P
– Parking mode
The driven wheels are locked mechanically in this mode.
The parking mode must only be selected when the vehicle is stationary.
R
- Reverse gear
Reverse gear can only be engaged when the vehicle is stationary and the en-
gine is at idling speed.
Before moving into mode R from mode P or N, depress the brake pedal while
simultaneously pressing the lock button in the direction of the ar-
row » Fig. 139 .
N
- Neutral
The power transmission to the drive wheels is interrupted in this mode.
D
- Mode for forwards travel (normal programme)
In mode D, the forward gears are automatically changed according to the en-
gine load, accelerator pedal actuation and driving speed.
S
- Mode for forwards travel (sports programme)
In mode S, the forward gears are shifted automatically up and down at higher
engine speeds than in mode D.
Before changing to mode S from mode D, press the lock button in the direction
of the arrow » Fig. 139.
Releasing selector lever from mode P or N (selector lever lock)
The selector lever is locked in modes P and N to prevent the forwards travel
mode from being selected accidentally and setting the vehicle in motion. The
warning light illuminates in the instrument cluster
» page 39.
The selector lever is released by depressing the brake pedal while simultane-
ously pressing the lock button in the direction of the arrow » Fig. 139.
The selector lever is not locked when quickly moving via position N (e.g. from R
to D). This, for example, helps to rock out a vehicle that is stuck, e.g. in a bank
of snow. The selector lever lock will engage if the lever is in position N for
more than approx. 2 seconds without the brake pedal being depressed.
The selector lever is locked only when the vehicle is stationary and at speeds up to 5 km/h.
NoteIf you want to move the selector lever from mode P to mode D or vice versa,
move the selector lever quickly. This prevents modes R or N from being acci-
dentally selected.
Manual shifting of gears (Tiptronic)
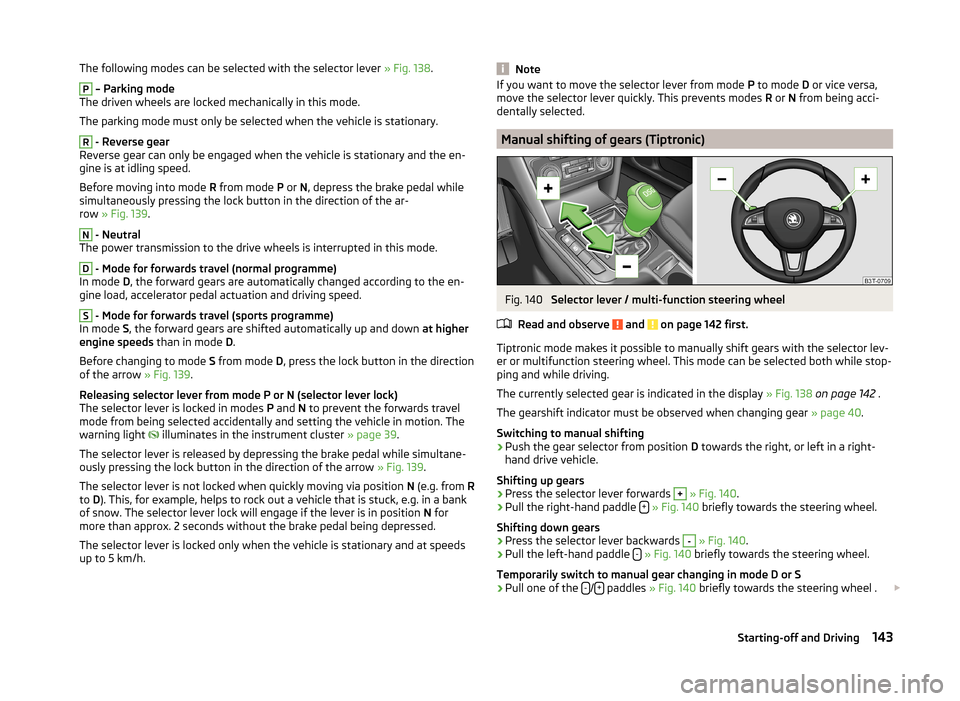
Fig. 140
Selector lever / multi-function steering wheel
Read and observe
and on page 142 first.
Tiptronic mode makes it possible to manually shift gears with the selector lev-
er or multifunction steering wheel. This mode can be selected both while stop-
ping and while driving.
The currently selected gear is indicated in the display » Fig. 138 on page 142 .
The gearshift indicator must be observed when changing gear » page 40.
Switching to manual shifting
›
Push the gear selector from position D towards the right, or left in a right-
hand drive vehicle.
Shifting up gears
›
Press the selector lever forwards
+
» Fig. 140 .
›
Pull the right-hand paddle +
» Fig. 140 briefly towards the steering wheel.
Shifting down gears
›
Press the selector lever backwards
-
» Fig. 140 .
›
Pull the left-hand paddle -
» Fig. 140 briefly towards the steering wheel.
Temporarily switch to manual gear changing in mode D or S
›
Pull one of the -/+ paddles
» Fig. 140 briefly towards the steering wheel .
143Starting-off and Driving
Page 146 of 246
If one of the rocker switches -/+ is not pulled for more than 1 minute, manual
gear changing is deactivated. The temporary switch to manual gear changing
can also be deactivated by pulling the right-hand rocker switch +
towards the
steering wheel for more than 1 second.
When accelerating, the gearbox automatically shifts up into the higher gear
just before the maximum permissible engine speed is reached.
If a lower gear is selected, the gearbox does not shift down until there is no risk of the engine overrevving.
Note
It may be beneficial, for example, when travelling downhill, to use manual
shifting of gears. Shifting to a lower gear reduces the load on the brakes and
hence the wear of the brakes » page 140.
Starting-off and driving
Read and observe
and on page 142 first.
Starting off
›
Start the engine.
›
Firmly depress and hold the brake pedal.
›
Press the lock button in the direction of to arrow » Fig. 139 on page 142 and
hold.
›
Move the selector lever into the desired position » page 142 and then release
the lock button.
›
Release the brake pedal and accelerate.
Stop
›
Fully depress and hold the brake pedal and bring the vehicle to a stop.
›
Keep holding the brake pedal until driving is resumed.
The selector lever position N does not have to be selected when stopping for a
short time, such as at a cross roads.
Parking
›
Fully depress and hold the brake pedal and bring the vehicle to a stop.
›
Firmly apply the handbrake.
›
Press the lock button in the direction of to arrow » Fig. 139 on page 142 and
hold.
› Move the selector lever into the position
P and then release the locking but-
ton.
Launch control 1)
The Launch control function allows the vehicle to reach maximum acceleration
when starting off in mode S or Tiptronic.›
Activate the ASR » page 151, Brake assist systems .
›
START STOP deactivate » page 161.
›
Fully depress and hold the brake pedal with your left foot.
›
Fully depress the accelerator pedal with your right foot.
›
Release the brake pedal.
The vehicle starts off with maximum acceleration.
Reactivate the ASR and START-STOP as soon as the desired speed is reached.
Kickdown
The kickdown function allows you to achieve the maximum acceleration of
your vehicle while driving.
When the accelerator pedal is fully depressed, the kickdown function is activa-
ted in any forward driving mode.
The gearbox shifts down one or more gears depending on the vehicle speed
and engine speed, and the vehicle accelerates.
The gearbox does not shift up into the highest gear until the engine has
reached its maximum revolutions for this gear range.
WARNINGRapid acceleration, particularly on slippery roads, can lead to loss of control
of the vehicle – risk of accident!
Malfunction
Read and observe
and on page 142 first.
Emergency programme
The transmission switches to the emergency programme, if there is a fault in
system of the automatic gearbox.
1)
This function is only valid for some engines.
144Driving
Page 153 of 246
Assist systems
Brake assist systems
Introduction
This chapter contains information on the following subjects:
Electronic Stability Control (ESC)
151
Antilock brake system (ABS)
152
Traction Control System (TCS)
152
Electronic Differential Lock (EDL)
152
Driver Steering Recommendation (DSR)
152
Hydraulic Brake Assist (HBA)
152
Hill Hold Control (HHC)
153WARNING■ A lack of fuel can cause irregular engine running or cause the engine to
shut down. The brake assist systems would then fail to function – risk of
accident!■
Adjust the speed and driving style to the current visibility, weather, road
and traffic conditions. The increased safety provided by the brake assist
systems must not tempt you to take safety risks – risk of accident!
■
In the event of an ABS fault, visit a specialist garage immediately. Adjust
your style of driving according to the damage to the ABS, as you will not
know the exact extent of the damage or the extent to which this is limiting the braking efficiency.
CAUTION
■ All four wheels must be fitted with the same tyres approved by the manufac-
turer to ensure the brake assist systems operate correctly.■
Changes to the vehicle (e.g. to the engine, brakes, chassis) can influence the
functionality of the brake assist systems » page 169, Services, modifications,
and technical alterations .
■
If a fault occurs in the ABS system, the ESC, ASR and EDL will also not work.
An ABS fault is indicated by the warning light
» page 36 .
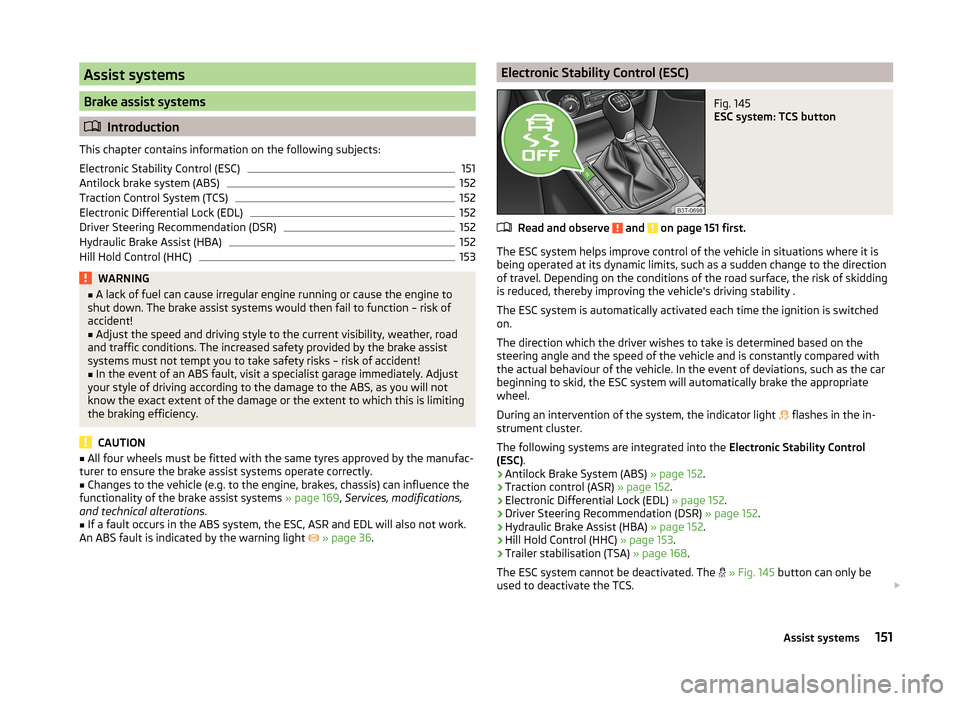
Electronic Stability Control (ESC)Fig. 145
ESC system: TCS button
Read and observe and on page 151 first.
The ESC system helps improve control of the vehicle in situations where it is
being operated at its dynamic limits, such as a sudden change to the direction
of travel. Depending on the conditions of the road surface, the risk of skidding
is reduced, thereby improving the vehicle's driving stability .
The ESC system is automatically activated each time the ignition is switched
on.
The direction which the driver wishes to take is determined based on the
steering angle and the speed of the vehicle and is constantly compared with
the actual behaviour of the vehicle. In the event of deviations, such as the car
beginning to skid, the ESC system will automatically brake the appropriate
wheel.
During an intervention of the system, the indicator light flashes in the in-
strument cluster.
The following systems are integrated into the Electronic Stability Control
(ESC) .
› Antilock Brake System (ABS)
» page 152.
› Traction control (ASR)
» page 152.
› Electronic Differential Lock (EDL)
» page 152.
› Driver Steering Recommendation (DSR)
» page 152.
› Hydraulic Brake Assist (HBA)
» page 152.
› Hill Hold Control (HHC)
» page 153.
› Trailer stabilisation (TSA)
» page 168.
The ESC system cannot be deactivated. The
» Fig. 145 button can only be
used to deactivate the TCS.
151Assist systems
Page 154 of 246
The warning light lights up in the instrument cluster when the ASR is deacti-
vated.
Antilock brake system (ABS)
Read and observe
and on page 151 first.
ABS prevents the wheels locking when braking. Thus helping the driver to
maintain control of the vehicle.
The intervention of the ABS is noticeable from the pulsating movements of
the brake pedal which is accompanied by noises.
When the ABS system is active, do not brake periodically or reduce the pres- sure on the brake pedal.
Traction Control System (TCS)
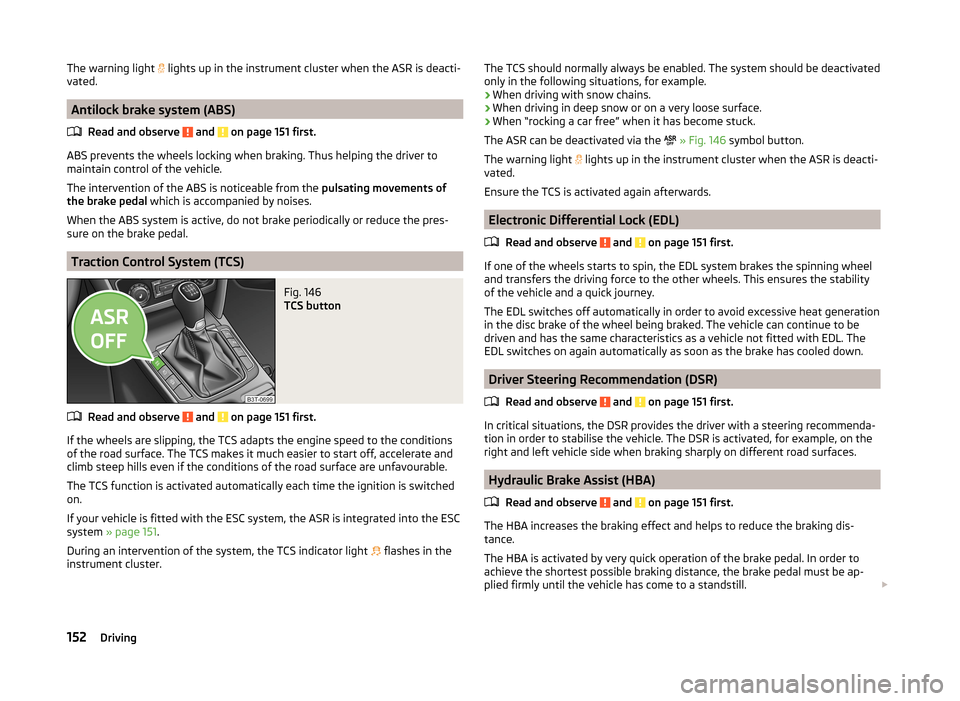
Fig. 146
TCS button
Read and observe and on page 151 first.
If the wheels are slipping, the TCS adapts the engine speed to the conditions
of the road surface. The TCS makes it much easier to start off, accelerate and
climb steep hills even if the conditions of the road surface are unfavourable.
The TCS function is activated automatically each time the ignition is switched
on.
If your vehicle is fitted with the ESC system, the ASR is integrated into the ESC
system » page 151 .
During an intervention of the system, the TCS indicator light flashes in the
instrument cluster.
The TCS should normally always be enabled. The system should be deactivated
only in the following situations, for example.
› When driving with snow chains.
› When driving in deep snow or on a very loose surface.
› When “rocking a car free” when it has become stuck.
The ASR can be deactivated via the
» Fig. 146 symbol button.
The warning light
lights up in the instrument cluster when the ASR is deacti-
vated.
Ensure the TCS is activated again afterwards.
Electronic Differential Lock (EDL)
Read and observe
and on page 151 first.
If one of the wheels starts to spin, the EDL system brakes the spinning wheel
and transfers the driving force to the other wheels. This ensures the stability
of the vehicle and a quick journey.
The EDL switches off automatically in order to avoid excessive heat generation
in the disc brake of the wheel being braked. The vehicle can continue to be
driven and has the same characteristics as a vehicle not fitted with EDL. The
EDL switches on again automatically as soon as the brake has cooled down.
Driver Steering Recommendation (DSR)
Read and observe
and on page 151 first.
In critical situations, the DSR provides the driver with a steering recommenda-
tion in order to stabilise the vehicle. The DSR is activated, for example, on the
right and left vehicle side when braking sharply on different road surfaces.
Hydraulic Brake Assist (HBA)
Read and observe
and on page 151 first.
The HBA increases the braking effect and helps to reduce the braking dis-
tance.
The HBA is activated by very quick operation of the brake pedal. In order to
achieve the shortest possible braking distance, the brake pedal must be ap-
plied firmly until the vehicle has come to a standstill.
152Driving
Page 156 of 246
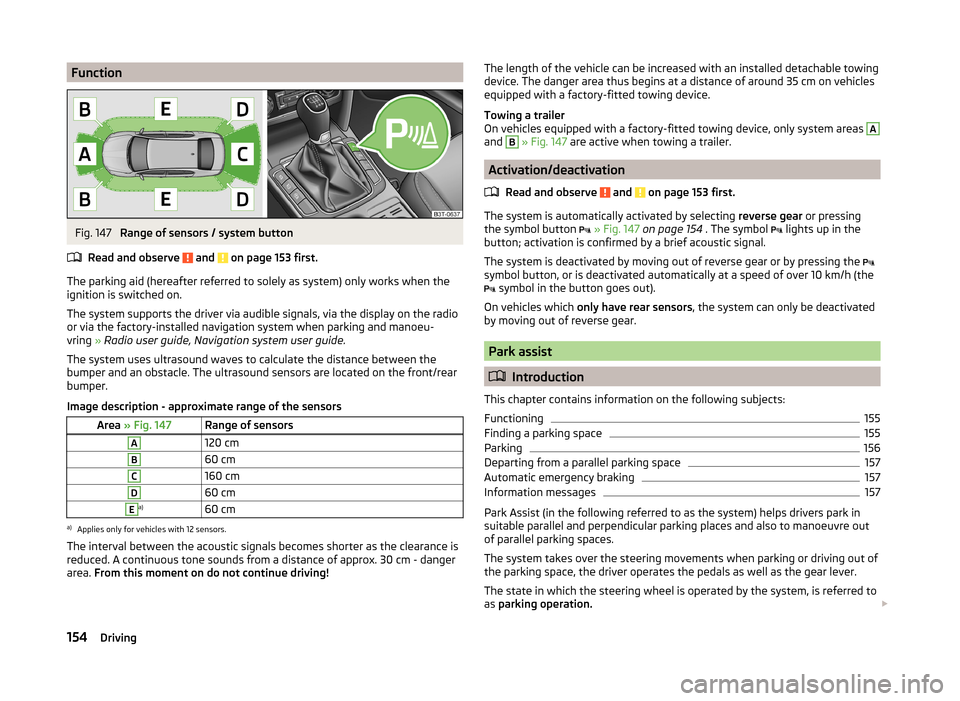
FunctionFig. 147
Range of sensors / system button
Read and observe
and on page 153 first.
The parking aid (hereafter referred to solely as system) only works when the
ignition is switched on.
The system supports the driver via audible signals, via the display on the radio
or via the factory-installed navigation system when parking and manoeu-
vring » Radio user guide, Navigation system user guide.
The system uses ultrasound waves to calculate the distance between the
bumper and an obstacle. The ultrasound sensors are located on the front/rear
bumper.
Image description - approximate range of the sensors
Area » Fig. 147Range of sensorsA120 cmB60 cmC160 cmD60 cmEa)60 cma)
Applies only for vehicles with 12 sensors.
The interval between the acoustic signals becomes shorter as the clearance is
reduced. A continuous tone sounds from a distance of approx. 30 cm - danger
area. From this moment on do not continue driving!
The length of the vehicle can be increased with an installed detachable towing
device. The danger area thus begins at a distance of around 35 cm on vehicles equipped with a factory-fitted towing device.
Towing a trailer
On vehicles equipped with a factory-fitted towing device, only system areas A
and
B
» Fig. 147 are active when towing a trailer.
Activation/deactivation
Read and observe
and on page 153 first.
The system is automatically activated by selecting reverse gear or pressing
the symbol button
» Fig. 147 on page 154 . The symbol
lights up in the
button; activation is confirmed by a brief acoustic signal.
The system is deactivated by moving out of reverse gear or by pressing the
symbol button, or is deactivated automatically at a speed of over 10 km/h (the
symbol in the button goes out).
On vehicles which only have rear sensors , the system can only be deactivated
by moving out of reverse gear.
Park assist
Introduction
This chapter contains information on the following subjects:
Functioning
155
Finding a parking space
155
Parking
156
Departing from a parallel parking space
157
Automatic emergency braking
157
Information messages
157
Park Assist (in the following referred to as the system) helps drivers park in
suitable parallel and perpendicular parking places and also to manoeuvre out
of parallel parking spaces.
The system takes over the steering movements when parking or driving out of
the parking space, the driver operates the pedals as well as the gear lever.
The state in which the steering wheel is operated by the system, is referred to
as parking operation.
154Driving
Page 157 of 246
The parking aid is part of the park assist system, therefore the information
and safety guidelines » page 153 , Parking aid must also be read and ob-
served.WARNING■ The system only serves to support and does not relieve the driver of the
responsibility for the vehicle operation.■
During the parking process, the system automatically performs rapid
steering movements. While it is doing so, do not place your hands between
the steering wheel – risk of injury!
■
During a parking manoeuvre on loose or slippery surfaces (gravel, snow,
ice, etc.) you may stray from the calculated road because of the surface
conditions. We therefore recommend not using the system in such situa-
tions.
■
External noise sources may affect the signals of the system sensors. Un-
der adverse conditions, this may cause objects or people to not be recog-
nised by the system.
CAUTION
■ If other vehicles are parked behind or on the kerb, the system can guide your
vehicle beyond the kerb or onto it. Ensure that the wheels or the wheel rims of
your vehicle are not damaged and if necessary intervene in time.■
Under certain circumstances, the surfaces or structures of certain objects
such as wire mesh fences or powder snow cannot be detected by the system.
■
Under adverse weather conditions (heavy rain, water vapour, very low or
high temperatures etc.) system function may be limited.
CAUTION
The correct evaluation of the parking space and the parking procedure de-
pends on the circumference of the wheels on the vehicle.■
The system only works correctly if the vehicle is fitted with the wheel size
approved by the manufacturer.
■
Do without the use of the system if snow chains or a spare wheel is moun-
ted.
■
If wheels other than those approved by the manufacturer are mounted, the
resulting position of the vehicle in the parking space can differ slightly. This
can be avoided by readjusting the system at a specialist garage.
Note
We recommend performing the parking at a safe speed to about 5 km / h.Functioning
Read and observe
and on page 155 first.
Basic system operations
› The measurement and evaluation of the size of parking spaces when driving.
› The determination of the correct position of the vehicle for parking.
› The calculation of the line on which the vehicle drives backwards into the
parking space or forwards from the parking space.
› Automatic rotation of the front wheels during the parking.
The display of the instrument cluster (hereinafter only in the display) informa- tion and system messages are displayed.
When the system is activated, the warning light lights up
» Fig. 148 on
page 155 -
.
The traction control system (TCS) must always be switched on when parking.
Finding a parking space
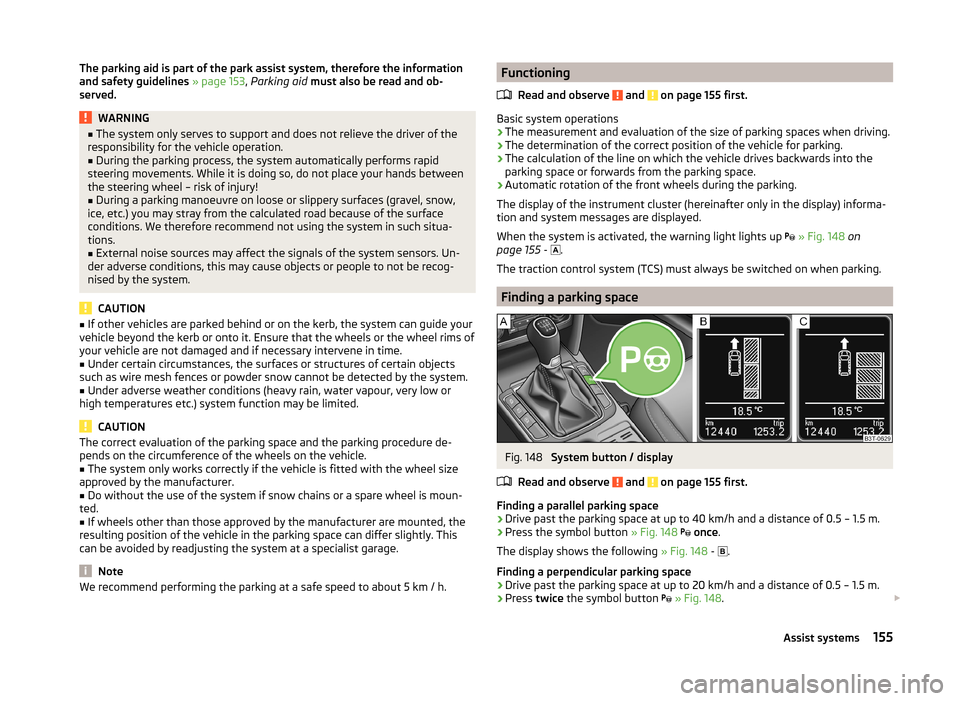
Fig. 148
System button / display
Read and observe
and on page 155 first.
Finding a parallel parking space
›
Drive past the parking space at up to 40 km/h and a distance of 0.5 – 1.5 m.
›
Press the symbol button » Fig. 148
once .
The display shows the following » Fig. 148 -
.
Finding a perpendicular parking space
›
Drive past the parking space at up to 20 km/h and a distance of 0.5 – 1.5 m.
›
Press twice the symbol button
» Fig. 148 .
155Assist systems
Page 158 of 246
The display shows the following » Fig. 148 - .
The search area for the parking space on the driver's side is automatically indi- cated on the display.
Activate the turn signal on the driver's side if you wish to park on this side of
the road. In the display the search area for the parking space is indicated on
the driver's side.
If suitable parking space is found, its parameters are stored until another suit-
able parking space has been found or until a distance of 10 m had been driven
after finding the parking space.
To change the parking mode when searching for a parking space, press the
symbol button again.
Note
If the symbol (km / h) is shown in the display , the vehicle speed should be
reduced below 40 km / hr (parallel parking) or below 20 km / hr (Transverse
parking) .
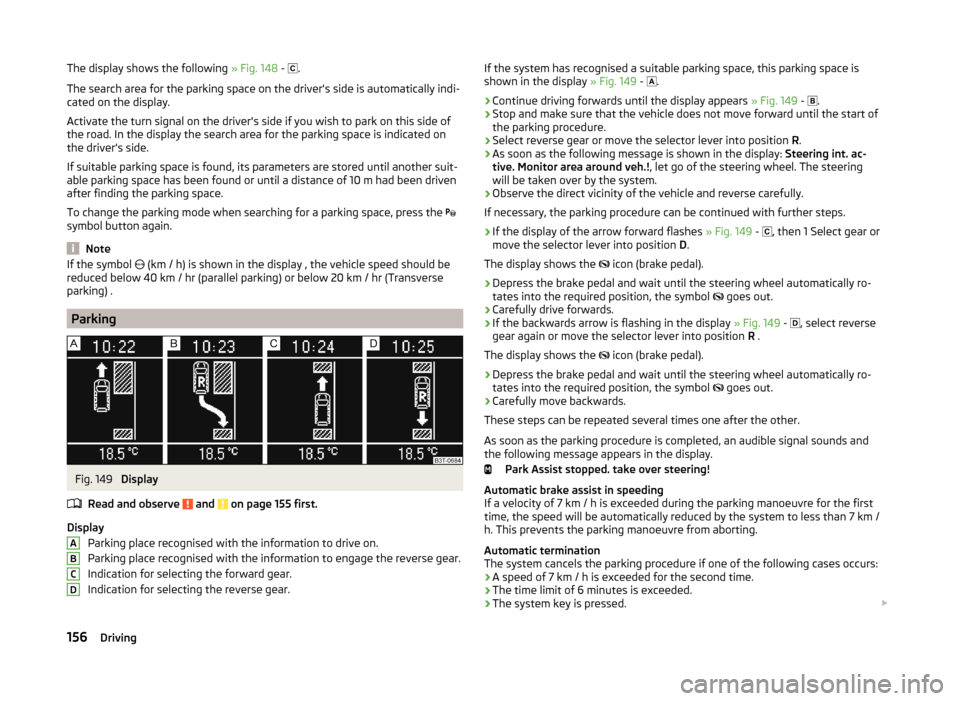
Parking
Fig. 149
Display
Read and observe
and on page 155 first.
Display Parking place recognised with the information to drive on.
Parking place recognised with the information to engage the reverse gear.
Indication for selecting the forward gear.
Indication for selecting the reverse gear.
ABCDIf the system has recognised a suitable parking space, this parking space is
shown in the display » Fig. 149 - .›
Continue driving forwards until the display appears » Fig. 149 -
.
›
Stop and make sure that the vehicle does not move forward until the start of
the parking procedure.
›
Select reverse gear or move the selector lever into position R.
›
As soon as the following message is shown in the display: Steering int. ac-
tive. Monitor area around veh.! , let go of the steering wheel. The steering
will be taken over by the system.
›
Observe the direct vicinity of the vehicle and reverse carefully.
If necessary, the parking procedure can be continued with further steps.
›
If the display of the arrow forward flashes » Fig. 149 -
, then 1 Select gear or
move the selector lever into position D.
The display shows the icon (brake pedal).
›
Depress the brake pedal and wait until the steering wheel automatically ro-
tates into the required position, the symbol goes out.
›
Carefully drive forwards.
›
If the backwards arrow is flashing in the display
» Fig. 149 -
, select reverse
gear again or move the selector lever into position R .
The display shows the icon (brake pedal).
›
Depress the brake pedal and wait until the steering wheel automatically ro-
tates into the required position, the symbol goes out.
›
Carefully move backwards.
These steps can be repeated several times one after the other.
As soon as the parking procedure is completed, an audible signal sounds and
the following message appears in the display.
Park Assist stopped. take over steering!
Automatic brake assist in speeding
If a velocity of 7 km / h is exceeded during the parking manoeuvre for the first
time, the speed will be automatically reduced by the system to less than 7 km /
h. This prevents the parking manoeuvre from aborting.
Automatic termination
The system cancels the parking procedure if one of the following cases occurs:
› A speed of 7 km / h is exceeded for the second time.
› The time limit of 6 minutes is exceeded.
› The system key is pressed.
156Driving
Page 159 of 246
›The ASR system is turned off.
› There is a driver intervention in the automatic steering operation (wheel
stop).
› When there is a system fault (system temporarily not available).
› There is an automatic emergency braking.
If any of the above events occurs, the following message is dis-
played » page 157 .
Departing from a parallel parking space
Read and observe
and on page 155 first.
Manoeuvring out
›
Press the symbol button » Fig. 148 on page 155
once .
›
Activate the turn signal for side of the vehicle where the parking space is out
of which you wish to manoeuvre.
›
Select reverse gear or move the selector lever into position R.
›
As soon as the following message is shown in the display: Steering int. ac-
tive. Monitor area around veh.! , let go of the steering wheel. The steering
will be taken over by the system.
›
Observe the direct vicinity of the vehicle and reverse carefully.
›
Follow the system instructions shown in the display.
As soon as the parking procedure is completed, an audible signal sounds and
the following message appears in the information display:
Please take over steering and drive on.
Automatic termination
The system terminates the manoeuvring procedure if one of the following ca-
ses arises.
› The system key is pressed.
› The ASR system is turned off.
› There is a driver intervention in the automatic steering operation (wheel
stop).
› When there is a system fault (system temporarily not available).
› There is an automatic emergency braking.
If any of the above events occurs, the following message is dis-
played » page 157 .
Automatic emergency braking
Read and observe
and on page 155 first.
If the system detects a risk of collision during parking, automatic emergencybraking takes place to prevent a collision.
The parking is terminated by the emergency braking.
CAUTION
If the parking is aborted due to the speed exceeding 7 km / h for the second
speed, then the automatic emergency braking is not triggered by the system!
Information messages
Read and observe
and on page 155 first.
Park Assist: Speed too high.
If a speed of 50 km / h is exceeded while searching for a parking space, the
system with the key symbol is must be reactivated.
Speed too high. take over steering!
The parking is terminated if the speed exceeds 7 km / hr. Steering intervention by the driver: take over steering!
The parking procedure is terminated due to a driver steering intervention. Park Assist stopped. ASR deactivated.
The parking procedure cannot be carried out because the TCS system is deac-
tivated. Activate the TCS.
ASR deactivated. take over steering!
The parking procedure was ended because TCS was deactivated during the parking procedure.
Trailer: Park Assist stopped.
The parking procedure cannot be carried out because a trailer is hitched. Time limit exceeded. take over steering!
The parking procedure was ended because the time limit of 6 minutes was
passed.
Park Assist currently not available.
157Assist systems
Page 160 of 246
The system cannot be activated because a fault exists on the vehicle. Seek
help from a specialist garage.
Park Assist stopped. System currently unavailable.
The parking procedure was ended because a fault exists on the vehicle. Seek
help from a specialist garage.
Park Assist faulty. Workshop!
The parking procedure is not possible because a fault exists in the system.
Seek help from a specialist garage.
ASR intervention. take over steering!
The parking procedure is terminated by a TCS intervention. PARK ASSIST Turn on turn signal and select reverse gear
The prerequisites for manoeuvring out of a parking space using the system
have been met. Switch on the turn signals and shift into reverse.
Automatic space departure not possible. Space too small.
The manoeuvring procedure using the system is not possible. The parking gap
is too small.
Park Assist: Brake interv. Speed too high.
The speed was too high during the parking and was automatically reduced.
Cruise Control System
Introduction
This chapter contains information on the following subjects:
Activating/deactivating
158
Storing and maintaining speed
159
Changing the stored speed
159
Switching off temporarily
159
The Cruise Control System (CCS) maintains a set speed, more than 25 km/h,
without you having to actuate the accelerator pedal.
This is only possible within the range which is permitted by the power output and braking power of the engine.
The warning light illuminates in the instrument cluster when the cruise con-
trol system is switched on.
WARNING■ For safety reasons, the cruise control system must not be used in dense
traffic or on unfavourable road surfaces (such as icy roads, slippery roads,
loose gravel) – risk of accident!■
The saved speed may only be resumed if it is not too high for the current
traffic conditions.
■
Always deactivate the cruise control system after use to prevent the sys-
tem being switched on unintentionally.
CAUTION
■ The cruise control system is not able to maintain a constant speed when
driving in areas with steeper gradients. The weight of the vehicle increases the
speed at which it travels. In such cases, select a lower gear or brake the vehi-
cle using the footbrake.■
The cruise control system cannot be activated when first gear or reverse
gear is selected (vehicles with manual transmission).
■
The cruise control system cannot be activated when the selector lever is in
positions P, N or R (vehicles with automatic transmission).
■
The cruise control system may automatically switch off when some brake as-
sist systems (e.g. ESC) intervene, when the maximum permissible engine
speed is exceeded, etc.
Activating/deactivating
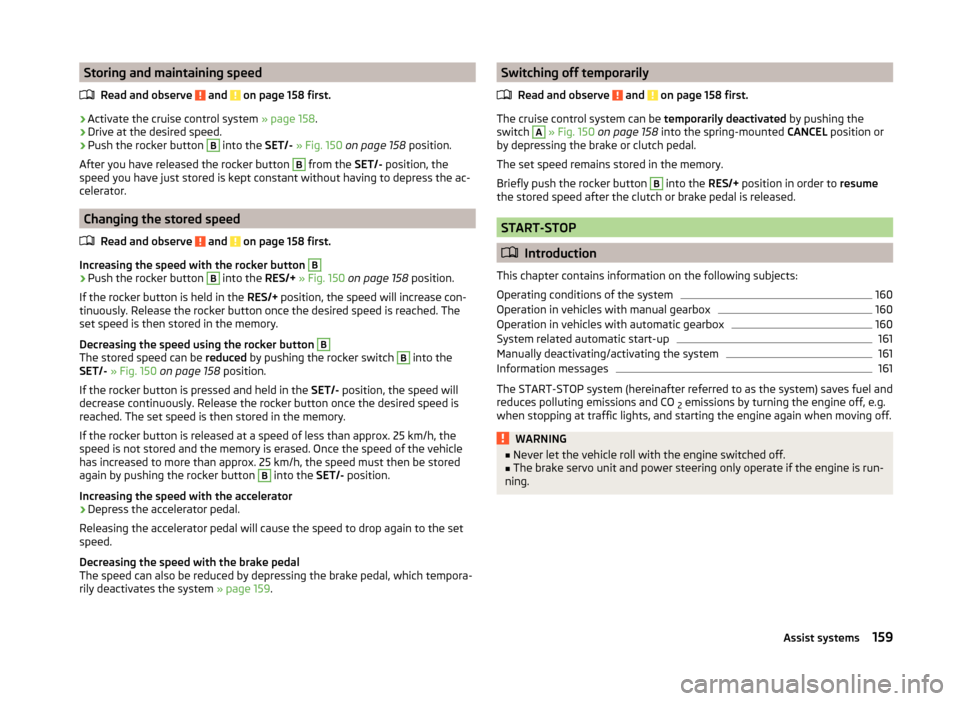
Fig. 150
Operating lever: Cruise control
system controls
Read and observe and on page 158 first.
Activating
›
Move switch
A
» Fig. 150 into the ON position.
Deactivating
›
Move switch
A
» Fig. 150 into the OFF position.
158Driving
Page 161 of 246
Storing and maintaining speedRead and observe
and on page 158 first.
›
Activate the cruise control system » page 158.
›
Drive at the desired speed.
›
Push the rocker button
B
into the SET/- » Fig. 150 on page 158 position.
After you have released the rocker button
B
from the SET/- position, the
speed you have just stored is kept constant without having to depress the ac-
celerator.
Changing the stored speed
Read and observe
and on page 158 first.
Increasing the speed with the rocker button
B›
Push the rocker button
B
into the RES/+ » Fig. 150 on page 158 position.
If the rocker button is held in the RES/+ position, the speed will increase con-
tinuously. Release the rocker button once the desired speed is reached. The
set speed is then stored in the memory.
Decreasing the speed using the rocker button
B
The stored speed can be reduced by pushing the rocker switch
B
into the
SET/- » Fig. 150 on page 158 position.
If the rocker button is pressed and held in the SET/- position, the speed will
decrease continuously. Release the rocker button once the desired speed is
reached. The set speed is then stored in the memory.
If the rocker button is released at a speed of less than approx. 25 km/h, the
speed is not stored and the memory is erased. Once the speed of the vehicle
has increased to more than approx. 25 km/h, the speed must then be stored
again by pushing the rocker button
B
into the SET/- position.
Increasing the speed with the accelerator
›
Depress the accelerator pedal.
Releasing the accelerator pedal will cause the speed to drop again to the set
speed.
Decreasing the speed with the brake pedal
The speed can also be reduced by depressing the brake pedal, which tempora-
rily deactivates the system » page 159.
Switching off temporarily
Read and observe
and on page 158 first.
The cruise control system can be temporarily deactivated by pushing the
switch
A
» Fig. 150 on page 158 into the spring-mounted CANCEL position or
by depressing the brake or clutch pedal.
The set speed remains stored in the memory.
Briefly push the rocker button
B
into the RES/+ position in order to resume
the stored speed after the clutch or brake pedal is released.
START-STOP
Introduction
This chapter contains information on the following subjects:
Operating conditions of the system
160
Operation in vehicles with manual gearbox
160
Operation in vehicles with automatic gearbox
160
System related automatic start-up
161
Manually deactivating/activating the system
161
Information messages
161
The START-STOP system (hereinafter referred to as the system) saves fuel and
reduces polluting emissions and CO 2 emissions by turning the engine off, e.g.
when stopping at traffic lights, and starting the engine again when moving off.
WARNING■ Never let the vehicle roll with the engine switched off.■The brake servo unit and power steering only operate if the engine is run-
ning.159Assist systems