SKODA SUPERB 2016 3.G / (B8/3V) Owner's Manual
Manufacturer: SKODA, Model Year: 2016, Model line: SUPERB, Model: SKODA SUPERB 2016 3.G / (B8/3V)Pages: 336, PDF Size: 53.89 MB
Page 291 of 336
The maximum towing speed is 50 km/h.
The vehicle must be transported on a special breakdown vehicle or trailer
if it is not possible to tow in the vehicle in the way described or if the tow-
ing distance is greater than 50 km.
Driver of the tow vehicle›
On vehicles with manual transmission , engage gear slowly when starting.
›
On vehicles with automatic transmission , accelerate with particular care.
›
Only then approach correctly when the rope is taut.
Driver of the towed vehicle
›
If possible, the vehicle should be towed with the engine running. Operate the
brake booster and power steering only if the engine is running, otherwise
the brake pedal must be depressed more strongly and more power has to be
directed to the steering.
›
If it is not possible to start the engine, switch on the ignition so that the
steering wheel is not locked and so that the turn signal lights, windscreen
wipers and windscreen washer system can be used.
›
Take the vehicle out of gear or move the selector lever into position N if the
vehicle is fitted with an automatic gearbox.
›
Always keep the tow rope taut during the towing procedure.
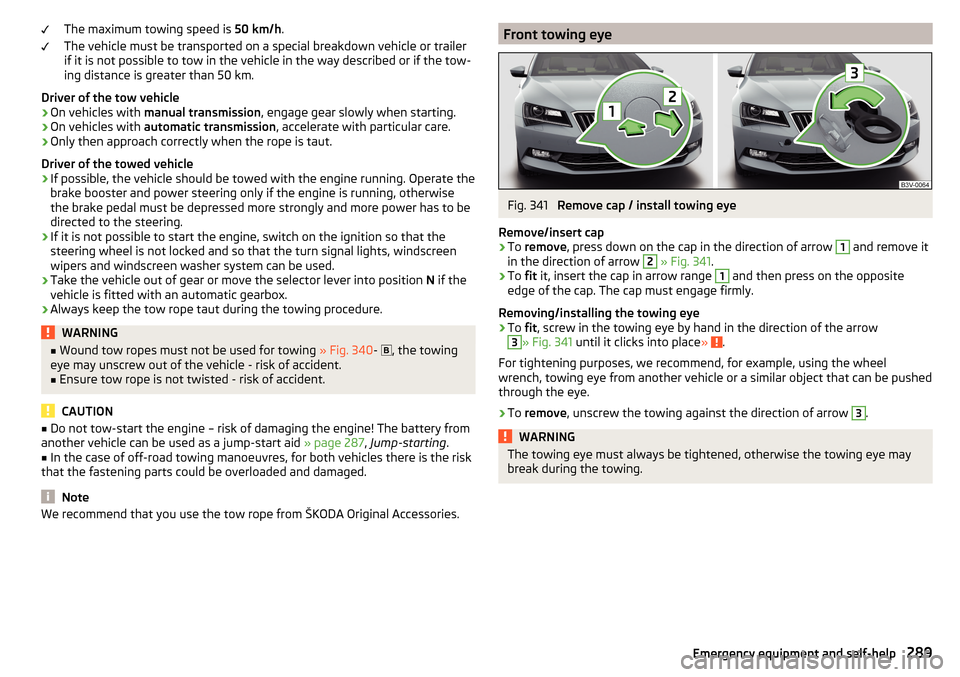
WARNING■ Wound tow ropes must not be used for towing » Fig. 340- , the towing
eye may unscrew out of the vehicle - risk of accident.■
Ensure tow rope is not twisted - risk of accident.
CAUTION
■ Do not tow-start the engine – risk of damaging the engine! The battery from
another vehicle can be used as a jump-start aid » page 287, Jump-starting .■
In the case of off-road towing manoeuvres, for both vehicles there is the risk
that the fastening parts could be overloaded and damaged.
Note
We recommend that you use the tow rope from ŠKODA Original Accessories.Front towing eyeFig. 341
Remove cap / install towing eye
Remove/insert cap
›
To remove , press down on the cap in the direction of arrow
1
and remove it
in the direction of arrow
2
» Fig. 341 .
›
To fit it, insert the cap in arrow range
1
and then press on the opposite
edge of the cap. The cap must engage firmly.
Removing/installing the towing eye
›
To fit, screw in the towing eye by hand in the direction of the arrow
3
» Fig. 341 until it clicks into place » .
For tightening purposes, we recommend, for example, using the wheel
wrench, towing eye from another vehicle or a similar object that can be pushed
through the eye.
›
To remove , unscrew the towing against the direction of arrow
3
.
WARNINGThe towing eye must always be tightened, otherwise the towing eye may
break during the towing.289Emergency equipment and self-help
Page 292 of 336
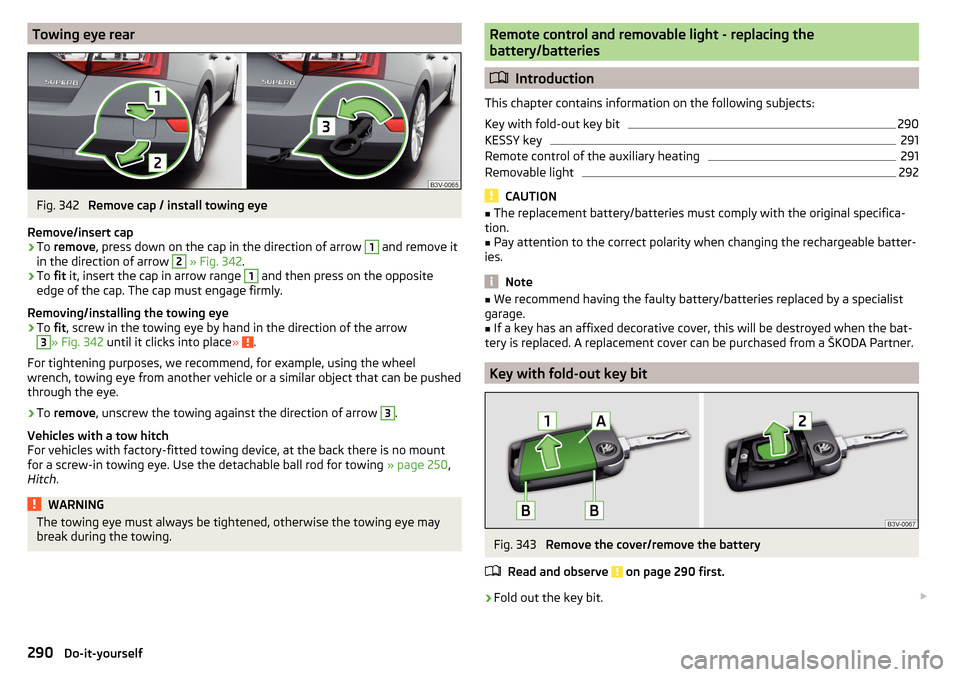
Towing eye rearFig. 342
Remove cap / install towing eye
Remove/insert cap
›
To remove , press down on the cap in the direction of arrow
1
and remove it
in the direction of arrow
2
» Fig. 342 .
›
To fit it, insert the cap in arrow range
1
and then press on the opposite
edge of the cap. The cap must engage firmly.
Removing/installing the towing eye
›
To fit, screw in the towing eye by hand in the direction of the arrow
3
» Fig. 342 until it clicks into place » .
For tightening purposes, we recommend, for example, using the wheel
wrench, towing eye from another vehicle or a similar object that can be pushed
through the eye.
›
To remove , unscrew the towing against the direction of arrow
3
.
Vehicles with a tow hitch
For vehicles with factory-fitted towing device, at the back there is no mount
for a screw-in towing eye. Use the detachable ball rod for towing » page 250,
Hitch .
WARNINGThe towing eye must always be tightened, otherwise the towing eye may
break during the towing.Remote control and removable light - replacing the
battery/batteries
Introduction
This chapter contains information on the following subjects:
Key with fold-out key bit
290
KESSY key
291
Remote control of the auxiliary heating
291
Removable light
292
CAUTION
■ The replacement battery/batteries must comply with the original specifica-
tion.■
Pay attention to the correct polarity when changing the rechargeable batter-
ies.
Note
■ We recommend having the faulty battery/batteries replaced by a specialist
garage.■
If a key has an affixed decorative cover, this will be destroyed when the bat-
tery is replaced. A replacement cover can be purchased from a ŠKODA Partner.
Key with fold-out key bit
Fig. 343
Remove the cover/remove the battery
Read and observe
on page 290 first.
›
Fold out the key bit.
290Do-it-yourself
Page 293 of 336
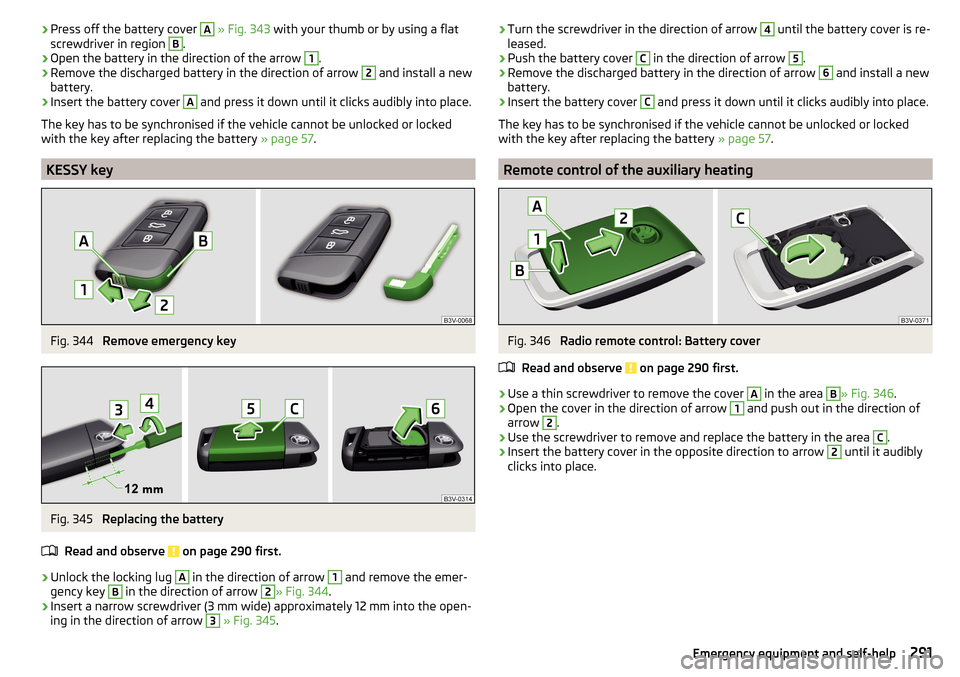
›Press off the battery cover A
» Fig. 343 with your thumb or by using a flat
screwdriver in region B.›
Open the battery in the direction of the arrow
1
.
›
Remove the discharged battery in the direction of arrow
2
and install a new
battery.
›
Insert the battery cover
A
and press it down until it clicks audibly into place.
The key has to be synchronised if the vehicle cannot be unlocked or locked
with the key after replacing the battery » page 57.
KESSY key
Fig. 344
Remove emergency key
Fig. 345
Replacing the battery
Read and observe
on page 290 first.
›
Unlock the locking lug
A
in the direction of arrow
1
and remove the emer-
gency key
B
in the direction of arrow
2
» Fig. 344 .
›
Insert a narrow screwdriver (3 mm wide) approximately 12 mm into the open-
ing in the direction of arrow
3
» Fig. 345 .
›Turn the screwdriver in the direction of arrow 4 until the battery cover is re-
leased.›
Push the battery cover
C
in the direction of arrow
5
.
›
Remove the discharged battery in the direction of arrow
6
and install a new
battery.
›
Insert the battery cover
C
and press it down until it clicks audibly into place.
The key has to be synchronised if the vehicle cannot be unlocked or locked
with the key after replacing the battery » page 57.
Remote control of the auxiliary heating
Fig. 346
Radio remote control: Battery cover
Read and observe
on page 290 first.
›
Use a thin screwdriver to remove the cover
A
in the area
B
» Fig. 346 .
›
Open the cover in the direction of arrow
1
and push out in the direction of
arrow
2
.
›
Use the screwdriver to remove and replace the battery in the area
C
.
›
Insert the battery cover in the opposite direction to arrow
2
until it audibly
clicks into place.
291Emergency equipment and self-help
Page 294 of 336
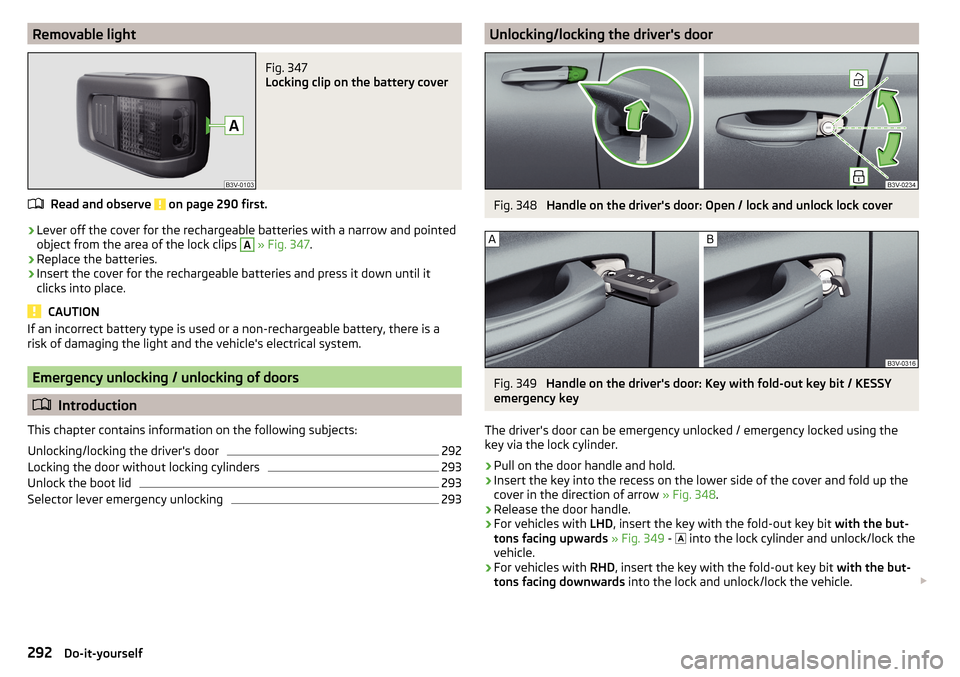
Removable lightFig. 347
Locking clip on the battery cover
Read and observe on page 290 first.
›
Lever off the cover for the rechargeable batteries with a narrow and pointed
object from the area of the lock clips
A
» Fig. 347 .
›
Replace the batteries.
›
Insert the cover for the rechargeable batteries and press it down until it
clicks into place.
CAUTION
If an incorrect battery type is used or a non-rechargeable battery, there is a
risk of damaging the light and the vehicle's electrical system.
Emergency unlocking / unlocking of doors
Introduction
This chapter contains information on the following subjects:
Unlocking/locking the driver's door
292
Locking the door without locking cylinders
293
Unlock the boot lid
293
Selector lever emergency unlocking
293Unlocking/locking the driver's doorFig. 348
Handle on the driver's door: Open / lock and unlock lock cover
Fig. 349
Handle on the driver's door: Key with fold-out key bit / KESSY
emergency key
The driver's door can be emergency unlocked / emergency locked using the
key via the lock cylinder.
›
Pull on the door handle and hold.
›
Insert the key into the recess on the lower side of the cover and fold up the
cover in the direction of arrow » Fig. 348.
›
Release the door handle.
›
For vehicles with LHD, insert the key with the fold-out key bit with the but-
tons facing upwards » Fig. 349 -
into the lock cylinder and unlock/lock the
vehicle.
›
For vehicles with RHD, insert the key with the fold-out key bit with the but-
tons facing downwards into the lock and unlock/lock the vehicle.
292Do-it-yourself
Page 295 of 336
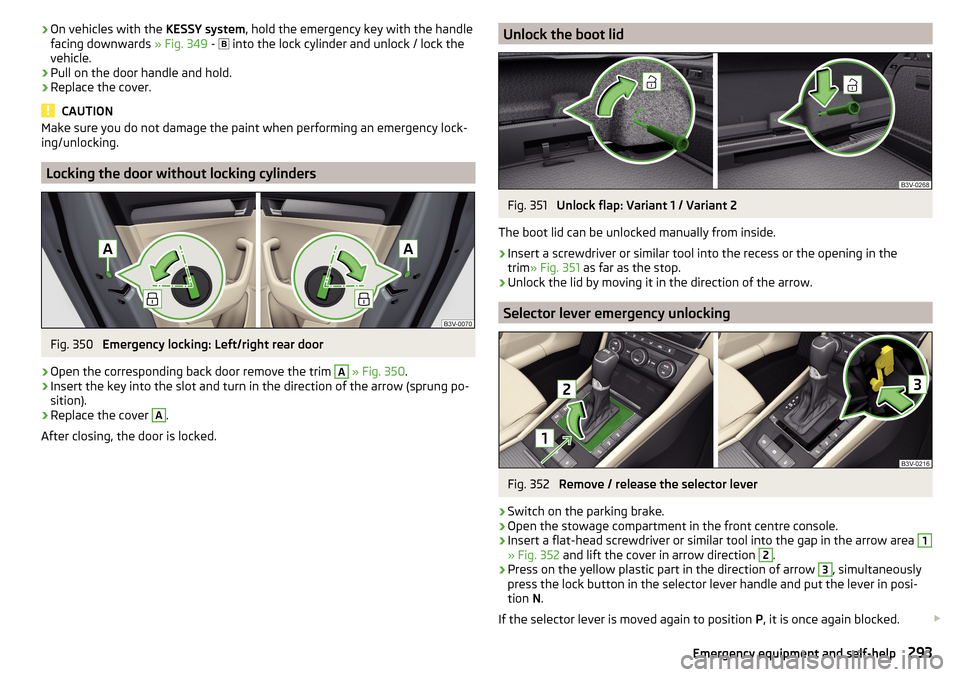
›On vehicles with the
KESSY system, hold the emergency key with the handle
facing downwards » Fig. 349 - into the lock cylinder and unlock / lock the
vehicle.›
Pull on the door handle and hold.
›
Replace the cover.
CAUTION
Make sure you do not damage the paint when performing an emergency lock-
ing/unlocking.
Locking the door without locking cylinders
Fig. 350
Emergency locking: Left/right rear door
›
Open the corresponding back door remove the trim
A
» Fig. 350 .
›
Insert the key into the slot and turn in the direction of the arrow (sprung po-
sition).
›
Replace the cover
A
.
After closing, the door is locked.
Unlock the boot lidFig. 351
Unlock flap: Variant 1 / Variant 2
The boot lid can be unlocked manually from inside.
›
Insert a screwdriver or similar tool into the recess or the opening in the
trim » Fig. 351 as far as the stop.
›
Unlock the lid by moving it in the direction of the arrow.
Selector lever emergency unlocking
Fig. 352
Remove / release the selector lever
›
Switch on the parking brake.
›
Open the stowage compartment in the front centre console.
›
Insert a flat-head screwdriver or similar tool into the gap in the arrow area
1
» Fig. 352 and lift the cover in arrow direction
2
.
›
Press on the yellow plastic part in the direction of arrow
3
, simultaneously
press the lock button in the selector lever handle and put the lever in posi-
tion N.
If the selector lever is moved again to position P, it is once again blocked.
293Emergency equipment and self-help
Page 296 of 336

CAUTIONMake sure when lifting not to damage cover parts by the screwdriver in the
shift lever environment.
Replacing windscreen wiper blades
Introduction
This chapter contains information on the following subjects:
Replacing the windscreen wiper blades
294
Replacing the rear window wiper blade
295WARNINGReplace the windscreen wiper blades once or twice a year for safety rea-
sons.
Replacing the windscreen wiper blades
Fig. 353
Setting the service position for
the wiper arms
Fig. 354
Replace windscreen wiper blade
Read and observe on page 294 first.
Before replacing the windscreen wiper blade, put the windscreen wiper arms
into the service position.
Setting the service position
›
Switch the ignition on and off again.
›
Within 10 seconds, push the lever in the direction of arrow » Fig. 353 and
hold for approximately 2 seconds.
Removing the wiper blade
›
Lift the wiper arm from the window in the direction of the arrow
1
» Fig. 354 .
›
Tilt the wiper blade to the stop in the same direction.
›
Hold the wiper arm and press the safety catch
A
in the direction of arrow
2
.
›
Remove the wiper blade in the direction of the arrow
3
.
Attaching the windscreen wiper blade
›
Push the windscreen wiper blade in the opposite direction of the arrow
3
until it locks into place. Check that the windscreen wiper blade is correctly at-
tached.
›
Fold the windscreen wiper arm back to the windscreen.
›
Turn on the ignition and press the lever into the direction of the arrow
» Fig. 353 .
Move the windscreen wiper arms into the home position.
294Do-it-yourself
Page 297 of 336
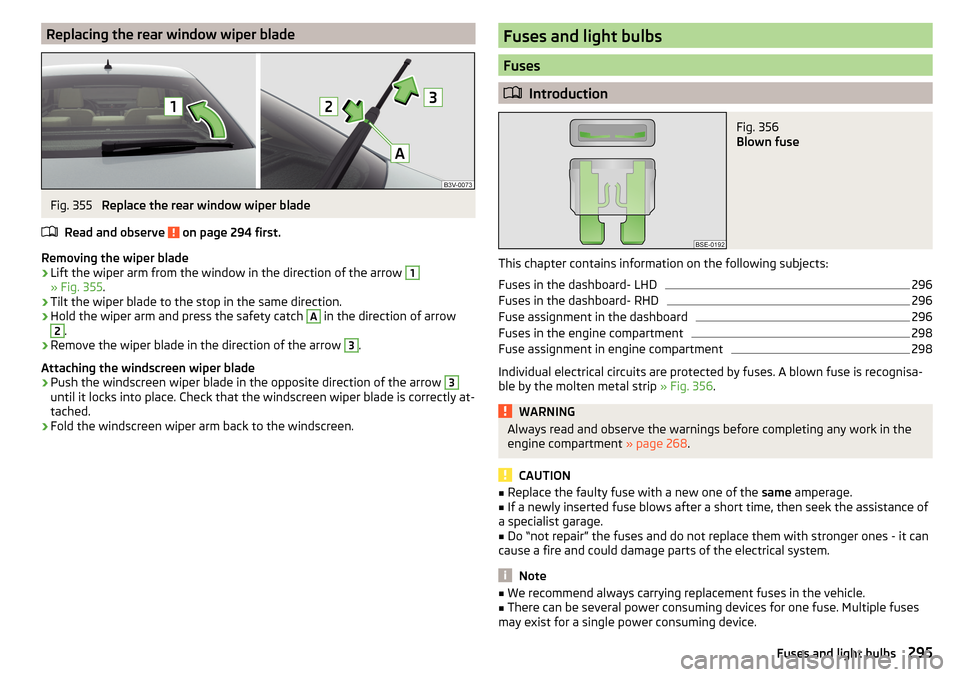
Replacing the rear window wiper bladeFig. 355
Replace the rear window wiper blade
Read and observe
on page 294 first.
Removing the wiper blade
›
Lift the wiper arm from the window in the direction of the arrow
1
» Fig. 355 .
›
Tilt the wiper blade to the stop in the same direction.
›
Hold the wiper arm and press the safety catch
A
in the direction of arrow
2
.
›
Remove the wiper blade in the direction of the arrow
3
.
Attaching the windscreen wiper blade
›
Push the windscreen wiper blade in the opposite direction of the arrow
3
until it locks into place. Check that the windscreen wiper blade is correctly at-
tached.
›
Fold the windscreen wiper arm back to the windscreen.
Fuses and light bulbs
Fuses
Introduction
Fig. 356
Blown fuse
This chapter contains information on the following subjects:
Fuses in the dashboard- LHD
296
Fuses in the dashboard- RHD
296
Fuse assignment in the dashboard
296
Fuses in the engine compartment
298
Fuse assignment in engine compartment
298
Individual electrical circuits are protected by fuses. A blown fuse is recognisa-
ble by the molten metal strip » Fig. 356.
WARNINGAlways read and observe the warnings before completing any work in the
engine compartment » page 268.
CAUTION
■
Replace the faulty fuse with a new one of the same amperage.■If a newly inserted fuse blows after a short time, then seek the assistance of
a specialist garage.■
Do “not repair” the fuses and do not replace them with stronger ones - it can
cause a fire and could damage parts of the electrical system.
Note
■ We recommend always carrying replacement fuses in the vehicle.■There can be several power consuming devices for one fuse. Multiple fuses
may exist for a single power consuming device.295Fuses and light bulbs
Page 298 of 336
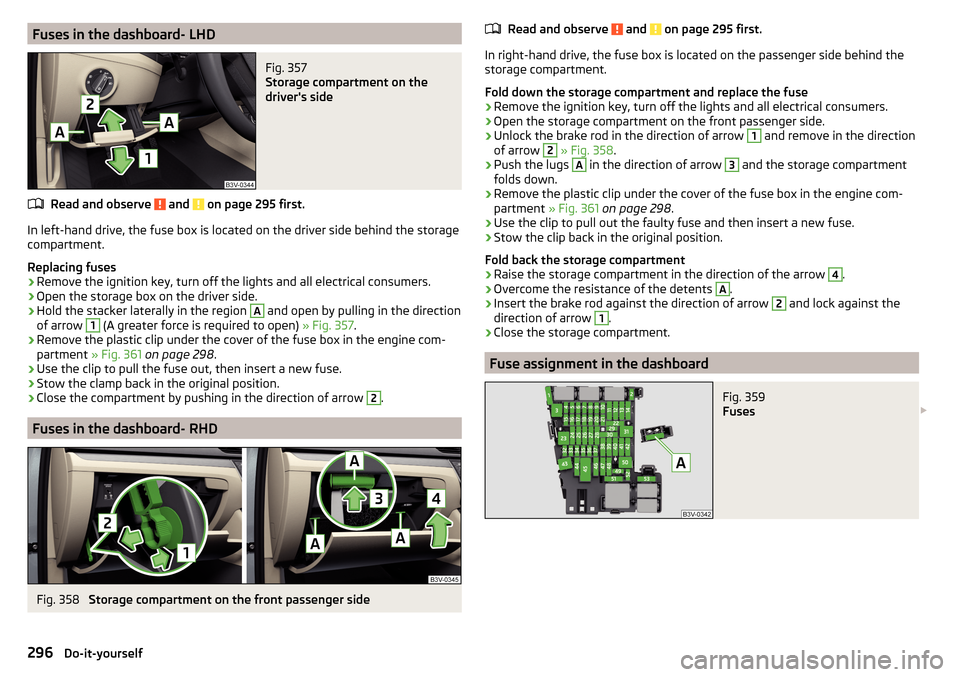
Fuses in the dashboard- LHDFig. 357
Storage compartment on the
driver's side
Read and observe and on page 295 first.
In left-hand drive, the fuse box is located on the driver side behind the storage compartment.
Replacing fuses
›
Remove the ignition key, turn off the lights and all electrical consumers.
›
Open the storage box on the driver side.
›
Hold the stacker laterally in the region
A
and open by pulling in the direction
of arrow
1
(A greater force is required to open) » Fig. 357.
›
Remove the plastic clip under the cover of the fuse box in the engine com-
partment » Fig. 361 on page 298 .
›
Use the clip to pull the fuse out, then insert a new fuse.
›
Stow the clamp back in the original position.
›
Close the compartment by pushing in the direction of arrow
2
.
Fuses in the dashboard- RHD
Fig. 358
Storage compartment on the front passenger side
Read and observe and on page 295 first.
In right-hand drive, the fuse box is located on the passenger side behind the
storage compartment.
Fold down the storage compartment and replace the fuse
›
Remove the ignition key, turn off the lights and all electrical consumers.
›
Open the storage compartment on the front passenger side.
›
Unlock the brake rod in the direction of arrow
1
and remove in the direction
of arrow
2
» Fig. 358 .
›
Push the lugs
A
in the direction of arrow
3
and the storage compartment
folds down.
›
Remove the plastic clip under the cover of the fuse box in the engine com-
partment » Fig. 361 on page 298 .
›
Use the clip to pull out the faulty fuse and then insert a new fuse.
›
Stow the clip back in the original position.
Fold back the storage compartment
›
Raise the storage compartment in the direction of the arrow
4
.
›
Overcome the resistance of the detents
A
.
›
Insert the brake rod against the direction of arrow
2
and lock against the
direction of arrow
1
.
›
Close the storage compartment.
Fuse assignment in the dashboard
Fig. 359
Fuses
296Do-it-yourself
Page 299 of 336
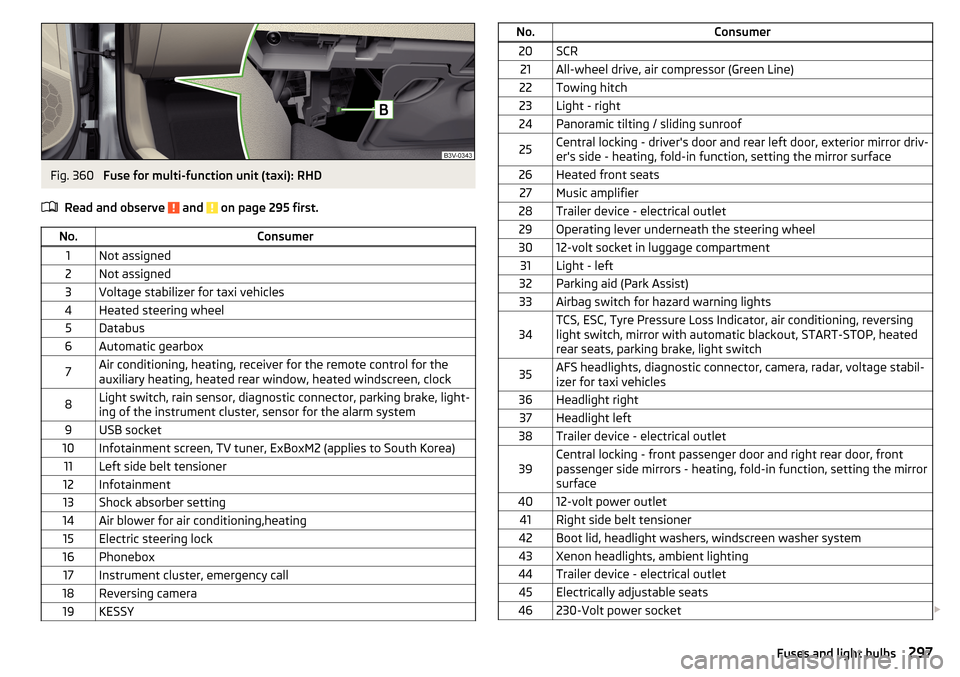
Fig. 360
Fuse for multi-function unit (taxi): RHD
Read and observe
and on page 295 first.
No.Consumer1Not assigned2Not assigned3Voltage stabilizer for taxi vehicles4Heated steering wheel5Databus6Automatic gearbox7Air conditioning, heating, receiver for the remote control for the
auxiliary heating, heated rear window, heated windscreen, clock8Light switch, rain sensor, diagnostic connector, parking brake, light-
ing of the instrument cluster, sensor for the alarm system9USB socket10Infotainment screen, TV tuner, ExBoxM2 (applies to South Korea)11Left side belt tensioner12Infotainment13Shock absorber setting14Air blower for air conditioning,heating15Electric steering lock16Phonebox17Instrument cluster, emergency call18Reversing camera19KESSYNo.Consumer20SCR21All-wheel drive, air compressor (Green Line)22Towing hitch23Light - right24Panoramic tilting / sliding sunroof25Central locking - driver's door and rear left door, exterior mirror driv-
er's side - heating, fold-in function, setting the mirror surface26Heated front seats27Music amplifier28Trailer device - electrical outlet29Operating lever underneath the steering wheel3012-volt socket in luggage compartment31Light - left32Parking aid (Park Assist)33Airbag switch for hazard warning lights34TCS, ESC, Tyre Pressure Loss Indicator, air conditioning, reversing
light switch, mirror with automatic blackout, START-STOP, heated
rear seats, parking brake, light switch35AFS headlights, diagnostic connector, camera, radar, voltage stabil-
izer for taxi vehicles36Headlight right37Headlight left38Trailer device - electrical outlet39Central locking - front passenger door and right rear door, front
passenger side mirrors - heating, fold-in function, setting the mirror
surface4012-volt power outlet41Right side belt tensioner42Boot lid, headlight washers, windscreen washer system43Xenon headlights, ambient lighting44Trailer device - electrical outlet45Electrically adjustable seats46230-Volt power socket 297Fuses and light bulbs
Page 300 of 336
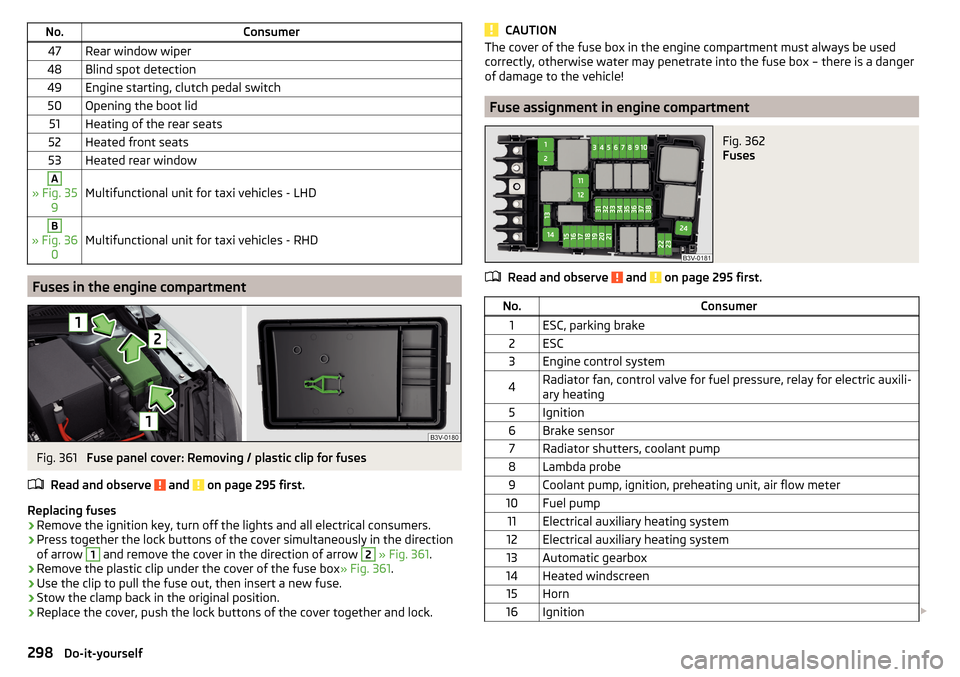
No.Consumer47Rear window wiper48Blind spot detection49Engine starting, clutch pedal switch50Opening the boot lid51Heating of the rear seats52Heated front seats53Heated rear windowA
» Fig. 359Multifunctional unit for taxi vehicles - LHD
B
» Fig. 36 0Multifunctional unit for taxi vehicles - RHD
Fuses in the engine compartment
Fig. 361
Fuse panel cover: Removing / plastic clip for fuses
Read and observe
and on page 295 first.
Replacing fuses
›
Remove the ignition key, turn off the lights and all electrical consumers.
›
Press together the lock buttons of the cover simultaneously in the direction
of arrow
1
and remove the cover in the direction of arrow
2
» Fig. 361 .
›
Remove the plastic clip under the cover of the fuse box » Fig. 361.
›
Use the clip to pull the fuse out, then insert a new fuse.
›
Stow the clamp back in the original position.
›
Replace the cover, push the lock buttons of the cover together and lock.
CAUTIONThe cover of the fuse box in the engine compartment must always be used
correctly, otherwise water may penetrate into the fuse box – there is a danger
of damage to the vehicle!
Fuse assignment in engine compartment
Fig. 362
Fuses
Read and observe and on page 295 first.
No.Consumer1ESC, parking brake2ESC3Engine control system4Radiator fan, control valve for fuel pressure, relay for electric auxili-
ary heating5Ignition6Brake sensor7Radiator shutters, coolant pump8Lambda probe9Coolant pump, ignition, preheating unit, air flow meter10Fuel pump11Electrical auxiliary heating system12Electrical auxiliary heating system13Automatic gearbox14Heated windscreen15Horn16Ignition 298Do-it-yourself