SKODA SUPERB 2016 3.G / (B8/3V) Owner's Manual
Manufacturer: SKODA, Model Year: 2016, Model line: SUPERB, Model: SKODA SUPERB 2016 3.G / (B8/3V)Pages: 336, PDF Size: 53.89 MB
Page 301 of 336
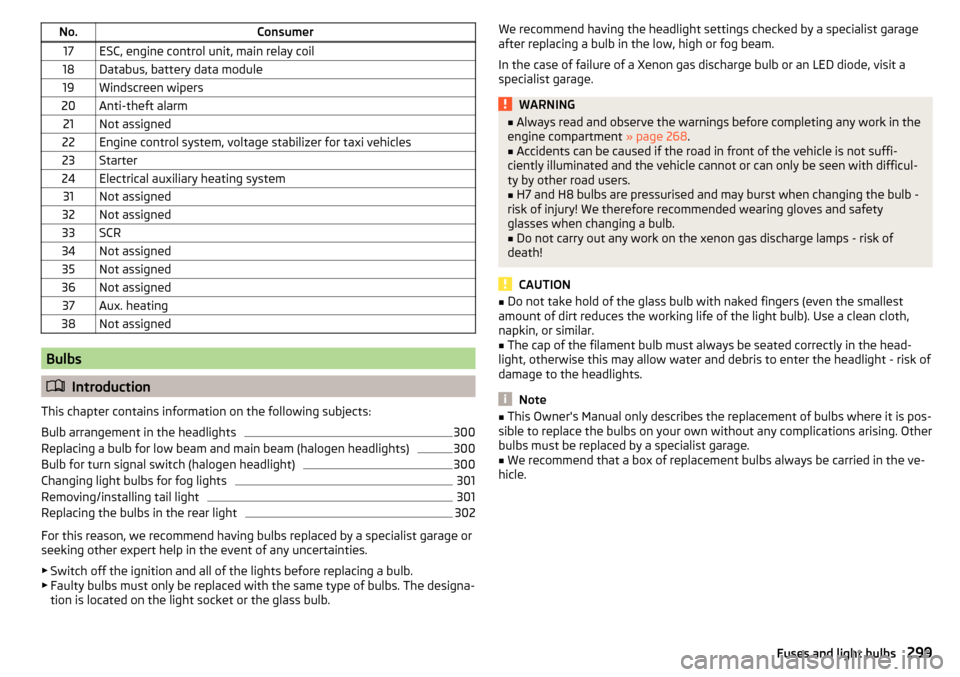
No.Consumer17ESC, engine control unit, main relay coil18Databus, battery data module19Windscreen wipers20Anti-theft alarm21Not assigned22Engine control system, voltage stabilizer for taxi vehicles23Starter24Electrical auxiliary heating system31Not assigned32Not assigned33SCR34Not assigned35Not assigned36Not assigned37Aux. heating38Not assigned
Bulbs
Introduction
This chapter contains information on the following subjects:
Bulb arrangement in the headlights
300
Replacing a bulb for low beam and main beam (halogen headlights)
300
Bulb for turn signal switch (halogen headlight)
300
Changing light bulbs for fog lights
301
Removing/installing tail light
301
Replacing the bulbs in the rear light
302
For this reason, we recommend having bulbs replaced by a specialist garage or
seeking other expert help in the event of any uncertainties.
▶ Switch off the ignition and all of the lights before replacing a bulb.
▶ Faulty bulbs must only be replaced with the same type of bulbs. The designa-
tion is located on the light socket or the glass bulb.
We recommend having the headlight settings checked by a specialist garage
after replacing a bulb in the low, high or fog beam.
In the case of failure of a Xenon gas discharge bulb or an LED diode, visit a
specialist garage.WARNING■ Always read and observe the warnings before completing any work in the
engine compartment » page 268.■
Accidents can be caused if the road in front of the vehicle is not suffi-
ciently illuminated and the vehicle cannot or can only be seen with difficul-
ty by other road users.
■
H7 and H8 bulbs are pressurised and may burst when changing the bulb -
risk of injury! We therefore recommended wearing gloves and safety
glasses when changing a bulb.
■
Do not carry out any work on the xenon gas discharge lamps - risk of
death!
CAUTION
■ Do not take hold of the glass bulb with naked fingers (even the smallest
amount of dirt reduces the working life of the light bulb). Use a clean cloth,
napkin, or similar.■
The cap of the filament bulb must always be seated correctly in the head-
light, otherwise this may allow water and debris to enter the headlight - risk of
damage to the headlights.
Note
■ This Owner's Manual only describes the replacement of bulbs where it is pos-
sible to replace the bulbs on your own without any complications arising. Other
bulbs must be replaced by a specialist garage.■
We recommend that a box of replacement bulbs always be carried in the ve-
hicle.
299Fuses and light bulbs
Page 302 of 336

Bulb arrangement in the headlightsFig. 363
Left headlight
Read and observe and on page 299 first.
The vehicle is equipped with headlights with halogen lamps or with a xenon
discharge lamp and an LED lighting element.
Bulb arrangement » Fig. 363
Flashing
Low beam with halogen bulb or Xenon gas discharge bulb
Main beam
Replacing a bulb for low beam and main beam (halogen headlights)
Fig. 364
Removing bulbs for low and main beam
Read and observe
and on page 299 first.
›
Remove the protective caps
B
and
C
» Fig. 363 on page 300 .
›
Turn the holder with the bulb in the direction of arrow
1
» Fig. 364 .
›
Remove the holder with the bulb in the direction of arrow
2
.
ABC›Remove the bulb from the holder in the direction of the arrow 3.›Insert a new bulb into the connector so that the lug A on the connector
snaps into the groove on the bulb.›
Insert the connector with the new bulb into the headlight in the opposite di-
rection to the arrow
2
.
›
Turn the connector with the new bulb in the opposite direction to the arrow
1
until it stops.
›
Use the protective caps
B
and
C
» Fig. 363 on page 300 .
Bulb for turn signal switch (halogen headlight)
Fig. 365
Changing the bulb for the turn signal light
Read and observe
and on page 299 first.
›
Remove the protective cap
A
» Fig. 363 on page 300 .
›
Remove the bulb holder with the bulb by jiggling it out in the direction of the
arrow
1
» Fig. 365 .
›
Hold the socket with the bulb at the position shown by the arrows.
›
Remove the faulty bulb from the holder in the direction of the arrow
2
.
›
Push a new bulb into the bulb holder up to the stop.
›
Slide the socket with the bulb with the fixing lug
B
upwards so that it fits
into the recess on the reflector.
›
Fit the protective cap
A
» Fig. 363 on page 300 .
300Do-it-yourself
Page 303 of 336
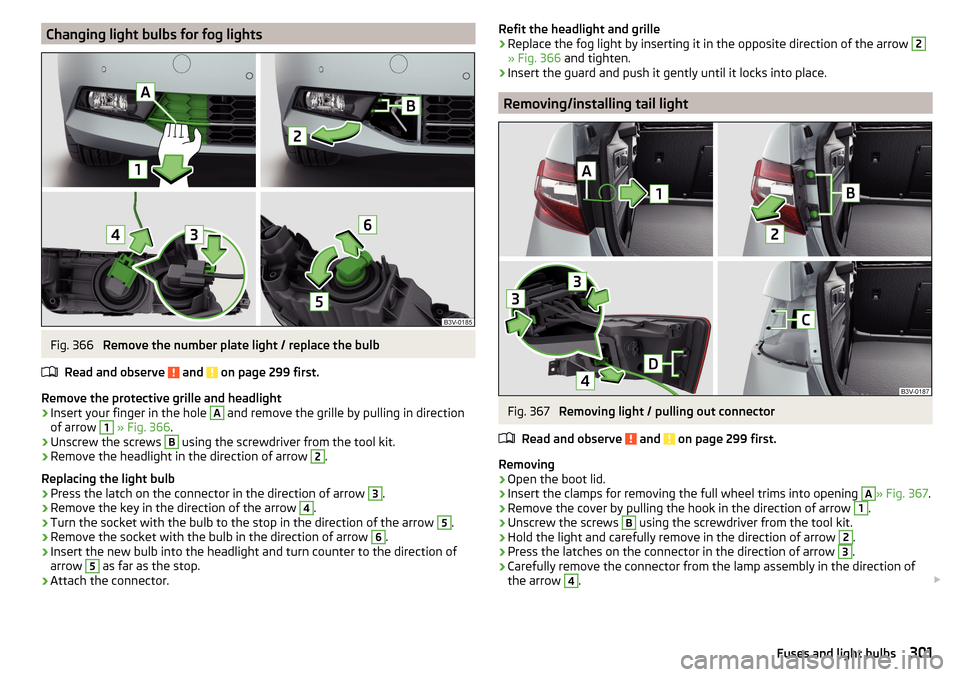
Changing light bulbs for fog lightsFig. 366
Remove the number plate light / replace the bulb
Read and observe
and on page 299 first.
Remove the protective grille and headlight
›
Insert your finger in the hole
A
and remove the grille by pulling in direction
of arrow
1
» Fig. 366 .
›
Unscrew the screws
B
using the screwdriver from the tool kit.
›
Remove the headlight in the direction of arrow
2
.
Replacing the light bulb
›
Press the latch on the connector in the direction of arrow
3
.
›
Remove the key in the direction of the arrow
4
.
›
Turn the socket with the bulb to the stop in the direction of the arrow
5
.
›
Remove the socket with the bulb in the direction of arrow
6
.
›
Insert the new bulb into the headlight and turn counter to the direction of
arrow
5
as far as the stop.
›
Attach the connector.
Refit the headlight and grille›Replace the fog light by inserting it in the opposite direction of the arrow 2
» Fig. 366 and tighten.
›
Insert the guard and push it gently until it locks into place.
Removing/installing tail light
Fig. 367
Removing light / pulling out connector
Read and observe
and on page 299 first.
Removing
›
Open the boot lid.
›
Insert the clamps for removing the full wheel trims into opening
A
» Fig. 367 .
›
Remove the cover by pulling the hook in the direction of arrow
1
.
›
Unscrew the screws
B
using the screwdriver from the tool kit.
›
Hold the light and carefully remove in the direction of arrow
2
.
›
Press the latches on the connector in the direction of arrow
3
.
›
Carefully remove the connector from the lamp assembly in the direction of
the arrow
4
.
301Fuses and light bulbs
Page 304 of 336
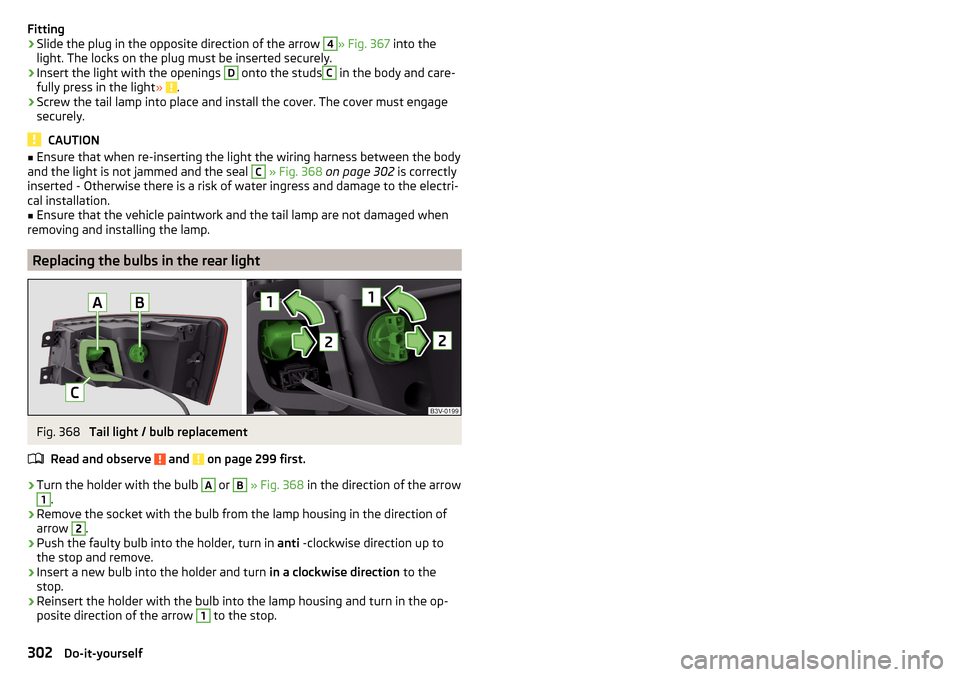
Fitting›Slide the plug in the opposite direction of the arrow 4» Fig. 367 into the
light. The locks on the plug must be inserted securely.›
Insert the light with the openings
D
onto the studs
C
in the body and care-
fully press in the light » .
›
Screw the tail lamp into place and install the cover. The cover must engage
securely.
CAUTION
■ Ensure that when re-inserting the light the wiring harness between the body
and the light is not jammed and the seal C » Fig. 368 on page 302 is correctly
inserted - Otherwise there is a risk of water ingress and damage to the electri-
cal installation.■
Ensure that the vehicle paintwork and the tail lamp are not damaged when
removing and installing the lamp.
Replacing the bulbs in the rear light
Fig. 368
Tail light / bulb replacement
Read and observe
and on page 299 first.
›
Turn the holder with the bulb
A
or
B
» Fig. 368 in the direction of the arrow
1
.
›
Remove the socket with the bulb from the lamp housing in the direction of
arrow
2
.
›
Push the faulty bulb into the holder, turn in anti -clockwise direction up to
the stop and remove.
›
Insert a new bulb into the holder and turn in a clockwise direction to the
stop.
›
Reinsert the holder with the bulb into the lamp housing and turn in the op-
posite direction of the arrow
1
to the stop.
302Do-it-yourself
Page 305 of 336
Technical data
Technical data
Basic vehicle data
Introduction
This chapter contains information on the following subjects:
Vehicle data
303
Operating weight
304
Payload
305
Measurement of fuel consumption and CO 2 emissions according to ECE
Regulations and EU Directives
305
Dimensions - Superb
306
Dimensions - Superb estate
307
Overhang angle
308
The details given in the vehicle's technical documentation always take prece-
dence over the details in the Owner's Manual.
The listed performance values were determined without performance-reduc- ing equipment, e.g. air conditioning system.
The values given have been determined in accordance with the rules and con-
ditions specified in statutory or technical regulations for determining opera-
tional and technical data for motor vehicles.
The values listed are for the basic model without any optional equipment.
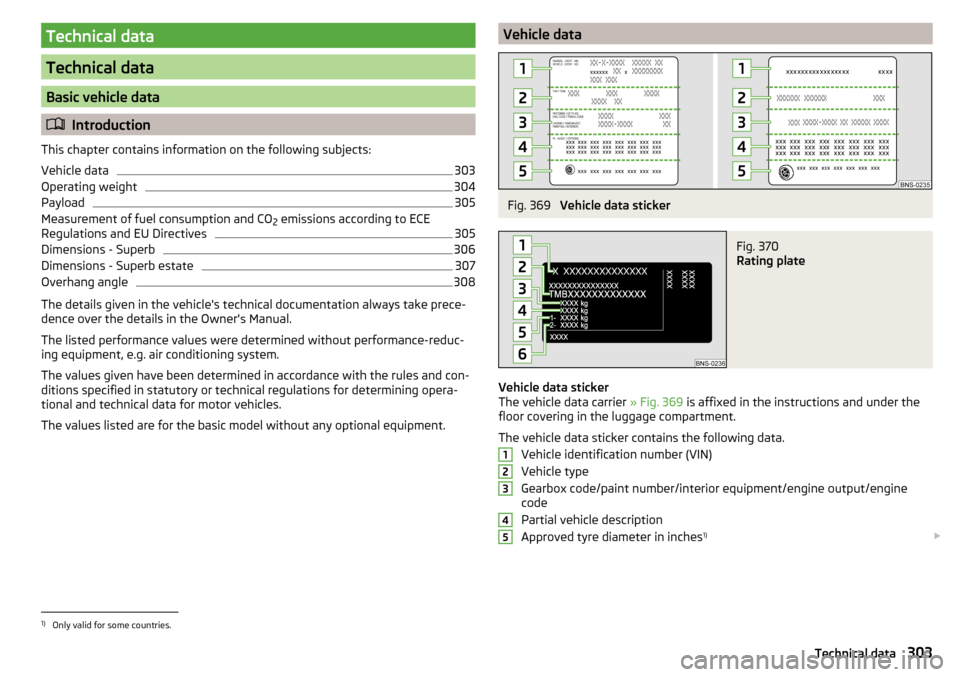
Vehicle dataFig. 369
Vehicle data sticker
Fig. 370
Rating plate
Vehicle data sticker
The vehicle data carrier » Fig. 369 is affixed in the instructions and under the
floor covering in the luggage compartment.
The vehicle data sticker contains the following data. Vehicle identification number (VIN)
Vehicle type
Gearbox code/paint number/interior equipment/engine output/engine
code
Partial vehicle description
Approved tyre diameter in inches 1)
123451)
Only valid for some countries.
303Technical data
Page 306 of 336
The approved tyres and rim sizes for your vehicle are listed in the vehicle's
technical documentation (the so called COC document) and this also states the
declaration of conformity.
Type plate
The rating plate » Fig. 370 is located at the bottom of the B-column on the
right-hand driver's side.
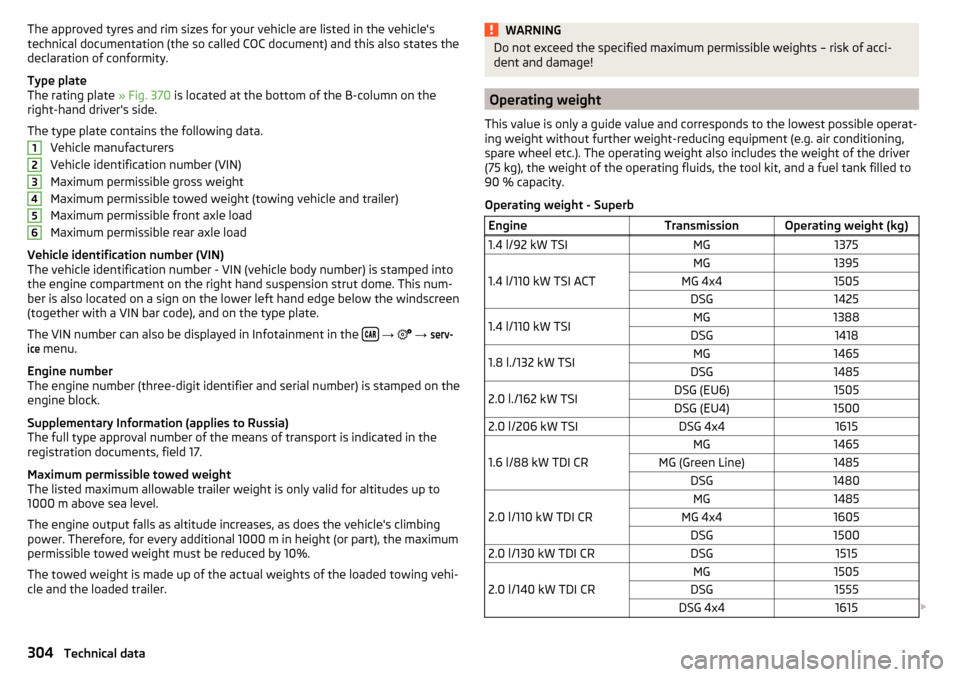
The type plate contains the following data. Vehicle manufacturers
Vehicle identification number (VIN)
Maximum permissible gross weight
Maximum permissible towed weight (towing vehicle and trailer)
Maximum permissible front axle load
Maximum permissible rear axle load
Vehicle identification number (VIN)
The vehicle identification number - VIN (vehicle body number) is stamped into
the engine compartment on the right hand suspension strut dome. This num-
ber is also located on a sign on the lower left hand edge below the windscreen
(together with a VIN bar code), and on the type plate.
The VIN number can also be displayed in Infotainment in the
→
→
serv-ice
menu.
Engine number
The engine number (three-digit identifier and serial number) is stamped on the
engine block.
Supplementary Information (applies to Russia)
The full type approval number of the means of transport is indicated in the
registration documents, field 17.
Maximum permissible towed weight
The listed maximum allowable trailer weight is only valid for altitudes up to
1000 m above sea level.
The engine output falls as altitude increases, as does the vehicle's climbing
power. Therefore, for every additional 1000 m in height (or part), the maximum
permissible towed weight must be reduced by 10%.
The towed weight is made up of the actual weights of the loaded towing vehi-
cle and the loaded trailer.
123456WARNINGDo not exceed the specified maximum permissible weights – risk of acci-
dent and damage!
Operating weight
This value is only a guide value and corresponds to the lowest possible operat-
ing weight without further weight-reducing equipment (e.g. air conditioning,
spare wheel etc.). The operating weight also includes the weight of the driver
(75 kg), the weight of the operating fluids, the tool kit, and a fuel tank filled to
90 % capacity.
Operating weight - Superb
EngineTransmissionOperating weight (kg)1.4 l/92 kW TSIMG1375
1.4 l/110 kW TSI ACT
MG1395MG 4x41505DSG14251.4 l/110 kW TSIMG1388DSG14181.8 l./132 kW TSIMG1465DSG14852.0 l./162 kW TSIDSG (EU6)1505DSG (EU4)15002.0 l/206 kW TSIDSG 4x41615
1.6 l/88 kW TDI CR
MG1465MG (Green Line)1485DSG1480
2.0 l/110 kW TDI CR
MG1485MG 4x41605DSG15002.0 l/130 kW TDI CRDSG1515
2.0 l/140 kW TDI CR
MG1505DSG1555DSG 4x41615 304Technical data
Page 307 of 336
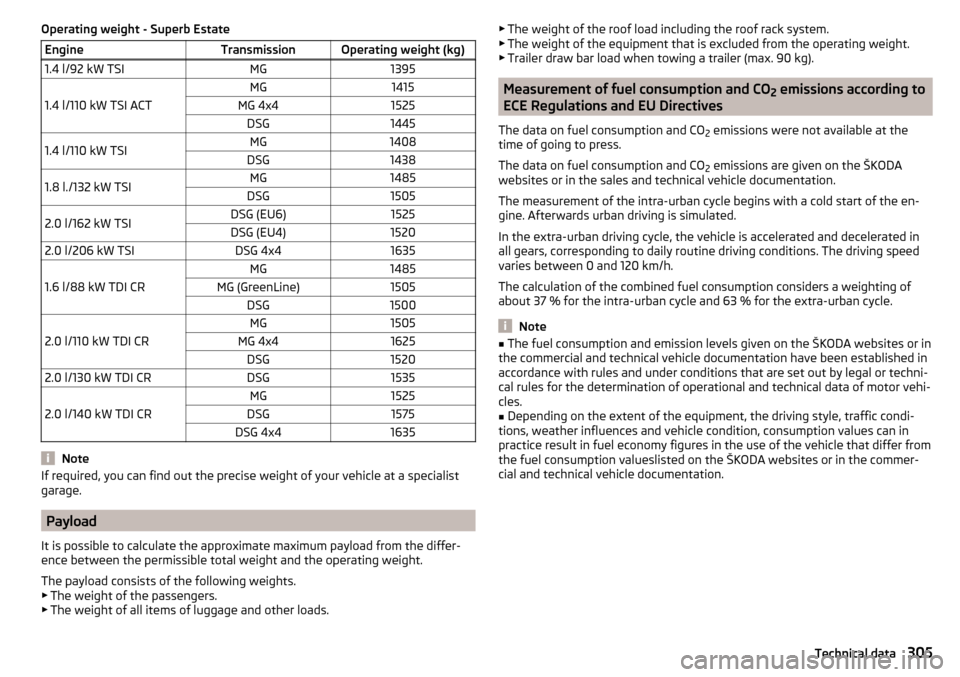
Operating weight - Superb EstateEngineTransmissionOperating weight (kg)1.4 l/92 kW TSIMG1395
1.4 l/110 kW TSI ACT
MG1415MG 4x41525DSG14451.4 l/110 kW TSIMG1408DSG14381.8 l./132 kW TSIMG1485DSG15052.0 l/162 kW TSIDSG (EU6)1525DSG (EU4)15202.0 l/206 kW TSIDSG 4x41635
1.6 l/88 kW TDI CR
MG1485MG (GreenLine)1505DSG1500
2.0 l/110 kW TDI CR
MG1505MG 4x41625DSG15202.0 l/130 kW TDI CRDSG1535
2.0 l/140 kW TDI CR
MG1525DSG1575DSG 4x41635
Note
If required, you can find out the precise weight of your vehicle at a specialist
garage.
Payload
It is possible to calculate the approximate maximum payload from the differ-
ence between the permissible total weight and the operating weight.
The payload consists of the following weights.
▶ The weight of the passengers.
▶ The weight of all items of luggage and other loads.
▶
The weight of the roof load including the roof rack system.
▶ The weight of the equipment that is excluded from the operating weight.
▶ Trailer draw bar load when towing a trailer (max. 90 kg).
Measurement of fuel consumption and CO
2 emissions according to
ECE Regulations and EU Directives
The data on fuel consumption and CO 2 emissions were not available at the
time of going to press.
The data on fuel consumption and CO 2 emissions are given on the ŠKODA
websites or in the sales and technical vehicle documentation.
The measurement of the intra-urban cycle begins with a cold start of the en-
gine. Afterwards urban driving is simulated.
In the extra-urban driving cycle, the vehicle is accelerated and decelerated in
all gears, corresponding to daily routine driving conditions. The driving speed
varies between 0 and 120 km/h.
The calculation of the combined fuel consumption considers a weighting of
about 37 % for the intra-urban cycle and 63 % for the extra-urban cycle.
Note
■ The fuel consumption and emission levels given on the ŠKODA websites or in
the commercial and technical vehicle documentation have been established in
accordance with rules and under conditions that are set out by legal or techni-
cal rules for the determination of operational and technical data of motor vehi-
cles.■
Depending on the extent of the equipment, the driving style, traffic condi-
tions, weather influences and vehicle condition, consumption values can in
practice result in fuel economy figures in the use of the vehicle that differ from
the fuel consumption valueslisted on the ŠKODA websites or in the commer-
cial and technical vehicle documentation.
305Technical data
Page 308 of 336
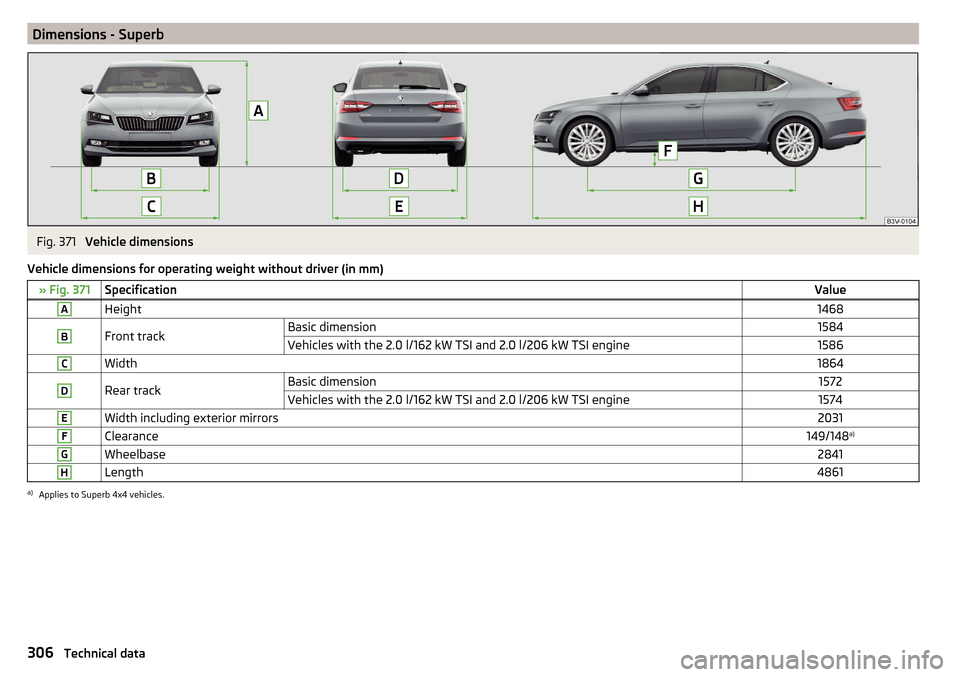
Dimensions - SuperbFig. 371
Vehicle dimensions
Vehicle dimensions for operating weight without driver (in mm)
» Fig. 371SpecificationValueAHeight1468BFront trackBasic dimension1584Vehicles with the 2.0 l/162 kW TSI and 2.0 l/206 kW TSI engine1586CWidth1864DRear trackBasic dimension1572Vehicles with the 2.0 l/162 kW TSI and 2.0 l/206 kW TSI engine1574EWidth including exterior mirrors2031FClearance149/148 a)GWheelbase2841HLength4861a)
Applies to Superb 4x4 vehicles.
306Technical data
Page 309 of 336
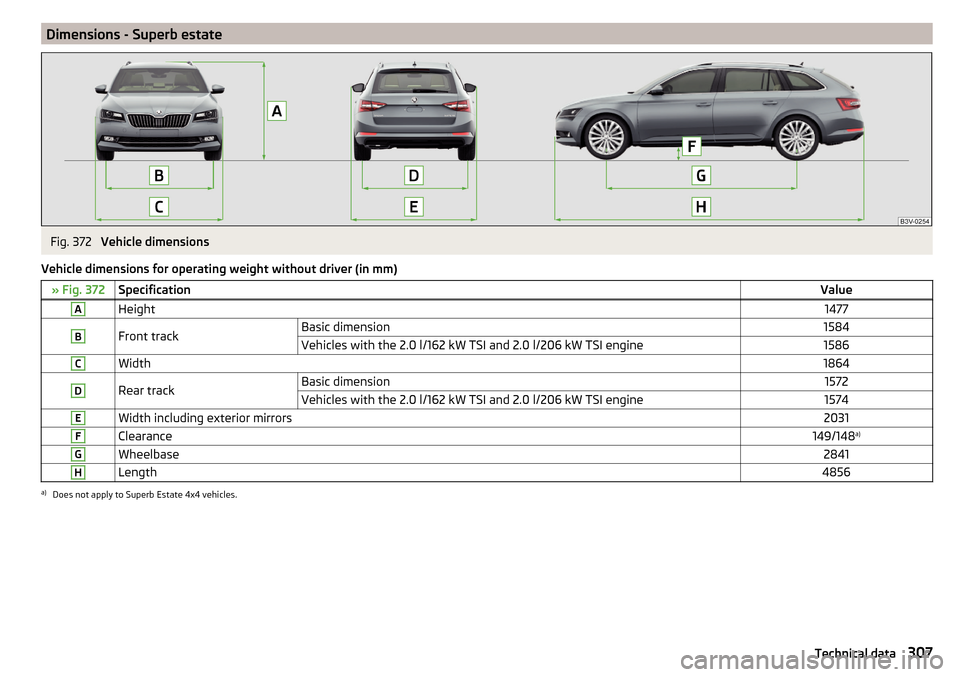
Dimensions - Superb estateFig. 372
Vehicle dimensions
Vehicle dimensions for operating weight without driver (in mm)
» Fig. 372SpecificationValueAHeight1477BFront trackBasic dimension1584Vehicles with the 2.0 l/162 kW TSI and 2.0 l/206 kW TSI engine1586CWidth1864DRear trackBasic dimension1572Vehicles with the 2.0 l/162 kW TSI and 2.0 l/206 kW TSI engine1574EWidth including exterior mirrors2031FClearance149/148 a)GWheelbase2841HLength4856a)
Does not apply to Superb Estate 4x4 vehicles.
307Technical data
Page 310 of 336

Overhang angleFig. 373
Overhang angle: Superb / Superb Combi
Angle » Fig. 373
Approach angle
Departure angle
The values shown indicate the maximum incline of an embankment, up which
the vehicle can drive at a slow speed without collision of the bumper or under-
body. The values listed represent the maximum axle load at the front and rear.
Overhang angle (°) - Superb
» Fig. 373ABBasic dimension14.0/14.1 a)12.2a)
Applies to Superb 4x4 vehicles.
Overhang angle (°) - Superb Estate
» Fig. 373ABBasic dimension14.0/14.1 a)12.2/12.0 a)a)
Does not apply to Superb Estate 4x4 vehicles.
AB308Technical data