ECO mode SKODA SUPERB 2016 3.G / (B8/3V) Owner's Guide
[x] Cancel search | Manufacturer: SKODA, Model Year: 2016, Model line: SUPERB, Model: SKODA SUPERB 2016 3.G / (B8/3V)Pages: 336, PDF Size: 53.89 MB
Page 229 of 336
Activation/deactivation
The system can be activated/deactivated by pressing the button » Fig. 282 .
When the system is activated, the symbol illuminates in the button.
Parking space search
Read and observe
and on page 226 first.
The system searches for a parking space in a number of parallel and transverse
parked vehicles on the passenger or driver's side.
Process with the parking space search
›
Slowly drive past a row of parked vehicles.
›
Activate the system with the button
» Fig. 282 on page 226 .
The system will automatically search for a parking space on the passenger
side.
If the system finds a parking space, the recommended parking mode is dis-
played » Fig. 284 on page 227 -
or
» Fig. 285 on page 228 -
.
Activate the turn signal on the driver's side if you wish to look for a parking
space on this side of the road. The display changes and the system searches
for a parking space on the driver's side.
Note
If the symbol (km / h) is shown in the display while you are looking for a
parking space, the vehicle speed should be reduced below 40 km / hr (parallel parking) or below 20 km / hr (Transverse parking).
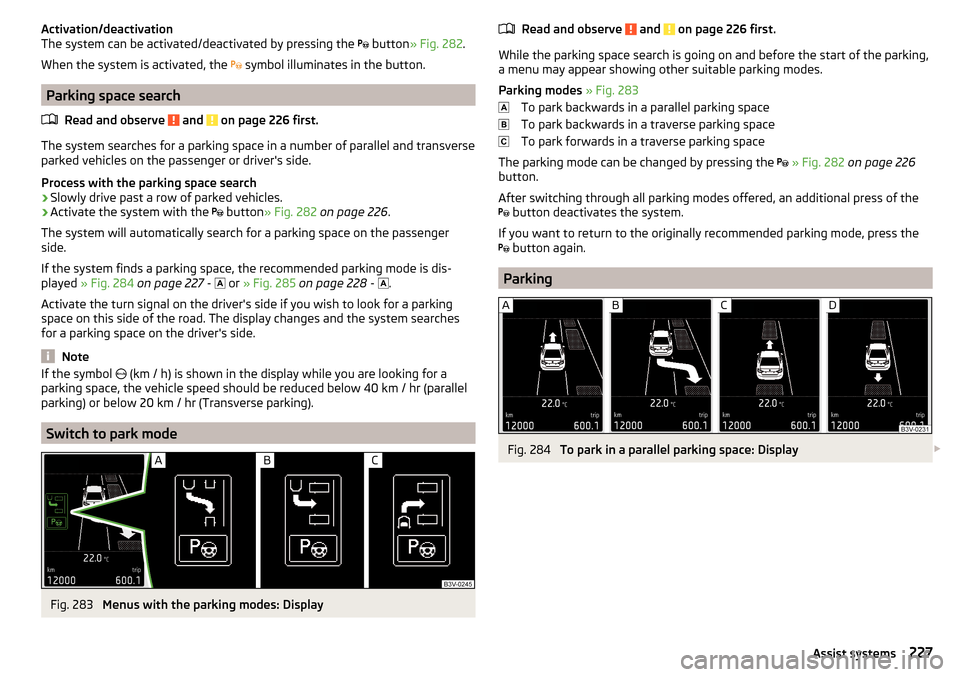
Switch to park mode
Fig. 283
Menus with the parking modes: Display
Read and observe and on page 226 first.
While the parking space search is going on and before the start of the parking,a menu may appear showing other suitable parking modes.
Parking modes » Fig. 283
To park backwards in a parallel parking space
To park backwards in a traverse parking space
To park forwards in a traverse parking space
The parking mode can be changed by pressing the
» Fig. 282 on page 226
button.
After switching through all parking modes offered, an additional press of the
button deactivates the system.
If you want to return to the originally recommended parking mode, press the
button again.
Parking
Fig. 284
To park in a parallel parking space: Display
227Assist systems
Page 230 of 336
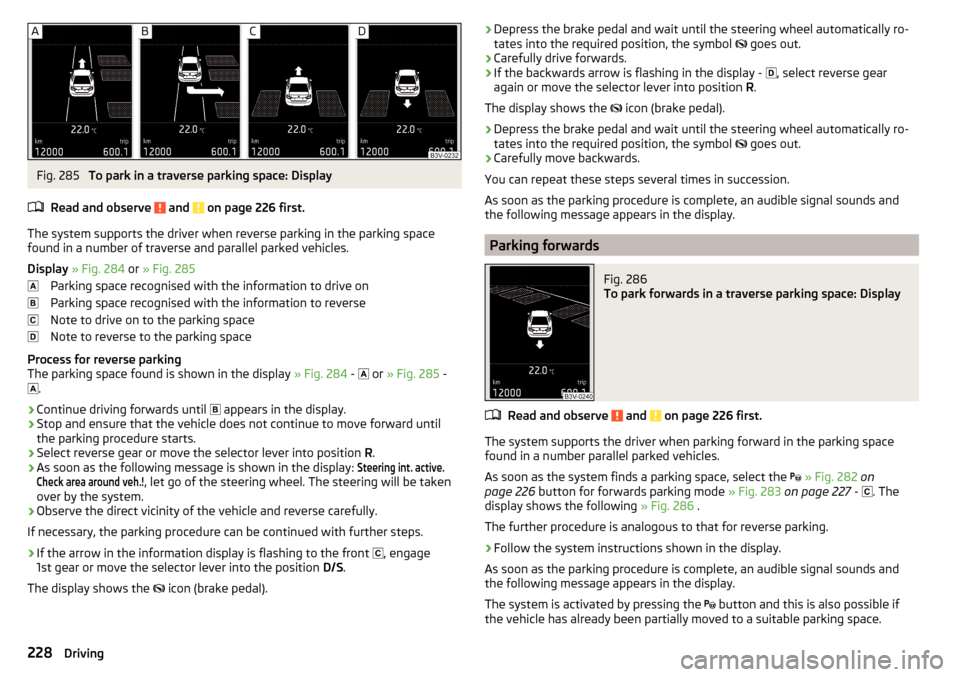
Fig. 285
To park in a traverse parking space: Display
Read and observe
and on page 226 first.
The system supports the driver when reverse parking in the parking space
found in a number of traverse and parallel parked vehicles.
Display » Fig. 284 or » Fig. 285
Parking space recognised with the information to drive on
Parking space recognised with the information to reverse
Note to drive on to the parking space
Note to reverse to the parking space
Process for reverse parking
The parking space found is shown in the display » Fig. 284 -
or
» Fig. 285 -
.
›
Continue driving forwards until
appears in the display.
›
Stop and ensure that the vehicle does not continue to move forward until
the parking procedure starts.
›
Select reverse gear or move the selector lever into position R.
›
As soon as the following message is shown in the display:
Steering int. active.Check area around veh.!
, let go of the steering wheel. The steering will be taken
over by the system.
›
Observe the direct vicinity of the vehicle and reverse carefully.
If necessary, the parking procedure can be continued with further steps.
›
If the arrow in the information display is flashing to the front , engage
1st gear or move the selector lever into the position D/S.
The display shows the icon (brake pedal).
›Depress the brake pedal and wait until the steering wheel automatically ro-
tates into the required position, the symbol goes out.›
Carefully drive forwards.
›
If the backwards arrow is flashing in the display -
, select reverse gear
again or move the selector lever into position R.
The display shows the
icon (brake pedal).
›
Depress the brake pedal and wait until the steering wheel automatically ro-
tates into the required position, the symbol
goes out.
›
Carefully move backwards.
You can repeat these steps several times in succession.
As soon as the parking procedure is complete, an audible signal sounds and the following message appears in the display.
Parking forwards
Fig. 286
To park forwards in a traverse parking space: Display
Read and observe and on page 226 first.
The system supports the driver when parking forward in the parking space
found in a number parallel parked vehicles.
As soon as the system finds a parking space, select the
» Fig. 282 on
page 226 button for forwards parking mode » Fig. 283 on page 227 -
. The
display shows the following » Fig. 286 .
The further procedure is analogous to that for reverse parking.
›
Follow the system instructions shown in the display.
As soon as the parking procedure is complete, an audible signal sounds and
the following message appears in the display.
The system is activated by pressing the button and this is also possible if
the vehicle has already been partially moved to a suitable parking space.
228Driving
Page 235 of 336
Adaptive Cruise Control (ACC)
Introduction
This chapter contains information on the following subjects:
Settings in Infotainment
233
Operation
234
Automatic stopping and starting
234
Operation overview
235
Start control
235
Stop/resume control
235
Set/change the desired speed
236
Set the clearance level
236
Special driving situations
236
Overtaking and towing
237
Malfunctions
237
The Adaptive Cruise Control (hereinafter referred to as ACC) maintains the set
speed or the distance to the vehicle ahead without the accelerator or brake
pedal being pressed.
The front of the vehicle and the distance to the vehicle ahead is monitored by
a radar sensor » page 212.
The state in which the ACC maintains the speed or the proximity is described
as control from here on.
WARNING■
The general information relating to the use of assistance systems must
be observed » page 212, in section Introduction .■
The driver must always be ready to take over the operation of the accel-
erator and brake pedal.
■
The ACC does not react when approaching a stationary obstacle, such as
traffic jams, vehicle breakdowns or vehicles waiting at a traffic light.
■
The ACC does not respond to crossing or oncoming objects.
■
If the ACC does not decelerate fast enough, immediately apply the vehi-
cle's foot brake.
WARNINGFor safety reasons, do not use the ACC under the following conditions.■When driving in turning lanes, motorway exits or construction sites, to
avoid an unwanted acceleration to the stored speed.■
When visibility is poor, (e.g. fog, heavy rain, thick snowfall).
■
When road conditions are poor (e.g. ice, slippery road, gravel, dirt road).
■
Driving in “sharp” corners or in steep gradients / on steep inclines.
■
When driving through places where metal objects (such as metal build-
ings, railway tracks, etc.) can be found.
■
When driving through very divided and enclosed spaces (such as large-ca-
pacity garages, car ferries, tunnels and the like.).
Note
■ The ACC is designed primarily for use on motorways.■The ACC reduces the speed by automatically releasing the accelerator or by
means of a braking procedure as appropriate. If the brakes are used for an au-
tomatic speed reduction at any moments, then the brake light illuminates.■
In case of failure of more than one brake light on the vehicle or on the con-
nected trailer, the ACC becomes unavailable.
■
The control automatically cancels the engagement of the brake supportive
assistance systems (e.g. ESC) or when the maximum permitted engine speed is
exceeded.
Settings in Infotainment
Read and observe
on page 233 first.
›
Press the button, then tap on the function surface
→
Driver assistance
.
■ ACC (adaptive cruise control) - Setting for the adaptive cruise control
■
Driving progr.:
- Set the vehicle acceleration when adaptive cruise control is
activated 1)
■
Last selec. Distance
- Switch on/off of the last distance selected
■
Distance:
- Set the distance monitoring to the vehicles ahead
1)
This can be set in the menu on vehicles with a travel mode option as follows » page 240 .
233Assist systems
Page 242 of 336
WARNINGIn the following situations, Front Assist should be switched off for safety
reasons.■
When the vehicle is being towed away.
■
When the vehicle is on a rolling test bench.
■
If an unfounded warning or a system action was taken.
■
When on a truck, or a car ferry service or similar.
Malfunctions
Read and observe
and on page 238 first.
If, for some unknown reason, the system is not available, an appropriate mes-
sage appears in the display of the instrument cluster.
Sensor covered / dirty
If the sensor cover or the sensor is dirty or covered, a message appears on the
instrument cluster display stating there is no sensor view. Clean the sensor
cover or remove the obstacles » Fig. 264 on page 212 .
If there is no sensor view in the winter, the snow on the sensor under the cov- er could be the reason. The system is functional again after the snow melts
away from the sensor.
System unavailable
If the system is currently unavailable, a message concerning the unavailability
appears. Stop the vehicle, switch off the engine and then start it again. If the
system still is not available, seek the assistance of a specialist garage.
Select the driving mode (Driving Mode Selection)
Introduction
This chapter contains information on the following subjects:
Adaptive Chassis Control (DCC)
240
mode
Eco240
Mode
Comfort241
Mode
Normal241
Mode
Sports241
Mode
individual241Mode selection and Infotainment display241Settings for individual
mode242
By selecting the driving mode, the driving behaviour can be adapted to the de-
sired mode of operation.
the following modes
Eco
.
Comfort
.
normal
.
Sports
and
individual
are available.
The mode
Comfort
is only available on vehicles with adaptive chassis control
(DCC).
WARNINGPlease take note of the general points relating to the use of assistance
systems » page 212, in section Introduction .
Adaptive Chassis Control (DCC)
Read and observe
on page 240 first.
The adaptive chassis control (following known as DCC) provides the ability to
adjust the shock characteristics for the sporty, normal or comfortable driving
when the corresponding control mode is selected.
The DCC evaluates steering response and road conditions while driving contin- uously and adjusts the suspension behaviour within the selected driving mode
accordingly.
mode
Eco
Read and observe on page 240 first.
This mode is suitable for a relaxed style of driving and helps to save fuel.
Selecting this mode primarily affects the function of the following systems.
Drive
Vehicle acceleration is more relaxed than in
Normal
mode.
The recommended gear is controlled such to achieve the lowest possible fuel
consumption » page 44.
If the START-STOP system is deactivated manually » page 202, this will be au-
tomatically activated.
The automatic gearbox is set automatically to mode E » page 207 .
240Driving
Page 243 of 336
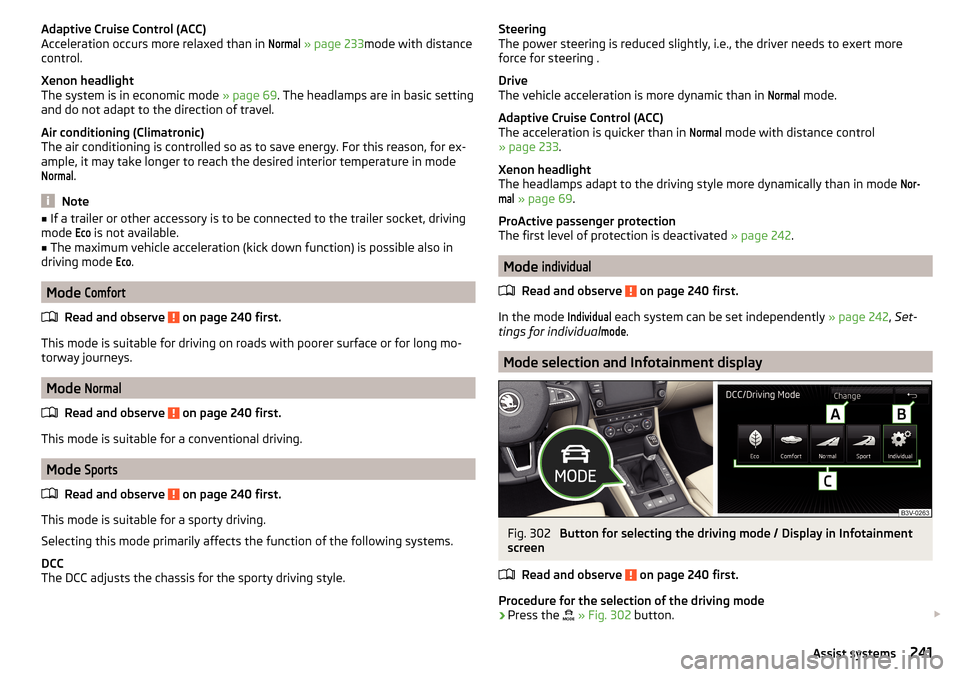
Adaptive Cruise Control (ACC)
Acceleration occurs more relaxed than in Normal
» page 233 mode with distance
control.
Xenon headlight
The system is in economic mode » page 69. The headlamps are in basic setting
and do not adapt to the direction of travel.
Air conditioning (Climatronic)
The air conditioning is controlled so as to save energy. For this reason, for ex-
ample, it may take longer to reach the desired interior temperature in mode
Normal
.
Note
■ If a trailer or other accessory is to be connected to the trailer socket, driving
mode Eco
is not available.■
The maximum vehicle acceleration (kick down function) is possible also in
driving mode
Eco
.
Mode
Comfort
Read and observe on page 240 first.
This mode is suitable for driving on roads with poorer surface or for long mo-
torway journeys.
Mode
Normal
Read and observe on page 240 first.
This mode is suitable for a conventional driving.
Mode
Sports
Read and observe on page 240 first.
This mode is suitable for a sporty driving.
Selecting this mode primarily affects the function of the following systems.
DCC
The DCC adjusts the chassis for the sporty driving style.
Steering
The power steering is reduced slightly, i.e., the driver needs to exert more
force for steering .
Drive
The vehicle acceleration is more dynamic than in Normal
mode.
Adaptive Cruise Control (ACC)
The acceleration is quicker than in
Normal
mode with distance control
» page 233 .
Xenon headlight
The headlamps adapt to the driving style more dynamically than in mode
Nor-mal
» page 69 .
ProActive passenger protection
The first level of protection is deactivated » page 242.
Mode
individual
Read and observe on page 240 first.
In the mode
Individual
each system can be set independently » page 242, Set-
tings for individual
mode
.
Mode selection and Infotainment display
Fig. 302
Button for selecting the driving mode / Display in Infotainment
screen
Read and observe
on page 240 first.
Procedure for the selection of the driving mode
›
Press the
» Fig. 302 button.
241Assist systems
Page 244 of 336
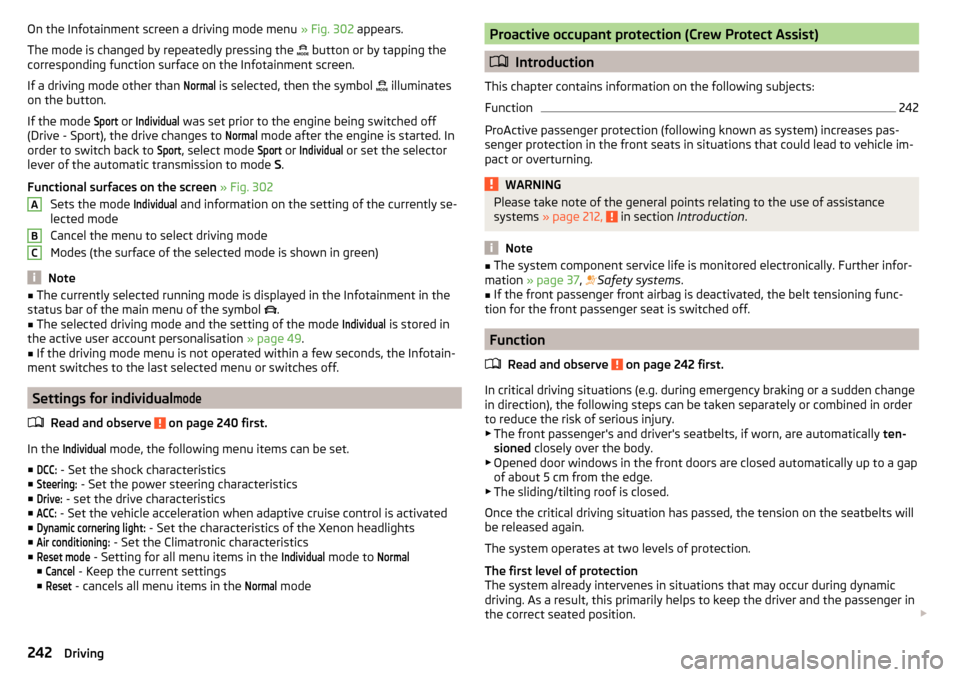
On the Infotainment screen a driving mode menu » Fig. 302 appears.
The mode is changed by repeatedly pressing the
button or by tapping the
corresponding function surface on the Infotainment screen.
If a driving mode other than Normal
is selected, then the symbol
illuminates
on the button.
If the mode
Sport
or
Individual
was set prior to the engine being switched off
(Drive - Sport), the drive changes to
Normal
mode after the engine is started. In
order to switch back to
Sport
, select mode
Sport
or
Individual
or set the selector
lever of the automatic transmission to mode S.
Functional surfaces on the screen » Fig. 302
Sets the mode
Individual
and information on the setting of the currently se-
lected mode
Cancel the menu to select driving mode
Modes (the surface of the selected mode is shown in green)
Note
■ The currently selected running mode is displayed in the Infotainment in the
status bar of the main menu of the symbol .■
The selected driving mode and the setting of the mode
Individual
is stored in
the active user account personalisation » page 49.
■
If the driving mode menu is not operated within a few seconds, the Infotain-
ment switches to the last selected menu or switches off.
Settings for individual
mode
Read and observe on page 240 first.
In the
Individual
mode, the following menu items can be set.
■
DCC:
- Set the shock characteristics
■
Steering:
- Set the power steering characteristics
■
Drive:
- set the drive characteristics
■
ACC:
- Set the vehicle acceleration when adaptive cruise control is activated
■
Dynamic cornering light:
- Set the characteristics of the Xenon headlights
■
Air conditioning:
- Set the Climatronic characteristics
■
Reset mode
- Setting for all menu items in the
Individual
mode to
Normal
■
Cancel
- Keep the current settings
■
Reset
- cancels all menu items in the
Normal
mode
ABCProactive occupant protection (Crew Protect Assist)
Introduction
This chapter contains information on the following subjects:
Function
242
ProActive passenger protection (following known as system) increases pas-
senger protection in the front seats in situations that could lead to vehicle im-
pact or overturning.
WARNINGPlease take note of the general points relating to the use of assistance
systems » page 212, in section Introduction .
Note
■
The system component service life is monitored electronically. Further infor-
mation » page 37 , Safety systems .■
If the front passenger front airbag is deactivated, the belt tensioning func-
tion for the front passenger seat is switched off.
Function
Read and observe
on page 242 first.
In critical driving situations (e.g. during emergency braking or a sudden changein direction), the following steps can be taken separately or combined in order
to reduce the risk of serious injury.
▶ The front passenger's and driver's seatbelts, if worn, are automatically ten-
sioned closely over the body.
▶ Opened door windows in the front doors are closed automatically up to a gap
of about 5 cm from the edge.
▶ The sliding/tilting roof is closed.
Once the critical driving situation has passed, the tension on the seatbelts will
be released again.
The system operates at two levels of protection.
The first level of protection
The system already intervenes in situations that may occur during dynamic
driving. As a result, this primarily helps to keep the driver and the passenger in
the correct seated position.
242Driving
Page 245 of 336

The first protection level can be deactivated in one of the following ways.
▶ in the menu in Infotainment
→ →
Driver assistance
.
▶ Deactivating the TCS » page 214.
▶ By selecting the driving mode
Sport
» page 241 .
Provided that the driving mode
Sport
is not selected, the system is activated
over the two levels of protection after switching the ignition off and on again.
The second level of protection
The system intervenes only if the situation is evaluated as critical, such as
when panic braking at high speeds.
This level of protection cannot be deactivated.
Vehicles with the Front Assist system
Using this information, a system intervention may also occur when there is the danger of a collision with an obstacle detected in front of the vehicle.
Lane Departure Warning (Lane Assist)
Introduction
Fig. 303
Sensor for Lane Assist
This chapter contains information on the following subjects:
Settings in Infotainment
243
Operation
244
Activation / deactivation
245
Malfunctions
245
The lane departure warning (following known as system) helps to keep the ve-
hicle between the boundary lines of a lane.
The system recognises the boundary lines of the lane using a sensor
» Fig. 303 .
When the vehicle approaches a detected line between lanes, the system
makes a light movement of the steering wheel in the opposite direction to the
boundary line. This corrective steering intervention can be manually overrid-
den at any time.WARNING■ Please take note of the general points relating to the use of assistance
systems » page 212, in section Introduction .■
Lane Assist can help you keep the vehicle within the lane. However, it
does not steer the vehicle for you. The driver retains full responsibility for
steering at all times.
■
Some objects or markings on the road can be recognised as the boundary
lines - an erroneous steering intervention may be the result.
WARNINGThe system may not be able to recognise the boundary line, or recognise it
incorrectly, for example, in the following situations.■
When visibility is poor, (e.g. fog, heavy rain, thick snowfall).
■
When driving in “sharp” bends.
■
The sensor is blinded by the sun or oncoming traffic.
■
The field of view of the sensor is limited by an obstacle or a preceding ve-
hicle.
CAUTION
Do not attach any stickers or similar objects in front of the sensor on the wind-
screen to avoid impairing the functions of the system.
Note
■ The system is designed for driving on motorways and roads with adequate
longitudinal markings.■
The system can detect both continuous and broken lines.
Settings in Infotainment
Read and observe
and on page 243 first.
›
Press the button, then tap on the function surface
→
Driver assistance
.
■ Lane Assist (lane departure warning sys.) - Settings for Lane Assist
■
Active
- Activate/deactivate the assistant
■
Adaptive lane guidance
- Activate/deactivate adaptive lane guidance
243Assist systems
Page 250 of 336
Data from the sensor is supplemented by information from the Infotainment
Navigation. This is the reason why traffic signs with maximum speeds can also
be shown on sections of roads which do not have any traffic signs.
Warning when exceeding the speed limit
The warning when exceeding the permissible speed (based on the detected
traffic sign) can be activated and set in Infotainment » page 247.
Mode when towing a trailer
For vehicles with a factory-fitted towing device, in the Infotainment it is possi- ble to enable or disable the relevant traffic signs for trailer operation and the
top speed for towing a trailer » page 247, Settings in Infotainment .
Additional display
Read and observe
on page 246 first.
If the menu item Road sign is currently not shown » Fig. 307 on page 247 -
,
the road sign with the speed limit will appear in the upper display area of the
instrument cluster » Fig. 307 on page 247 -
,
.
If several traffic signs are detected simultaneously, in some cases the next
traffic sign will also be displayed in the colour display - » Fig. 307 on page 247 -
.
All detected traffic signs can be displayed via the multifunction display in the
menu item Traffic Sign Recognition » Fig. 307 on page 247 -
.
This additional function can be activated/deactivated in Infotainment
» page 247 .
Note
The setting (activation/deactivation) of the auxiliary display will be saved (de-
pending on the Infotainment type) in the active user account personalisation
» page 49 .
Malfunction and information messages
Read and observe
on page 246 first.
If, for some unknown reason, the system is not available, an appropriate mes-
sage appears in the display of the instrument cluster.
Sensor covered / dirty
If the screen in the sensor area is dirty, iced or misted, a caution to clean the
screen appears. Clean the windscreen or remove the obstacles from the sen-
sor area.
System fault
In the case of a system fault, an error message appears. Seek help from a spe-
cialist garage.
System limitation (Navigation data not available)
If the Infotainment Navigation submits no data, a message regarding the limi- tation of the system function appears. Check whether the map documents are
up to date or whether the vehicle is currently in a location for which no naviga-
tion data are available.
Traffic signs unavailable
No speed restriction is detected, a message is displayed regarding the unavail-
ability of road signs.
Fatigue detection
The fatigue detection system (following known as system) recommends the
driver taking a break from driving when, because of the driver's steering be-
haviour, driver fatigue can be detected.
From the starting of the journey, the system evaluates the steering behaviour
at speeds 65-200 km/h. If, while driving, there have been changes in the steer-
ing behaviours that are evaluated by the system as indicating possible fatigue,
a break recommendation is issued.
Conditions under which a break from driving is detected by the system ▶ The vehicle is stopped and the ignition switched off.
▶ The vehicle is stopped, the seat belt removed and the driver's door opened.
▶ The vehicle is stopped for more than 15 minutes.
If none of these conditions are met or if the driving style is not changed, the
system recommends a driving break again after 15 minutes.
The system can be activated//deactivated in infotainment in the
→
→
Driver assistance
menu.
Pause recommendation
The icon appears and the following message for a few seconds in the display
of the instrument cluster and a message about the detected fatigue. An au-
dible signal is also emitted.
248Driving
Page 279 of 336
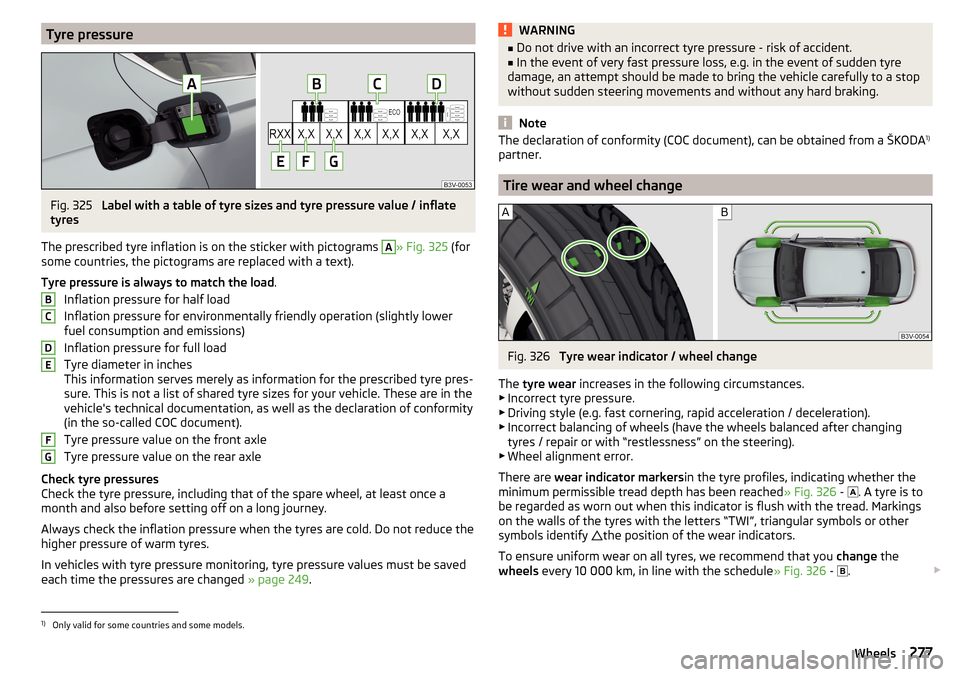
Tyre pressureFig. 325
Label with a table of tyre sizes and tyre pressure value / inflate
tyres
The prescribed tyre inflation is on the sticker with pictograms
A
» Fig. 325 (for
some countries, the pictograms are replaced with a text).
Tyre pressure is always to match the load .
Inflation pressure for half load
Inflation pressure for environmentally friendly operation (slightly lower
fuel consumption and emissions)
Inflation pressure for full load
Tyre diameter in inches
This information serves merely as information for the prescribed tyre pres-
sure. This is not a list of shared tyre sizes for your vehicle. These are in the
vehicle's technical documentation, as well as the declaration of conformity
(in the so-called COC document).
Tyre pressure value on the front axle
Tyre pressure value on the rear axle
Check tyre pressures
Check the tyre pressure, including that of the spare wheel, at least once a
month and also before setting off on a long journey.
Always check the inflation pressure when the tyres are cold. Do not reduce the
higher pressure of warm tyres.
In vehicles with tyre pressure monitoring, tyre pressure values must be saved
each time the pressures are changed » page 249.
BCDEFGWARNING■
Do not drive with an incorrect tyre pressure - risk of accident.■In the event of very fast pressure loss, e.g. in the event of sudden tyre
damage, an attempt should be made to bring the vehicle carefully to a stop
without sudden steering movements and without any hard braking.
Note
The declaration of conformity (COC document), can be obtained from a ŠKODA 1)
partner.
Tire wear and wheel change
Fig. 326
Tyre wear indicator / wheel change
The tyre wear increases in the following circumstances.
▶ Incorrect tyre pressure.
▶ Driving style (e.g. fast cornering, rapid acceleration / deceleration).
▶ Incorrect balancing of wheels (have the wheels balanced after changing
tyres / repair or with “restlessness” on the steering).
▶ Wheel alignment error.
There are wear indicator markers in the tyre profiles, indicating whether the
minimum permissible tread depth has been reached » Fig. 326 -
. A tyre is to
be regarded as worn out when this indicator is flush with the tread. Markings
on the walls of the tyres with the letters “TWI”, triangular symbols or other
symbols identify the position of the wear indicators.
To ensure uniform wear on all tyres, we recommend that you change the
wheels every 10 000 km, in line with the schedule » Fig. 326 -
.
1)
Only valid for some countries and some models.
277Wheels
Page 318 of 336
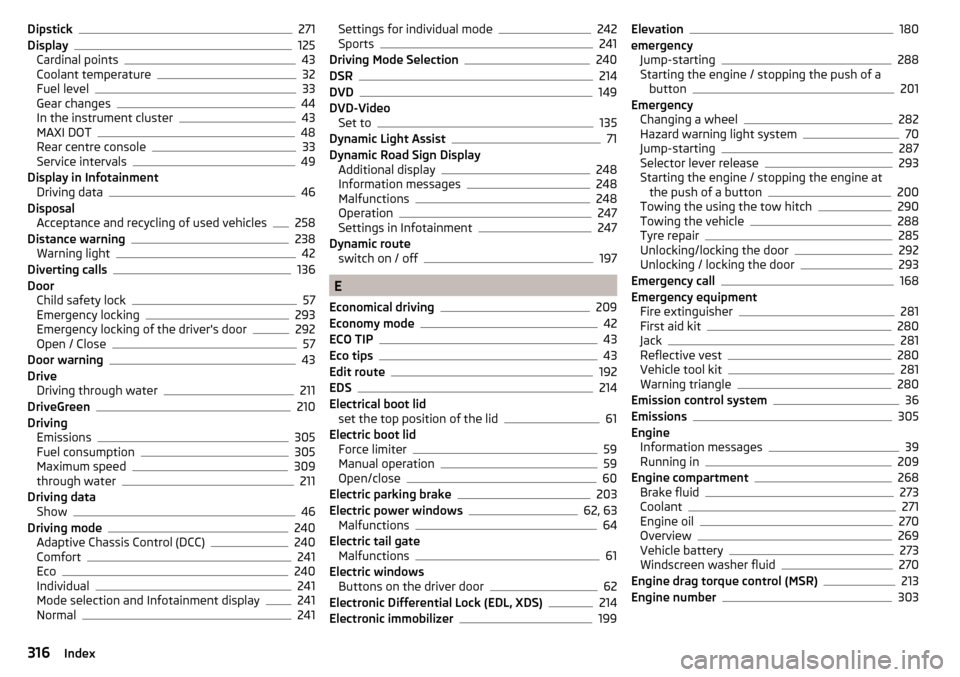
Dipstick271
Display125
Cardinal points43
Coolant temperature32
Fuel level33
Gear changes44
In the instrument cluster43
MAXI DOT48
Rear centre console33
Service intervals49
Display in Infotainment Driving data
46
Disposal Acceptance and recycling of used vehicles
258
Distance warning238
Warning light42
Diverting calls136
Door Child safety lock
57
Emergency locking293
Emergency locking of the driver's door292
Open / Close57
Door warning43
Drive Driving through water
211
DriveGreen210
Driving Emissions
305
Fuel consumption305
Maximum speed309
through water211
Driving data Show
46
Driving mode240
Adaptive Chassis Control (DCC)240
Comfort241
Eco240
Individual241
Mode selection and Infotainment display241
Normal241
Settings for individual mode242
Sports241
Driving Mode Selection240
DSR214
DVD149
DVD-Video Set to
135
Dynamic Light Assist71
Dynamic Road Sign Display Additional display
248
Information messages248
Malfunctions248
Operation247
Settings in Infotainment247
Dynamic route switch on / off
197
E
Economical driving
209
Economy mode42
ECO TIP43
Eco tips43
Edit route192
EDS214
Electrical boot lid set the top position of the lid
61
Electric boot lid Force limiter
59
Manual operation59
Open/close60
Electric parking brake203
Electric power windows62, 63
Malfunctions64
Electric tail gate Malfunctions
61
Electric windows Buttons on the driver door
62
Electronic Differential Lock (EDL, XDS)214
Electronic immobilizer199
Elevation180
emergency Jump-starting
288
Starting the engine / stopping the push of a button
201
Emergency Changing a wheel
282
Hazard warning light system70
Jump-starting287
Selector lever release293
Starting the engine / stopping the engine at the push of a button
200
Towing the using the tow hitch290
Towing the vehicle288
Tyre repair285
Unlocking/locking the door292
Unlocking / locking the door293
Emergency call168
Emergency equipment Fire extinguisher
281
First aid kit280
Jack281
Reflective vest280
Vehicle tool kit281
Warning triangle280
Emission control system36
Emissions305
Engine Information messages
39
Running in209
Engine compartment268
Brake fluid273
Coolant271
Engine oil270
Overview269
Vehicle battery273
Windscreen washer fluid270
Engine drag torque control (MSR)213
Engine number303
316Index