engine SKODA SUPERB 2016 3.G / (B8/3V) Repair Manual
[x] Cancel search | Manufacturer: SKODA, Model Year: 2016, Model line: SUPERB, Model: SKODA SUPERB 2016 3.G / (B8/3V)Pages: 336, PDF Size: 53.89 MB
Page 271 of 336
CAUTIONRefill only operating fluids of the correct specification - danger of damaging
the vehicle!
Note
■ Fluids with the proper specifications can be purchased from the ŠKODA Origi-
nal Accessories or from the ŠKODA Genuine Parts ranges.■
We recommend you have the battery replaced by a specialist garage.
Open the bonnet and close
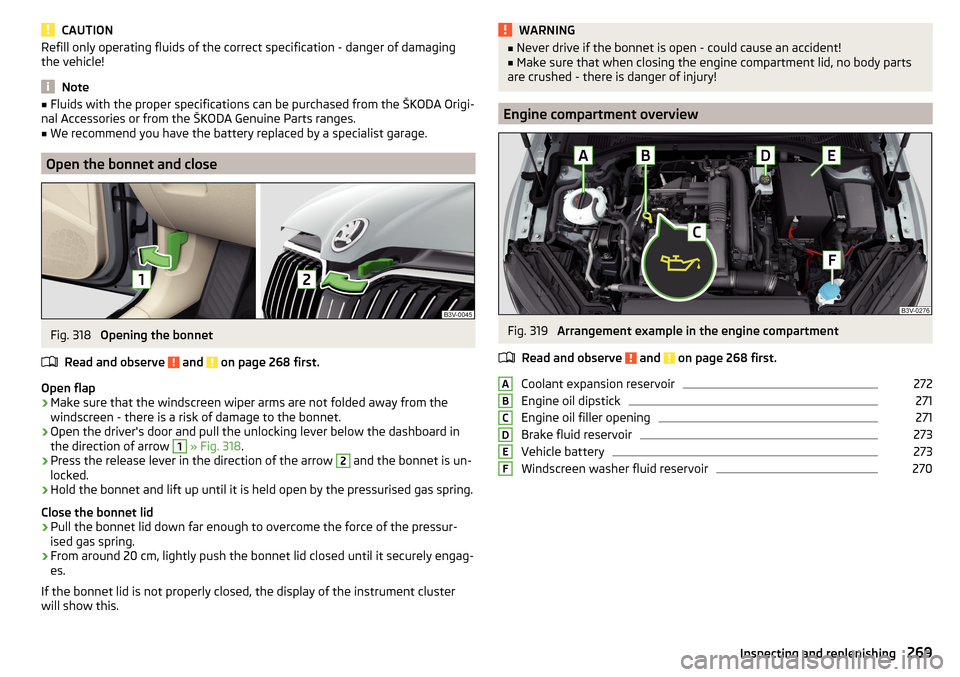
Fig. 318
Opening the bonnet
Read and observe
and on page 268 first.
Open flap
›
Make sure that the windscreen wiper arms are not folded away from the
windscreen - there is a risk of damage to the bonnet.
›
Open the driver's door and pull the unlocking lever below the dashboard in
the direction of arrow
1
» Fig. 318 .
›
Press the release lever in the direction of the arrow
2
and the bonnet is un-
locked.
›
Hold the bonnet and lift up until it is held open by the pressurised gas spring.
Close the bonnet lid
›
Pull the bonnet lid down far enough to overcome the force of the pressur-
ised gas spring.
›
From around 20 cm, lightly push the bonnet lid closed until it securely engag-
es.
If the bonnet lid is not properly closed, the display of the instrument cluster
will show this.
WARNING■ Never drive if the bonnet is open - could cause an accident!■Make sure that when closing the engine compartment lid, no body parts
are crushed - there is danger of injury!
Engine compartment overview
Fig. 319
Arrangement example in the engine compartment
Read and observe
and on page 268 first.
Coolant expansion reservoir
272
Engine oil dipstick
271
Engine oil filler opening
271
Brake fluid reservoir
273
Vehicle battery
273
Windscreen washer fluid reservoir
270ABCDEF269Inspecting and replenishing
Page 272 of 336
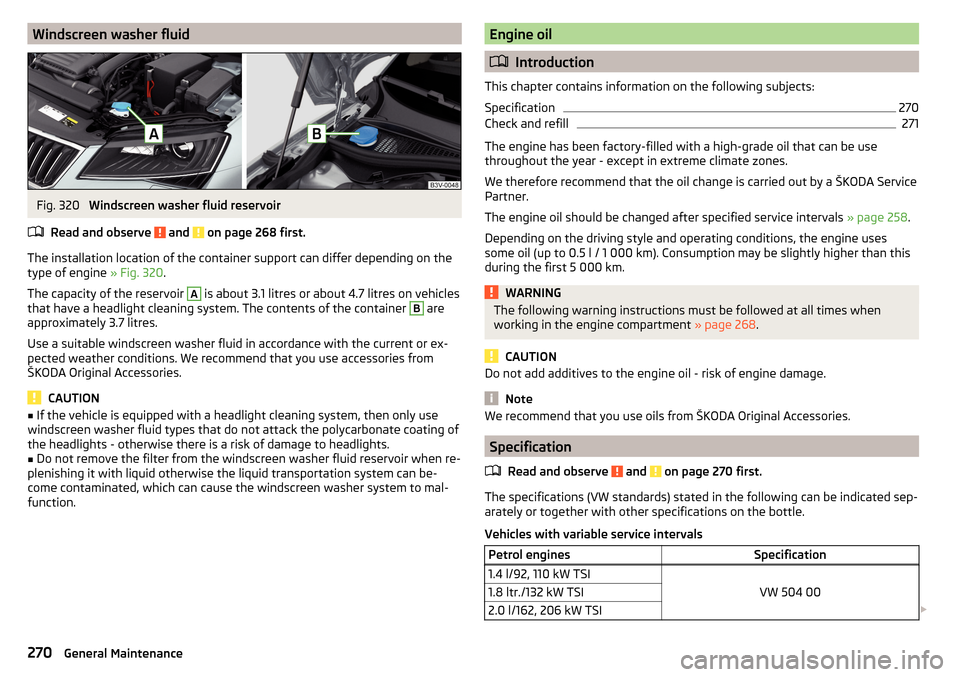
Windscreen washer fluidFig. 320
Windscreen washer fluid reservoir
Read and observe
and on page 268 first.
The installation location of the container support can differ depending on the
type of engine » Fig. 320.
The capacity of the reservoir
A
is about 3.1 litres or about 4.7 litres on vehicles
that have a headlight cleaning system. The contents of the container
B
are
approximately 3.7 litres.
Use a suitable windscreen washer fluid in accordance with the current or ex-
pected weather conditions. We recommend that you use accessories from
ŠKODA Original Accessories.
CAUTION
■ If the vehicle is equipped with a headlight cleaning system, then only use
windscreen washer fluid types that do not attack the polycarbonate coating of
the headlights - otherwise there is a risk of damage to headlights.■
Do not remove the filter from the windscreen washer fluid reservoir when re-
plenishing it with liquid otherwise the liquid transportation system can be-
come contaminated, which can cause the windscreen washer system to mal-
function.
Engine oil
Introduction
This chapter contains information on the following subjects:
Specification
270
Check and refill
271
The engine has been factory-filled with a high-grade oil that can be use
throughout the year - except in extreme climate zones.
We therefore recommend that the oil change is carried out by a ŠKODA Service
Partner.
The engine oil should be changed after specified service intervals » page 258.
Depending on the driving style and operating conditions, the engine uses
some oil (up to 0.5 l / 1 000 km). Consumption may be slightly higher than this
during the first 5 000 km.
WARNINGThe following warning instructions must be followed at all times when
working in the engine compartment » page 268.
CAUTION
Do not add additives to the engine oil - risk of engine damage.
Note
We recommend that you use oils from ŠKODA Original Accessories.
Specification
Read and observe
and on page 270 first.
The specifications (VW standards) stated in the following can be indicated sep-arately or together with other specifications on the bottle.
Vehicles with variable service intervals
Petrol enginesSpecification1.4 l/92, 110 kW TSI
VW 504 00
1.8 ltr./132 kW TSI2.0 l/162, 206 kW TSI 270General Maintenance
Page 273 of 336

Diesel enginesSpecification1.6 ltr. / 88 kW TDI CRVW 507 002.0 l/110, 130, 140 kW TDI CR
Vehicles with fixed service intervals
Petrol enginesSpecification1.4 l/92, 110 kW TSI
VW 502 00
1.8 ltr./132 kW TSI2.0 l/162, 206 kW TSIDiesel enginesSpecification1.6 ltr. / 88 kW TDI CRVW 507 002.0 l/110, 130, 140 kW TDI CR
Engine oil VW 505 01 can optionally be used in diesel engines without a DPF.
CAUTION
■
If no prescribed engine oil is available, then max. 0.5 l oil of the following
specifications can be refilled. ■Petrol engines: ACEA A3/ACEA B4 or API SN, (API SM);
■ Diesel engines: ACEA C3 or API CJ-4.
Check and refill
Fig. 321
Dipstick variants
Read and observe and on page 270 first.
Check the oil under the following conditions and refill.
The vehicle is standing on a horizontal surface.
The engine operating temperature is reached.
The engine is turned off.
Checking the level
›
Wait a few minutes until the engine oil flows back into the oil trough.
›
Remove the dipstick and wipe with a clean cloth.
›
Push the dipstick to the stop and pull out again.
›
Read the oil level and push in the dipstick.
The oil level must be in range
A
» Fig. 321 . If the oil level is below the range
A
, refill the oil.
Refilling
›
Unscrew the cap of the engine oil filler opening
C
» Fig. 319 on page 269 .
›
Add oil of the correct specification in portions of 0.5 litres » page 270.
›
Check the oil level .
›
Screw the lid of the engine oil filler closed carefully.
CAUTION
■
The oil level must never be below the range A » Fig. 321 – risk of damage to
the motor as well as the exhaust system.■
If a top up with oil is not possible or the oil level is above range
A
,
stop
driving! Switch off the engine and seek assistance from a specialist garage.
Note
Too low engine oil level is shown in the instrument cluster by the warning
light illuminating and also indicated by the message » page 40. Nevertheless,
we recommend to check the oil level on a regular basis with the dipstick.
Coolant
Introduction
This chapter contains information on the following subjects:
Checking and refilling
272
The coolant cools the engine and consists of water and coolant additive (with
additives that protect the cooling system against corrosion and prevents fur-
ring).
271Inspecting and replenishing
Page 274 of 336
The coolant additive proportion in the coolant must be between 40 and 60 %.
The correct mixing ratio of water and coolant additive should be checked if
necessary by a specialist garage or corrected if necessary.WARNING■ The following warning instructions must be followed at all times when
working in the engine compartment » page 268.■
Never open the end cover of the coolant expansion reservoir while the
engine is still warm. The cooling system is pressurized - risk of scalding or
injury from being splashed with coolant!
■
To protect against coolant splashes, cover the cap with a cloth when
opening.
■
Coolant and coolant fumes are harmful - avoid contact with the coolant. If
your eyes or skin come into contact with the coolant, immediately wash the
affected area for a few minutes long with a lot of water and seek medical
advice if required.
CAUTION
Do not cover the radiator or fit any parts (e.g. auxiliary lights) in front of the air
intakes - there is a risk of the engine overheating.
Checking and refilling
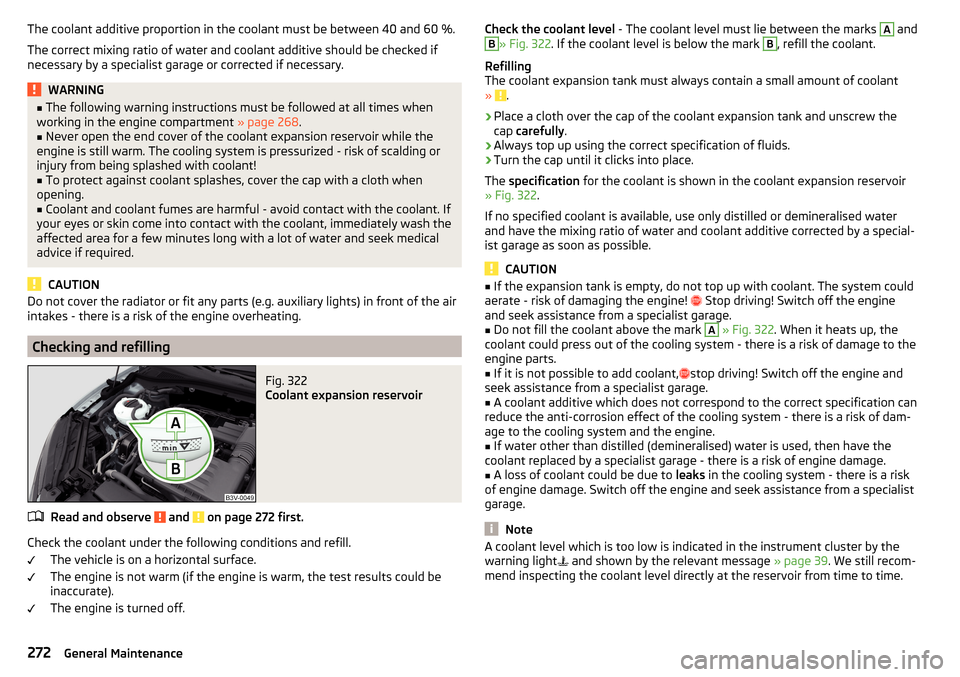
Fig. 322
Coolant expansion reservoir
Read and observe and on page 272 first.
Check the coolant under the following conditions and refill.
The vehicle is on a horizontal surface.
The engine is not warm (if the engine is warm, the test results could be
inaccurate).
The engine is turned off.
Check the coolant level - The coolant level must lie between the marks A andB» Fig. 322. If the coolant level is below the mark B, refill the coolant.
Refilling
The coolant expansion tank must always contain a small amount of coolant
»
.
›
Place a cloth over the cap of the coolant expansion tank and unscrew the
cap carefully .
›
Always top up using the correct specification of fluids.
›
Turn the cap until it clicks into place.
The specification for the coolant is shown in the coolant expansion reservoir
» Fig. 322 .
If no specified coolant is available, use only distilled or demineralised water
and have the mixing ratio of water and coolant additive corrected by a special-
ist garage as soon as possible.
CAUTION
■ If the expansion tank is empty, do not top up with coolant. The system could
aerate - risk of damaging the engine! Stop driving! Switch off the engine
and seek assistance from a specialist garage.■
Do not fill the coolant above the mark
A
» Fig. 322 . When it heats up, the
coolant could press out of the cooling system - there is a risk of damage to the
engine parts.
■
If it is not possible to add coolant,
stop driving! Switch off the engine and
seek assistance from a specialist garage.
■
A coolant additive which does not correspond to the correct specification can
reduce the anti-corrosion effect of the cooling system - there is a risk of dam-
age to the cooling system and the engine.
■
If water other than distilled (demineralised) water is used, then have the
coolant replaced by a specialist garage - there is a risk of engine damage.
■
A loss of coolant could be due to leaks in the cooling system - there is a risk
of engine damage. Switch off the engine and seek assistance from a specialist
garage.
Note
A coolant level which is too low is indicated in the instrument cluster by the
warning light and shown by the relevant message » page 39. We still recom-
mend inspecting the coolant level directly at the reservoir from time to time.272General Maintenance
Page 275 of 336
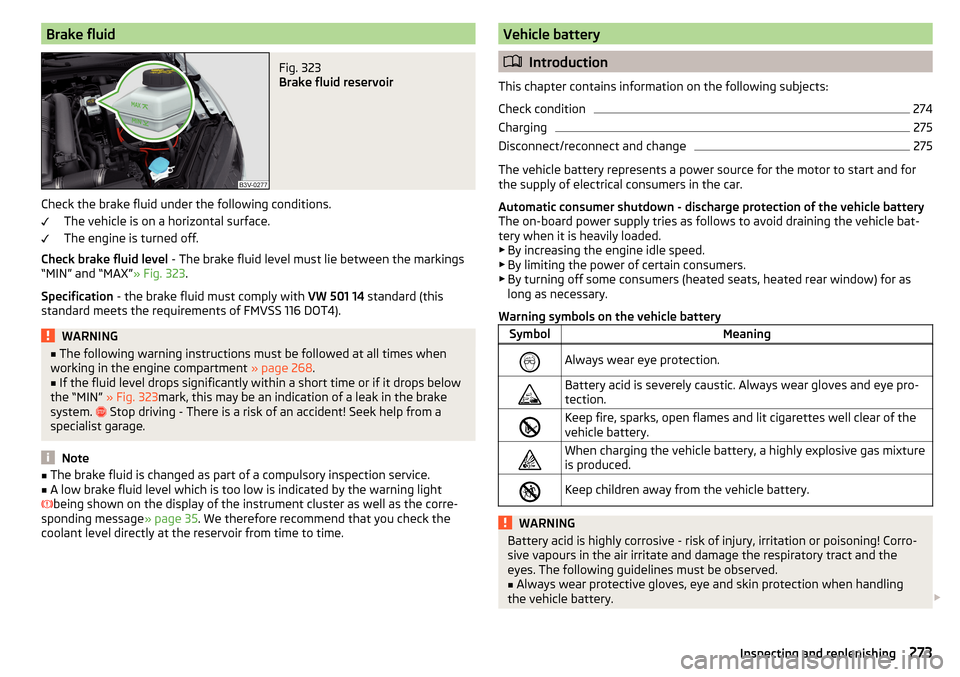
Brake fluidFig. 323
Brake fluid reservoir
Check the brake fluid under the following conditions.The vehicle is on a horizontal surface.
The engine is turned off.
Check brake fluid level - The brake fluid level must lie between the markings
“MIN” and “MAX” » Fig. 323.
Specification - the brake fluid must comply with VW 501 14 standard (this
standard meets the requirements of FMVSS 116 DOT4).
WARNING■ The following warning instructions must be followed at all times when
working in the engine compartment » page 268.■
If the fluid level drops significantly within a short time or if it drops below
the “MIN” » Fig. 323mark, this may be an indication of a leak in the brake
system.
Stop driving - There is a risk of an accident! Seek help from a
specialist garage.
Note
■ The brake fluid is changed as part of a compulsory inspection service.■A low brake fluid level which is too low is indicated by the warning light
being shown on the display of the instrument cluster as well as the corre-
sponding message » page 35. We therefore recommend that you check the
coolant level directly at the reservoir from time to time.Vehicle battery
Introduction
This chapter contains information on the following subjects:
Check condition
274
Charging
275
Disconnect/reconnect and change
275
The vehicle battery represents a power source for the motor to start and for the supply of electrical consumers in the car.
Automatic consumer shutdown - discharge protection of the vehicle battery
The on-board power supply tries as follows to avoid draining the vehicle bat-
tery when it is heavily loaded.
▶ By increasing the engine idle speed.
▶ By limiting the power of certain consumers.
▶ By turning off some consumers (heated seats, heated rear window) for as
long as necessary.
Warning symbols on the vehicle battery
SymbolMeaningAlways wear eye protection.Battery acid is severely caustic. Always wear gloves and eye pro-
tection.Keep fire, sparks, open flames and lit cigarettes well clear of the
vehicle battery.When charging the vehicle battery, a highly explosive gas mixture
is produced.Keep children away from the vehicle battery.WARNINGBattery acid is highly corrosive - risk of injury, irritation or poisoning! Corro-
sive vapours in the air irritate and damage the respiratory tract and the
eyes. The following guidelines must be observed.■
Always wear protective gloves, eye and skin protection when handling
the vehicle battery.
273Inspecting and replenishing
Page 277 of 336
ChargingRead and observe
and on page 273 first.
Only charge the vehicle battery when the ignition and all consumers are
switched off.
Refer to the instructions of the charger manufacturer.
Charging
›
For vehicles with START-STOP system or auxiliary heating, connect the
terminal of the charger on the
pole of the battery, the
terminal of the
charger to the earth point of the engine » page 288.
›
For vehicles without START-STOP system or auxiliary heating, connect the
terminals of the charger to the corresponding battery poles ( at
.
at
).
›
Plug the mains cable of the charger into the power socket and switch on the
device.
›
After charging has been successful: Switch off the charger and remove the
mains cable from the power socket.
›
Disconnect the terminals of the charger from the vehicle battery.
A charging current of 0.1 multiple of the total vehicle battery capacity (or low-
er) must be used until full charging is achieved.
WARNING■ When charging the vehicle battery, hydrogen is released - risk of explo-
sion. An explosion can be caused from sparks or connection or releasing
the cable plug while the ignition is on.■
The so-called “quick charging” of the vehicle battery is dangerous and re-
quires a special charger and specialist knowledge. Therefore, have“Quick
loading” carried out by a specialist garage.
Disconnect/reconnect and change
Read and observe
and on page 273 first.
The new vehicle battery must have the same capacity, voltage, current and the
same size as the original Battery.
We recommend you have the battery replaced by a specialist garage.
›
To disconnect the battery, switch off the ignition and disconnect first the
negative terminal , and only after this the positive
.
›To
connect the battery, first connect the positive terminal , and only after
this the negative terminal .
After disconnecting and re-connecting the vehicle battery, the following func-
tions or devices are partially or completely inoperative.Function / deviceOperating measurePower windows» page 64Panorama sliding/tilting roof» page 65Sun screen» page 66Time setting» page 44
CAUTION
■ Disconnect the vehicle battery only with the ignition turned off - there is a
risk of damaging the electrical system of the vehicle.■
Before disconnecting the battery, close the electric tailgate, all the windows,
the sliding / tilting roof and the electric sunshade - otherwise malfunctions of
equipment elements may occur.
■
Under no circumstances must the connection cables be connected incorrect-
ly – risk of fire.
Note
After disconnecting and re-connecting the vehicle battery, we recommend
having the vehicle checked by a specialist to ensure that the full functionality
of all electrical systems is guaranteed.275Inspecting and replenishing
Page 281 of 336
Speed symbol
All-season or “winter” tyres (marked with M+S and a peak/snowflake symbol
) of a lower speed category than stated in the technical vehicle documenta-
tion can be used, provided the permissible maximum speed of these tyres is
not exceeded even if the possible maximum speed of the vehicle is higher.
The speed limit for all-season or “winter” tyres can be adjusted in Infotainment
in the
→
→
tire
menu.
If the vehicle has all-season or “winter” tyres of a lower speed category then
the specified maximum speed of the vehicle (referring to tyres that have not
been delivered by the factory, a warning label with the maximum value of the
speed category provided for the mounted tyres must be fixed in the interior of
the vehicle in a constantly visible place in the driver’s field of vision. The warn-
ing label (sticker) can be replaced by setting the maximum value of the speed
category supplied for the mounted tyres in Infotainment 1)
. This specification
defines the maximum vehicle speed with mounted all-season or “winter”tyres
that may not be exceeded.
Snow chains
The snow chains improve driving in wintry road conditions.
Remove the full wheel trims before installing the snow chains » page 283.
Only fit snow chains with links and locks no larger than 12 mm.
Snow chains must only be mounted on the front wheels and are applicable on-
ly for the following wheel / tyre combinations.
Applies for 2.0 l/162, 206 kW TSI
Rim sizeImpression depth DTyre size6.5J x 1741 mm215/55 R17
Applies to the other engines
Rim sizeImpression depth DTyre size6.5J x 1641 mm215/60 R166.5J x 1741 mm215/55 R17WARNINGDo not use chains on snow- and ice-free routes - the driving behaviour may
be affected and there is a risk of a puncture.1)
Applies to some countries.
279Wheels
Page 284 of 336
CAUTIONScrew the jack back to its starting position prior to putting it back in its box -
Otherwise, there is a risk of damage to the box.
Note
The declaration of conformity is included with the jack or the log folder.
Changing a wheel
Preliminary work
For safety's sake, the following instructions must be observed before
changing a wheel on the road.
›
As far as possible, park the vehicle far away from the traffic flow - find a
place with a flat and firm surface.
›
Switch off the engine.
›
For vehicles with manual transmission , select 1st gear.
›
For vehicles with automatic transmission , place the selector lever in the P
position.
›
Switch on the parking brake.
›
Position the hazard warning system and the warning triangle at the prescri-
bed distance.
›
All the occupants should get out of the vehicle. The passengers should not
stand on the road (instead they should remain behind a crash barrier, for in-
stance) while the wheel is being changed.
›
Uncouple any trailers.
Changing a wheel
›
Remove the spare wheel » page 283.
›
Remove the full wheel trim » page 283 or caps » page 283 .
›
Loosen the wheel bolts » page 284 » .
›
Jack up the vehicle » page 284 until the wheel that needs changing is clear of
the ground.
›
Unscrew the wheel bolts and place them on a clean surface (cloth, paper,
etc.).
›
Remove the wheel carefully.
›
Attach the spare wheel and slightly screw on the wheel bolts.
›
Lower the vehicle.
›
Tighten the wheel bolts opposite each other using the wheel wrench (“alter- nating crosswise”) » page 284.
›Replace the wheel trim
» page 283and the caps » page 283.
When fitting a wheel with a unidirectional tyre, ensure that the direction of ro-
tation is correct » page 276.
All bolts must be clean and must turn easily. If the screws are corroded and dif-
ficult to move, then these must be replaced.WARNING■ Undo the wheel bolts just a little (about one turn) while the vehicle is not
jacked up. Otherwise, the wheel could come off and fall down – there is a
risk of injury.■
Under no circumstances grease or oil the wheel bolts - risk of accident!
Subsequent steps
After changing the wheel, the following work must be carried out.
›
Stow the replaced wheel in the well under the floor covering of the luggage
compartment and secure with a locking screw.
›
Stow the tool kit in the space provided and secure using the band.
›
Check and, if necessary, adjust the tyre pressure on the assembled wheel,
and, for vehicle with tyre pressure monitoring, save the tyre pressure values
in the system » page 249.
›
Have the tightening torque of the wheel bolts checked with a torque wrench
as soon as possible. The prescribed tightening torque is 140 Nm.
Replace the damaged wheel or consult a specialist garage about repair op-
tions.
WARNINGA tightening torque which is too high can damage the bolts and threads
and this can result in permanent deformation of the contact surfaces on
the rim. Too low tightening torque, the wheels may fall off while driving -
risk of an accident. Drive cautiously and only at a moderate speed until the
tightening torque has been checked.282Do-it-yourself
Page 287 of 336
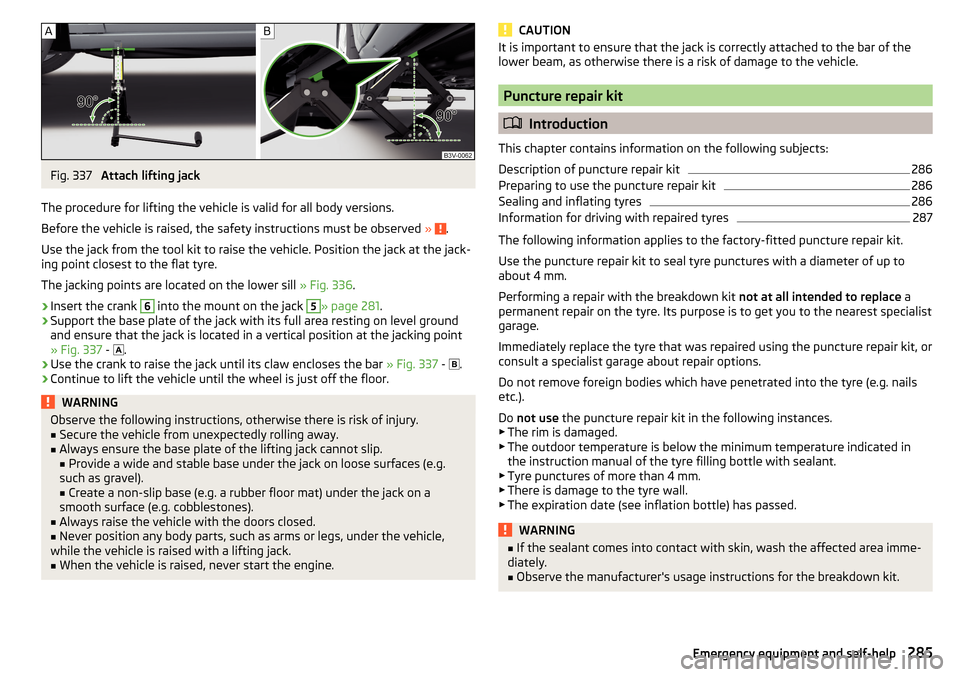
Fig. 337
Attach lifting jack
The procedure for lifting the vehicle is valid for all body versions.
Before the vehicle is raised, the safety instructions must be observed »
.
Use the jack from the tool kit to raise the vehicle. Position the jack at the jack-
ing point closest to the flat tyre.
The jacking points are located on the lower sill » Fig. 336.
›
Insert the crank
6
into the mount on the jack
5
» page 281 .
›
Support the base plate of the jack with its full area resting on level ground
and ensure that the jack is located in a vertical position at the jacking point
» Fig. 337 -
.
›
Use the crank to raise the jack until its claw encloses the bar
» Fig. 337 -
.
›
Continue to lift the vehicle until the wheel is just off the floor.
WARNINGObserve the following instructions, otherwise there is risk of injury.■Secure the vehicle from unexpectedly rolling away.■
Always ensure the base plate of the lifting jack cannot slip.
■ Provide a wide and stable base under the jack on loose surfaces (e.g.
such as gravel). ■ Create a non-slip base (e.g. a rubber floor mat) under the jack on a
smooth surface (e.g. cobblestones).
■
Always raise the vehicle with the doors closed.
■
Never position any body parts, such as arms or legs, under the vehicle,
while the vehicle is raised with a lifting jack.
■
When the vehicle is raised, never start the engine.
CAUTIONIt is important to ensure that the jack is correctly attached to the bar of the
lower beam, as otherwise there is a risk of damage to the vehicle.
Puncture repair kit
Introduction
This chapter contains information on the following subjects:
Description of puncture repair kit
286
Preparing to use the puncture repair kit
286
Sealing and inflating tyres
286
Information for driving with repaired tyres
287
The following information applies to the factory-fitted puncture repair kit.
Use the puncture repair kit to seal tyre punctures with a diameter of up to
about 4 mm.
Performing a repair with the breakdown kit not at all intended to replace a
permanent repair on the tyre. Its purpose is to get you to the nearest specialist
garage.
Immediately replace the tyre that was repaired using the puncture repair kit, or
consult a specialist garage about repair options.
Do not remove foreign bodies which have penetrated into the tyre (e.g. nails etc.).
Do not use the puncture repair kit in the following instances.
▶ The rim is damaged.
▶ The outdoor temperature is below the minimum temperature indicated in
the instruction manual of the tyre filling bottle with sealant.
▶ Tyre punctures of more than 4 mm.
▶ There is damage to the tyre wall.
▶ The expiration date (see inflation bottle) has passed.
WARNING■ If the sealant comes into contact with skin, wash the affected area imme-
diately.■
Observe the manufacturer's usage instructions for the breakdown kit.
285Emergency equipment and self-help
Page 288 of 336
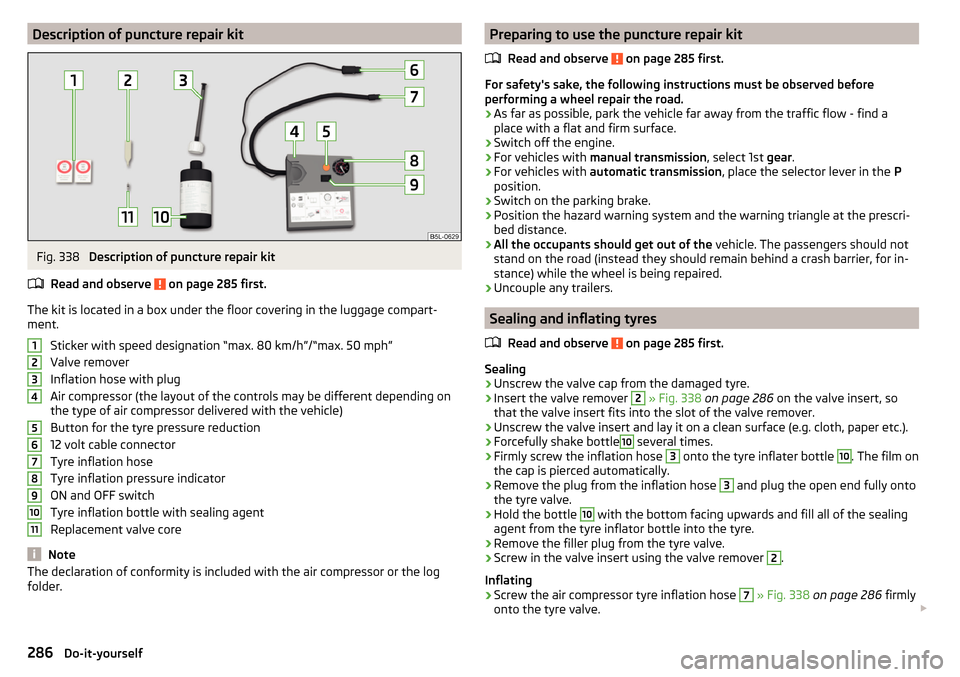
Description of puncture repair kitFig. 338
Description of puncture repair kit
Read and observe
on page 285 first.
The kit is located in a box under the floor covering in the luggage compart-
ment.
Sticker with speed designation “max. 80 km/h”/“max. 50 mph”Valve remover
Inflation hose with plug
Air compressor (the layout of the controls may be different depending on
the type of air compressor delivered with the vehicle)
Button for the tyre pressure reduction
12 volt cable connector
Tyre inflation hose
Tyre inflation pressure indicator
ON and OFF switch
Tyre inflation bottle with sealing agent
Replacement valve core
Note
The declaration of conformity is included with the air compressor or the log
folder.1234567891011Preparing to use the puncture repair kit
Read and observe
on page 285 first.
For safety's sake, the following instructions must be observed before
performing a wheel repair the road.
›
As far as possible, park the vehicle far away from the traffic flow - find a
place with a flat and firm surface.
›
Switch off the engine.
›
For vehicles with manual transmission , select 1st gear.
›
For vehicles with automatic transmission , place the selector lever in the P
position.
›
Switch on the parking brake.
›
Position the hazard warning system and the warning triangle at the prescri-
bed distance.
›
All the occupants should get out of the vehicle. The passengers should not
stand on the road (instead they should remain behind a crash barrier, for in-
stance) while the wheel is being repaired.
›
Uncouple any trailers.
Sealing and inflating tyres
Read and observe
on page 285 first.
Sealing
›
Unscrew the valve cap from the damaged tyre.
›
Insert the valve remover
2
» Fig. 338 on page 286 on the valve insert, so
that the valve insert fits into the slot of the valve remover.
›
Unscrew the valve insert and lay it on a clean surface (e.g. cloth, paper etc.).
›
Forcefully shake bottle
10
several times.
›
Firmly screw the inflation hose
3
onto the tyre inflater bottle
10
. The film on
the cap is pierced automatically.
›
Remove the plug from the inflation hose
3
and plug the open end fully onto
the tyre valve.
›
Hold the bottle
10
with the bottom facing upwards and fill all of the sealing
agent from the tyre inflator bottle into the tyre.
›
Remove the filler plug from the tyre valve.
›
Screw in the valve insert using the valve remover
2
.
Inflating
›
Screw the air compressor tyre inflation hose
7
» Fig. 338 on page 286 firmly
onto the tyre valve.
286Do-it-yourself