Remove rear SKODA SUPERB 2016 3.G / (B8/3V) Owner's Manual
[x] Cancel search | Manufacturer: SKODA, Model Year: 2016, Model line: SUPERB, Model: SKODA SUPERB 2016 3.G / (B8/3V)Pages: 336, PDF Size: 53.89 MB
Page 17 of 336
Seat belts
Using seat belts
Introduction
This chapter contains information on the following subjects:
Correct routing of seat belt
16
Fastening and unfastening seat belts
16
Seat belts that are fastened correctly offer good protection in the event of an
accident. They reduce the risk of an injury and increase the chance of survival
in the event of a major accident.
The seat belts reduce the kinetic energy considerably. They also prevent un-
controlled movements which, in turn, may well result in severe injuries.
When transporting children, observe the following information » page 22,
Transporting children safely .
WARNING■
Put the seat belt on before starting any journey! This also applies to other
passengers - there is a danger of injury!■
Maximum seat belt protection is only achieved if you are correctly seated
» page 12 , Correct and safe seated position .
■
The seat backrests of the front seats must not be tilted too far to the rear
otherwise the seatbelts can lose their effectiveness.
WARNINGInformation on dealing with the safety belts■The belt webbing must not be jammed in-between at any point or twis-
ted, or chafe against any sharp edges.■
Make sure you do not catch the seat belt in the door when closing it.
WARNINGInformation on the proper use of safety belts■Adjust the height of the belt in such a way that the shoulder part of the
belt is roughly positioned across the middle of your shoulder - on no ac-
count across your neck.WARNING (Continued)■ No two persons (also not children) should ever use a single seat belt to-
gether.■
The lock tongue should only be inserted into the lock which is the correct
one for your seat. Wrong use of the safety belt will reduce its capacity to
protect and the risk of injury increases.
■
Many layers of clothing and loose clothing (e. g. a winter coat over a jack-
et) do not allow you to be correctly seated and impairs proper operation of
the seat belts.
■
Do not use clamps or other objects to adjust seat belts (e.g. for shorten-
ing the belts for smaller persons).
■
The seat belts for the rear seats can only fulfil their function reliably
when the seat backrests are correctly locked into position » page 83.
WARNINGInformation on the care and maintenance of safety belts■The belt webbing must always be kept clean. Soiled belt webbing may im-
pair the proper operation of the inertia reel » page 263.■
The seat belts must not be removed or changed in any way. Do not at-
tempt to repair the seat belts yourself.
■
Check the condition of all the seat belts on a regular basis. If parts of the
belt system become damaged (e.g. the belt webbing, the belt connections,
the inertia reel, the locking part etc.), the respective seat belt must be re-
placed by a specialist garage immediately.
■
Seat belts which have been subjected to stress in an accident must be re-
placed by a specialist garage. The anchorage points for the belts should al-
so be checked.
15Seat belts
Page 23 of 336
Airbag deactivation
Introduction
This chapter contains information on the following subjects:
Deactivating airbags
21
Deactivating the front passenger airbag
21
Deactivating airbags
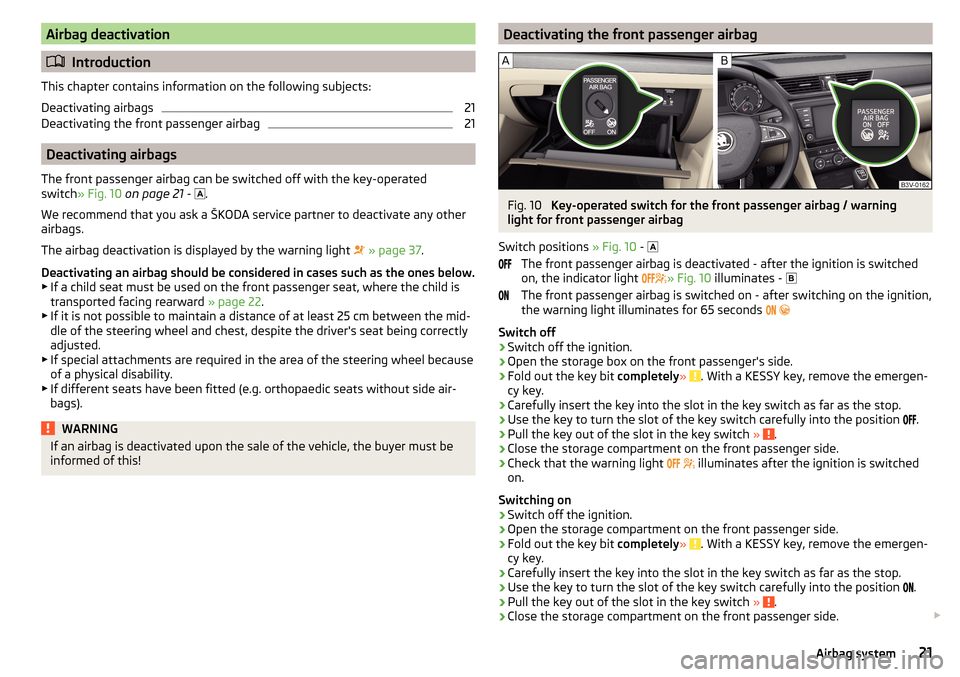
The front passenger airbag can be switched off with the key-operated
switch » Fig. 10 on page 21 -
.
We recommend that you ask a ŠKODA service partner to deactivate any other airbags.
The airbag deactivation is displayed by the warning light
» page 37 .
Deactivating an airbag should be considered in cases such as the ones below. ▶ If a child seat must be used on the front passenger seat, where the child is
transported facing rearward » page 22.
▶ If it is not possible to maintain a distance of at least 25 cm between the mid-
dle of the steering wheel and chest, despite the driver's seat being correctly
adjusted.
▶ If special attachments are required in the area of the steering wheel because
of a physical disability.
▶ If different seats have been fitted (e.g. orthopaedic seats without side air-
bags).
WARNINGIf an airbag is deactivated upon the sale of the vehicle, the buyer must be
informed of this!Deactivating the front passenger airbagFig. 10
Key-operated switch for the front passenger airbag / warning
light for front passenger airbag
Switch positions » Fig. 10 -
The front passenger airbag is deactivated - after the ignition is switched
on, the indicator light » Fig. 10
illuminates -
The front passenger airbag is switched on - after switching on the ignition,
the warning light illuminates for 65 seconds
Switch off
›
Switch off the ignition.
›
Open the storage box on the front passenger's side.
›
Fold out the key bit completely» . With a KESSY key, remove the emergen-
cy key.
›
Carefully insert the key into the slot in the key switch as far as the stop.
›
Use the key to turn the slot of the key switch carefully into the position .
›
Pull the key out of the slot in the key switch
» .
›
Close the storage compartment on the front passenger side.
›
Check that the warning light
illuminates after the ignition is switched
on.
Switching on
›
Switch off the ignition.
›
Open the storage compartment on the front passenger side.
›
Fold out the key bit completely» . With a KESSY key, remove the emergen-
cy key.
›
Carefully insert the key into the slot in the key switch as far as the stop.
›
Use the key to turn the slot of the key switch carefully into the position .
›
Pull the key out of the slot in the key switch
» .
›
Close the storage compartment on the front passenger side.
21Airbag system
Page 24 of 336
›Check that the warning light
illuminates after the ignition is switched
on.WARNING■ The key cannot be inserted into the key switch while driving. Shocks can
cause the key to turn in the slot and trigger the airbag! The airbag can be
triggered unexpectedly in an accident - it may result in injury or death!■
The driver is responsible for whether the airbag is switched on or switch-
ed off.
■
Only switch off the airbag when the ignition is switched off! Otherwise a
fault can occur in the system for deactivating the airbag.
■
If the warning lights
flash, the front passenger airbag will not
be deployed in the event of an accident! Have the airbag system checked
by a specialist garage immediately.
CAUTION
An insufficiently folded out key bit can damage the key switch!Transporting children safely
Child seat
Introduction
To reduce the risk of injury in the event of an accident, children must be trans- ported in child seats!
This chapter contains information on the following subjects:
Use of a child seat on the front passenger seat (variant 1)
23
Use of a child seat on the front passenger seat (variant 2)
24
Use of a child seat on the front passenger seat (variant 3)
24
Child safety and the side airbag
24
Classification of child seats
25
Use of child safety seats which are secured using a seat belt
25
The information in this Owner´s Manual as well as the instructions of the child
seat manufacturer must be observed when installing and using the child seat.
For safety reasons, we recommend that you always transport child seats on
the rear seats. Children should be transported on the front passenger seat on-
ly in exceptional circumstances.
Child seats complying with the ECE-R 44 Economic Commission for Europe
standard must be used.
Child seats that comply with the ECE-R 44 standard are identified with a test
mark that cannot be removed: Large E in a circle, approval number underneath.
WARNING■ One should never carry children, and also not babies! - on one's lap.■When leaving the vehicle, do not leave children unattended in the vehicle.
They might not be capable of leaving the vehicle or helping themselves in-
dependently in the event of an emergency. Very high or low temperatures
can be fatal!■
The child must be secured in the vehicle during the entire journey! Other-
wise, the child would be thrown through the vehicle in the event of an acci-
dent, causing fatal injuries to both the child and other occupants.
22Safety
Page 25 of 336

WARNING (Continued)■Children are exposed to an increased risk of injury in the event of an acci-
dent if they lean forward or adopt an incorrect seated position when the
vehicle is moving. This particularly applies to children who are transported
on the front passenger seat as they can suffer severe, or even fatal injuries
if the airbag system is deployed!■
Pay particular attention to the information provided by the manufacturer
of the child safety seat regarding the correct routing of the belt. Seat belts
which are not correctly adjusted can themselves cause injuries even in mi-
nor accidents.
■
Safety belts must be checked to ensure that they are running properly.
One should also ensure that the belt is not damaged by sharp-edged fit-
tings.
■
When installing the child seat on the back seat, the corresponding front
seat must be adjusted so that there is no contact between the front seat
and the child seat or the child being transported in a child seat.
■
Before installing a forward-facing child seat with backrest, remove the
headrest » page 84 . After removing the child seat, refit the head re-
straints.
Note
We recommend that you use child seats from ŠKODA Original Accessories.
These child seats were developed and also tested for use in ŠKODA vehicles.
They meet the ECE-R 44 standard.Use of a child seat on the front passenger seat (variant 1)
Does not apply to TaiwanFig. 11
Warning labels
Read and observe
on page 22 first.
Never use a rearward-facing child restraint system on a seat which is protec-
ted by an active airbag. This could cause serious injury to the child, even
death.
This is indicated also on stickers that are located at the following positions.
▶ On the front passenger's sun visor » Fig. 11 -
.
▶ On the B-pillar on the front passenger side » Fig. 11 –
.
The following instructions must be followed when using a child seat on the front passenger seat. ▶ The front passenger airbag must be deactivated if using a rear-facing child
seat »
.
▶ If possible, adjust the front passenger seat backrest so that it is as vertical,
so as to ensure secure contact between the passenger seat backrest and the
back of the child seat.
▶ If possible, move the front passenger seat backwards so that there is no con-
tact between the front passenger seat and the child seat behind it.
▶ Set the height-adjustable front passenger seat as high up as possible.
▶ Set the front passenger seat belt as high up as possible.
▶ With child safety seats in groups 2 and 3, make sure that the loop-around fit-
tings attached to the child seat headrest is positioned in front of or at the
same height as the loop-around fittings on the B pillar on the passenger side.
23Transporting children safely
Page 28 of 336

Fastening systems
Introduction
This chapter contains information on the following subjects:
attachment points of the
system
26
Use of child safety seats with the
System
26
Using child seats with the
system
27
Attachment points of the
system
27
attachment points of the system
Fig. 15
Labels of the system
is a system for securing child seats quickly and safely.
Two locking eyes are located between the seat backrest and the seat cushion
of the outer rear seats and front passenger seat for fixing the
system
child seat in place.
First, remove the caps A
in order to access the locking eyes » Fig. 15. After re-
moving the child seat, replace he caps.
WARNING■ Always refer to the instructions of the manufacturer of the child seat
when installing and removing a child seat with the system.■
Never attach other child seats, belts or objects to the attachment points
intended for the installation of a child seat with the
system – risk of
death!
Note
■ A child seat fitted with the system can only be mounted in a vehicle fit-
ted with a system if the child seat has been approved for this type of ve-
hicle. Further information is available from a ŠKODA Partner.■
Child seats with the
system can be purchased from ŠKODA Original Ac-
cessories.
Use of child safety seats with the System
Never use a rear-facing child seat on the front passenger seat if the passenger airbag is activated. This child safety seat is positioned in the deployment area of
the front passenger airbag. The airbag may cause the child severe, or even fatal injuries, in the event of it being deployed.Overview of the usability of child seats fastened with the system on each of the seats in accordance with the ECE-R 16 standard.GroupSize class of
the child seat a)Front passenger seat
b)Rear seats outsideRear seat middle0
up to 10 kgEXILX0+
up to 13 kgE
XILX
DC 26Safety
Page 65 of 336

Rear door, right
Deactivate/activate the buttons in the rear doors (the deactivation may be
advantageous if, for example, children are transported on the rear seats)
Open/close window›
To open , lightly press the appropriate button down and hold it until the win-
dow has moved into the desired position.
›
or: press the button to the stop, the window automatically opens fully. Re-
newed pressing of the button causes the window to stop.
›
To close , pull gently on the top edge of the corresponding button and hold
until the window has moved into the desired position.
›
or: pull the button briefly to the stop, the window automatically closes fully.
Renewed pulling of the button causes the window to stop immediately.
Disable / enable buttons in the rear doors
›
To deactivate/activate the buttons in the rear doors, press the
E
button. If
the buttons in the rear doors are deactivated, the warning light illumi-
nates in the
E
button.
Note
■ After switching off the ignition, the windows can still open and close for
about 10 minutes.■
After the driver or front passenger door is opened, the operation of the win-
dow is only possible with the button
A
» Fig. 43 , in which case this is pressed
or pulled for approx. 2 seconds.
Force limiter
Read and observe
and on page 62 first.
The electrical power windows are fitted with a force limiter.
If there is an obstacle, the closing process is stopped and the window goes
down by several centimetres.
If the obstacle prevents the window from being closed during the next 10 sec-
onds, the closing process is interrupted once again and the window goes down
by several centimetres.
If you attempt to close the window again within 10 seconds of the window be-
ing moved down for the second time, even though the obstacle was not yet
been removed, the closing process is only stopped. During this time it is not
possible to automatically close the window. The force limiter is still switched
on.
DEThe force limiter is only not operational if you attempt to close the window
again within the next 10 seconds – the window will now close with full force!
If you wait longer than 10 seconds, the force limiter is switched on again.
Window convenience operation
Read and observe
and on page 62 first.
The convenience operation for the window offers the option to open/close all
the windows at once (or only the window in the driver's door). The functions of
the comfort operation can be individually adjusted in infotainment in the
→
→
Opening and closing
menu.
Opening
›
Press and hold the button on the key.
›
Or
Switch off the ignition, open the driver's door and hold the key
A
until it
stops in the open position » Fig. 43 on page 62 .
Closing
›
Press and hold the button on the key.
›
Or
Switch off the ignition, open the driver's door and hold the key
A
until it
stops in the closed position » Fig. 43 on page 62 .
›
In the KESSY system, hold your finger on the sensor on the outside of the
door handle of the front door » Fig. 35 on page 55 .
The convenience operation will only function correctly if all the windows auto-
matically open/close properly.
Convenience opening or closing the window using the key in the driver's door
locking cylinder is only possible within 45 seconds of locking the vehicle.
The movement of the window is stopped immediately when the respective
button is released.
Note
The settings for the window convenience operation are stored (depending on
the Infotainment type) in the active user account personalisation » page 49.63Unlocking and opening
Page 69 of 336
Operating the lightsFig. 48
Light switch
Read and observe on page 66 first.
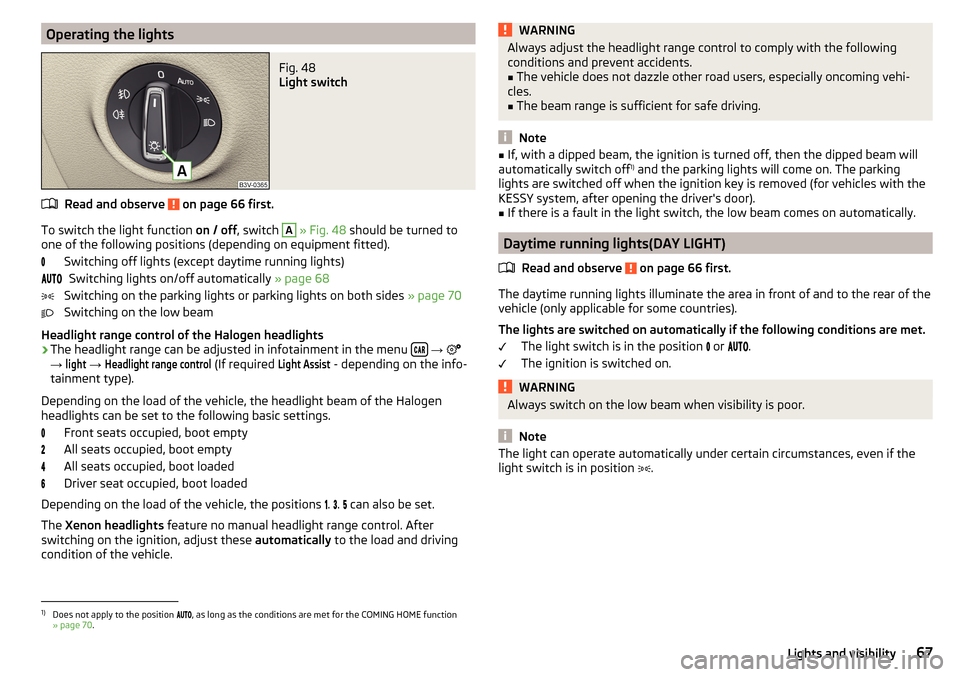
To switch the light function on / off, switch
A
» Fig. 48 should be turned to
one of the following positions (depending on equipment fitted).
Switching off lights (except daytime running lights)Switching lights on/off automatically » page 68
Switching on the parking lights or parking lights on both sides » page 70
Switching on the low beam
Headlight range control of the Halogen headlights
›
The headlight range can be adjusted in infotainment in the menu
→
→
light
→
Headlight range control
(If required
Light Assist
- depending on the info-
tainment type).
Depending on the load of the vehicle, the headlight beam of the Halogen
headlights can be set to the following basic settings.
Front seats occupied, boot empty
All seats occupied, boot empty
All seats occupied, boot loaded
Driver seat occupied, boot loaded
Depending on the load of the vehicle, the positions .
.
can also be set.
The Xenon headlights feature no manual headlight range control. After
switching on the ignition, adjust these automatically to the load and driving
condition of the vehicle.
WARNINGAlways adjust the headlight range control to comply with the following
conditions and prevent accidents.■
The vehicle does not dazzle other road users, especially oncoming vehi-
cles.
■
The beam range is sufficient for safe driving.
Note
■ If, with a dipped beam, the ignition is turned off, then the dipped beam will
automatically switch off 1)
and the parking lights will come on. The parking
lights are switched off when the ignition key is removed (for vehicles with the
KESSY system, after opening the driver's door).■
If there is a fault in the light switch, the low beam comes on automatically.
Daytime running lights(DAY LIGHT)
Read and observe
on page 66 first.
The daytime running lights illuminate the area in front of and to the rear of thevehicle (only applicable for some countries).
The lights are switched on automatically if the following conditions are met. The light switch is in the position
or
.
The ignition is switched on.
WARNINGAlways switch on the low beam when visibility is poor.
Note
The light can operate automatically under certain circumstances, even if the
light switch is in position .1)
Does not apply to the position , as long as the conditions are met for the COMING HOME function
» page 70 .
67Lights and visibility
Page 75 of 336

Front and rear lighting
Passenger light
Automatic operation - switch
The system is turned on when any of the following is present.
▶ The vehicle is unlocked.
▶ One of the doors is opened.
▶ The ignition key is removed.
The system is turned off when any of the following is present.
▶ The vehicle is locked.
▶ The ignition is switched on.
▶ About 30 seconds after all the doors have been closed.
Interior light, rear
Fig. 56
Interior light, rear: Variant 1
Fig. 57
Interior light, rear: Variant 2 / Variant 3
CDOption 1 - switch on/off (by pressing relevant switch) » Fig. 56
Reading lamp left
Reading lamp right
Variant 2 - operation (by moving the light lens C
) » Fig. 57
Switching on
Switching off
Automatic operation 1)
Option 3 - switch on/off (by pressing relevant switch) » Fig. 57
Reading lamp left
Reading lamp right
The rear lighting (variants 1 and 3) is controlled together with the automatic
operation of the lighting from the front seats. ▶ When the front interior lighting is switched on, the rear interior lighting also
turns on automatically.
▶ When the front interior lighting is switched off, the rear interior lighting can
be turned on/off as required.
Ambient lighting
Fig. 58
Infotainment Columbus, Amund-
sen, Bolero: Setting ambient
lighting
The ambient lighting illuminates the panel in colour, side door panels and the
footwell white.
The switching on of the lighting takes place automatically after opening the
door, switching off occurs automatically after the locking of the vehicle or 30
seconds after the closing of the door with the ignition switched off.
ABD1)
In this position, for the rear lighting, the same conditions apply as for the automatic operation of the
lighting from the front seats » page 72.
73Lights and visibility
Page 77 of 336

Sun visorsFig. 60
Fold down flap / flip up flap / make-up mirror and parking permit
holder
Read and observe
on page 74 first.
Operation and description of the sun visor » Fig. 60
Swivel the visor towards the windscreen
Swivel cover towards the door
Make-up mirror with cover (the cover can be pushed in the direction of the
arrow)
Light (turns on when the cover of the make-up mirror is pushed to one
side)
Parking ticket holder
Sunshade
Fig. 61
Sun screen
12ABCRead and observe on page 74 first.
The sun screen is located in a housing on the luggage compartment cover.
›
To roll down , pull the sunshade by the handle
A
in direction of arrow
1
and
suspend in the magnetic holder
B
in the direction of arrow
2
» Fig. 61 .
›
To roll up , pull the sunshade by the handle
A
out of the holder
B
against
the direction of arrow
2
» Fig. 61 . Hold the sunshade so that this can slowly
roll back in without damaging.
Note
It is not necessary to roll up the sunshade before opening the boot lid.
Sunshade in the rear doors
Fig. 62
Sun blind on the rear door
Read and observe
on page 74 first.
›
To roll down , pull out the sunshade by the handle
A
in direction of arrow
1
and suspend in the holder
B
on top edge of the door in the direction of ar-
row
2
» Fig. 62 .
›
To roll up , hold the sunshade by the handle
A
and remove it from the holder
B
against the direction of arrow
2
» Fig. 62 . Hold the sunshade so that this
can slowly roll back in without damaging.
75Lights and visibility
Page 78 of 336
Windscreen wipers and washers
Introduction
This chapter contains information on the following subjects:
Front wipers and washers
76
Rear window wipers and washers / reversing camera cleaning system
77
Headlight cleaning system
77
The windscreen wipers and the wash system only operate if the ignition is
switched on and the bonnet and boot are closed.
WARNINGDo not use the windscreen washer system at low temperatures, without
heating the windscreen beforehand. The window washer fluid could other-
wise freeze on the windscreen and restrict the view to the front.
CAUTION
■ If the windscreen wipers are in rest position, they cannot be folded out from
the windscreen. The wipers must be set to the service position to raise them
off the windscreen » page 294.■
In cold temperatures and during the winter, check before switching on the
ignition that the wiper blades are not frozen to the windscreen. If the wind-
screen wipers are switched on when the blades are frozen to the windscreen,
this may damage both the blades and windscreen wiper motor.
■
Carefully release the frozen-on windscreen wiper blades from the wind-
screen and remove snow and ice.
■
Handle the windscreen wipers with care - there is the risk of damaging the
windscreen with the windscreen wiper arms.
■
Do not switch on the ignition when the front windscreen wiper arms are fol-
ded down - there is the danger of damaging the bonnet by the windscreen
wiper arms.
■
If there is an obstacle on the windscreen, the wipers will try to push away
the obstacle five times. Thereafter, the wipers will stop to prevent them be-
coming damaged. Turn on the wipers again only after the obstacle has been
removed.
Note■ Each time the ignition switches off for the third time, the position of the
windscreen wipers changes. This counteracts an early fatigue of the wiper
blades.■
The windscreen washer nozzles for the windscreen are heated when the en-
gine is running and the outside temperature is less than +10 °C.
Front wipers and washers
Fig. 63
Operating the windscreen wipers
and washing system at the front
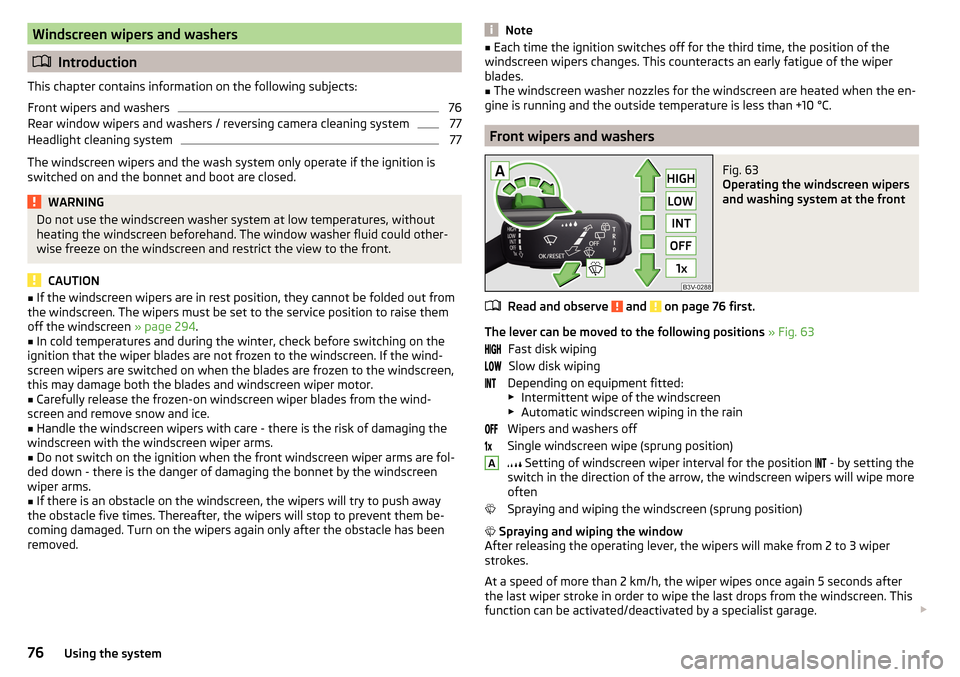
Read and observe and on page 76 first.
The lever can be moved to the following positions » Fig. 63
Fast disk wiping Slow disk wiping
Depending on equipment fitted:
▶ Intermittent wipe of the windscreen
▶ Automatic windscreen wiping in the rain
Wipers and washers off
Single windscreen wipe (sprung position)
Setting of windscreen wiper interval for the position
- by setting the
switch in the direction of the arrow, the windscreen wipers will wipe more
often
Spraying and wiping the windscreen (sprung position)
Spraying and wiping the window
After releasing the operating lever, the wipers will make from 2 to 3 wiper
strokes.
At a speed of more than 2 km/h, the wiper wipes once again 5 seconds after
the last wiper stroke in order to wipe the last drops from the windscreen. This
function can be activated/deactivated by a specialist garage.
A76Using the system