technical data SKODA YETI 2009 1.G / 5L User Guide
[x] Cancel search | Manufacturer: SKODA, Model Year: 2009, Model line: YETI, Model: SKODA YETI 2009 1.G / 5LPages: 271, PDF Size: 16.24 MB
Page 22 of 271
Instruments and Indicator/Warning Lights
21
Using the system
Safety
Driving Tips
General Maintenance
Breakdown assistance
Technical Data
Single-trip memory (memory 1) The single-trip memory collates the driving information from the moment the ignition is switched on until it is switched off. New data will also flow into the calculation of the current driving information if the trip is continued
within 2 hours
after switching off
the ignition. The memory will be is automatically erased, on the other hand, if the trip is interrupted for
more than 2 hours
.
Total-trip memory (memory 2) The total distance driven memory gathers da
ta from any number of individual jour-
neys up to a total of 99 hours and 59 minutes driving or 9.999 kilometres driven. The memory is deleted when either of these limits is reached and the calculation starts from anew. The total-trip memory will not, contrary to
the single-trip memory, be deleted after a
period of interr
uption of driving of 2 hours.
Note
All information in the memory
1 and
2 is erased if the battery of the vehicle is
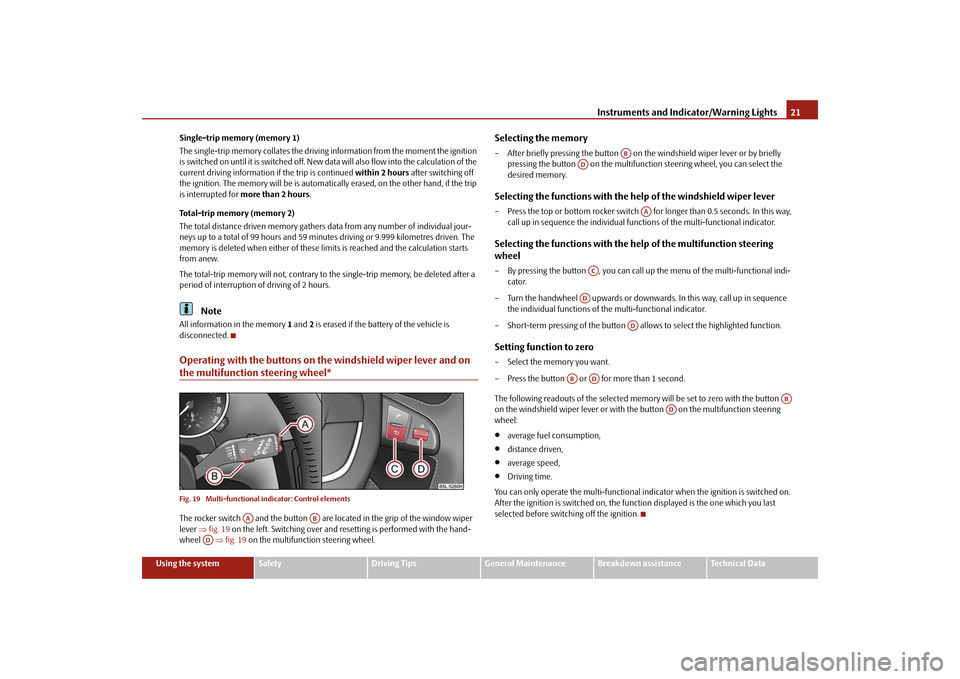
disconnected.Operating with the buttons on the windshield wiper lever and on the multifunction steering wheel*Fig. 19 Multi-functional indicator: Control elementsThe rocker switch and the button are lo
cated in the grip of the window wiper
lever
⇒fig. 19
on the left. Switching over and resetting is performed with the hand-
wheel
⇒fig. 19
on the multifunction steering wheel.
Selecting the memory– After briefly pressing the button on
the windshield wiper lever or by briefly
pressing the button on the multifuncti
on steering wheel, you can select the
desired memory.
Selecting the functions with the he
lp of the windshield wiper lever
– Press the top or bottom rocker switch
for longer than 0.5 seconds. In this way,
call up in sequence the individual func
tions of the multi-functional indicator.
Selecting the functions with the
help of the multifunction steering
wheel– By pressing the button , you can call up
the menu of the multi-functional indi-
cator.
– Turn the handwheel upwards or downward
s. In this way, call up in sequence
the individual functions of th
e multi-functional indicator.
– Short-term pressing of the button allows to select the highlighted function.Setting function to zero– Select the memory you want.– Press the button or for more than 1 second. The following readouts of the selected memo
ry will be set to zero with the button
on the windshield wiper lever or with the button on the multifunction steering wheel:•
average fuel consumption,
•
distance driven,
•
average speed,
•
Driving time.
You can only operate the multi-functional in
dicator when the igniti
on is switched on.
After the ignition is switched on, the function displayed is the one which you last selected before switching off the ignition.
AA
AB
AD
AB
AD
AA
AC
AD
AD
AB
AD
AB
AD
sgg.6.book Page 21 Thursday, September 24, 2009 2:32 PM
Page 24 of 271

Instruments and Indicator/Warning Lights
23
Using the system
Safety
Driving Tips
General Maintenance
Breakdown assistance
Technical Data
If the memory is set to zero (after disco
nnecting the battery), th
e fuel consumption of
10 ltr./100 km is calculated for the range; afterwards the value is adapted accordingly to the style of driving.Distance drivenThe distance driven since the memory was last erased appears in the display ⇒ page 20. If you wish to measure the distance
driven of a particular time, you must
set the memory to zero at this moment in time by pressing the button on the wind- shield wiper lever
⇒page 21, fig. 19
or the handwheel on the multifunction
steering wheel*
⇒page 21, fig. 19
.
The maximum distance indicated in both switch positions is 9.999 km. The indicator is set back to null if this
period is exceeded.
Average speedThe average speed since the memory was last erased is shown in the display in km/hour
⇒page 20. If you wish to determine the average vehicle speed over a certain
period of time you must set the memory to zero at the start of the measurement using the button on the windshield wiper lever
⇒page 21, fig. 19
or with the handwheel
on the multifunction steering wheel*
⇒page 21, fig. 19
.
A zero appears in the display for the first 100 m you drive after erasing the memory.The indicated value will be updated every 5 seconds while you are driving.Current speed*The current speed which is identical to the display of the speedometer, is indicated on the display
⇒page 16, fig. 15
.
Oil temperatureThe oil temperature appears in the display when the ignition is switched on. If there is a fault, three lines are displayed instead of the temperature.
Warning against excessive speeds*Fig. 21 Warning against excessive speeds / mu
lti-functional indicator: Control elements
This function enables you to set a speed limit, e.g. if you drive in town. A text in the display is intended to draw your attention
to the fact that you have exceeded the set
speed limit.Warning against excessive speeds– Select the menu point
Speed warning --- km/h (warning at --- km/h).
.
– Drive e.°g at a speed of 50 km/h. – Press the button on the windshield wiper lever
⇒fig. 21
or the handwheel
on the multifunction steering wheel*
⇒page 21, fig. 19
. Speed warning 50 km/h
(warning at 50 km/h)
is displayed in the information display*
⇒fig. 21
. You can
increase or reduce this value with the
button on the windshield wiper lever or
by turning the handwheel on the multifunction steering wheel*.
– The value is stored by repeated pressing
of the button on the windshield wiper
lever or the handwheel on the multifunction steering wheel*.
If you now exceed th
e set speed limit,
Speed 50°km/h exceeded
will be shown on the
display. This message is indicated for as long as the speed is reduced below the set limit or switch off the message by pressing the button on the windshield wiper lever ⇒ fig. 21
or the handwheel on the mu
ltifunction steering wheel*
⇒page 21,
fig. 19
.
An audible signal sounds as an additional warning signal.The set speed limit remains stored even after switching off the ignition.
AB
AD
AB
AD
A2
AB
AD
AA
AD
AB
AD
AB
AD
sgg.6.book Page 23 Thursday, September 24, 2009 2:32 PM
Page 26 of 271

Instruments and Indicator/Warning Lights
25
Using the system
Safety
Driving Tips
General Maintenance
Breakdown assistance
Technical Data
– You can select the individual menus by
pressing the handwheel . After briefly
pressing the handwheel , th
e desired menu is indicated.
– After briefly pressing the button you can achieve a higher level, by pressing the
button for longer than 1 second, you can call up the
MAIN MENU
.
You can select the following information (d
epending on the equipment installed on
the vehicle):�„
MFD (Onboard computer)
⇒page 20
�„
Audio
*
�„
Navigation
*
�„
Phone
* ⇒page 129
�„
Aux. Heating (auxiliary heating)
* ⇒page 105
�„
Assistant
* ⇒page 55
�„
Vehicle status
⇒page 26
�„
Setup
⇒page 27
The menu point
Audio
is only then displayed when
the factory-fitted Radio* is
switched on. The menu point
Navigation
is only then displayed when the factory-fitted Navigation
system* is switched on. The menu point
Aux. Heating
is only then displayed, if
the vehicle is fitted with the
factory-fitted auxiliary heating*. The menu point
Assistant
is only then displayed, if the
vehicle is fitted with cornering
lights*.
Note
•
If warning messages are shown in the information display
⇒page 25
⇒page 26,
these messages can be confirmed with the bu
tton on the windshield wiper lever or
with the button on the multifunction steering wheel in order to call up the main menu.•
If you do not activate the information display at that moment, the menu shifts to
one level higher every 10 seconds.
•
The operation of the factory-fitted radio*
or the navigation system* is described in
separate operating instructions to be
found in the on-board literature.
Door, luggage compartment door and bonnet ajar warningThe door, luggage compartment and bonnet ajar
warning lights up if at least one door,
the luggage compartment or bonnet are not closed. The symbol indicates which door is still open or whether the luggage
compartment door or bonnet is
not closed
⇒ fig. 24
.
The symbol goes out as soon as the doors,
luggage compartment door and bonnet are
completely closed. A warning signal sounds if the car is driven at a speed of more than 6km/hour and if the engine or the luggage compartment door is open.
AD
AD
AC
AC
AB
AD
Fig. 24 Information display: Door warning
sgg.6.book Page 25 Thursday, September 24, 2009 2:32 PM
Page 28 of 271

Instruments and Indicator/Warning Lights
27
Using the system
Safety
Driving Tips
General Maintenance
Breakdown assistance
Technical Data
Yellow symbols A yellow symbol signals a warning.Check the relevant function as soon as possible. The meaning of the yellow symbols: One
warning signal will sound if a yellow symbol appears.
If several operational faults
of priority 2 exist, the symbols appear one after the other
and are each illuminated for about 5 seconds.
Set-upYou can change certain settings by means
of the information display. The current
setting is shown on the information display in the respective menu at the top below the line
⇒fig. 28
.
You can select the following information (d
epending on the equipment installed on
the vehicle):•
Language
•
MFD Data (MFA DATA)
•
Convenience
•
Lights & Vision (Lights & Vision)
•
Time
•
Winter tyres
•
Units
•
Assistant (Assistant)
•
Alternative speed displayed (Second speed)
•
Tra v e l m o d e
•
Service Interval (Service)
•
Factory Setting
•
Back
After selecting the menu point
Back
you will reach one level higher in the menu.
Check engine oil level, engine oil sensor faulty
⇒ page 205
Brake pad worn
⇒page 36
Fig. 27 Information display: Brake pad worn
Fig. 28 Setting the clock
sgg.6.book Page 27 Thursday, September 24, 2009 2:32 PM
Page 30 of 271
Instruments and Indicator/Warning Lights
29
Using the system
Safety
Driving Tips
General Maintenance
Breakdown assistance
Technical Data
Service Here you can have the kilometers still to
be driven and the days until the following
service interval shown and the Service Interval Display reset.
Factory Setting After selecting the menu point
Factory Setting
the factory setting of the information
display is established again.
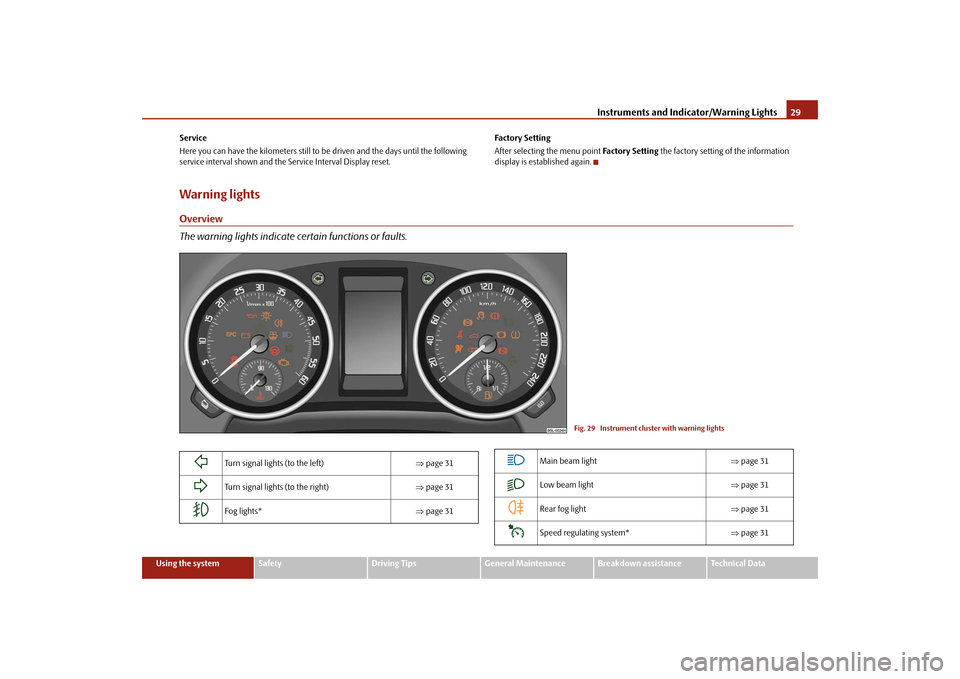
Warning lightsOverview The warning lights indicate certain functions or faults.
Fig. 29 Instrument cluster with warning lights
Turn signal lights (to the left)
⇒page 31
Turn signal lights (to the right)
⇒page 31
Fog lights*
⇒page 31
Main beam light
⇒page 31
Low beam light
⇒page 31
Rear fog light
⇒page 31
Speed regulating system*
⇒page 31
sgg.6.book Page 29 Thursday, September 24, 2009 2:32 PM
Page 32 of 271
Instruments and Indicator/Warning Lights
31
Using the system
Safety
Driving Tips
General Maintenance
Breakdown assistance
Technical Data
Turn signal system
Either the left
or right
indicator light flashes depending on the position of the turn
signal lever. The indicator light flashes at twice its normal rate if a turn signal light fails. This does not apply when towing a trailer. Switching off the hazard warning light system
is switched on will cause all of the turn
signal lights as well as both indicator lights to flash. Further information about the turn signal system
⇒page 59.
Fog lights*
The warning light
comes on when the fog lights are operating
⇒page 56.
Main beam
The indicator light
comes on when the main beam is selected or also when the
headlight flasher is operated. Further information about the main beam
⇒page 59.
Low beam
The warning light
comes on when low beam is selected
⇒page 53.
Rear fog light
The warning light
comes on when the rear fog lights are operating
⇒page 57.
Cruise control system*
The warning light
lights up, when operating the speed regulating system.
Bulb failure
The warning light
comes on if a bulb is faulty:
•
up to 2 seconds after the ignition is switched on;
•
when switching on the defective light bulb.
The following text e.g will be displayed in the information display*:
Check front right dipped beam!
The rear side lights and the licence plate lighting require several light bulbs. The indi- cator light
only lights up if all light bulbs of
the licence plate lighting or the parking
light (in one rear light unit) are defective.
Check regularly the function of the light
bulbs.Diesel particle filter*
(diesel engine)
If the warning light
comes on, this means that soot
has accumulated in the diesel
particle filter because of the frequent short distances. In order to clean the diesel particle filter, the vehicle should be driven at an even speed of at least 60 km/h at engine speeds of 1
800 - 2 500 rpm for at least 15 minutes or until
the warning light goes out with the 4th or
5th gear engaged (automatic gearbox: posi-
tion S) when the traffic situation permits it. This increases the exhaust temperature and the soot deposited in the diesel particle filter is burnt. Always pay attention to the valid speed limits
⇒
.
The warning light
goes out after the successful cleaning of the diesel particle filter.
If the filter is not properly
cleaned, the warning light
does not go out and the
warning light
begins to flash. In the in
formation display* appears
Diesel-particle
Owner's manual
. Afterwards the engine control unit shifts the engine into the emer-
gency mode, which only has a reduced power
output. After switchin
g the ignition off
and on again the warning light
comes on.
Have the vehicle inspected without
delay by your specialist garage.
sgg.6.book Page 31 Thursday, September 24, 2009 2:32 PM
Page 34 of 271

Instruments and Indicator/Warning Lights
33
Using the system
Safety
Driving Tips
General Maintenance
Breakdown assistance
Technical Data
WARNING
Contact your specialist
garage if the power steering is defective.
Note
•
If the yellow warning light
goes out after starting the engine again and a short
drive, it is not necessary to visit a specialist garage.•
If the battery has been di
sconnected and reconnected, the yellow warning light
comes on after switching on the ignition. Th
e warning light must go out after driving a
short distance.Engine oil pressure
The warning light
comes on for a few seconds
3) when the ignition is switched on.
Stop the vehicle and switch the engine off
if the warning light does not go off after
the engine has started or flashes while driving. Check the oil level and top up with oil as necessary
⇒page 206, “Replenishing engine oil”.
An audible signal sounds three times as an additional warning signal.Do not continue your journey
if for some reason it is not possible under the condi-
tions prevailing to top up with oil.
Keep the engine switched off
and obtain profes-
sional assistance from a specialist garage, otherwise it could lead to severe engine damage. Do not drive any further
if the warning light flashes even
if the oil is at the correct
level. Do not run the engine
not at idling speed either. Contact the nearest specialist
garage to obtain professional assistance. The following text will be displayed in the information display*:
Oil Pressure Engine off! Owner's manual!
WARNING
•
If you must stop for technical reasons, then park the vehicle at a safe
distance from the traffic and switch of
f the engine and switch on the hazard
warning light system.•
The red oil pressure light
is not an oil level indicator! One should there-
fore check the oil level at regular inte
rvals, preferably after every refueling
stop.Engine oil level
Warning light
lights up
If the warning light
lights up, the quantity of oil in
the engine is probably too low.
Check as soon as possible the oil level or top up
⇒page 206 with engine oil.
A peep sounds as an additional warning signal.The following text will be displayed in the information display*:
Check oil level!
The warning light will go out if the bonnet is
left open for more than 30 seconds. If no
engine oil has been replenished, the warning light will come on again after driving about 100 km. Warning light
flashes
A fault on the engine oil level sensor is indicated additionally by an audible signal and the warning light coming on several times after the ignition has been switched on. In this case have the engine inspecte
d without delay by a specialist garage.
The following text will be displayed in the information display*:
Oil sensor Workshop!
EPC fault light
(petrol engine)
The
(Electronic Power Control) warning light comes on for a few seconds when the
ignition is switched on.
3)The warning light
on vehicles fitted with information display does not come on after switch-
ing the ignition on, but only if a fault exists or the engine oil level is too low.
sgg.6.book Page 33 Thursday, September 24, 2009 2:32 PM
Page 36 of 271
Instruments and Indicator/Warning Lights
35
Using the system
Safety
Driving Tips
General Maintenance
Breakdown assistance
Technical Data
The warning light lights up permanently if there is a fault in the TCS system. The fact that the TCS system operates together with the ABS means that the TCS warning light will also come on if the ABS system is not operating properly. If the warning light
comes on immediately after starting the engine, the TCS system
can be switched off for technical reasons. In this case, the TCS system can be switched on again by switching the ignition on and off. If the warning light goes out, the TCS system is fully functional again. Further information about the TCS
⇒page 165, “Traction control system (TCS)”.
Note
If the battery has been disconnected
and reconnected, the warning light
comes on
after switching on the ignition. The warning light must go out after driving a short distance.Electronic stability programme (ESP)*
The warning light
comes on for a few seconds when
the ignition is switched on.
When the ESP helps to stabilise the vehicle (for example when applying and releasing a braking force to an individual wheel), then the warning light
flashes quickly in the
information display. The ESP system cannot be switched off, the
TCS system can only be switched off by
pressing the button
⇒page 163, fig. 154
, then the warning light flashes slowly
.
The warning light lights up permanently
if there is a fault in the ESP system.
The fact that the ESP system operates together with the ABS means that the ESP warning light will also come on if the ABS system is not operating properly. If the warning light
comes on immediately after starting the engine, the ESP system
can be switched off for technical reasons. In this case, the ESP system can be switched on again by switching the ignition on and off. If the warning light goes out, the ESP system is fully functional again. Further information on the ESP
⇒page 163, “Electronic stability programme (ESP)*”.
Electronic Differential Lock (EDL)* The EDL is a part of the ESP. A fault in the
EDL is indicated by th
e ESP warning light in
the instrument cluster. Have the vehicle inspected immediately by your specialist garage. Further information on the EDL
⇒page 164, “Electronic Differential Lock
(EDL)*”.
Note
If the battery has been disconnected
and reconnected, the warning light
comes on
after switching on the ignition. The warning light must go out after driving a short distance.Selector lever lock*
If the
green
warning light
lights up, operate the brake pedal. This is necessary, in
order to be able to move the selector lever out of the position
P or N.
Further information about the selector lever lock
⇒page 123.
Tyre inflation pressure*
The warning light
lights up, if there is a substantial drop in inflation pressure in one
of the tyres. Reduce the speed and check or
correct as soon as possible the inflation
pressure in the tyres
⇒page 215.
If the warning light flashes, there is a system fault. Visit the nearest specialist garage and have the fault rectified. Further information about tyre pressure-control system
⇒page 169.
WARNING
•
When the warning light
lights up, immediately reduce the speed and
avoid sudden steering and brake manoeuvr
es. Please stop the vehicle without
delay at the nearest possible stop and in
spect the tyres and their inflation pres-
sures.•
Under certain circumstances (e.g. sporty style of driving, wintry or unpaved
roads) the warning light
can be delayed or does not light up at all.
sgg.6.book Page 35 Thursday, September 24, 2009 2:32 PM
Page 38 of 271
Instruments and Indicator/Warning Lights
37
Using the system
Safety
Driving Tips
General Maintenance
Breakdown assistance
Technical Data
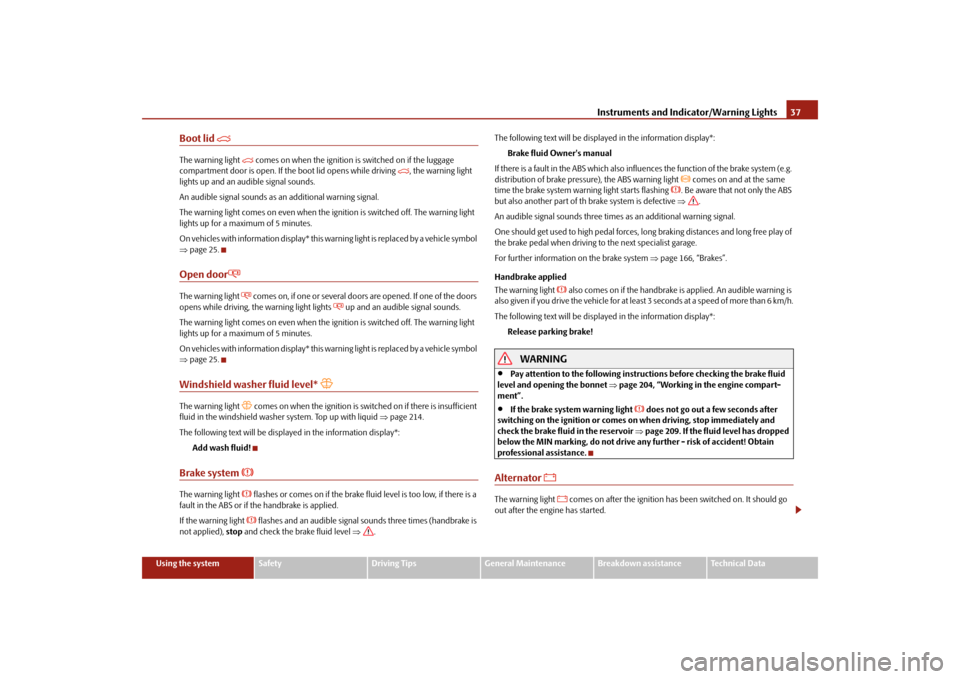
Boot lid
The warning light
comes on when the ignition is switched on if the luggage
compartment door is open. If th
e boot lid opens while driving
, the warning light
lights up and an audible signal sounds. An audible signal sounds as an additional warning signal.The warning light comes on even when the ig
nition is switched off. The warning light
lights up for a maximum of 5 minutes. On vehicles with information display* this wa
rning light is replaced
by a vehicle symbol
⇒ page 25.Open door
The warning light
comes on, if one or several doors are opened. If one of the doors
opens while driving, the warning light lights
up and an audible signal sounds.
The warning light comes on even when the ig
nition is switched off. The warning light
lights up for a maximum of 5 minutes. On vehicles with information display* this wa
rning light is replaced
by a vehicle symbol
⇒ page 25.Windshield washer fluid level*
The warning light
comes on when the ignition is switched on if there is insufficient
fluid in the windshield washer system. Top up with liquid
⇒page 214.
The following text will be displayed in the information display*:
Add wash fluid!
Brake system
The warning light
flashes or comes on if the brake fluid level is too low, if there is a
fault in the ABS or if the handbrake is applied. If the warning light
flashes and an audible signal sounds three times (handbrake is
not applied),
stop
and check the brake fluid level
⇒
.
The following text will be displayed in the information display*:
Brake fluid Owner's manual
If there is a fault in the ABS which also infl
uences the function of the brake system (e.g.
distribution of brake pressure), the ABS warning light
comes on and at the same
time the brake system warn
ing light starts flashing
. Be aware that not only the ABS
but also another part of th brake system is defective
⇒
.
An audible signal sounds three times as an additional warning signal.One should get used to high pedal forces, long braking distances and long free play of the brake pedal when driving to the next specialist garage. For further information on the brake system
⇒page 166, “Brakes”.
Handbrake applied The warning light
also comes on if the handbrake is applied. An audible warning is
also given if you drive the vehicle for at least 3 seconds at a speed of more than 6 km/h. The following text will be displayed in the information display*:
Release parking brake!
WARNING
•
Pay attention to the following instruct
ions before checking the brake fluid
level and opening the bonnet
⇒page 204, “Working in the engine compart-
ment”.•
If the brake system warning light
does not go out a few seconds after
switching on the ignition or comes on when driving, stop immediately and check the brake fluid in the reservoir
⇒page 209. If the fluid level has dropped
below the MIN marking, do not drive any further - risk of accident! Obtain professional assistance.Alternator
The warning light
comes on after the ignition has been switched on. It should go
out after the engine has started.
sgg.6.book Page 37 Thursday, September 24, 2009 2:32 PM
Page 40 of 271
Unlocking and locking
39
Using the system
Safety
Driving Tips
General Maintenance
Breakdown assistance
Technical Data
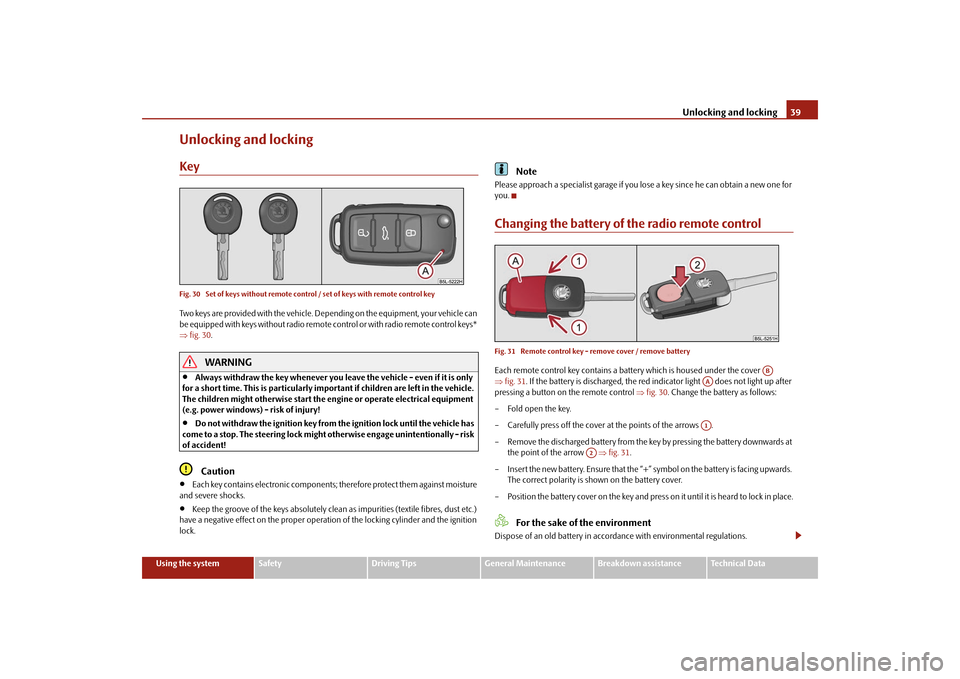
Unlocking and lockingKeyFig. 30 Set of keys without remote control / set of keys with remote control keyTwo keys are provided with the vehicle. Depending on the equipment, your vehicle can be equipped with keys without radio remote control or with radio remote control keys* ⇒ fig. 30
.WARNING
•
Always withdraw the key whenever you le
ave the vehicle - even if it is only
for a short time. This is particularly important if children are left in the vehicle. The children might otherwise start the en
gine or operate electrical equipment
(e.g. power windows) - risk of injury!•
Do not withdraw the ignition key from the ignition lock until the vehicle has
come to a stop. The steerin
g lock might otherwise enga
ge unintentionally - risk
of accident!
Caution
•
Each key contains electronic components; therefore protect them against moisture
and severe shocks.•
Keep the groove of the keys absolutely clean as impurities (textile fibres, dust etc.)
have a negative effect on the proper operation of the locking cylinder and the ignition lock.
Note
Please approach a specialist garage if you lose a key since he can obtain a new one for you.Changing the battery of the radio remote controlFig. 31 Remote control key - remove cover / remove batteryEach remote control key contains a batt
ery which is housed under the cover
⇒ fig. 31
. If the battery is discharged, the red in
dicator light does not light up after
pressing a button on the remote control
⇒fig. 30
. Change the battery as follows:
– Fold open the key. – Carefully press off the cover at the points of the arrows .– Remove the discharged battery from the key by pressing the battery downwards at
the point of the arrow
⇒fig. 31
.
– Insert the new battery. Ensure that the “+”
symbol on the battery is facing upwards.
The correct polarity is shown on the battery cover.
– Position the battery cover on the key and press on it until it is heard to lock in place.
For the sake of the environment
Dispose of an old battery in accord
ance with environmental regulations.
AB
AAA1
A2
sgg.6.book Page 39 Thursday, September 24, 2009 2:32 PM