CD player SKODA YETI 2011 1.G / 5L Columbus Navigation System Manual
[x] Cancel search | Manufacturer: SKODA, Model Year: 2011, Model line: YETI, Model: SKODA YETI 2011 1.G / 5LPages: 47, PDF Size: 1.09 MB
Page 13 of 47

SETUP
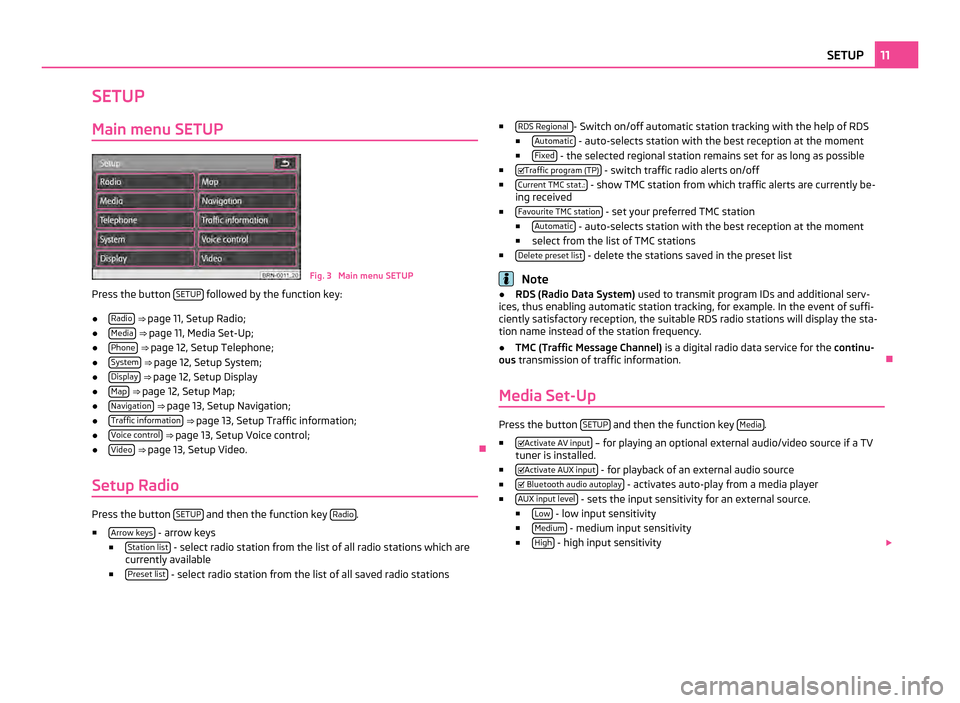
Main menu SETUP Fig. 3 Main menu SETUP
Press the button SETUP followed by the function key:
● Radio
⇒ page 11, Setup Radio;
● Media
⇒ page 11, Media Set-Up ;
● Phone
⇒ page 12, Setup Telephone;
● System
⇒ page 12, Setup System;
● Display
⇒ page 12, Setup Display
● Map
⇒ page 12, Setup Map ;
● Navigation
⇒ page 13, Setup Navigation;
● Traffic information
⇒ page 13, Setup Traffic information;
● Voice control
⇒ page 13, Setup Voice control;
● Video
⇒ page 13, Setup Video. Ð
Setup Radio Press the button
SETUP and then the function key
Radio .
■ Arrow keys - arrow keys
■ Station list - select radio station from the list of all radio stations which are
currently available
■ Preset list - select radio station from the list of all saved radio stations ■
RDS Regional - Switch on/off automatic station tracking with the help of RDS
■ Automatic - auto-selects station with the best reception at the moment
■ Fixed - the selected regional station remains set for as long as possible
■ Traffic program (TP) - switch traffic radio alerts on/off
■ Current TMC stat.: - show TMC station from which traffic alerts are currently be-
ing received
■ Favourite TMC station - set your preferred TMC station
■ Automatic - auto-selects station with the best reception at the moment
■ select from the list of TMC stations
■ Delete preset list - delete the stations saved in the preset list
Note
● RDS (Radio Data System) used to transmit program IDs and additional serv-
ices, thus enabling automatic station tracking, for example. In the event of suffi-
ciently satisfactory reception, the suitable RDS radio stations will display the sta-
tion name instead of the station frequency.
● TMC (Traffic Message Channel)
is a digital radio data service for the continu-
ous transmission of traffic information. Ð
Media Set-Up Press the button
SETUP and then the function key
Media .
■ Activate AV input – for playing an optional external audio/video source if a TV
tuner is installed.
■ Activate AUX input - for playback of an external audio source
■ Bluetooth audio autoplay - activates auto-play from a media player
■ AUX input level - sets the input sensitivity for an external source.
■ Low - low input sensitivity
■ Medium - medium input sensitivity
■ High - high input sensitivity
11
SETUP
Page 19 of 47

- pressing this briefly changes over to the beginning of the current title or
chapter, repeated pressing changes over to the beginning of the previous title or
chapter.
- pressing this briefly changes over to the beginning of the next title or chapter,
repeated pressing changes over to the beginning of the next title or chapter.
It is also possible to change tracks in the menu of the currently played audio
source using the control button 15 .
Unit buttons for controlling the current audio and video source - pressing this briefly changes over to the beginning of the current title or
chapter, repeated pressing changes over to the beginning of the previous title or
chapter.
- briefly pressing this changes over to the next title or chapter.
- Pause: the play function is stopped in the current position and the symbol
changes to - after pressing, the play function will continue in this position.
Note
If the volume is reduced to 0 during playback from a CD, the hard drive or another
audio source, the symbol changes to
and playback is interrupted.
Ð
General information for CD/DVD operation Audio-CDs (CD-A) and Audio-DVDs, MP3-CDs and MP3-DVDs as well as Video-
DVDs can be played in the internal CD/DVD drive.
Insert CD/DVD
Insert a CD with the written side facing up as far as possible into the CD case
11until it is automatically drawn in. The play function will start automatically.
Remove CD/DVD
Pressing
- ejects the CD/DVD.
If the
“ejected” CD is not taken out within 10 seconds, it will be retracted again for
safety reasons.
CD not legible
If you insert a CD/DVD which cannot be read by the unit, a pop-up window is dis-
played with a note. The CD/DVD is moved to the eject position within a few sec-
onds. If the CD/DVD is not taken out within 10 seconds, it is drawn in again for safety
reasons.
CD to jump
Uneven road surfaces and strong vibrations may cause the CD to jump.
Formation of condensation
When it is cold and after rain showers, moisture can deposit in the CD/DVD drive
(condensation). This can effect the CD jump or impair the play function. In such ca-
ses wait until the moisture has dissipated.
Notes for the care of the CD/DVDs
If a CD/DVD is soiled, never clean it in the direction of a circle but rather from in-
side to outside with a soft lint-free cloth. In case of severe layers of dirt we rec-
ommend to clean the CD/DVD with a commercially available CD/DVD cleaner. Also
in this case do not clean the CD/DVD in the direction of a circle but rather from
inside to outside and then let it dry off.
MP3 and WMA Data (Windows Media Audio)
Playable MP3 and WMA data can also be stored on the hard disk of the unit
⇒
page 20, Hard drive (HDD).
The copyright of audio data compressed by Windows Media Audio, can also be
protected by the DRM procedure ( Digital Rights Management). Such WMA data is
not supported by the unit. WARNING
The CD/DVD player is a 1st class laser product. There is a risk of injury from in-
visible laser beams if you open the CD/DVD player. CAUTION
● Never place Eco Disc CDs into the internal drive.
● Inserting a second CD/DVD while a CD/DVD is being ejected can destroy the
CD/DVD drive in the unit. After pressing the Eject button there is a delay of a
few seconds before the CD/DVD is ejected. During this time the lock in front of the
CD/DVD case is open. It is essential that you wait until the CD/DVD has been fully
ejected before you try to insert a new CD/DVD. 17
MEDIA mode