warning light SKODA YETI 2011 1.G / 5L Owner's Manual
[x] Cancel search | Manufacturer: SKODA, Model Year: 2011, Model line: YETI, Model: SKODA YETI 2011 1.G / 5LPages: 252, PDF Size: 3.61 MB
Page 191 of 252
Inspecting and Replenishing
Engine compartment
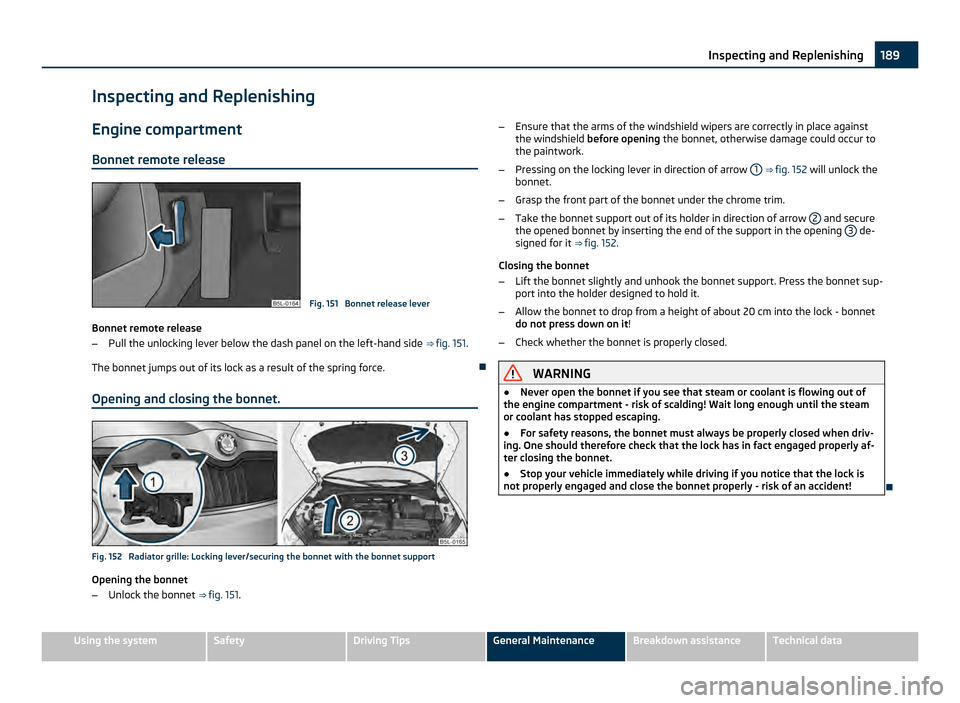
Bonnet remote release Fig. 151 Bonnet release lever
Bonnet remote release
– Pull the unlocking lever below the dash panel on the left-hand side ⇒ fig. 151.
The bonnet jumps out of its lock as a result of the spring force.
Opening and closing the bonnet. Fig. 152 Radiator grille: Locking lever/securing the bonnet with the bonnet support
Opening the bonnet
–
Unlock the bonnet ⇒
fig. 151. –
Ensure that the arms of the windshield wipers are correctly in place against
the windshield before opening the bonnet, otherwise damage could occur to
the paintwork.
– Pressing on the locking lever in direction of arrow 1 ⇒
fig. 152 will unlock the
bonnet.
– Grasp the front part of the bonnet under the chrome trim.
– Take the bonnet support out of its holder in direction of arrow 2 and secure
the opened bonnet by inserting the end of the support in the opening 3 de-
signed for it ⇒ fig. 152.
Closing the bonnet
– Lift the bonnet slightly and unhook the bonnet support. Press the bonnet sup-
port into the holder designed to hold it.
– Allow the bonnet to drop from a height of about 20 cm into the lock - bonnet
do not press down on it!
– Check whether the bonnet is properly closed. WARNING
● Never open the bonnet if you see that steam or coolant is flowing out of
the engine compartment - risk of scalding! Wait long enough until the steam
or coolant has stopped escaping.
● For safety reasons, the bonnet must always be properly closed when driv-
ing. One should therefore check that the lock has in fact engaged properly af-
ter closing the bonnet.
● Stop your vehicle immediately while driving if you notice that the lock is
not properly engaged and close the bonnet properly - risk of an accident! 189
Inspecting and Replenishing Using the system Safety Driving Tips General Maintenance Breakdown assistance Technical data
Page 194 of 252
It is normal for the engine to consume oil. The oil consumption may be as much as
0.5 l/1 000 km depending on your style of driving and the conditions under which
you operate your vehicle. The oil consumption may be slightly higher than this
during the first 5 000 kilometres.
One should therefore check the oil level at regular intervals, preferably every time
after the fuel tank is filled or after driving for long stretches.
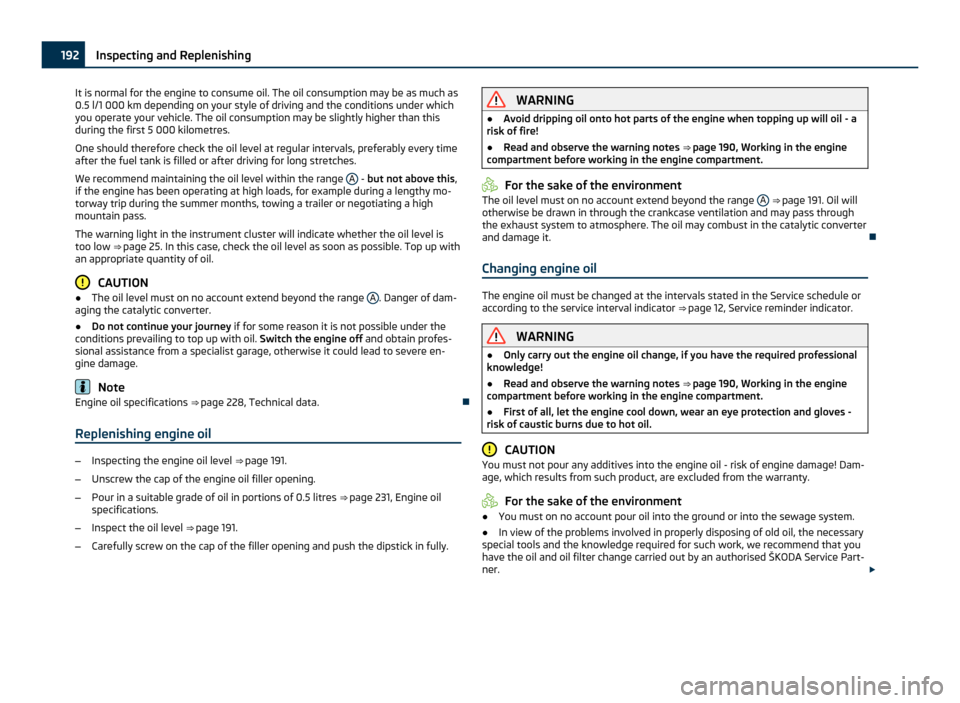
We recommend maintaining the oil level within the range A - but not above this
,
if the engine has been operating at high loads, for example during a lengthy mo-
torway trip during the summer months, towing a trailer or negotiating a high
mountain pass.
The warning light in the instrument cluster will indicate whether the oil level is
too low ⇒ page 25. In this case, check the oil level as soon as possible. Top up with
an appropriate quantity of oil. CAUTION
● The oil level must on no account extend beyond the range A . Danger of dam-
aging the catalytic converter.
● Do not continue your journey if for some reason it is not possible under the
conditions prevailing to top up with oil. Switch the engine off and obtain profes-
sional assistance from a specialist garage, otherwise it could lead to severe en-
gine damage. Note
Engine oil specifications ⇒ page 228, Technical data.
Replenishing engine oil –
Inspecting the engine oil level ⇒
page 191.
– Unscrew the cap of the engine oil filler opening.
– Pour in a suitable grade of oil in portions of 0.5 litres ⇒ page 231, Engine oil
specifications.
– Inspect the oil level ⇒ page 191
.
– Carefully screw on the cap of the filler opening and push the dipstick in fully. WARNING
● Avoid dripping oil onto hot parts of the engine when topping up will oil - a
risk of fire!
● Read and observe the warning notes ⇒
page 190, Working in the engine
compartment before working in the engine compartment. For the sake of the environment
The oil level must on no account extend beyond the range A ⇒
page 191. Oil will
otherwise be drawn in through the crankcase ventilation and may pass through
the exhaust system to atmosphere. The oil may combust in the catalytic converter
and damage it.
Changing engine oil The engine oil must be changed at the intervals stated in the Service schedule or
according to the service interval indicator
⇒ page 12, Service reminder indicator
. WARNING
● Only carry out the engine oil change, if you have the required professional
knowledge!
● Read and observe the warning notes ⇒
page 190, Working in the engine
compartment before working in the engine compartment.
● First of all, let the engine cool down, wear an eye protection and gloves -
risk of caustic burns due to hot oil. CAUTION
You must not pour any additives into the engine oil - risk of engine damage! Dam-
age, which results from such product, are excluded from the warranty. For the sake of the environment
● You must on no account pour oil into the ground or into the sewage system.
● In view of the problems involved in properly disposing of old oil, the necessary
special tools and the knowledge required for such work, we recommend that you
have the oil and oil filter change carried out by an authorised
ŠKODA Service Part-
ner. £192
Inspecting and Replenishing
Page 196 of 252
–
Open the bonnet ⇒ page 189 .
– Check the level of coolant in the coolant expansion bottle ⇒ fig. 155. When the
engine is cold, the coolant level must lie between the a and
b markings. The
level may also rise slightly above the a (MAX) marking when the engine is
warm.
If the coolant level in the reservoir is too low, this is indicated by the warning light
in the instrument cluster ⇒ page 26
, Coolant temperature/Coolant quantity . We
still recommend inspecting the coolant level directly at the reservoir from time to
time.
Loss of coolant
A loss of coolant is first and foremost an indication of a leak in the system. You
should not merely top up the coolant in the reservoir. It is also important to have
the cooling system inspected without delay by a specialist garage.
Losses can only occur through the pressure relief in the cap of the coolant expan-
sion bottle which is completely free of leaks if the coolant boils as a result of over-
heating and is forced out of the cooling system. WARNING
Read and observe the warning notes ⇒ page 190
, Working in the engine com-
partment before working in the engine compartment. CAUTION
One should contact a specialist garage as soon as possible if the source of over-
heating itself cannot be determined and removed, since there may be grave dam-
age to the engine.
Replenishing the coolant –
Switch the engine off.
– Allow the engine to cool down.
– Place a cloth over the cap of the coolant expansion reservoir ⇒
fig. 155 and un-
screw the cap carefully by turning it to the left ⇒ .
– Top up the coolant.
– Screw the cap tight until it is heard to lock. The coolant which you use for replenishing the system, must comply with one
specific specification ⇒ page 193. Do not use an alternative additive if the speci-
fied coolant additive is not available in exceptional cases. Just top up the system
with water and as soon as possible arrange adjustment to correct the mixing ratio
of water and coolant additive again by a specialist garage.
Only use fresh coolant for topping up the system.
Do not fill the coolant above the mark a (max.)
⇒ fig. 155 ! Excess coolant heats up
and then is forced out of the cooling system through the pressure relief valve in
the cap.
Wait until the engine has cooled down for a system which has suffered a major
loss of coolant before pouring in coolant. This is necessary to avoid engine dam-
age. WARNING
● The cooling system is pressurized! Do not open the cap of the coolant ex-
pansion bottle if the engine is still hot - risk of scalding!
● The coolant additive and thus all of the coolant is harmful to your health.
Avoid contact with the coolant. Coolant vapours are also harmful to the
health. It is important, therefore, to always safely store any coolant additive in
its original container out of the reach of children - risk of poisoning!
● If any splashes of coolant get into your eyes, rinse out your eyes immedi-
ately with clear water and contact a doctor as soon as possible.
● You should also consult a doctor without delay if you have inadvertently
swallowed coolant. CAUTION
Do not continue your journey if for some reason it is not possible under the con-
ditions prevailing to top up with coolant. Switch the engine off and obtain pro-
fessional assistance from a specialist garage, otherwise it could lead to severe en-
gine damage. For the sake of the environment
Do not re-use coolant if it is necessary to drain the coolant in the system. It should
be collected and disposed of in compliance with environmental protection regula-
tions. 194
Inspecting and Replenishing
Page 197 of 252
Radiator fan
The radiator fan may switch on suddenly.
The radiator fan is driven by an electric motor and controlled according to the
coolant temperature.
The radiator fan may continue running for up to 10 minutes after the engine has
been switched off - even if the ignition is also off. It may also switch on suddenly
after a certain time, if
● the coolant temperature has risen because of an accumulation of heat or
● the warm engine compartment is heated up additionally by strong sunlight. WARNING
You must therefore be aware when working in the engine compartment that
the fan may switch on suddenly - risk of injury!
Brake fluid
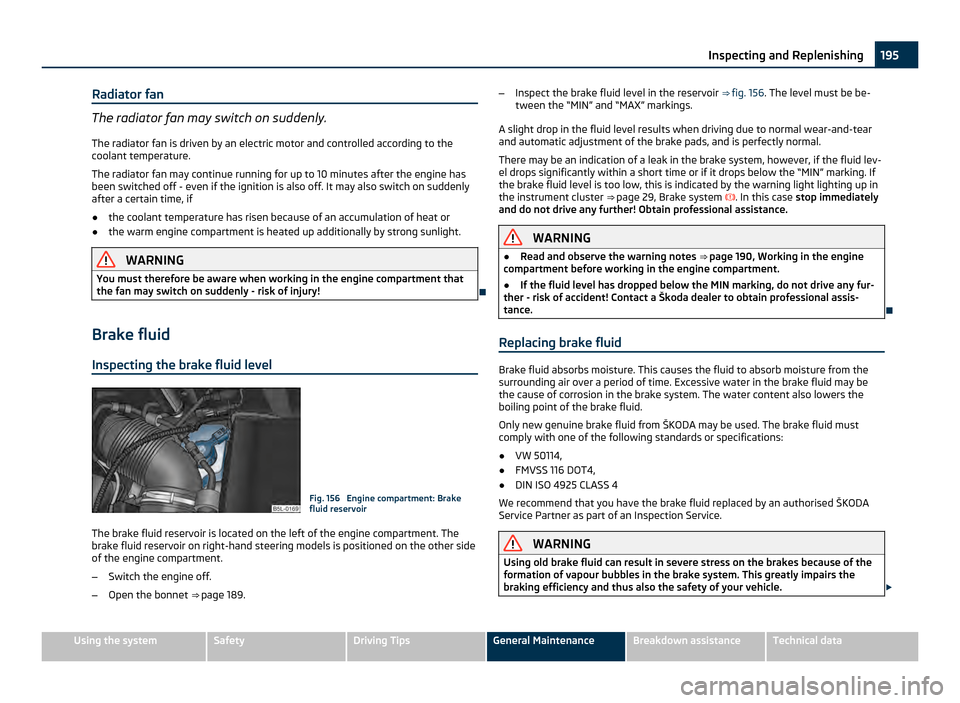
Inspecting the brake fluid level Fig. 156 Engine compartment: Brake
fluid reservoir
The brake fluid reservoir is located on the left of the engine compartment. The
brake fluid reservoir on right-hand steering models is positioned on the other side
of the engine compartment.
– Switch the engine off.
– Open the bonnet ⇒ page 189 . –
Inspect the brake fluid level in the reservoir ⇒
fig. 156. The level must be be-
tween the “MIN” and “MAX” markings.
A slight drop in the fluid level results when driving due to normal wear-and-tear
and automatic adjustment of the brake pads, and is perfectly normal.
There may be an indication of a leak in the brake system, however, if the fluid lev-
el drops significantly within a short time or if it drops below the “MIN” marking. If
the brake fluid level is too low, this is indicated by the warning light lighting up in
the instrument cluster ⇒ page 29, Brake system . In this case stop immediately
and do not drive any further! Obtain professional assistance. WARNING
● Read and observe the warning notes ⇒
page 190, Working in the engine
compartment before working in the engine compartment.
● If the fluid level has dropped below the MIN marking, do not drive any fur-
ther - risk of accident! Contact a Škoda dealer to obtain professional assis-
tance.
Replacing brake fluid Brake fluid absorbs moisture. This causes the fluid to absorb moisture from the
surrounding air over a period of time. Excessive water in the brake fluid may be
the cause of corrosion in the brake system. The water content also lowers the
boiling point of the brake fluid.
Only new genuine brake fluid from
ŠKODA may be used. The brake fluid must
comply with one of the following standards or specifications:
● VW 50114,
● FMVSS 116 DOT4,
● DIN ISO 4925 CLASS 4
We recommend that you have the brake fluid replaced by an authorised
ŠKODA
Service Partner as part of an Inspection Service. WARNING
Using old brake fluid can result in severe stress on the brakes because of the
formation of vapour bubbles in the brake system. This greatly impairs the
braking efficiency and thus also the safety of your vehicle. £ 195
Inspecting and Replenishing Using the system Safety Driving Tips General Maintenance Breakdown assistance Technical data
Page 198 of 252
CAUTION
Brake fluid damages the paintwork of the vehicle. For the sake of the environment
Due to issues with disposal, the special tools and knowledge required, we recom-
mend you have the brake fluid replaced by an authorised Service Partner ŠKODA.
Battery General information Improper handling of the vehicle battery can cause damage. We therefore recom-
mend you have work on the vehicle battery carried out by an authorised ŠKODA
Service Partner.
There is a risk of injuries, scalding, accidents and burns when carrying out any
work on the battery and on the electrical system. For this reason, it is essential to
comply with the warning instructions ⇒ stated below and with the general ap-
plicable rules of safety. WARNING
● The battery acid is strongly corrosive and must, therefore, be handled with
the greatest of care. Always wear protective gloves, eye and skin protection
when handling batteries. Corrosive fumes in the air irritate the air passages
and lead to conjunctivitis and inflammation of the air passages in the lungs.
Battery acid corrodes dental enamel and creates deep wounds after contact
with the skin which take a long time to heal. Repeated contact with diluted
acids causes skin diseases (inflammations, ulcers, slin cracks). Acids coming in-
to contact with water are diluted accompanied by significant development of
heat.
● Do not tilt the battery otherwise battery electrolyte may flow out of the
battery vent openings. Protect the eyes with safety glasses or a shield! There
is the danger of suffering blindness! If any battery electrolyte gets into your
eye, rinse out your eye immediately with clear water for several minutes. Con-
tact a doctor without delay. WARNING (Continued)
● Splashes of acid on your skin or clothes should be neutralised as soon as
possible using soap suds and then rinsed with plenty of water. If acid was
swallowed, seek immediate medical attention.
● Keep batteries out of the reach of children.
● Hydrogen is released when you charge a battery and a highly explosive gas
mixture is produced. An explosion can be caused through sparkling over dur-
ing unclamping or loosening of the cable plug while the ignition is on.
● Bridging of the poles will create a short circuit (e.g. through metal objects,
cables). Possible consequences of a short circuit: Melting of lead struts, explo-
sion and burning of the battery, jets of acid spurting out.
● It is prohibited to work with a naked flame and light, to smoke or to carry
out any activities which produce sparks. Avoid creating sparks when working
with cables and electrical devices. Strong sparking represents a risk of injury.
● Before carrying out any work on the electrical system, switch off the en-
gine, the ignition as well as all electrical components and disconnect the neg-
ative cable (-) on the battery. If you wish to replace a bulb it is sufficient to
switch off the appropriate light.
● Never charge a frozen or thawed battery - risk of explosion and caustic
burns! Replace a frozen battery.
● Never jump-start the batteries which have a too low electrolyte level - risk
of explosion and caustic burns!
● Never use a battery which is damaged - risk of explosion! Immediately re-
place a damaged battery. CAUTION
● You must only disconnect the battery if the ignition is switched off, otherwise
the electrical system (electronic components) of the vehicle may be damaged.
When disconnecting the battery from the electrical system of the vehicle, first dis-
connect the negative terminal (-) of the battery. Then disconnect the positive ter-
minal (+).
● When reconnecting the battery, first connect the positive terminal (+) and only
then the negative terminal (-) of the battery. You must on no account connect the
cables wrongly - risk of a cable fire.
● Ensure that battery acid does not come into contact with the vehicle body oth-
erwise damage could occur to the paintwork. £196
Inspecting and Replenishing
Page 201 of 252
Replacing the battery
When replacing a battery, the new new battery must have the same capacity,
voltage (12
V), amperage and be the same size. Suitable types of vehicle battery
are available from an authorised ŠKODA Service Partner.
We recommend you have a battery change carried out by an authorised ŠKODA
Service Partner, who will properly install the new battery and dispose of the origi-
nal one. CAUTION
Vehicles with a “START-STOP” system are fitted with a special battery type which
allows the battery control unit to check the energy level for recurring engine start.
This battery must only be replaced by a battery of the same type. For the sake of the environment
Batteries contain poisonous substances such as sulphuric acid and lead. For this
reason, it must be disposed of properly. Under no circumstances must it be dis-
posed of in the communal rubbish.
Automatic consumer shut-off Under heavy load on the vehicle battery, the vehicle electrical system manage-
ment automatically takes various measures to avoid draining the vehicle battery.
●
The idling speed is raised to allow the generator to deliver more electricity to
the electrical system.
● If necessary, some electrical consumers are limited in their performance or are
temporarily switched off completely. Note
Despite such intervention by the vehicle electric system management, the vehicle
battery may be drained. For example, when the ignition is switched on a long time
with the engine turned off or the side or parking lights are turned on during lon-
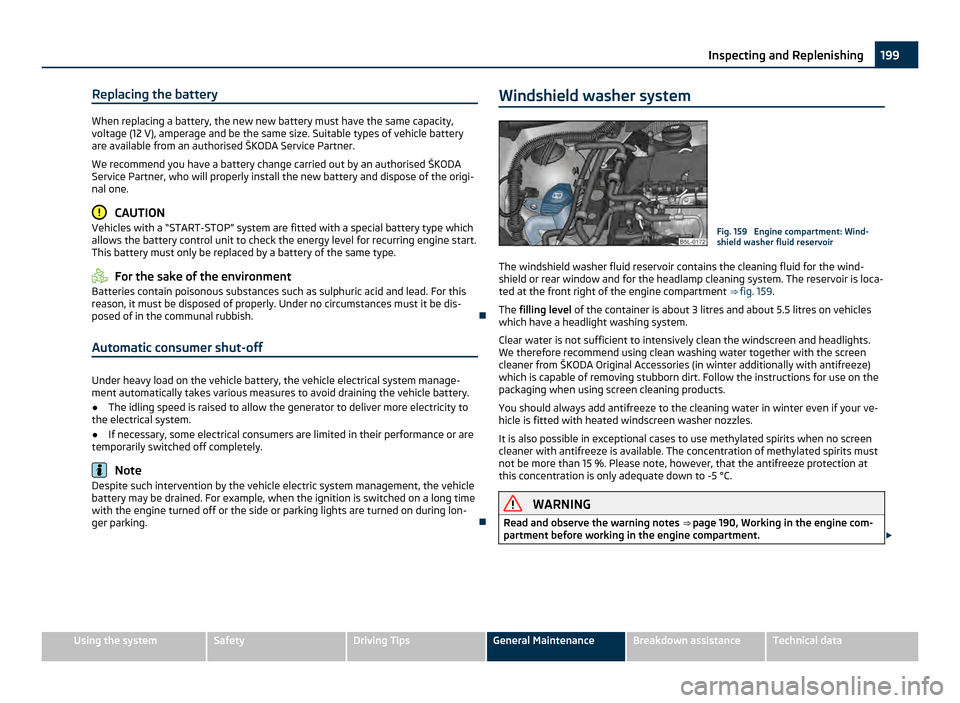
ger parking. Windshield washer system Fig. 159 Engine compartment: Wind-
shield washer fluid reservoir
The windshield washer fluid reservoir contains the cleaning fluid for the wind-
shield or rear window and for the headlamp cleaning system. The reservoir is loca-
ted at the front right of the engine compartment ⇒ fig. 159 .
The filling level of the container is about 3 litres and about 5.5 litres on vehicles
which have a headlight washing system.
Clear water is not sufficient to intensively clean the windscreen and headlights.
We therefore recommend using clean washing water together with the screen
cleaner from
ŠKODA Original Accessories (in winter additionally with antifreeze)
which is capable of removing stubborn dirt. Follow the instructions for use on the
packaging when using screen cleaning products.
You should always add antifreeze to the cleaning water in winter even if your ve-
hicle is fitted with heated windscreen washer nozzles.
It is also possible in exceptional cases to use methylated spirits when no screen
cleaner with antifreeze is available. The concentration of methylated spirits must
not be more than 15 %. Please note, however, that the antifreeze protection at
this concentration is only adequate down to -5 °C. WARNING
Read and observe the warning notes ⇒ page 190
, Working in the engine com-
partment before working in the engine compartment. £ 199
Inspecting and Replenishing Using the system Safety Driving Tips General Maintenance Breakdown assistance Technical data
Page 206 of 252
WARNING
● Only use those tyres or wheel rims which have been approved for your
model of ŠKODA vehicle. Failure to observe this instruction will adversely af-
fect the road safety of your vehicle - risk of accident! Approval and licensing of
your vehicle on public roads may also become void as a result.
● You must on no account drive at a higher speed than is permissible for
your tyres - risk of an accident resulting from tyre damage and loss of control
over your vehicle.
● Tyres which are 6 years old or more should only be fitted in exceptional ca-
ses and when adopting an appropriately cautious style of driving.
● Never fit tyres which have already been used without having adequate
knowledge of their previous history. Tyres age even if they have not been
used at all or only very little. A spare tyre must only be used in exceptional ca-
ses and only then when adopting an appropriately cautious style of driving.
● Do not, where possible, replace individual tyres but at least replace them
on both wheels of a given axle at the same time. Always fit the tyres with the
deeper tread depth to the front wheels. For the sake of the environment
Old tyres must be disposed of in conformity with the appropriate regulations. Note
It is not normally possible to fit wheels from other models of cars for technical
reasons. This may also apply in certain circumstances to the wheels of the same
type of vehicle.
Wheel bolts Wheels and
wheel bolts are matched to each other in terms of design. Each time
you fit other wheels - e.g. light alloy wheels or wheels with winter tyres - you
must therefore also use the matching wheel bolts of the correct length and shape
of spherical cap. This is essential to ensure that the wheels are tightly fitted and
that the brake system operates properly.
If you retrofit wheel trims (or have this done), please also ensure that an ade-
quate flow of air remains assured for cooling the brake system.
Authorised
ŠKODA Service Partners are instructed in the technical possibilities
which exist regarding converting or retrofitting tyres, wheels and wheel trims. WARNING
● In case of incorrect treatment of the wheel bolts, the wheel can loosen
when the car is moving - risk of accident!
● The wheel bolts must be clean and must turn easily. However, they must
never be treated with grease or oil.
● If the wheel bolts are tightened to a too low tightening torque, the rim can
lossen when the car is moving - risk of accident! A tightening torque which is
too high can damage the bolts and threads and this can result in permanent
deformation of the contact surfaces on the rim. CAUTION
The prescribed tightening torque of the wheel bolts for steel and light alloy
wheels is 120 Nm.
Winter tyres The handling of your vehicle will be significantly improved when driving on wintry
roads if you fit winter tyres. Summer tyres do not offer the same grip on ice, snow
and at temperatures below 7 °C because of their construction (width, rubber
blend, tread pattern). This particularly applies to vehicles which are equipped with
low-profile tyres
or high-speed tyres (code index H or V on wall of tyre).
Winter tyres must be mounted on all four wheels to obtain the best handling
characteristics.
You must only fit those types of winter tyre which are approved for your vehicle.
The permissible sizes of winter tyres are stated in your vehicle documents. Ap-
provals may differ because of national legislation.
Please remember that the tyres should be inflated to 20
kPa (0.2 bar) more than is
the case for summer tyres ⇒ page 201.
Winter tyres no longer offer the same winter performance once the tyre tread has
worn down to a depth of about 4 mm.
Ageing also causes winter tyres to lose most of their winter performance proper-
ties - even in cases where the remaining tread depth is still clearly more than 4
mm.
Speed restrictions apply to winter tyres as well as to summer tyres ⇒ page 203,
⇒ .
£204
Wheels and Tyres
Page 212 of 252
WARNING
● If you find yourself in flowing traffic switch on the hazard warning lights
system and place the warning triangle on the side of the road at the prescri-
bed distance from your vehicle. Comply with the national legal regulations. In
this way you are protecting not only yourself but also other road users.
● Never start the engine with the vehicle sitting on the raised jack - danger
of suffering injury. CAUTION
If you have to change a wheel on a slope first block the opposite wheel with a
stone or similar object in order to secure the vehicle from unexpectedly rolling
away. Note
Comply with the national legal regulations.
Changing a wheel Always change a wheel on a level surface as far as possible.
–
Take off the full wheel trim ⇒ page 210 or the wheel trim cap ⇒ page 211 or
the caps ⇒ page 211.
– In the case of light alloy wheels remove the wheel trim cap ⇒
page 211.
– First of all slacken the safety wheel bolt and afterwards the other wheel bolts
⇒ page 211.
– Jack up the vehicle until the wheel to be changed is clear of the ground
⇒ page 212.
– Unscrew the wheel bolts and place them on a clean surface (cloth, paper etc.).
– Take off the wheel.
– Fit on the spare wheel and tighten the wheel bolts slightly.
– Lower the car.
– Tighten the wheel bolts firmly, alternately and diagonally using the wheel
wrench (crosswise) and lastly the wheel safety bolt ⇒
page 211.
– Mount the full wheel trim/wheel trim cap or the caps. Note
● All bolts must be clean and must turn easily.
● You must never grease or oil the wheel bolts!
● When fitting on unidirectional tyres, ensure that the tyres rotate in the correct
direction ⇒ page 201
.
Subsequent steps After changing the wheel, you must perform the following steps.
–
Stow and attach the replaced wheel in the spare wheel well using a special
screw ⇒ fig. 165 .
– Stow the vehicle tool kit in the space provided.
– Check the tyre pressure on the spare wheel just mounted as soon as possible.
– Have the tightening torque of the wheel bolts checked with a torque wrench
as soon as possible. Steel and light alloy wheels must be tightened to a tight-
ening torque of 120
Nm.
– Change the damaged wheel or consult a specialist garage about possibilities
for getting repairs done. WARNING
It is necessary to observe the guidelines given on ⇒
page 203 if the vehicle is
subsequently fitted with tyres which are different to those it was fitted with
at the works. Note
● If you find, when changing the wheel, that the wheel bolts are corroded and
difficult to turn, the bolts must be replaced before checking the tightening torque.
● Drive cautiously and only at a moderate speed to a workshop where the tight-
ening torque can be checked.
Full wheel trim Pulling off
–
Hook the clamp found in the vehicle tool kit into the reinforced edge of the full
wheel trim. £210
Breakdown assistance
Page 215 of 252
WARNING (Continued)
● Secure the base plate of the lifting jack with suitable means to prevent
possible moving. A soft and slippery ground under the base plate may move
the lifting jack, causing the vehicle to fall down. It is therefore always neces-
sary to place the lifting jack on a solid surface or use a wide and stable base.
Use a non-slip base (e.g. a rubber foot mat) if the
surface is smooth, such as
cobbled stones, a tiled floor, etc.
● Attach the lifting jack only at the attachment points provided for this pur-
pose.
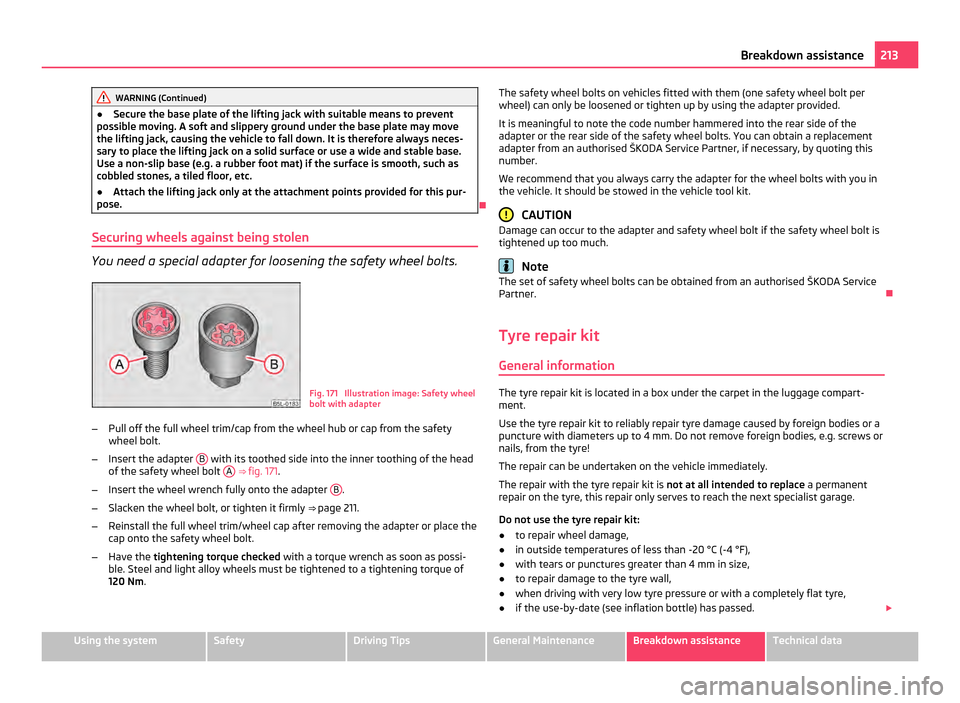
Securing wheels against being stolen You need a special adapter for loosening the safety wheel bolts.
Fig. 171 Illustration image: Safety wheel
bolt with adapter
– Pull off the full wheel trim/cap from the wheel hub or cap from the safety
wheel bolt.
– Insert the adapter B with its toothed side into the inner toothing of the head
of the safety wheel bolt A
⇒
fig. 171 .
– Insert the wheel wrench fully onto the adapter B .
– Slacken the wheel bolt, or tighten it firmly ⇒ page 211.
– Reinstall the full wheel trim/wheel cap after removing the adapter or place the
cap onto the safety wheel bolt.
– Have the tightening torque checked with a torque wrench as soon as possi-
ble. Steel and light alloy wheels must be tightened to a tightening torque of
120
Nm. The safety wheel bolts on vehicles fitted with them (one safety wheel bolt per
wheel) can only be loosened or tighten up by using the adapter provided.
It is meaningful to note the code number hammered into the rear side of the
adapter or the rear side of the safety wheel bolts. You can obtain a replacement
adapter from an authorised
ŠKODA Service Partner, if necessary, by quoting this
number.
We recommend that you always carry the adapter for the wheel bolts with you in
the vehicle. It should be stowed in the vehicle tool kit. CAUTION
Damage can occur to the adapter and safety wheel bolt if the safety wheel bolt is
tightened up too much. Note
The set of safety wheel bolts can be obtained from an authorised ŠKODA Service
Partner.
Tyre repair kit General information The tyre repair kit is located in a box under the carpet in the luggage compart-
ment.
Use the tyre repair kit to reliably repair tyre damage caused by foreign bodies or a
puncture with diameters up to 4 mm. Do not remove foreign bodies, e.g. screws or
nails, from the tyre!
The repair can be undertaken on the vehicle immediately.
The repair with the tyre repair kit is not at all intended to replace a permanent
repair on the tyre, this repair only serves to reach the next specialist garage.
Do not use the tyre repair kit:
● to repair wheel damage,
● in outside temperatures of less than -20 °C (-4 °F),
● with tears or punctures greater than 4 mm in size,
● to repair damage to the tyre wall,
● when driving with very low tyre pressure or with a completely flat tyre,
● if the use-by-date (see inflation bottle) has passed. £ 213
Breakdown assistance Using the system Safety Driving Tips General Maintenance Breakdown assistance Technical data
Page 216 of 252
WARNING
● If you find yourself in flowing traffic switch on the hazard warning lights
system and place the warning triangle on the side of the road at the prescri-
bed distance from your vehicle. Comply with the national legal regulations. In
this way you are protecting not only yourself but also other road users.
● Park the vehicle as far away as possible from the traffic flow. Park on as
flat and firm a surface as possible.
● A tyre filled with sealant has the same driving characteristics as a standard
tyre.
● Do not drive faster than 80 km/h, 50 mph.
● Avoid accelerating at full throttle, sharp braking and fast cornering.
● Check the tyre inflation pressure after driving 10 minutes.
● Sealant is hazardous to heath. Remove immediately if it comes into con-
tact with the skin. For the sake of the environment
Used sealant or sealant whose expiry date has passed must be disposed of in ac-
cordance with environmental protection regulations. Note
● Observe the manufacturer's usage instructions for the tyre repair kit.
● You can purchase a new bottle of sealant from the range of the ŠKODA Origi-
nal Accessories.
● Change the wheel that was repaired using the tyre repair kit or consult a spe-
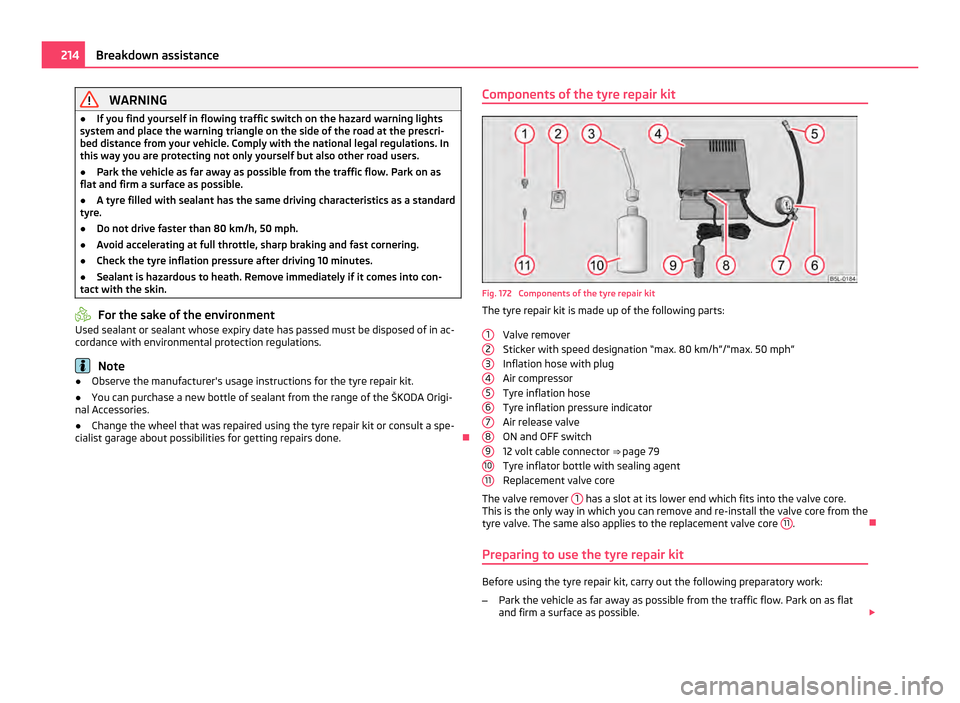
cialist garage about possibilities for getting repairs done. Components of the tyre repair kit Fig. 172 Components of the tyre repair kit
The tyre repair kit is made up of the following parts:
Valve remover
Sticker with speed designation
“max. 80 km/h”/“max. 50 mph”
Inflation hose with plug
Air compressor
Tyre inflation hose
Tyre inflation pressure indicator
Air release valve
ON and OFF switch
12 volt cable connector ⇒ page 79
Tyre inflator bottle with sealing agent
Replacement valve core
The valve remover 1 has a slot at its lower end which fits into the valve core.
This is the only way in which you can remove and re-install the valve core from the
tyre valve. The same also applies to the replacement valve core 11 .
Preparing to use the tyre repair kit Before using the tyre repair kit, carry out the following preparatory work:
–
Park the vehicle as far away as possible from the traffic flow. Park on as flat
and firm a surface as possible. £
1 2
3
4
5
6
7
8
9
10
11214
Breakdown assistance