radio SKODA YETI 2011 1.G / 5L Owner's Manual
[x] Cancel search | Manufacturer: SKODA, Model Year: 2011, Model line: YETI, Model: SKODA YETI 2011 1.G / 5LPages: 252, PDF Size: 3.61 MB
Page 4 of 252
On-board literature
The on-board literature for your vehicle consists of this
“Owner's Man-
ual ” as well as a “Service schedule” and a “ Help on the road”. There can
also be a variety of other additional operating manuals and instructions
on-board (e.g. an operating manual for the radio) depending on the ve-
hicle model and equipment.
If one of the publications listed above is missing, please contact a spe-
cialist garage immediately, where one will be glad to assist you in such
matters.
One should note that the details given in the vehicle's technical docu-
mentation always take precedence over those in the Owner's Manual.
Owner's Manual
This Owner's manual describes all possible equipment variants without
identifying them as special equipment, model variants or market-de-
pendent equipment.
Consequently, this vehicle does not need to contain all of the equip-
ment components described in this Owner's manual.
The scope of equipment for your vehicle is described in the sales docu-
mentation you were given when purchasing the car. For more informa-
tion, contact your local ŠKODA retailer.
The illustrations can differ in minor details from your vehicle; they are
only intended for general information.
In addition to information regarding all the controls and equipment, the
Owner's Manual also contains important information regarding care and
operation for your safety and also to retain the value of your vehicle. To
provide you with valuable tips and aids. You will learn how you can op-
erate your vehicle safely, economically and in an environmentally con-
scious way.
For safety reasons, please also pay attention to the information on ac-
cessories, modifications and replacement of parts ⇒ page 207. The other chapters of the Owner's Manual are also important, however,
for proper treatment of your car - in addition to regular care and main-
tenance - helps to retain its value and in many cases is also one of the
conditions for possible warranty claims.
The Service schedule
contains:
● Vehicle data;
● Service intervals;
● Overview of the service work;
● Service proof;
● Confirmation of mobility warranty (only valid in certain countries);
● important information on the warranty.
The confirmations of the carried out service work are one of the condi-
tions for possible warranty claims.
Please always present the Service schedule when you take your car to a
specialist garage.
If the Service schedule is missing or worn, please contact the specialist
garage where your car is serviced regularly. You will receive a duplicate,
in which the previously carried out service work are confirmed.
Help on the road
Contains the most important telephone numbers in individual countries
as well as the addresses and telephone numbers of
ŠKODA importers.2
Introduction
Page 11 of 252
Using the system
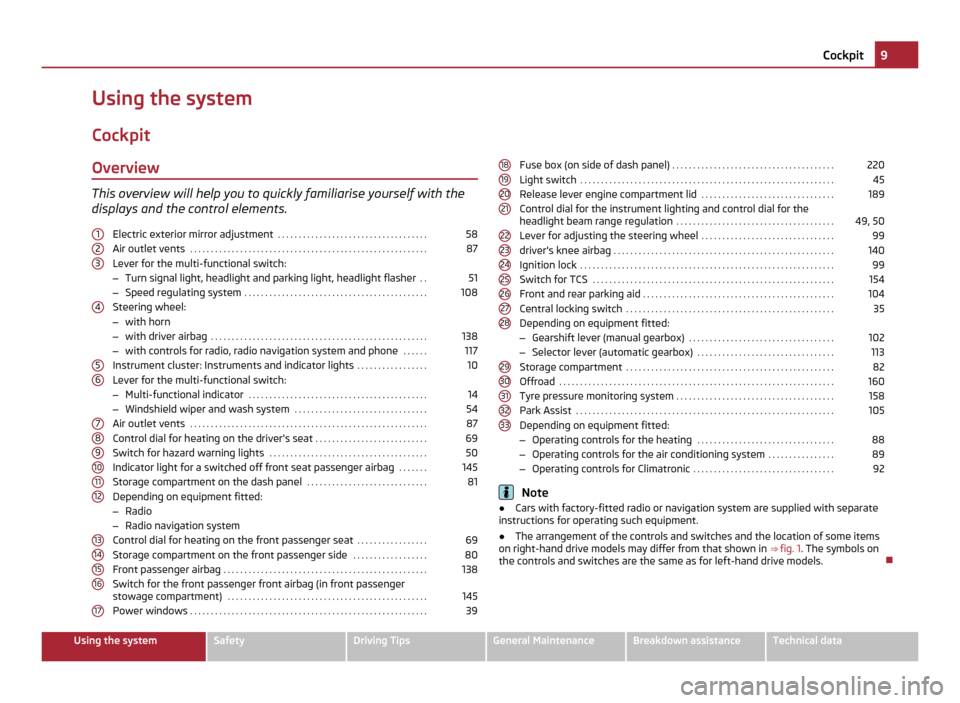
Cockpit Overview This overview will help you to quickly familiarise yourself with the
displays and the control elements.
Electric exterior mirror adjustment . . . . . . . . . . . . . . . . . . . . . . . . . . . . . . . . . . . . 58
Air outlet vents . . . . . . . . . . . . . . . . . . . . . . . . . . . . . . . . . . . . . . . . . . . . . . . . . . . . . . . . . 87
Lever for the multi-functional switch:
– Turn signal light, headlight and parking light, headlight flasher . .51
– Speed regulating system . . . . . . . . . . . . . . . . . . . . . . . . . . . . . . . . . . . . . . . . . . . . 108
Steering wheel:
– with horn
– with driver airbag . . . . . . . . . . . . . . . . . . . . . . . . . . . . . . . . . . . . . . . . . . . . . . . . . . . . 138
– with controls for radio, radio navigation system and phone . . . . . .117
Instrument cluster: Instruments and indicator lights . . . . . . . . . . . . . . . . .10
Lever for the multi-functional switch:
– Multi-functional indicator . . . . . . . . . . . . . . . . . . . . . . . . . . . . . . . . . . . . . . . . . . . 14
– Windshield wiper and wash system . . . . . . . . . . . . . . . . . . . . . . . . . . . . . . . . 54
Air outlet vents . . . . . . . . . . . . . . . . . . . . . . . . . . . . . . . . . . . . . . . . . . . . . . . . . . . . . . . . . 87
Control dial for heating on the driver's seat . . . . . . . . . . . . . . . . . . . . . . . . . . .69
Switch for hazard warning lights . . . . . . . . . . . . . . . . . . . . . . . . . . . . . . . . . . . . . . 50
Indicator light for a switched off front seat passenger airbag . . . . . . .145
Storage compartment on the dash panel . . . . . . . . . . . . . . . . . . . . . . . . . . . . .81
Depending on equipment fitted:
– Radio
– Radio navigation system
Control dial for heating on the front passenger seat . . . . . . . . . . . . . . . . .
69
Storage compartment on the front passenger side . . . . . . . . . . . . . . . . . .80
Front passenger airbag . . . . . . . . . . . . . . . . . . . . . . . . . . . . . . . . . . . . . . . . . . . . . . . . . 138
Switch for the front passenger front airbag (in front passenger
stowage compartment) . . . . . . . . . . . . . . . . . . . . . . . . . . . . . . . . . . . . . . . . . . . . . . . . 145
Power windows . . . . . . . . . . . . . . . . . . . . . . . . . . . . . . . . . . . . . . . . . . . . . . . . . . . . . . . . . 39
1 2
3
4
5
6
7
8
9
10
11
12
13
14
15
16
17 Fuse box (on side of dash panel)
. . . . . . . . . . . . . . . . . . . . . . . . . . . . . . . . . . . . . . . 220
Light switch . . . . . . . . . . . . . . . . . . . . . . . . . . . . . . . . . . . . . . . . . . . . . . . . . . . . . . . . . . . . . 45
Release lever engine compartment lid . . . . . . . . . . . . . . . . . . . . . . . . . . . . . . . .189
Control dial for the instrument lighting and control dial for the
headlight beam range regulation . . . . . . . . . . . . . . . . . . . . . . . . . . . . . . . . . . . . . . 49, 50
Lever for adjusting the steering wheel . . . . . . . . . . . . . . . . . . . . . . . . . . . . . . . .99
driver's knee airbag . . . . . . . . . . . . . . . . . . . . . . . . . . . . . . . . . . . . . . . . . . . . . . . . . . . . . 140
Ignition lock . . . . . . . . . . . . . . . . . . . . . . . . . . . . . . . . . . . . . . . . . . . . . . . . . . . . . . . . . . . . . 99
Switch for TCS . . . . . . . . . . . . . . . . . . . . . . . . . . . . . . . . . . . . . . . . . . . . . . . . . . . . . . . . . . 154
Front and rear parking aid . . . . . . . . . . . . . . . . . . . . . . . . . . . . . . . . . . . . . . . . . . . . . . 104
Central locking switch . . . . . . . . . . . . . . . . . . . . . . . . . . . . . . . . . . . . . . . . . . . . . . . . . . 35
Depending on equipment fitted:
– Gearshift lever (manual gearbox) . . . . . . . . . . . . . . . . . . . . . . . . . . . . . . . . . . . 102
– Selector lever (automatic gearbox) . . . . . . . . . . . . . . . . . . . . . . . . . . . . . . . . . 113
Storage compartment . . . . . . . . . . . . . . . . . . . . . . . . . . . . . . . . . . . . . . . . . . . . . . . . . . 82
Offroad . . . . . . . . . . . . . . . . . . . . . . . . . . . . . . . . . . . . . . . . . . . . . . . . . . . . . . . . . . . . . . . . . . 160
Tyre pressure monitoring system . . . . . . . . . . . . . . . . . . . . . . . . . . . . . . . . . . . . . . 158
Park Assist . . . . . . . . . . . . . . . . . . . . . . . . . . . . . . . . . . . . . . . . . . . . . . . . . . . . . . . . . . . . . . 105
Depending on equipment fitted:
– Operating controls for the heating . . . . . . . . . . . . . . . . . . . . . . . . . . . . . . . . . 88
– Operating controls for the air conditioning system . . . . . . . . . . . . . . . .89
– Operating controls for Climatronic . . . . . . . . . . . . . . . . . . . . . . . . . . . . . . . . . . 92 Note
● Cars with factory-fitted radio or navigation system are supplied with separate
instructions for operating such equipment.
● The arrangement of the controls and switches and the location of some items
on right-hand drive models may differ from that shown in ⇒
fig. 1. The symbols on
the controls and switches are the same as for left-hand drive models. 18
19
20
21
22
23
24
25
26
27
28
29
30
31
32
33 9
Cockpit Using the system Safety Driving Tips General Maintenance Breakdown assistance Technical data
Page 20 of 252
MAXI DOT display (information display)
Introduction The information display provides you with information in a convenient way con-
cerning the
current operating state of your vehicle . The information system also
provides you with data (depending on the equipment installed in the vehicle) re-
lating to the radio, mobile phone, multi-functional indicator, radio navigation sys-
tem, the unit connected to the MDI input and the automatic gearbox.
Certain functions and operating conditions are always being checked on the vehi-
cle when the ignition is switched on and also while driving.
Functional faults, if required repair work and other information are indicated by
red symbols ⇒ page 19 and yellow symbols ⇒
page 20.
Lighting up of certain symbols is combined with an acoustic warning signal.
Information and texts giving warnings are also shown in the display ⇒ page 22.
The following information can be shown in the display (depending on the equip-
ment installed on the vehicle): Main menu ⇒ page 18
Door, luggage compartment door and bonnet ajar
warning ⇒
page 19 Service Interval Display ⇒
page 12 Selector lever positions for the automatic gearbox DSG ⇒ page 113
CAUTION
Pull out the ignition key while having contact with the display (for example when
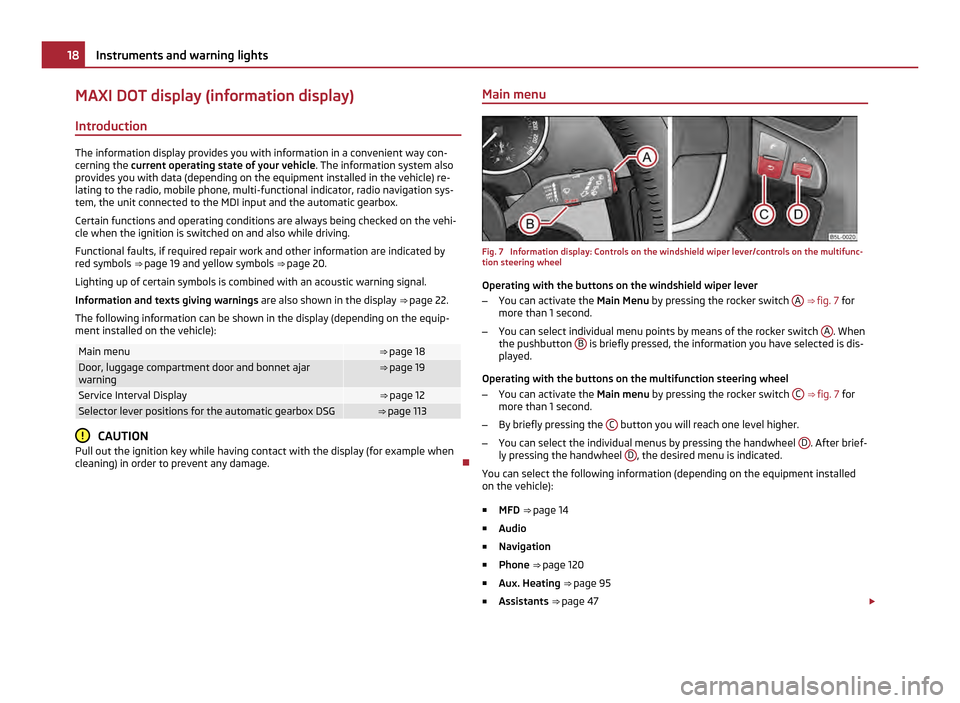
cleaning) in order to prevent any damage. Main menu Fig. 7 Information display: Controls on the windshield wiper lever/controls on the multifunc-
tion steering wheel
Operating with the buttons on the windshield wiper lever
– You can activate the Main Menu by pressing the rocker switch A
⇒ fig. 7 for
more than 1
second.
– You can select individual menu points by means of the rocker switch A . When
the pushbutton B is briefly pressed, the information you have selected is dis-
played.
Operating with the buttons on the multifunction steering wheel
– You can activate the Main menu by pressing the rocker switch C
⇒ fig. 7
for
more than 1 second.
– By briefly pressing the C button you will reach one level higher.
– You can select the individual menus by pressing the handwheel D . After brief-
ly pressing the handwheel D , the desired menu is indicated.
You can select the following information (depending on the equipment installed
on the vehicle):
■ MFD ⇒
page 14
■ Audio
■ Navigation
■ Phone ⇒ page 120
■ Aux. Heating ⇒ page 95
■ Assistants ⇒ page 47 £18
Instruments and warning lights
Page 21 of 252
■
Vehicle status ⇒ page 19
■ Settings ⇒ page 20
The menu point Audio is only then displayed when the factory-fitted car radio is
switched on.
The menu point Navigation is only then displayed when the factory-fitted radio
navigation system is switched on.
The menu point Aux.
heating is only then displayed, if the vehicle is factory-fitted
with auxiliary heating.
The menu point Assistants is only then displayed, if the vehicle is fitted with cor-
nering lights. Note
● If warning messages are shown in the information display, these messages
can be confirmed with the button B on the windshield wiper lever or with the
button D on the multifunction steering wheel in order to call up the main menu.
● If you do not activate the information display at that moment, the menu shifts
to one level higher every 10 seconds.
● The operation of the factory-fitted car stereo or radio navigation system is de-
scribed in separate operating instructions to be found in the on-board literature.
Door, luggage compartment door and bonnet ajar warning The door, luggage compartment and bonnet ajar warning lights up if at least one
door, the luggage compartment or bonnet are not closed. The symbol indicates
which door is still open or whether the luggage compartment door or bonnet is
not closed
.
The symbol goes out as soon as the doors, luggage compartment door and bonnet
are completely closed.
A warning signal sounds if the car is driven at a speed of more than 6km/hour and
if the engine or the luggage compartment door is open. Auto Check Control
Car state The Auto Check Control carries out a check of certain functions and vehicle com-
ponents. The check is performed constantly when the ignition is switched on,
both when the vehicle is stationary, as well as when driving.
Some operational faults, urgent repairs, service work or other information appear
in the display of the instrument cluster. The displays are shown with a red or yel-
low light symbol depending on the priority of the message.
The red symbols indicate danger (priority 1) while the yellow symbols indicate a
warning (priority 2). Information for the driver may also appear in addition to the
symbols ⇒
page 22.
There is at least one error message when the term Vehicle status is displayed in
the menu. After selecting this menu the first of the error messages is displayed.
Several error messages are shown on the display under the message e.g. 1/3. This
indicates that the first of a total of three error messages is displayed. Investigate
the displayed faults as soon as possible.
As long as the operational faults are not rectified, the symbols are always indica-
ted again. After the first display, the symbols are indicated without information for
the driver.
If a fault occurs, a warning signal will also sound in addition to the symbol and
text in the display:
● Priority 1 - three warning signals
● Priority 2 - one warning signal
Red symbols A red symbol signals danger.
– Bring the vehicle to a stop.
– Switch the engine off.
– Investigate the function indicated.
– Obtain professional assistance.
Meaning of the red symbols: £ 19
Instruments and warning lights Using the system Safety Driving Tips General Maintenance Breakdown assistance Technical data
Page 33 of 252
Locking and Unlocking
Vehicle key
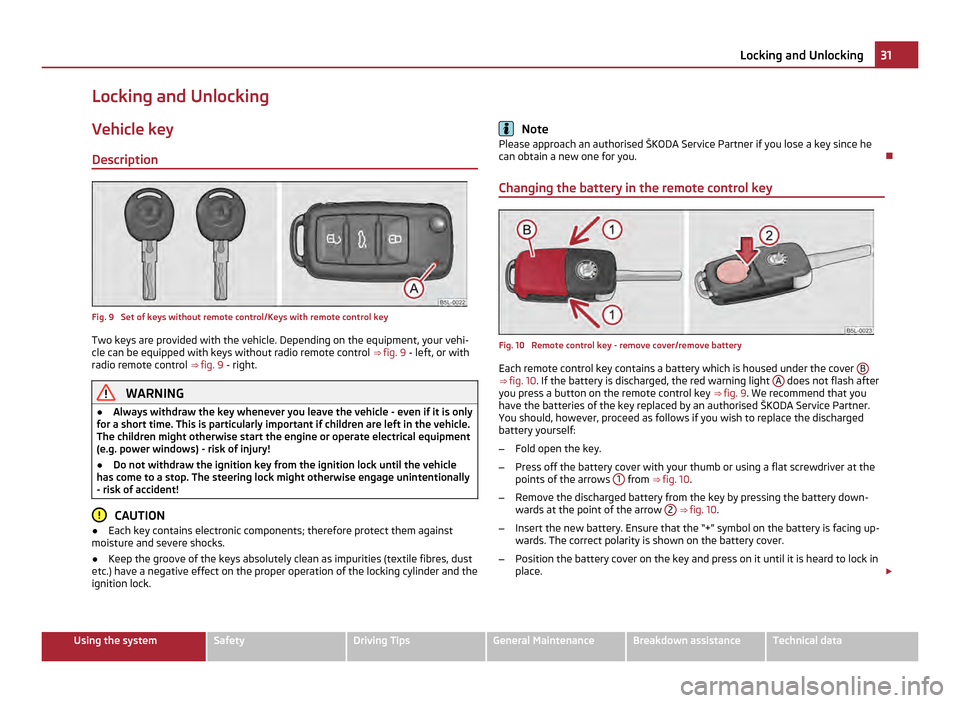
Description Fig. 9 Set of keys without remote control/Keys with remote control key
Two keys are provided with the vehicle. Depending on the equipment, your vehi-
cle can be equipped with keys without radio remote control ⇒
fig. 9 - left, or with
radio remote control ⇒ fig. 9 - right. WARNING
● Always withdraw the key whenever you leave the vehicle - even if it is only
for a short time. This is particularly important if children are left in the vehicle.
The children might otherwise start the engine or operate electrical equipment
(e.g. power windows) - risk of injury!
● Do not withdraw the ignition key from the ignition lock until the vehicle
has come to a stop. The steering lock might otherwise engage unintentionally
- risk of accident! CAUTION
● Each key contains electronic components; therefore protect them against
moisture and severe shocks.
● Keep the groove of the keys absolutely clean as impurities (textile fibres, dust
etc.) have a negative effect on the proper operation of the locking cylinder and the
ignition lock. Note
Please approach an authorised ŠKODA Service Partner if you lose a key since he
can obtain a new one for you.
Changing the battery in the remote control key Fig. 10 Remote control key - remove cover/remove battery
Each remote control key contains a battery which is housed under the cover
B ⇒
fig. 10 . If the battery is discharged, the red warning light A does not flash after
you press a button on the remote control key ⇒
fig. 9 . We recommend that you
have the batteries of the key replaced by an authorised ŠKODA Service Partner.
You should, however, proceed as follows if you wish to replace the discharged
battery yourself:
– Fold open the key.
– Press off the battery cover with your thumb or using a flat screwdriver at the
points of the arrows 1 from
⇒
fig. 10.
– Remove the discharged battery from the key by pressing the battery down-
wards at the point of the arrow 2
⇒
fig. 10.
– Insert the new battery. Ensure that the “+” symbol on the battery is facing up-
wards. The correct polarity is shown on the battery cover.
– Position the battery cover on the key and press on it until it is heard to lock in
place. £ 31
Locking and Unlocking Using the system Safety Driving Tips General Maintenance Breakdown assistance Technical data
Page 38 of 252
–
Insert the key into the slot B and turn it into the horizontal position in the
direction of the arrow (mirror-inverted on the right doors).
– Re-insert the panel.
After closing the door, you can no longer open it from outside. The door can be
unlocked from the inside by pulling on the door handle again, and then opened
from the outside.
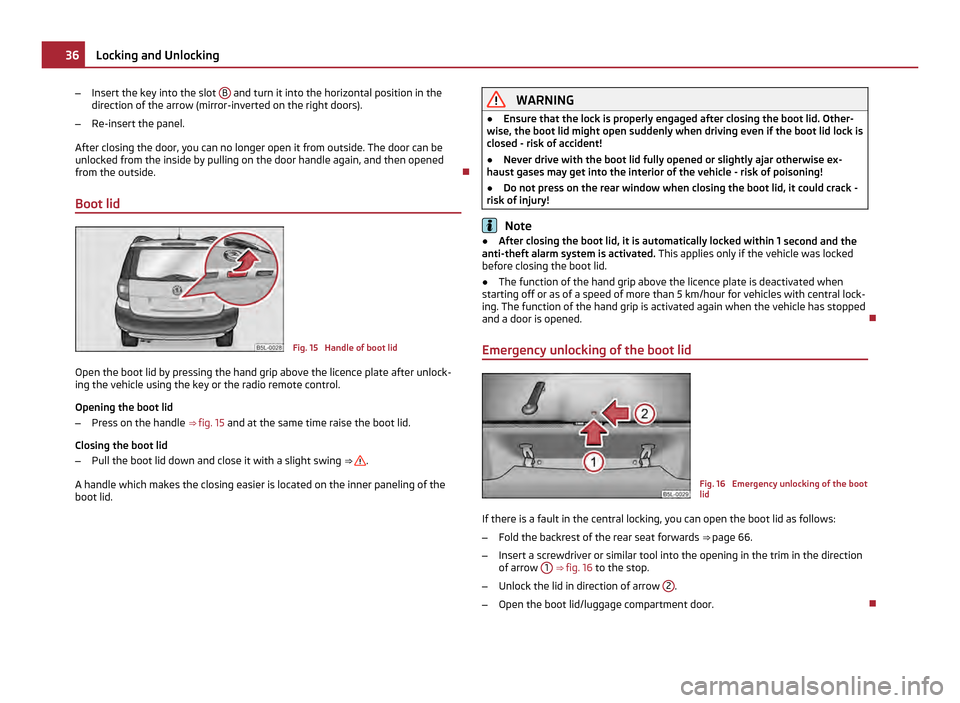
Boot lid Fig. 15 Handle of boot lid
Open the boot lid by pressing the hand grip above the licence plate after unlock-
ing the vehicle using the key or the radio remote control.
Opening the boot lid
– Press on the handle ⇒ fig. 15 and at the same time raise the boot lid.
Closing the boot lid
– Pull the boot lid down and close it with a slight swing ⇒ .
A handle which makes the closing easier is located on the inner paneling of the
boot lid. WARNING
● Ensure that the lock is properly engaged after closing the boot lid. Other-
wise, the boot lid might open suddenly when driving even if the boot lid lock is
closed - risk of accident!
● Never drive with the boot lid fully opened or slightly ajar otherwise ex-
haust gases may get into the interior of the vehicle - risk of poisoning!
● Do not press on the rear window when closing the boot lid, it could crack -
risk of injury! Note
● After closing the boot lid, it is automatically locked within 1
second and the
anti-theft alarm system is activated. This applies only if the vehicle was locked
before closing the boot lid.
● The function of the hand grip above the licence plate is deactivated when
starting off or as of a speed of more than 5 km/hour for vehicles with central lock-
ing. The function of the hand grip is activated again when the vehicle has stopped
and a door is opened.
Emergency unlocking of the boot lid Fig. 16 Emergency unlocking of the boot
lid
If there is a fault in the central locking, you can open the boot lid as follows:
– Fold the backrest of the rear seat forwards ⇒ page 66
.
– Insert a screwdriver or similar tool into the opening in the trim in the direction
of arrow 1
⇒ fig. 16 to the stop.
– Unlock the lid in direction of arrow 2 .
– Open the boot lid/luggage compartment door. 36
Locking and Unlocking
Page 40 of 252
Display of the locking
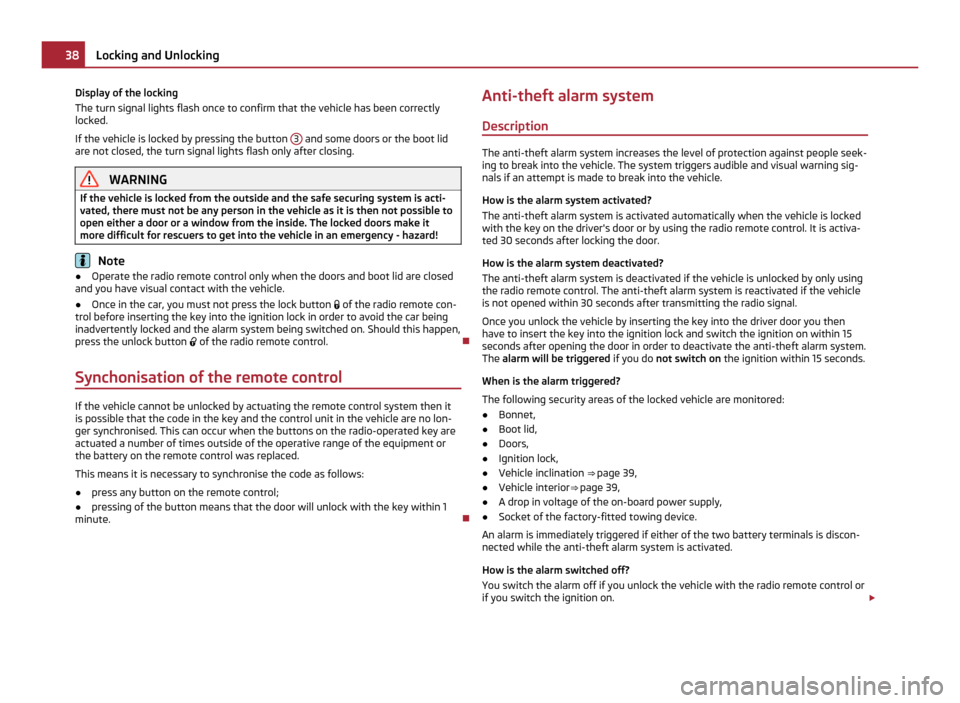
The turn signal lights flash once to confirm that the vehicle has been correctly
locked.
If the vehicle is locked by pressing the button
3 and some doors or the boot lid
are not closed, the turn signal lights flash only after closing. WARNING
If the vehicle is locked from the outside and the safe securing system is acti-
vated, there must not be any person in the vehicle as it is then not possible to
open either a door or a window from the inside. The locked doors make it
more difficult for rescuers to get into the vehicle in an emergency - hazard! Note
● Operate the radio remote control only when the doors and boot lid are closed
and you have visual contact with the vehicle.
● Once in the car, you must not press the lock button of the radio remote con-
trol before inserting the key into the ignition lock in order to avoid the car being
inadvertently locked and the alarm system being switched on. Should this happen,
press the unlock button of the radio remote control.
Synchonisation of the remote control If the vehicle cannot be unlocked by actuating the remote control system then it
is possible that the code in the key and the control unit in the vehicle are no lon-
ger synchronised. This can occur when the buttons on the radio-operated key are
actuated a number of times outside of the operative range of the equipment or
the battery on the remote control was replaced.
This means it is necessary to synchronise the code as follows:
● press any button on the remote control;
● pressing of the button means that the door will unlock with the key within 1
minute. Anti-theft alarm system
Description The anti-theft alarm system increases the level of protection against people seek-
ing to break into the vehicle. The system triggers audible and visual warning sig-
nals if an attempt is made to break into the vehicle.
How is the alarm system activated?
The anti-theft alarm system is activated automatically when the vehicle is locked
with the key on the driver's door or by using the radio remote control. It is activa-
ted 30 seconds after locking the door.
How is the alarm system deactivated?
The anti-theft alarm system is deactivated if the vehicle is unlocked by only using
the radio remote control. The anti-theft alarm system is reactivated if the vehicle
is not opened within 30 seconds after transmitting the radio signal.
Once you unlock the vehicle by inserting the key into the driver door you then
have to insert the key into the ignition lock and switch the ignition on within 15
seconds after opening the door in order to deactivate the anti-theft alarm system.
The alarm will be triggered if you do not switch on the ignition within 15 seconds.
When is the alarm triggered?
The following security areas of the locked vehicle are monitored:
● Bonnet,
● Boot lid,
● Doors,
● Ignition lock,
● Vehicle inclination ⇒ page 39,
● Vehicle interior ⇒ page 39,
● A drop in voltage of the on-board power supply,
● Socket of the factory-fitted towing device.
An alarm is immediately triggered if either of the two battery terminals is discon- nected while the anti-theft alarm system is activated.
How is the alarm switched off?
You switch the alarm off if you unlock the vehicle with the radio remote control or
if you switch the ignition on. £38
Locking and Unlocking
Page 41 of 252
Note
● The working life of the alarm siren is 6 years. More detailed information is
available by a specialist garage.
● Before leaving the car, check that all the doors, windows and the electric slid-
ing/tilting roof are properly closed in order to ensure that the anti-theft alarm sys-
tem is fully operational.
● Coding of the radio remote control and the receiver unit precludes the use of
the radio remote control from other vehicles.
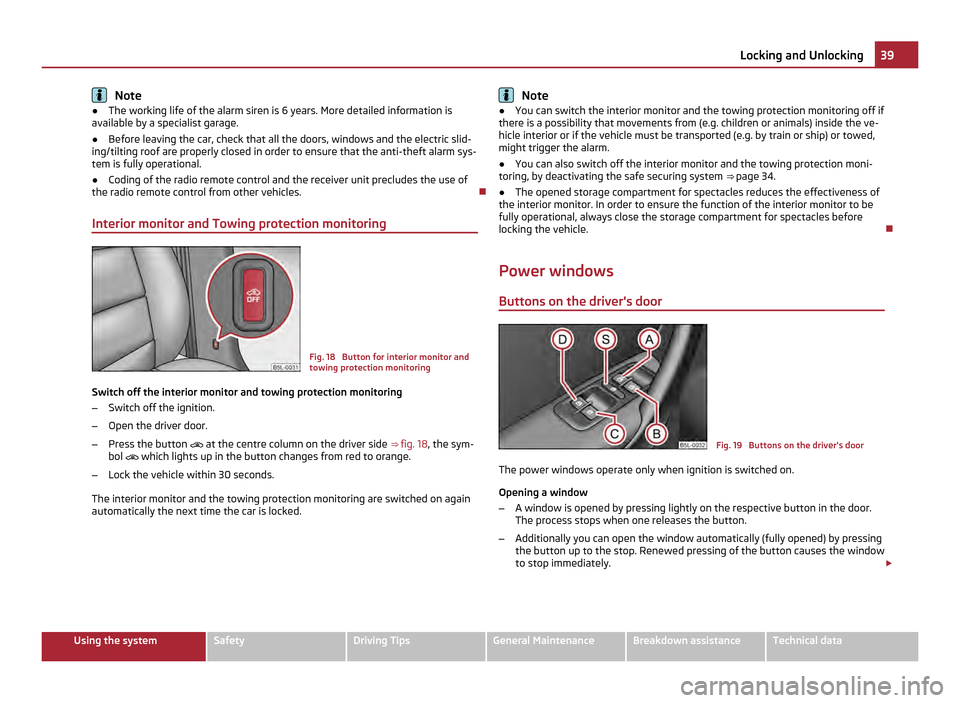
Interior monitor and Towing protection monitoring Fig. 18 Button for interior monitor and
towing protection monitoring
Switch off the interior monitor and towing protection monitoring
– Switch off the ignition.
– Open the driver door.
– Press the button
at the centre column on the driver side ⇒ fig. 18 , the sym-
bol
which lights up in the button changes from red to orange.
– Lock the vehicle within 30 seconds.
The interior monitor and the towing protection monitoring are switched on again
automatically the next time the car is locked. Note
● You can switch the interior monitor and the towing protection monitoring off if
there is a possibility that movements from (e.g. children or animals) inside the ve-
hicle interior or if the vehicle must be transported (e.g. by train or ship) or towed,
might trigger the alarm.
● You can also switch off the interior monitor and the towing protection moni-
toring, by deactivating the safe securing system ⇒
page 34.
● The opened storage compartment for spectacles reduces the effectiveness of
the interior monitor. In order to ensure the function of the interior monitor to be
fully operational, always close the storage compartment for spectacles before
locking the vehicle.
Power windows Buttons on the driver's door Fig. 19 Buttons on the driver's door
The power windows operate only when ignition is switched on.
Opening a window
– A window is opened by pressing lightly on the respective button in the door.
The process stops when one releases the button.
– Additionally you can open the window automatically (fully opened) by pressing
the button up to the stop. Renewed pressing of the button causes the window
to stop immediately. £ 39
Locking and Unlocking Using the system Safety Driving Tips General Maintenance Breakdown assistance Technical data
Page 43 of 252
Closing a window
–
Lightly press the appropriate button up and hold it until the window has
moved into the desired position.
– Additionally you can close the window automatically (fully closed) by pressing
the button up up to the stop. Renewed pressing of the button causes the win-
dow to stop immediately. WARNING
The system is fitted with a force limiter ⇒ page 41 . If there is an obstacle, the
closing process is stopped and the window goes down by several centimetres.
You should then take particular care when closing the windows! You may oth-
erwise suffer severe injuries as a result of getting an arm, for example, jam-
med in the window! Note
● After switching the ignition off, it is still possible to open or close the windows
for a further 10 minutes. The automatic closing and opening functions will not op-
erate during this time. The power windows are switched off completely once you
open the driver or front passenger door.
Force limiter of the power windows The electrically operated power windows are fitted with a force limiter. It reduces
the risk of bruises or injuries when closing the windows.
If there is an obstacle, the closing process is stopped and the window goes down
by several centimetres.
If an obstacle prevents the window from being closed during the next 10 seconds,
the closing process is interrupted once again and the window goes down several
centimetres.
If you try to close the window once again within 10 seconds after the window has
gone down twice, although the obstacle was not yet removed, the closing process
is stopped only. During this time it is not possible to automatically close the win-
dow. The force limiter is still switched on.
The force limiter is switched off only, if you attempt within the next 10 seconds to
close the window again - now the window will close with full force.
If you wait longer than 10 seconds, the force limiter is switched on again. WARNING
You should take particular care when closing the windows! You may otherwise
suffer severe injuries as a result of getting an arm, for example, jammed in the
window!
Window convenience operation You can open and close the electrically powered windows as follows when un-
locking and locking the vehicle (only close the panoramic sliding roof):
Opening a window
–
Hold the key in the locking cylinder of the driver's door in the unlock position
or press the unlock button of the radio remote control until all the windows
are opened.
Closing a window
– Hold the key in the locking cylinder of the driver's door in the lock position or
press the lock button of the radio remote control until all the windows are
closed.
You can interrupt the opening or closing operation of the windows immediately by
releasing the key or the lock button. WARNING
The system is fitted with a force limiter ⇒ page 41
. If there is an obstacle, the
closing process is stopped and the window goes down by several centimetres.
You should then take particular care when closing the windows! You may oth-
erwise suffer severe injuries as a result of getting an arm, for example, jam-
med in the window! Note
On vehicles fitted with anti-theft alarm system the convenience window opening
is possible by means of the key in the locking cylinder only 45 seconds after deac-
tivating the warning system or after activating the anti-theft alarm system. 41
Locking and Unlocking Using the system Safety Driving Tips General Maintenance Breakdown assistance Technical data
Page 50 of 252
Leaving Home Function
This function makes it possible to switch on the lights when approaching the ve-
hicle.
Switching on Leaving Home Function
– The light switch is in the position automatic driving lamp control .
– Unlock the vehicle with the radio remote control - the lights come on.
Depending on equipment fitted the function Leaving Home switches on the fol-
lowing lights:
● Parking lights,
● Low beam,
● Entry lighting in the exterior mirrors,
● Licence plate light.
Leaving Home Function
The function Leaving Home is controlled with the light sensor in the mount of the
interior rear mirror. If the light intensity is higher than the set value of the light
sensor, the Leaving Home Function is not switched on after unlocking the vehicle
with the radio remote control.
After unlocking the vehicle with the radio remote control, the lights come on for
10 seconds. The Leaving Home Function is also switched off after the ignition is
switched on and after locking the vehicle.
If no door is opened within 30 seconds, the lights go out and the vehicle is locked
automatically. Note
● If the Leaving Home Function is switched on constantly, the battery will be
heavily discharged particularly in short-haul traffic.
● The switching on of the described lights should only be undertaken in accord-
ance with the legal requirements.
● You can change the illumination period for the Leaving Home Function by
means of the Information display. Tourist light Xenon headlight
This mode makes it possible to drive in countries with opposing traffic system,
driving on the left/right, without dazzling the oncoming vehicles. When the mode
“tourist light
” is active, the side to side swivel of the headlights is deactivated.
The mode “tourist light” is activated/deactivated via the Information display in the
menu:
■ Settings
■ Lights & Vision
■ Travel mode
■ Off
■ Switched on
Halogen headlight
When using Halogen headlights, it is necessary to stick a sticker over a certain
part of the headlights in order to prevent the dazzling of oncoming traffic.
You can purchase headlight stickers from the range of the ŠKODA Original Acces-
sories.
Fog lights Fig. 26 Dash panel: Light switch
Switch on the front fog lamp
– First of all turn the light switch into position or ⇒
fig. 26 .
– Pull the light switch into position 1 .
£48
Lights and Visibility