roof SKODA YETI 2011 1.G / 5L Owner's Manual
[x] Cancel search | Manufacturer: SKODA, Model Year: 2011, Model line: YETI, Model: SKODA YETI 2011 1.G / 5LPages: 252, PDF Size: 3.61 MB
Page 4 of 252
On-board literature
The on-board literature for your vehicle consists of this
“Owner's Man-
ual ” as well as a “Service schedule” and a “ Help on the road”. There can
also be a variety of other additional operating manuals and instructions
on-board (e.g. an operating manual for the radio) depending on the ve-
hicle model and equipment.
If one of the publications listed above is missing, please contact a spe-
cialist garage immediately, where one will be glad to assist you in such
matters.
One should note that the details given in the vehicle's technical docu-
mentation always take precedence over those in the Owner's Manual.
Owner's Manual
This Owner's manual describes all possible equipment variants without
identifying them as special equipment, model variants or market-de-
pendent equipment.
Consequently, this vehicle does not need to contain all of the equip-
ment components described in this Owner's manual.
The scope of equipment for your vehicle is described in the sales docu-
mentation you were given when purchasing the car. For more informa-
tion, contact your local ŠKODA retailer.
The illustrations can differ in minor details from your vehicle; they are
only intended for general information.
In addition to information regarding all the controls and equipment, the
Owner's Manual also contains important information regarding care and
operation for your safety and also to retain the value of your vehicle. To
provide you with valuable tips and aids. You will learn how you can op-
erate your vehicle safely, economically and in an environmentally con-
scious way.
For safety reasons, please also pay attention to the information on ac-
cessories, modifications and replacement of parts ⇒ page 207. The other chapters of the Owner's Manual are also important, however,
for proper treatment of your car - in addition to regular care and main-
tenance - helps to retain its value and in many cases is also one of the
conditions for possible warranty claims.
The Service schedule
contains:
● Vehicle data;
● Service intervals;
● Overview of the service work;
● Service proof;
● Confirmation of mobility warranty (only valid in certain countries);
● important information on the warranty.
The confirmations of the carried out service work are one of the condi-
tions for possible warranty claims.
Please always present the Service schedule when you take your car to a
specialist garage.
If the Service schedule is missing or worn, please contact the specialist
garage where your car is serviced regularly. You will receive a duplicate,
in which the previously carried out service work are confirmed.
Help on the road
Contains the most important telephone numbers in individual countries
as well as the addresses and telephone numbers of
ŠKODA importers.2
Introduction
Page 5 of 252
Table of Contents
Layout of this Owner's Manual
(explanations)
. . . . . . . . . . . . . . . . . . . . . . . . . . . . . . . 6
Using the system . . . . . . . . . . . . . . . . . . . . . . . . . . 9
Cockpit . . . . . . . . . . . . . . . . . . . . . . . . . . . . . . . . . . . . . . . . . . . . . 9
Overview . . . . . . . . . . . . . . . . . . . . . . . . . . . . . . . . . . . . . . . . . . 8
Instruments and warning lights . . . . . . . . . . . . . . . . . . 10
General information . . . . . . . . . . . . . . . . . . . . . . . . . . . . . . . 10
Overview of the instrument cluster . . . . . . . . . . . . . . . . . 10
Engine revolutions counter . . . . . . . . . . . . . . . . . . . . . . . . . 11
Speedometer . . . . . . . . . . . . . . . . . . . . . . . . . . . . . . . . . . . . . . 11
Coolant temperature gauge . . . . . . . . . . . . . . . . . . . . . . . . 11
Fuel gauge . . . . . . . . . . . . . . . . . . . . . . . . . . . . . . . . . . . . . . . . 11
Counter for distance driven . . . . . . . . . . . . . . . . . . . . . . . . 12
Service reminder indicator . . . . . . . . . . . . . . . . . . . . . . . . . 12
Digital clock . . . . . . . . . . . . . . . . . . . . . . . . . . . . . . . . . . . . . . . 13
Shift recommendation for changing gears . . . . . . . . . . . 14
Multi-functional indicator (onboard computer) . . . . . . . 14
MAXI DOT display (information display) . . . . . . . . . . . . . . 18
Auto Check Control . . . . . . . . . . . . . . . . . . . . . . . . . . . . . . . . 19
Warning lights . . . . . . . . . . . . . . . . . . . . . . . . . . . . . . . . . . . . . 22
Locking and Unlocking . . . . . . . . . . . . . . . . . . . . . . . . . . . . 31
Vehicle key . . . . . . . . . . . . . . . . . . . . . . . . . . . . . . . . . . . . . . . . 31
Child safety lock . . . . . . . . . . . . . . . . . . . . . . . . . . . . . . . . . . . 32
Central locking system . . . . . . . . . . . . . . . . . . . . . . . . . . . . . 33
Remote control . . . . . . . . . . . . . . . . . . . . . . . . . . . . . . . . . . . . 37
Synchonisation of the remote control . . . . . . . . . . . . . . . 38
Anti-theft alarm system . . . . . . . . . . . . . . . . . . . . . . . . . . . . 38
Power windows . . . . . . . . . . . . . . . . . . . . . . . . . . . . . . . . . . . 39
Panoramic sliding roof . . . . . . . . . . . . . . . . . . . . . . . . . . . . . 42
Lights and Visibility . . . . . . . . . . . . . . . . . . . . . . . . . . . . . . . . 45
Lights . . . . . . . . . . . . . . . . . . . . . . . . . . . . . . . . . . . . . . . . . . . . . 45
Interior lighting . . . . . . . . . . . . . . . . . . . . . . . . . . . . . . . . . . . . 52
Visibility . . . . . . . . . . . . . . . . . . . . . . . . . . . . . . . . . . . . . . . . . . 53
Windshield wiper and wash system . . . . . . . . . . . . . . . . . 54
Rear-view mirror . . . . . . . . . . . . . . . . . . . . . . . . . . . . . . . . . . 58 Seats and Stowage
. . . . . . . . . . . . . . . . . . . . . . . . . . . . . . . . 61
Front seats . . . . . . . . . . . . . . . . . . . . . . . . . . . . . . . . . . . . . . . . 61
Adjusting front seats electrically . . . . . . . . . . . . . . . . . . . . 63
Head restraints . . . . . . . . . . . . . . . . . . . . . . . . . . . . . . . . . . . . 65
Middle rear head restraint . . . . . . . . . . . . . . . . . . . . . . . . . . 66
Rear seats . . . . . . . . . . . . . . . . . . . . . . . . . . . . . . . . . . . . . . . . 66
Pedals . . . . . . . . . . . . . . . . . . . . . . . . . . . . . . . . . . . . . . . . . . . . 70
luggage compartment . . . . . . . . . . . . . . . . . . . . . . . . . . . . . 70
Variable loading floor in the luggage compartment . . 74
Variable loading floor with spare wheel . . . . . . . . . . . . . 75
Roof rack . . . . . . . . . . . . . . . . . . . . . . . . . . . . . . . . . . . . . . . . . 76
Cup holder . . . . . . . . . . . . . . . . . . . . . . . . . . . . . . . . . . . . . . . . 77
Note holder . . . . . . . . . . . . . . . . . . . . . . . . . . . . . . . . . . . . . . . 78
Ashtray . . . . . . . . . . . . . . . . . . . . . . . . . . . . . . . . . . . . . . . . . . . 78
Cigarette lighter, power sockets . . . . . . . . . . . . . . . . . . . . 79
Storage compartments . . . . . . . . . . . . . . . . . . . . . . . . . . . . 80
Overview . . . . . . . . . . . . . . . . . . . . . . . . . . . . . . . . . . . . . . . . . . 80
Storage compartment on the front passenger side . . 80
Cooling of storage compartment on front passenger
side . . . . . . . . . . . . . . . . . . . . . . . . . . . . . . . . . . . . . . . . . . . . . . . 81
Storage compartment on the dash panel . . . . . . . . . . . . 81
Stowage compartment in front centre console . . . . . . 82
Stowage compartment for spectacles . . . . . . . . . . . . . . . 82
Storage compartment in the front and rear doors . . . . 82
Stowage compartment below front passenger seat . . 83
Front seat armrest with storage compartment . . . . . . 83
Stowage compartment in rear centre console . . . . . . . 84
Storage compartments in the luggage compartment . 84
Flexible storage compartment . . . . . . . . . . . . . . . . . . . . . . 84
Removable through-loading bag . . . . . . . . . . . . . . . . . . . . 85
Clothes hooks . . . . . . . . . . . . . . . . . . . . . . . . . . . . . . . . . . . . . 85
Heating and air conditioning system . . . . . . . . . . . . . 86
Introduction . . . . . . . . . . . . . . . . . . . . . . . . . . . . . . . . . . . . . . . 86
Air outlet vents . . . . . . . . . . . . . . . . . . . . . . . . . . . . . . . . . . . . 87
Heating . . . . . . . . . . . . . . . . . . . . . . . . . . . . . . . . . . . . . . . . . . . 88
Air conditioning system (manual air conditioning
system)
. . . . . . . . . . . . . . . . . . . . . . . . . . . . . . . . . . . . . . . . . . . 89
Climatronic (automatic air conditioning) . . . . . . . . . . . . . 92
Auxiliary heating (auxiliary heating and ventilation) . . 95 Starting-off and Driving
. . . . . . . . . . . . . . . . . . . . . . . . . . . 99
Setting steering wheel position . . . . . . . . . . . . . . . . . . . . 99
Ignition lock . . . . . . . . . . . . . . . . . . . . . . . . . . . . . . . . . . . . . . . 99
Starting the engine . . . . . . . . . . . . . . . . . . . . . . . . . . . . . . . . 100
Pedals . . . . . . . . . . . . . . . . . . . . . . . . . . . . . . . . . . . . . . . . . . . . 102
Handbrake . . . . . . . . . . . . . . . . . . . . . . . . . . . . . . . . . . . . . . . . 102
Rear parking aid . . . . . . . . . . . . . . . . . . . . . . . . . . . . . . . . . . . 103
Front and rear parking aid . . . . . . . . . . . . . . . . . . . . . . . . . . 104
Park Assist . . . . . . . . . . . . . . . . . . . . . . . . . . . . . . . . . . . . . . . . 105
Cruise control system (CCS) . . . . . . . . . . . . . . . . . . . . . . . . 108
“(START-STOP)” . . . . . . . . . . . . . . . . . . . . . . . . . . . . . . . . . . . 110
Automatic gearbox DSG . . . . . . . . . . . . . . . . . . . . . . . . . . . 112
Automatic gearbox DSG . . . . . . . . . . . . . . . . . . . . . . . . . . . . 112
Communication . . . . . . . . . . . . . . . . . . . . . . . . . . . . . . . . . . . . 117
Multifunction steering wheel . . . . . . . . . . . . . . . . . . . . . . . 117
Universal telephone preinstallation GSM II . . . . . . . . . . 119
Voice control . . . . . . . . . . . . . . . . . . . . . . . . . . . . . . . . . . . . . . 124
Music playback via Bluetooth ®
. . . . . . . . . . . . . . . . . . . . . . 125
Multimedia . . . . . . . . . . . . . . . . . . . . . . . . . . . . . . . . . . . . . . . . 125
Safety . . . . . . . . . . . . . . . . . . . . . . . . . . . . . . . . . . . . . . . . . . . 128
Passive Safety . . . . . . . . . . . . . . . . . . . . . . . . . . . . . . . . . . . . . 128
Basic information . . . . . . . . . . . . . . . . . . . . . . . . . . . . . . . . . . 128
Correct seated position . . . . . . . . . . . . . . . . . . . . . . . . . . . . 129
Seat belts . . . . . . . . . . . . . . . . . . . . . . . . . . . . . . . . . . . . . . . . . . 132
Why seat belts? . . . . . . . . . . . . . . . . . . . . . . . . . . . . . . . . . . . 132
The physical principle of a frontal collision . . . . . . . . . . 132
Important safety information regarding the use of
seat belts
. . . . . . . . . . . . . . . . . . . . . . . . . . . . . . . . . . . . . . . . . 133
How are seat belts correctly fastened? . . . . . . . . . . . . . . 134
Airbag system . . . . . . . . . . . . . . . . . . . . . . . . . . . . . . . . . . . . . . 137
Description of the airbag system . . . . . . . . . . . . . . . . . . . 137
Front airbags . . . . . . . . . . . . . . . . . . . . . . . . . . . . . . . . . . . . . . 138
Driver's knee airbag . . . . . . . . . . . . . . . . . . . . . . . . . . . . . . . 140
Side airbags . . . . . . . . . . . . . . . . . . . . . . . . . . . . . . . . . . . . . . . 141 3
Table of Contents Using the system Safety Driving Tips General Maintenance Breakdown assistance Technical data
Page 22 of 252
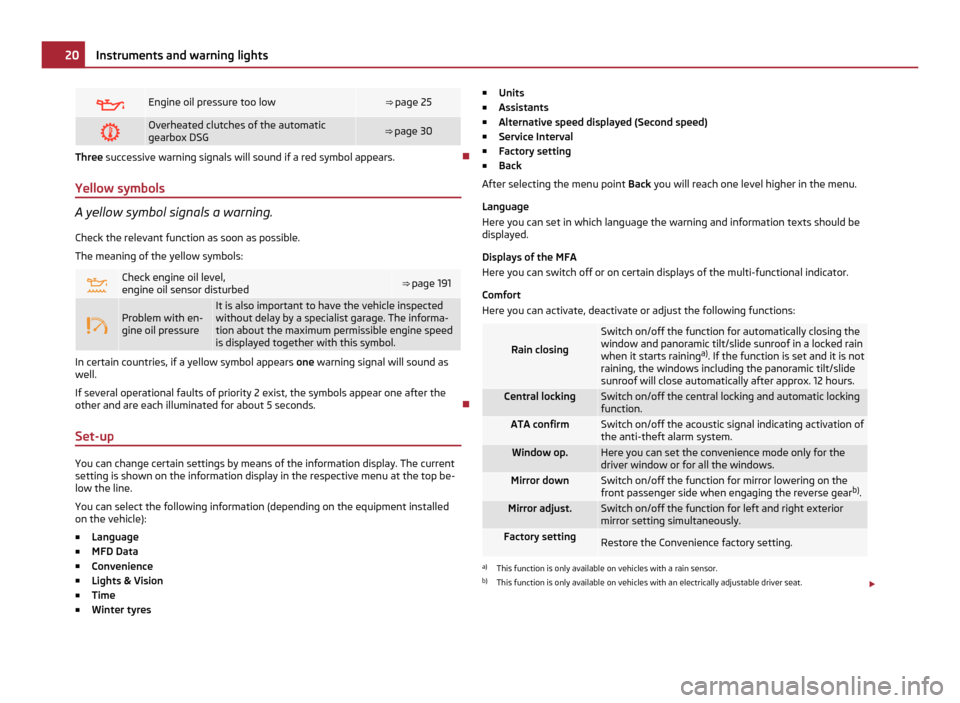
Engine oil pressure too low ⇒ page 25
Overheated clutches of the automatic
gearbox DSG
⇒ page 30
Three successive warning signals will sound if a red symbol appears.
Yellow symbols A yellow symbol signals a warning.
Check the relevant function as soon as possible.
The meaning of the yellow symbols: Check engine oil level,
engine oil sensor disturbed
⇒
page 191 Problem with en-
gine oil pressure It is also important to have the vehicle inspected
without delay by a specialist garage. The informa-
tion about the maximum permissible engine speed
is displayed together with this symbol. In certain countries, if a yellow symbol appears
one warning signal will sound as
well.
If several operational faults of priority 2 exist, the symbols appear one after the
other and are each illuminated for about 5 seconds.
Set-up You can change certain settings by means of the information display. The current
setting is shown on the information display in the respective menu at the top be-
low the line.
You can select the following information (depending on the equipment installed
on the vehicle):
■ Language
■ MFD Data
■ Convenience
■ Lights & Vision
■ Time
■ Winter tyres ■
Units
■ Assistants
■ Alternative speed displayed (Second speed)
■ Service Interval
■ Factory setting
■ Back
After selecting the menu point Back you will reach one level higher in the menu.
Language
Here you can set in which language the warning and information texts should be
displayed.
Displays of the MFA
Here you can switch off or on certain displays of the multi-functional indicator.
Comfort
Here you can activate, deactivate or adjust the following functions: Rain closing Switch on/off the function for automatically closing the
window and panoramic tilt/slide sunroof in a locked rain
when it starts raining a)
. If the function is set and it is not
raining, the windows including the panoramic tilt/slide
sunroof will close automatically after approx. 12
hours. Central locking Switch on/off the central locking and automatic locking
function. ATA confirm Switch on/off the acoustic signal indicating activation of
the anti-theft alarm system.
Window op. Here you can set the convenience mode only for the
driver window or for all the windows.
Mirror down Switch on/off the function for mirror lowering on the
front passenger side when engaging the reverse gear b)
. Mirror adjust. Switch on/off the function for left and right exterior
mirror setting simultaneously.
Factory setting
Restore the Convenience factory setting.
a)
This function is only available on vehicles with a rain sensor.
b) This function is only available on vehicles with an electrically adjustable driver seat. £20
Instruments and warning lights
Page 37 of 252
●
The windows and the electric sliding/tilting roof close while the key is held in
the lock position.
● The safe securing system is activated immediately.
● The indicator light in the driver door begins flashing. Note
If the driver's door has been opened, the vehicle cannot be locked.
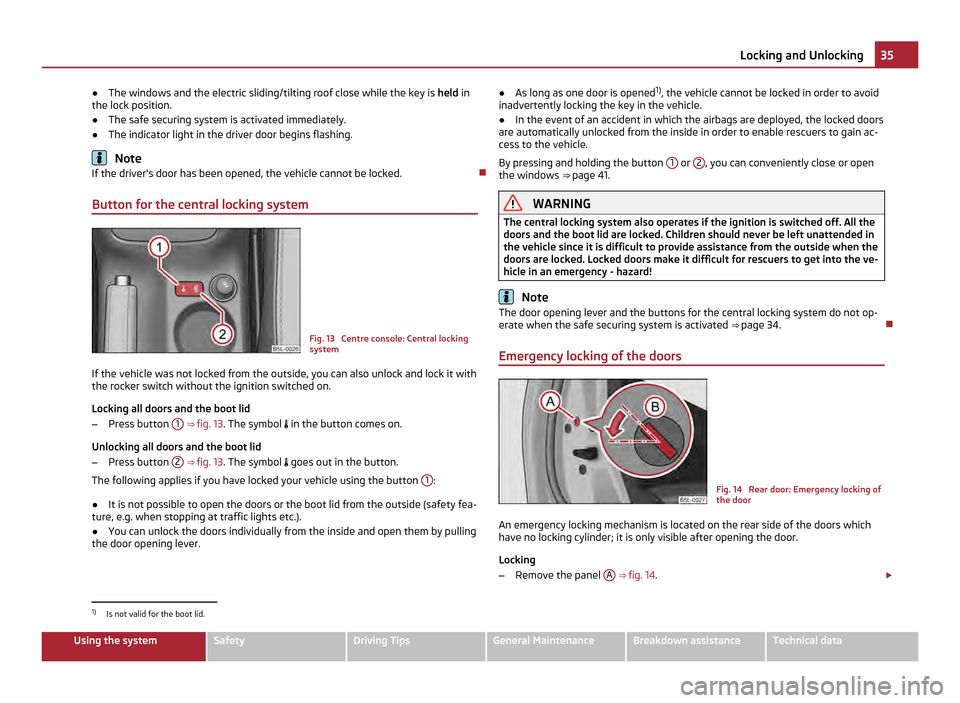
Button for the central locking system Fig. 13 Centre console: Central locking
system
If the vehicle was not locked from the outside, you can also unlock and lock it with
the rocker switch without the ignition switched on.
Locking all doors and the boot lid
– Press button 1
⇒ fig. 13 . The symbol
in the button comes on.
Unlocking all doors and the boot lid
– Press button 2 ⇒
fig. 13
. The symbol
goes out in the button.
The following applies if you have locked your vehicle using the button 1 :
● It is not possible to open the doors or the boot lid from the outside (safety fea-
ture, e.g. when stopping at traffic lights etc.).
● You can unlock the doors individually from the inside and open them by pulling
the door opening lever. ●
As long as one door is opened 1)
, the vehicle cannot be locked in order to avoid
inadvertently locking the key in the vehicle.
● In the event of an accident in which the airbags are deployed, the locked doors
are automatically unlocked from the inside in order to enable rescuers to gain ac-
cess to the vehicle.
By pressing and holding the button 1 or
2 , you can conveniently close or open
the windows ⇒ page 41. WARNING
The central locking system also operates if the ignition is switched off. All the
doors and the boot lid are locked. Children should never be left unattended in
the vehicle since it is difficult to provide assistance from the outside when the
doors are locked. Locked doors make it difficult for rescuers to get into the ve-
hicle in an emergency - hazard! Note
The door opening lever and the buttons for the central locking system do not op-
erate when the safe securing system is activated ⇒ page 34.
Emergency locking of the doors Fig. 14 Rear door: Emergency locking of
the door
An emergency locking mechanism is located on the rear side of the doors which
have no locking cylinder; it is only visible after opening the door.
Locking
– Remove the panel A
⇒ fig. 14 . £1)
Is not valid for the boot lid. 35
Locking and Unlocking Using the system Safety Driving Tips General Maintenance Breakdown assistance Technical data
Page 41 of 252
Note
● The working life of the alarm siren is 6 years. More detailed information is
available by a specialist garage.
● Before leaving the car, check that all the doors, windows and the electric slid-
ing/tilting roof are properly closed in order to ensure that the anti-theft alarm sys-
tem is fully operational.
● Coding of the radio remote control and the receiver unit precludes the use of
the radio remote control from other vehicles.
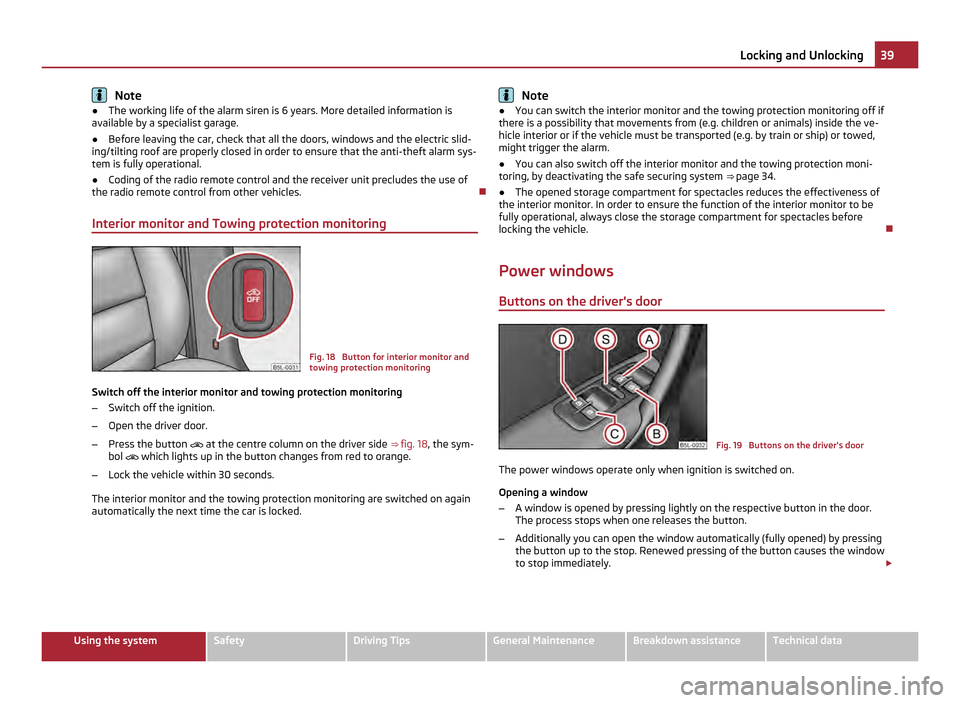
Interior monitor and Towing protection monitoring Fig. 18 Button for interior monitor and
towing protection monitoring
Switch off the interior monitor and towing protection monitoring
– Switch off the ignition.
– Open the driver door.
– Press the button
at the centre column on the driver side ⇒ fig. 18 , the sym-
bol
which lights up in the button changes from red to orange.
– Lock the vehicle within 30 seconds.
The interior monitor and the towing protection monitoring are switched on again
automatically the next time the car is locked. Note
● You can switch the interior monitor and the towing protection monitoring off if
there is a possibility that movements from (e.g. children or animals) inside the ve-
hicle interior or if the vehicle must be transported (e.g. by train or ship) or towed,
might trigger the alarm.
● You can also switch off the interior monitor and the towing protection moni-
toring, by deactivating the safe securing system ⇒
page 34.
● The opened storage compartment for spectacles reduces the effectiveness of
the interior monitor. In order to ensure the function of the interior monitor to be
fully operational, always close the storage compartment for spectacles before
locking the vehicle.
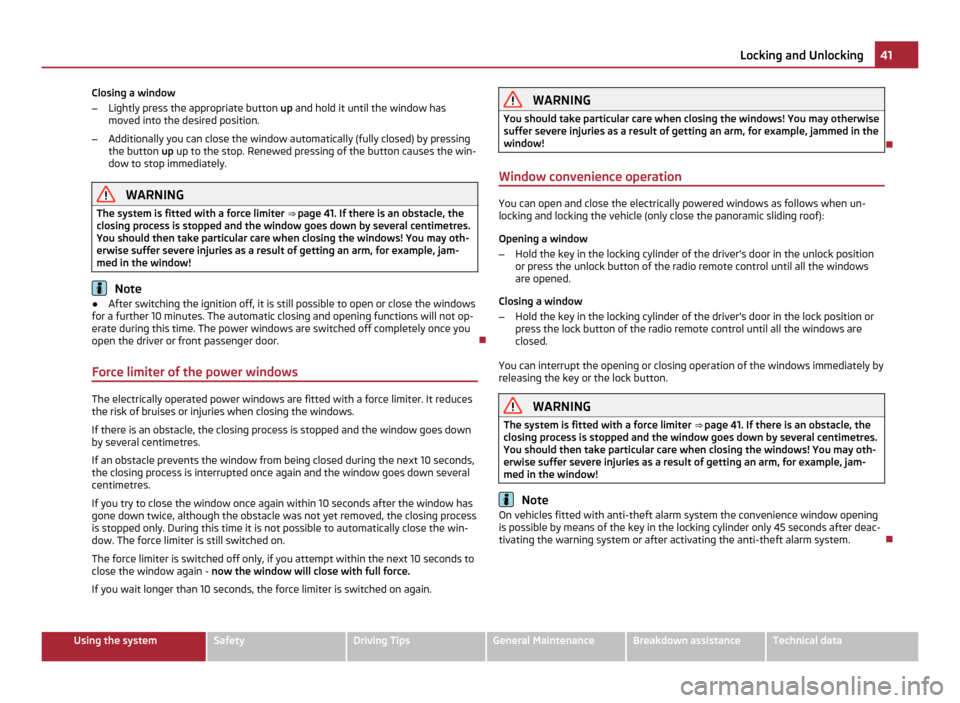
Power windows Buttons on the driver's door Fig. 19 Buttons on the driver's door
The power windows operate only when ignition is switched on.
Opening a window
– A window is opened by pressing lightly on the respective button in the door.
The process stops when one releases the button.
– Additionally you can open the window automatically (fully opened) by pressing
the button up to the stop. Renewed pressing of the button causes the window
to stop immediately. £ 39
Locking and Unlocking Using the system Safety Driving Tips General Maintenance Breakdown assistance Technical data
Page 43 of 252
Closing a window
–
Lightly press the appropriate button up and hold it until the window has
moved into the desired position.
– Additionally you can close the window automatically (fully closed) by pressing
the button up up to the stop. Renewed pressing of the button causes the win-
dow to stop immediately. WARNING
The system is fitted with a force limiter ⇒ page 41 . If there is an obstacle, the
closing process is stopped and the window goes down by several centimetres.
You should then take particular care when closing the windows! You may oth-
erwise suffer severe injuries as a result of getting an arm, for example, jam-
med in the window! Note
● After switching the ignition off, it is still possible to open or close the windows
for a further 10 minutes. The automatic closing and opening functions will not op-
erate during this time. The power windows are switched off completely once you
open the driver or front passenger door.
Force limiter of the power windows The electrically operated power windows are fitted with a force limiter. It reduces
the risk of bruises or injuries when closing the windows.
If there is an obstacle, the closing process is stopped and the window goes down
by several centimetres.
If an obstacle prevents the window from being closed during the next 10 seconds,
the closing process is interrupted once again and the window goes down several
centimetres.
If you try to close the window once again within 10 seconds after the window has
gone down twice, although the obstacle was not yet removed, the closing process
is stopped only. During this time it is not possible to automatically close the win-
dow. The force limiter is still switched on.
The force limiter is switched off only, if you attempt within the next 10 seconds to
close the window again - now the window will close with full force.
If you wait longer than 10 seconds, the force limiter is switched on again. WARNING
You should take particular care when closing the windows! You may otherwise
suffer severe injuries as a result of getting an arm, for example, jammed in the
window!
Window convenience operation You can open and close the electrically powered windows as follows when un-
locking and locking the vehicle (only close the panoramic sliding roof):
Opening a window
–
Hold the key in the locking cylinder of the driver's door in the unlock position
or press the unlock button of the radio remote control until all the windows
are opened.
Closing a window
– Hold the key in the locking cylinder of the driver's door in the lock position or
press the lock button of the radio remote control until all the windows are
closed.
You can interrupt the opening or closing operation of the windows immediately by
releasing the key or the lock button. WARNING
The system is fitted with a force limiter ⇒ page 41
. If there is an obstacle, the
closing process is stopped and the window goes down by several centimetres.
You should then take particular care when closing the windows! You may oth-
erwise suffer severe injuries as a result of getting an arm, for example, jam-
med in the window! Note
On vehicles fitted with anti-theft alarm system the convenience window opening
is possible by means of the key in the locking cylinder only 45 seconds after deac-
tivating the warning system or after activating the anti-theft alarm system. 41
Locking and Unlocking Using the system Safety Driving Tips General Maintenance Breakdown assistance Technical data
Page 44 of 252
Operational faults
Automatically operated power windows do not operate
If the battery of the car has been disconnected and then reconnected, the auto-
matically operated power windows do not operate. The system must be activated.
Proceed as follows in order to re-establish the function:
● switch on the ignition,
● slightly pull on the upper edge of the relevant button and hold it until the win-
dow is closed,
● release the switch,
● you must pull the respective switch again in upward direction for approx. 3
seconds.
Operation in winter
Ice accumulating on the surface of the windows during the winter may result in a
greater resistance when closing the windows and the window may stop and move
back several centimetres
It is necessary to put the force limiter out of operation in order to close the win-
dow ⇒ page 41, Force limiter of the power windows
.WARNING
The system is fitted with a force limiter ⇒ page 41
. If there is an obstacle, the
closing process is stopped and the window goes down by several centimetres.
You should then take particular care when closing the windows! You may oth-
erwise suffer severe injuries as a result of getting an arm, for example, jam-
med in the window! CAUTION
● Keep the window glass clean to ensure correct function of the electric win-
dows.
● In the event of a freezing up of the windscreen, first of all eliminate the ice
⇒
page 182 and then operate the power windows otherwise the power window
mechanism could be damaged. Panoramic sliding roof
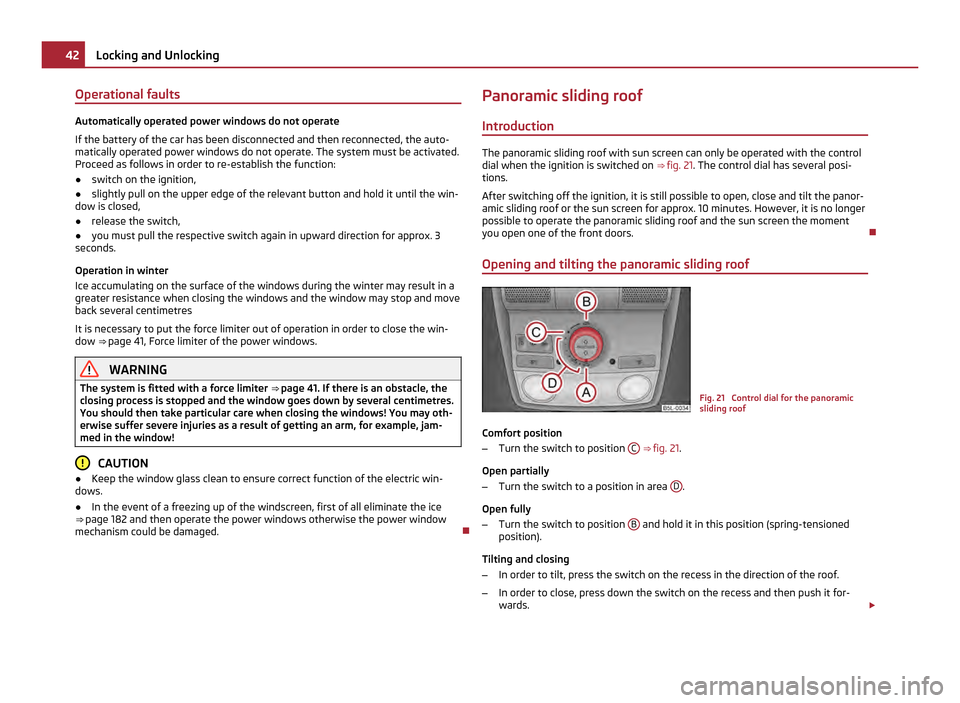
Introduction The panoramic sliding roof with sun screen can only be operated with the control
dial when the ignition is switched on
⇒ fig. 21. The control dial has several posi-
tions.
After switching off the ignition, it is still possible to open, close and tilt the panor-
amic sliding roof or the sun screen for approx. 10 minutes. However, it is no longer
possible to operate the panoramic sliding roof and the sun screen the moment
you open one of the front doors.
Opening and tilting the panoramic sliding roof Fig. 21 Control dial for the panoramic
sliding roof
Comfort position
– Turn the switch to position C
⇒ fig. 21 .
Open partially
– Turn the switch to a position in area D .
Open fully
– Turn the switch to position B and hold it in this position (spring-tensioned
position).
Tilting and closing
– In order to tilt, press the switch on the recess in the direction of the roof.
– In order to close, press down the switch on the recess and then push it for-
wards. £42
Locking and Unlocking
Page 45 of 252
When the panoramic sliding roof is in the comfort position, the intensity of the
wind noise is reduced.
CAUTION
It may be necessary during winter to remove any ice and snow in the area of the
panoramic sliding roof before opening it, in order to prevent damaging the open-
ing mechanism.
Closing the panoramic sliding roof Closing
–
Turn the switch to position A
⇒ fig. 21 .
Force limiter
The panoramic sliding roof is fitted with a force limiter. The panoramic sliding roof
stops and moves back several centimetres when it cannot be closed because
there is something in the way (e.g. ice). You can close the panoramic sliding roof
fully without force limiter by pressing down the switch on the recess and then
pushing it forwards until the panoramic sliding roof is fully closed ⇒
.
WARNING
Carefully close the panoramic sliding roof - risk of injury!
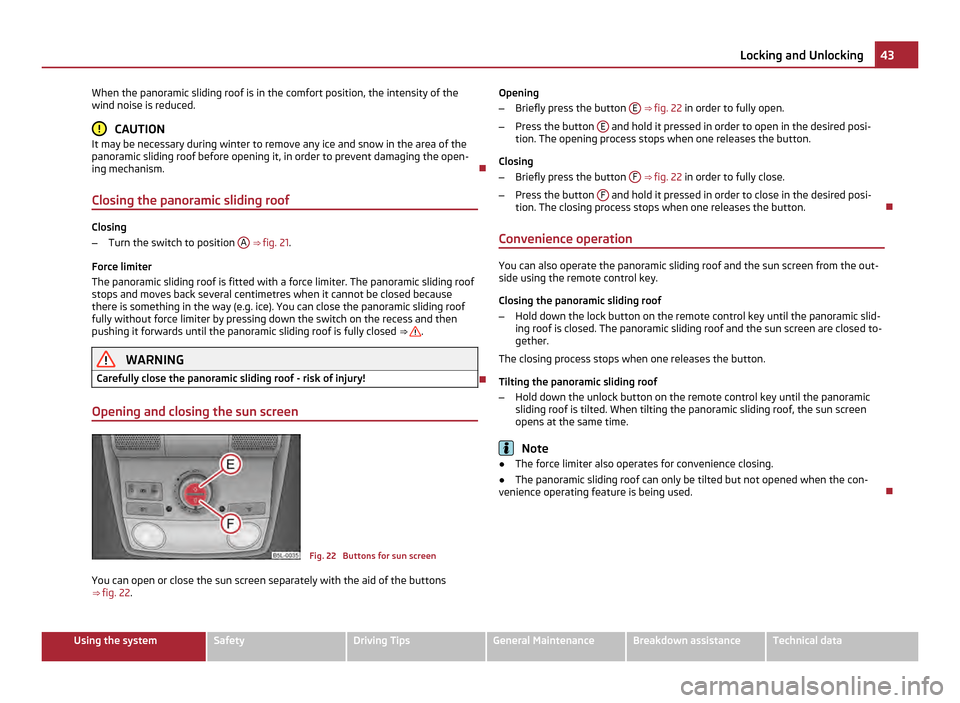
Opening and closing the sun screen Fig. 22 Buttons for sun screen
You can open or close the sun screen separately with the aid of the buttons
⇒ fig. 22. Opening
–
Briefly press the button E ⇒
fig. 22
in order to fully open.
– Press the button E and hold it pressed in order to open in the desired posi-
tion. The opening process stops when one releases the button.
Closing
– Briefly press the button F ⇒
fig. 22
in order to fully close.
– Press the button F and hold it pressed in order to close in the desired posi-
tion. The closing process stops when one releases the button.
Convenience operation You can also operate the panoramic sliding roof and the sun screen from the out-
side using the remote control key.
Closing the panoramic sliding roof
– Hold down the lock button on the remote control key until the panoramic slid-
ing roof is closed. The panoramic sliding roof and the sun screen are closed to-
gether.
The closing process stops when one releases the button.
Tilting the panoramic sliding roof
– Hold down the unlock button on the remote control key until the panoramic
sliding roof is tilted. When tilting the panoramic sliding roof, the sun screen
opens at the same time. Note
● The force limiter also operates for convenience closing.
● The panoramic sliding roof can only be tilted but not opened when the con-
venience operating feature is being used. 43
Locking and Unlocking Using the system Safety Driving Tips General Maintenance Breakdown assistance Technical data
Page 46 of 252
Emergency operation
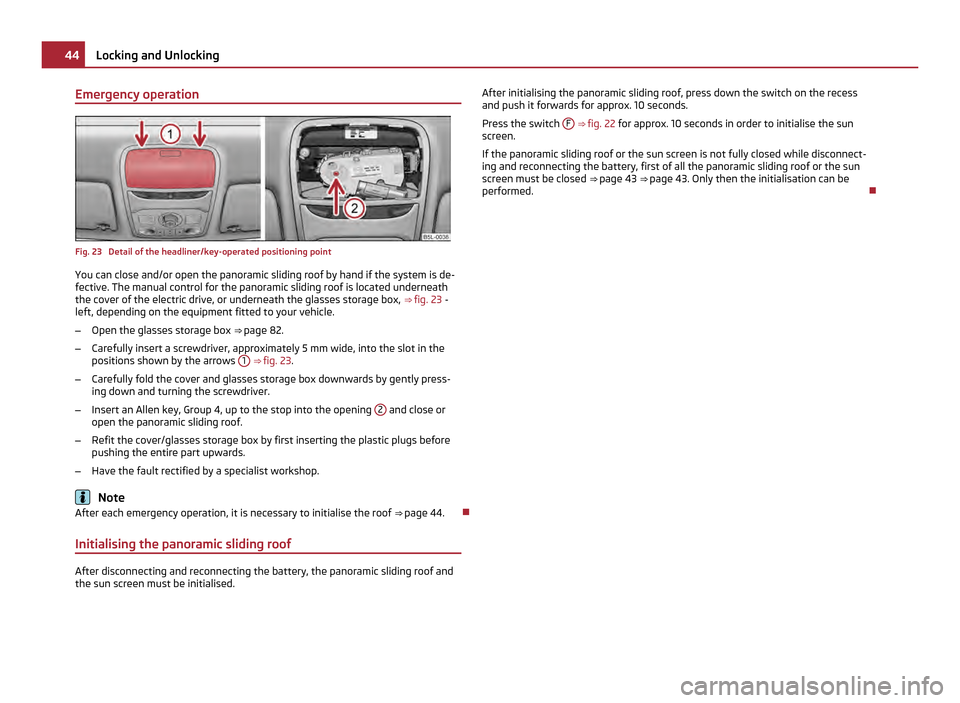
Fig. 23 Detail of the headliner/key-operated positioning point
You can close and/or open the panoramic sliding roof by hand if the system is de-
fective. The manual control for the panoramic sliding roof is located underneath
the cover of the electric drive, or underneath the glasses storage box, ⇒ fig. 23 -
left, depending on the equipment fitted to your vehicle.
– Open the glasses storage box ⇒ page 82 .
– Carefully insert a screwdriver, approximately 5 mm wide, into the slot in the
positions shown by the arrows 1
⇒
fig. 23.
– Carefully fold the cover and glasses storage box downwards by gently press-
ing down and turning the screwdriver.
– Insert an Allen key, Group 4, up to the stop into the opening 2 and close or
open the panoramic sliding roof.
– Refit the cover/glasses storage box by first inserting the plastic plugs before
pushing the entire part upwards.
– Have the fault rectified by a specialist workshop. Note
After each emergency operation, it is necessary to initialise the roof ⇒ page 44.
Initialising the panoramic sliding roof After disconnecting and reconnecting the battery, the panoramic sliding roof and
the sun screen must be initialised. After initialising the panoramic sliding roof, press down the switch on the recess
and push it forwards for approx. 10 seconds.
Press the switch F ⇒
fig. 22 for approx. 10 seconds in order to initialise the sun
screen.
If the panoramic sliding roof or the sun screen is not fully closed while disconnect-
ing and reconnecting the battery, first of all the panoramic sliding roof or the sun
screen must be closed ⇒ page 43 ⇒ page 43. Only then the initialisation can be
performed. 44
Locking and Unlocking
Page 78 of 252
Removable storage box
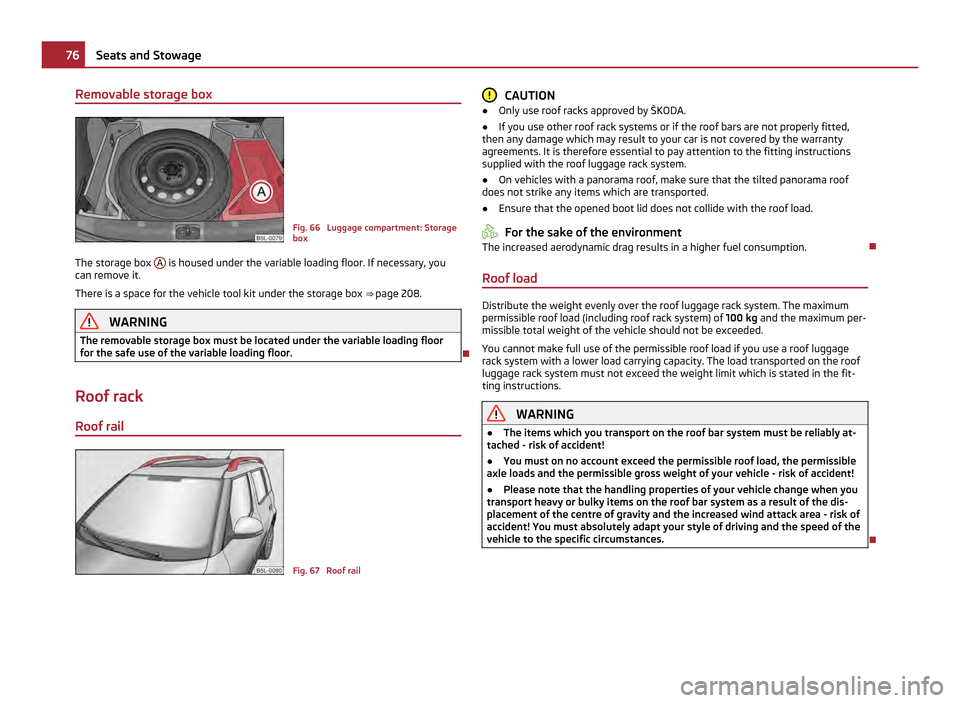
Fig. 66 Luggage compartment: Storage
box
The storage box A is housed under the variable loading floor. If necessary, you
can remove it.
There is a space for the vehicle tool kit under the storage box ⇒
page 208. WARNING
The removable storage box must be located under the variable loading floor
for the safe use of the variable loading floor.
Roof rack
Roof rail Fig. 67 Roof rail CAUTION
● Only use roof racks approved by
ŠKODA.
● If you use other roof rack systems or if the roof bars are not properly fitted,
then any damage which may result to your car is not covered by the warranty
agreements. It is therefore essential to pay attention to the fitting instructions
supplied with the roof luggage rack system.
● On vehicles with a panorama roof, make sure that the tilted panorama roof
does not strike any items which are transported.
● Ensure that the opened boot lid does not collide with the roof load. For the sake of the environment
The increased aerodynamic drag results in a higher fuel consumption.
Roof load Distribute the weight evenly over the roof luggage rack system. The maximum
permissible roof load (including roof rack system) of
100 kg and the maximum per-
missible total weight of the vehicle should not be exceeded.
You cannot make full use of the permissible roof load if you use a roof luggage
rack system with a lower load carrying capacity. The load transported on the roof
luggage rack system must not exceed the weight limit which is stated in the fit-
ting instructions. WARNING
● The items which you transport on the roof bar system must be reliably at-
tached - risk of accident!
● You must on no account exceed the permissible roof load, the permissible
axle loads and the permissible gross weight of your vehicle - risk of accident!
● Please note that the handling properties of your vehicle change when you
transport heavy or bulky items on the roof bar system as a result of the dis-
placement of the centre of gravity and the increased wind attack area - risk of
accident! You must absolutely adapt your style of driving and the speed of the
vehicle to the specific circumstances. 76
Seats and Stowage