buttons SKODA YETI 2014 1.G / 5L User Guide
[x] Cancel search | Manufacturer: SKODA, Model Year: 2014, Model line: YETI, Model: SKODA YETI 2014 1.G / 5LPages: 248, PDF Size: 29.49 MB
Page 117 of 248

Universal telephone preinstallation (hands free)
Introduction
This chapter applies only to vehicles with universal phone installation kit GSM II or GSM III.
This chapter contains information on the following subjects:
Operating the phone on the multifunction steering wheel
114
Symbols in the MAXI DOT display
115
Phone Phonebook
116WARNING■ Concentrate fully at all times on your driving! As the driver you are fully
responsible for the operation of your vehicle. Only use the hands-free sys-
tem to the extent that you are in full control of your vehicle in any traffic
situation.■
The national regulations for using a mobile phone in a vehicle must be
observed.
CAUTION
■ In areas with no signal and sometimes in tunnels, garages or subways tele-
phone conversations can be interrupted and telephone connections cannot be
established - even in an emergency!■
We recommend that the installation of mobile phones and two-way radio
systems in a vehicle be carried out by a specialist garage.
Note■ Not all mobile phones that enable Bluetooth ®
communication are compatible
with the universal telephone preinstallation GSM II or GSM III. Ask a ŠKODA
partner or visit the ŠKODA website www.infotainment.skoda-auto.com to find
out whether your phone is compatible with universal telephone installation kit
GSM II or GSM III.■
The range of the telephone connection to the device using the Bluetooth ®
profile is limited to the vehicle interior. The range is dependent on local fac-
tors, e.g. obstacles between the devices and mutual interferences with other
devices. If your telephone is in a jacket pocket, for example, this can lead to
difficulties when establishing a connection with the device or transferring da-
ta.
■
The functionality of the telephone is dependent on the telephone service op-
erator and the telephone being used. Further information is available from the
telephone service operator or can be found in the telephone manual.
■
In some countries the connection via the Bluetooth ®
function, may be limi-
ted. Further information can be obtained from local authorities.
Operating the phone on the multifunction steering wheel
Fig. 118
Multifunction steering wheel: Control buttons for the telephone
Read and observe and on page 114 first.
There are buttons in the steering wheel for easy operation of the basic func- tions of the phone » Fig. 118 so that the driver is distracted from the traffic as
little as possible when using the phone.
This applies only if your vehicle has been equipped with the universal tele-
phone preinstallation at the factory.
The buttons operate the functions for the operating mode of the current tele-
phone.
If the side lights are switched on, the buttons on the multifunction steering
wheel are illuminated.
114Using the system
Page 129 of 248

The GSM II universal telephone installation kit allows music played back via the
hands-free system to be controlled via voice command » page 124, Voice com-
mands - GSM II .NoteThe device being connected must support the Bluetooth ®
A2DP profile; refer
to the operating instructions for the relevant device being connected.
Operating the radio and audio sources from the multifunction steering wheel
The following information applies only for vehicles with Blues and Swing.radios.
Fig. 120
Multifunction steering wheel: control buttons
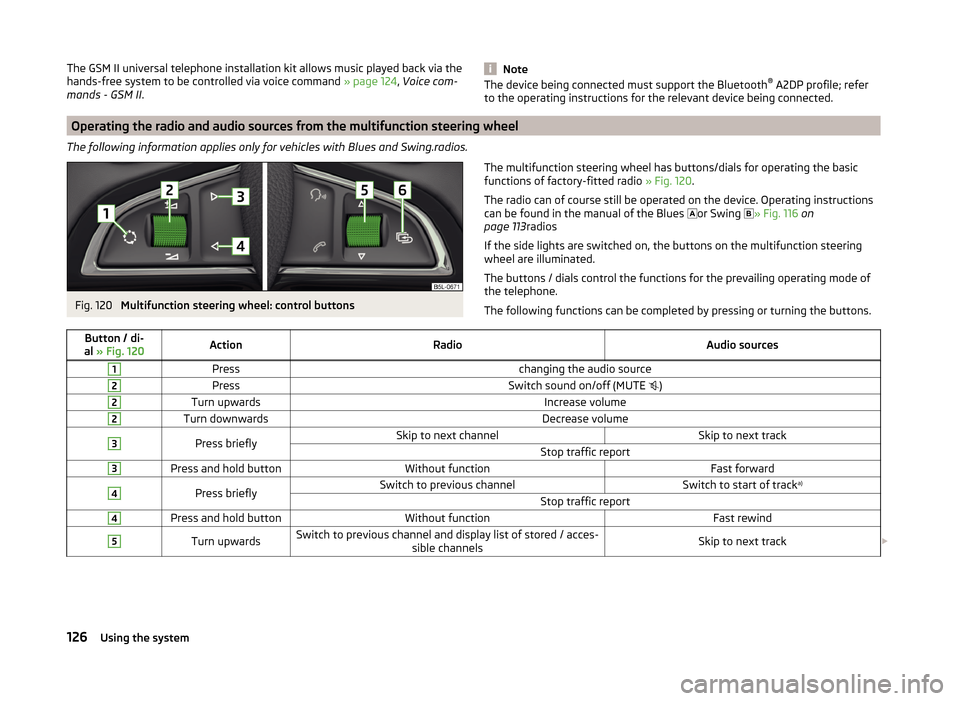
The multifunction steering wheel has buttons/dials for operating the basic
functions of factory-fitted radio » Fig. 120.
The radio can of course still be operated on the device. Operating instructions can be found in the manual of the Blues
or Swing
» Fig. 116 on
page 113 radios
If the side lights are switched on, the buttons on the multifunction steering
wheel are illuminated.
The buttons / dials control the functions for the prevailing operating mode of
the telephone.
The following functions can be completed by pressing or turning the buttons.Button / di-
al » Fig. 120ActionRadioAudio sources1Presschanging the audio source2PressSwitch sound on/off (MUTE )2Turn upwardsIncrease volume2Turn downwardsDecrease volume3Press brieflySkip to next channelSkip to next trackStop traffic report3Press and hold buttonWithout functionFast forward4Press brieflySwitch to previous channelSwitch to start of track a)Stop traffic report4Press and hold buttonWithout functionFast rewind5Turn upwardsSwitch to previous channel and display list of stored / acces-
sible channelsSkip to next track 126Using the system
Page 131 of 248

CD change
The following information applies only for vehicles with Blues and Swing.ra-
dios.Fig. 123
The CD changer
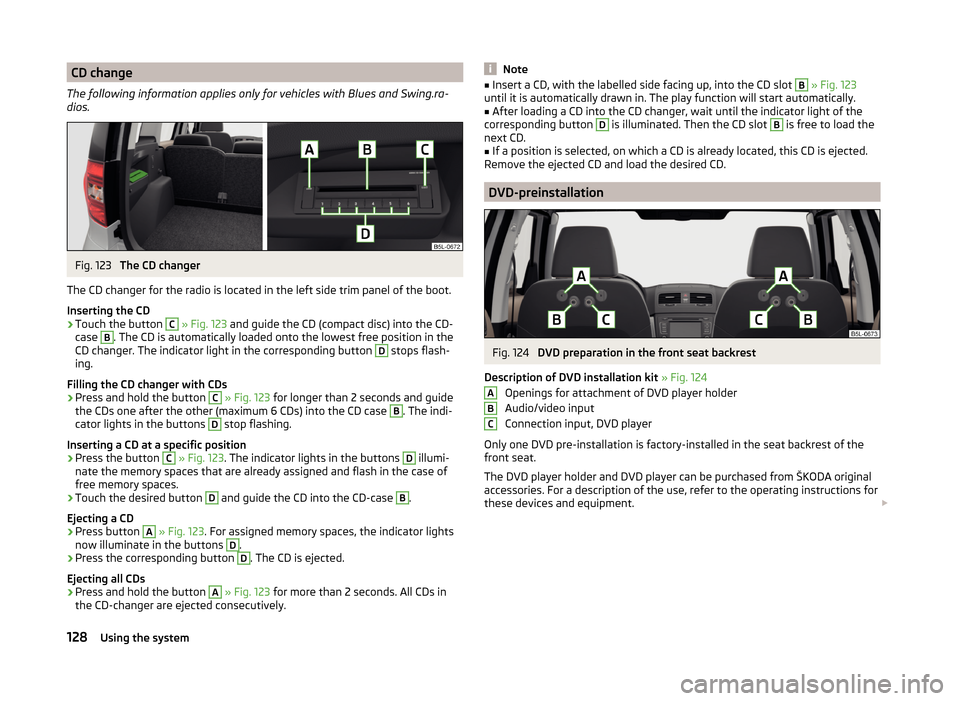
The CD changer for the radio is located in the left side trim panel of the boot.
Inserting the CD
›
Touch the button
C
» Fig. 123 and guide the CD (compact disc) into the CD-
case
B
. The CD is automatically loaded onto the lowest free position in the
CD changer. The indicator light in the corresponding button
D
stops flash-
ing.
Filling the CD changer with CDs
›
Press and hold the button
C
» Fig. 123 for longer than 2 seconds and guide
the CDs one after the other (maximum 6 CDs) into the CD case
B
. The indi-
cator lights in the buttons
D
stop flashing.
Inserting a CD at a specific position
›
Press the button
C
» Fig. 123 . The indicator lights in the buttons
D
illumi-
nate the memory spaces that are already assigned and flash in the case of
free memory spaces.
›
Touch the desired button
D
and guide the CD into the CD-case
B
.
Ejecting a CD
›
Press button
A
» Fig. 123 . For assigned memory spaces, the indicator lights
now illuminate in the buttons
D
.
›
Press the corresponding button
D
. The CD is ejected.
Ejecting all CDs
›
Press and hold the button
A
» Fig. 123 for more than 2 seconds. All CDs in
the CD-changer are ejected consecutively.
Note■ Insert a CD, with the labelled side facing up, into the CD slot B » Fig. 123
until it is automatically drawn in. The play function will start automatically.■
After loading a CD into the CD changer, wait until the indicator light of the
corresponding button
D
is illuminated. Then the CD slot
B
is free to load the
next CD.
■
If a position is selected, on which a CD is already located, this CD is ejected.
Remove the ejected CD and load the desired CD.
DVD-preinstallation
Fig. 124
DVD preparation in the front seat backrest
Description of DVD installation kit » Fig. 124
Openings for attachment of DVD player holder
Audio/video input
Connection input, DVD player
Only one DVD pre-installation is factory-installed in the seat backrest of the
front seat.
The DVD player holder and DVD player can be purchased from ŠKODA original
accessories. For a description of the use, refer to the operating instructions for
these devices and equipment.
ABC128Using the system
Page 213 of 248

Replacing the battery in the remote control keyFig. 184
Remove cover/take out battery
Read and observe
on page 209 first.
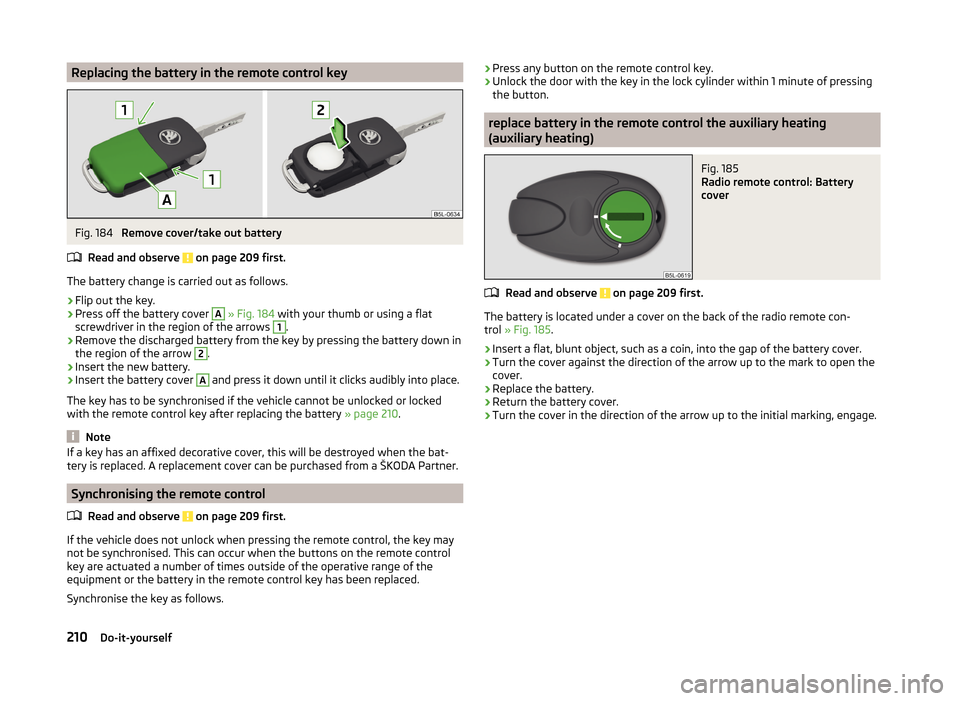
The battery change is carried out as follows.
›
Flip out the key.
›
Press off the battery cover
A
» Fig. 184 with your thumb or using a flat
screwdriver in the region of the arrows
1
.
›
Remove the discharged battery from the key by pressing the battery down in
the region of the arrow
2
.
›
Insert the new battery.
›
Insert the battery cover
A
and press it down until it clicks audibly into place.
The key has to be synchronised if the vehicle cannot be unlocked or locked
with the remote control key after replacing the battery » page 210.
Note
If a key has an affixed decorative cover, this will be destroyed when the bat-
tery is replaced. A replacement cover can be purchased from a ŠKODA Partner.
Synchronising the remote control
Read and observe
on page 209 first.
If the vehicle does not unlock when pressing the remote control, the key may
not be synchronised. This can occur when the buttons on the remote control
key are actuated a number of times outside of the operative range of the
equipment or the battery in the remote control key has been replaced.
Synchronise the key as follows.
› Press any button on the remote control key.›Unlock the door with the key in the lock cylinder within 1 minute of pressing
the button.
replace battery in the remote control the auxiliary heating
(auxiliary heating)
Fig. 185
Radio remote control: Battery
cover
Read and observe on page 209 first.
The battery is located under a cover on the back of the radio remote con-
trol » Fig. 185 .
›
Insert a flat, blunt object, such as a coin, into the gap of the battery cover.
›
Turn the cover against the direction of the arrow up to the mark to open the
cover.
›
Replace the battery.
›
Return the battery cover.
›
Turn the cover in the direction of the arrow up to the initial marking, engage.
210Do-it-yourself
Page 240 of 248

Multifunction displayFunctions44
Information45
Memory45
Operation42
Multimedia125
AUX127
MDI127
USB127
N
N1
102
Nameplate222
Net partition100
Nets97
Notes for driving with repaired tyres205
Notes on using wheels191
O
OFF ROAD
144
ABS146
EDS146
hill descent assistant145
operation145
Start-Off Assistant146
TCS146
OFF ROAD mode warning light
41
Oil See Engine oil
184
Warning messages37
Oil pressure Warning messages
37
On-board computer See multifunction display
44
Operate windscreen wipers
73
Operating weight223
Operation in winter Diesel fuel179
Vehicle battery188
Optical Parking Assistant149
Function keys150
Operation149
Orientation lines150
Original accessories167
Outside temperature45
Overhang angle225
Overview Engine compartment
182
Warning lights34
P
Park assist
150
Departing from a parallel parking space153
Finding a parking space151
Information messages153
Parking152
Park Assist automatic emergency braking
153
Operation151
Parking137
Park assist150
Parking aid146
Parking aid146
Function147
Parking lights64
Parking space137
Parking vehicle Parking
137
Part replacement166
Passive safety Before setting off
8
Driving safety8
Safety equipment8
Passive Safety8
Payload223
Pedals137
Footmats137
Petrol see fuel
178
pitch angle225
Plastic parts171
Polishing vehicle paint work see vehicle care
171
Power outlet 12 V
90
Power Steering / steering lock (KESSY system) Warning light
36
Power windows58
Button in the front passenger door59
Buttons in the driver's door59
Practical equipment folding table at the centre backrest
95
Reflective Vest197
storage net in the front centre console92
Practical features 12-Volt power outlet
90
Storage pockets on the front seats94
Waste container91
Puncture repair kit203
R
Radiator fan
182
Radio4
Radio remote control Auxiliary heating
111
Raising the vehicle202
Rear Interior light
70
Rear-view mirror Exterior mirrors
76
Fold in passenger mirror76
Synchronous adjustment of the rear-view mir- ror
76
237Index