buttons SKODA YETI 2014 1.G / 5L Owner's Manual
[x] Cancel search | Manufacturer: SKODA, Model Year: 2014, Model line: YETI, Model: SKODA YETI 2014 1.G / 5LPages: 248, PDF Size: 29.49 MB
Page 32 of 248
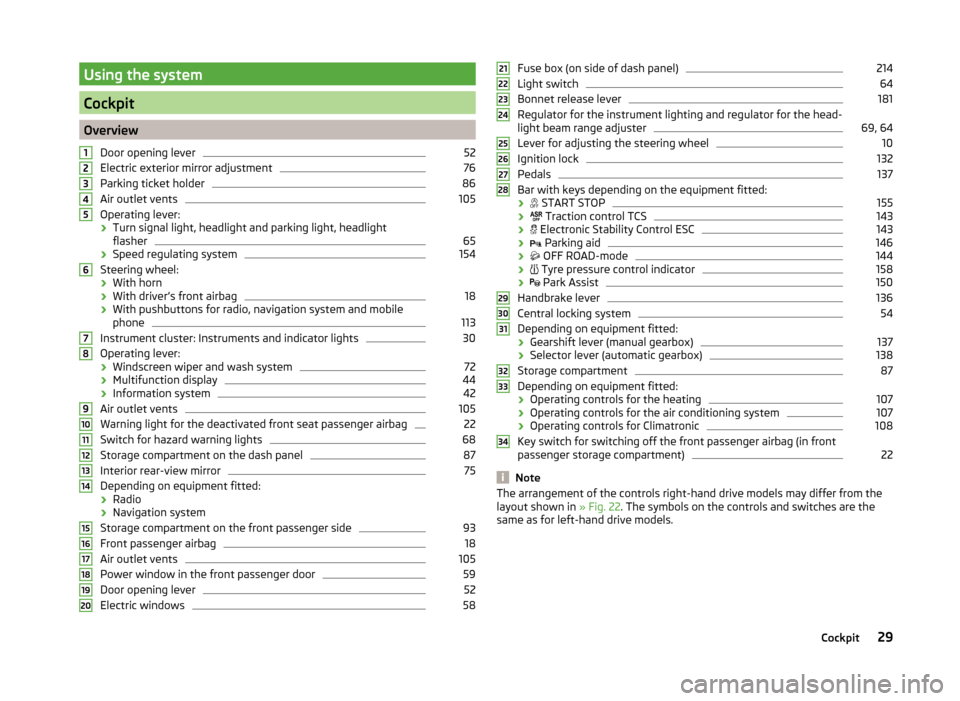
Using the system
Cockpit
OverviewDoor opening lever
52
Electric exterior mirror adjustment
76
Parking ticket holder
86
Air outlet vents
105
Operating lever:
› Turn signal light, headlight and parking light, headlight
flasher
65
› Speed regulating system
154
Steering wheel:
› With horn
› With driver’s front airbag
18
›With pushbuttons for radio, navigation system and mobile
phone
113
Instrument cluster: Instruments and indicator lights
30
Operating lever:
› Windscreen wiper and wash system
72
›Multifunction display
44
›Information system
42
Air outlet vents
105
Warning light for the deactivated front seat passenger airbag
22
Switch for hazard warning lights
68
Storage compartment on the dash panel
87
Interior rear-view mirror
75
Depending on equipment fitted:
› Radio
› Navigation system
Storage compartment on the front passenger side
93
Front passenger airbag
18
Air outlet vents
105
Power window in the front passenger door
59
Door opening lever
52
Electric windows
581234567891011121314151617181920Fuse box (on side of dash panel)214
Light switch
64
Bonnet release lever
181
Regulator for the instrument lighting and regulator for the head-
light beam range adjuster
69, 64
Lever for adjusting the steering wheel
10
Ignition lock
132
Pedals
137
Bar with keys depending on the equipment fitted:
›
START STOP
155
›
Traction control TCS
143
›
Electronic Stability Control ESC
143
›
Parking aid
146
›
OFF ROAD-mode
144
›
Tyre pressure control indicator
158
›
Park Assist
150
Handbrake lever
136
Central locking system
54
Depending on equipment fitted:
› Gearshift lever (manual gearbox)
137
›Selector lever (automatic gearbox)
138
Storage compartment
87
Depending on equipment fitted:
› Operating controls for the heating
107
›Operating controls for the air conditioning system
107
›Operating controls for Climatronic
108
Key switch for switching off the front passenger airbag (in front
passenger storage compartment)
22
Note
The arrangement of the controls right-hand drive models may differ from the
layout shown in » Fig. 22. The symbols on the controls and switches are the
same as for left-hand drive models.212223242526272829303132333429Cockpit
Page 36 of 248

Counter for distance drivenFig. 27
Display: MAXI DOT display / Seg-
ment Display
Read and observe on page 30 first.
Display » Fig. 27
Counter for distance travelled (trip)
Odometer
Counter for distance travelled (trip)
The daily trip counter shows the distance driven since the time the counter
was last reset - in steps of 0.1 km.
Reset counter for distance travelled (trip)
›
Press and hold the
7
» Fig. 23 on page 30 button.
Odometer
The odometer indicates the total distance which the vehicle has been driven.
Note
If the second speed display is enabled on vehicles with a segment display, this
speed will be shown instead of the odometer.
Read and observe on page 30 first.
Use buttons
3
and
7
to set the clock » Fig. 23 on page 30 .
The choice to change the display (hours or minutes).
The change of the displayed value.
In vehicles equipped with the MAXI DOT display, it is also possible to set the
Time in the Time menu » page 47, Settings .
AB37Display of the second speed
Read and observe
on page 30 first.
The display can show the current speed in mph 1)
.
This feature is provided for driving in countries with different speed units.
MAXI DOT display
The display of the second speed can be set in the Alt. speed dis. menu
item » page 47 , Settings .
Segment display
›
Press key
3
» Fig. 23 on page 30 repeatedly, until the odometer display
flashes » page 33 .
›
Press the
7
key while the display flashes.
The second speed is displayed instead of the odometer.
The display of the second speed can be disabled in the same way.
Auto Check Control
Read and observe
on page 30 first.
Vehicle condition
Certain functions of vehicle systems are checked continuously when the igni- tion is switched on.
Some error messages and other information are displayed in the MAXI DOT
display. The messages are displayed simultaneously with the icons in the MAXI
DOT display or with the warning lights in the instrument cluster » page 34,
Warning lights .
The menu item Vehicle status is shown in the main menu of the MAXI DOT
display whenever at least one fault message exists. After selecting this menu,
the first of the error messages is displayed.
Several error messages are shown on the display under the message e.g. 1/3.
This indicates that the first of a total of three error messages is being dis-
played.
1)
For models with the speedometer in mph, the second speed is displayed in km/h.
33Instruments and Indicator Lights
Page 45 of 248
Information system
Driver information system
Introduction
This chapter contains information on the following subjects:
Using the information system
42
Display a low temperature
43
Gear recommendation
43
Door, boot or engine compartment warning
44
The information system provides the driver with alerts and messages about in-
dividual vehicle systems.
This information and advice is shown in the instrument cluster display or indi-
cated by the illumination of the corresponding indicator light in the instrument
cluster.
The information system provides the following information and instructions
(depending on vehicle equipment).
› Data relating to the multi-function display (MFD)
» page 44.
› Data relating to the Maxi DOT display
» page 47.
› Service interval display
» page 49.
› Auto Check Control
» page 33.
› Selector lever positions for an automatic gearbox
» page 138.
WARNINGConcentrate fully at all times on your driving! As the driver, you are fully re-
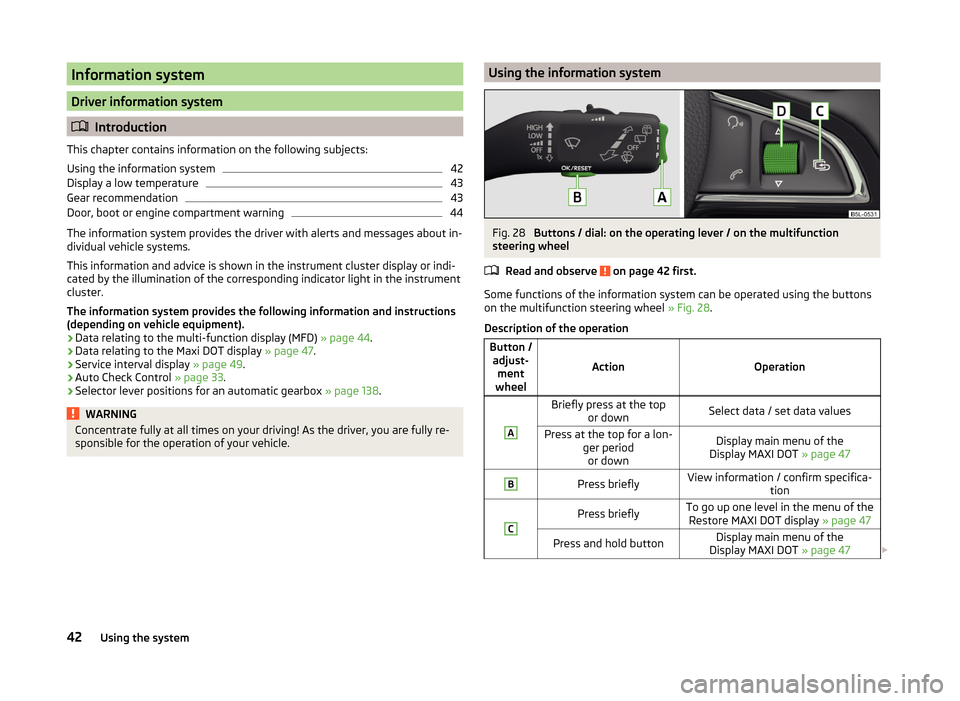
sponsible for the operation of your vehicle.Using the information systemFig. 28
Buttons / dial: on the operating lever / on the multifunction
steering wheel
Read and observe
on page 42 first.
Some functions of the information system can be operated using the buttons
on the multifunction steering wheel » Fig. 28.
Description of the operation
Button / adjust- ment
wheel
ActionOperation
ABriefly press at the top or downSelect data / set data valuesPress at the top for a lon- ger periodor downDisplay main menu of the
Display MAXI DOT » page 47BPress brieflyView information / confirm specifica-
tionCPress brieflyTo go up one level in the menu of theRestore MAXI DOT display » page 47Press and hold buttonDisplay main menu of the
Display MAXI DOT » page 4742Using the system
Page 58 of 248

Unlocking / locking » Fig. 36
Locking
Unlocking
If the icon in the button
is lit, the vehicle is locked.
If the icon in the button
is not lit, the vehicle is not locked.
The central locking system also operates if the ignition is switched off.
The following applies after locking.
› Opening the doors and the boot lid from the outside is not possible.
› The doors can be unlocked and opened from the inside by a single pull on the
opening lever of the respective door.
› In the event of an accident in which the airbags are deployed, the locked
doors are automatically unlocked in order to enable rescuers to gain access
to the vehicle.WARNING■ Doors locked from the inside make it difficult for rescuers to get into the
vehicle in an emergency – risk to life!■
If the Safelock system is switched on » page 54, the door opening levers
and the central locking buttons do not operate.
CAUTION
If at least one door has been opened, the vehicle cannot be locked.
Child safety lock
Fig. 37
Back door: left / right
Read and observe and on page 51 first.
The child safety lock prevents the rear door from being opened from the in- side. The door can only be opened from the outside.
Switching the child safety system on and off » Fig. 37
Switching on
Switching off
You can switch the child safety lock on and off using the vehicle key.
Malfunctions
Read and observe
and on page 51 first.
Failure of the central locking
If the central locking system fails, only the driver's door can be locked / un-
locked with the key. The other doors and the tailgate can be emergency-
locked or unlocked.
› Unlocking / locking
» page 52 for vehicles without remote control.
› Unlocking / locking for vehicles with remote control
» page 211.
› Emergency locking of the door
» page 211.
› Emergency unlocking of the boot lid
» page 212.
Displaying an error
If the warning light in the driver's door initially flashes quickly for around 2 sec-
onds, and then lights up for 30 seconds without interruption before flashing
again slowly, you will need to seek the assistance of a specialist garage.
Discharged battery in the remote control key
If the red indicator light
B
» Fig. 33 on page 52 does not flash when you press
a button on the remote control key, the battery is empty.
If the voltage of the battery in the remote control key is too low, the following
message appears in the display of the instrument cluster.
Renew key battery!
KEY BATTERY
Replace the battery » page 210.
55Unlocking and opening
Page 62 of 248
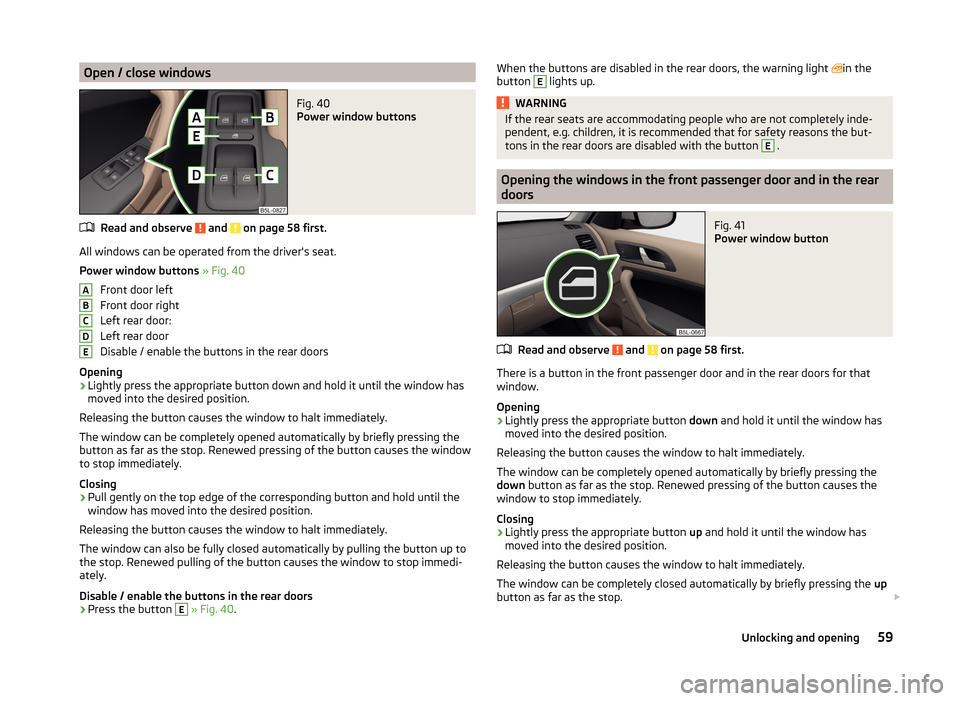
Open / close windowsFig. 40
Power window buttons
Read and observe and on page 58 first.
All windows can be operated from the driver's seat.
Power window buttons » Fig. 40
Front door left
Front door right
Left rear door:
Left rear door
Disable / enable the buttons in the rear doors
Opening
›
Lightly press the appropriate button down and hold it until the window has
moved into the desired position.
Releasing the button causes the window to halt immediately.
The window can be completely opened automatically by briefly pressing the
button as far as the stop. Renewed pressing of the button causes the window
to stop immediately.
Closing
›
Pull gently on the top edge of the corresponding button and hold until the
window has moved into the desired position.
Releasing the button causes the window to halt immediately.
The window can also be fully closed automatically by pulling the button up to
the stop. Renewed pulling of the button causes the window to stop immedi-
ately.
Disable / enable the buttons in the rear doors
›
Press the button
E
» Fig. 40 .
ABCDEWhen the buttons are disabled in the rear doors, the warning light in the
button E lights up.WARNINGIf the rear seats are accommodating people who are not completely inde-
pendent, e.g. children, it is recommended that for safety reasons the but-
tons in the rear doors are disabled with the button E
.
Opening the windows in the front passenger door and in the rear
doors
Fig. 41
Power window button
Read and observe and on page 58 first.
There is a button in the front passenger door and in the rear doors for that
window.
Opening
›
Lightly press the appropriate button down and hold it until the window has
moved into the desired position.
Releasing the button causes the window to halt immediately.
The window can be completely opened automatically by briefly pressing the
down button as far as the stop. Renewed pressing of the button causes the
window to stop immediately.
Closing
›
Lightly press the appropriate button up and hold it until the window has
moved into the desired position.
Releasing the button causes the window to halt immediately.
The window can be completely closed automatically by briefly pressing the up
button as far as the stop.
59Unlocking and opening
Page 65 of 248
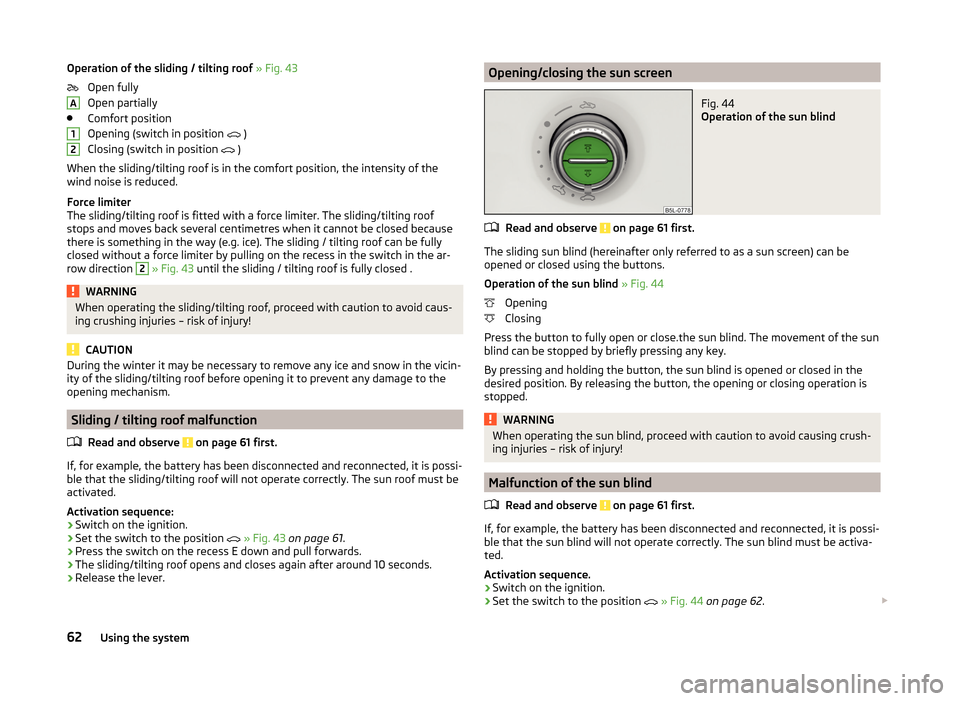
Operation of the sliding / tilting roof » Fig. 43
Open fully
Open partially
Comfort position
Opening (switch in position
)
Closing (switch in position
)
When the sliding/tilting roof is in the comfort position, the intensity of the
wind noise is reduced.
Force limiter
The sliding/tilting roof is fitted with a force limiter. The sliding/tilting roof
stops and moves back several centimetres when it cannot be closed because
there is something in the way (e.g. ice). The sliding / tilting roof can be fully
closed without a force limiter by pulling on the recess in the switch in the ar-
row direction 2
» Fig. 43 until the sliding / tilting roof is fully closed .
WARNINGWhen operating the sliding/tilting roof, proceed with caution to avoid caus-
ing crushing injuries – risk of injury!
CAUTION
During the winter it may be necessary to remove any ice and snow in the vicin-
ity of the sliding/tilting roof before opening it to prevent any damage to the
opening mechanism.
Sliding / tilting roof malfunction
Read and observe
on page 61 first.
If, for example, the battery has been disconnected and reconnected, it is possi-ble that the sliding/tilting roof will not operate correctly. The sun roof must be
activated.
Activation sequence: › Switch on the ignition.
› Set the switch to the position
» Fig. 43 on page 61 .
› Press the switch on the recess E down and pull forwards.
› The sliding/tilting roof opens and closes again after around 10 seconds.
› Release the lever.
A12Opening/closing the sun screenFig. 44
Operation of the sun blind
Read and observe on page 61 first.
The sliding sun blind (hereinafter only referred to as a sun screen) can be
opened or closed using the buttons.
Operation of the sun blind » Fig. 44
Opening
Closing
Press the button to fully open or close.the sun blind. The movement of the sun
blind can be stopped by briefly pressing any key.
By pressing and holding the button, the sun blind is opened or closed in the
desired position. By releasing the button, the opening or closing operation is
stopped.
WARNINGWhen operating the sun blind, proceed with caution to avoid causing crush-
ing injuries – risk of injury!
Malfunction of the sun blind
Read and observe
on page 61 first.
If, for example, the battery has been disconnected and reconnected, it is possi-ble that the sun blind will not operate correctly. The sun blind must be activa-
ted.
Activation sequence.
› Switch on the ignition.
› Set the switch to the position
» Fig. 44 on page 62 .
62Using the system
Page 74 of 248
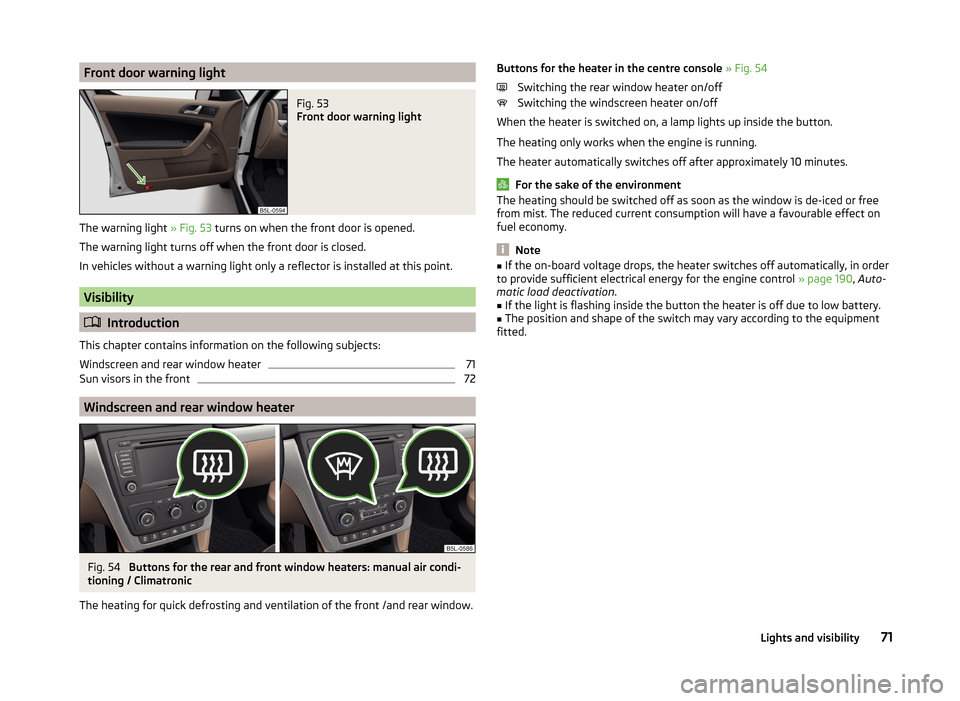
Front door warning lightFig. 53
Front door warning light
The warning light » Fig. 53 turns on when the front door is opened.
The warning light turns off when the front door is closed.
In vehicles without a warning light only a reflector is installed at this point.
Visibility
Introduction
This chapter contains information on the following subjects:
Windscreen and rear window heater
71
Sun visors in the front
72
Windscreen and rear window heater
Fig. 54
Buttons for the rear and front window heaters: manual air condi-
tioning / Climatronic
The heating for quick defrosting and ventilation of the front /and rear window.
Buttons for the heater in the centre console » Fig. 54
Switching the rear window heater on/off
Switching the windscreen heater on/off
When the heater is switched on, a lamp lights up inside the button.
The heating only works when the engine is running.
The heater automatically switches off after approximately 10 minutes.
For the sake of the environment
The heating should be switched off as soon as the window is de-iced or free
from mist. The reduced current consumption will have a favourable effect on
fuel economy.
Note
■ If the on-board voltage drops, the heater switches off automatically, in order
to provide sufficient electrical energy for the engine control » page 190, Auto-
matic load deactivation .■
If the light is flashing inside the button the heater is off due to low battery.
■
The position and shape of the switch may vary according to the equipment
fitted.
71Lights and visibility
Page 82 of 248

NoteIf the setting procedure is interrupted, you will need to press the button again.
Memory Function of the electrically adjustable seat
Fig. 61
Memory buttons and SET button
Read and observe on page 77 first.
The memory function for the driver's seat provides the option to store the po-
sitions of the driver's seat and the external mirrors. Each of the three memory
buttons
B
» Fig. 61 can be assigned a set position.
Storing seat and exterior mirror settings for driving forward
›
Switch on the ignition.
›
Adjust the seat to the desired position.
›
Adjust both of the exterior mirrors » page 76.
›
Press the SET button
A
» Fig. 61
.
›
Within 10 seconds after pressing the SET button, press the desired memory
button
B
.
An acknowledgement sound confirms the storage.
Saving front passenger mirror settings when reversing
Above the MAXI DOT display in the menu item Mirror down The lowering func-
tion for the mirror on the passenger side when reversing must be ena-
bled » page 47 .
›
Switch on the ignition.
›
Press the required memory button
B
» Fig. 61 .
›
Adjust the rotary knob for the mirrors to the position
or in right-hand drive
to the position
» page 76 .
›
Engage reverse gear.
›
Adjust the front passenger's mirror to the desired position » page 76.
›
Disengage reverse gear.
The set position of the exterior mirror is stored.
Retrieving the saved setting
The retrieval is possible when turned the ignition is switched on and the vehi-
cle speed is less than 5 km/h or when the ignition key is inserted in the igni-
tion lock.›
Press and hold the desired memory button
B
» Fig. 61 for a short while.
Stopping the ongoing adjustment
›
Press any button on the driver's seat.
Or
›
Press the button on the remote control key.
Note
Each time you save the seat- and exterior mirror settings for forward travel
you also have to re-save the setting of the exterior mirror on the passenger
side for reversing.
Memory function of the remote control key
Read and observe
on page 77 first.
The automatic storage of the driver's seat and exterior mirror positions when
locking the vehicle can be turned on in the memory of the remote control key
(afterwards only as function of automatic storage).
Enable automatic storage
›
Unlock the vehicle with the remote control key.
›
Press and hold any memory button
B
» Fig. 61 on page 79 . After the seat
has assumed the position stored under this button, at the same time press
the button
on the remote control key within 10 seconds.
The successful activation of the automatic storage function for each key is
confirmed by an acoustic signal.
Storing seat and exterior mirror settings for driving forward
›
Enable automatic storage.
79Seats and head restraints
Page 83 of 248

When automatic storage is activated, the current positions of the driver's seat
and the external mirrors are saved in the memory of the remote control key
each time the vehicle is locked. When the vehicle is next unlocked using the
same key, the driver's seat and the external mirrors assume the positions stor-
ed in the memory of this key 1)
.
Saving front passenger mirror settings when reversing
Above the MAXI DOT display in the menu item Mirror down The lowering func-
tion for the mirror on the passenger side when reversing must be ena-
bled » page 47 .›
Unlock the vehicle with the remote control key.
›
Switch on the ignition.
›
Adjust the rotary knob for the mirrors to the position
or in right-hand drive
to the position
» page 76 .
›
Engage reverse gear.
›
Adjust the front passenger's mirror to the desired position » page 76.
›
Disengage reverse gear.
The adjusted position of the exterior mirror is stored in the remote control key
memory.
Disable the function of automatic storage
›
Unlock the vehicle with the remote control key.
›
Press and hold the SET button
A
» Fig. 61 on page 79 . At the same time,
press the button on the remote control key within 10 seconds.
The successful deactivation of the automatic storage function for each key is confirmed by an acoustic signal.
Stopping the ongoing adjustment
›
Press any button on the driver's seat.
Or
›
Press the button on the remote control key.
Front seat functions
Introduction
This chapter contains information on the following subjects:
Front seat heating
80
Front armrest
81
Folding front passenger seat
81
Front seat heating
Fig. 62
Buttons for heating the front
seats
The seat backrests and seats can be heated electrically.
The seat heating can only be switched on when the engine is running.
Buttons for the seat heater » Fig. 62
Left seat heating
Right seat heating
Switching on
›
Press the corresponding symbol button or
» Fig. 62 .
Pressing once switches the seat heating on at its maximum level.
With repeated pressing of the switch, the intensity of the heating is reduced
until it is switched off.
The level of the seat heating is indicated by the number of illuminated warning
lights in the switch.
1)
The vehicle must be locked and unlocked with the same key to save the seat and exterior mirror position
to the key.
80Using the system
Page 112 of 248

If a temperature lower than +18 °C is selected, a blue symbol lights up at the
start of the numerical scale.
If a temperature higher than +26 °C is selected, the
symbol lights up at the
start of the numerical scale.
At both end positions, Climatronic runs at maximum cooling/heating output
and the temperature is automatically not regulated.
Controlling blower
The Climatronic system controls the blower stages automatically in line with the interior temperature. However, the blower stages can be manually adap-
ted to suit your particular needs.
If the blower speed is reduced to a minimum, Climatronic is switched off.
The set blower speed is displayed above the symbol button when the re-
spective number of indicator lights come on.
Automatic mode
The automatic mode is used in order to maintain a constant temperature and to demist the windows in the interior of the car.
If the warning light in the top right corner of the button lights up, the Cli-
matronic operates in “HIGH”-mode. The “HIGH” mode is the standard setting of
the Climatronic.
Upon pressing the button again, the Climatronic switches to “LOW”-mode
and the indicator light in the top left corner lights up. The Climatronic uses on-
ly in this mode the lower blower speed. However taking into account the noise
level, this is more comfortable, yet be aware that the effectiveness of the air
conditioning system is reduced particularly if the vehicle is fully occupied.
By pressing the button again, it is changed to “HIGH”-mode.
Automatic mode is switched off by pressing one of the buttons for the air dis- tribution or by increasing/decreasing the blower speed. The temperature is
nevertheless regulated.WARNING■ Do not switch off the Climatronic system for longer than necessary.■Switch on the Climatronic system as soon as the windows mist up.Note■ Do not stick anything onto or cover the interior temperature sensorB » Fig. 113 as this could impair the functioning of the Climatronic.■
If the windscreen mists up, press the symbol button
. Press the button
once the windscreen has demisted.
■
During operation of the Climatronic, an increase in engine idle speed can oc-
cur under certain circumstances in order to ensure adequate heating comfort.
■
For vehicles with factory-fitted radio the Climatronic information also ap-
pears on its display. This function can be switched off, see » Radio manual .
Efficient handling of the cooling system
Read and observe
and on page 104 first.
The air conditioning system compressor uses power from the engine when incooling mode, which will affect the fuel consumption.
It recommended to open the windows or the doors of a vehicle for which the
interior has been strongly heated through the effect of direct sunlight in order
to allow the heated air to escape.
The cooling system should not be on if the windows are open.
For the sake of the environment
Pollutant emissions are also lower when fuel is being saved » page 140.
malfunctions
Read and observe
and on page 104 first.
If the cooling system does not operate at outside temperatures higher than +5°C, there is a problem in the system. The reasons for this may be.
› One of the fuses has blown. Check the fuse and replace if necessa-
ry » page 214 .
› The cooling system has switched off automatically for a short time because
the coolant temperature of the engine is too hot » page 31.
If you are not able to resolve the operational problem yourself, or if the cooler
output has reduced, switch off the cooling system and seek assistance from a
specialist garage.
109Heating and air conditioning