SMART FORTWO COUPE 2011 Owners Manual
Manufacturer: SMART, Model Year: 2011, Model line: FORTWO COUPE, Model: SMART FORTWO COUPE 2011Pages: 228, PDF Size: 11.48 MB
Page 101 of 228
Setting the period of dayXPress the control switch on the control
lever ( Y page 93) up or down until the
am pm submenu appears in the
multifunction display.XPress the OK button on the control lever
briefly.XPress the control switch on the control
lever ( Y page 93) up or down until the
desired setting is selected.XPress the OK button on the control lever
briefly to confirm.
The selected mode is stored.
Setting the hours
XPress the control switch on the control
lever ( Y page 93) up or down until the
Hour submenu appears in the
multifunction display.XPress the OK button on the control lever
briefly.XPress the control switch on the control
lever ( Y page 93) up or down until the
desired setting is selected.XPress the OK button on the control lever
briefly to confirm.
The selected hours are stored.
Setting the minutes
XPress the control switch on the control
lever ( Y page 93) up or down until the
Minute submenu appears in the
multifunction display.XPress the OK button on the control lever
briefly.XPress the control switch on the control
lever ( Y page 93) up or down until the
desired setting is selected.XPress the OK button on the control lever
briefly to confirm.
The selected minutes are stored.Audio system*GWarning!
In order to avoid distraction which could
lead to an accident, the driver should enter
system settings with the vehicle at a
standstill and operate the system only when
road and traffic conditions permit. Always
pay full attention to traffic conditions
first before operating system controls
while driving.
Bear in mind that at a speed of just 30 mph
(approximately 50 km/h), your vehicle is
covering a distance of 44 feet
(approximately 14 m) every second.
GWarning!
Always select a volume that allows you to
still hear ambient sound in your immediate
vicinity (e.g. horns, emergency rescue
vehicles, police vehicles, etc.). You could
otherwise cause an accident.
GWarning!
If you wish to have a radio other than an
original smart radio fitted in your
vehicle, please always have the necessary
work performed at an authorized smart
center.
This is particularly important if your
vehicle is fitted with a radio
preinstallation. Improper connection can
result in the failure of important vehicle
functions, thereby endangering the
operating safety of your vehicle and thus
your own safety and that of other people.
The following pages contain a brief
description of the audio systems available
for the coupé and cabriolet.
The devices are described with their full
complement of equipment. The description
for your individual equipment
specification applies.
Please refer to the separate operating
instructions for detailed functions.
Audio system*99>> Controls.* optionalBA 451 USA, CA Edition A 2011; 1; 4, en-UShereepeVersion: 3.0.3.62010-05-11T15:12:26+02:00 - Seite 99Z
Page 102 of 228
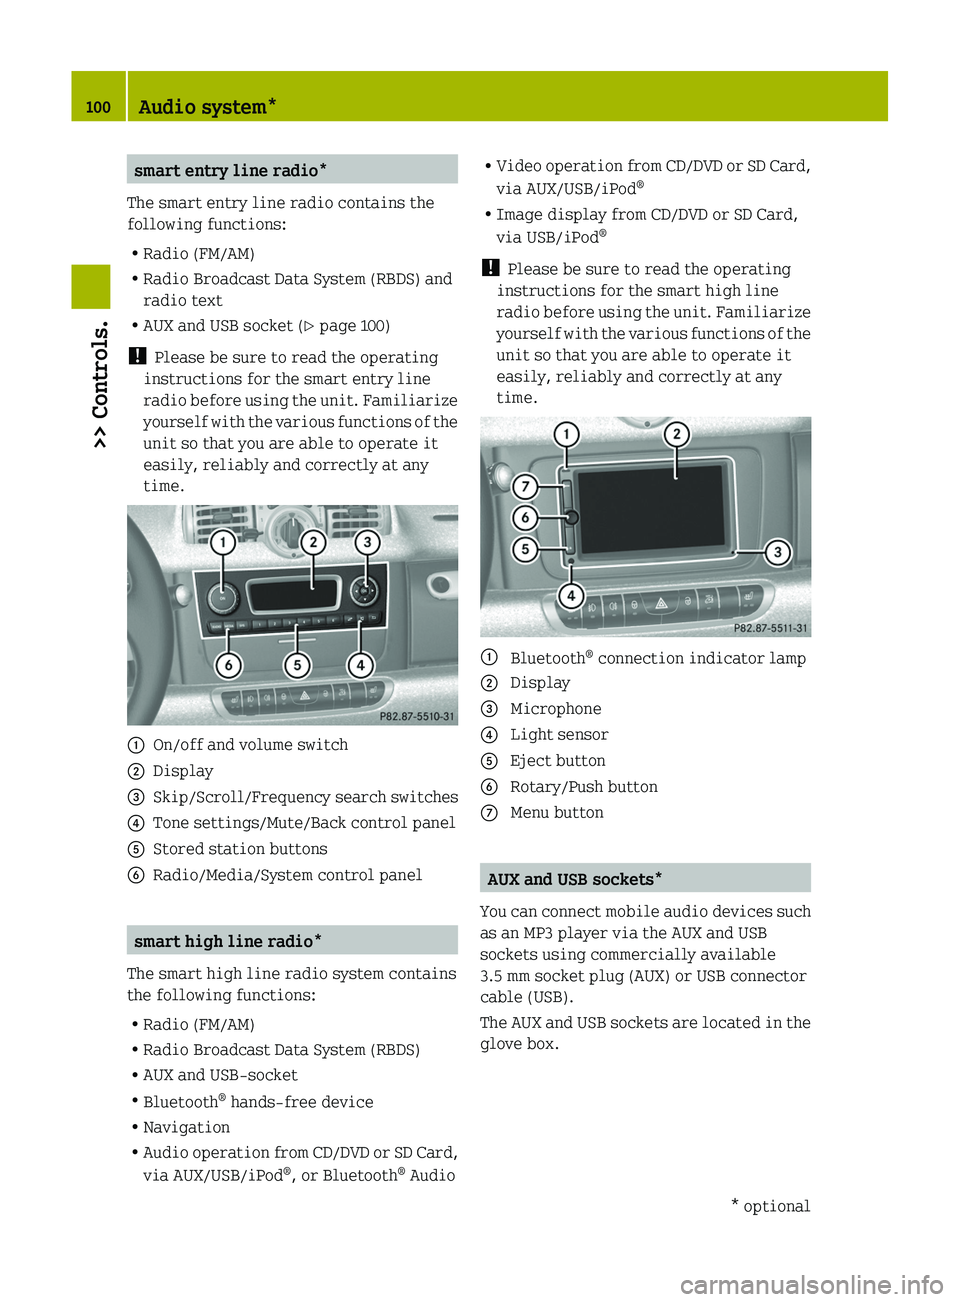
smart entry line radio*
The smart entry line radio contains the
following functions:
RRadio (FM/AM)
RRadio Broadcast Data System (RBDS) and
radio text
RAUX and USB socket (Y page 100)
! Please be sure to read the operating
instructions for the smart entry line
radio before using the unit. Familiarize
yourself with the various functions of the
unit so that you are able to operate it
easily, reliably and correctly at any
time.
\000FOn/off and volume switch\000GDisplay\000
Page 103 of 228
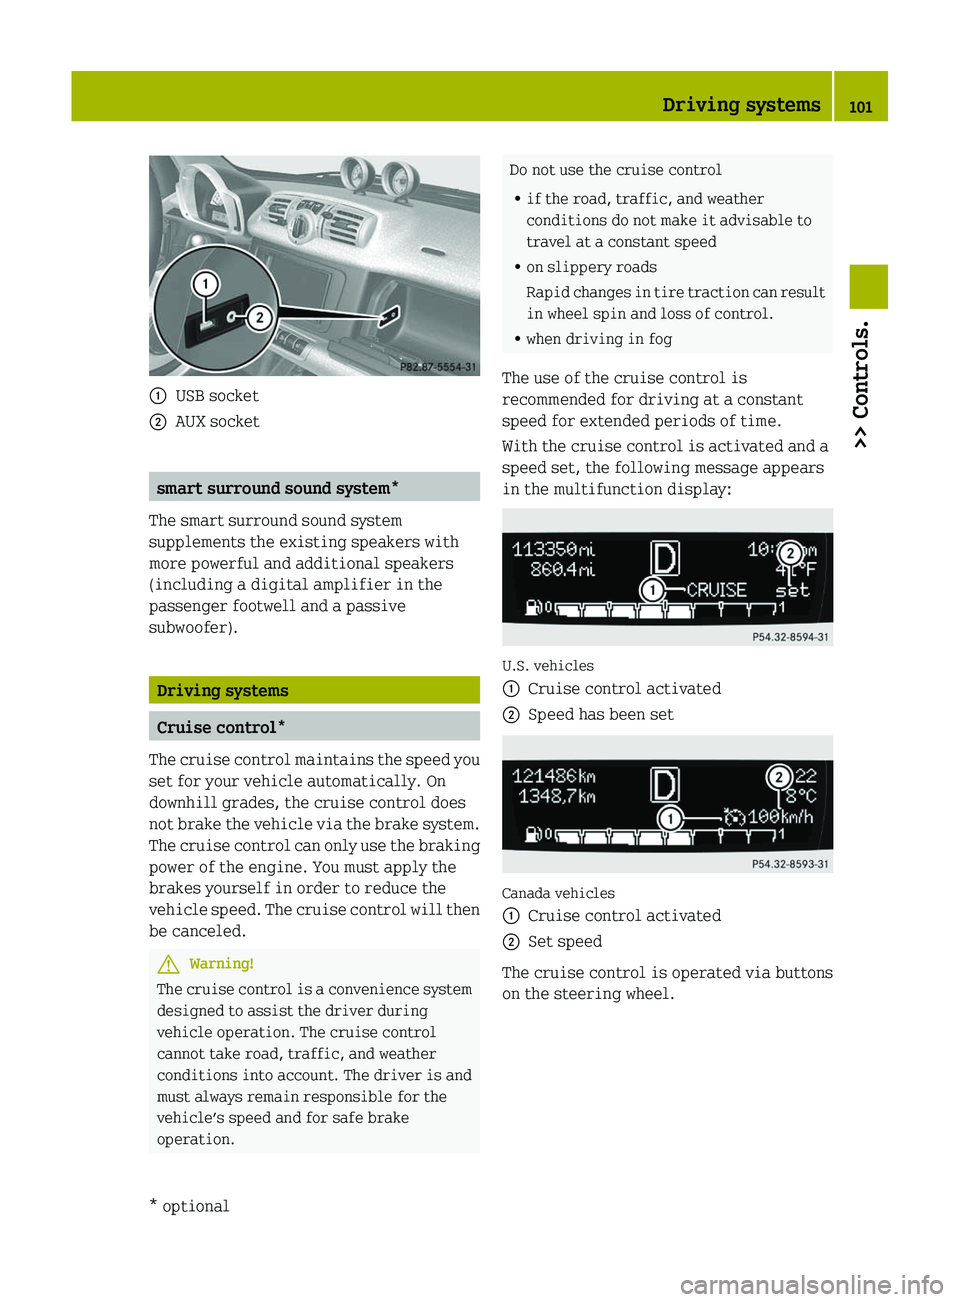
\000FUSB socket\000GAUX socket
smart surround sound system*
The smart surround sound system
supplements the existing speakers with
more powerful and additional speakers
(including a digital amplifier in the
passenger footwell and a passive
subwoofer).
Driving systems
Cruise control*
The cruise control maintains the speed you
set for your vehicle automatically. On
downhill grades, the cruise control does
not brake the vehicle via the brake system.
The cruise control can only use the braking
power of the engine. You must apply the
brakes yourself in order to reduce the
vehicle speed. The cruise control will then
be canceled.
GWarning!
The cruise control is a convenience system
designed to assist the driver during
vehicle operation. The cruise control
cannot take road, traffic, and weather
conditions into account. The driver is and
must always remain responsible for the
vehicle’s speed and for safe brake
operation.
Do not use the cruise control
Rif the road, traffic, and weather
conditions do not make it advisable to
travel at a constant speed
Ron slippery roads
Rapid changes in tire traction can result
in wheel spin and loss of control.
Rwhen driving in fog
The use of the cruise control is
recommended for driving at a constant
speed for extended periods of time.
With the cruise control is activated and a
speed set, the following message appears
in the multifunction display:
U.S. vehicles
\000FCruise control activated\000GSpeed has been set
Canada vehicles
\000FCruise control activated\000GSet speed
The cruise control is operated via buttons
on the steering wheel.
Driving systems101>> Controls.* optionalBA 451 USA, CA Edition A 2011; 1; 4, en-UShereepeVersion: 3.0.3.62010-05-11T15:12:26+02:00 - Seite 101Z
Page 104 of 228
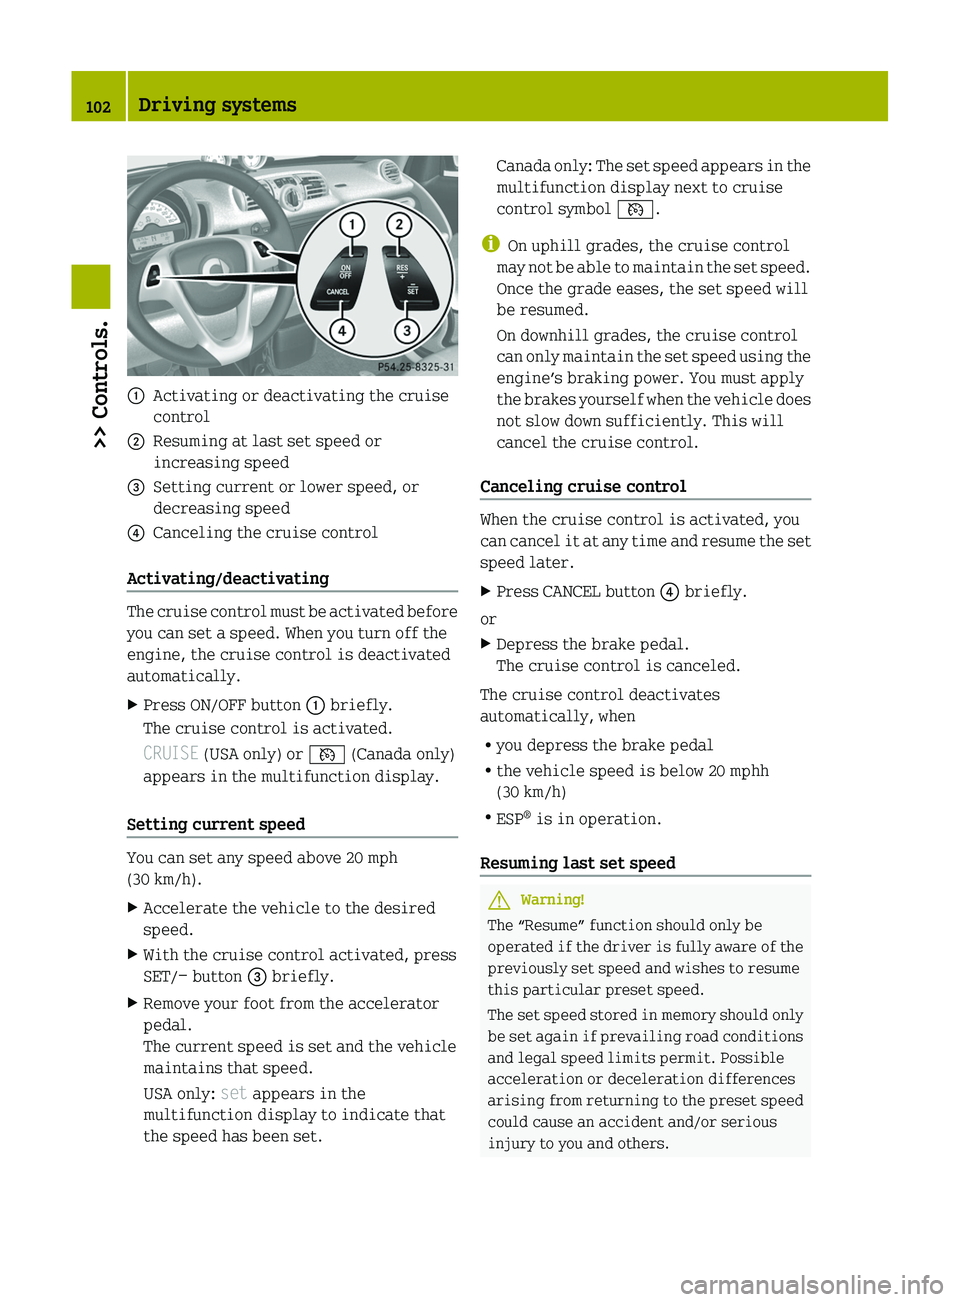
\000FActivating or deactivating the cruise
control
\000GResuming at last set speed or
increasing speed
\000
Page 105 of 228
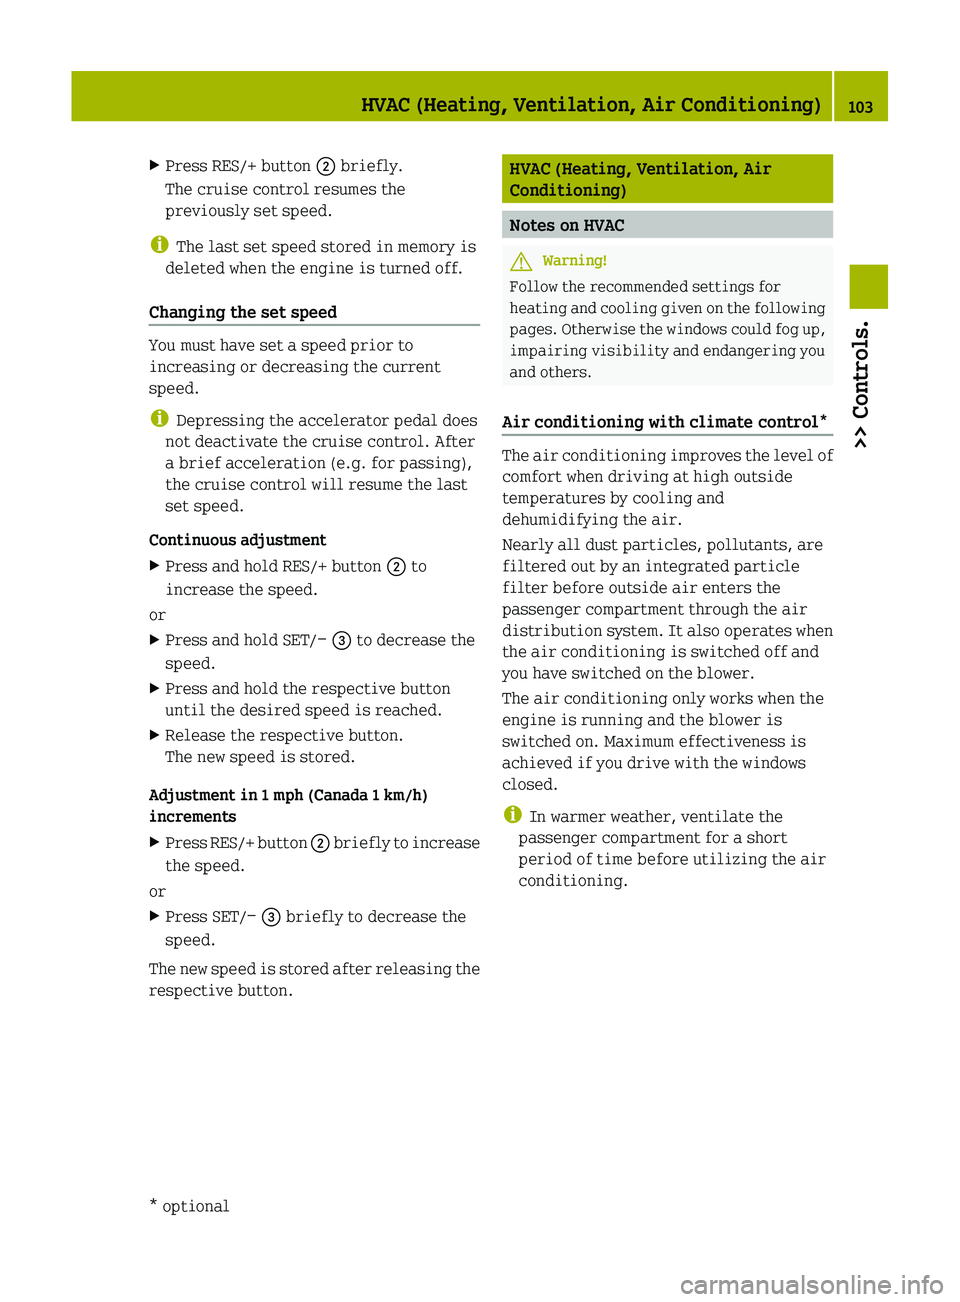
XPress RES/+ button 0047 briefly.
The cruise control resumes the
previously set speed.
i The last set speed stored in memory is
deleted when the engine is turned off.
Changing the set speed
You must have set a speed prior to
increasing or decreasing the current
speed.
i Depressing the accelerator pedal does
not deactivate the cruise control. After
a brief acceleration (e.g. for passing),
the cruise control will resume the last
set speed.
Continuous adjustment
XPress and hold RES/+ button 0047 to
increase the speed.
or
XPress and hold SET/ − 008A to decrease the
speed.XPress and hold the respective button
until the desired speed is reached.XRelease the respective button.
The new speed is stored.
Adjustment in 1 mph (Canada 1 km/h)
increments
XPress RES/+ button 0047 briefly to increase
the speed.
or
XPress SET/ − 008A briefly to decrease the
speed.
The new speed is stored after releasing the
respective button.
HVAC (Heating, Ventilation, Air
Conditioning)
Notes on HVAC
GWarning!
Follow the recommended settings for
heating and cooling given on the following
pages. Otherwise the windows could fog up,
impairing visibility and endangering you
and others.
Air conditioning with climate control*
The air conditioning improves the level of
comfort when driving at high outside
temperatures by cooling and
dehumidifying the air.
Nearly all dust particles, pollutants, are
filtered out by an integrated particle
filter before outside air enters the
passenger compartment through the air
distribution system. It also operates when
the air conditioning is switched off and
you have switched on the blower.
The air conditioning only works when the
engine is running and the blower is
switched on. Maximum effectiveness is
achieved if you drive with the windows
closed.
i In warmer weather, ventilate the
passenger compartment for a short
period of time before utilizing the air
conditioning.
HVAC (Heating, Ventilation, Air Conditioning)103>> Controls.* optionalBA 451 USA, CA Edition A 2011; 1; 4, en-UShereepeVersion: 3.0.3.62010-05-11T15:12:26+02:00 - Seite 103Z
Page 106 of 228
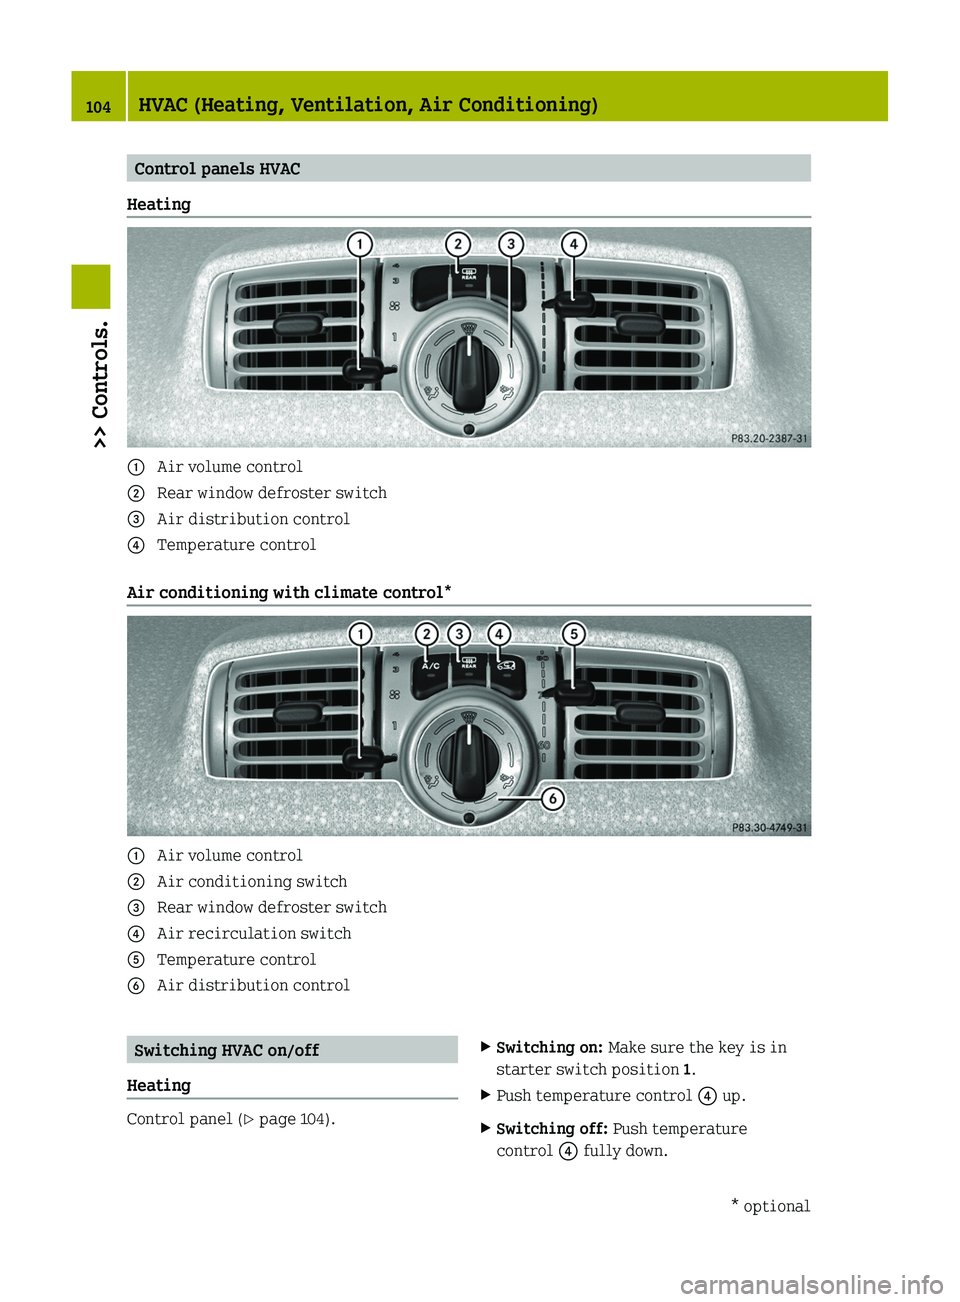
Control panels HVAC
Heating
\000F Air volume control\000G Rear window defroster switch\000
Page 107 of 228
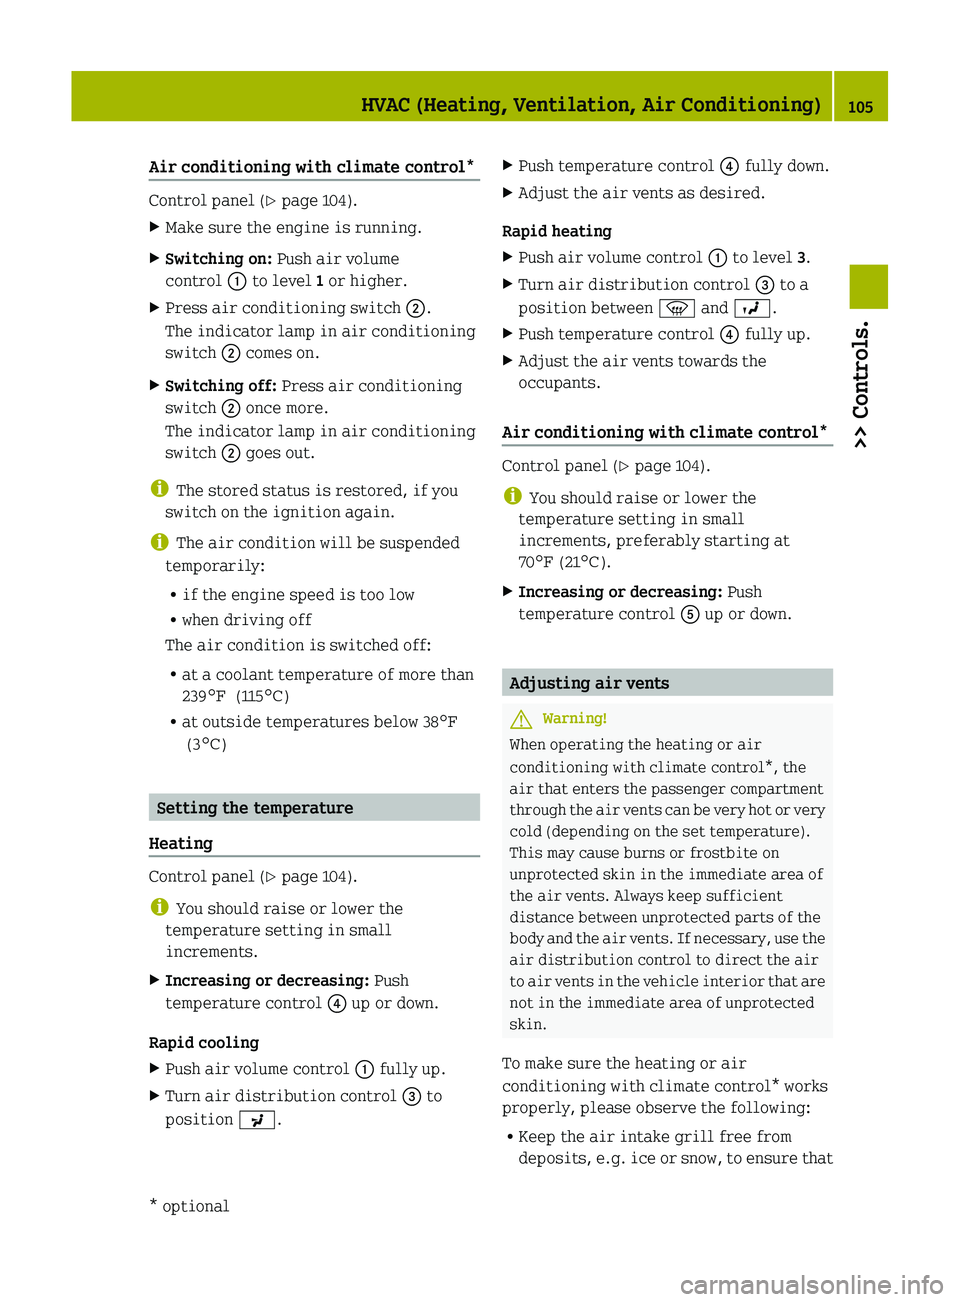
Air conditioning with climate control*
Control panel (Y page 104).
XMake sure the engine is running.XSwitching on: Push air volume
control 0046 to level 1 or higher.XPress air conditioning switch 0047.
The indicator lamp in air conditioning
switch 0047 comes on.XSwitching off: Press air conditioning
switch 0047 once more.
The indicator lamp in air conditioning
switch 0047 goes out.
i
The stored status is restored, if you
switch on the ignition again.
i The air condition will be suspended
temporarily:
R if the engine speed is too low
R when driving off
The air condition is switched off:
R at a coolant temperature of more than
239 ¦ (115 ¥)
R at outside temperatures below 38 ¦
(3 ¥ )
Setting the temperature
Heating
Control panel ( Y page 104).
i You should raise or lower the
temperature setting in small
increments.
XIncreasing or decreasing: Push
temperature control 0088 up or down.
Rapid cooling
XPush air volume control 0046 fully up.XTurn air distribution control 008A to
position 009E.XPush temperature control 0088 fully down.XAdjust the air vents as desired.
Rapid heating
XPush air volume control 0046 to level 3.XTurn air distribution control 008A to a
position between 0087 and 009D .XPush temperature control 0088 fully up.XAdjust the air vents towards the
occupants.
Air conditioning with climate control*
Control panel ( Y page 104).
i You should raise or lower the
temperature setting in small
increments, preferably starting at
70 ¦ (21 ¥).
XIncreasing or decreasing: Push
temperature control 0086 up or down.
Adjusting air vents
GWarning!
When operating the heating or air
conditioning with climate control*, the
air that enters the passenger compartment
through the air vents can be very hot or very
cold (depending on the set temperature).
This may cause burns or frostbite on
unprotected skin in the immediate area of
the air vents. Always keep sufficient
distance between unprotected parts of the
body and the air vents. If necessary, use the
air distribution control to direct the air
to air vents in the vehicle interior that are
not in the immediate area of unprotected
skin.
To make sure the heating or air
conditioning with climate control* works
properly, please observe the following:
R Keep the air intake grill free from
deposits, e.g. ice or snow, to ensure that
HVAC (Heating, Ventilation, Air Conditioning)105>> Controls.* optionalBA 451 USA, CA Edition A 2011; 1; 4, en-UShereepeVersion: 3.0.3.62010-05-11T15:12:26+02:00 - Seite 105Z
Page 108 of 228
fresh air can flow freely into the vehicle
interior.
RDo not obstruct air vents or ventilation
grilles in the vehicle interior.
iFor draft-free ventilation, move the
sliders for the center air vents and side
air vents to the middle position.
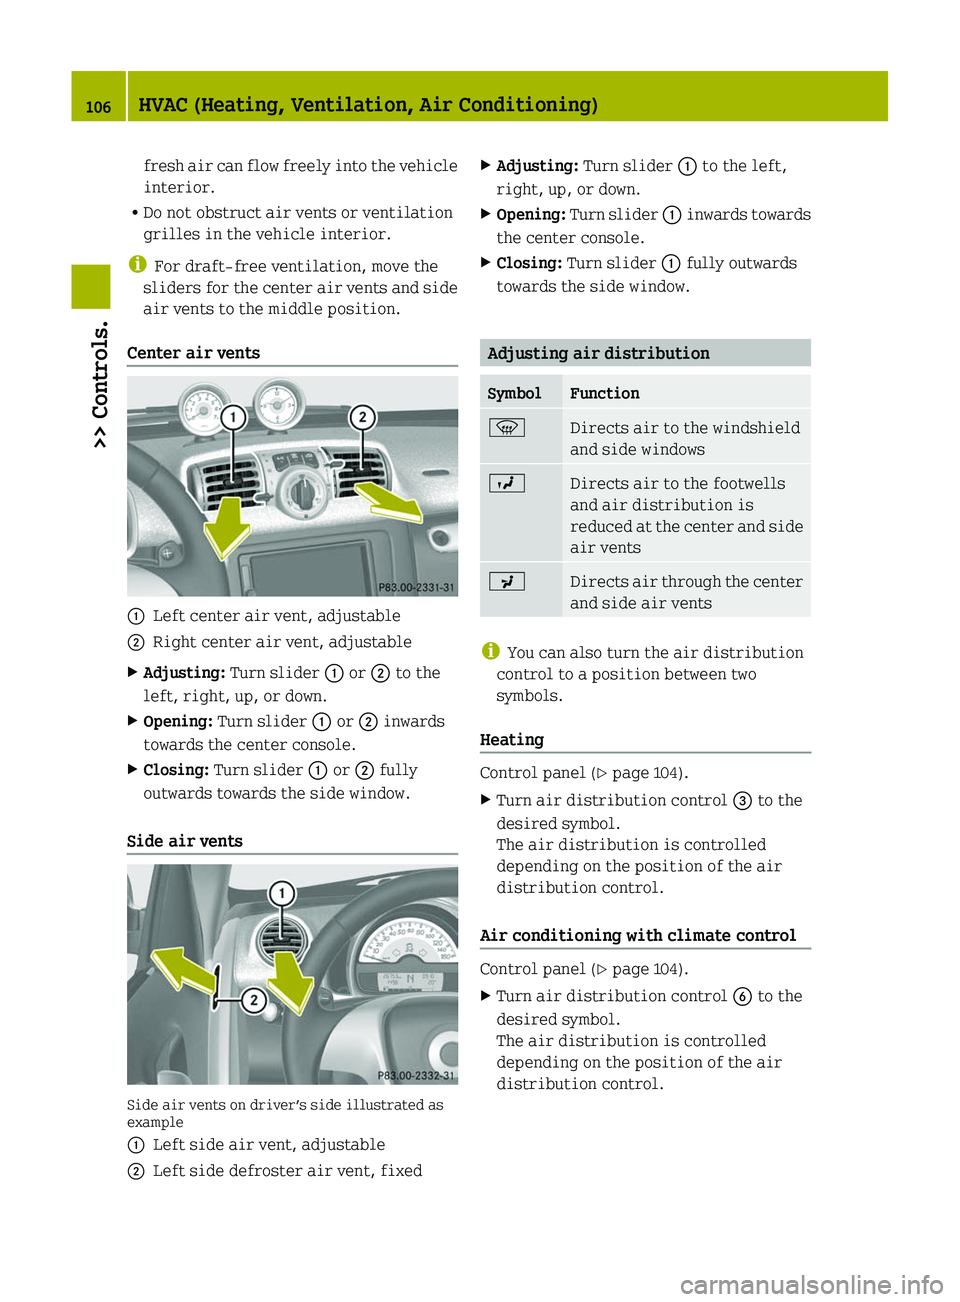
Center air vents
\000FLeft center air vent, adjustable\000GRight center air vent, adjustableXAdjusting: Turn slider \000F or \000G to the
left, right, up, or down.
XOpening: Turn slider \000F or \000G inwards
towards the center console.
XClosing: Turn slider \000F or \000G fully
outwards towards the side window.
Side air vents
Side air vents on driver’s side illustrated asexample
\000FLeft side air vent, adjustable\000GLeft side defroster air vent, fixedXAdjusting: Turn slider \000F to the left,
right, up, or down.
XOpening: Turn slider \000F inwards towards
the center console.
XClosing: Turn slider \000F fully outwards
towards the side window.
Adjusting air distribution
SymbolFunction\000
Page 109 of 228
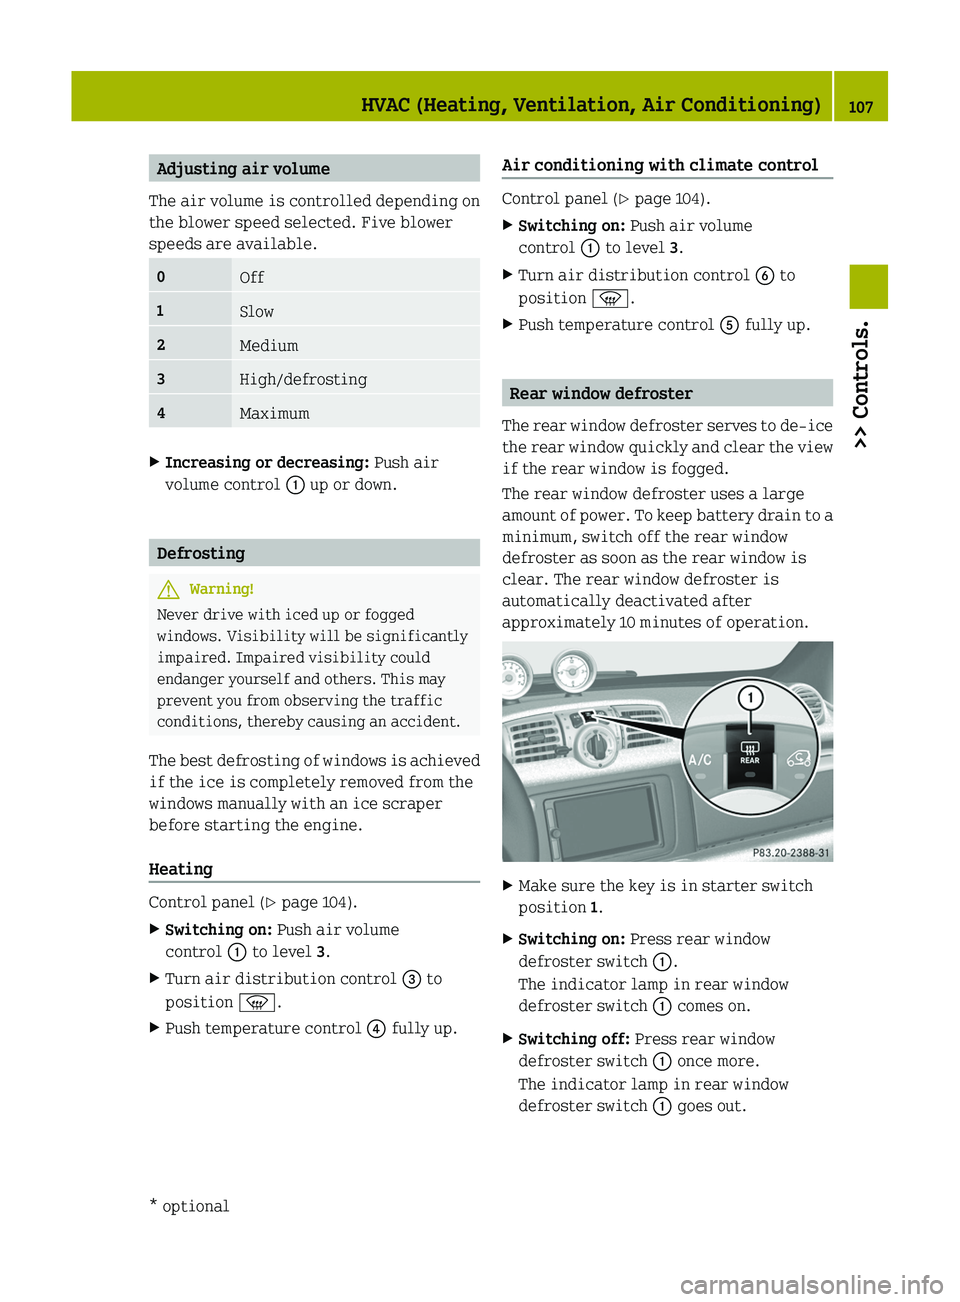
Adjusting air volume
The air volume is controlled depending on
the blower speed selected. Five blower
speeds are available.
0Off1Slow2Medium3High/defrosting4MaximumXIncreasing or decreasing: Push air
volume control \000F up or down.
Defrosting
GWarning!
Never drive with iced up or fogged
windows. Visibility will be significantly
impaired. Impaired visibility could
endanger yourself and others. This may
prevent you from observing the traffic
conditions, thereby causing an accident.
The best defrosting of windows is achieved
if the ice is completely removed from the
windows manually with an ice scraper
before starting the engine.
Heating
Control panel (Y page 104).
XSwitching on: Push air volume
control \000F to level 3.
XTurn air distribution control \000
Page 110 of 228
Air recirculation mode*
Switch to air recirculation mode 12
to
prevent unpleasant odors from entering the
vehicle from the outside (e.g. before
driving through a tunnel). This setting cuts
off the intake of outside air and
recirculates the air in the passenger
compartment.GWarning!
When the air recirculation mode is
switched on, windows can fog on the inside
immediately. Fogged windows impair
visibility, endangering you and others. If
the windows begin to fog on the inside,
switching off the air recirculation mode
immediately should clear interior window
fogging. If interior window fogging
persists, make sure the air conditioning is
switched on, turn air distribution control
0087 to position 0087 and increase the air
volume using air volume control 0046.
Control panel ( Y page 104).
XSwitching on: Press air recirculation
switch 0088.
The indicator lamp in air recirculation
switch 0088 comes on.XSwitching off: Press air recirculation
switch 0088 once more.
The indicator lamp in air recirculation
switch 0088 goes out.
Loading and storing
Cup holder
GWarning!
In order to help prevent spilling liquids
on vehicle occupants and/or vehicle
equipment, only use containers that fit
into the cup holder. Use lids on open
containers and do not fill containers to a
height where the contents, especially hot
liquids, could spill during braking,
vehicle maneuvers, or an accident. Liquids
spilled on vehicle occupants may cause
serious personal injury. Liquids spilled
on vehicle equipment may cause damage not
covered by the smart Limited Warranty.
Keep in mind that objects placed in a cup
holder may come loose during braking,
vehicle maneuvers, or an accident and be
thrown around in the vehicle interior.
Objects thrown around in the vehicle
interior may cause an accident and/or
serious personal injury.
The cup holder can be used to safely store
sealed drink bottles, containers with a lid,
or beverage cans.
! Do not use the cup holder as an ashtray.
Otherwise it could be damaged.
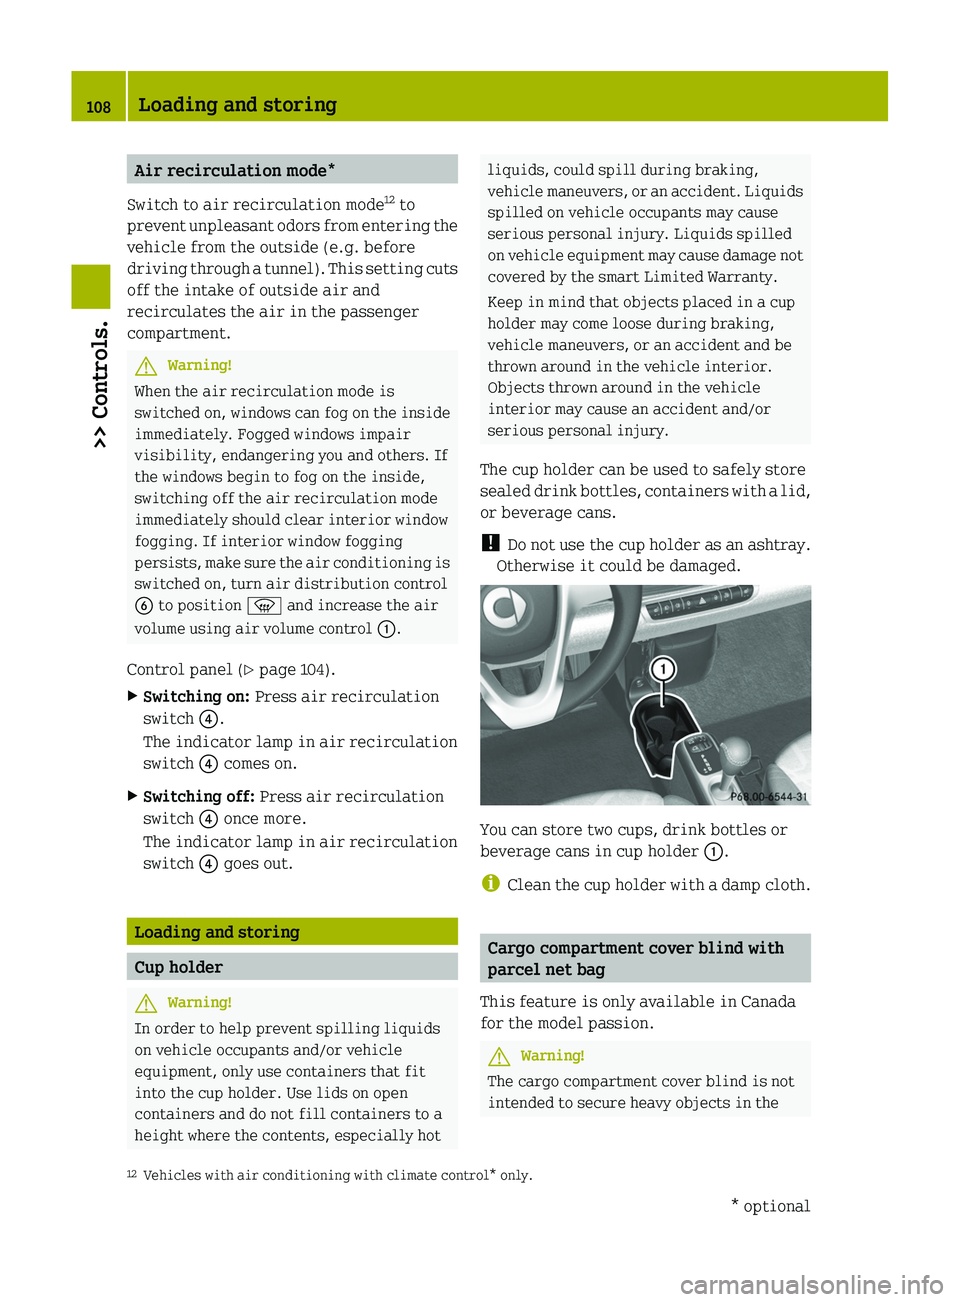
You can store two cups, drink bottles or
beverage cans in cup holder 0046.
i Clean the cup holder with a damp cloth.
Cargo compartment cover blind with
parcel net bag
This feature is only available in Canada
for the model passion.
GWarning!
The cargo compartment cover blind is not
intended to secure heavy objects in the
12 Vehicles with air conditioning with climate control* only.108Loading and storing>> Controls.* optionalBA 451 USA, CA Edition A 2011; 1; 4, en-UShereepeVersion: 3.0.3.62010-05-11T15:12:26+02:00 - Seite 108