sensor SSANGYONG KORANDO 1997 Service Service Manual
[x] Cancel search | Manufacturer: SSANGYONG, Model Year: 1997, Model line: KORANDO, Model: SSANGYONG KORANDO 1997Pages: 2053, PDF Size: 88.33 MB
Page 243 of 2053
1F1 -- 80 M162 ENGINE CONTROLS
D AEW OO M Y_2000
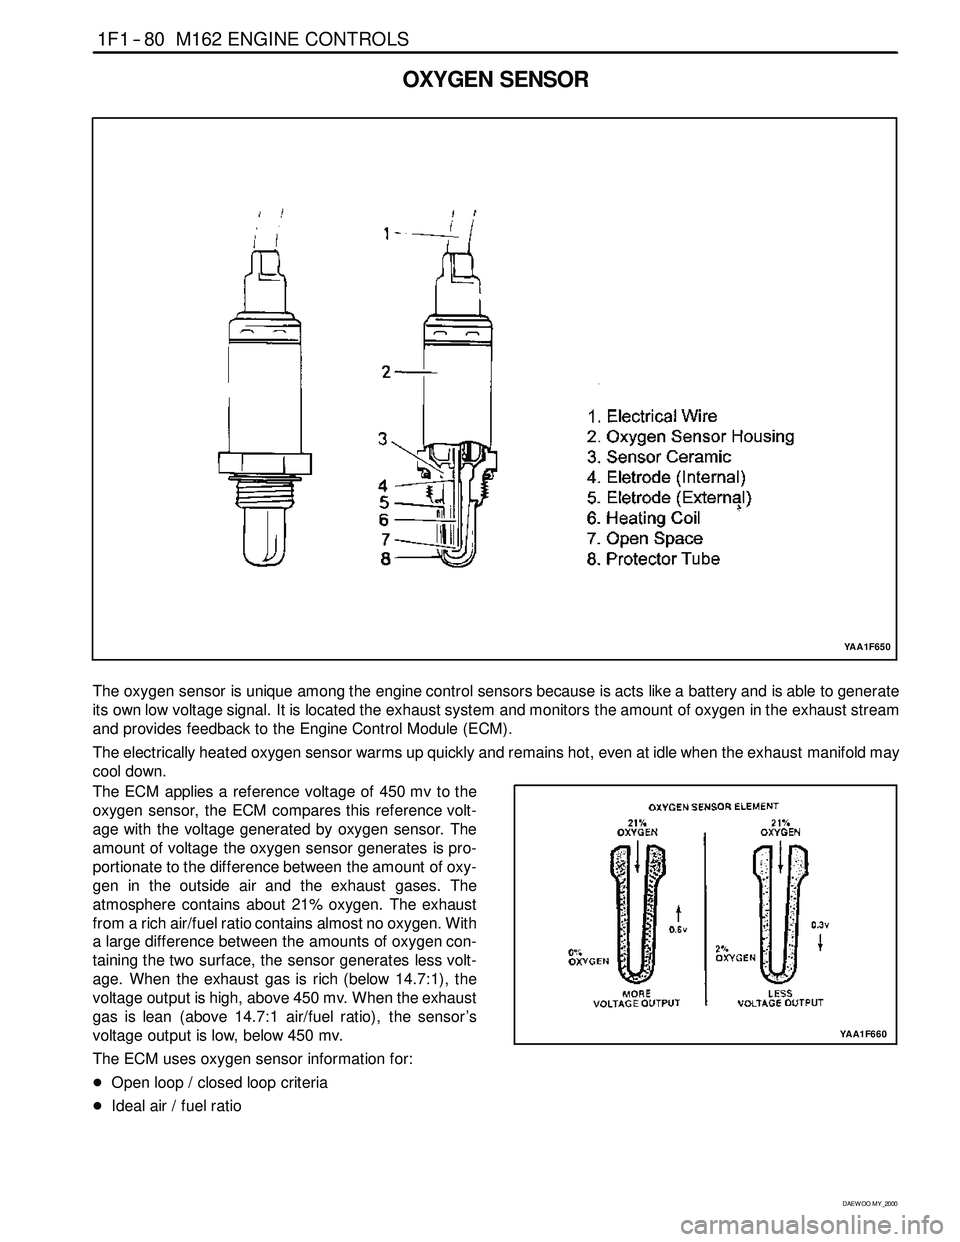
OXYGEN SENSOR
YAA1F650
The oxygen sensor is unique among the engine control sensors because is acts like a battery and is able to generate
its own low voltage signal. It is located the exhaust system and monitors the amount of oxygen in the exhaust stream
and provides feedback to the Engine Control Module (ECM).
The electrically heated oxygen sensor warms up quickly and remains hot, even at idle when the exhaust manifold may
cool down.
The ECM applies a reference voltage of 450 mv to the
oxygen sensor, the ECM compares this reference volt-
age with the voltage generated by oxygen sensor. The
amount of voltage the oxygen sensor generates is pro-
portionate to the difference between the amount of oxy-
gen in the outside air and the exhaust gases. The
atmosphere contains about 21% oxygen. The exhaust
from a rich air/fuel ratio contains almost no oxygen. With
a large difference between the amounts of oxygen con-
taining the two surface, the sensor generates less volt-
age. When the exhaust gas is rich (below 14.7:1), the
voltage output is high, above 450 mv. When the exhaust
gas is lean (above 14.7:1 air/fuel ratio), the sensor ’s
voltage output is low, below 450 mv.
The ECM uses oxygen sensor information for:
DOpen loop / closed loop criteria
DIdeal air / fuel ratio
YAA1F660
Page 245 of 2053
1F1 -- 82 M162 ENGINE CONTROLS
D AEW OO M Y_2000
KAB1F340
Failure
CodeDescriptionTrouble AreaMaintenance Hint
80Oxygen sensor high
voltage
When recognition the output
that more than nominal
threshold, malfunction of
sensing voltage.
89Oxygen sensor low
voltage
When recognition the output
that more than nominal
threshold, malfunction of
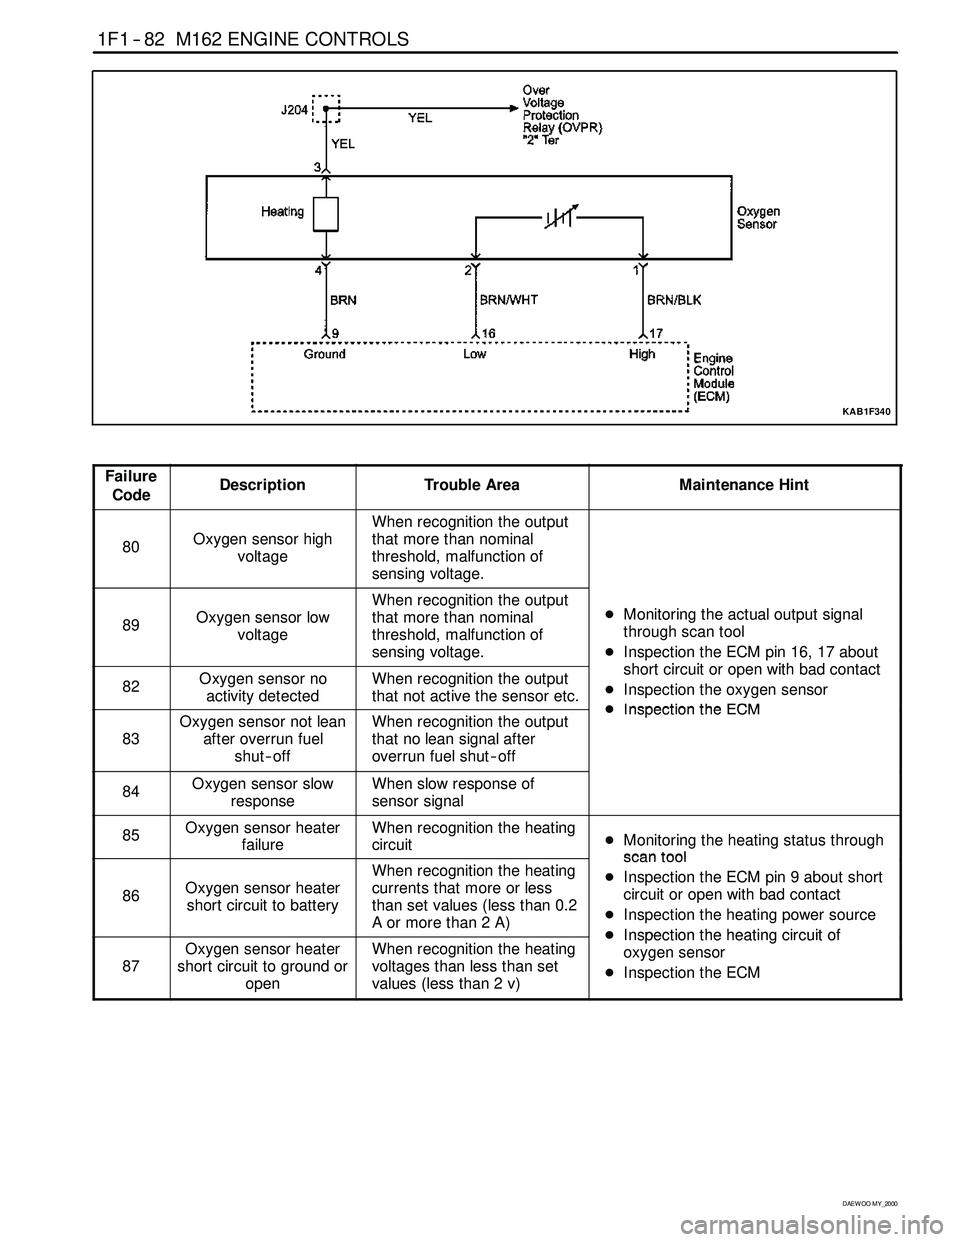
sensing voltage.DMonitoring the actual output signal
through scan tool
DInspection the ECM pin 16, 17 about
htiitithbdtt
82Oxygen sensor no
activity detectedWhen recognition the output
that not active the sensor etc.short circuit or open with bad contact
DInspection the oxygen sensor
DInspectiontheECM
83
Oxygen sensor not lean
after overrun fuel
shut -- offWhen recognition the output
that no lean signal after
overrun fuel shut -- offDInspectiontheECM
84Oxygen sensor slow
responseWhen slow response of
sensor signal
85Oxygen sensor heater
failureWhen recognition the heating
circuitDMonitoring the heating status through
scantool
86Oxygen sensor heater
short circuit to battery
When recognition the heating
currents that more or less
than set values (less than 0.2
Aormorethan2A)scantool
DInspection the ECM pin 9 about short
circuit or open with bad contact
DInspection the heating power source
DInspectiontheheatingcircuitof
87
Oxygen sensor heater
short circuit to ground or
openWhen recognition the heating
voltages than less than set
values (less than 2 v)DInspectiontheheating circuitof
oxygen sensor
DInspection the ECM
Page 246 of 2053
M162 ENGINE CONTROLS 1F1 -- 83
D AEW OO M Y_2000
Failure
CodeDescriptionTrouble AreaMaintenance Hint
81
Bank 1 system short
term fuel trim adaptation
below lean threshold
When recognition the value
less than nominal control
threshold, it means that when
big deviation in control range
of adaptation values through
fuel and air mixture formation
93
Bank 1 system short
term fuel trim adaptation
above rich threshold
When recognition the value
more than nominal control
threshold, it means that when
big deviation in control range
of adaptation values through
fuel and air mixture formation
96
Bank 1 system short
term fuel trim at rich
stopWhen recognition the short
term fuel trim that more than
nominal threshold
97
Bank1 system short
term fuel trim at lean
stopWhen recognition the short
term fuel trim that less than
nominal threshold
DInspection the intake air leakage
DIns
pection the injectionquantities with
98
Bank 1 system idle
adaptation failure (above
rich threshold)When recognition the long
term fuel trim exceeds rich
threshold
DInspectiontheinjectionquantitieswith
injector block or leakage
DInspection the exhaust leakage
DInspection the ECM
99
Bank 1 system idle
adaptation failure (below
rich threshold)When recognition the long
term fuel trim exceeds lean
threshold
p
100
Bank 1 system learning
control failure (rich, low
load)When recognition the long
term fuel trim exceeds rich
threshold
101
Bank 1 system learning
control failure (lean, low
load)When recognition the long
term fuel trim exceeds lean
threshold
102
Bank 1 system learning
control failure (rich, high
load)When recognition the long
term fuel trim exceeds rich
threshold
103
Bank 1 system learning
control failure (rich, low
load)When recognition the long
term fuel trim exceeds lean
threshold
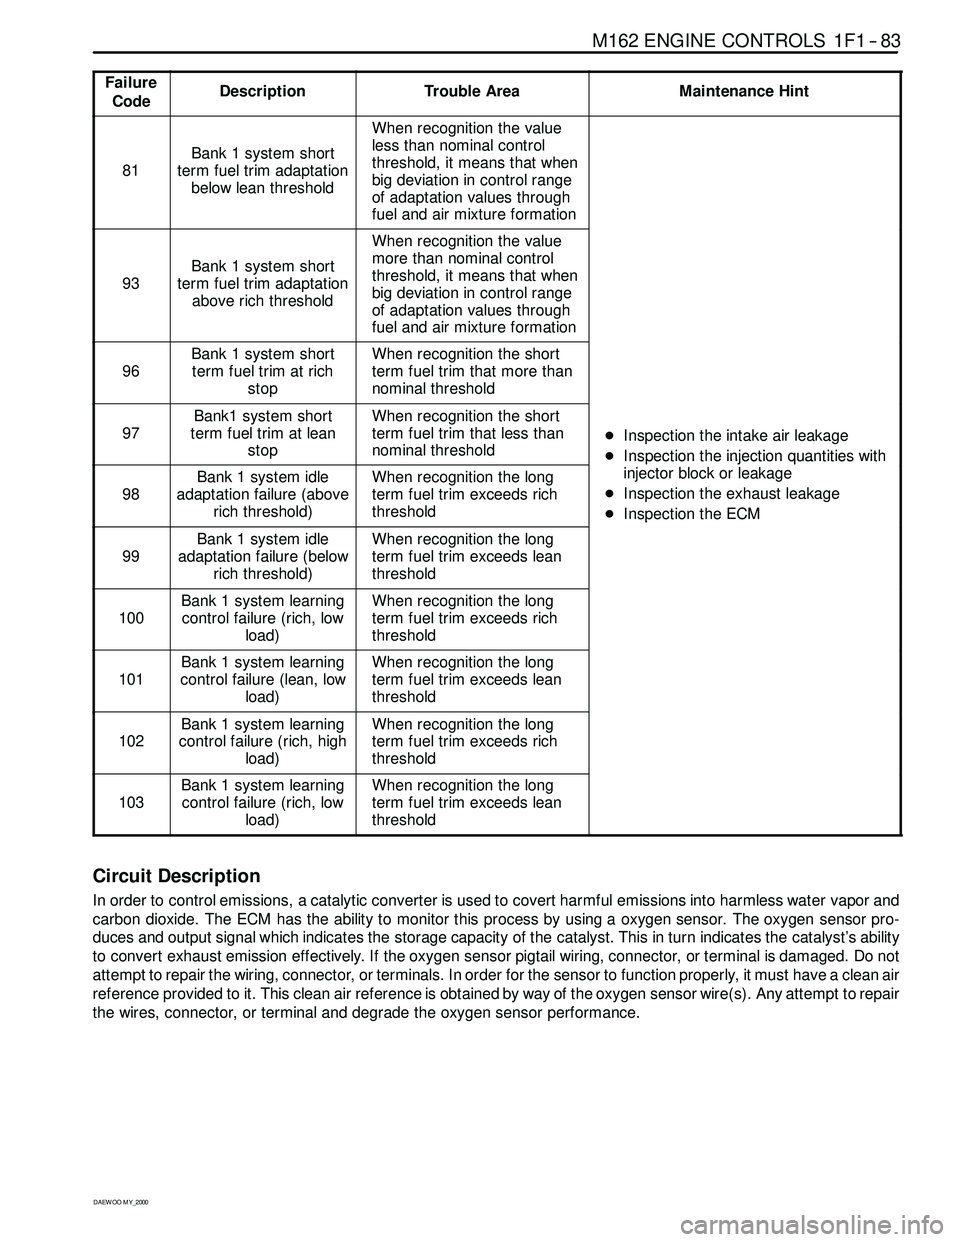
Circuit Description
In order to control emissions, a catalytic converter is used to covert harmful emissions into harmless water vapor and
carbon dioxide. The ECM has the ability to monitor this process by using a oxygen sensor. The oxygen sensor pro-
duces and output signal which indicates the storage capacity of the catalyst. This in turn indicates the catalyst’s ability
to convert exhaust emission effectively. If the oxygen sensor pigtail wiring, connector, or terminal is damaged. Do not
attempt to repair the wiring, connector, or terminals. In order for the sensor to function properly, it must have a clean air
reference provided to it. This clean air reference is obtained by way of the oxygen sensor wire(s). Any attempt to repair
the wires, connector, or terminal and degrade the oxygen sensor performance.
Page 247 of 2053
1F1 -- 84 M162 ENGINE CONTROLS
D AEW OO M Y_2000
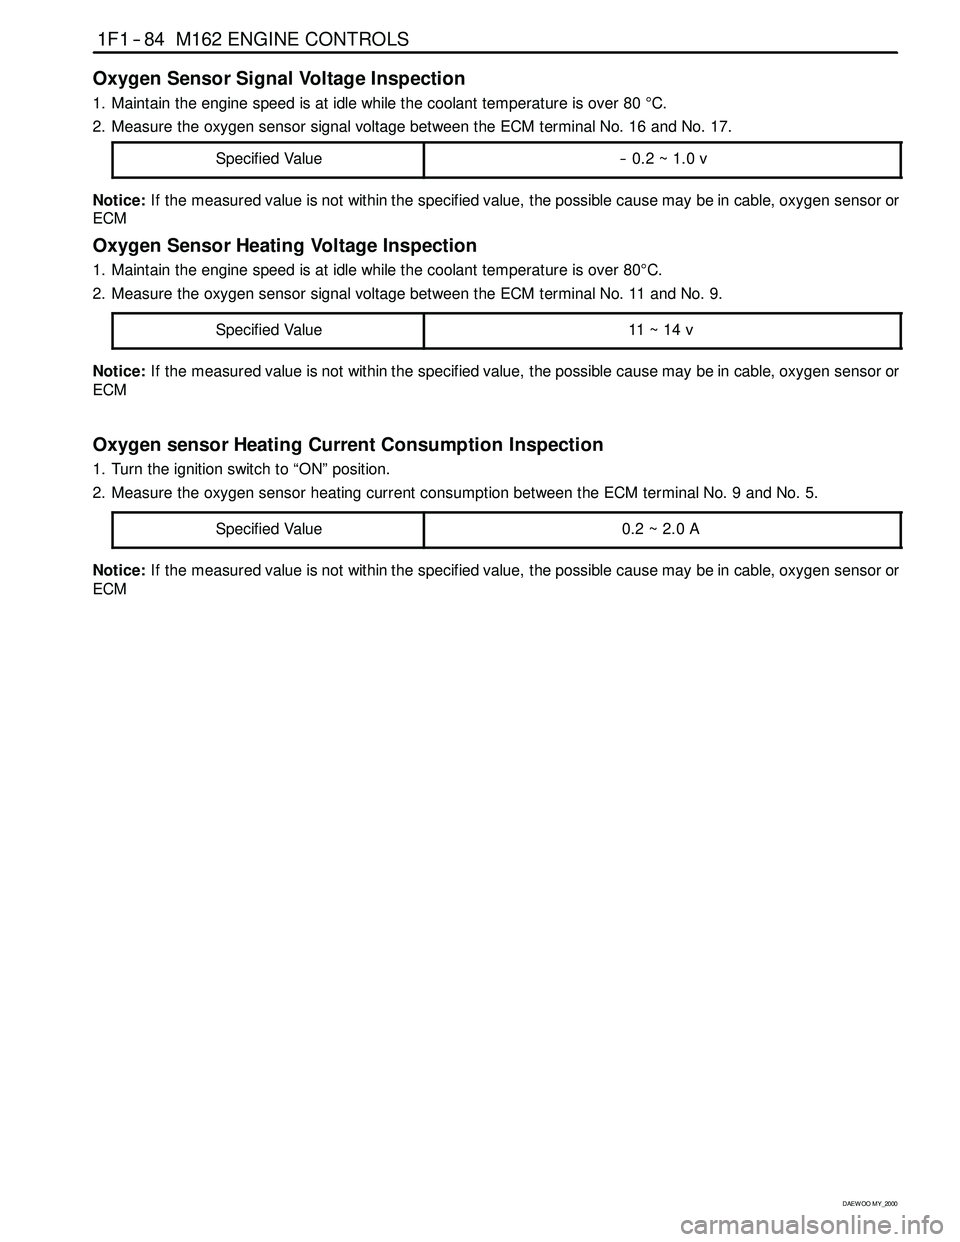
Oxygen Sensor Signal Voltage Inspection
1. Maintain the engine speed is at idle while the coolant temperature is over 80°C.
2. Measure the oxygen sensor signal voltage between the ECM terminal No. 16 and No. 17.
Specified Value
-- 0.2 ~ 1.0 v
Notice:If the measured value is not within the specified value, the possible cause may be in cable, oxygen sensor or
ECM
Oxygen Sensor Heating Voltage Inspection
1. Maintain the engine speed is at idle while the coolant temperature is over 80°C.
2. Measure the oxygen sensor signal voltage between the ECM terminal No. 11 and No. 9.
Specified Value
11 ~ 14 v
Notice:If the measured value is not within the specified value, the possible cause may be in cable, oxygen sensor or
ECM
Oxygen sensor Heating Current Consumption Inspection
1. Turn the ignition switch to “ON” position.
2. Measure the oxygen sensor heating current consumption between the ECM terminal No. 9 and No. 5.
Specified Value
0.2~2.0A
Notice:If the measured value is not within the specified value, the possible cause may be in cable, oxygen sensor or
ECM
Page 249 of 2053
1F1 -- 86 M162 ENGINE CONTROLS
D AEW OO M Y_2000
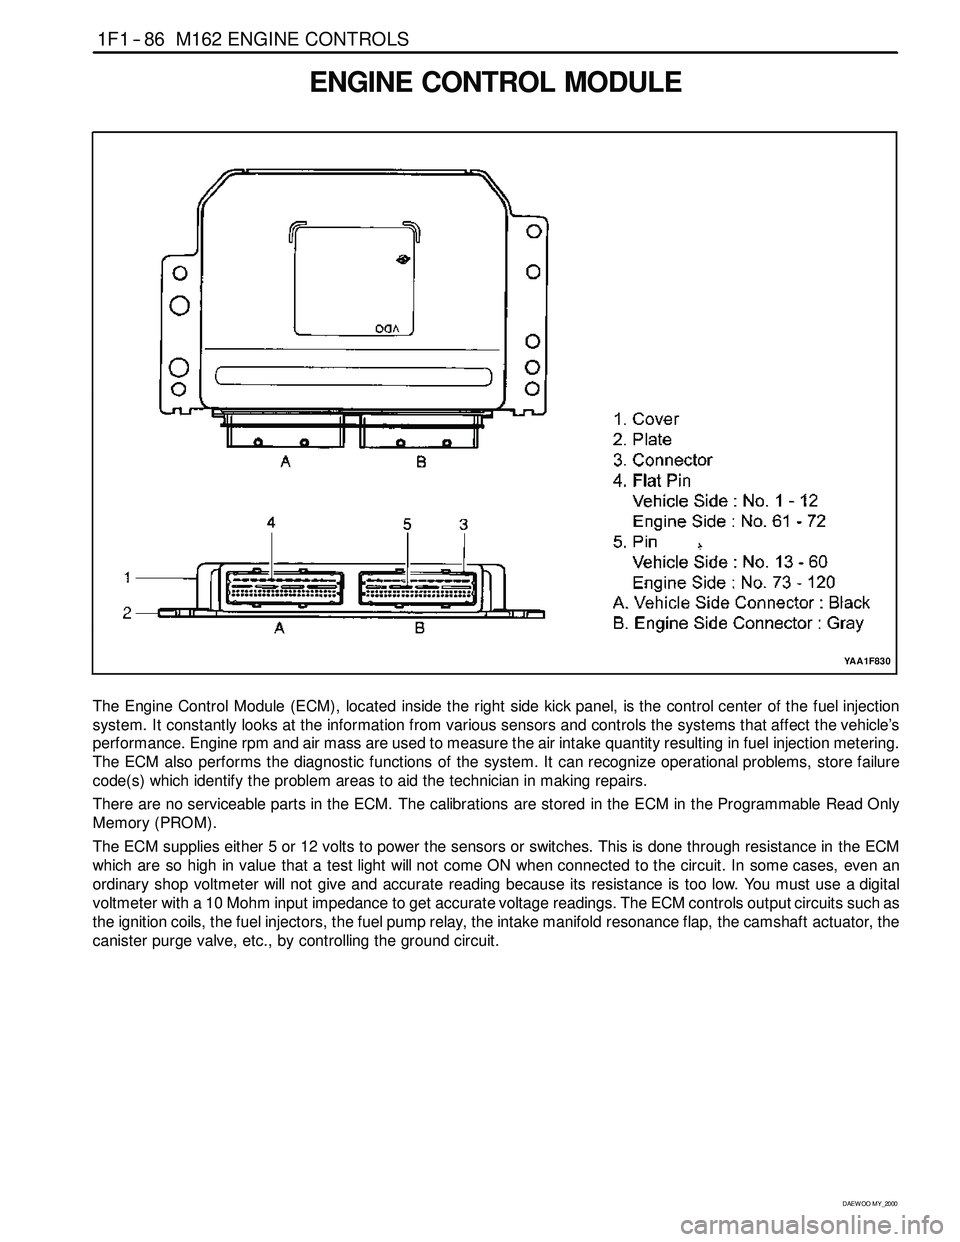
ENGINE CONTROL MODULE
YAA1F830
The Engine Control Module (ECM), located inside the right side kick panel, is the control center of the fuel injection
system. It constantly looks at the information from various sensors and controls the systems that affect the vehicle’s
performance. Engine rpm and air mass are used to measure the air intake quantity resulting in fuel injection metering.
The ECM also performs the diagnostic functions of the system. It can recognize operational problems, store failure
code(s) which identify the problem areas to aid the technician in making repairs.
There are no serviceable parts in the ECM. The calibrations are stored in the ECM in the Programmable Read Only
Memory (PROM).
The ECM supplies either 5 or 12 volts to power the sensors or switches. This is done through resistance in the ECM
which are so high in value that a test light will not come ON when connected to the circuit. In some cases, even an
ordinary shop voltmeter will not give and accurate reading because its resistance is too low. You must use a digital
voltmeter with a 10 Mohm input impedance to get accurate voltage readings. The ECM controls output circuits such as
the ignition coils, the fuel injectors, the fuel pump relay, the intake manifold resonance flap, the camshaft actuator, the
canister purge valve, etc., by controlling the ground circuit.
Page 256 of 2053
M162 ENGINE CONTROLS 1F1 -- 93
D AEW OO M Y_2000
Failure
CodeDescriptionTrouble AreaMaintenance Hint
239
Unusual accelerator
pedal position sensor
comparison fault
(CPU 2)
240
Throttle potentiometer
comparison fault
(CPU 2)
241Unusual CPU
communication (CPU 2)
242Unusual CPU
configuration (CPU 2)
243A/D converter failure
(CPU 2)
244
Accelerator pedal
position sensor setpoint
fault between CPU 1
and CPU 2
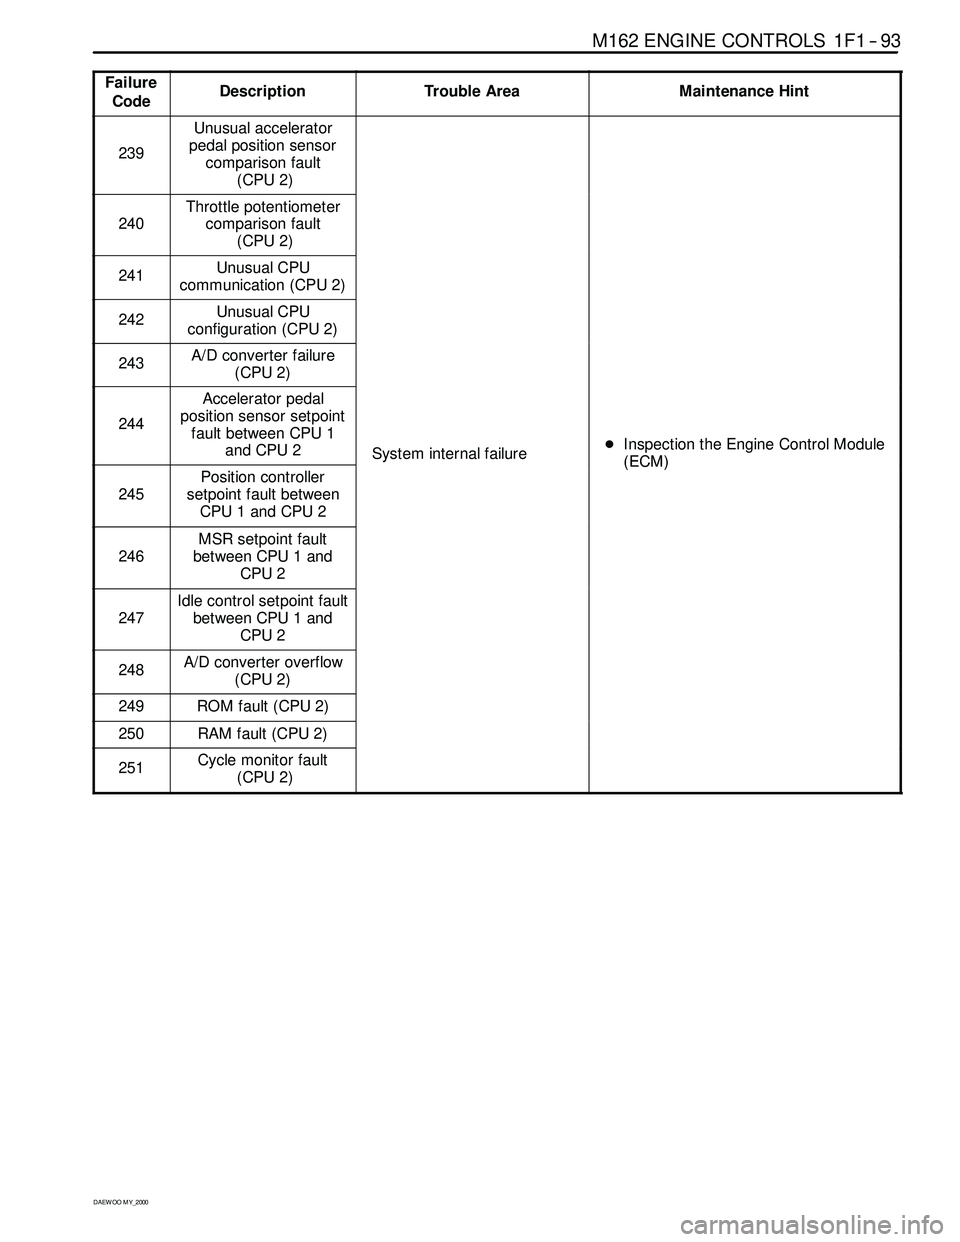
System internal failureDInspection the Engine Control Module
(ECM)
245
Position controller
setpoint fault between
CPU 1 and CPU 2
y(ECM)
246
MSR setpoint fault
between CPU 1 and
CPU 2
247
Idle control setpoint fault
between CPU 1 and
CPU 2
248A/D converter overflow
(CPU 2)
249ROM fault (CPU 2)
250RAM fault (CPU 2)
251Cycle monitor fault
(CPU 2)
Page 262 of 2053
M162 ENGINE CONTROLS 1F1 -- 99
D AEW OO M Y_2000
KAA1F440
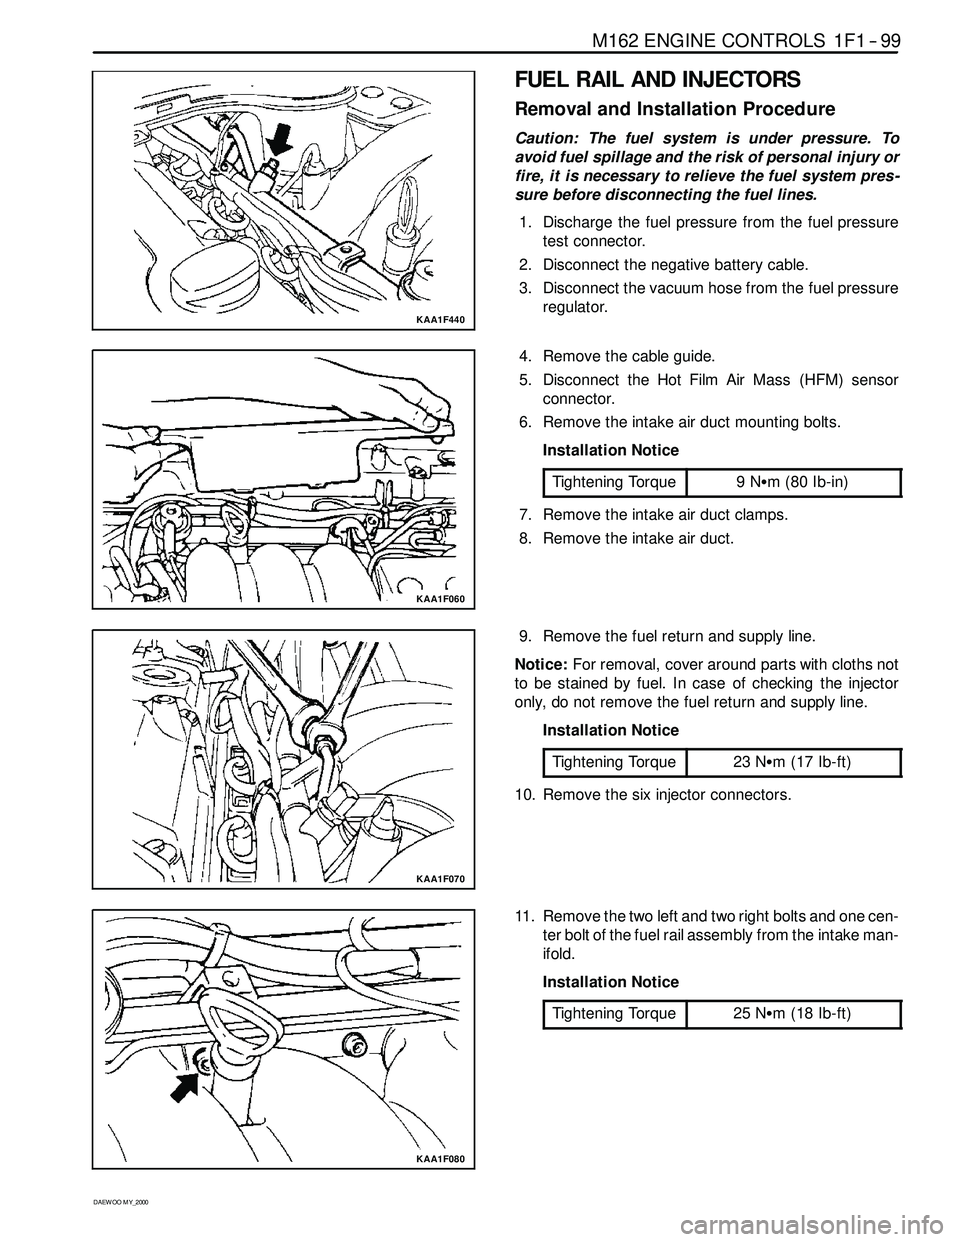
FUEL RAIL AND INJECTORS
Removal and Installation Procedure
Caution: The fuel system is under pressure. To
avoid fuel spillage and the risk of personal injury or
fire, it is necessary to relieve the fuel system pres -
sure before disconnecting the fuel lines.
1. Discharge the fuel pressure from the fuel pressure
test connector.
2. Disconnect the negative battery cable.
3. Disconnect the vacuum hose from the fuel pressure
regulator.
KAA1F060
4. Remove the cable guide.
5. Disconnect the Hot Film Air Mass (HFM) sensor
connector.
6. Remove the intake air duct mounting bolts.
Installation Notice
Tightening Torque
9NSm (80 Ib-in)
7. Remove the intake air duct clamps.
8. Remove the intake air duct.
KAA1F070
9. Remove the fuel return and supply line.
Notice:For removal, cover around parts with cloths not
to be stained by fuel. In case of checking the injector
only, do not remove the fuel return and supply line.
Installation Notice
Tightening Torque
23 NSm (17 Ib-ft)
10. Remove the six injector connectors.
KAA1F080
11. Remove the two left and two right bolts and one cen-
ter bolt of the fuel rail assembly from the intake man-
ifold.
Installation Notice
Tightening Torque
25 NSm (18 Ib-ft)
Page 263 of 2053
1F1 -- 100 M162 ENGINE CONTROLS
D AEW OO M Y_2000
KAA1F090
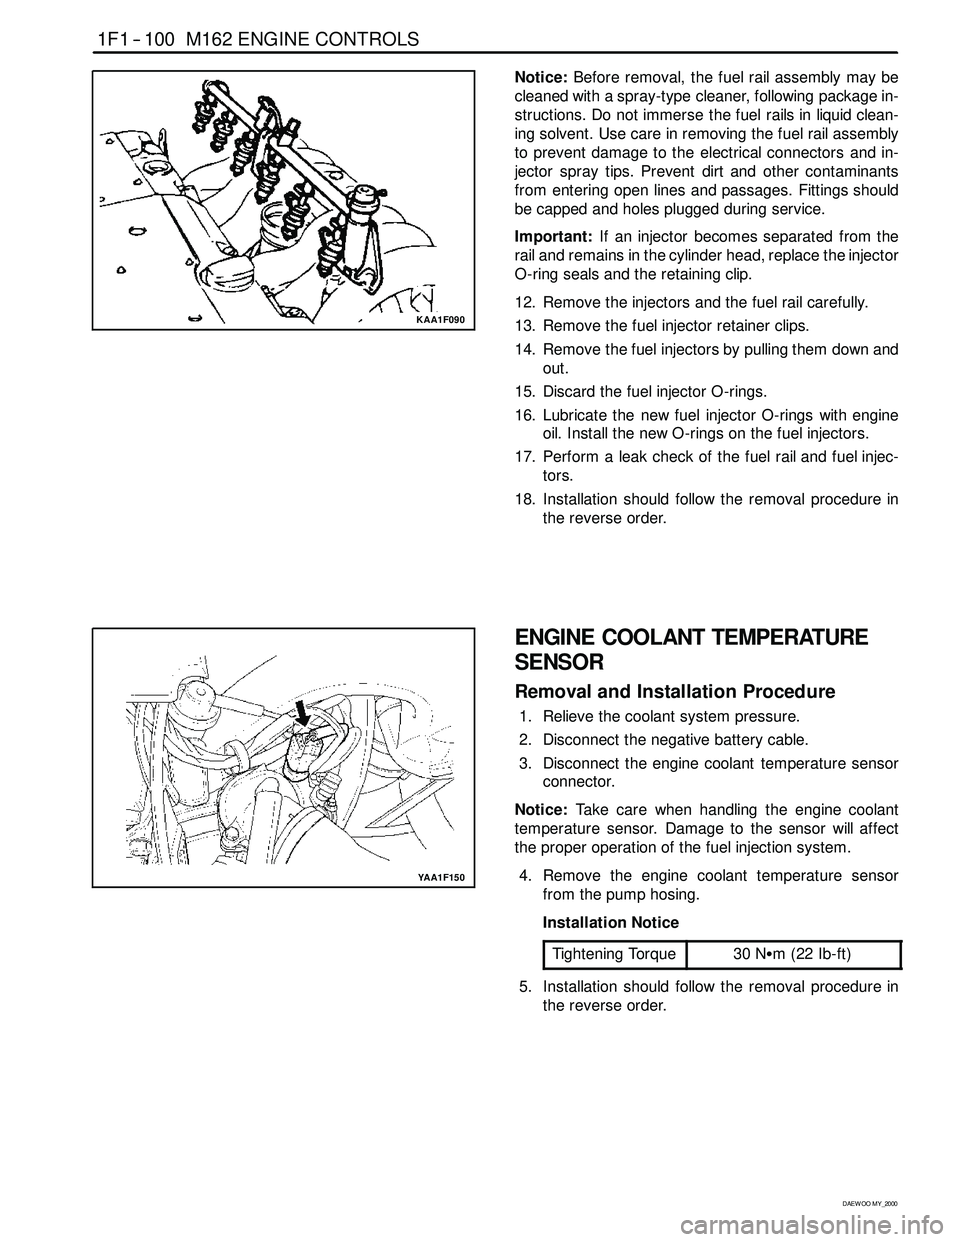
Notice:Before removal, the fuel rail assembly may be
cleaned with a spray-type cleaner, following package in-
structions. Do not immerse the fuel rails in liquid clean-
ing solvent. Use care in removing the fuel rail assembly
to prevent damage to the electrical connectors and in-
jector spray tips. Prevent dirt and other contaminants
from entering open lines and passages. Fittings should
be capped and holes plugged during service.
Important:If an injector becomes separated from the
rail and remains in the cylinder head, replace the injector
O-ring seals and the retaining clip.
12. Remove the injectors and the fuel rail carefully.
13. Remove the fuel injector retainer clips.
14. Remove the fuel injectors by pulling them down and
out.
15. Discard the fuel injector O-rings.
16. Lubricate the new fuel injector O-rings with engine
oil. Install the new O-rings on the fuel injectors.
17. Perform a leak check of the fuel rail and fuel injec-
tors.
18. Installation should follow the removal procedure in
the reverse order.
YAA1F150
ENGINE COOLANT TEMPERATURE
SENSOR
Removal and Installation Procedure
1. Relieve the coolant system pressure.
2. Disconnect the negative battery cable.
3. Disconnect the engine coolant temperature sensor
connector.
Notice:Take care when handling the engine coolant
temperature sensor. Damage to the sensor will affect
the proper operation of the fuel injection system.
4. Remove the engine coolant temperature sensor
from the pump hosing.
Installation Notice
Tightening Torque
30 NSm (22 Ib-ft)
5. Installation should follow the removal procedure in
the reverse order.
Page 264 of 2053
M162 ENGINE CONTROLS 1F1 -- 101
D AEW OO M Y_2000
KAA1C010
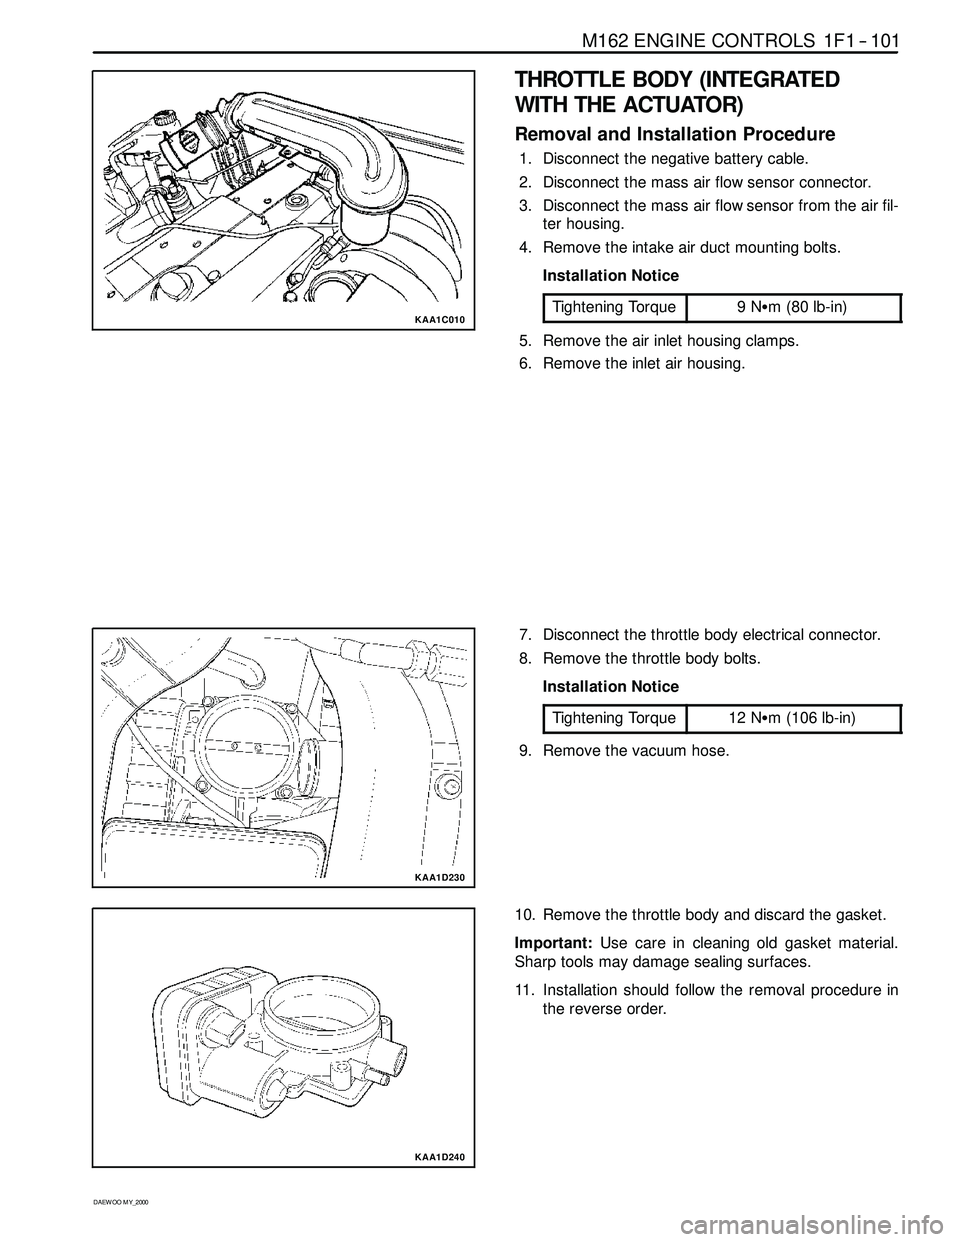
THROTTLE BODY (INTEGRATED
WITH THE ACTUATOR)
Removal and Installation Procedure
1. Disconnect the negative battery cable.
2. Disconnect the mass air flow sensor connector.
3. Disconnect the mass air flow sensor from the air fil-
ter housing.
4. Remove the intake air duct mounting bolts.
Installation Notice
Tightening Torque
9NSm (80 lb-in)
5. Remove the air inlet housing clamps.
6. Remove the inlet air housing.
KAA1D230
7. Disconnect the throttle body electrical connector.
8. Remove the throttle body bolts.
Installation Notice
Tightening Torque
12 NSm (106 lb-in)
9. Remove the vacuum hose.
KAA1D240
10. Remove the throttle body and discard the gasket.
Important:Use care in cleaning old gasket material.
Sharp tools may damage sealing surfaces.
11. Installation should follow the removal procedure in
the reverse order.
Page 265 of 2053
1F1 -- 102 M162 ENGINE CONTROLS
D AEW OO M Y_2000
KAA1F190
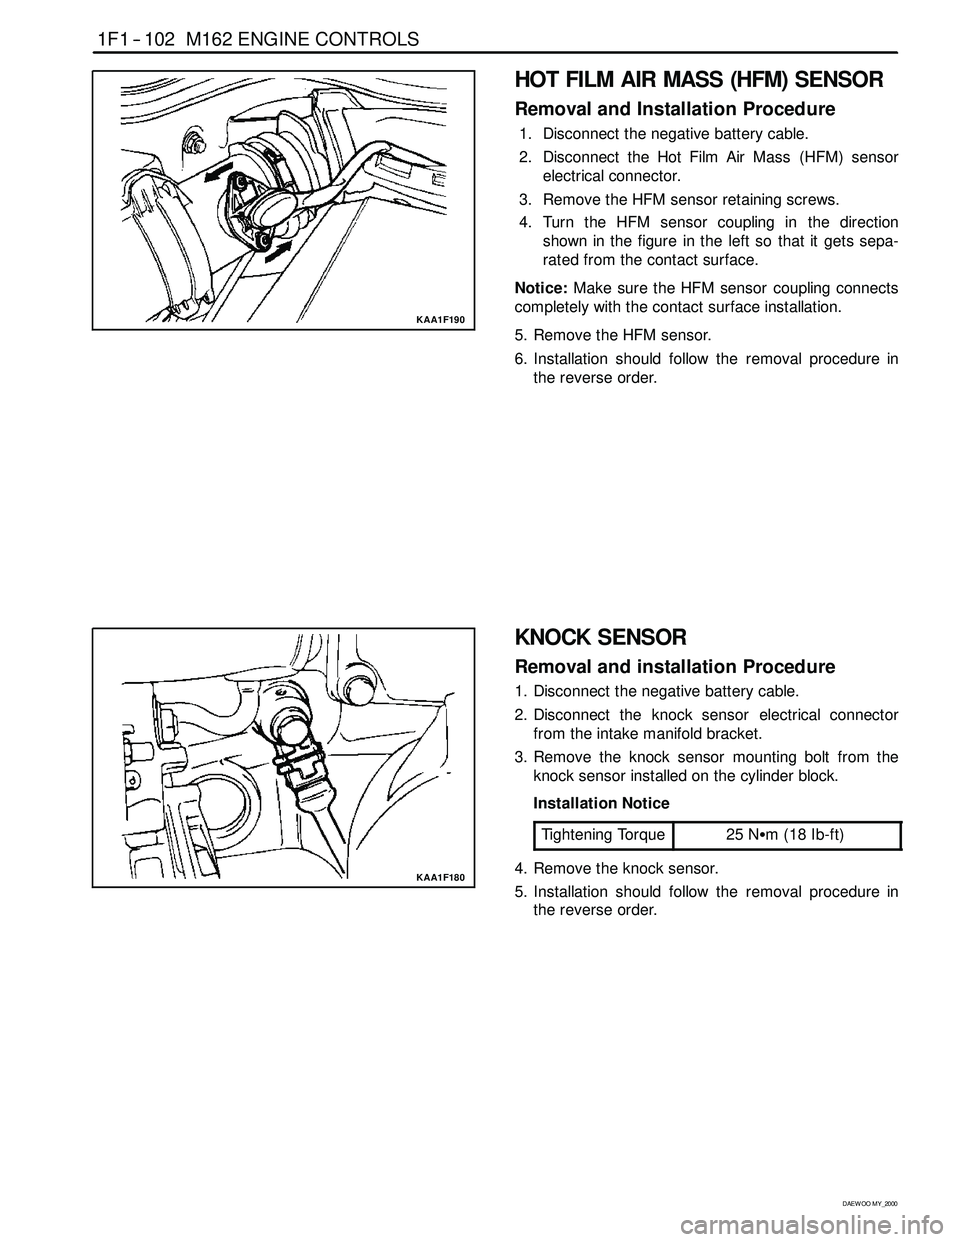
HOT FILM AIR MASS (HFM) SENSOR
Removal and Installation Procedure
1. Disconnect the negative battery cable.
2. Disconnect the Hot Film Air Mass (HFM) sensor
electrical connector.
3. Remove the HFM sensor retaining screws.
4. Turn the HFM sensor coupling in the direction
shown in the figure in the left so that it gets sepa-
rated from the contact surface.
Notice:Make sure the HFM sensor coupling connects
completely with the contact surface installation.
5. Remove the HFM sensor.
6. Installation should follow the removal procedure in
the reverse order.
KAA1F180
KNOCK SENSOR
Removal and installation Procedure
1. Disconnect the negative battery cable.
2. Disconnect the knock sensor electrical connector
from the intake manifold bracket.
3. Remove the knock sensor mounting bolt from the
knock sensor installed on the cylinder block.
Installation Notice
Tightening Torque
25 NSm (18 Ib-ft)
4. Remove the knock sensor.
5. Installation should follow the removal procedure in
the reverse order.