engine SSANGYONG KORANDO 1997 Service Repair Manual
[x] Cancel search | Manufacturer: SSANGYONG, Model Year: 1997, Model line: KORANDO, Model: SSANGYONG KORANDO 1997Pages: 2053, PDF Size: 88.33 MB
Page 510 of 2053
1F2 -- 92 M161 ENGINE CONTROLS
D AEW OO M Y_2000
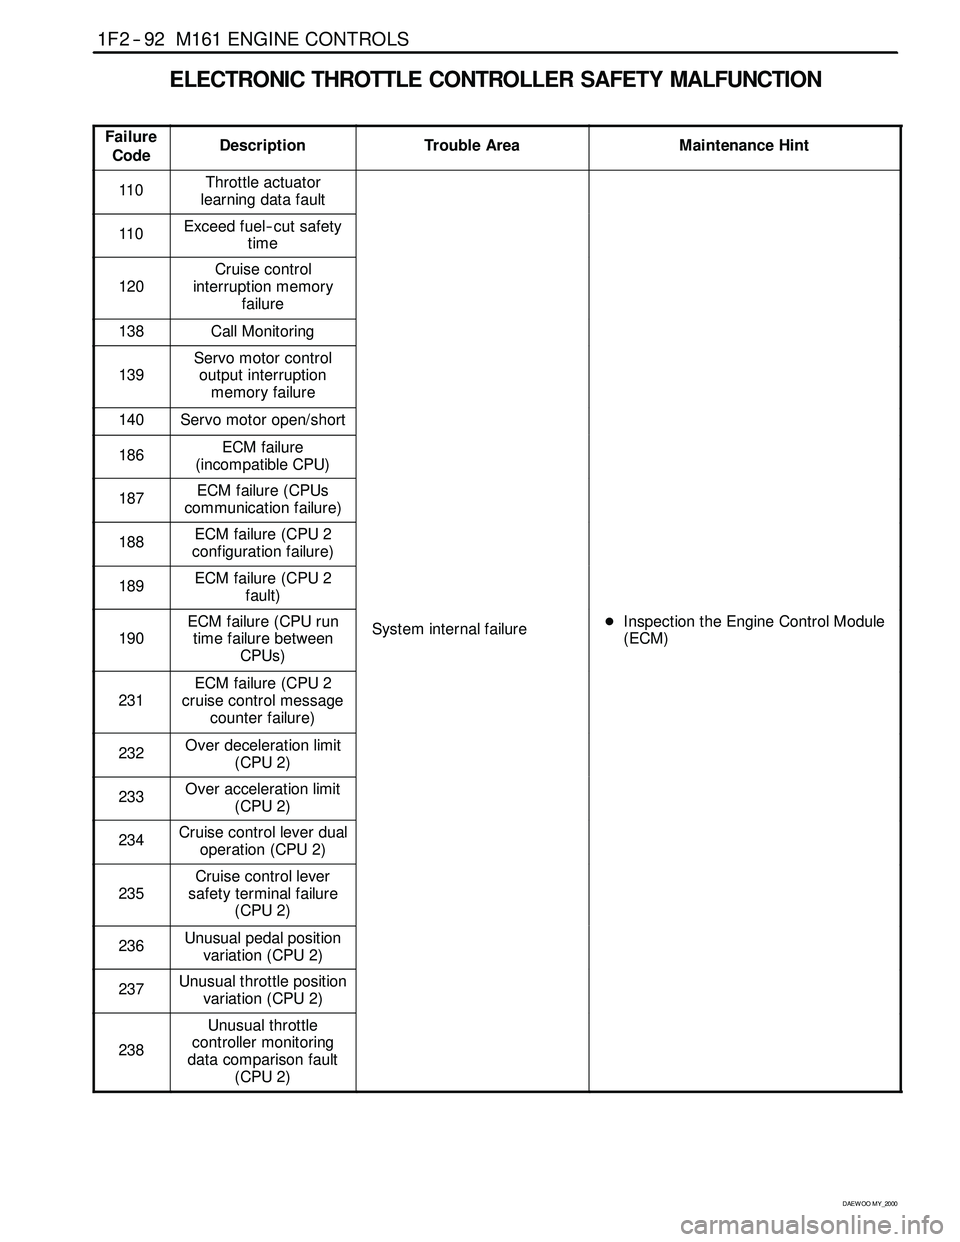
ELECTRONIC THROTTLE CONTROLLER SAFETY MALFUNCTION
Failure
CodeDescriptionTrouble AreaMaintenance Hint
110Throttle actuator
learning data fault
110Exceed fuel-- cut safety
time
120
Cruise control
interruption memory
failure
138Call Monitoring
139
Servo motor control
output interruption
memory failure
140Servo motor open/short
186ECM failure
(incompatible CPU)
187ECM failure (CPUs
communication failure)
188ECM failure (CPU 2
configuration failure)
189ECM failure (CPU 2
fault)
190
ECM failure (CPU run
time failure between
CPUs)System internal failureDInspection the Engine Control Module
(ECM)
231
ECM failure (CPU 2
cruise control message
counter failure)
232Over deceleration limit
(CPU 2)
233Over acceleration limit
(CPU 2)
234Cruise control lever dual
operation (CPU 2)
235
Cruise control lever
safety terminal failure
(CPU 2)
236Unusual pedal position
variation (CPU 2)
237Unusual throttle position
variation (CPU 2)
238
Unusual throttle
controller monitoring
data comparison fault
(CPU 2)
Page 511 of 2053
M161 ENGINE CONTROLS 1F2 -- 93
D AEW OO M Y_2000
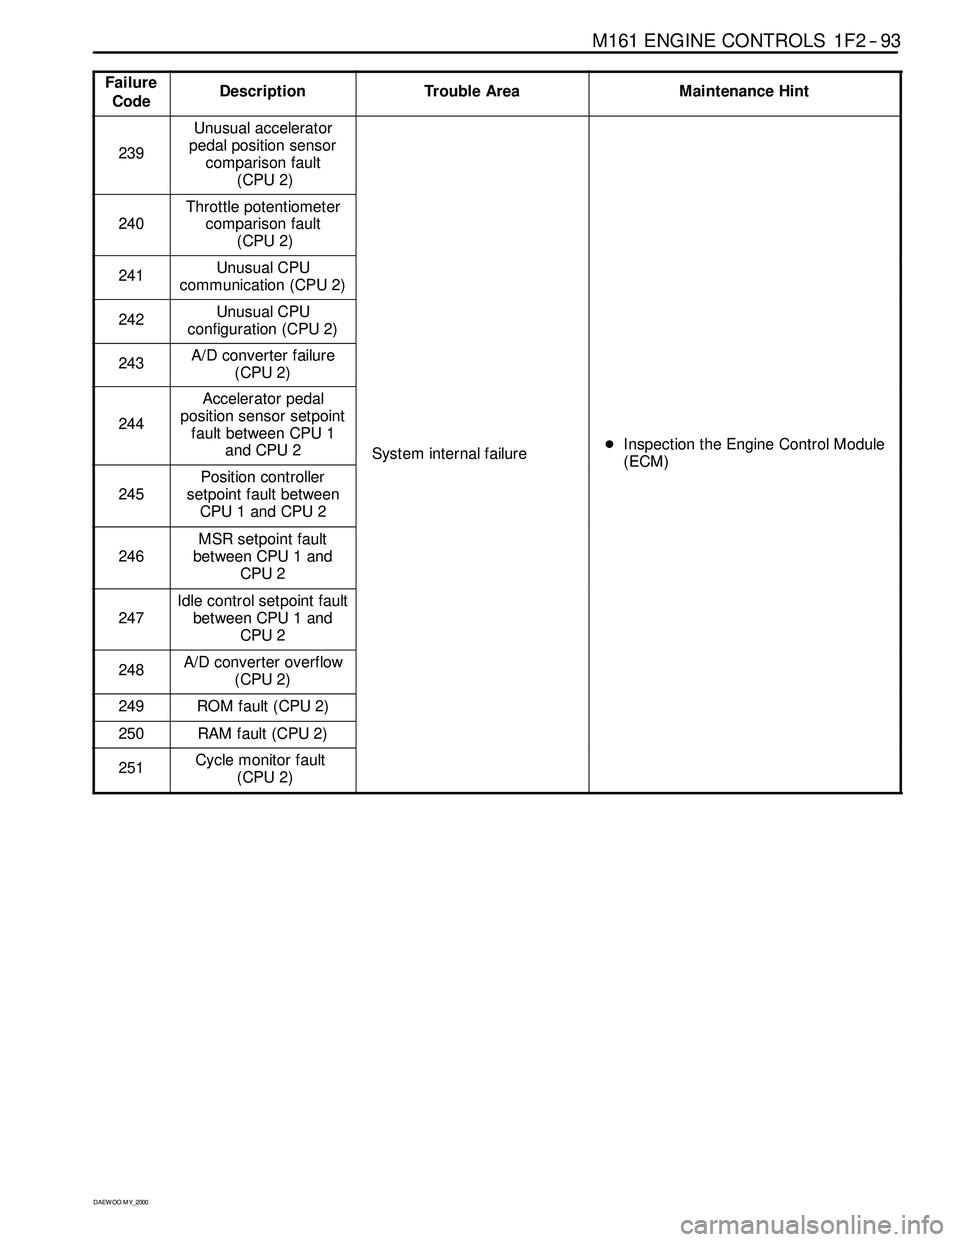
Failure
CodeDescriptionTrouble AreaMaintenance Hint
239
Unusual accelerator
pedal position sensor
comparison fault
(CPU 2)
240
Throttle potentiometer
comparison fault
(CPU 2)
241Unusual CPU
communication (CPU 2)
242Unusual CPU
configuration (CPU 2)
243A/D converter failure
(CPU 2)
244
Accelerator pedal
position sensor setpoint
fault between CPU 1
and CPU 2
System internal failureDInspection the Engine Control Module
(ECM)
245
Position controller
setpoint fault between
CPU 1 and CPU 2
y(ECM)
246
MSR setpoint fault
between CPU 1 and
CPU 2
247
Idle control setpoint fault
between CPU 1 and
CPU 2
248A/D converter overflow
(CPU 2)
249ROM fault (CPU 2)
250RAM fault (CPU 2)
251Cycle monitor fault
(CPU 2)
Page 512 of 2053
1F2 -- 94 M161 ENGINE CONTROLS
D AEW OO M Y_2000
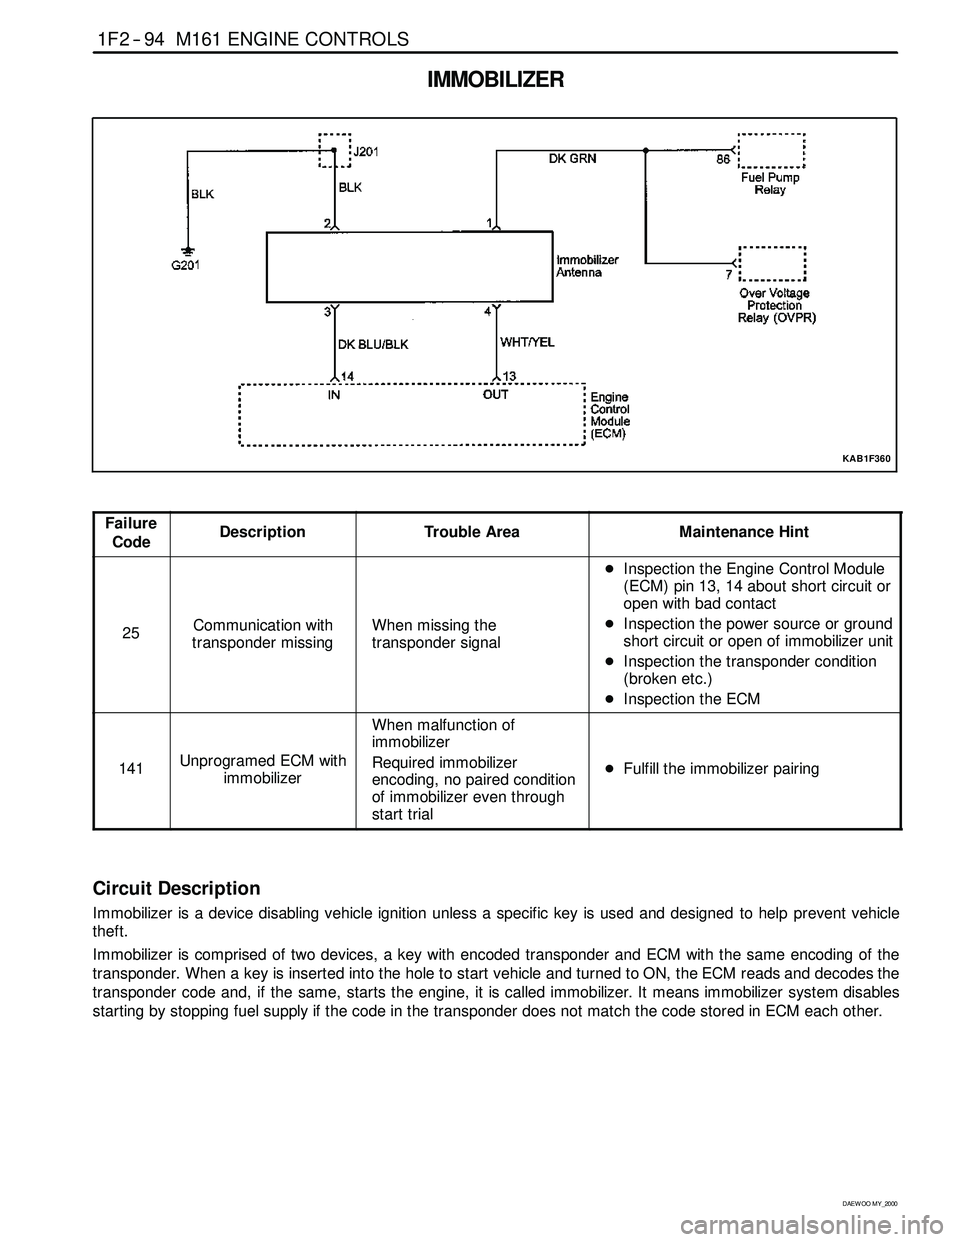
IMMOBILIZER
KAB1F360
Failure
CodeDescriptionTrouble AreaMaintenance Hint
25Communication with
transponder missingWhen missing the
transponder signal
DInspection the Engine Control Module
(ECM) pin 13, 14 about short circuit or
open with bad contact
DInspection the power source or ground
short circuit or open of immobilizer unit
DInspection the transponder condition
(broken etc.)
DInspection the ECM
141Unprogramed ECM with
immobilizer
When malfunction of
immobilizer
Required immobilizer
encoding, no paired condition
of immobilizer even through
start trial
DFulfill the immobilizer pairing
Circuit Description
Immobilizer is a device disabling vehicle ignition unless a specific key is used and designed to help prevent vehicle
theft.
Immobilizer is comprised of two devices, a key with encoded transponder and ECM with the same encoding of the
transponder. When a key is inserted into the hole to start vehicle and turned to ON, the ECM reads and decodes the
transponder code and, if the same, starts the engine, it is called immobilizer. It means immobilizersystem disables
starting by stopping fuel supply if the code in the transponder does not match the code stored in ECM each other.
Page 513 of 2053
M161 ENGINE CONTROLS 1F2 -- 95
D AEW OO M Y_2000
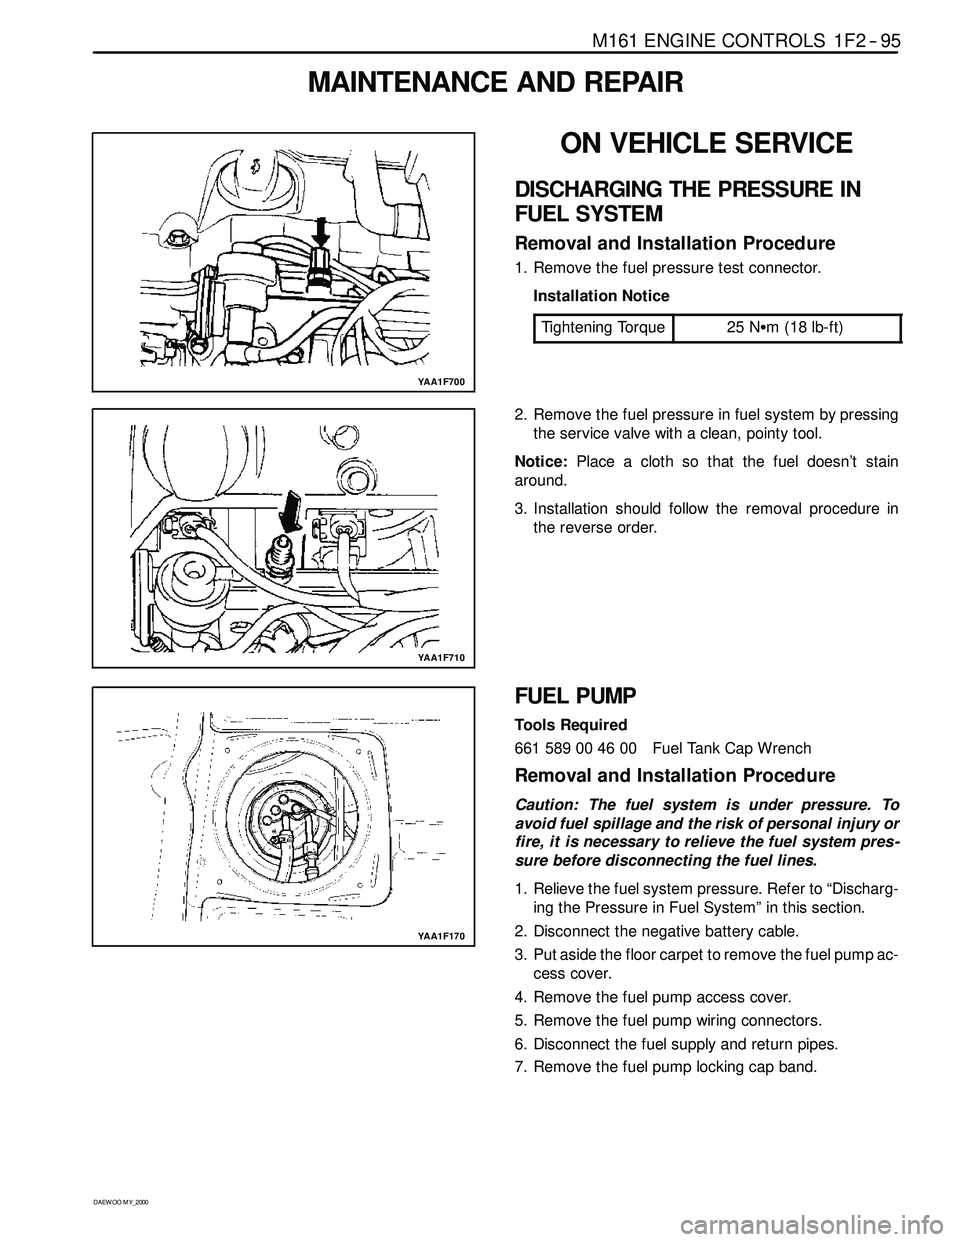
MAINTENANCE AND REPAIR
YAA1F700
ON VEHICLE SERVICE
DISCHARGING THE PRESSURE IN
FUEL SYSTEM
Removal and Installation Procedure
1. Remove the fuel pressure test connector.
Installation Notice
Tightening Torque
25 NSm (18 lb-ft)
YAA1F710
2. Remove the fuel pressure in fuel system by pressing
the service valve with a clean, pointy tool.
Notice:Place a cloth so that the fuel doesn’t stain
around.
3. Installation should follow the removal procedure in
the reverse order.
YAA1F170
FUEL PUMP
Tools Required
661 589 00 46 00 Fuel Tank Cap Wrench
Removal and Installation Procedure
Caution: The fuel system is under pressure. To
avoid fuel spillage and the risk of personal injury or
fire, it is necessary to relieve the fuel system pres -
sure before disconnecting the fuel lines.
1. Relieve the fuel system pressure. Refer to “Discharg-
ing the Pressure in Fuel System” in this section.
2. Disconnect the negative battery cable.
3. Put aside the floor carpet to remove the fuel pump ac-
cess cover.
4. Remove the fuel pump access cover.
5. Remove the fuel pump wiring connectors.
6. Disconnect the fuel supply and return pipes.
7. Remove the fuel pump locking cap band.
Page 514 of 2053
1F2 -- 96 M161 ENGINE CONTROLS
D AEW OO M Y_2000
YAA1F550
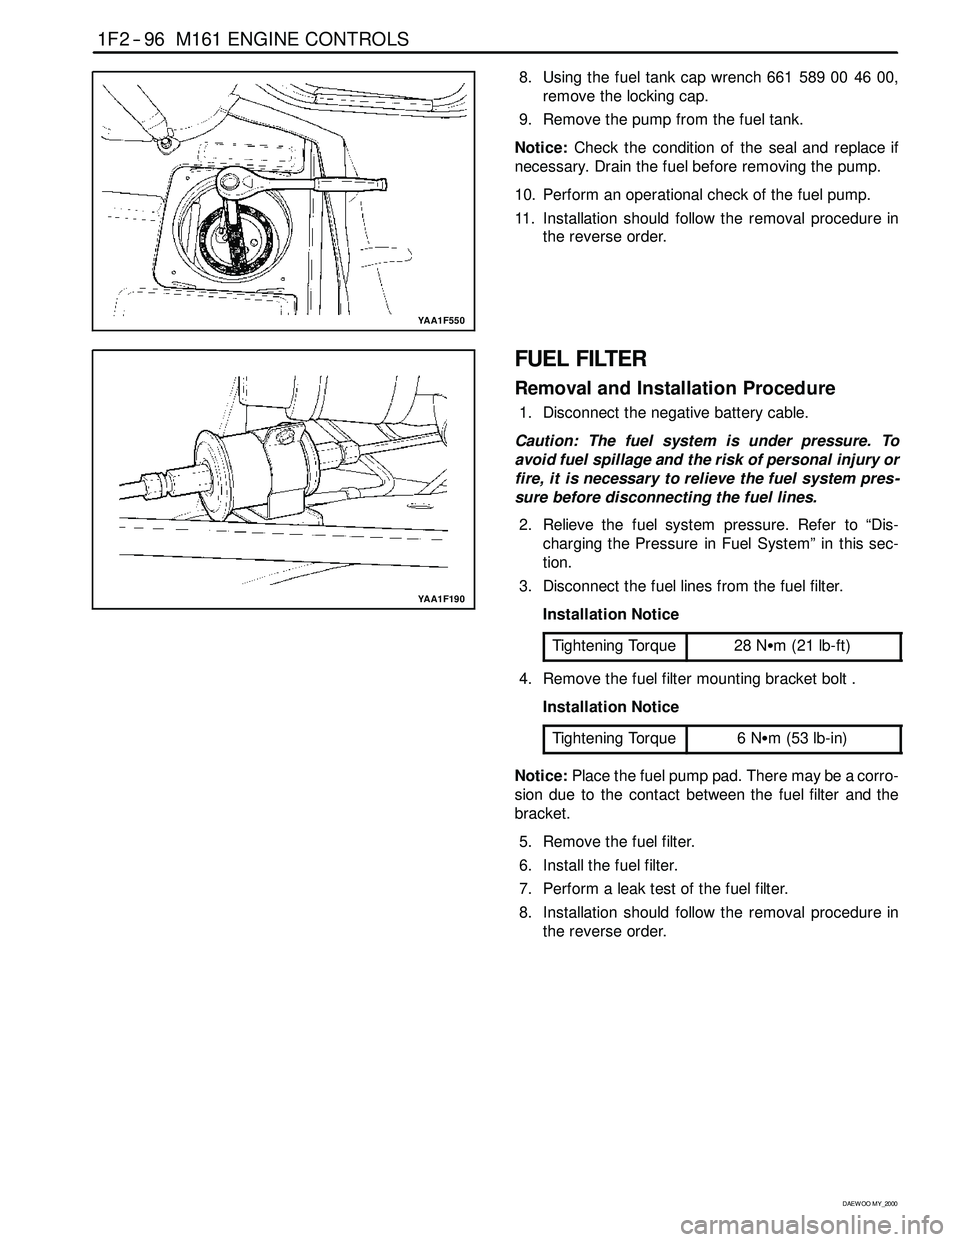
8. Using the fuel tank cap wrench 661 589 00 46 00,
remove the locking cap.
9. Remove the pump from the fuel tank.
Notice:Check the condition of the seal and replace if
necessary. Drain the fuel before removing the pump.
10. Perform an operational check of the fuel pump.
11. Installation should follow the removal procedure in
the reverse order.
YAA1F190
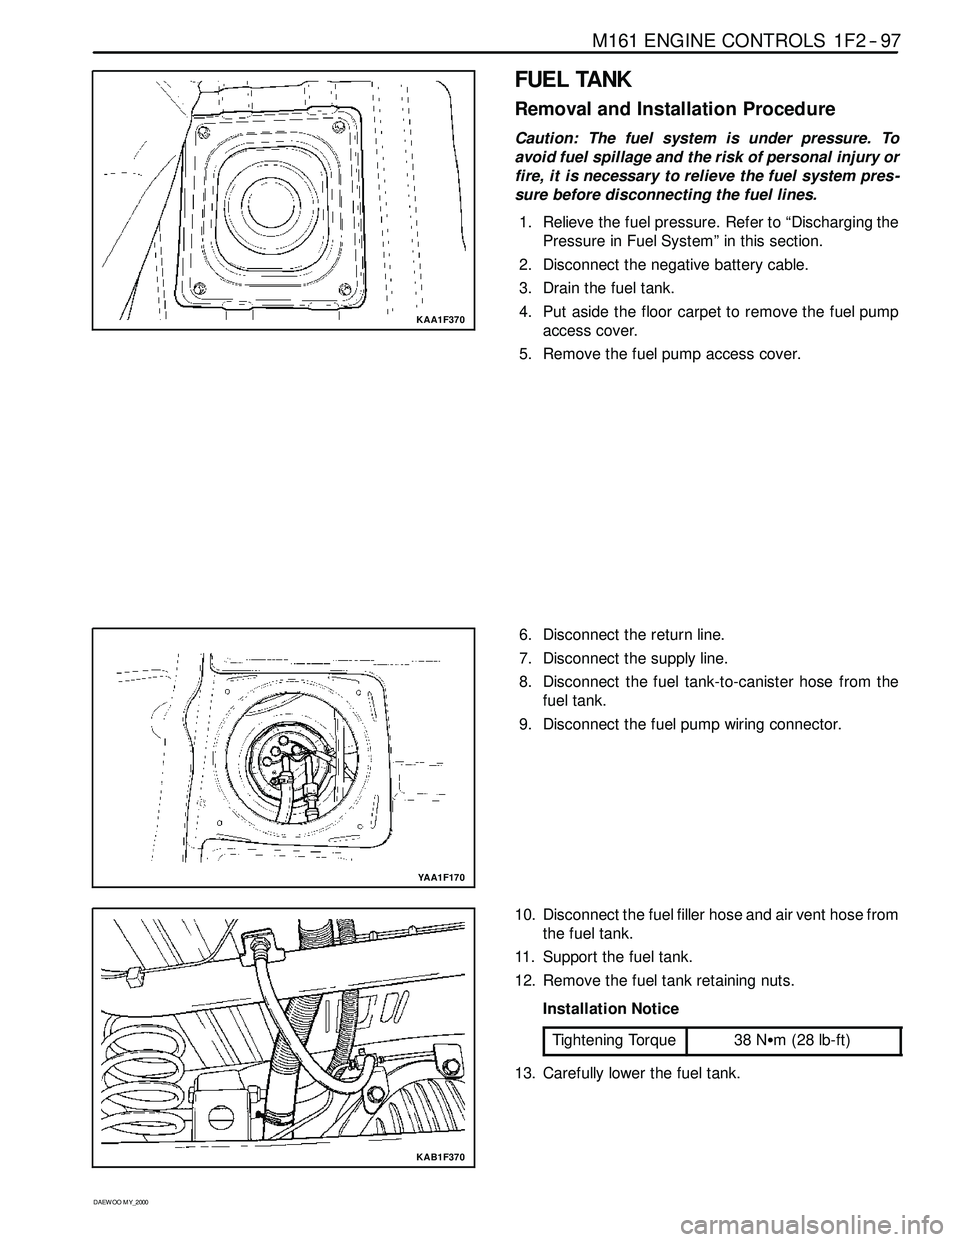
FUEL FILTER
Removal and Installation Procedure
1. Disconnect the negative battery cable.
Caution: The fuel system is under pressure. To
avoid fuel spillage and the risk of personal injury or
fire, it is necessary to relieve the fuel system pres -
sure before disconnecting the fuel lines.
2. Relieve the fuel system pressure. Refer to “Dis-
charging the Pressure in Fuel System” in this sec-
tion.
3. Disconnect the fuel lines from the fuel filter.
Installation Notice
Tightening Torque
28 NSm (21 lb-ft)
4. Remove the fuel filter mounting bracket bolt .
Installation Notice
Tightening Torque
6NSm (53 lb-in)
Notice:Place the fuel pump pad. There may be a corro-
sion due to the contact between the fuel filter and the
bracket.
5. Remove the fuel filter.
6. Install the fuel filter.
7. Perform a leak test of the fuel filter.
8. Installation should follow the removal procedure in
the reverse order.
Page 515 of 2053
M161 ENGINE CONTROLS 1F2 -- 97
D AEW OO M Y_2000
KAA1F370
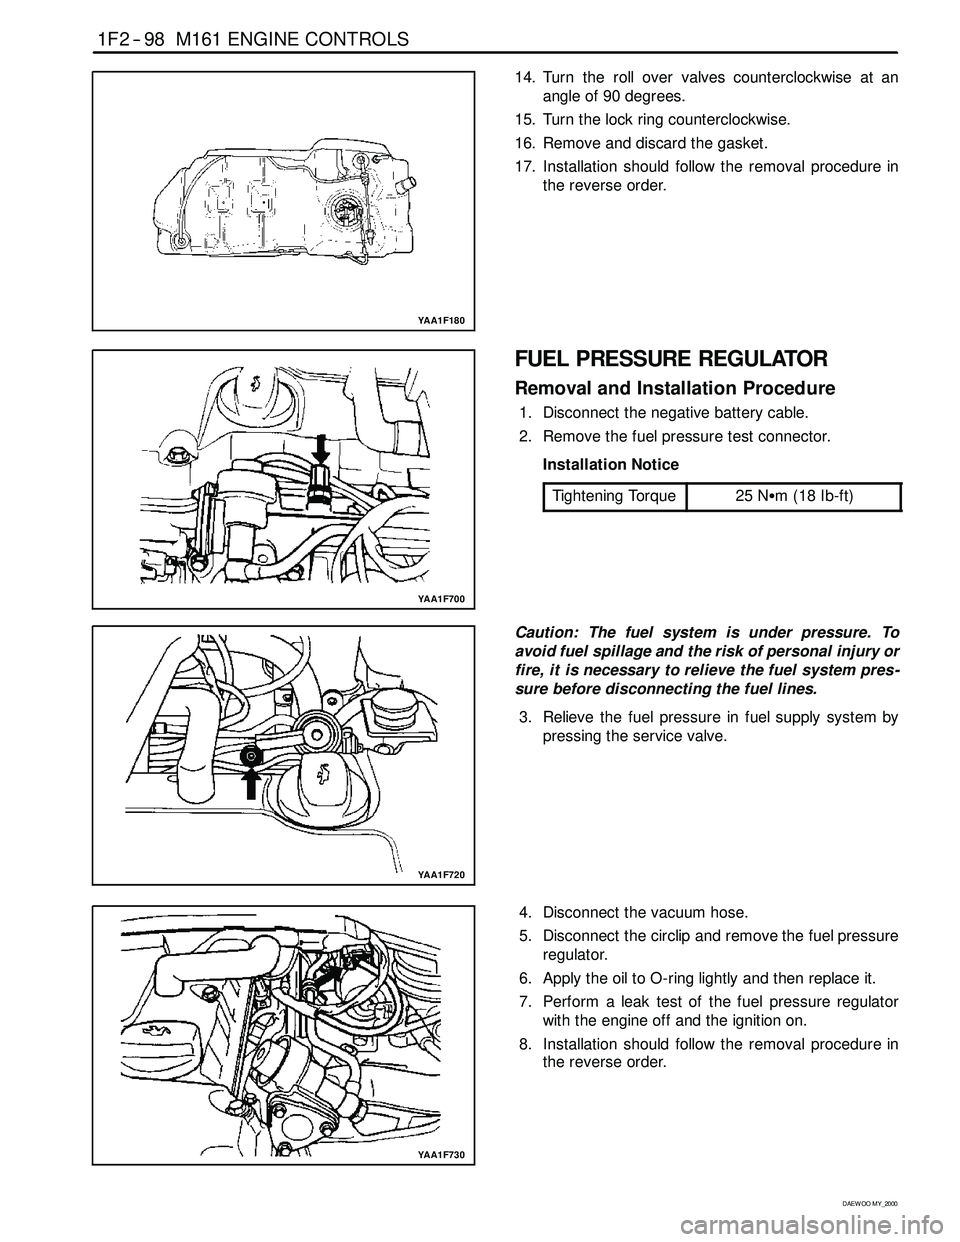
FUEL TANK
Removal and Installation Procedure
Caution: The fuel system is under pressure. To
avoid fuel spillage and the risk of personal injury or
fire, it is necessary to relieve the fuel system pres -
sure before disconnecting the fuel lines.
1. Relieve the fuel pressure. Refer to “Discharging the
Pressure in Fuel System” in this section.
2. Disconnect the negative battery cable.
3. Drain the fuel tank.
4. Put aside the floor carpet to remove the fuel pump
access cover.
5. Remove the fuel pump access cover.
YAA1F170
6. Disconnect the return line.
7. Disconnect the supply line.
8. Disconnect the fuel tank-to-canister hose from the
fuel tank.
9. Disconnect the fuel pump wiring connector.
KAB1F370
10. Disconnect the fuel filler hose and air vent hose from
the fuel tank.
11. Support the fuel tank.
12. Remove the fuel tank retaining nuts.
Installation Notice
Tightening Torque
38 NSm (28 lb-ft)
13. Carefully lower the fuel tank.
Page 516 of 2053
1F2 -- 98 M161 ENGINE CONTROLS
D AEW OO M Y_2000
YAA1F180
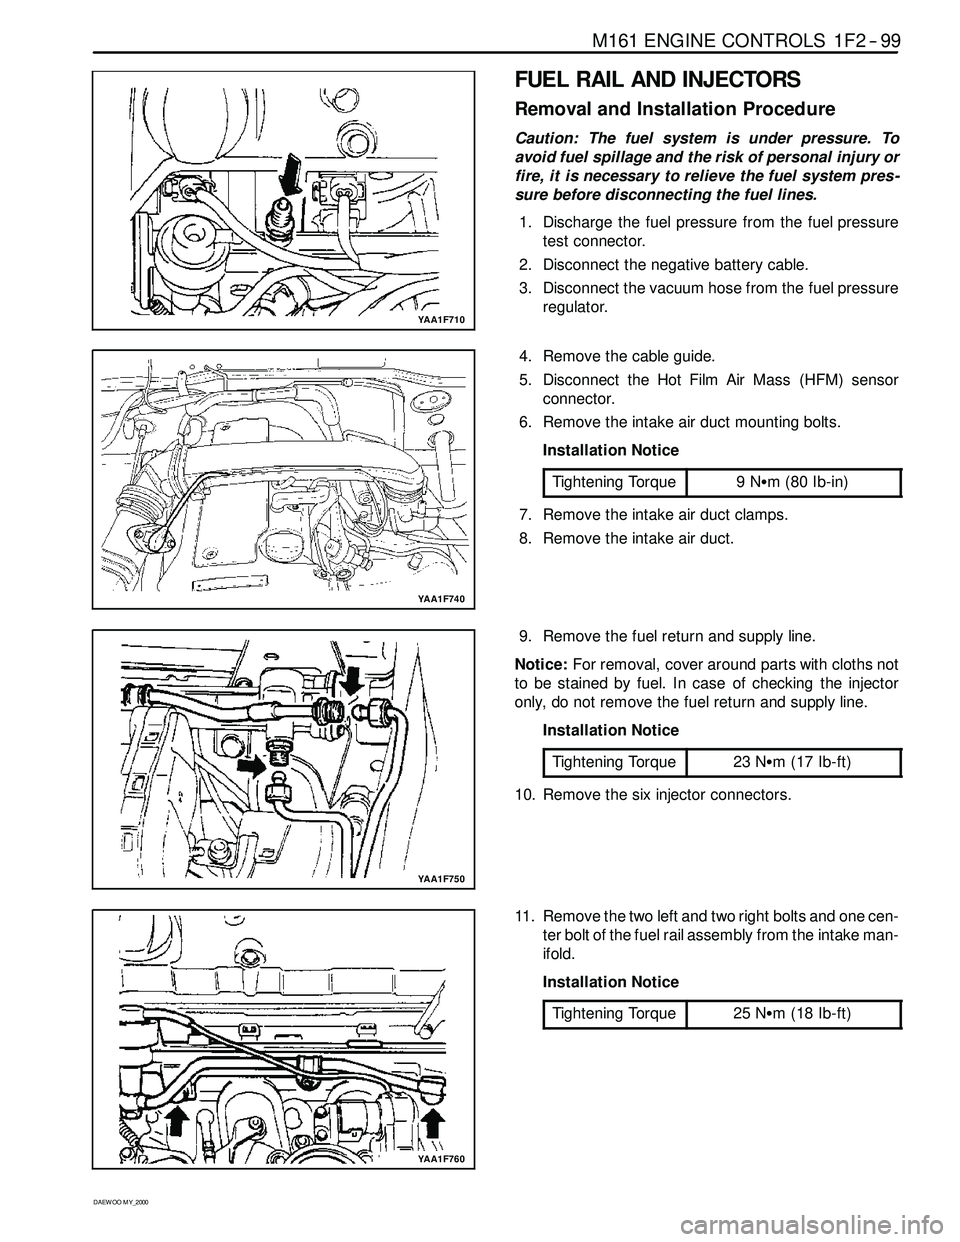
14. Turn the roll over valves counterclockwise at an
angle of 90 degrees.
15. Turn the lock ring counterclockwise.
16. Remove and discard the gasket.
17. Installation should follow the removal procedure in
the reverse order.
YAA1F700
FUEL PRESSURE REGULATOR
Removal and Installation Procedure
1. Disconnect the negative battery cable.
2. Remove the fuel pressure test connector.
Installation Notice
Tightening Torque
25 NSm (18 Ib-ft)
YAA1F720
Caution: The fuel system is under pressure. To
avoid fuel spillage and the risk of personal injury or
fire, it is necessary to relieve the fuel system pres -
sure before disconnecting the fuel lines.
3. Relieve the fuel pressure in fuel supply system by
pressing the service valve.
YAA1F730
4. Disconnect the vacuum hose.
5. Disconnect the circlip and remove the fuel pressure
regulator.
6. Apply the oil to O-ring lightly and then replace it.
7. Perform a leak test of the fuel pressure regulator
with the engine off and the ignition on.
8. Installation should follow the removal procedure in
the reverse order.
Page 517 of 2053
M161 ENGINE CONTROLS 1F2 -- 99
D AEW OO M Y_2000
YAA1F710
FUEL RAIL AND INJECTORS
Removal and Installation Procedure
Caution: The fuel system is under pressure. To
avoid fuel spillage and the risk of personal injury or
fire, it is necessary to relieve the fuel system pres -
sure before disconnecting the fuel lines.
1. Discharge the fuel pressure from the fuel pressure
test connector.
2. Disconnect the negative battery cable.
3. Disconnect the vacuum hose from the fuel pressure
regulator.
YAA1F740
4. Remove the cable guide.
5. Disconnect the Hot Film Air Mass (HFM) sensor
connector.
6. Remove the intake air duct mounting bolts.
Installation Notice
Tightening Torque
9NSm (80 Ib-in)
7. Remove the intake air duct clamps.
8. Remove the intake air duct.
YAA1F750
9. Remove the fuel return and supply line.
Notice:For removal, cover around parts with cloths not
to be stained by fuel. In case of checking the injector
only, do not remove the fuel return and supply line.
Installation Notice
Tightening Torque
23 NSm (17 Ib-ft)
10. Remove the six injector connectors.
YAA1F760
11. Remove the two left and two right bolts and one cen-
ter bolt of the fuel rail assembly from the intake man-
ifold.
Installation Notice
Tightening Torque
25 NSm (18 Ib-ft)
Page 518 of 2053
1F2 -- 100 M161 ENGINE CONTROLS
D AEW OO M Y_2000
YAA1F770
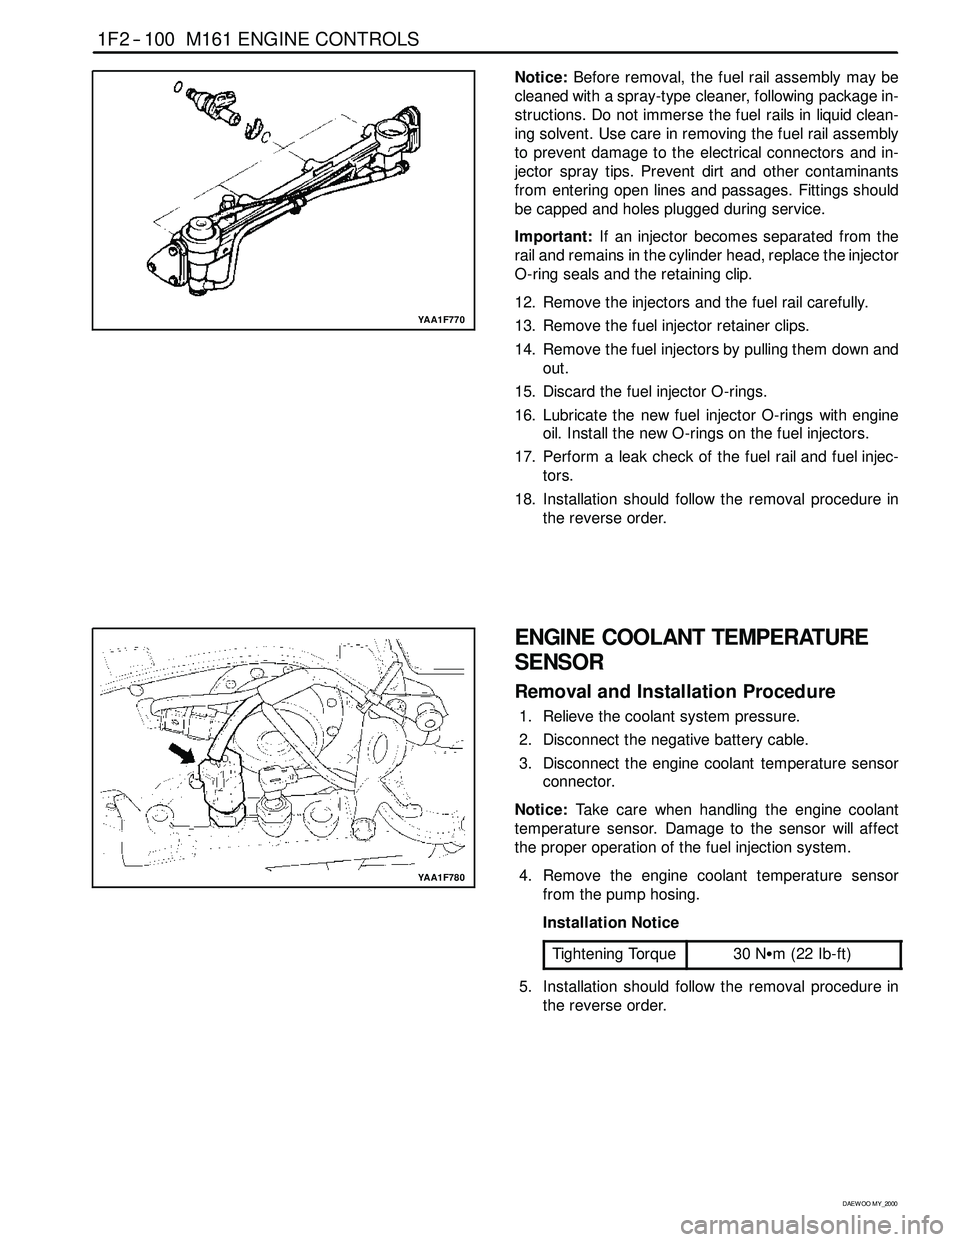
Notice:Before removal, the fuel rail assembly may be
cleaned with a spray-type cleaner, following package in-
structions. Do not immerse the fuel rails in liquid clean-
ing solvent. Use care in removing the fuel rail assembly
to prevent damage to the electrical connectors and in-
jector spray tips. Prevent dirt and other contaminants
from entering open lines and passages. Fittings should
be capped and holes plugged during service.
Important:If an injector becomes separated from the
rail and remains in the cylinder head, replace the injector
O-ring seals and the retaining clip.
12. Remove the injectors and the fuel rail carefully.
13. Remove the fuel injector retainer clips.
14. Remove the fuel injectors by pulling them down and
out.
15. Discard the fuel injector O-rings.
16. Lubricate the new fuel injector O-rings with engine
oil. Install the new O-rings on the fuel injectors.
17. Perform a leak check of the fuel rail and fuel injec-
tors.
18. Installation should follow the removal procedure in
the reverse order.
YAA1F780
ENGINE COOLANT TEMPERATURE
SENSOR
Removal and Installation Procedure
1. Relieve the coolant system pressure.
2. Disconnect the negative battery cable.
3. Disconnect the engine coolant temperature sensor
connector.
Notice:Take care when handling the engine coolant
temperature sensor. Damage to the sensor will affect
the proper operation of the fuel injection system.
4. Remove the engine coolant temperature sensor
from the pump hosing.
Installation Notice
Tightening Torque
30 NSm (22 Ib-ft)
5. Installation should follow the removal procedure in
the reverse order.
Page 519 of 2053
M161 ENGINE CONTROLS 1F2 -- 101
D AEW OO M Y_2000
YAA1F740
THROTTLE BODY (INTEGRATED
WITH THE ACTUATOR)
Removal and Installation Procedure
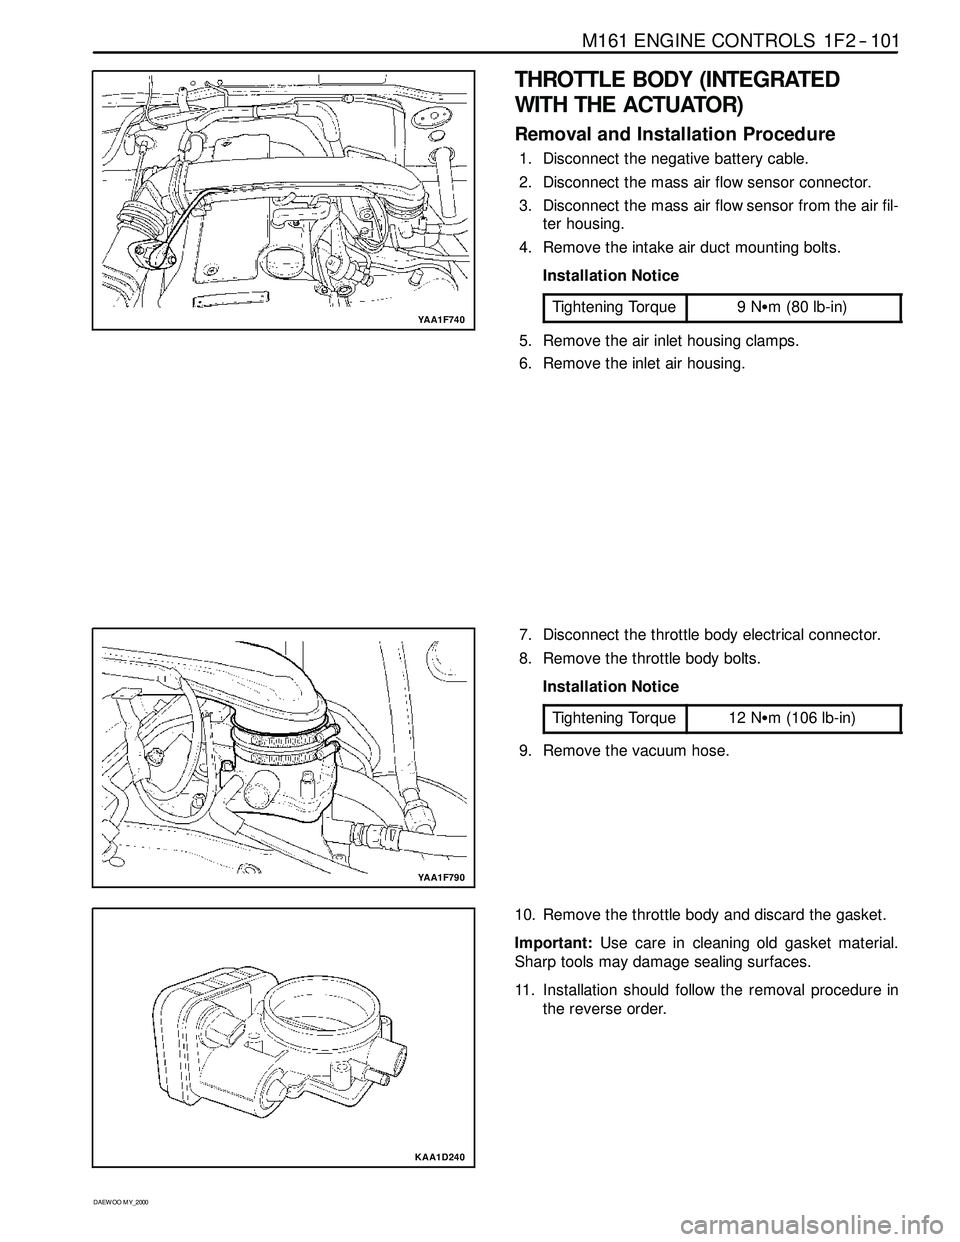
1. Disconnect the negative battery cable.
2. Disconnect the mass air flow sensor connector.
3. Disconnect the mass air flow sensor from the air fil-
ter housing.
4. Remove the intake air duct mounting bolts.
Installation Notice
Tightening Torque
9NSm (80 lb-in)
5. Remove the air inlet housing clamps.
6. Remove the inlet air housing.
YAA1F790
7. Disconnect the throttle body electrical connector.
8. Remove the throttle body bolts.
Installation Notice
Tightening Torque
12 NSm (106 lb-in)
9. Remove the vacuum hose.
KAA1D240
10. Remove the throttle body and discard the gasket.
Important:Use care in cleaning old gasket material.
Sharp tools may damage sealing surfaces.
11. Installation should follow the removal procedure in
the reverse order.