engine control unit SSANGYONG KORANDO 1997 Service Repair Manual
[x] Cancel search | Manufacturer: SSANGYONG, Model Year: 1997, Model line: KORANDO, Model: SSANGYONG KORANDO 1997Pages: 2053, PDF Size: 88.33 MB
Page 164 of 2053

D AEW OO M Y_2000
SECTION 1F1
ENGINE CONTROLS
CAUTION: Disconnect the negative battery cable before removing or installing any electrical unit or when a
tool or equipment could easily come in contact with exposed electrical terminals. Disconnecting this cable
will help prevent personal injury and damage to the vehicle. The ignition must also be in LOCK unless other -
wise noted.
TABLE OF CONTENTS
Engine and ECM Problem Check Report 1F1 -- 2....
Specifications 1F1 -- 3............................
Engine Data Display Table 1F1 -- 3.................
Fastener Tightening Specifications 1F1 -- 4..........
Fuel System Specification 1F1 -- 5.................
Temperature vs Resistance 1F1 -- 5................
Special Tools and Equipment 1F1 -- 6..............
Special Tools Table 1F1 -- 6.......................
Schematic and Routing Diagrams 1F1 -- 7..........
ECM Wiring Diagram
(3.2L DOHC -- MSE 3.62S) 1F1 -- 7..............
Diagnosis 1F1 -- 14................................
Failure Code Diagnosis 1F1 -- 14.....................
Clearing Failure Codes 1F1 -- 14...................
Failure Codes Table 1F1 -- 14.....................
Ignition System 1F1 -- 18...........................
Ignition Coil 1F1 -- 20.............................
Crankshaft Position (CKP) Sensor 1F1 -- 22.........
Camshaft Position (CMP) Sensor 1F1 -- 26..........
Camshaft Actuator 1F1 -- 30......................
Knock Sensor (KS) 1F1 -- 32......................
Spark Plug 1F1 -- 34.............................
System Voltage 1F1 -- 38.........................
Ignition Switch 1F1 -- 39..........................
Fuel System 1F1 -- 40..............................
Fuel Pump 1F1 -- 42.............................
Fuel Injector 1F1 -- 46............................
Purge Control Valve 1F1 -- 50.....................
Fuel Rail 1F1 -- 52...............................
Fuel Pressure Regulator 1F1 -- 54.................
Induction System 1F1 -- 56..........................
Throttle Valve Actuator 1F1 -- 56...................
Hot Film Air Mass (HFM) Sensor 1F1 -- 60..........
Engine Coolant Temperature (ECT) Sensor 1F1 -- 64.
Accelerator Pedal Module 1F1 -- 68................
Clutch Switch 1F1 -- 71...........................Cooling Fan 1F1 -- 72............................
A/C Compressor Relay 1F1 -- 73...................
Cruise Control Switch 1F1 -- 74....................
Traction Control System (TCS) 1F1 -- 75............
Resonance Flap 1F1 -- 76.........................
Stop Lamp Switch 1F1 -- 77.......................
Engine RPM 1F1 -- 78............................
Exhaust System 1F1 -- 79...........................
Catalytic Converter 1F1 -- 79......................
Oxygen Sensor 1F1 -- 80.........................
Engine Control Module 1F1 -- 86.....................
Serial Data Communication 1F1--88...............
Internal Failure 1F1 -- 90..........................
Electronic Throttle Controller Safety
Malfunction 1F1 -- 92...........................
Immobilizer 1F1 -- 94.............................
Maintenance and Repair 1F1 -- 95..................
On -- Vehicle Service 1F1 -- 95........................
Discharging the Pressure in Fuel System 1F1 -- 95...
Fuel Pump 1F1 -- 95.............................
Fuel Filter 1F1 -- 96..............................
Fuel Tank 1F1 -- 97..............................
Fuel Pressure Regulator 1F1 -- 98.................
Fuel Rail and Injector 1F1 -- 99....................
Engine Coolant Temperature Sensor 1F1 -- 100......
Throttle Body (Integrated with the
Actuator) 1F1 -- 101............................
Hot Film Air Mass (HFM) Sensor 1F1 -- 102.........
Knock Sensor 1F1 -- 102..........................
Pedal Position Sensor 1F1 -- 103...................
Oxygen Sensor 1F1 -- 103........................
Purge Control Valve 1F1 -- 104....................
Canister 1F1 -- 104...............................
Camshaft Position Sensor 1F1 -- 104...............
Crankshaft Position Sensor 1F1 -- 105..............
Engine Control Module 1F1 -- 105..................
Page 166 of 2053

M162 ENGINE CONTROLS 1F1 -- 3
D AEW OO M Y_2000
SPECIFICATIONS
ENGINE DATA DISPLAY TABLE
ParameterUnitVa l u e
Engine Coolant Temp.°Cgreater than 95_Cafterwarmup
Intake Air Temp.°C-- 40 ~ 130_C (varies with ambient
temp. or engine mode)
Engine RPMrpm700±50 (P/N), 600±50 (D)
Regular RPMrpm700±50 (P/N), 600±50 (D)
Engine Load%18 ~ 25 %
Mass Air Flow MeterKg/h16 ~ 25 Kg/h
Throttle Position Angle_TA0_TA(upto100_TA at the wide
open throttle)
Spark Advance_CA8_CA (6 ~ 9_CA)
Indicated Engine TorqueNmVaries with engine condition
Injection Timems3~5ms
Battery VoltageV13.5 ~ 14.1 v (engine running)
Front Axle SpeedKm/h0~265Km/h
Rear Axle SpeedKm/h0~265Km/h
Accel. Pedal Position 1V0.4~4.8V
Accel. Pedal Position 2V0.2~2.4V
Throttle Position 1V0.3~4.6V
Throttle Position 2V0.3~4.6V
Fuel Integrator0.8 ~ 1.2
Oxygen Sensormv100 ~ 900 mv
A/C S/W Condition1=ON/0=OFF--
Full Load State1=ON/0=OFF--
Shift Gear State (A/T)1=ON/0=OFF--
A/CControlState1=ON/0=OFF--
Clutch Switch (M/T)1=ON/0=OFF--
Cam Actuator State1=ON/0=OFF--
Knocking Control1=ON/0=OFF--
Protect Mission1=ON/0=OFF--
Purge Control Valve1=ON/0=OFF--
Lambda Function1=ON/0=OFF--
Catalyst Heating1=ON/0=OFF--
Overrun Fuel Cut1=ON/0=OFF--
Full Fuel Cut1=ON/0=OFF--
Brake Switch1=ON/0=OFF--
Cruise Control Status1=ON/0=OFF--
* Condition : Warmed up, idle, P/N or neutral
Page 193 of 2053

1F1 -- 30 M162 ENGINE CONTROLS
D AEW OO M Y_2000
CAMSHAFT ACTUATOR
YAA1F300
When the engine is running, the camshaft actuator rotates the intake camshaft hydraulically and mechanically relative
to the camshaft sprocket by 32°crank angle to the “advanced” position and back to the “retard” position.
The camshaft actuator is actuated electro-mechanically by the Engine Control Module (ECM). The positioning time of
apporx. 1 second is dependent on the engine oil pressure at the camshaft actuator and on the oil viscosity and oil
temperature, respectively.
The camshaft indicator on the camshaft sprocket provides the camshaft rotational speed to the position sensor as an
input parameter for the engine ignition control unit.
Operation Condition of Camshaft Actuator
Engine RPMCamshaft PositionEffect
Engine stopRetard--
0 ~ 1,500 rpmRetard
Idle speed is improved
Blow-by gas is decreased
Valve overlap is decreased
1,500 ~ 4,300 rpmAdvanced
Torque is increased
Fuel loss is decreased
NOx is decreased
Above 4,300 rpmRetardEngine overrun is prohibited
Page 211 of 2053

1F1 -- 48 M162 ENGINE CONTROLS
D AEW OO M Y_2000
Failure
CodeDescriptionTrouble AreaMaintenance Hint
77No. 3 injector short
circuit to ground or open
When malfunction of injector
circuit
Injector #3 short circuit to
ground or openDInspection the ECM pin 66 about short
circuit or open with bad contact
DInspection the injector
DInspection the ECM
78No. 4 injector short
circuit to battery
When malfunction of injector
circuit
Injector #4 short circuit to
powerDInspection the power to injector #4 or
bad contact
DInspection the injector
DInspection the ECM
79No. 4 injector short
circuit to ground or open
When malfunction of injector
circuit
Injector #4 short circuit to
ground or openDInspection the ECM pin 62 about short
circuit or open with bad contact
DInspection the injector
DInspection the ECM
192No. 5 injector short
circuit to battery
When malfunction of injector
circuit
Injector #5 short circuit to
powerDInspection the power to injector #5 or
bad contact
DInspection the injector
DInspection the ECM
193No. 5 injector short
circuit to ground or open
When malfunction of injector
circuit
Injector #5 short circuit to
ground or openDInspection the ECM pin 65 about short
circuit or open with bad contact
DInspection the injector
DInspection the ECM
194No. 6 injector short
circuit to battery
When malfunction of injector
circuit
Injector #6 short circuit to
powerDInspection the power to injector #6 or
bad contact
DInspection the injector
DInspection the ECM
195No. 6 injector short
circuit to ground or open
When malfunction of injector
circuit
Injector #6 short circuit to
ground or openDInspection the ECM pin 64 about short
circuit or open with bad contact
DInspection the injector
DInspection the ECM
YAA1F420YAA1F430
Injector Spray Pattern Check
1. Turn the ignition switch OFF.
2. Remove the fuel injector connectors.
3. Remove the fuel distributor and injector with a unit. At this time, do not remove the supply and return line.
Page 251 of 2053

1F1 -- 88 M162 ENGINE CONTROLS
D AEW OO M Y_2000
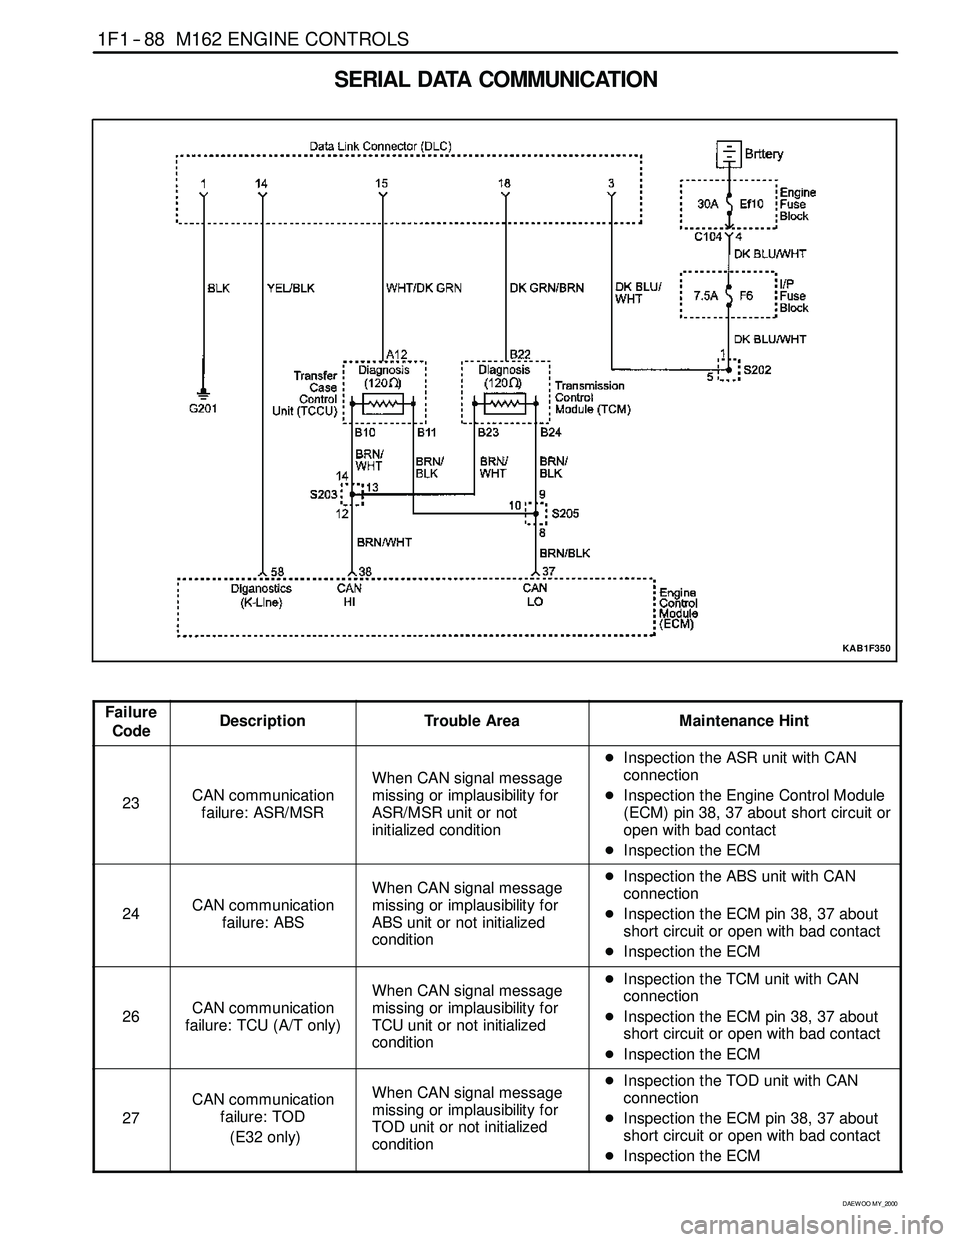
SERIAL DATA COMMUNICATION
KAB1F350
Failure
CodeDescriptionTrouble AreaMaintenance Hint
23CAN communication
failure: ASR/MSR
When CAN signal message
missing or implausibility for
ASR/MSR unit or not
initialized condition
DInspection the ASR unit with CAN
connection
DInspection the Engine Control Module
(ECM) pin 38, 37 about short circuit or
open with bad contact
DInspection the ECM
24CAN communication
failure: ABS
When CAN signal message
missing or implausibility for
ABS unit or not initialized
conditionDInspection the ABS unit with CAN
connection
DInspection the ECM pin 38, 37 about
short circuit or open with bad contact
DInspection the ECM
26CAN communication
failure: TCU (A/T only)
When CAN signal message
missing or implausibility for
TCU unit or not initialized
conditionDInspection the TCM unit with CAN
connection
DInspection the ECM pin 38, 37 about
short circuit or open with bad contact
DInspection the ECM
27
CAN communication
failure: TOD
(E32 only)When CAN signal message
missing or implausibility for
TOD unit or not initialized
conditionDInspection the TOD unit with CAN
connection
DInspection the ECM pin 38, 37 about
short circuit or open with bad contact
DInspection the ECM
Page 252 of 2053

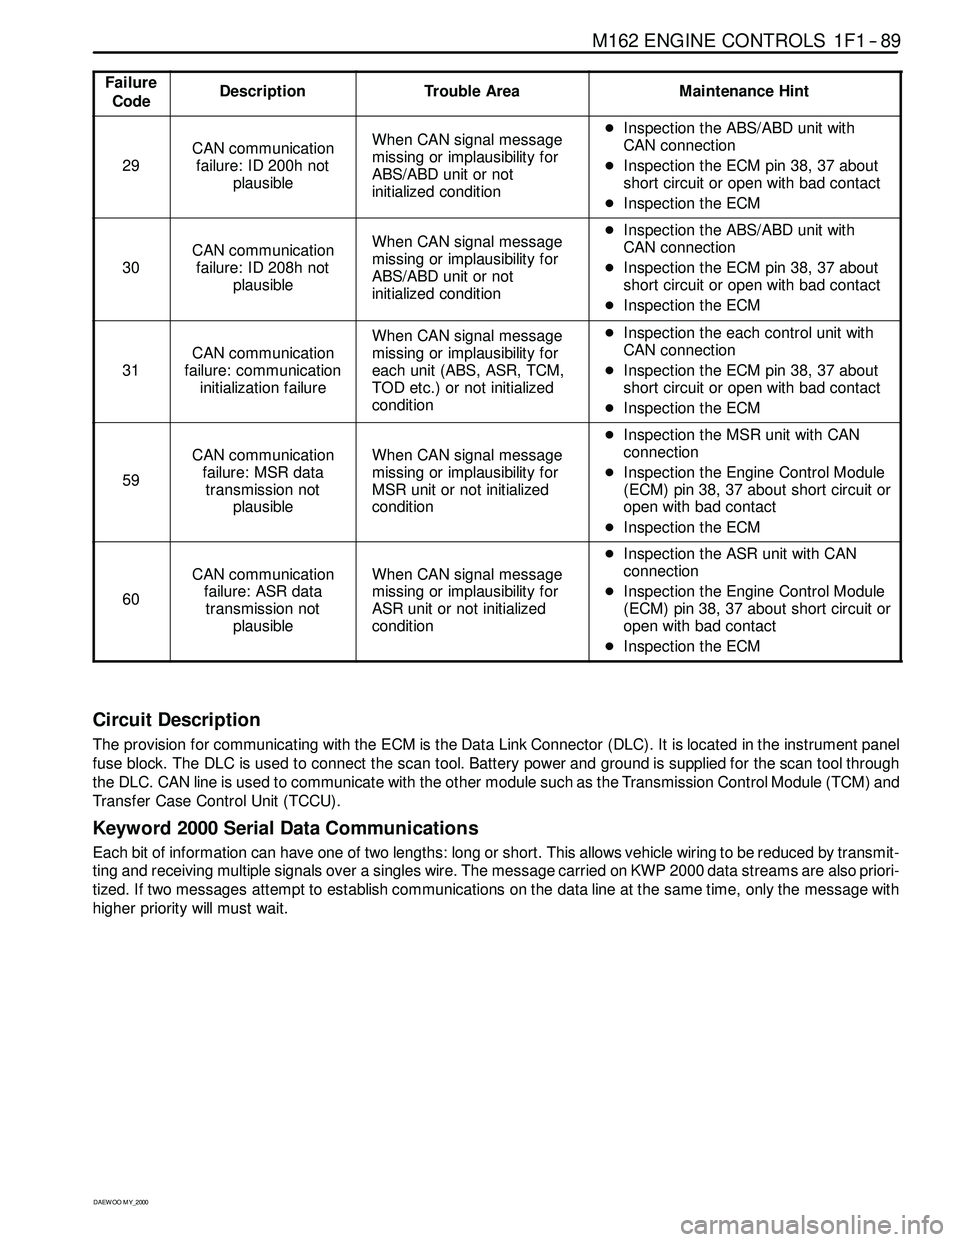
M162 ENGINE CONTROLS 1F1 -- 89
D AEW OO M Y_2000
Failure
CodeDescriptionTrouble AreaMaintenance Hint
29
CAN communication
failure: ID 200h not
plausibleWhen CAN signal message
missing or implausibility for
ABS/ABD unit or not
initialized conditionDInspection the ABS/ABD unit with
CAN connection
DInspection the ECM pin 38, 37 about
short circuit or open with bad contact
DInspection the ECM
30
CAN communication
failure: ID 208h not
plausibleWhen CAN signal message
missing or implausibility for
ABS/ABD unit or not
initialized conditionDInspection the ABS/ABD unit with
CAN connection
DInspection the ECM pin 38, 37 about
short circuit or open with bad contact
DInspection the ECM
31
CAN communication
failure: communication
initialization failure
When CAN signal message
missing or implausibility for
each unit (ABS, ASR, TCM,
TOD etc.) or not initialized
conditionDInspection the each control unit with
CAN connection
DInspection the ECM pin 38, 37 about
short circuit or open with bad contact
DInspection the ECM
59
CAN communication
failure: MSR data
transmission not
plausibleWhen CAN signal message
missing or implausibility for
MSR unit or not initialized
condition
DInspection the MSR unit with CAN
connection
DInspection the Engine Control Module
(ECM) pin 38, 37 about short circuit or
open with bad contact
DInspection the ECM
60
CAN communication
failure: ASR data
transmission not
plausibleWhen CAN signal message
missing or implausibility for
ASR unit or not initialized
condition
DInspection the ASR unit with CAN
connection
DInspection the Engine Control Module
(ECM) pin 38, 37 about short circuit or
open with bad contact
DInspection the ECM
Circuit Description
The provision for communicating with the ECM is the Data Link Connector (DLC). It is located in the instrument panel
fuse block. The DLC is used to connect the scan tool. Battery power and ground is supplied for the scan tool through
the DLC. CAN line is used to communicate with the other module such as the Transmission Control Module (TCM) and
Transfer Case Control Unit (TCCU).
Keyword 2000 Serial Data Communications
Each bit of information can have one of two lengths: long or short. This allows vehicle wiring to be reduced by transmit-
ting and receiving multiple signals over a singles wire. The message carried on KWP 2000 data streams are also priori-
tized. If two messages attempt to establish communications on the data line at the same time, only the message with
higher prioritywill must wait.
Page 257 of 2053

1F1 -- 94 M162 ENGINE CONTROLS
D AEW OO M Y_2000
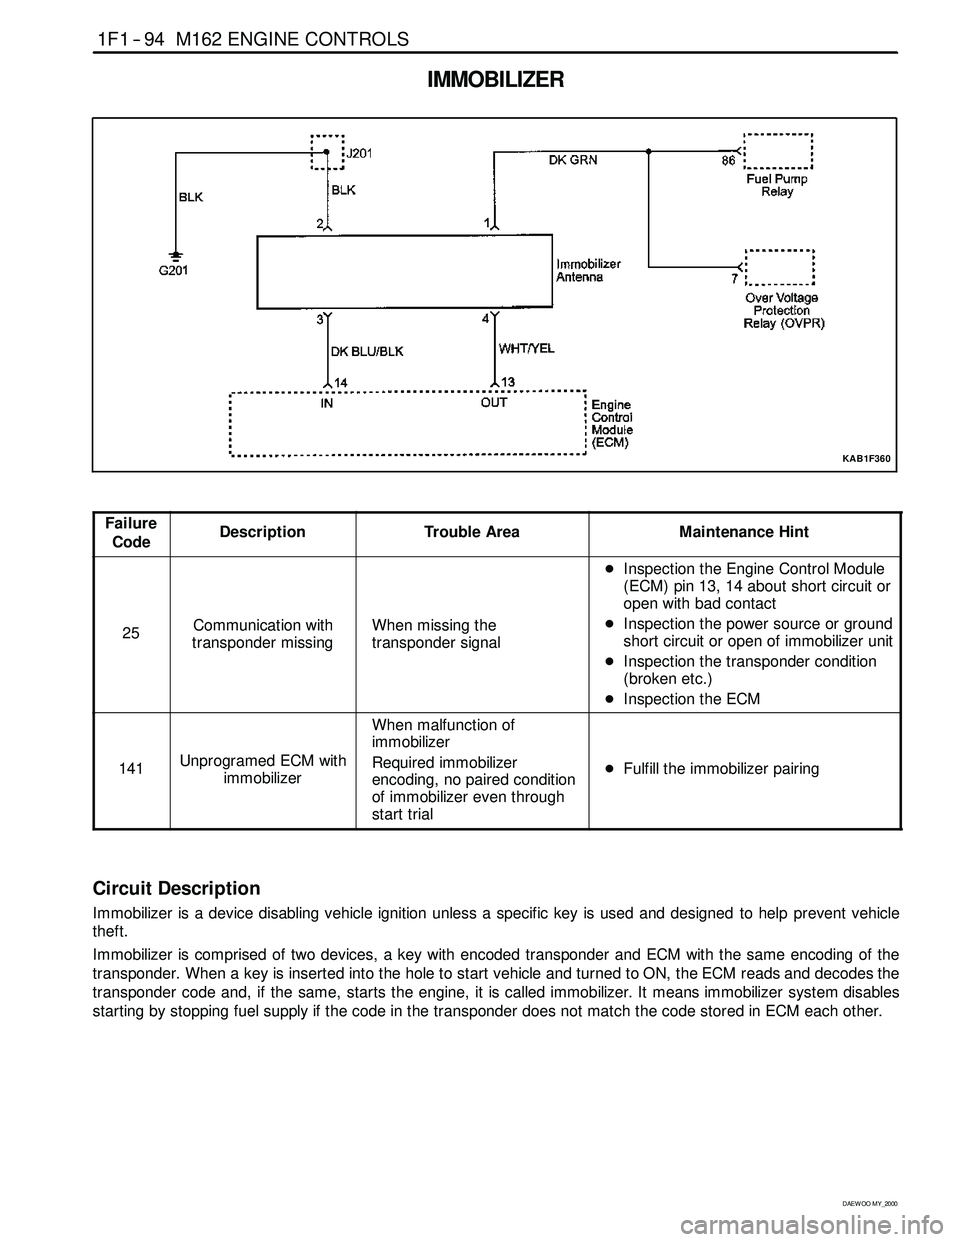
IMMOBILIZER
KAB1F360
Failure
CodeDescriptionTrouble AreaMaintenance Hint
25Communication with
transponder missingWhen missing the
transponder signal
DInspection the Engine Control Module
(ECM) pin 13, 14 about short circuit or
open with bad contact
DInspection the power source or ground
short circuit or open of immobilizer unit
DInspection the transponder condition
(broken etc.)
DInspection the ECM
141Unprogramed ECM with
immobilizer
When malfunction of
immobilizer
Required immobilizer
encoding, no paired condition
of immobilizer even through
start trial
DFulfill the immobilizer pairing
Circuit Description
Immobilizer is a device disabling vehicle ignition unless a specific key is used and designed to help prevent vehicle
theft.
Immobilizer is comprised of two devices, a key with encoded transponder and ECM with the same encoding of the
transponder. When a key is inserted into the hole to start vehicle and turned to ON, the ECM reads and decodes the
transponder code and, if the same, starts the engine, it is called immobilizer. It means immobilizersystem disables
starting by stopping fuel supply if the code in the transponder does not match the code stored in ECM each other.
Page 423 of 2053

D AEW OO M Y_2000
SECTION 1F2
ENGINE CONTROLS
CAUTION: Disconnect the negative battery cable before removing or installing any electrical unit or when a
tool or equipment could easily come in contact with exposed electrical terminals. Disconnecting this cable
will help prevent personal injury and damage to the vehicle. The ignition must also be in LOCK unless other -
wise noted.
TABLE OF CONTENTS
Engine and ECM Problem Check Report 1F2 -- 2....
Specifications 1F2 -- 3............................
Engine Data Display Table 1F2 -- 3.................
Fastener Tightening Specifications 1F2 -- 4..........
Fuel System Specification 1F2 -- 5.................
Temperature vs Resistance 1F2 -- 5................
Special Tools and Equipment 1F2 -- 6..............
Special Tools Table 1F2 -- 6.......................
Schematic and Routing Diagrams 1F2 -- 7..........
ECM Wiring Diagram
(2.3L DOHC -- MSE 3.53S) 1F2 -- 7..............
Diagnosis 1F2 -- 14................................
Failure Code Diagnosis 1F2 -- 14.....................
Clearing Failure Codes 1F2 -- 14...................
Failure Codes Table 1F2 -- 14.....................
Ignition System 1F2 -- 18...........................
Ignition Coil 1F2 -- 20.............................
Crankshaft Position (CKP) Sensor 1F2 -- 22.........
Camshaft Position (CMP) Sensor 1F2 -- 26..........
Camshaft Actuator 1F2 -- 30......................
Knock Sensor (KS) 1F2 -- 32......................
Spark Plug 1F2 -- 34.............................
System Voltage 1F2 -- 38.........................
Ignition Switch 1F2 -- 39..........................
Fuel System 1F2 -- 40..............................
Fuel Pump 1F2 -- 42.............................
Fuel Injector 1F2 -- 46............................
Purge Control Valve 1F2 -- 50.....................
Fuel Rail 1F2 -- 52...............................
Fuel Pressure Regulator 1F2 -- 54.................
Induction System 1F2 -- 56..........................
Throttle Valve Actuator 1F2 -- 56...................
Hot Film Air Mass (HFM) Sensor 1F2 -- 60..........
Engine Coolant Temperature (ECT) Sensor 1F2 -- 64.
Accelerator Pedal Module 1F2 -- 68................Cooling Fan 1F2 -- 72............................
A/C Compressor Relay 1F2 -- 73...................
Cruise Control Switch 1F2 -- 74....................
Traction Control System (TCS) 1F2 -- 75............
Stop Lamp Switch 1F2 -- 76.......................
Engine RPM 1F2 -- 77............................
Exhaust System 1F2 -- 78...........................
Catalytic Converter 1F2 -- 78......................
Oxygen Sensor 1F2 -- 80.........................
Engine Control Module 1F2 -- 86.....................
Serial Data Communication 1F2--88...............
Internal Failure 1F2 -- 90..........................
Electronic Throttle Controller Safety
Malfunction 1F2 -- 92...........................
Immobilizer 1F2 -- 94.............................
Maintenance and Repair 1F2 -- 95..................
On -- Vehicle Service 1F2 -- 95........................
Discharging the Pressure in Fuel System 1F2 -- 95...
Fuel Pump 1F2 -- 95.............................
Fuel Filter 1F2 -- 96..............................
Fuel Tank 1F2 -- 97..............................
Fuel Pressure Regulator 1F2 -- 98.................
Fuel Rail and Injector 1F2 -- 99....................
Engine Coolant Temperature Sensor 1F2 -- 100......
Throttle Body (Integrated with the
Actuator) 1F2 -- 101............................
Hot Film Air Mass (HFM) Sensor 1F2 -- 102.........
Knock Sensor 1F2 -- 102..........................
Pedal Position Sensor 1F2 -- 103...................
Oxygen Sensor 1F2 -- 103........................
Purge Control Valve 1F2 -- 104....................
Canister 1F2 -- 104...............................
Camshaft Position Sensor 1F2 -- 104...............
Crankshaft Position Sensor 1F2 -- 105..............
Engine Control Module 1F2 -- 105..................
Page 425 of 2053

M161 ENGINE CONTROLS 1F2 -- 3
D AEW OO M Y_2000
SPECIFICATIONS
ENGINE DATA DISPLAY TABLE
ParameterUnitVa l u e
Engine Coolant Temp.°Cgreater than 95_Cafterwarmup
Intake Air Temp.°C-- 40 ~ 130_C (varies with ambient
temp. or engine mode)
Engine RPMrpm700±50 (P/N), 600±50 (D)
Regular RPMrpm700±50 (P/N), 600±50 (D)
Engine Load%18 ~ 25 %
Mass Air Flow MeterKg/h16 ~ 25 Kg/h
Throttle Position Angle_TA0_TA(upto100_TA at the wide
open throttle)
Spark Advance_CA8_CA (6 ~ 9_CA)
Indicated Engine TorqueNmVaries with engine condition
Injection Timems3~5ms
Battery VoltageV13.5 ~ 14.1 v (engine running)
Front Axle SpeedKm/h0~265Km/h
Rear Axle SpeedKm/h0~265Km/h
Accel. Pedal Position 1V0.4~4.8V
Accel. Pedal Position 2V0.2~2.4V
Throttle Position 1V0.3~4.6V
Throttle Position 2V0.3~4.6V
Fuel Integrator0.8 ~ 1.2
Oxygen Sensormv100 ~ 900 mv
A/C S/W Condition1=ON/0=OFF--
Full Load State1=ON/0=OFF--
Shift Gear State (A/T)1=ON/0=OFF--
A/CControlState1=ON/0=OFF--
Clutch Switch (M/T)1=ON/0=OFF--
Cam Actuator State1=ON/0=OFF--
Knocking Control1=ON/0=OFF--
Protect Mission1=ON/0=OFF--
Purge Control Valve1=ON/0=OFF--
Lambda Function1=ON/0=OFF--
Catalyst Heating1=ON/0=OFF--
Overrun Fuel Cut1=ON/0=OFF--
Full Fuel Cut1=ON/0=OFF--
Brake Switch1=ON/0=OFF--
Cruise Control Status1=ON/0=OFF--
* Condition : Warmed up, idle, P/N or neutral
Page 466 of 2053

1F2 -- 48 M161 ENGINE CONTROLS
D AEW OO M Y_2000
Failure
CodeDescriptionTrouble AreaMaintenance Hint
77No. 3 injector short
circuit to ground or open
When malfunction of injector
circuit
Injector #3 short circuit to
ground or openDInspection the ECM pin 65 about short
circuit or open with bad contact
DInspection the injector
DInspection the ECM
78No. 4 injector short
circuit to battery
When malfunction of injector
circuit
Injector #4 short circuit to
powerDInspection the power to injector #4 or
bad contact
DInspection the injector
DInspection the ECM
79No. 4 injector short
circuit to ground or open
When malfunction of injector
circuit
Injector #4 short circuit to
ground or openDInspection the ECM pin 66 about short
circuit or open with bad contact
DInspection the injector
DInspection the ECM
YAA1F420YAA1F430
Injector Spray Pattern Check
1. Turn the ignition switch OFF.
2. Remove the fuel injector connectors.
3. Remove the fuel distributor and injector with a unit. At this time, do not remove the supply and return line.
Notice:Prepare the beaker for taking the fuel.
4. Connect the shop made cable to the injector with a firing order.
5. Connect the other end of shop made cable to the positive battery cable and negative battery cable.
6. Turn the ignition switch ON.
7. Check the injector for normal spray pattern as shown in the figure. Check injector for leaks or later drop
Injector Resistance Inspection
1. Turn the ignition switch OFF.
2. Remove the fuel injector connectors.
3. Measure the fuel injector coil resistance using a multimeter.
Specified Value
14 ~ 17Ω
Notice:Replace the fuel injector if the measured value is out of the specified values. Check the connector and wire
connection between the ECM and the injector if the measured values are normal.