width SSANGYONG MUSSO 1998 Workshop Repair Manual
[x] Cancel search | Manufacturer: SSANGYONG, Model Year: 1998, Model line: MUSSO, Model: SSANGYONG MUSSO 1998Pages: 1463, PDF Size: 19.88 MB
Page 17 of 1463

GENERAL INFORMATION 0B-5
Application
Overall Length (mm)
Overall Width (mm)
Overall Height (mm)
Wheel Base (mm)
Tread :Front (mm)
Rear (mm)
VEHICLE DIMENSIONS AND WEIGHTS
Vehicle Dimensions
Application
Manual : Curb Weight (kg)
Gross Vehicle Weight (kg)
Automatic : Curb Weight (kg)
Gross Vehicle Weight (kg)
Passenger Capacity
Vehicle Weights
Application
4656
1864
1735
2630
1510
1520
661LA
1860
2520
1916
2520
5662NA
1968
2520
1989
2520
5662LA
1890
2520
2005
2520
52.0L DOHC
1937
2520
-
-
52.3L DOHC
1850
2520
1942
2520
53.2L DOHC
1930
2520
2025
2520
5
Page 122 of 1463
M162 ENGINE MECHANICAL 1B1-49
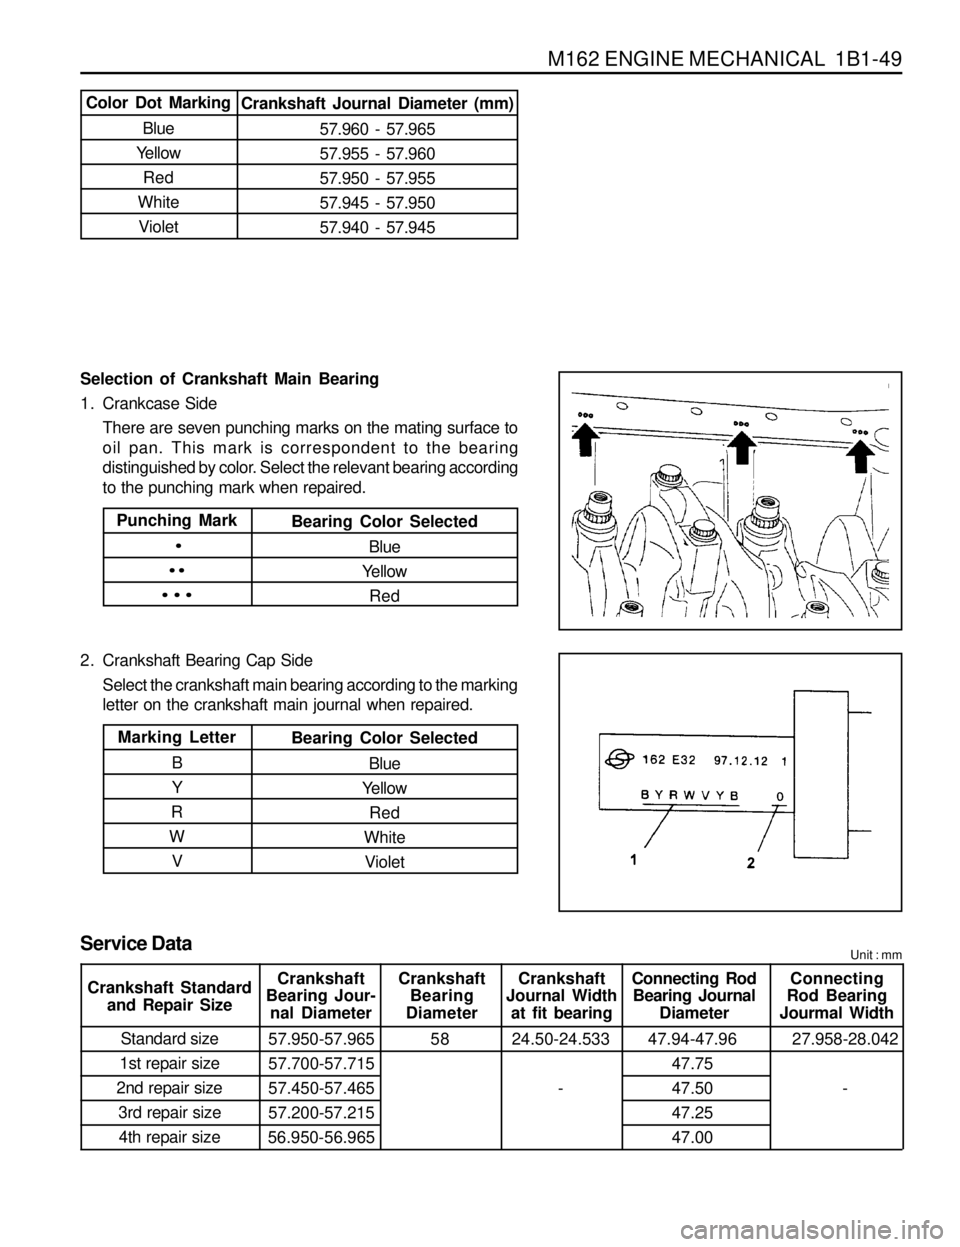
Selection of Crankshaft Main Bearing
1. Crankcase Side
There are seven punching marks on the mating surface to
oil pan. This mark is correspondent to the bearing
distinguished by color. Select the relevant bearing according
to the punching mark when repaired.
2. Crankshaft Bearing Cap Side
Select the crankshaft main bearing according to the marking
letter on the crankshaft main journal when repaired.
Color Dot Marking
Blue
Yellow
Red
White
VioletCrankshaft Journal Diameter (mm)
57.960 - 57.965
57.955 - 57.960
57.950 - 57.955
57.945 - 57.950
57.940 - 57.945
Punching Mark
·
··
···
Bearing Color Selected
Blue
Yellow
Red
Marking Letter
B
Y
R
W
VBearing Color Selected
Blue
Yellow
Red
White
Violet
Service DataUnit : mm
Crankshaft
Bearing Jour-
nal DiameterCrankshaft
Bearing
DiameterCrankshaft
Journal Width
at fit bearingConnecting Rod
Bearing Journal
DiameterConnecting
Rod Bearing
Jourmal Width
Standard size
1st repair size
2nd repair size
3rd repair size
4th repair size57.950-57.965
57.700-57.715
57.450-57.465
57.200-57.215
56.950-56.96558 24.50-24.533
-47.94-47.96
47.75
47.50
47.25
47.0027.958-28.042
- Crankshaft Standard
and Repair Size
Page 161 of 1463

1B1-88 M162 ENGINE MECHANICAL
CONNECTING ROD
Preceding Work : Removal of piston
1 Connecting Rod Bushing
2 Oil Gallery
3 Balance Weight
4 Connecting Rod Bolt
(M9 x 52, 12 m pieces) .. 1st step 40+5 Nm
2nd step 90°+10°
5 Fit Sleeve
6 Upper Connecting Rod Bearing
7 Lower Connecting Rod Bearing
8 BearingShell Lug
9 Marking [Indication(//) or Numbers]
Service Data Standard
Distance (L) from The Connecting Rod Bearing Bore Center to The Bushing Bore Center
Width of The Connecting Rod (B) at Bearing Bore
Width of The Connecting Rod (b) at Bushing Bore
Basic Bore at The Bearing Shell (D1)
Basic Bore at The Bushing (d1)
Bushing Inner Diameter (d)
Clearance Between The Piston Pin and The Bushing
Peak-to-valley Height of Connecting Rod Bushing on Inside
Permissible Wwist of Connecting Rod Bearing Bore to Connecting Rod Bushing Bore
Permissible Deviation of Axial Paralleism of Connecting Rod Bearing Bore to Connecting
Rod Bushing Core
Permissible Deviation of Connecting Rod Bearing Bore from Concentricity
Permissible Difference of Each Connecting Rod in Weight145 ± 0.05 mm
21.940 - 22.000 mm
21.940 - 22.000 mm
51.600 - 51.614 mm
24.500 - 24.571 mm
22.007 - 22.013 mm
0.007 - 0.018 mm
0.005 mm
0.15 mm
0.07 mm
0.01 mm
0.4 g
Page 245 of 1463
1B2-56 M161 ENGINE MECHANICAL
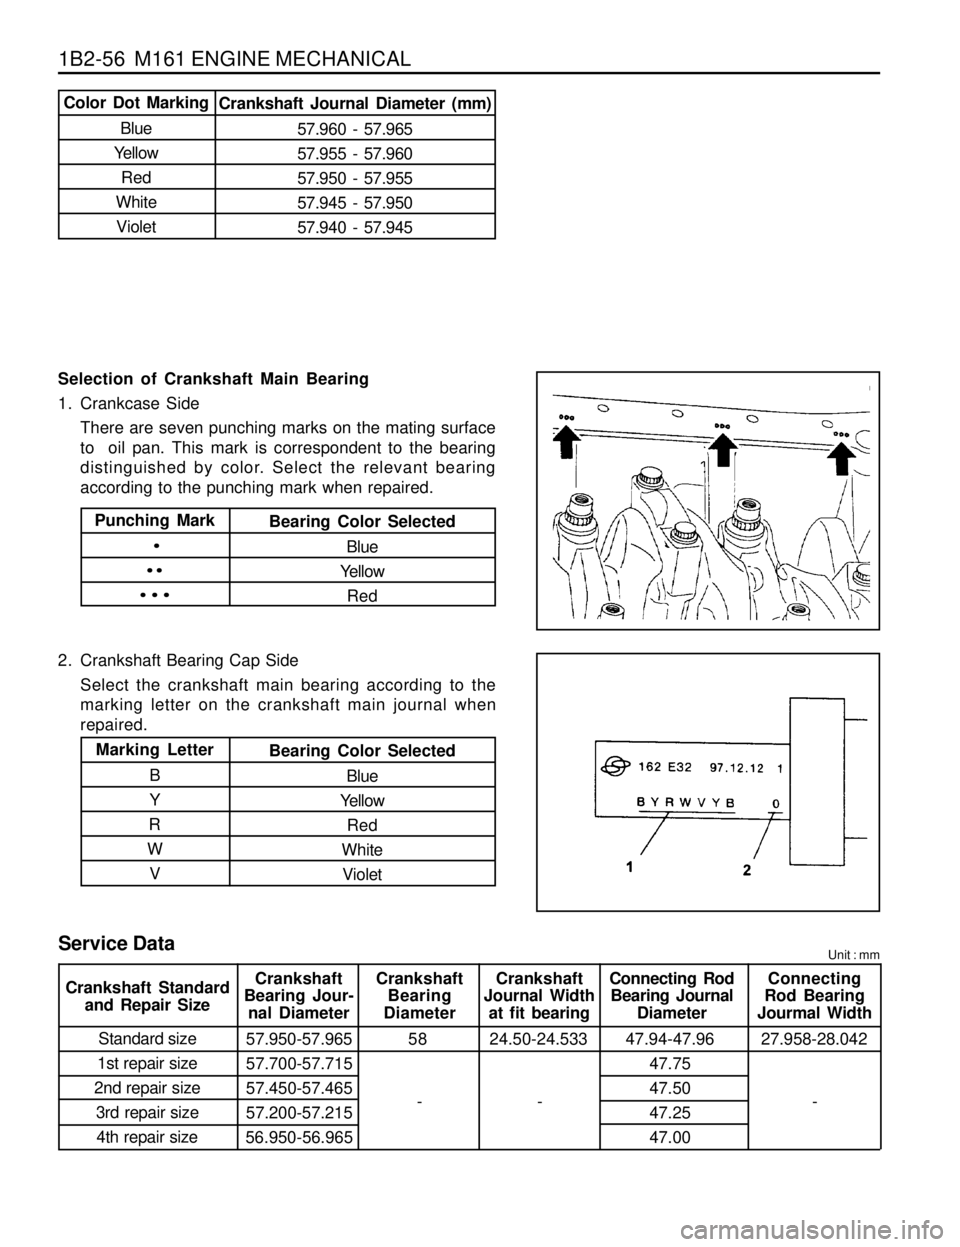
Selection of Crankshaft Main Bearing
1. Crankcase Side
There are seven punching marks on the mating surface
to oil pan. This mark is correspondent to the bearing
distinguished by color. Select the relevant bearing
according to the punching mark when repaired.
2. Crankshaft Bearing Cap Side
Select the crankshaft main bearing according to the
marking letter on the crankshaft main journal when
repaired.
Color Dot Marking
Blue
Yellow
Red
White
VioletCrankshaft Journal Diameter (mm)
57.960 - 57.965
57.955 - 57.960
57.950 - 57.955
57.945 - 57.950
57.940 - 57.945
Punching Mark
·
··
···
Bearing Color Selected
Blue
Yellow
Red
Marking Letter
B
Y
R
W
VBearing Color Selected
Blue
Yellow
Red
White
Violet
Service DataUnit : mm
Crankshaft
Bearing Jour-
nal DiameterCrankshaft
Bearing
DiameterCrankshaft
Journal Width
at fit bearingConnecting Rod
Bearing Journal
DiameterConnecting
Rod Bearing
Jourmal Width
Standard size
1st repair size
2nd repair size
3rd repair size
4th repair size57.950-57.965
57.700-57.715
57.450-57.465
57.200-57.215
56.950-56.96558 24.50-24.533 47.94-47.96
47.75
47.50
47.25
47.0027.958-28.042 Crankshaft Standard
and Repair Size
- --
Page 282 of 1463

M161 ENGINE MECHANICAL 1B2-93
CONNECTING ROD
Preceding Work : Removal of piston
1 Connecting Rod Bushing
2 Oil Gallery
3 Balance Weight
4 Connecting Rod Bolt
(M9 x 52, 8 pieces)............1st step 40 Nm
2nd step 90°
5 Fit Sleeve
6 Upper Connecting Rod Bearing
7 Lower Connecting Rod Bearing
8 BearingShell Lug
9 Marking [Indication(//) or Numbers]
Service Data Standard
Distance (L) from The Connecting Rod Bearing to Bushing Bore Center
Width of The Connecting Rod (B) at Bearing Bore
Width of The Connecting Rod (b) at Bushing Bore
Basic Bore at The Bearing Shell (D1)
Basic Bore at The Bushing (d1)
Bushing Inner Diameter (d)
Clearance Between The Piston Pin and The Bushing
Peak-to-valley Height of Connecting Rod Bushing on Inside
Permissible Wwist of Connecting Rod Bearing Bore to
Connecting Rod Bushing Bore
Permissible Deviation of Axial Paralleism of Connecting Rod
Bearing Bore to Connecting Rod Bushing Bore
Permissible Deviation of Axial Paralleism of Connecting Rod Bearing Bore from
Concentricity
Permissible Difference of Each Connecting Rod in WeightE20 : 154 mm
E23 : 149 ± 0.05 mm
21.940 - 22.000 mm
21.940 - 22.000 mm
51.600 - 51.614 mm
24.500 - 24.571 mm
22.007 - 22.013 mm
0.007 - 0.018 mm
0.005 mm
0.1/100 mm
0.045/100 mm
0.01 mm
0.4 g
Page 388 of 1463
1B3-86 OM600 ENGINE MECHANICAL
24.500 - 24.533
24.600 - 24.633
24.700 - 24.733
24.900 - 24.933
25.000 - 25.033New
Limit
New
Limit Radial clearances
Axial clearancesCrankshaft bearing
journal diameter Crankshaft Standard and Repair Sizes
Standard size 50.950 - 57.965
journal width
24.500 - 24.533
24.600 - 24.633
24.700 - 24.733
24.900 - 24.933
25.000 - 25.033
-Thrust bearing
journal diameter
47.950 - 47.965 Thrust bearing
47.700 - 47.715
47.450 - 47.650
47.200 - 47.215
46.950 - 46.965 57.500 - 57.715
57.450 - 57.465
57.200 - 57.215
56.950 - 56.965 Repair size 1
Repair size 2
Repair size 3
Repair size 4
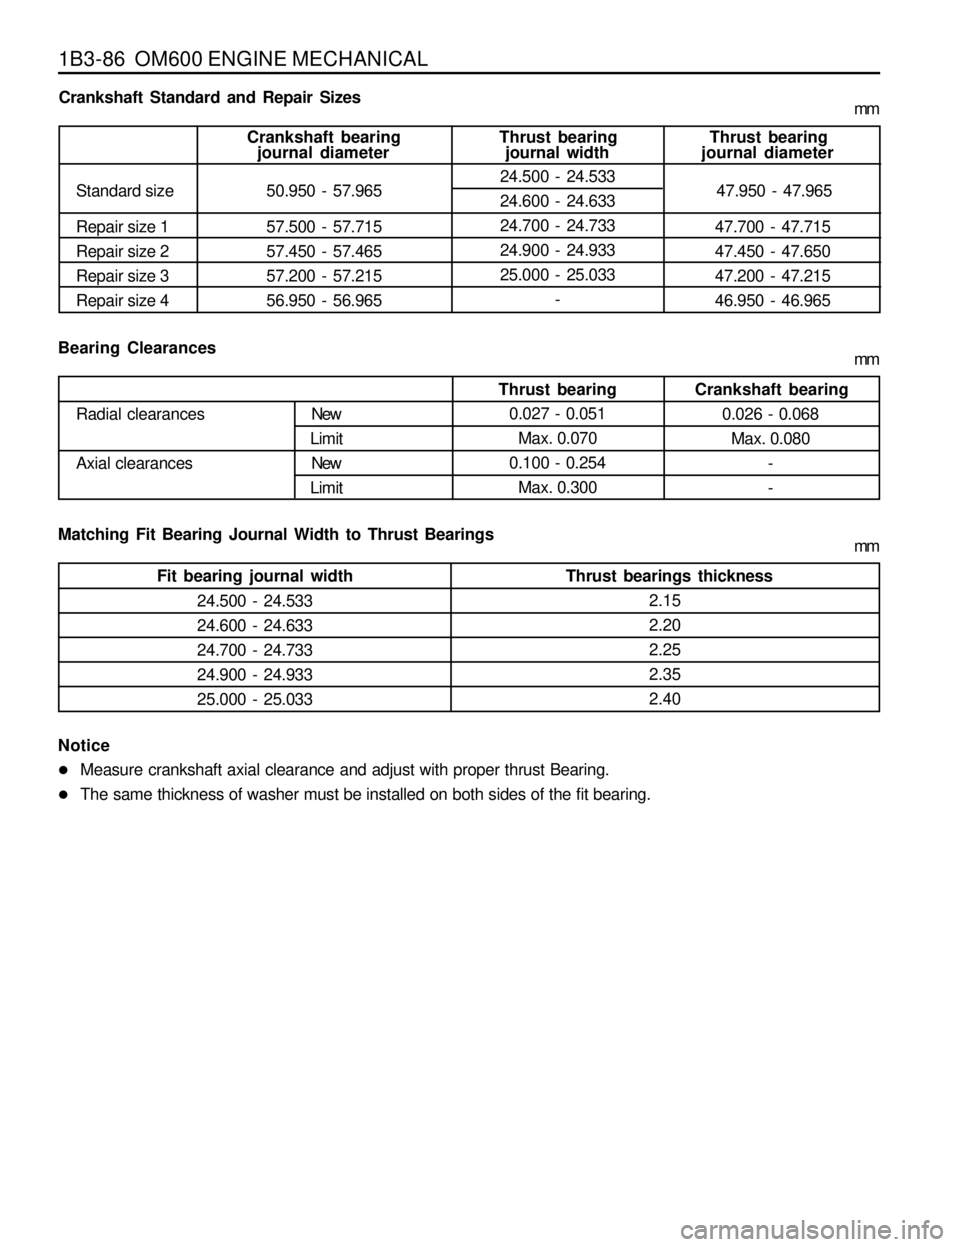
Bearing Clearances
Thrust bearingCrankshaft bearing
0.026 - 0.068
Max. 0.080
-
- 0.027 - 0.051
Max. 0.070
0.100 - 0.254
Max. 0.300
Matching Fit Bearing Journal Width to Thrust Bearings
Fit bearing journal width Thrust bearings thickness
2.15
2.20
2.25
2.35
2.40
Notice
lMeasure crankshaft axial clearance and adjust with proper thrust Bearing.
lThe same thickness of washer must be installed on both sides of the fit bearing.mm
mm
mm
Page 392 of 1463
1B3-90 OM600 ENGINE MECHANICAL
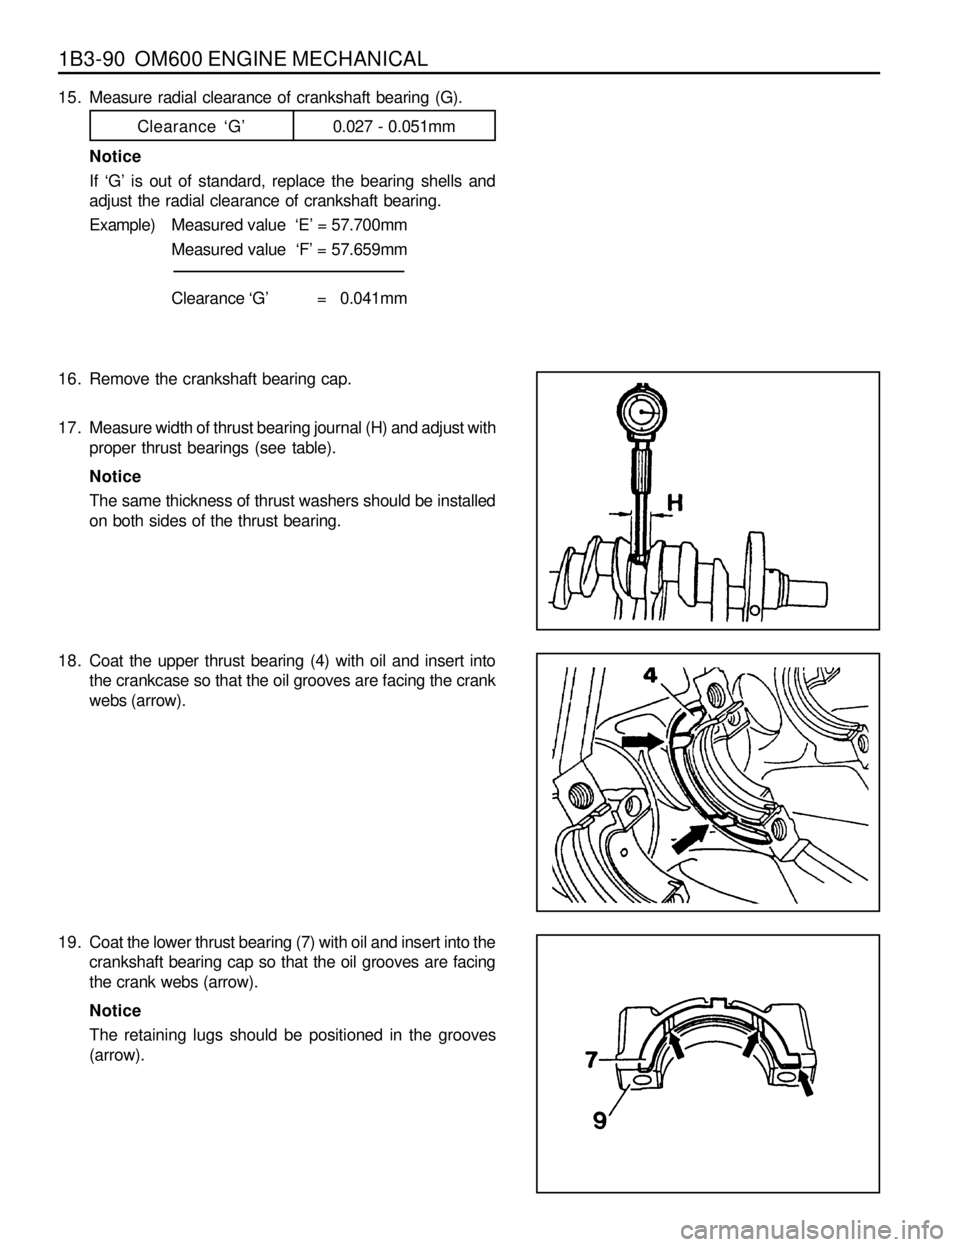
15. Measure radial clearance of crankshaft bearing (G).
Clearance ‘G’0.027 - 0.051mm
Notice
If ‘G’ is out of standard, replace the bearing shells and
adjust the radial clearance of crankshaft bearing.
Example)Measured value ‘E’ = 57.700mm
Measured value ‘F’ = 57.659mm
Clearance ‘G’ = 0.041mm
16. Remove the crankshaft bearing cap.
17. Measure width of thrust bearing journal (H) and adjust with
proper thrust bearings (see table).
Notice
The same thickness of thrust washers should be installed
on both sides of the thrust bearing.
18. Coat the upper thrust bearing (4) with oil and insert into
the crankcase so that the oil grooves are facing the crank
webs (arrow).
19. Coat the lower thrust bearing (7) with oil and insert into the
crankshaft bearing cap so that the oil grooves are facing
the crank webs (arrow).
Notice
The retaining lugs should be positioned in the grooves
(arrow).
Page 435 of 1463
OM600 ENGINE MECHANICAL 1B3-133
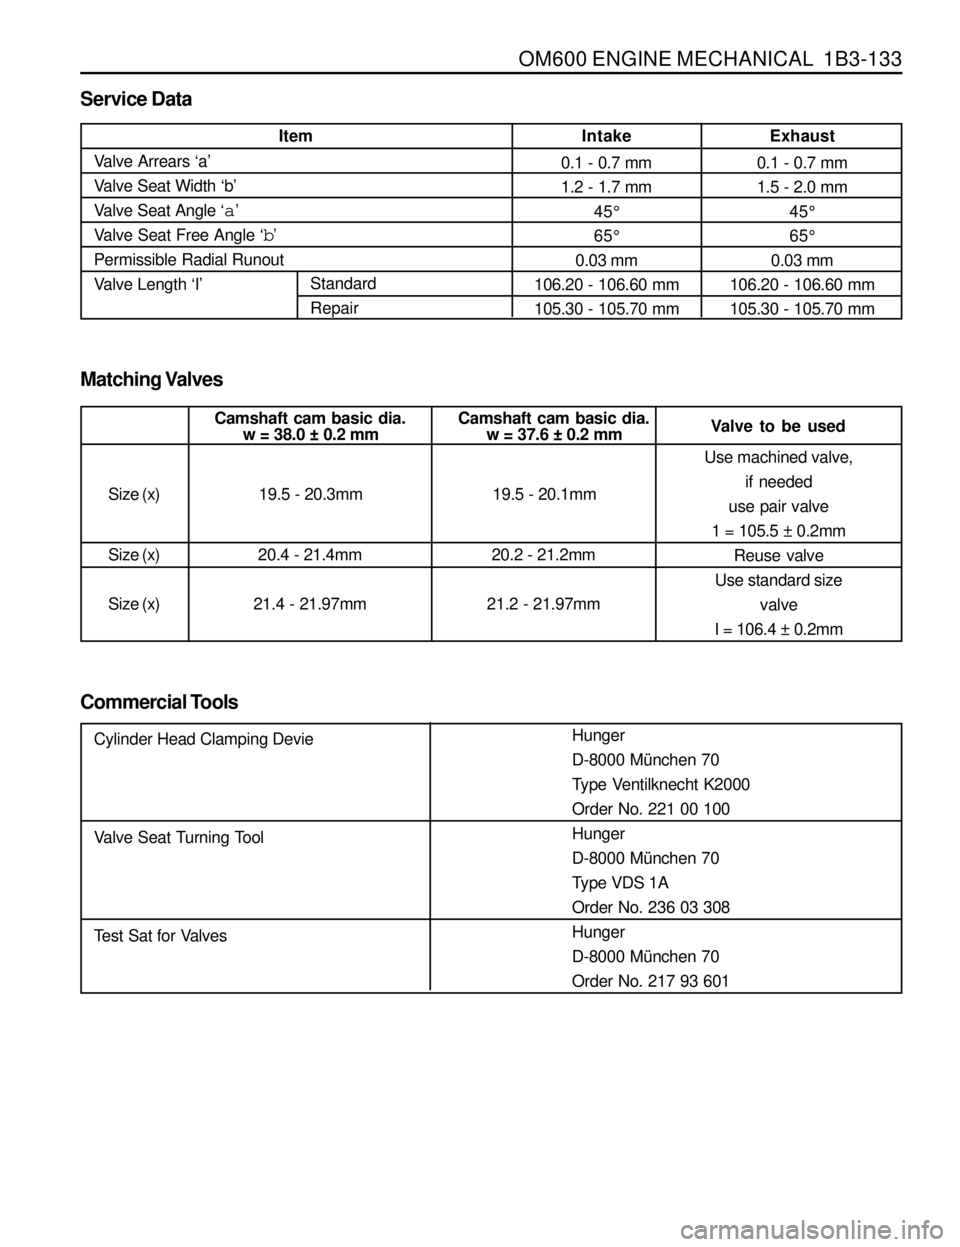
Service Data
Item
Valve Arrears ‘a’
Valve Seat Width ‘b’
Valve Seat Angle ‘
a’
Valve Seat Free Angle ‘
b’
Permissible Radial Runout
Valve Length ‘I’Intake
0.1 - 0.7 mm
1.2 - 1.7 mm
45°
65°
0.03 mm
106.20 - 106.60 mm
105.30 - 105.70 mmExhaust
0.1 - 0.7 mm
1.5 - 2.0 mm
45°
65°
0.03 mm
106.20 - 106.60 mm
105.30 - 105.70 mm
Standard
Repair
w = 38.0 ± 0.2 mm
Matching Valves
Camshaft cam basic dia.
Size (x)
Size (x)
Size (x)19.5 - 20.3mm
20.4 - 21.4mm
21.4 - 21.97mmw = 37.6 ± 0.2 mm Camshaft cam basic dia.
19.5 - 20.1mm
20.2 - 21.2mm
21.2 - 21.97mmValve to be used
Use machined valve,
if needed
use pair valve
1 = 105.5 ± 0.2mm
Reuse valve
Use standard size
valve
I = 106.4 ± 0.2mm
Commercial Tools
Hunger
D-8000 München 70
Type Ventilknecht K2000
Order No. 221 00 100
Hunger
D-8000 München 70
Type VDS 1A
Order No. 236 03 308
Hunger
D-8000 München 70
Order No. 217 93 601 Cylinder Head Clamping Devie
Valve Seat Turning Tool
Test Sat for Valves
Page 436 of 1463
1B3-134 OM600 ENGINE MECHANICAL
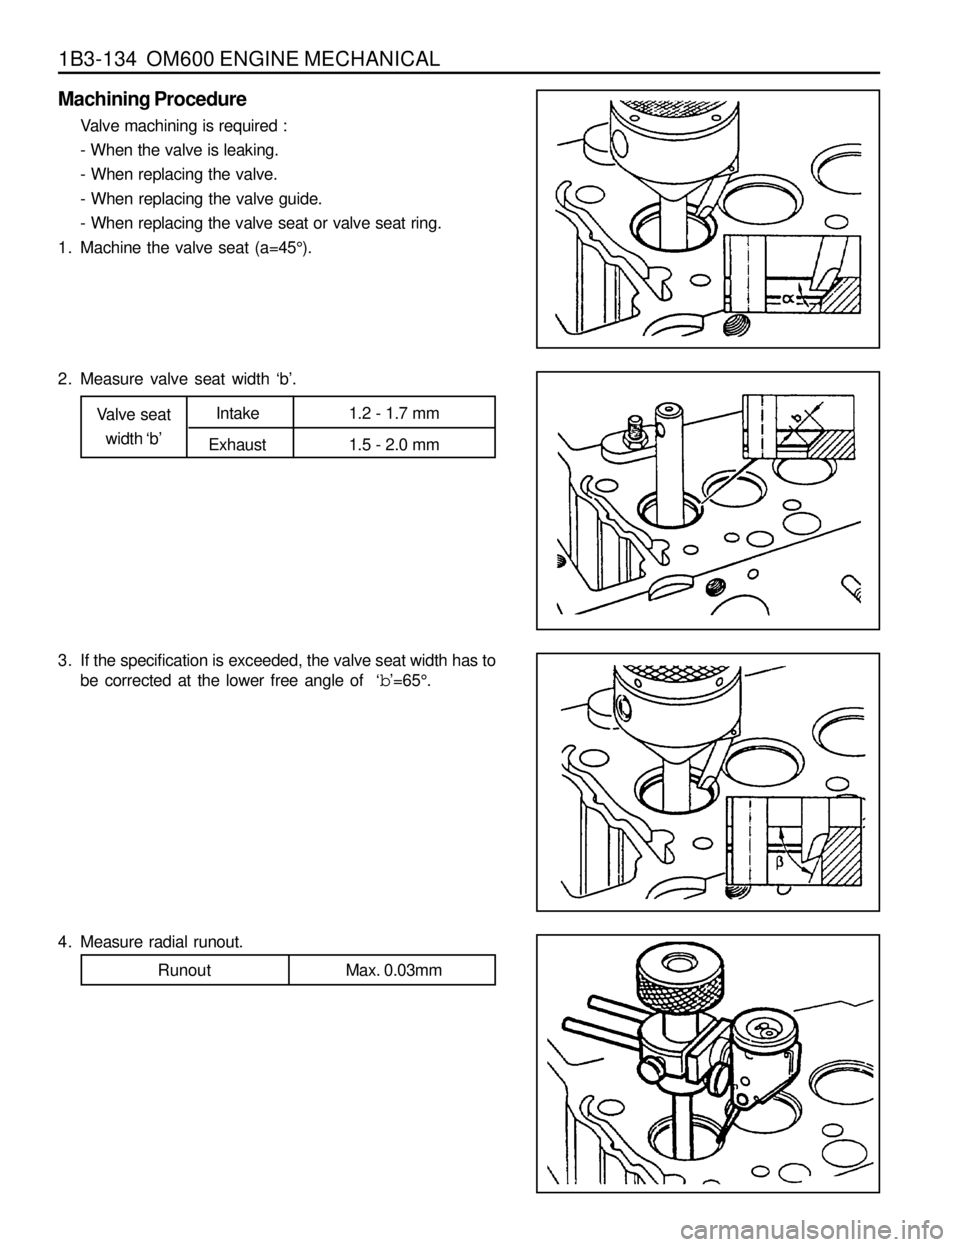
Machining Procedure
Valve machining is required :
- When the valve is leaking.
- When replacing the valve.
- When replacing the valve guide.
- When replacing the valve seat or valve seat ring.
1. Machine the valve seat (a=45°).
2. Measure valve seat width ‘b’.
Valve seat
width ‘b’1.2 - 1.7 mm
1.5 - 2.0 mm Intake
Exhaust
3. If the specification is exceeded, the valve seat width has to
be corrected at the lower free angle of ‘
b’=65°.
4. Measure radial runout.
Runout Max. 0.03mm
Page 490 of 1463

SECTION 1D1
M162 ENGINE COOLING
Specifications . . . . . . . . . . . . . . . . . . . . . . . 1D1-1
General Specifications . . . . . . . . . . . . . . . . . 1D1-1
Fastener Tightening Specifications . . . . . . . . 1D1-2
Special Tools . . . . . . . . . . . . . . . . . . . . . . . 1D1-3
Special Tools Table . . . . . . . . . . . . . . . . . . . . 1D1-3
Diagnosis . . . . . . . . . . . . . . . . . . . . . . . . . . 1D1-4
System Leakage Test . . . . . . . . . . . . . . . . . . 1D1-4
Maintenance and Repair . . . . . . . . . . . . . . 1D1-5
On-Vehicle Service . . . . . . . . . . . . . . . . . . . . . 1D1-5Coolant Drain and Fill Up . . . . . . . . . . . . . . . 1D1-5
Coolant Connection Fitting . . . . . . . . . . . . . . 1D1-7
Water Pump . . . . . . . . . . . . . . . . . . . . . . . . . 1D1-8
Thermostat . . . . . . . . . . . . . . . . . . . . . . . . . 1D1-10
Oil Cooler Pipe Line . . . . . . . . . . . . . . . . . . 1D1-11
Cooling Fan and Viscous Clutch . . . . . . . . . 1D1-12
Cooling Fan Shroud . . . . . . . . . . . . . . . . . . 1D1-14
Radiator . . . . . . . . . . . . . . . . . . . . . . . . . . . 1D1-15
SPECIFICATIONS
GENERAL SPECIFICATIONS
CAUTION: Disconnect the negative battery cable before removing or installing any electrical unit or when a
tool or equipment could easily come in contact with exposed electrical terminals. Disconnecting this cable
will help prevent personal injury and damage to the vehicle. The ignition must also be in LOCK unless otherwise
noted.
TABLE OF CONTENTS
Description
Water Cooling Forced Circulation
Double Cross Flow
70,000 kcal/h
580 x 482 x 45 mm
f 460, Six Blades
ALUTEC - P78
50 : 50
11.3 L
3.4 L
1.4 bar Application
Cooling Type
Radiator
Dimension(Width´Height´Thickeness)
Cooling Fan
Anti-Freeze Agent
Mixing Ratio of Anti-Freeze Agen with Water (Anti-Freeze Agent : Water)
Coolant Capacity
Reservoir Capacity
Cap Operating Pressure (Reservoir Tank Pressure Cap)
Circulation Type
Radiation Capability