electric SSANGYONG MUSSO 2003 Repair Manual
[x] Cancel search | Manufacturer: SSANGYONG, Model Year: 2003, Model line: MUSSO, Model: SSANGYONG MUSSO 2003Pages: 1574, PDF Size: 26.41 MB
Page 1077 of 1574
TRANSFER CASE (PART TIME 4408) 5D1-25
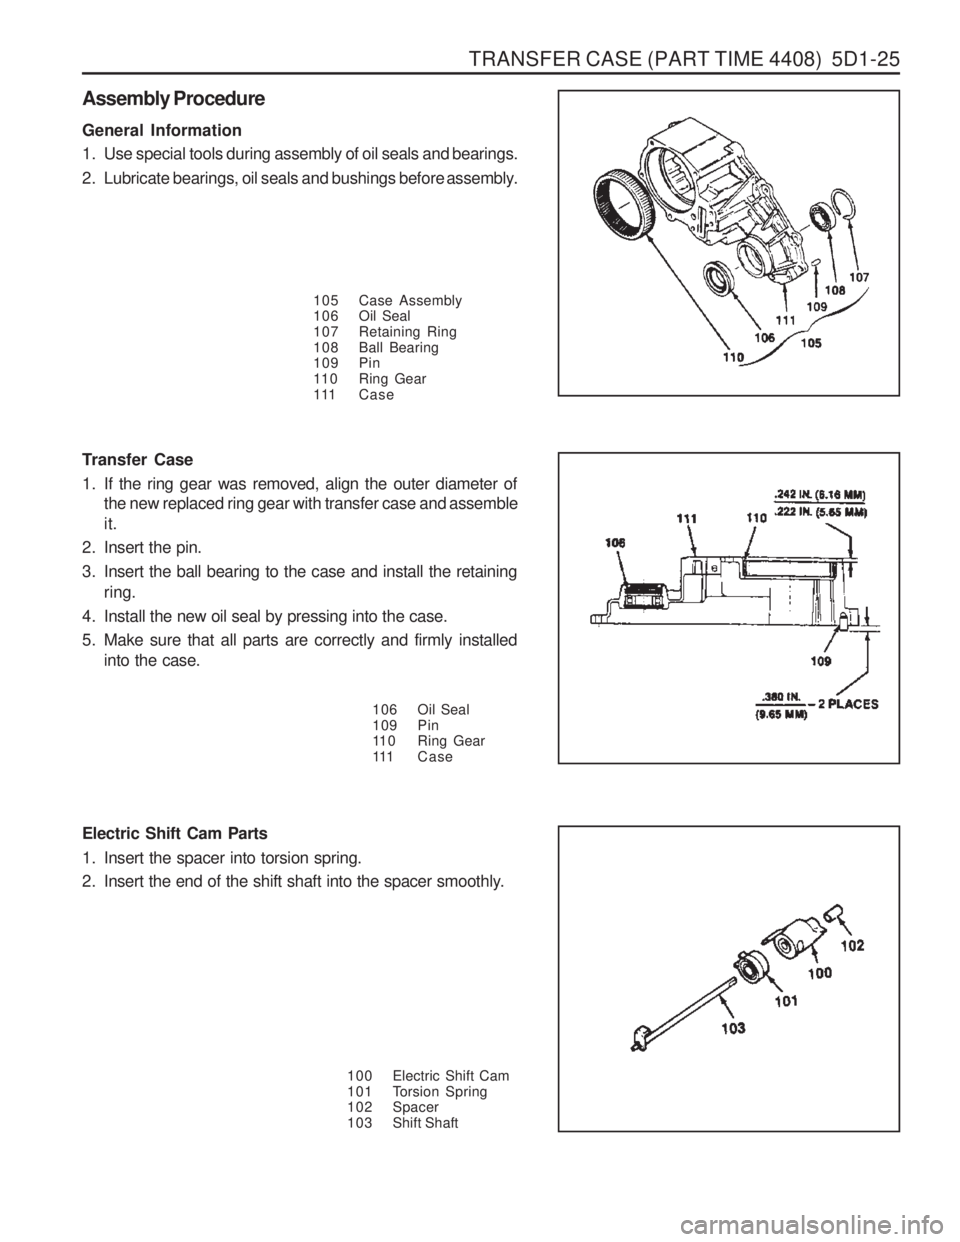
Electric Shift Cam Parts
1. Insert the spacer into torsion spring.
2. Insert the end of the shift shaft into the spacer smoothly.100 Electric Shift Cam
101 Torsion Spring
102 Spacer
103 Shift Shaft
Assembly Procedure General Information
1. Use special tools during assembly of oil seals and bearings.
2. Lubricate bearings, oil seals and bushings before assembly.105 Case Assembly
106 Oil Seal
107 Retaining Ring
108 Ball Bearing
109 Pin
110 Ring Gear
111 Case
106 Oil Seal
109 Pin
110 Ring Gear
111 Case
Transfer Case
1. If the ring gear was removed, align the outer diameter of
the new replaced ring gear with transfer case and assemble it.
2. Insert the pin.
3. Insert the ball bearing to the case and install the retaining ring.
4. Install the new oil seal by pressing into the case.
5. Make sure that all parts are correctly and firmly installed into the case.
Page 1078 of 1574
5D1-26 TRANSFER CASE (PART TIME 4408)
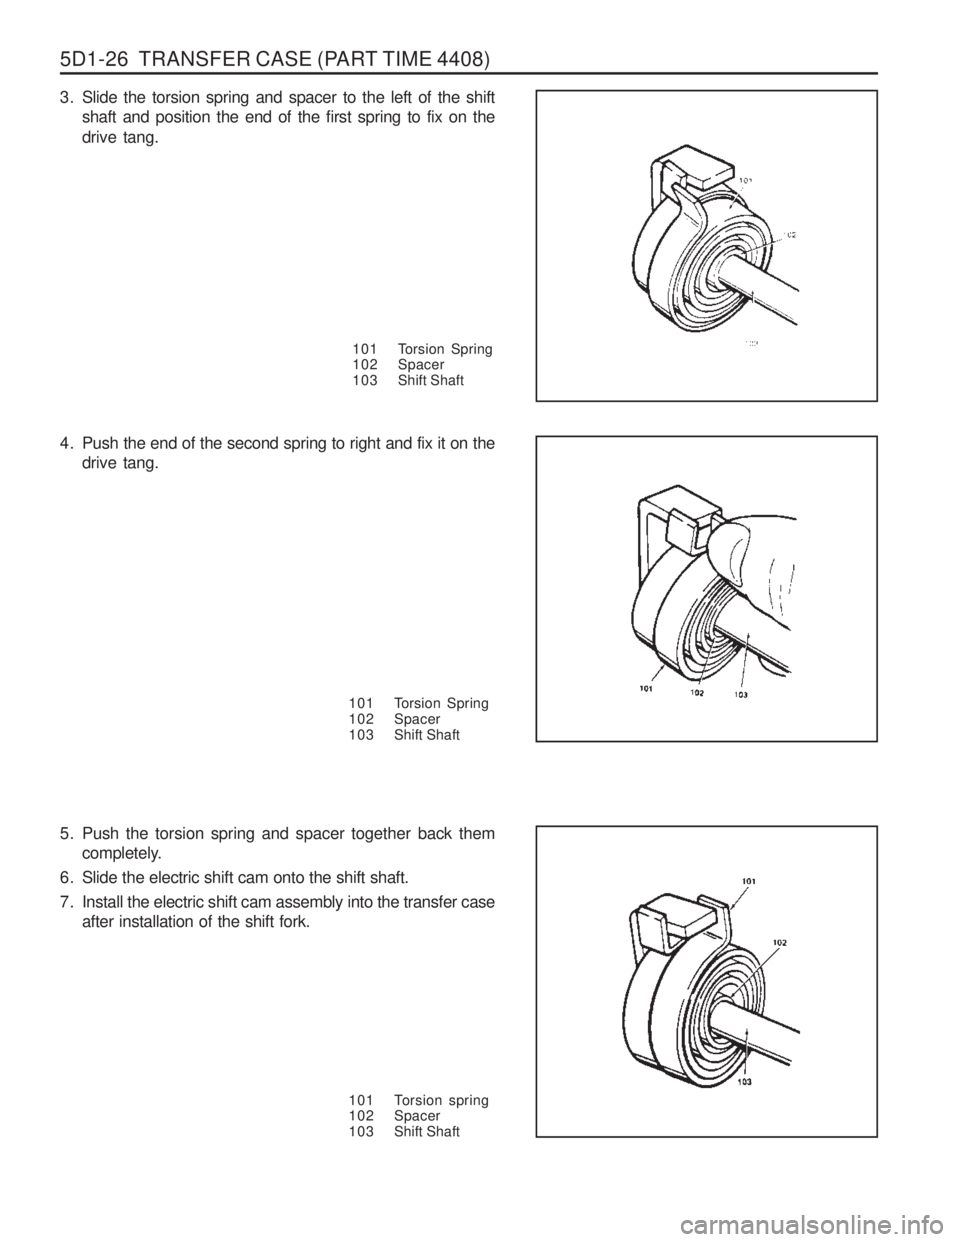
101 Torsion Spring
102 Spacer
103 Shift Shaft
3. Slide the torsion spring and spacer to the left of the shift
shaft and position the end of the first spring to fix on the drive tang.
4. Push the end of the second spring to right and fix it on thedrive tang.
101 Torsion Spring
102 Spacer
103 Shift Shaft
5. Push the torsion spring and spacer together back them completely.
6. Slide the electric shift cam onto the shift shaft.
7. Install the electric shift cam assembly into the transfer case after installation of the shift fork.
101 Torsion spring
102 Spacer
103 Shift Shaft
Page 1083 of 1574
TRANSFER CASE (PART TIME 4408) 5D1-31
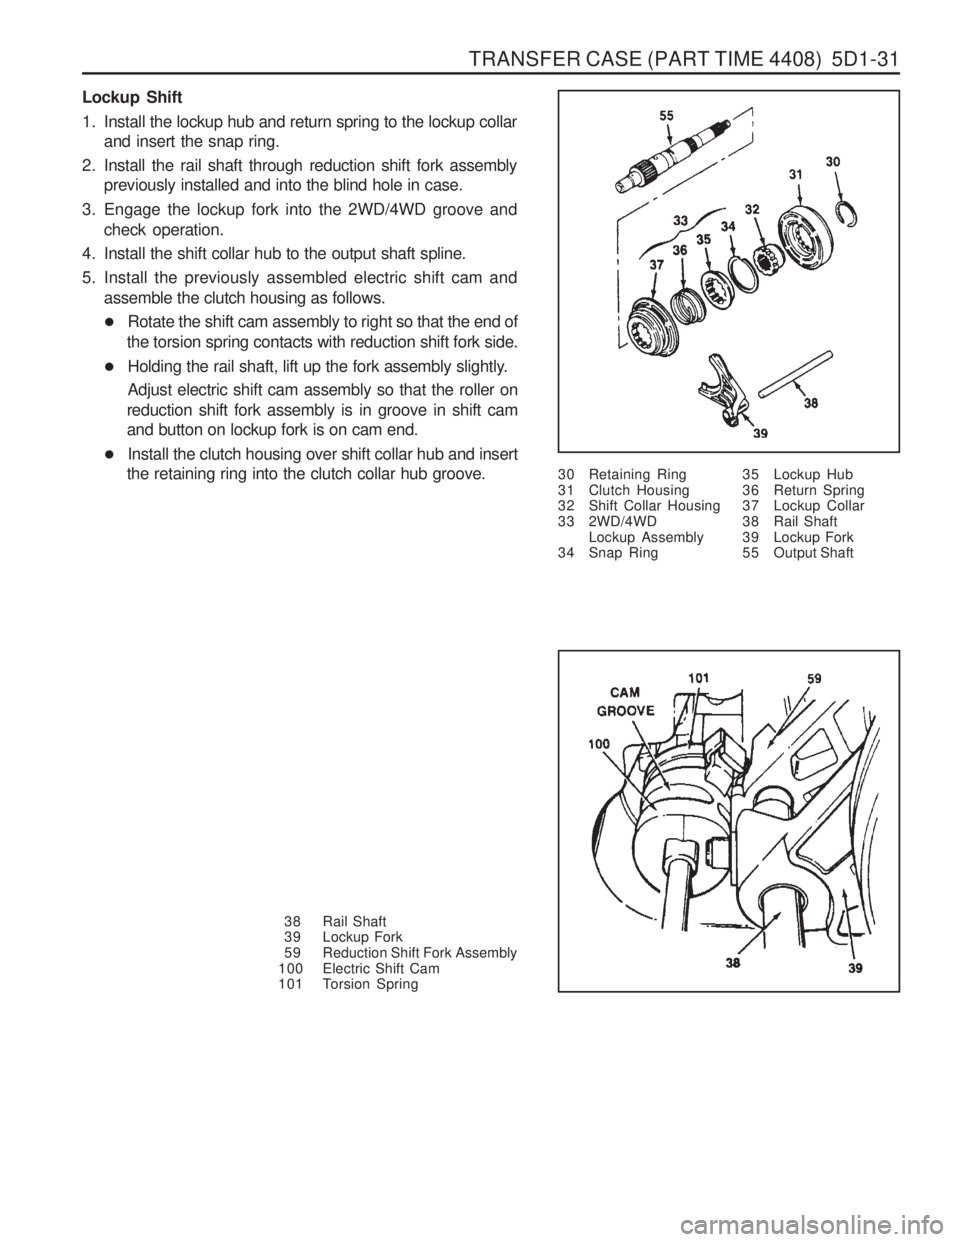
Lockup Shift
1. Install the lockup hub and return spring to the lockup collarand insert the snap ring.
2. Install the rail shaft through reduction shift fork assembly previously installed and into the blind hole in case.
3. Engage the lockup fork into the 2WD/4WD groove and check operation.
4. Install the shift collar hub to the output shaft spline.
5. Install the previously assembled electric shift cam and assemble the clutch housing as follows.
� Rotate the shift cam assembly to right so that the end of
the torsion spring contacts with reduction shift fork side.
� Holding the rail shaft, lift up the fork assembly slightly. Adjust electric shift cam assembly so that the roller on
reduction shift fork assembly is in groove in shift cam and button on lockup fork is on cam end.
� Install the clutch housing over shift collar hub and insert
the retaining ring into the clutch collar hub groove. 30 Retaining Ring
31 Clutch Housing
32 Shift Collar Housing
33 2WD/4WD
Lockup Assembly
34 Snap Ring
38 Rail Shaft
39 Lockup Fork
59 Reduction Shift Fork Assembly
100 Electric Shift Cam
101 Torsion Spring 35 Lockup Hub
36 Return Spring
37 Lockup Collar
38 Rail Shaft
39 Lockup Fork
55 Output Shaft
Page 1086 of 1574
5D1-34 TRANSFER CASE (PART TIME 4408)
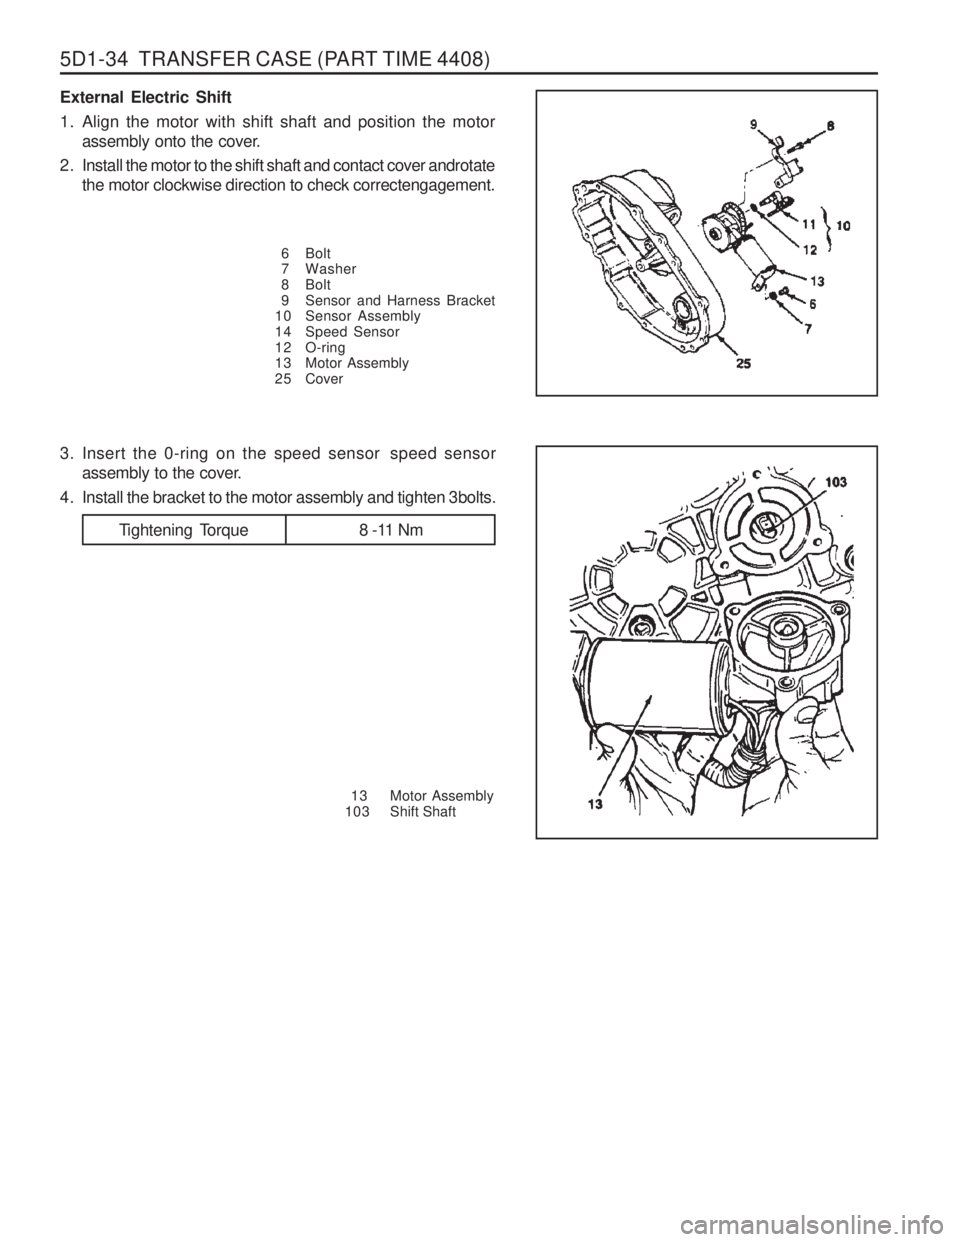
External Electric Shift
1. Align the motor with shift shaft and position the motorassembly onto the cover.
2. Install the motor to the shift shaft and contact cover androtate the motor clockwise direction to check correctengagement.
6 Bolt
7 Washer
8 Bolt
9 Sensor and Harness Bracket
10 Sensor Assembly
14 Speed Sensor
12 O-ring
13 Motor Assembly
2 5 Cover
13 Motor Assembly
103 Shift Shaft
3. Insert the 0-ring on the speed sensor speed sensor
assembly to the cover.
4. Install the bracket to the motor assembly and tighten 3bolts.
Tightening Torque 8 -11 Nm
Page 1094 of 1574
TRANSFER CASE (TOD) 5D2-5
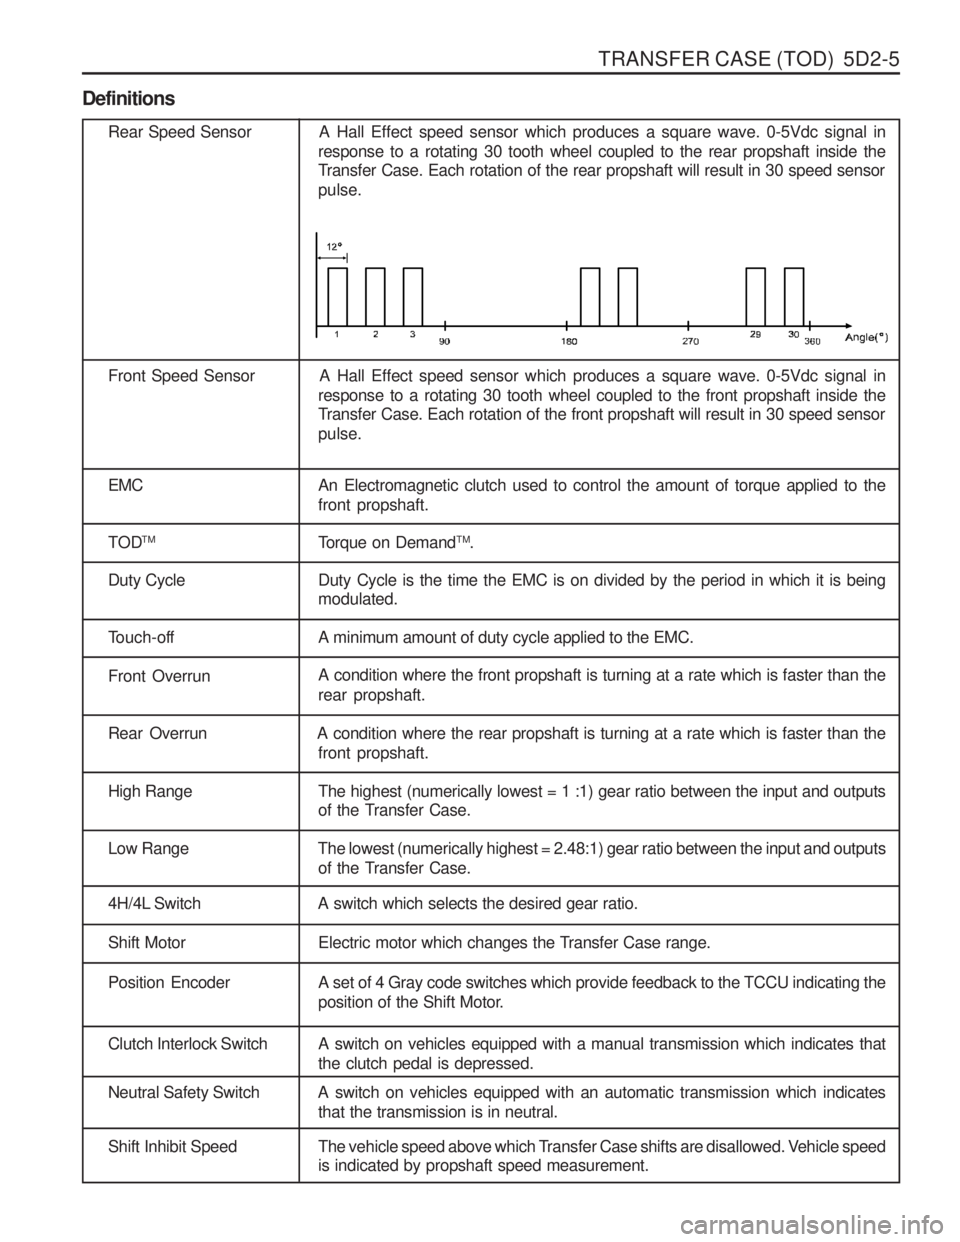
Definitions
Rear Speed Sensor A Hall Effect speed sensor which produces a square wave. 0-5Vdc signal inresponse to a rotating 30 tooth wheel coupled to the rear propshaft inside the
Transfer Case. Each rotation of the rear propshaft will result in 30 speed sensor pulse.
Front Speed Sensor A Hall Effect speed sensor which produces a square wave. 0-5Vdc signal in response to a rotating 30 tooth wheel coupled to the front propshaft inside the
Transfer Case. Each rotation of the front propshaft will result in 30 speed sensor pulse.
EMC An Electromagnetic clutch used to control the amount of torque applied to the front propshaft.
TOD TM
Torque on DemandTM
.
Duty Cycle Duty Cycle is the time the EMC is on divided by the period in which it is being modulated.
Touch-off A minimum amount of duty cycle applied to the EMC.
Front OverrunA condition where the front propshaft is turning at a rate which is faster than the rear propshaft.
Rear Overrun A condition where the rear propshaft is turning at a rate which is faster than the
front propshaft.
High Range The highest (numerically lowest = 1 :1) gear ratio between the input and outputsof the Transfer Case.
Low Range The lowest (numerically highest = 2.48:1) gear ratio between the input and outputs
of the Transfer Case.
4H/4L Switch A switch which selects the desired gear ratio.
Shift Motor Electric motor which changes the Transfer Case range.
Position Encoder A set of 4 Gray code switches which provide feedback to the TCCU indicating theposition of the Shift Motor.
Clutch Interlock Switch A switch on vehicles equipped with a manual transmission which indicates that the clutch pedal is depressed.
Neutral Safety Switch A switch on vehicles equipped with an automatic transmission which indicatesthat the transmission is in neutral.
Shift Inhibit Speed The vehicle speed above which Transfer Case shifts are disallowed. Vehicle speedis indicated by propshaft speed measurement.
Page 1099 of 1574
5D2-10 TRANSFER CASE (TOD) Electric Shift System Operation
The Electric Shift System is responsible for changing the Transfer Case gear ratio by controlling the electric shift
motor. The TCCU monitors the 4H/4L switch, neutral switch, speed sensors, position encoder, and ignition switch. A range change is initiated when
1. The 4H/4L Switch is changed from 4H to 4L or from 4L to 4H.
2. The motor position (as indicated by the position encoder) does not match the 4H/4L Switch immediately after theignition is turned on.
1. Shift Criteria When a range change is initiated a Diagnostic Test will be completed on the motor, speed sensors, and position
encoder. If the Diagnostic Test fails, the shift will not be attempted. If all components are operating properly, theTCCU will attempt a range change after the following shift criteria are met:
a. The transmission is in neutral for 2 seconds after the shift is requested.
b. Both propshaft speeds are below 87 rpm (2580 pulses/minute).
If the transmission is taken out of neutral before 2 seconds has elapsed, or either propshaft speed increases above the limit, the shift will be suspended and the 4L Indicator will continue to blink until the criteria are met again or the 4H/4L Switch is returned to the original position.
2. Range Change When the shift criteria are met, the motor is rotated in the appropriate direction (as determined by the selectorswitch) until one of the following occurs:
a. The motor reaches its destination.
b. The motor is on for 5 seconds without reaching its destination. The shift has failed and the TCCU will respond as default mode.
c. A fault occurs with either the motor or position encoder. Refer to the diagnosis requirement.
When the motor is energized, the Ignition, 4H/4L Switch, propshaft speeds, and transmission neutral inputs are ignored.
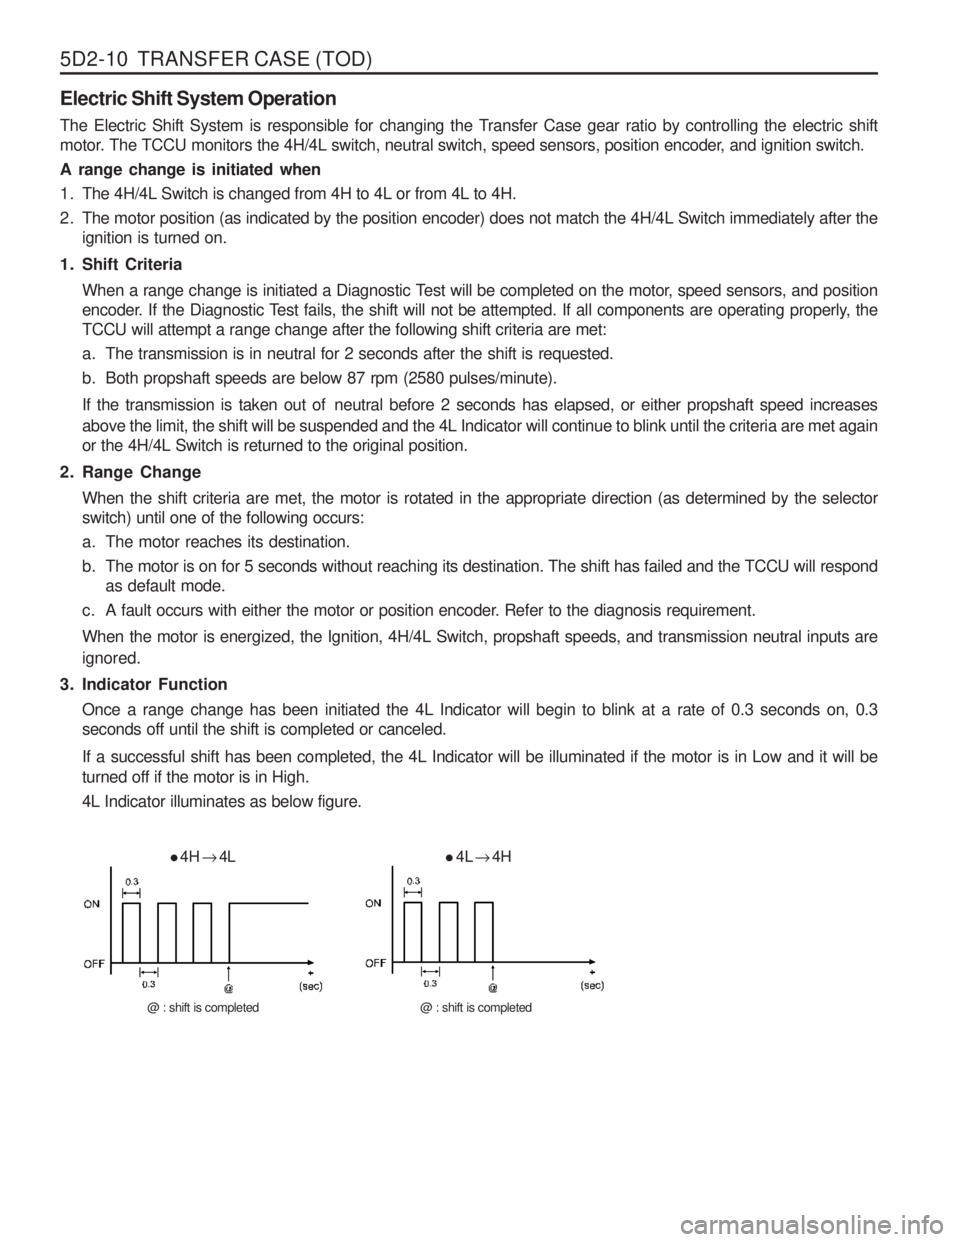
3. Indicator Function Once a range change has been initiated the 4L Indicator will begin to blink at a rate of 0.3 seconds on, 0.3 seconds off until the shift is completed or canceled.
If a successful shift has been completed, the 4L Indicator will be illuminated if the motor is in Low and it will be turned off if the motor is in High. 4L Indicator illuminates as below figure.
4H
� 4L
@ : shift is completed
4L
� 4H
@ : shift is completed
Page 1100 of 1574
TRANSFER CASE (TOD) 5D2-11
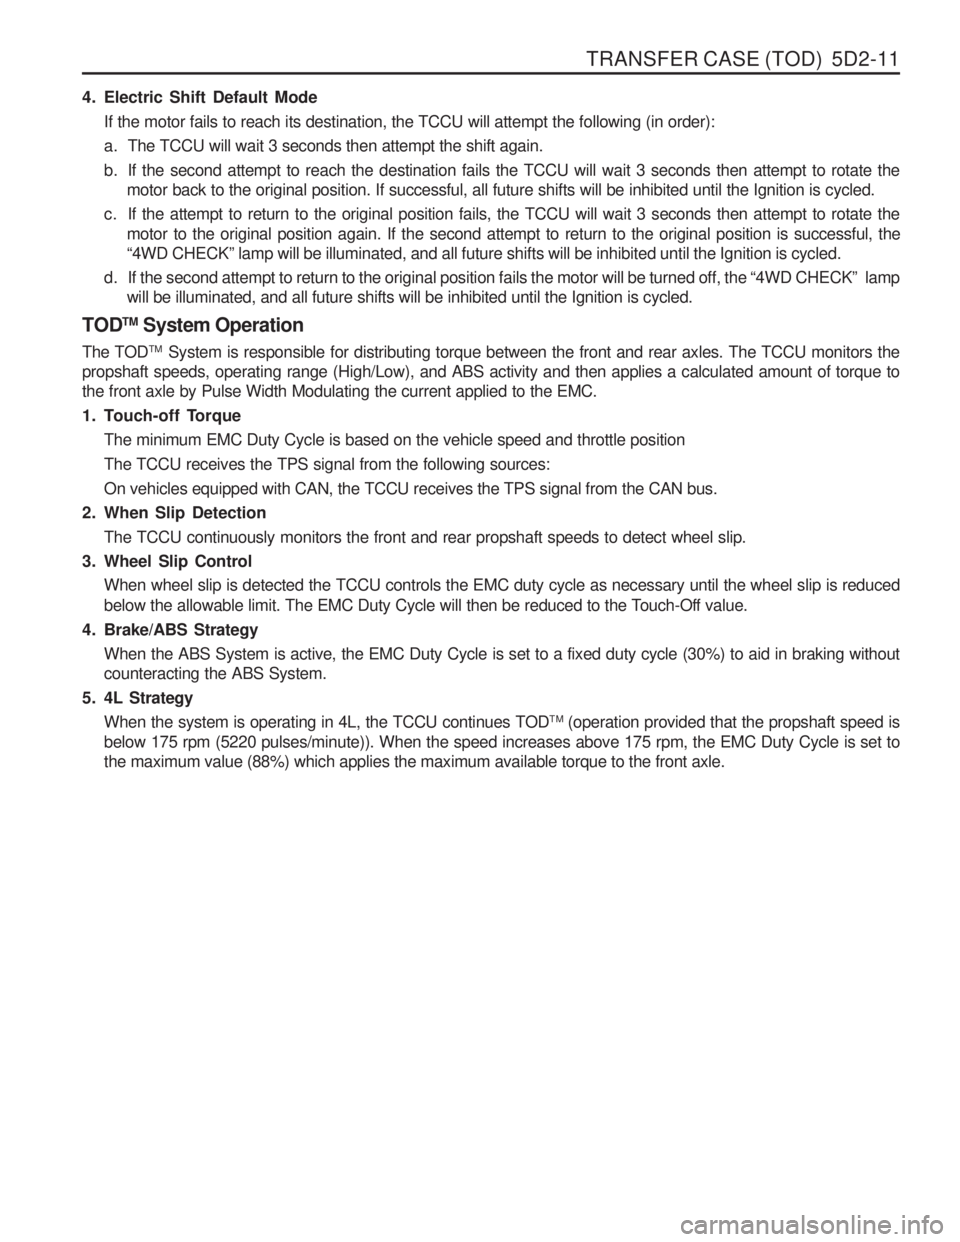
4. Electric Shift Default ModeIf the motor fails to reach its destination, the TCCU will attempt the following (in order):
a. The TCCU will wait 3 seconds then attempt the shift again.
b. If the second attempt to reach the destination fails the TCCU will wait 3 seconds then attempt to rotate the motor back to the original position. If successful, all future shifts will be inhibited until the Ignition is cycled.
c. If the attempt to return to the original position fails, the TCCU will wait 3 seconds then attempt to rotate the motor to the original position again. If the second attempt to return to the original position is successful, the “4WD CHECK ” lamp will be illuminated, and all future shifts will be inhibited until the Ignition is cycled.
d. If the second attempt to return to the original position fails the motor will be turned off, the “4WD CHECK ” lamp
will be illuminated, and all future shifts will be inhibited until the Ignition is cycled.
TOD TM
System Operation
The TOD TM
System is responsible for distributing torque between the front and rear axles. The TCCU monitors the
propshaft speeds, operating range (High/Low), and ABS activity and then applies a calculated amount of torque tothe front axle by Pulse Width Modulating the current applied to the EMC.
1. Touch-off Torque
The minimum EMC Duty Cycle is based on the vehicle speed and throttle positionThe TCCU receives the TPS signal from the following sources:On vehicles equipped with CAN, the TCCU receives the TPS signal from the CAN bus.
2. When Slip Detection
The TCCU continuously monitors the front and rear propshaft speeds to detect wheel slip.
3. Wheel Slip Control When wheel slip is detected the TCCU controls the EMC duty cycle as necessary until the wheel slip is reduced
below the allowable limit. The EMC Duty Cycle will then be reduced to the Touch-Off value.
4. Brake/ABS Strategy When the ABS System is active, the EMC Duty Cycle is set to a fixed duty cycle (30%) to aid in braking without counteracting the ABS System.
5. 4L Strategy When the system is operating in 4L, the TCCU continues TOD TM
(operation provided that the propshaft speed is
below 175 rpm (5220 pulses/minute)). When the speed increases above 175 rpm, the EMC Duty Cycle is set tothe maximum value (88%) which applies the maximum available torque to the front axle.
Page 1105 of 1574
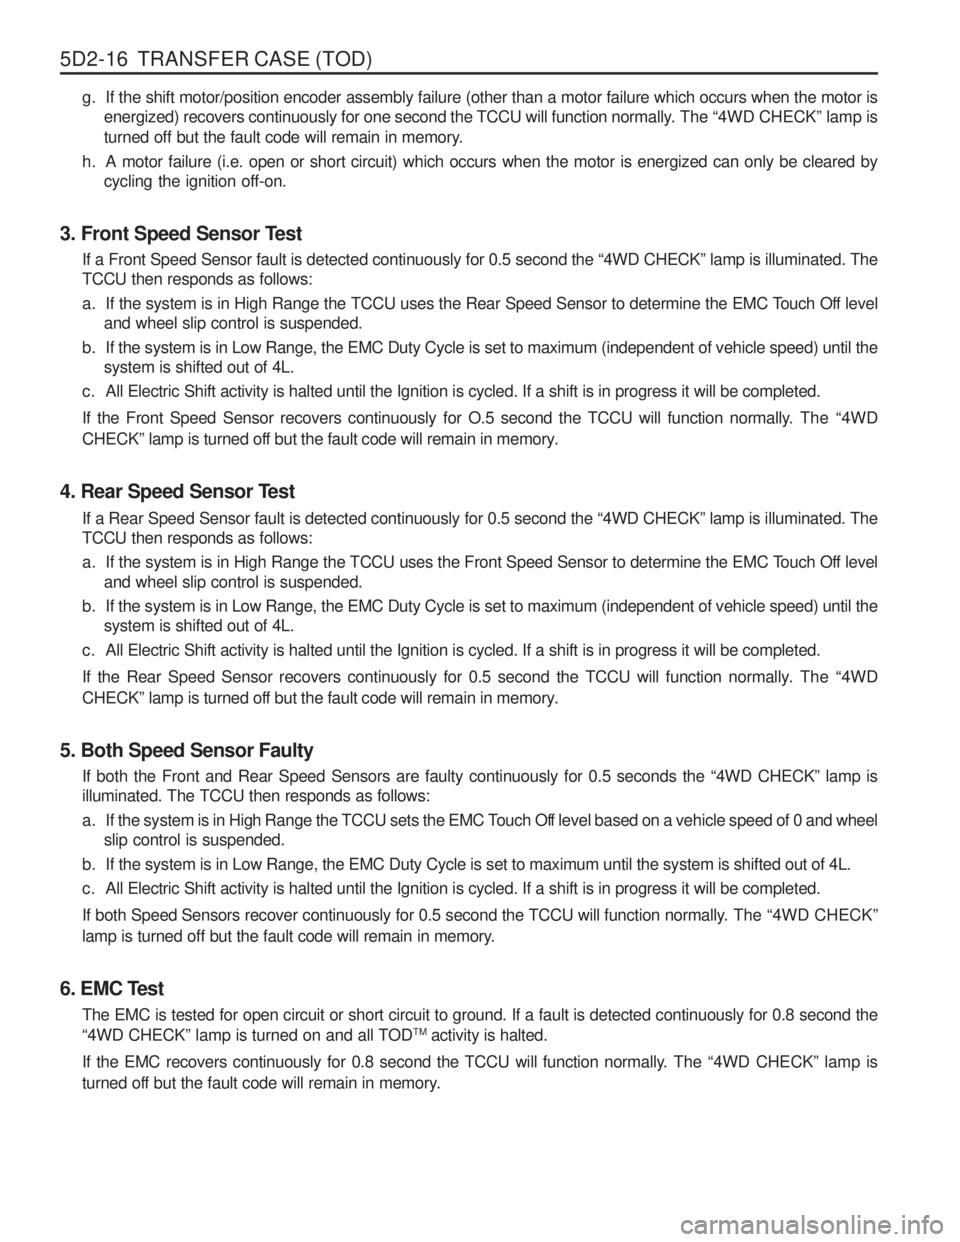
5D2-16 TRANSFER CASE (TOD)g. If the shift motor/position encoder assembly failure (other than a motor failure which occurs when the motor isenergized) recovers continuously for one second the TCCU will function normally. The “4WD CHECK ” lamp is
turned off but the fault code will remain in memory.
h. A motor failure (i.e. open or short circuit) which occurs when the motor is energized can only be cleared by cycling the ignition off-on.
3. Front Speed Sensor Test If a Front Speed Sensor fault is detected continuously for 0.5 second the “4WD CHECK ” lamp is illuminated. The
TCCU then responds as follows:
a. If the system is in High Range the TCCU uses the Rear Speed Sensor to determine the EMC Touch Off level and wheel slip control is suspended.
b. If the system is in Low Range, the EMC Duty Cycle is set to maximum (independent of vehicle speed) until the system is shifted out of 4L.
c. All Electric Shift activity is halted until the Ignition is cycled. If a shift is in progress it will be completed.
If the Front Speed Sensor recovers continuously for O.5 second the TCCU will function normally. The “4WD
CHECK ” lamp is turned off but the fault code will remain in memory.
4. Rear Speed Sensor Test If a Rear Speed Sensor fault is detected continuously for 0.5 second the “4WD CHECK ” lamp is illuminated. The
TCCU then responds as follows:
a. If the system is in High Range the TCCU uses the Front Speed Sensor to determine the EMC Touch Off level and wheel slip control is suspended.
b. If the system is in Low Range, the EMC Duty Cycle is set to maximum (independent of vehicle speed) until the system is shifted out of 4L.
c. All Electric Shift activity is halted until the Ignition is cycled. If a shift is in progress it will be completed.
If the Rear Speed Sensor recovers continuously for 0.5 second the TCCU will function normally. The “4WD
CHECK ” lamp is turned off but the fault code will remain in memory.
5. Both Speed Sensor Faulty If both the Front and Rear Speed Sensors are faulty continuously for 0.5 seconds the “4WD CHECK ” lamp is
illuminated. The TCCU then responds as follows:
a. If the system is in High Range the TCCU sets the EMC Touch Off level based on a vehicle speed of 0 and wheel slip control is suspended.
b. If the system is in Low Range, the EMC Duty Cycle is set to maximum until the system is shifted out of 4L.
c. All Electric Shift activity is halted until the Ignition is cycled. If a shift is in progress it will be completed.
If both Speed Sensors recover continuously for 0.5 second the TCCU will function normally. The “4WD CHECK ”
lamp is turned off but the fault code will remain in memory.
6. EMC Test The EMC is tested for open circuit or short circuit to ground. If a fault is detected continuously for 0.8 second the “4WD CHECK ” lamp is turned on and all TOD TM
activity is halted.
If the EMC recovers continuously for 0.8 second the TCCU will function normally. The “4WD CHECK ” lamp is
turned off but the fault code will remain in memory.
Page 1122 of 1574
TRANSFER CASE (TOD) 5D2-33
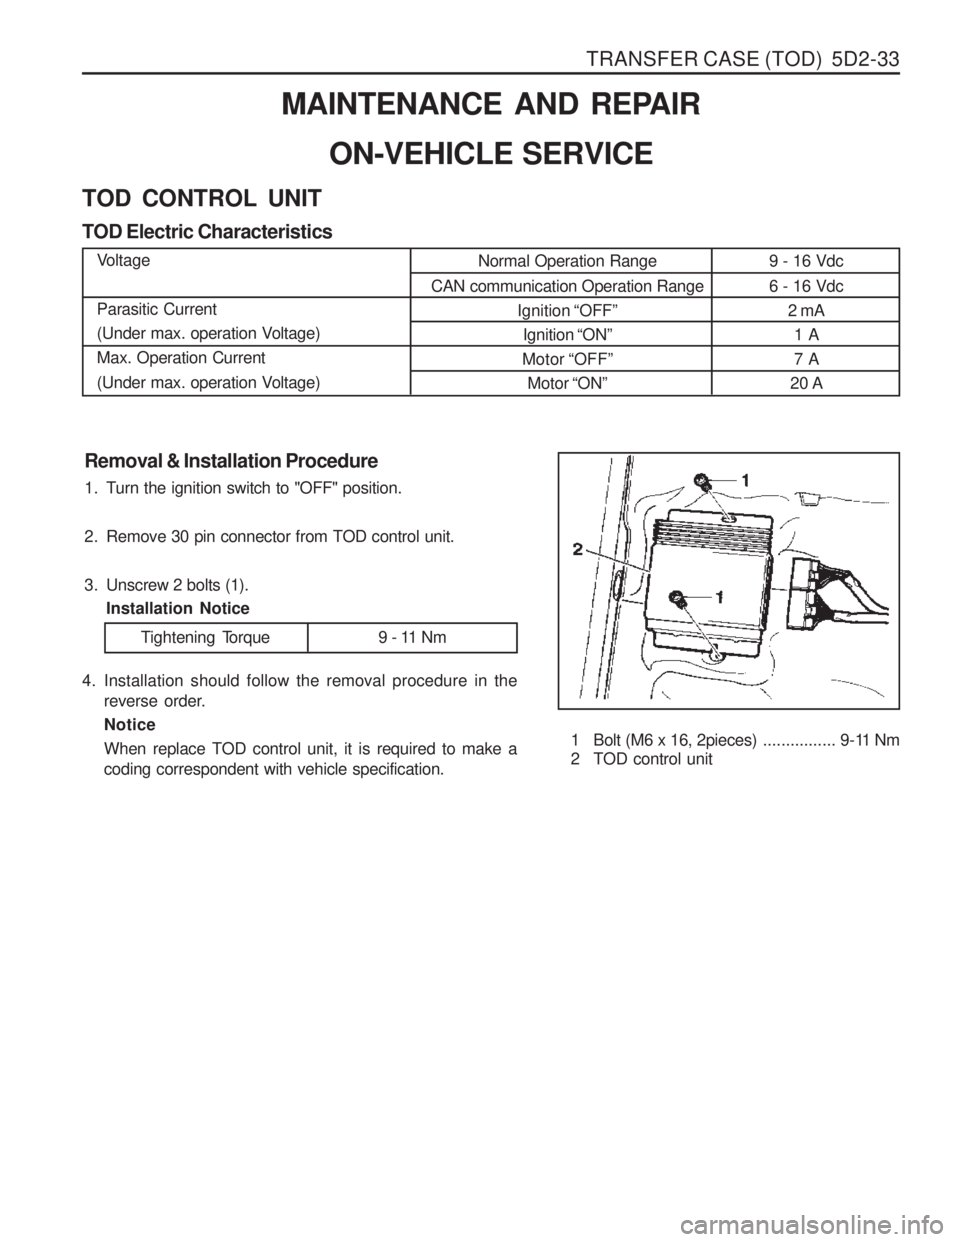
9 - 16 Vdc 6 - 16 Vdc2 mA1 A 7 A
20 A
Removal & Installation Procedure
1. Turn the ignition switch to "OFF" position.
2. Remove 30 pin connector from TOD control unit.
3. Unscrew 2 bolts (1). Installation Notice
1 Bolt (M6 x 16, 2pieces)................ 9-11 Nm
2 TOD control unit
MAINTENANCE AND REPAIR
ON-VEHICLE SERVICE
TOD CONTROL UNIT TOD Electric CharacteristicsVoltage Parasitic Current
(Under max. operation Voltage)Max. Operation Current
(Under max. operation Voltage) Normal Operation Range
CAN communication Operation Range Ignition “OFF ”
Ignition “ON ”
Motor “OFF ”
Motor “ON ”
4. Installation should follow the removal procedure in the
reverse order. Notice When replace TOD control unit, it is required to make a coding correspondent with vehicle specification.
Tightening Torque 9 - 11 Nm
Page 1177 of 1574
SECTION 8A
SEAT BELTS
Specifications . . . . . . . . . . . . . . . . . . . . . . . . 8A-1
Fastener Tightening Specifications . . . . . . . . . 8A-1
Component Locator . . . . . . . . . . . . . . . . . . . 8A-2
Front Seat Belt . . . . . . . . . . . . . . . . . . . . . . . . 8A-2
Rear Seat Belt . . . . . . . . . . . . . . . . . . . . . . . . 8A-3 TABLE OF CONTENTS
Caution: Disconnect the negative battery cable before removing or installing any electrical unit or when a tool or equipment could easily come in contact with exposed electrical terminals. Disconnecting this cable will help prevent personal injury and damage to the vehicle. The ignition must also be in LOCK unless otherwisenoted.
General Description and System
Operation . . . . . . . . . . . . . . . . . . . . . . . . . 8A-4
Driver Seat Belt Warning . . . . . . . . . . . . . . . . 8A-4
Operation and Functional Checks . . . . . . . . . 8A-4
SPECIFICATIONS
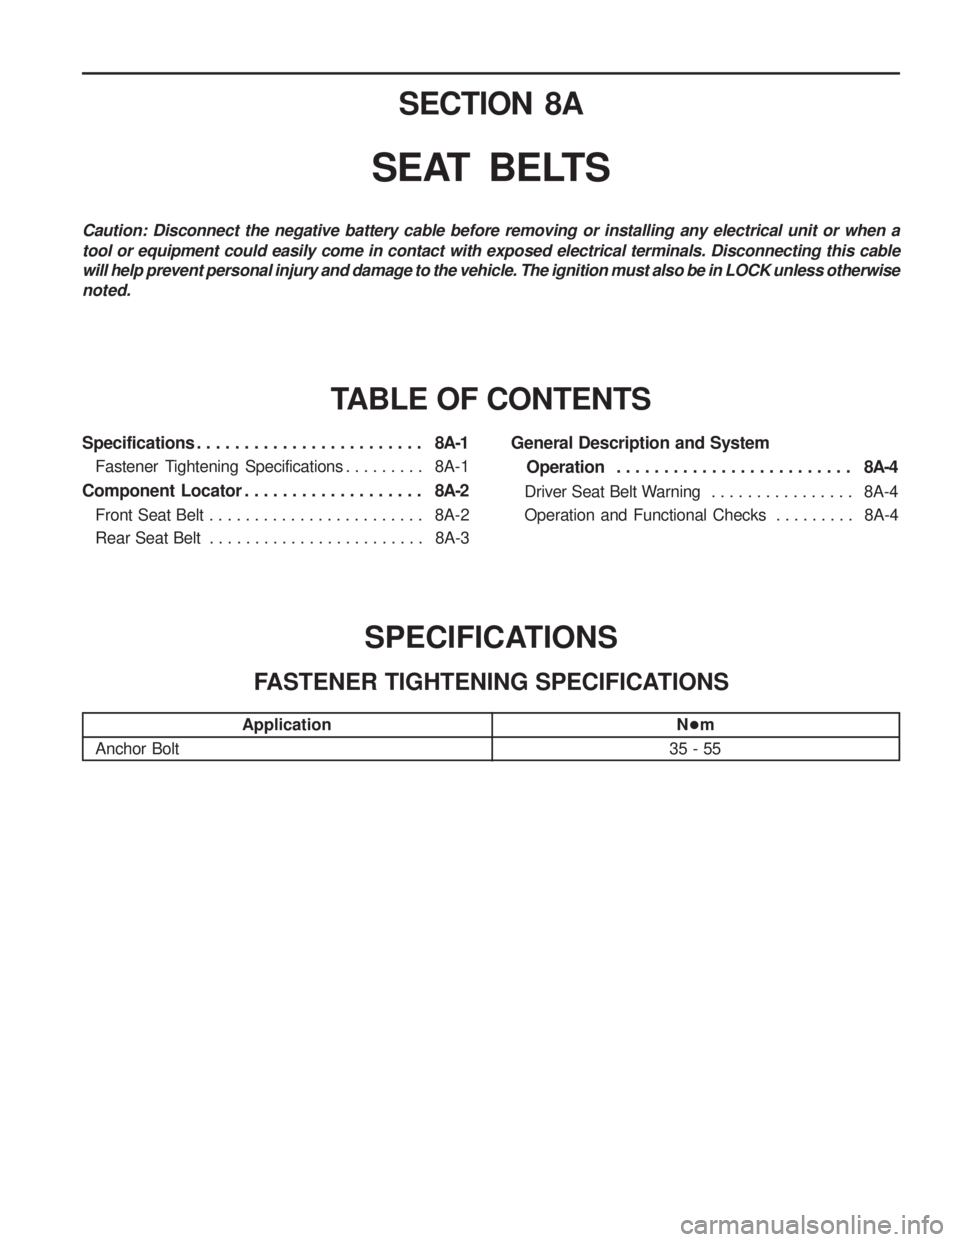
FASTENER TIGHTENING SPECIFICATIONS
Application
Anchor Bolt N
�m
35 - 55