check oil SSANGYONG MUSSO 2003 Manual PDF
[x] Cancel search | Manufacturer: SSANGYONG, Model Year: 2003, Model line: MUSSO, Model: SSANGYONG MUSSO 2003Pages: 1574, PDF Size: 26.41 MB
Page 735 of 1574

2D-2 REAR SUSPENSIONDIAGNOSIS
NOISE (DURING STRAIGHT DRIVING)
Check
Lack of Oil
Low Viscosity of Oil Insufficient Oil Excessive Backlash of Ring Gear
Worn or Damaged Tooth of Ring and Pinion GearWorn or Damaged Drive Pinion BearingWorn Spline of Side Bearing and Side Gear Bent Axle Housing Bent Differential CaseWorn Pinion ShaftIncorrect Drive Pinion PreloadIncorrect Contact of Ring Gear and Pinion Action
Replenish ReplaceReplace Adjust
ReplaceReplace Replace ReplaceReplaceReplace Adjust
Retightening
NOISE (DURING TURNING)
Check
Worn or Damaged Tooth of Pinion or Side Gear Worn Pinion ShaftExcessive Backlash of Pinion Gear and Side Gear Excessive End-play of Rear Axle Shaft Incorrect Contact of Side Gear and Differential CaseAxle Housing CrackBent or Poor Installation of Drive Pinion Oil Seal
Damaged or Torn Drive Pinion Oil Seal Loosened Bearing Collar Worn or Damaged Universal JointWorn of Damaged Axle Shaft Bearing Action
ReplaceReplaceReplace Adjust
ReplaceReplaceReplaceReplace Replace ReplaceReplace
OIL LEAKAGE
Check
Excessive Oil Faulty Seal of Carrier Contact Surface Axle Housing Crack Worn or Damaged Oil Seal Action
Adjust
Repair
ReplaceReplace
Page 736 of 1574

REAR SUSPENSION 2D-3
HEATING
Check
Lack of Oil Insufficient Backlash of GearsExcessive Preload of Bearing Action
Replenish Adjust Adjust
Page 783 of 1574

REAR DRIVE AXLE 3D-3
Checks
Worn or Damaged Tooth of Pinion or Side Gear Worn Pinion Shaft Excessive Backlash of Pinion Gear and Side Gear Excessive End-play of Rear Axle ShaftIncorrect Contact of Side Gear and Differential CaseAxle Housing CrackBent or Poor Installation of Drive Pinion Oil Seal
Damaged or Torn Drive Pinion Oil Seal Loosened Bearing CollarWorn or Damaged Universal JointWorn or Damaged Axle Shaft Bearing Checks
Excessive OilFaulty Seal of Carrier Contact Surface Axle Housing Crack Worn or Damaged Oil Seal Checks
Lack of OilLow Viscosity of OilInsufficient Oil Excessive Backlash of Ring Gear
Worn or Damaged Tooth of Ring and Pinion GearWorn or Damaged Drive Pinion BearingBent Axle HousingBent Differential Case Worn Pinion Shaft Incorrect Drive Pinion PreloadIncorrect Contact of Ring Gear and Pinion DIAGNOSIS
NOISE (DURING STRAIGHT DRIVING)
Action
Replenish
Replace Replace
Adjust
ReplaceReplaceReplaceReplace Replace Adjust
Retightening
OIL LEAKAGE
Action Adjust
Repair
Replace Replace
NOISE (DURING TURNING)
Action
Replace Replace Replace Adjust
Replace ReplaceReplace Replace ReplaceReplaceReplace
HEATING
Checks
Lack of Oil Insufficient Backlash of GearsExcessive Preload of Bearing Action
Replenish AdjustAdjust
Page 799 of 1574

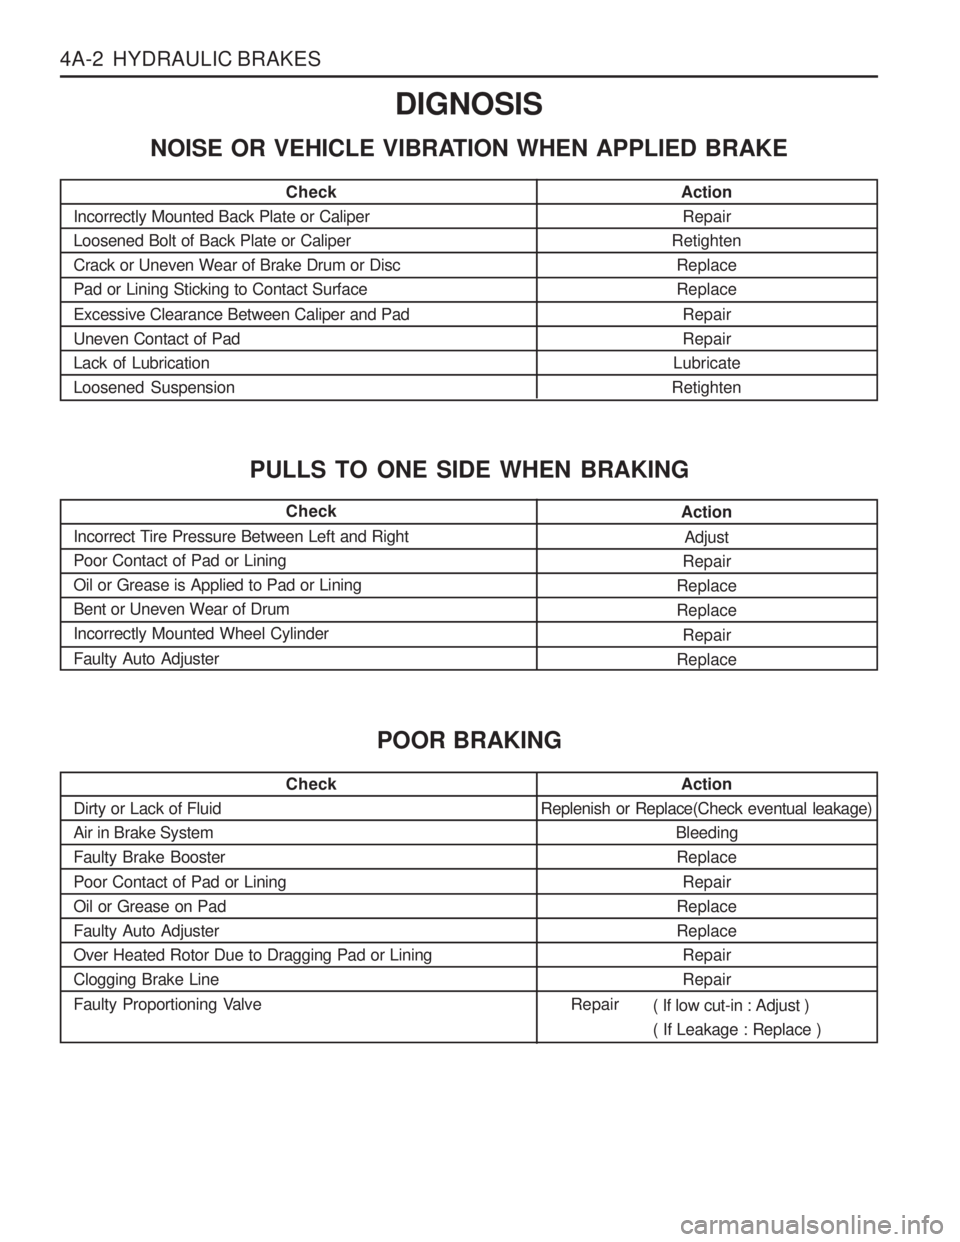
4A-2 HYDRAULIC BRAKESCheck
Dirty or Lack of Fluid Air in Brake SystemFaulty Brake Booster Poor Contact of Pad or Lining Oil or Grease on PadFaulty Auto AdjusterOver Heated Rotor Due to Dragging Pad or LiningClogging Brake Line
Faulty Proportioning Valve Check
Incorrect Tire Pressure Between Left and Right Poor Contact of Pad or LiningOil or Grease is Applied to Pad or LiningBent or Uneven Wear of DrumIncorrectly Mounted Wheel Cylinder Faulty Auto Adjuster Action
Repair
Retighten Replace Replace
RepairRepair
Lubricate
Retighten
Check
Incorrectly Mounted Back Plate or CaliperLoosened Bolt of Back Plate or CaliperCrack or Uneven Wear of Brake Drum or DiscPad or Lining Sticking to Contact Surface Excessive Clearance Between Caliper and Pad Uneven Contact of PadLack of LubricationLoosened Suspension DIGNOSIS
NOISE OR VEHICLE VIBRATION WHEN APPLIED BRAKE
PULLS TO ONE SIDE WHEN BRAKING
Action Adjust
Repair
Replace Replace
Repair
Replace
Action
Replenish or Replace(Check eventual leakage) Bleeding
Replace
Repair
Replace Replace RepairRepair
Repair
POOR BRAKING
( If low cut-in : Adjust ) ( If Leakage : Replace )
Page 800 of 1574

HYDRAULIC BRAKES 4A-3
Check
Air in Brake system Fluid LeakingExcessive Clearance Between Push Rod and M/cylinder Parking Brake is not Fully Released Incorrect Adjustment of Parking BrakeWeak Return Spring of Brake PedalIncorrect Pedal FreeplayBroken Rear Drum Brake Shoe Return Spring Lack of Lubrication
Damaged Master Cylinder Check Valve or Piston Return Spring Action
Bleeding
RepairAdjust
Repair Adjust
Replace
Repair
Replace
lubricate Replace
INCREASING PEDAL STROKE (PEDAL GOES TO FLOOR)
OR BRAKE DRAGGING
Check
Insufficient Clearance Between Push Rod and Master Cylinder Worn Brake Lining Oil or Grease on Lining Binding Parking Brake CableFaulty Auto AdjusterExcessive Lever Stroke Action
Adjust
Replace Replace ReplaceReplace
Adjust or Check Cable
POOR BRAKING OF PARKING BRAKE
Page 804 of 1574

HYDRAULIC BRAKES 4A-7
MAINTENANCE AND REPAIRON-VEHICLE SERVICE
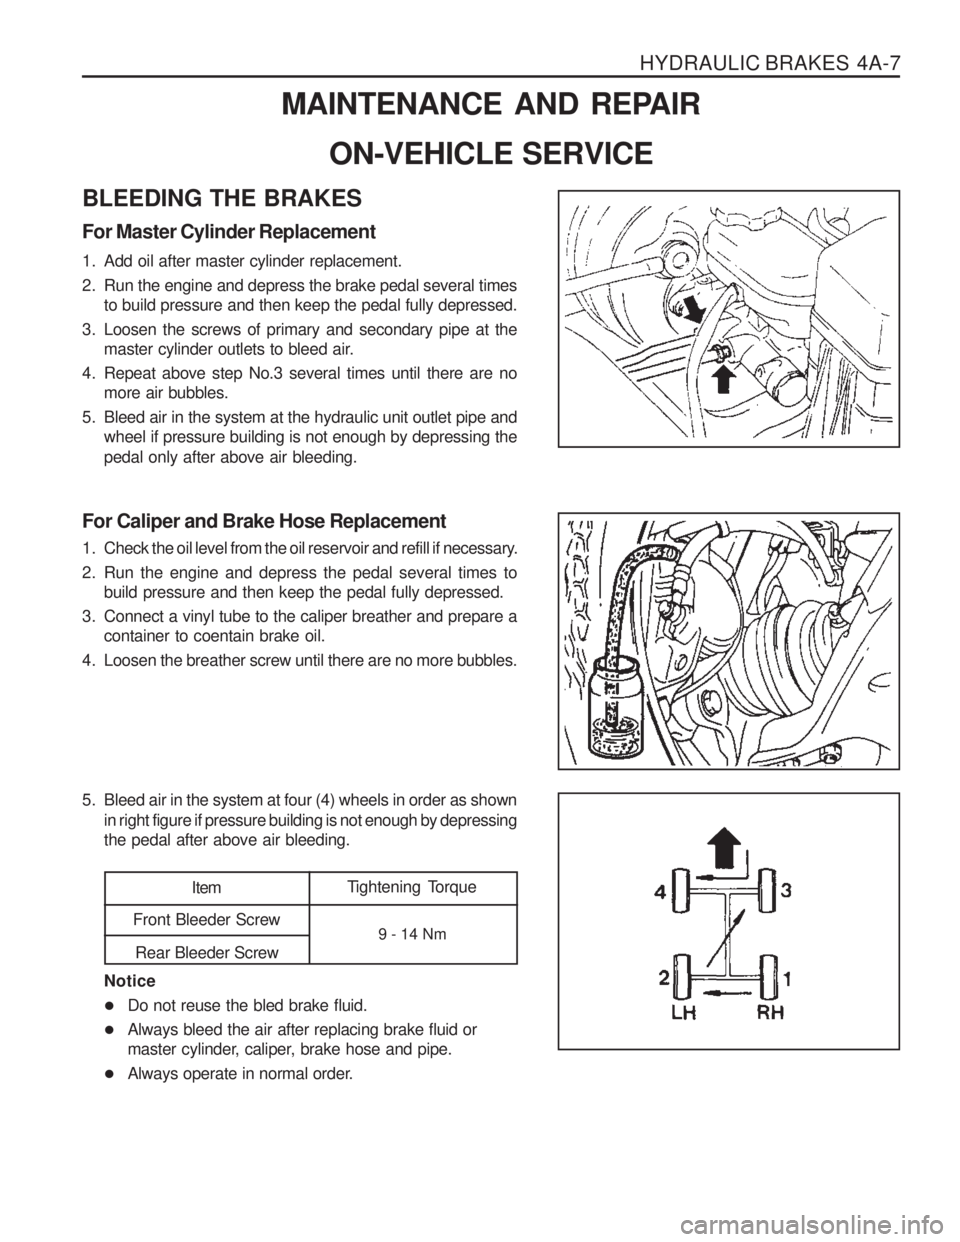
BLEEDING THE BRAKES For Master Cylinder Replacement
1. Add oil after master cylinder replacement.
2. Run the engine and depress the brake pedal several times to build pressure and then keep the pedal fully depressed.
3. Loosen the screws of primary and secondary pipe at the master cylinder outlets to bleed air.
4. Repeat above step No.3 several times until there are no more air bubbles.
5. Bleed air in the system at the hydraulic unit outlet pipe and wheel if pressure building is not enough by depressing the pedal only after above air bleeding.
For Caliper and Brake Hose Replacement
1. Check the oil level from the oil reservoir and refill if necessary.
2. Run the engine and depress the pedal several times to build pressure and then keep the pedal fully depressed.
3. Connect a vinyl tube to the caliper breather and prepare a container to coentain brake oil.
4. Loosen the breather screw until there are no more bubbles.
5. Bleed air in the system at four (4) wheels in order as shown in right figure if pressure building is not enough by depressing the pedal after above air bleeding.
Tightening Torque
9 - 14 NmItem
Front Bleeder Screw
Rear Bleeder Screw
Notice
� Do not reuse the bled brake fluid.
� Always bleed the air after replacing brake fluid or
master cylinder, caliper, brake hose and pipe.
� Always operate in normal order.
Page 813 of 1574

4B-2 MASTER CYLINDER
1 Nut .......................................................14-22 Nm
2 Washer
3 Master Cylinder Assembly
4 Oil Level Sensor
5 Check V alve
6 Booster
7 Clevis Pin
8 Snap Pin9 Seal
10 Spacer 11 Nut ......................................................... 8-18 Nm
12 Front Tube (LH)
13 Front Tube (RH)
14 Rear Tube
15 1st Tube (Primary)
16 2nd Tube (Secondary)
MANDO
PBR
MAINTENANCE AND REPAIR
ON-VEHICLE SERVICE
BOOSTER AND BRAKE MASTER CYLINDER
Page 817 of 1574

4C-2 POWER BOOSTER
1 Nut .......................................................14-22 Nm
2 Washer
3 Master Cylinder Assembly
4 Oil Level Sensor
5 Check V alve
6 Booster
7 Clevis Pin
8 Snap Pin MAINTENANCE AND REPAIR
ON-VEHICLE SERVICE
BOOSTER AND BRAKE MASTER CYLINDER9 Seal
10 Spacer 11 Nut ......................................................... 8-18 Nm
12 Front Tube (LH)
13 Front Tube (RH)
14 Rear Tube
15 1st Tube (Primary)
16 2nd Tube (Secondary)
MANDO
PBR
Page 825 of 1574

FRONT DISC BRAKES 4D-5
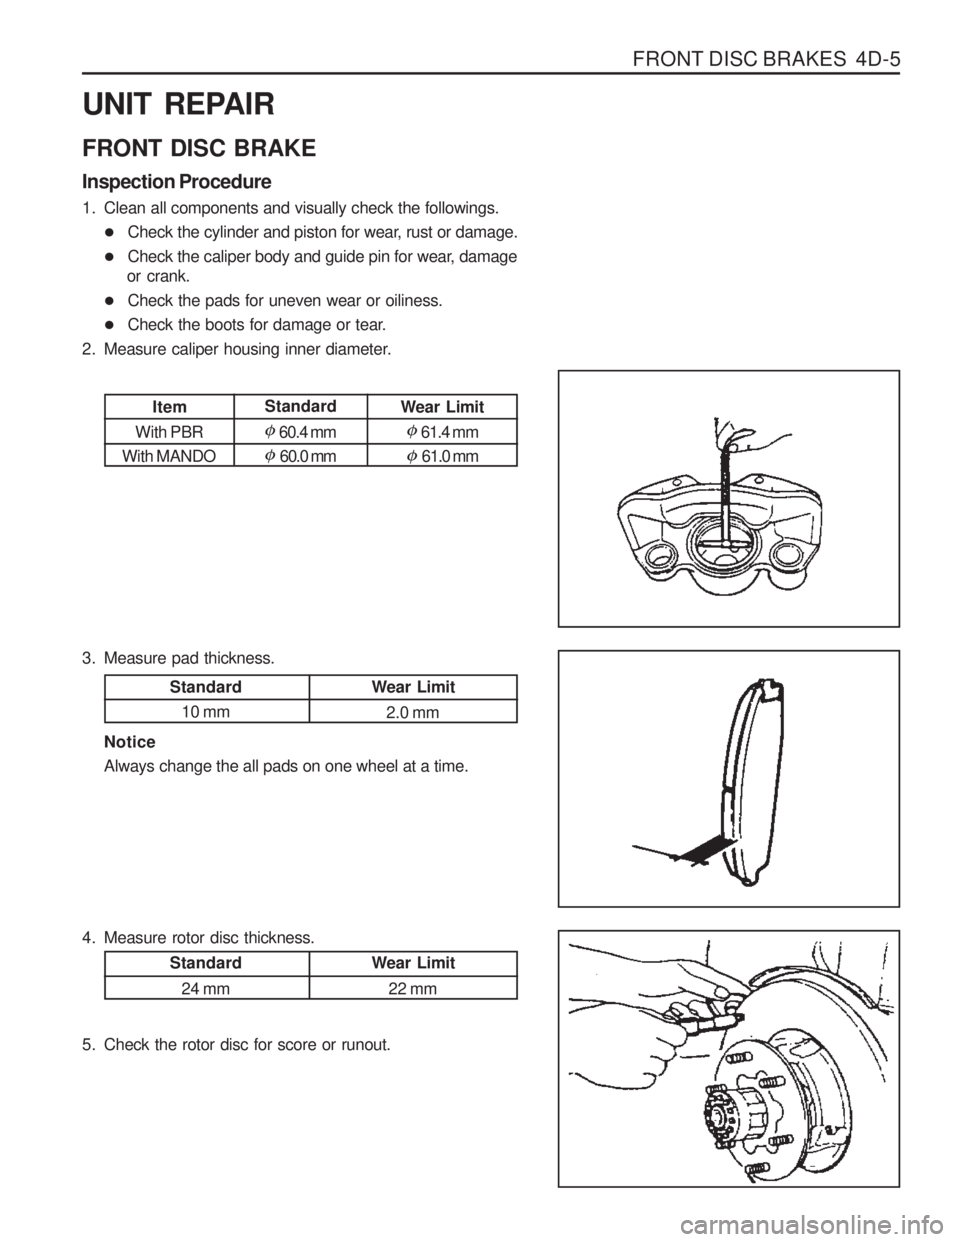
4. Measure rotor disc thickness.
UNIT REPAIR FRONT DISC BRAKE Inspection Procedure
1. Clean all components and visually check the followings.� Check the cylinder and piston for wear, rust or damage.
� Check the caliper body and guide pin for wear, damage
or crank.
� Check the pads for uneven wear or oiliness.
� Check the boots for damage or tear.
2. Measure caliper housing inner diameter.
Item
With PBR
With MANDO Wear Limit
�
61.4 mm
� 61.0 mm
Standard
10 mm Wear Limit
2.0 mm
Standard
� 60.4 mm
� 60.0 mm
3. Measure pad thickness. Notice Always change the all pads on one wheel at a time.
5. Check the rotor disc for score or runout.
Standard 24 mm Wear Limit
22 mm
Page 829 of 1574

4E-4 REAR DISC BRAKES
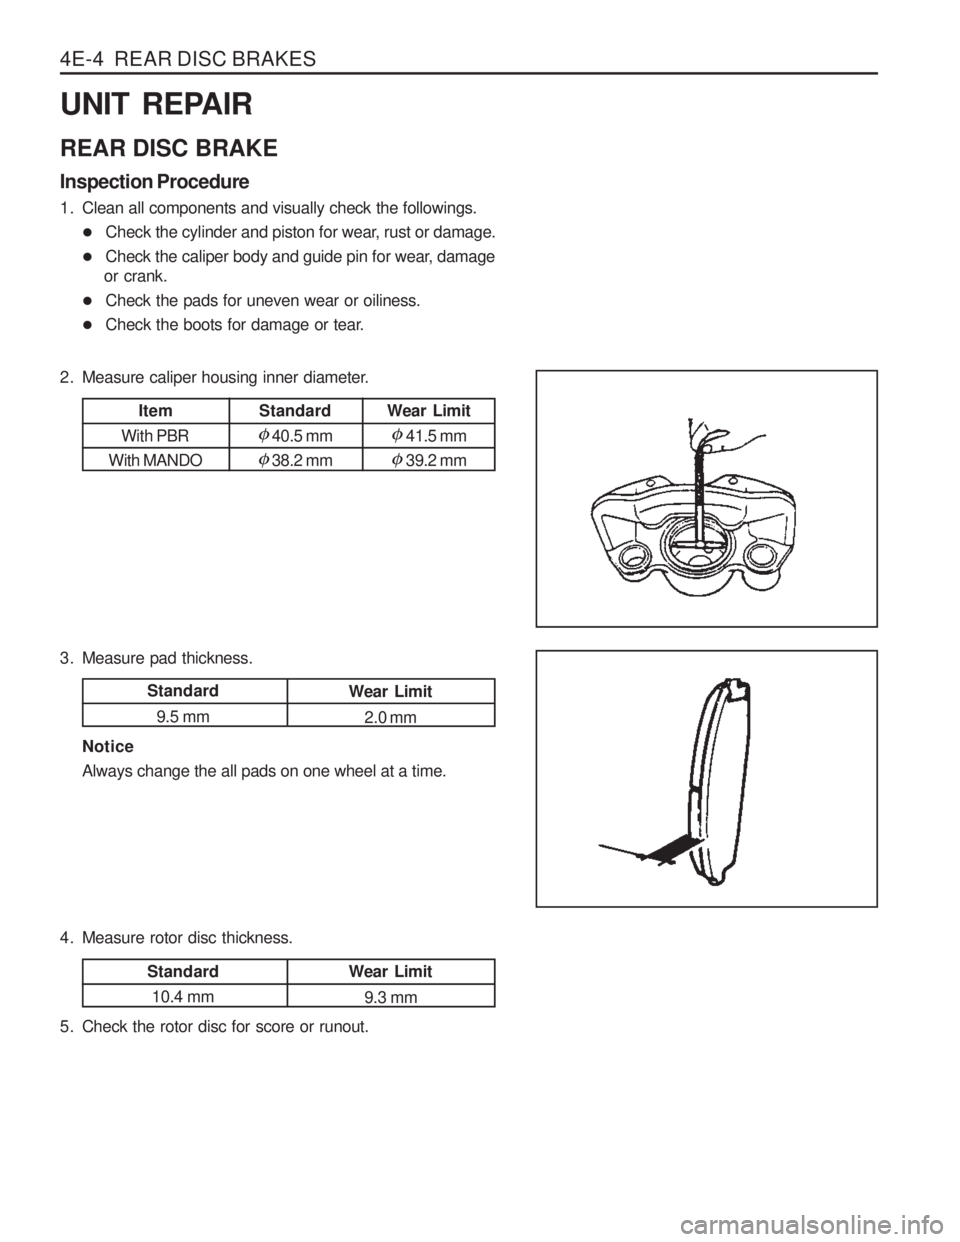
Standard10.4 mm Wear Limit
9.3 mm
UNIT REPAIR REAR DISC BRAKE Inspection Procedure
1. Clean all components and visually check the followings. � Check the cylinder and piston for wear, rust or damage.
� Check the caliper body and guide pin for wear, damage
or crank.
� Check the pads for uneven wear or oiliness.
� Check the boots for damage or tear.
Standard
�40.5 mm
�38.2 mm Wear Limit
�41.5 mm
�39.2 mm
2. Measure caliper housing inner diameter.
3. Measure pad thickness.
Standard
9.5 mm Wear Limit
2.0 mm
Notice Always change the all pads on one wheel at a time.
4. Measure rotor disc thickness.
5. Check the rotor disc for score or runout.
Item
With PBR
With MANDO