SSANGYONG MUSSO 2003 Manual Online
MUSSO 2003
SSANGYONG
SSANGYONG
https://www.carmanualsonline.info/img/67/57511/w960_57511-0.png
SSANGYONG MUSSO 2003 Manual Online
Page 752 of 1574
3A-2 FRONT DRIVE AXLEFASTENER TIGHTENING SPECIFICATIONS
Steering Knuckle and Drive Shaft
Application
Drive Shaft to Front Axle Inner Shaft Wheel Speed Sensor Drive Shaft Cover Bolt
Locking Hub Washer ScrewHub Flange BoltHub Nut N
�m
25 - 35
85 - 105 50 - 60 2 - 4
70 - 90
15
Page 753 of 1574
FRONT DRIVE AXLE 3A-3
1 Drive Shaft
2 Axle Housing Mounting Bolt
3 Axle Housing
4 Cross MemberCOMPONENT LOCATOR
FRONT AXLE5 Brake Disc
6 Hub-Wheel
7 Locking Hub
Page 754 of 1574
3A-4 FRONT DRIVE AXLE AUTO-LOCKING HUB
1 Cap
2 Filter
3 Vacuum Diaphragm
4 Diaphragm Retainer
5 Piston
6 Bolt (M10)
7 Lock Washer
8 O-ring
9 Retaining Ring
10 Clutch Ring 11 Body
12 Return Spring
13 Bearing
14 O-ring
15 Retaining Ring
16 Inner Drive Gear
17 Oil Seal
18 Oil Seal Race
19 Axle Retaining Ring
Page 755 of 1574
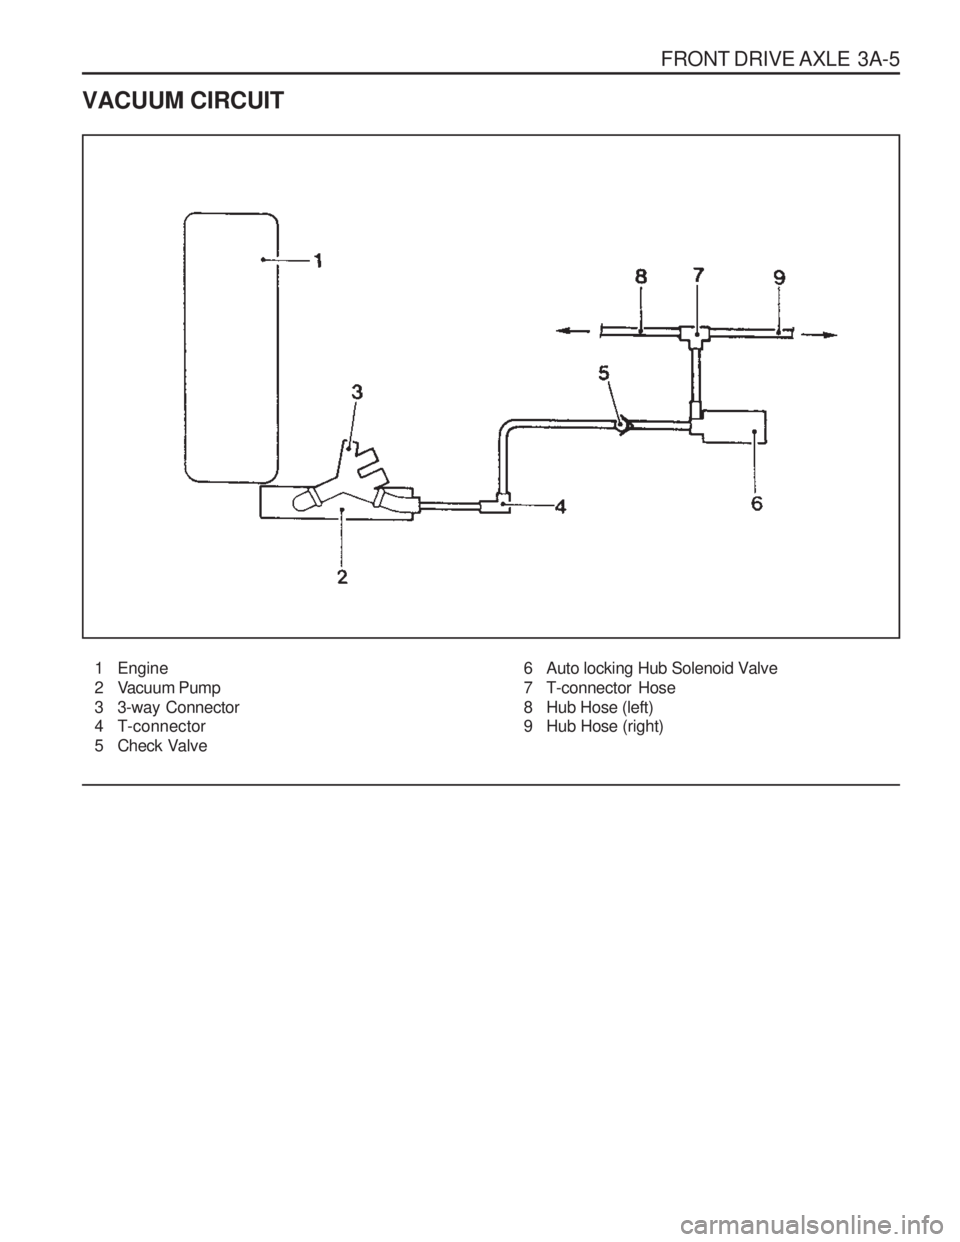
FRONT DRIVE AXLE 3A-5
VACUUM CIRCUIT
1 Engine
2 Vacuum Pump
3 3-way Connector
4 T-connector
5 Check Valve 6 Auto locking Hub Solenoid Valve
7 T-connector Hose
8 Hub Hose (left)
9 Hub Hose (right)
Page 756 of 1574
3A-6 FRONT DRIVE AXLEMAINTENANCE AND REPAIR
ON-VEHICLE SERVICE
VACUUM LINE
1 Vacuum Auto-locking Hub Assembly
2 Bolt ...................................................... 50-60 Nm
3 Cam Washer
4 Auto-locking Hub Cap
5 Retainer Ring
6 Shim
7 Locking Hub
8 Band
9 Hose (L : 400)
10 T-connector 11 Hose (L : 250, white)
12 Check V alve
13 Hose (L :100, green)
14 Auto Locking Hub Solenoid Valve
15 Bolt
16 Hose (L :100, green)
17 T-connector
18 Hose (L : 720, yellow)
19 Hose (L :2, 360 , red)
20 Corrugated Tube
21 Clip
22 Clip
Page 757 of 1574
FRONT DRIVE AXLE 3A-7
Removal & Installation Procedure
1. Be careful not to change the valve when connecting thecheck valve and each hose.
2. Adjust the clearance between the retainer ring (5) and locking hub (7) using the shim(6).
Notice Shim thickness : 0.1, 0.2, 0.3, 0.5, 1.0 mm
Normal Max. 0.2 mm
3. Tighten the auto locking hub cap bolt to the specified torque and order.
Tightening Torque 50 - 60 Nm
Page 759 of 1574
FRONT DRIVE AXLE 3A-9
Removal & Installation Procedure
1. Remove the tire.Installation Notice
Steel Wheel
Aluminum Wheel
Tightening Torque80 - 120 Nm
110 - 130 Nm
2. Remove the autolocking hub vacuum hose.
3. With ABS Remove the wheel speed sensor from the steering knuckle. Installation Notice
4. Remove the mounting bolts and pull off the caliper assembly. Installation Notice
Tightening Torque 6 - 8 Nm
Hose Bolt
Mounting Bolt
Tightening Torque25 - 35 Nm
85 - 105 Nm
Notice Be careful not to damage the brake hose.
Page 760 of 1574
3A-10 FRONT DRIVE AXLE
5. With part time transfer case. 5-1.Remove the cover mounting bolts and pull off the cover. Installation Notice
5-2. Remove the snap ring of the drive shaft and pull off the
hub body. Notice
For assembly, adjust the clearance between the snap ring and hub not to exceed 0.2 mm (Shim thickness : 0.1, 0.2,0.3, 0.5, 1.0 mm).
Tightening Torque 50 - 60 Nm
6. With full time transfer case
6-1. Detach the hub cap with screw driver and remove the snap ring on drive shaft. Installation Notice
Tightening Torque 2 - 4 Nm
5-3. Remove the screws and pull off the locking hub washer.
Installation Notice Notice
For assembly, adjust the clearance between the snap ring and hub not to exceed 0.2 mm (Shim thickness : 0.1, 0.2, 0.3, 0.5, 1.0 mm).
Tightening Torque 15 Nm
Page 767 of 1574

FRONT DRIVE AXLE 3A-17
1 Front Axle Housing Mounting Bracket
2 Inner Shaft (Left)
3 Bolt...................................................... 55-65 Nm
4 Oil Seal .................................................. Replace
Apply Grease to the Sealing Rib
5 Snap Ring
6 Bearing
7 Snap Ring
8 Oil Drain Plug ....................................... 28-41 Nm
9 Front Axle Housing
10 Breather Nipple 11 Inner Shaft (Right)
12 Pinion Lock Nut ................................ 240-310 Nm
13 Washer
14 Companion Flange
15 Oil Seal .................................................. Replace
Apply Grease to the Sealing Rib
16 Bearing
1 7 Shim
18 Bearing Baffle
1 9 Shim20 Bearing
21 Oil Slinger
22 Drive Pinion
23 Oil Filler Plug ....................................... 28-41 Nm
24 Bolt ...................................................... 39-46 Nm
25 Axle Housing Cover ..............Apply Liquid Gasket
to the Contact Surface
26 Ring Gear
27 Bearing
2 8 Shim
29 Shaft Lock Pin
30 Differential Case
31 Bolt ...................................................... 75-90 Nm
32 Bolt ...................................................... 48-69 Nm
33 Washer
34 Bearing Cap
35 Thrust Washer
36 Side Gear
37 Differential Shaft
38 Differential Pinion
39 Thrust Washer
Page 769 of 1574
FRONT DRIVE AXLE 3A-19
5. Unscrew the bearing cap bolts and remove the bearing caps.Pull out the differential carrier assembly. NoticePlace alignment marks on the bearing cap not to change the caps before removal. When pulling out the differential
carrier assembly, be careful not to damage the axle housing.
6. Disassemble the parts of the differential carrier assembly.
7. Remove the drive pinion lock nut. Disassemble the parts of the drive pinion.
Assembly Procedure
1. Clean the all parts and check the followings : � Check the ring gear and drive pinion for wear and damage. If damaged, replace it as a set.
� Check the bearing for sticks, wear, noise and turning resistance.
� Check the side gear, pinion, pinion shaft and thrustwasher for wear and damage.
� Check the differential carrier for crack and wear (bearingcontact surface). Check the gear case for crack.


