low oil pressure SSANGYONG MUSSO 2003 Service Manual
[x] Cancel search | Manufacturer: SSANGYONG, Model Year: 2003, Model line: MUSSO, Model: SSANGYONG MUSSO 2003Pages: 1574, PDF Size: 26.41 MB
Page 9 of 1574
GENERAL INFORMATION 0B-9
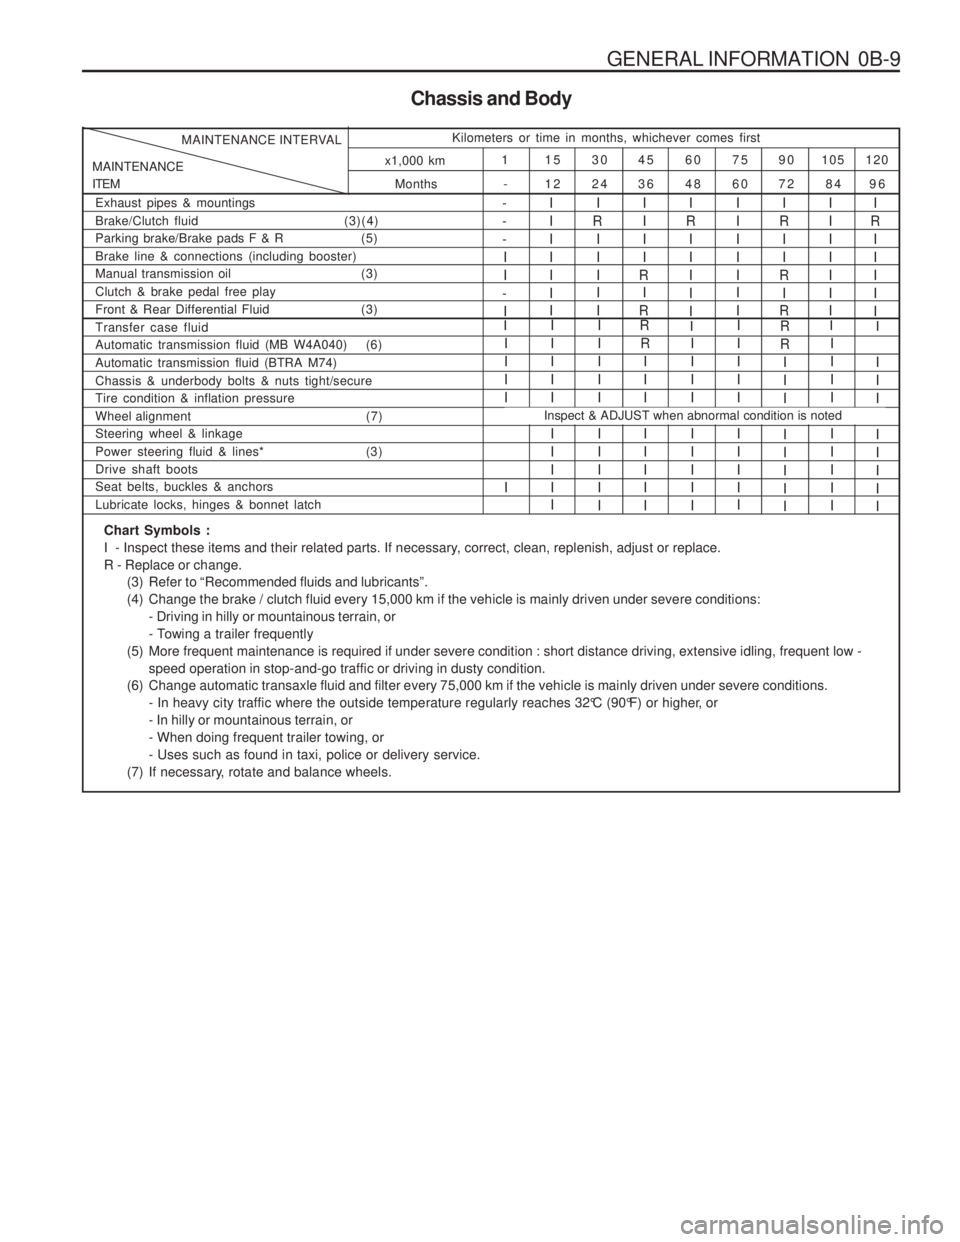
Chassis and Body
Months
MAINTENANCE ITEM MAINTENANCE INTERVAL
Kilometers or time in months, whichever comes first
120
105
90
75
60
45
30
15
1
96
84
72
60
48
36
24
12
-
x1,000 km
Exhaust pipes & mountings Brake/Clutch fluid
(3)(4)
Parking brake/Brake pads F & R (5)Brake line & connections (including booster)
Manual transmission oil (3) Clutch & brake pedal free play
Front & Rear Differential Fluid (3)I
R
IIIII- --II
-
I IIIIII I
I
R I II I I IIII
R I
R IIIII I II
R
II
R I
R IIIIII II
R I IIII
Automatic transmission fluid (MB W4A040) (6) Automatic transmission fluid (BTRA M74)Chassis & underbody bolts & nuts tight/secure Tire condition & inflation pressure
Wheel alignment (7) Steering wheel & linkage
Power steering fluid & lines* (3)Drive shaft boots Seat belts, buckles & anchors Lubricate locks, hinges & bonnet latchIIII I I IIII I III I I IIII I IIII
R
III I IIII IIII I IIIIIIIII I III I
R R
III I IIII IIII I IIII
Transfer case fluidRII
I
Inspect & ADJUST when abnormal condition is noted
I
I II I IIII
Chart Symbols :
I - Inspect these items and their related parts. If necessary, correct, clean, replenish, adjust or replace.R - Replace or change.
(3) Refer to “Recommended fluids and lubricants”.
(4) Change the brake / clutch fluid every 15,000 km if the vehicle is mainly driven under severe conditions:- Driving in hilly or mountainous terrain, or
- Towing a trailer frequently
(5) More frequent maintenance is required if under severe condition : short distance driving, extensive idling, frequent low - speed operation in stop-and-go traffic or driving in dusty condition.
(6) Change automatic transaxle fluid and filter every 75,000 km if the vehicle is mainly driven under severe conditions. - In heavy city traffic where the outside temperature regularly reaches 32°C (90°F) or higher, or- In hilly or mountainous terrain, or- When doing frequent trailer towing, or- Uses such as found in taxi, police or delivery service.
(7) If necessary, rotate and balance wheels.
Page 12 of 1574
0B-12 GENERAL INFORMATIONOWNER INSPECTIONS AND SERVICES
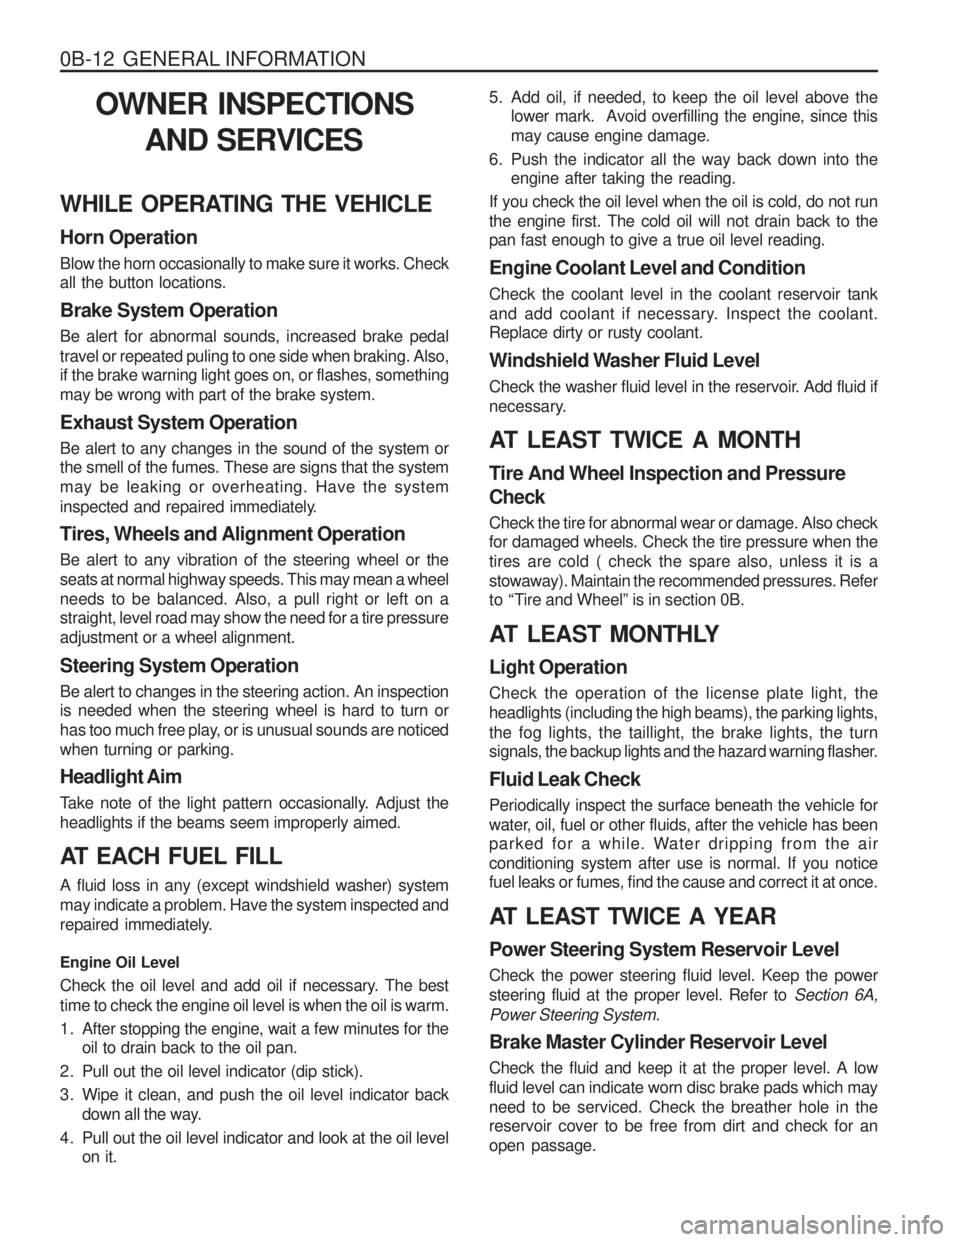
WHILE OPERATING THE VEHICLE Horn Operation Blow the horn occasionally to make sure it works. Check all the button locations. Brake System Operation Be alert for abnormal sounds, increased brake pedal travel or repeated puling to one side when braking. Also, if the brake warning light goes on, or flashes, something may be wrong with part of the brake system. Exhaust System Operation Be alert to any changes in the sound of the system or the smell of the fumes. These are signs that the system may be leaking or overheating. Have the system
inspected and repaired immediately. Tires, Wheels and Alignment Operation Be alert to any vibration of the steering wheel or the seats at normal highway speeds. This may mean a wheelneeds to be balanced. Also, a pull right or left on a straight, level road may show the need for a tire pressure adjustment or a wheel alignment. Steering System Operation Be alert to changes in the steering action. An inspection is needed when the steering wheel is hard to turn or
has too much free play, or is unusual sounds are noticedwhen turning or parking. Headlight Aim
Take note of the light pattern occasionally. Adjust the headlights if the beams seem improperly aimed.
AT EACH FUEL FILL A fluid loss in any (except windshield washer) system may indicate a problem. Have the system inspected and
repaired immediately. Engine Oil Level
Check the oil level and add oil if necessary. The best time to check the engine oil level is when the oil is warm.
1. After stopping the engine, wait a few minutes for the oil to drain back to the oil pan.
2. Pull out the oil level indicator (dip stick).
3. Wipe it clean, and push the oil level indicator back down all the way.
4. Pull out the oil level indicator and look at the oil level on it. 5. Add oil, if needed, to keep the oil level above the
lower mark. Avoid overfilling the engine, since this may cause engine damage.
6. Push the indicator all the way back down into the engine after taking the reading.
If you check the oil level when the oil is cold, do not runthe engine first. The cold oil will not drain back to the pan fast enough to give a true oil level reading. Engine Coolant Level and Condition Check the coolant level in the coolant reservoir tank
and add coolant if necessary. Inspect the coolant. Replace dirty or rusty coolant.
Windshield Washer Fluid Level
Check the washer fluid level in the reservoir. Add fluid if
necessary.
AT LEAST TWICE A MONTH Tire And Wheel Inspection and Pressure Check Check the tire for abnormal wear or damage. Also check for damaged wheels. Check the tire pressure when the tires are cold ( check the spare also, unless it is astowaway). Maintain the recommended pressures. Refer
to “Tire and Wheel” is in section 0B.
AT LEAST MONTHLY Light Operation Check the operation of the license plate light, the headlights (including the high beams), the parking lights,the fog lights, the taillight, the brake lights, the turn
signals, the backup lights and the hazard warning flasher. Fluid Leak Check Periodically inspect the surface beneath the vehicle for
water, oil, fuel or other fluids, after the vehicle has been
parked for a while. Water dripping from the air conditioning system after use is normal. If you notice fuel leaks or fumes, find the cause and correct it at once.
AT LEAST TWICE A YEAR Power Steering System Reservoir Level Check the power steering fluid level. Keep the power steering fluid at the proper level. Refer to Section 6A,
Power Steering System. Brake Master Cylinder Reservoir Level Check the fluid and keep it at the proper level. A low fluid level can indicate worn disc brake pads which mayneed to be serviced. Check the breather hole in the reservoir cover to be free from dirt and check for an open passage.
Page 21 of 1574
1A1-2 GENERAL ENGINE INFORMATION
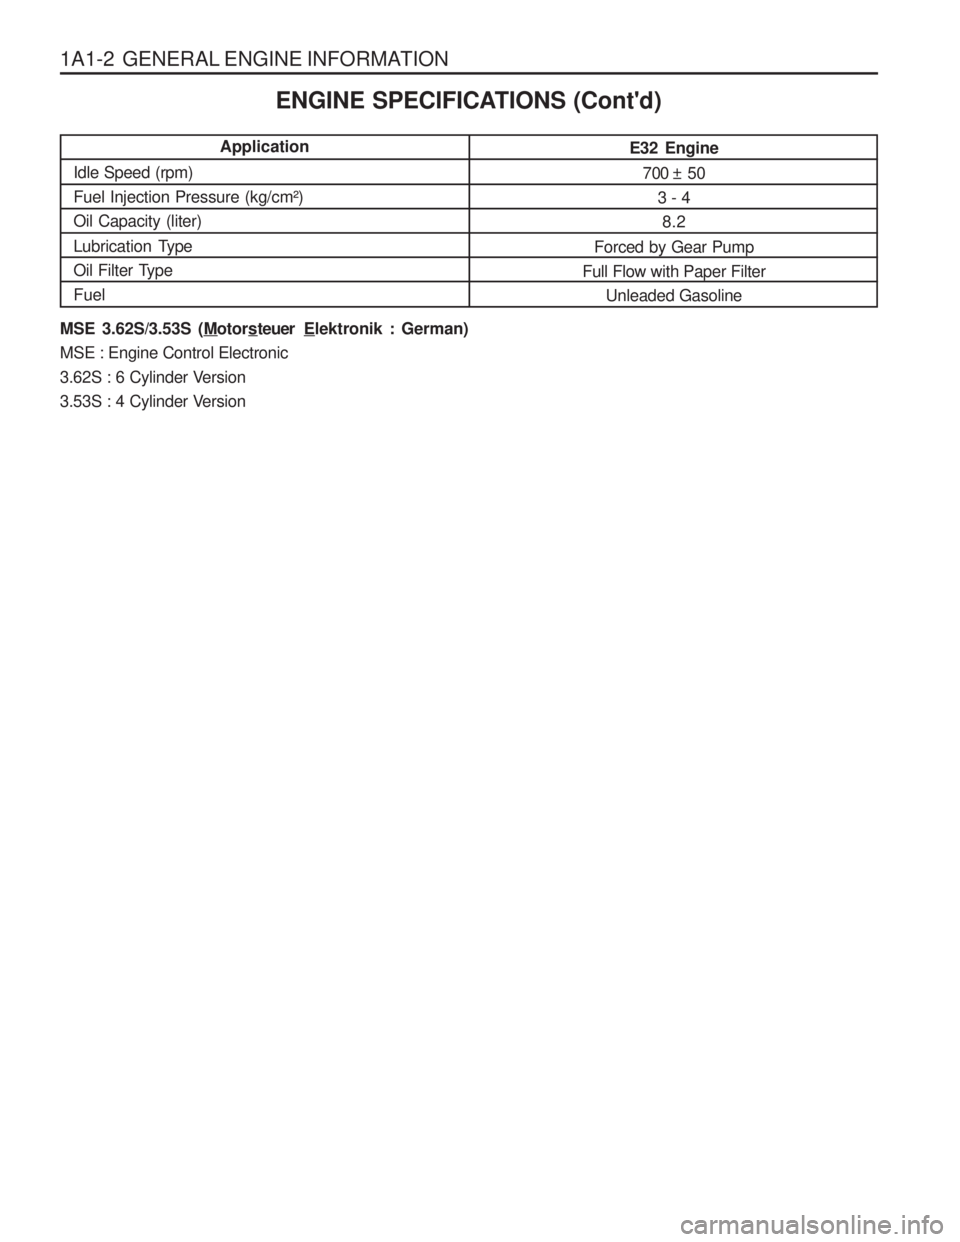
Application
Idle Speed (rpm)
Fuel Injection Pressure (kg/cm²)Oil Capacity (liter)
Lubrication Type
Oil Filter TypeFuel ENGINE SPECIFICATIONS (Cont'd)
E32 Engine7 00 ± 5 0 3 - 48.2
Forced by Gear Pump
Full Flow with Paper Filter
Unleaded Gasoline
MSE 3.62S/3.53S (Motors teuer Elektronik : German)
MSE : Engine Control Electronic
3.62S : 6 Cylinder Version
3.53S : 4 Cylinder Version
Page 26 of 1574
GENERAL ENGINE INFORMATION 1A1-7
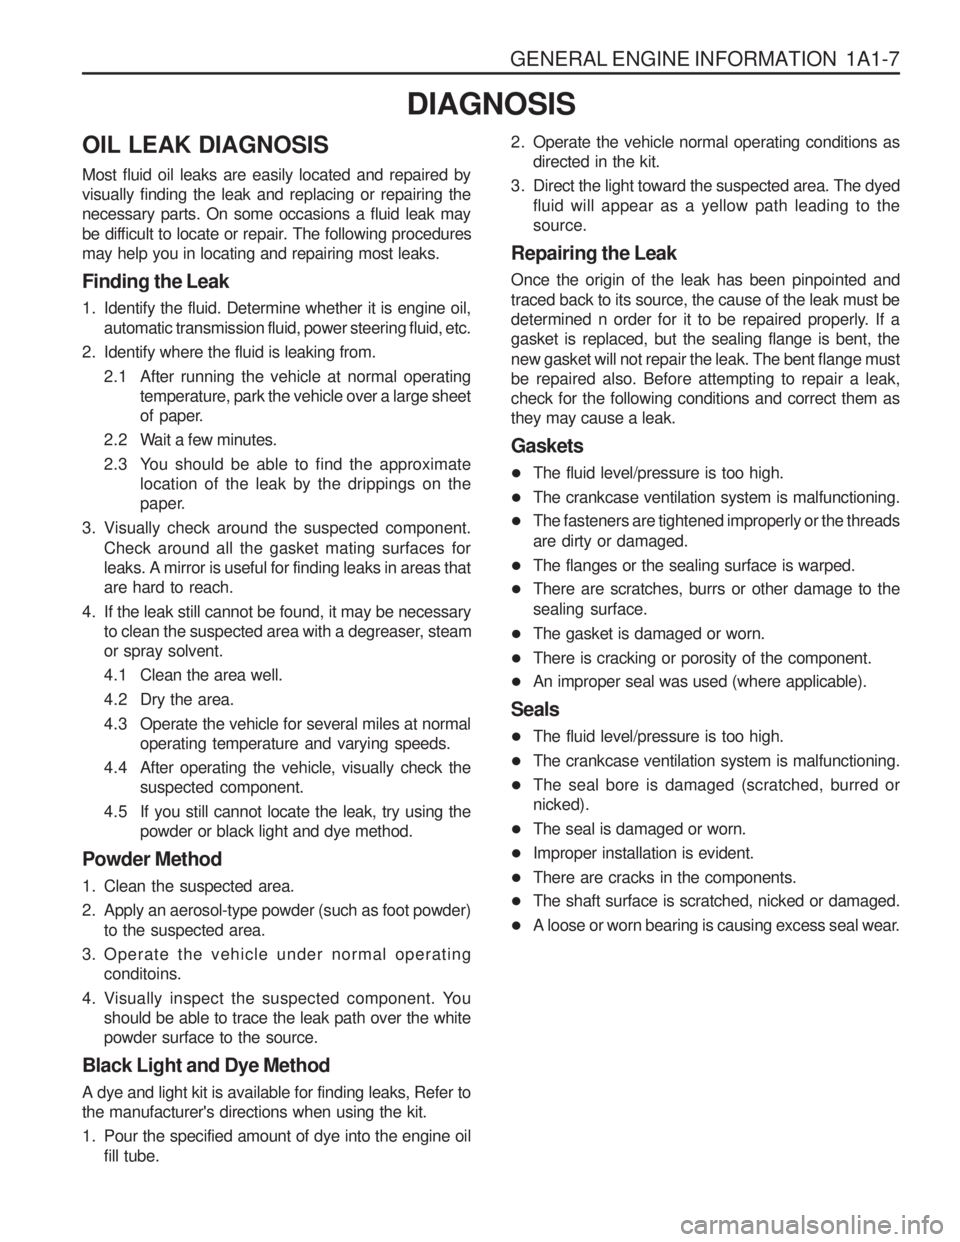
OIL LEAK DIAGNOSIS Most fluid oil leaks are easily located and repaired by visually finding the leak and replacing or repairing thenecessary parts. On some occasions a fluid leak may
be difficult to locate or repair. The following proceduresmay help you in locating and repairing most leaks. Finding the Leak
1. Identify the fluid. Determine whether it is engine oil,automatic transmission fluid, power steering fluid, etc.
2. Identify where the fluid is leaking from. 2.1 After running the vehicle at normal operating temperature, park the vehicle over a large sheet
of paper.
2.2 Wait a few minutes.
2.3 You should be able to find the approximate location of the leak by the drippings on the
paper.
3. Visually check around the suspected component. Check around all the gasket mating surfaces forleaks. A mirror is useful for finding leaks in areas thatare hard to reach.
4. If the leak still cannot be found, it may be necessary to clean the suspected area with a degreaser, steamor spray solvent.
4.1 Clean the area well.
4.2 Dry the area.
4.3 Operate the vehicle for several miles at normal operating temperature and varying speeds.
4.4 After operating the vehicle, visually check the suspected component.
4.5 If you still cannot locate the leak, try using the powder or black light and dye method.
Powder Method
1. Clean the suspected area.
2. Apply an aerosol-type powder (such as foot powder) to the suspected area.
3. Operate the vehicle under normal operating conditoins.
4. Visually inspect the suspected component. You should be able to trace the leak path over the white powder surface to the source.
Black Light and Dye Method A dye and light kit is available for finding leaks, Refer to the manufacturer's directions when using the kit.
1. Pour the specified amount of dye into the engine oil fill tube. 2. Operate the vehicle normal operating conditions as
directed in the kit.
3. Direct the light toward the suspected area. The dyed fluid will appear as a yellow path leading to the source.
Repairing the Leak Once the origin of the leak has been pinpointed and traced back to its source, the cause of the leak must be
determined n order for it to be repaired properly. If agasket is replaced, but the sealing flange is bent, the new gasket will not repair the leak. The bent flange must be repaired also. Before attempting to repair a leak,check for the following conditions and correct them asthey may cause a leak. Gaskets
� The fluid level/pressure is too high.
� The crankcase ventilation system is malfunctioning.
� The fasteners are tightened improperly or the threads are dirty or damaged.
� The flanges or the sealing surface is warped.
� There are scratches, burrs or other damage to thesealing surface.
� The gasket is damaged or worn.
� There is cracking or porosity of the component.
� An improper seal was used (where applicable).
Seals
� The fluid level/pressure is too high.
� The crankcase ventilation system is malfunctioning.
� The seal bore is damaged (scratched, burred or nicked).
� The seal is damaged or worn.
� Improper installation is evident.
� There are cracks in the components.
� The shaft surface is scratched, nicked or damaged.
� A loose or worn bearing is causing excess seal wear.
DIAGNOSIS
Page 31 of 1574
1A1-12 GENERAL ENGINE INFORMATION
Leakage Test1. Warm the engine up to normal operating temperature.
2. Disconnect the negative battery cable.
3. Remove the spark plugs.
4. Check the coolant level by opening the coolant surge tank cap and replenish if insufficient.
5. Open the engine oil filler cap.
6. Connect the tester to air pressure line and adjust the scale of tester.
7. Install the connecting hose to spark plug hole.
9. Connect the connecting hose to tester and measure the leakage volume after blowing up 5bar of compressed air. Notice Measure the leakage volume in the completely opening condition of throttle valve by pulling the acceleration cable.
10. Perform the pressure test according to the firing order.
Notice Firing Order : 1 - 5 - 3 - 6 - 2 - 4
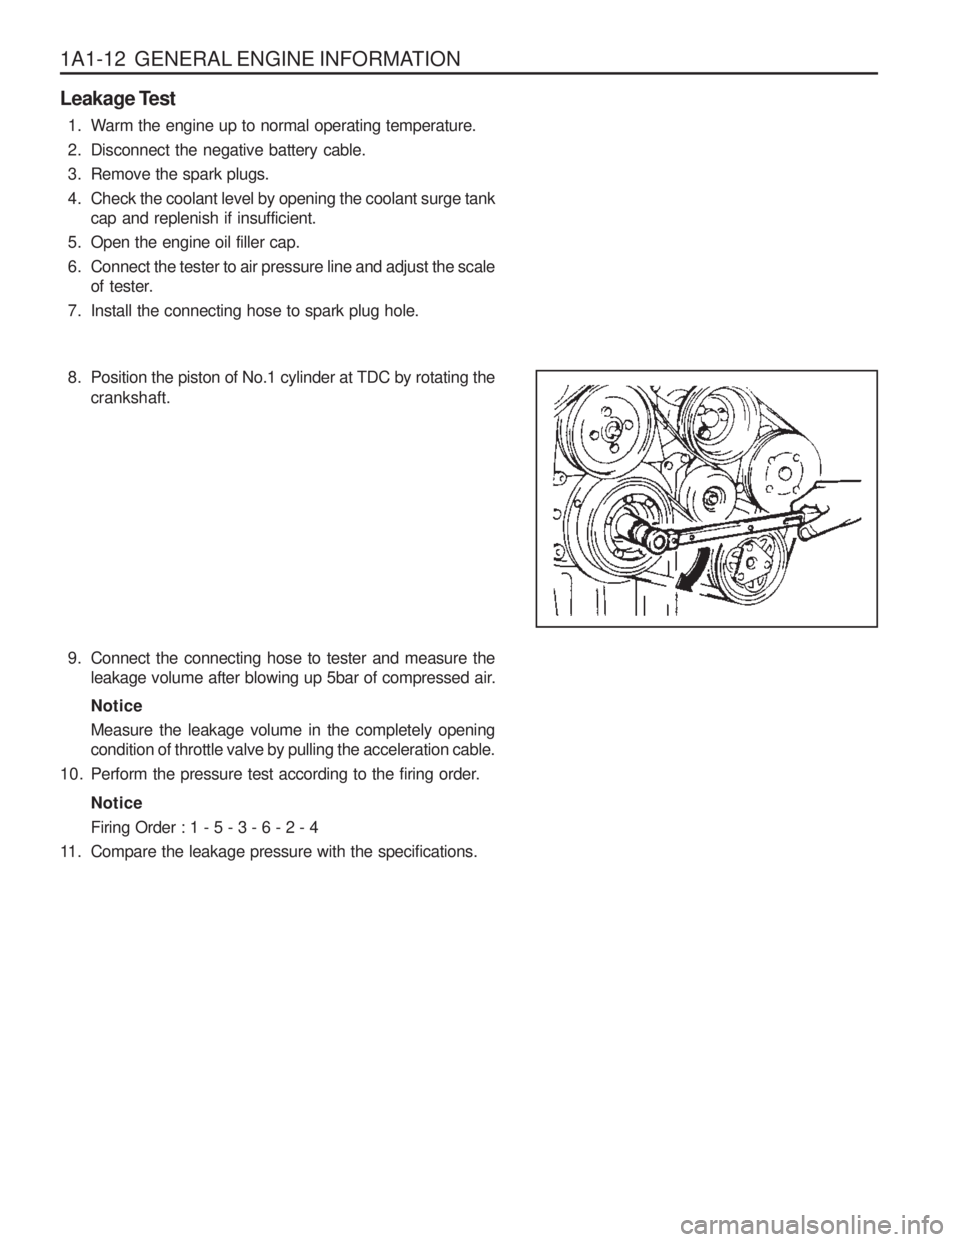
11. Compare the leakage pressure with the specifications. 8. Position the piston of No.1 cylinder at TDC by rotating the
crankshaft.
Page 34 of 1574
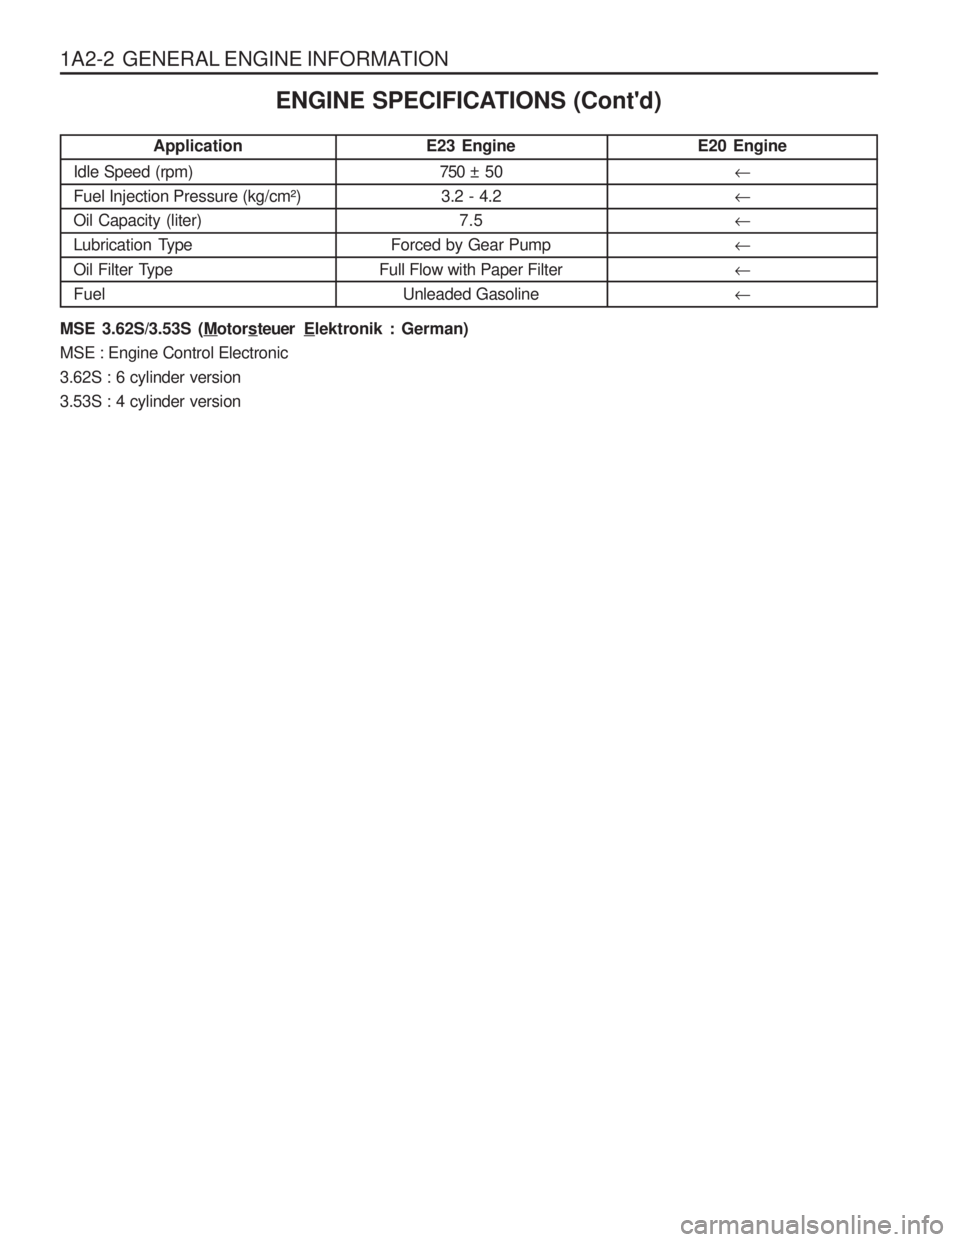
1A2-2 GENERAL ENGINE INFORMATION
E20 Engine� ��� � �
Application
Idle Speed (rpm)
Fuel Injection Pressure (kg/cm²)Oil Capacity (liter)
Lubrication Type
Oil Filter Type Fuel ENGINE SPECIFICATIONS (Cont'd)
E23 Engine750 ± 503.2 - 4.2 7.5
Forced by Gear Pump
Full Flow with Paper Filter Unleaded Gasoline
MSE 3.62S/3.53S (Motors teuer Elektronik : German)
MSE : Engine Control Electronic 3.62S : 6 cylinder version3.53S : 4 cylinder version
Page 36 of 1574
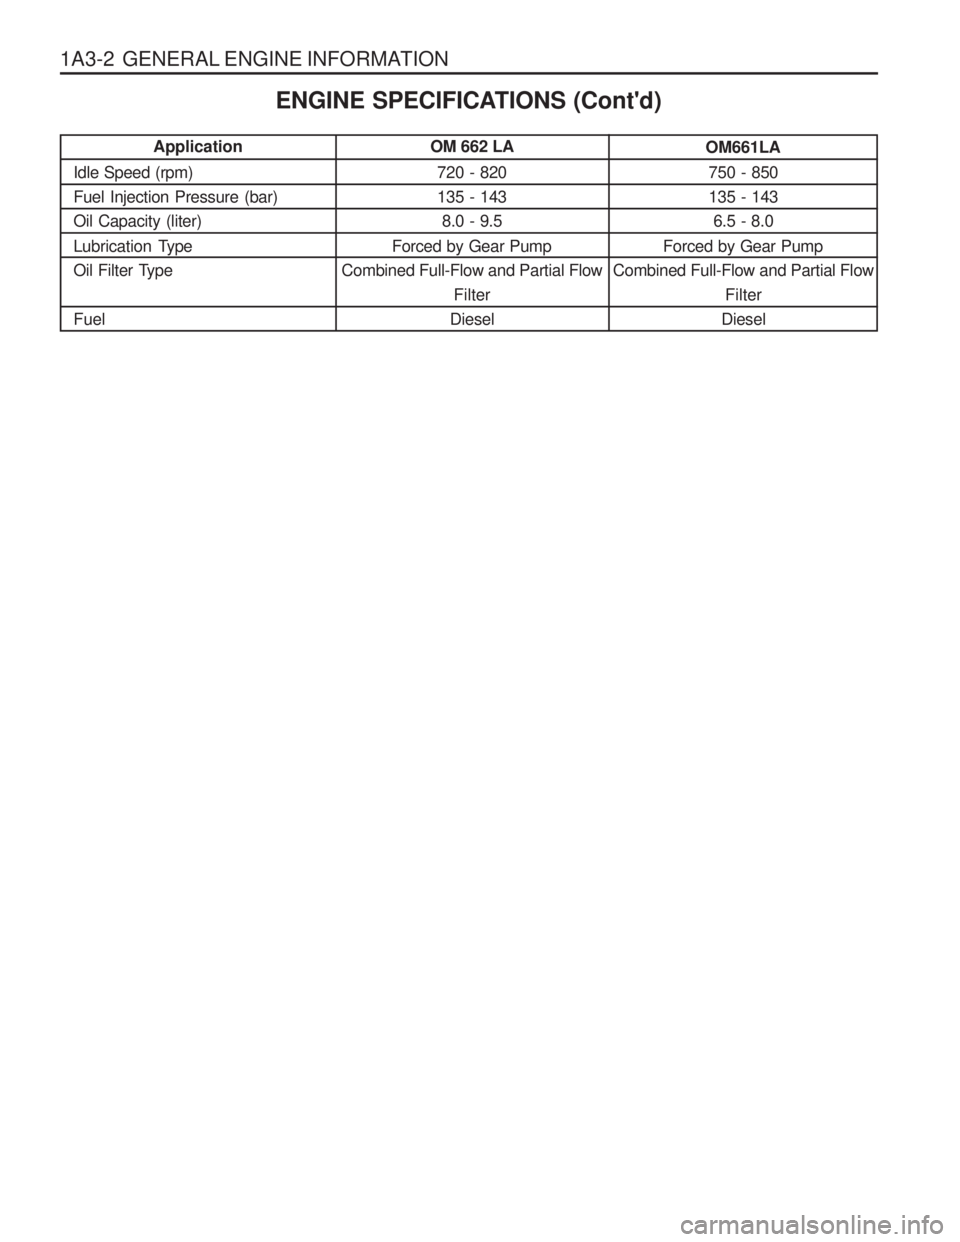
1A3-2 GENERAL ENGINE INFORMATION
OM 662 LA720 - 820 135 - 1438.0 - 9.5
Forced by Gear Pump
Combined Full-Flow and Partial Flow Filter
Diesel
Application
Idle Speed (rpm)Fuel Injection Pressure (bar)Oil Capacity (liter)
Lubrication Type
Oil Filter Type Fuel ENGINE SPECIFICATIONS (Cont'd)OM661LA
750 - 850 135 - 143 6.5 - 8.0
Forced by Gear Pump
Combined Full-Flow and Partial Flow
Filter
Diesel
Page 39 of 1574
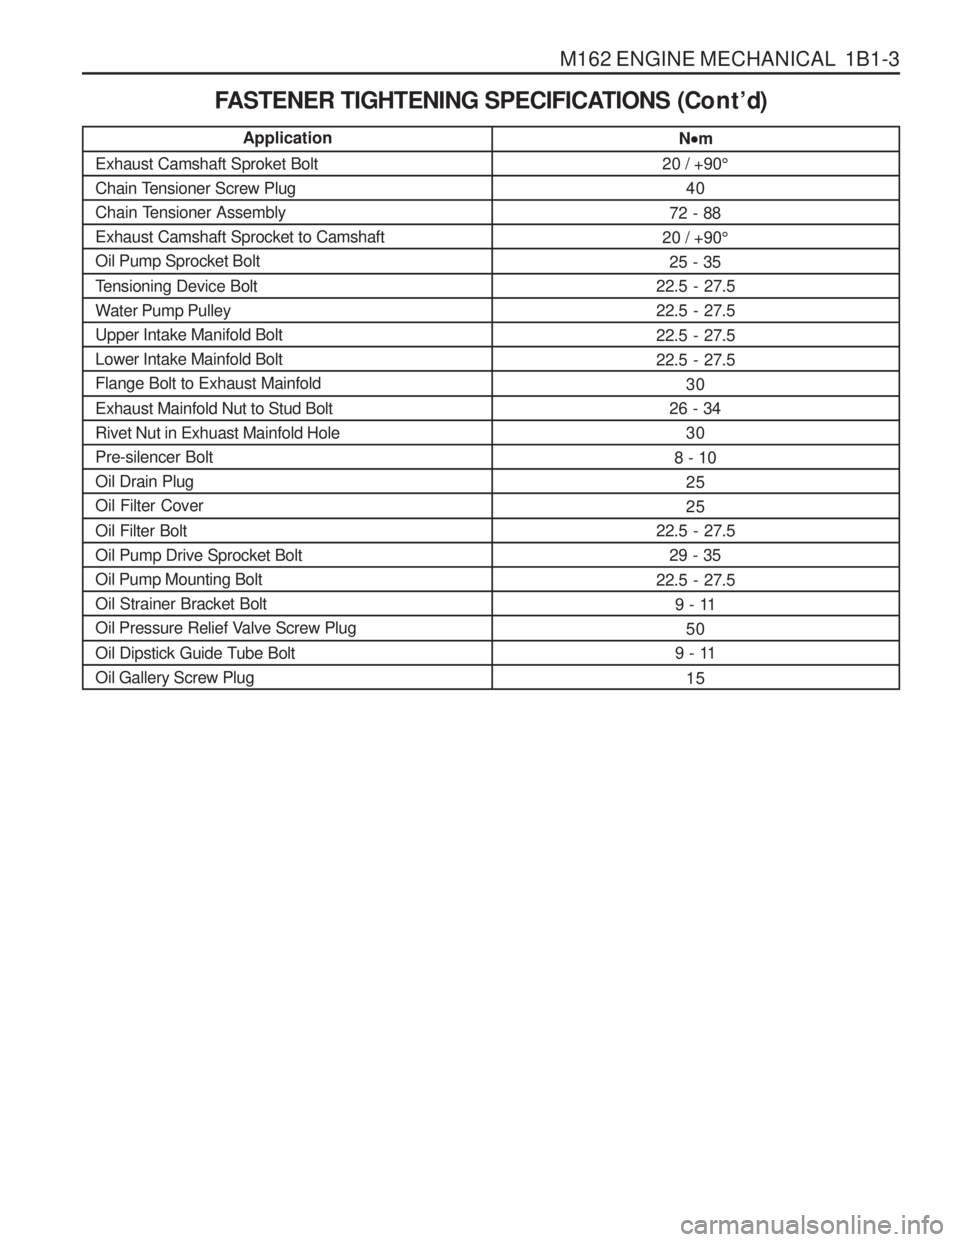
M162 ENGINE MECHANICAL 1B1-3
N
m
20 / +90 °
40
72 - 88
20 / +90 °
25 - 35
22.5 - 27.5 22.5 - 27.5 22.5 - 27.5 22.5 - 27.5 30
26 - 34
30
8 - 10 2525
22.5 - 27.5 29 - 35
22.5 - 27.5 9 - 11
50
9 - 11
15Application
Exhaust Camshaft Sproket Bolt
Chain Tensioner Screw Plug
Chain Tensioner AssemblyExhaust Camshaft Sprocket to CamshaftOil Pump Sprocket Bolt
Tensioning Device Bolt
Water Pump PulleyUpper Intake Manifold BoltLower Intake Mainfold BoltFlange Bolt to Exhaust Mainfold Exhaust Mainfold Nut to Stud Bolt Rivet Nut in Exhuast Mainfold HolePre-silencer BoltOil Drain PlugOil Filter Cover Oil Filter Bolt Oil Pump Drive Sprocket BoltOil Pump Mounting BoltOil Strainer Bracket Bolt
Oil Pressure Relief Valve Screw Plug
Oil Dipstick Guide Tube Bolt Oil Gallery Screw Plug
FASTENER TIGHTENING SPECIFICATIONS (Co n t ’d)
Page 53 of 1574

M162 ENGINE MECHANICAL 1B1-17
Operation at Idling and Mid-Load
�It show that the throttle valve (19) is closed or very partially opened and the vacuum pressure in intake manifold is high. The blowby gas in the crankcase in partial load flows into the intake manifold through the vent line (20) after passingthe air conditioner bracket (6) and the filter (4). The air reentered into the intake manifold will be dilluted on the flow
through the restriction hole (11) in the vent line (10). The circulated engine oil is separated at the air conditioner bracket (6) and then returns into the oil pan through thedrain pipe (7). The vacuum pressure generated at the crankcase sucks fresh air from intake air line(13) through the air admissionand vent connection (17,18). The fresh air prevents engine oil from being contami-nated and the air admission and vent connection (17,18) is designed to control the rapid pressure changes in intakeair line (13).
Operation at Full-Load
� The throttle valve (19) is fully opened. All the blowby gases flow into the intake air duct (13) after passing through the oil separator (15,16) of the cylinder head cover (14) when fully loaded. This dilluted air will be supplied to the combustion chamber through the intakemanifold (12).
Page 137 of 1574

M162 ENGINE MECHANICAL 1B1-101
OIL PRESSURE RELIEF VALVE Preceding Work : Removal of oil pan
1 Screw Plug................................................ 50 Nm
2 Compression Spring
Removal & Installation Procedure
1. Remove the screw plug (1). Installation Notice
2. Remove the spring (2), guide pin (3) and the piston (4).
3. Installation should follow the removal procedure in the reverse order. Notice Don ’t use the seal for the screw plug. 3 Guide Pin
4 Piston
Tightening Torque 50 Nm