replace SUBARU FORESTER 2004 Service Repair Manual
[x] Cancel search | Manufacturer: SUBARU, Model Year: 2004, Model line: FORESTER, Model: SUBARU FORESTER 2004Pages: 2870, PDF Size: 38.67 MB
Page 558 of 2870

CC-6
CRUISE CONTROL SYSTEM
Actuator
C: INSPECTION
Measure the cruise control actuator resistance.
If NG, replace the cruise control actuator.
Terminal No. Standard
4 and 1 Approx. 5 Ω
4 and 2 Approx. 5 Ω
4 and 5 Approx. 5 Ω
3 and 6 Approx. 39 Ω
CC-00012
1 3
4 5 62
Page 560 of 2870

CC-8
CRUISE CONTROL SYSTEM
Cruise Control Main Switch
4. Cruise Control Main Switch
A: REMOVAL
1) Disconnect the ground cable from battery.
2) Remove the screws and clip from instrument
panel lower cover.
3) Remove the instrument panel lower cover.
4) Disconnect the connector from cruise control
main switch.
5) Remove the main switch by pushing it outward.
For Europe model
For Australia model
B: INSTALLATION
Install in the reverse order of removal.
C: INSPECTION
Measure the cruise control main switch resistance.
If NG, replace the cruise control main switch.
CC-00014
CC-00015
CC-00071
CC-00072
Switch position Terminal No. Standard
OFF (released)LHD, RHD (For
Europe) model : 1
and 2More than 1 MΩ
ON (depressed)RHD (Except for
Europe) model : 3
and 5Less than 1 Ω
CC-00073
1 2
64
53
Page 561 of 2870
CC-9
CRUISE CONTROL SYSTEM
Cruise Control Command Switch
5. Cruise Control Command
Switch
A: REMOVAL
WARNING:
Before servicing, be sure to read the notes in
the AB section for proper handling of the driv-
er’s airbag module.
1) Set the front wheels in straight ahead position.
2) Turn the ignition switch to OFF.
3) Disconnect the ground cable from battery and
wait for at least 20 seconds before starting work.
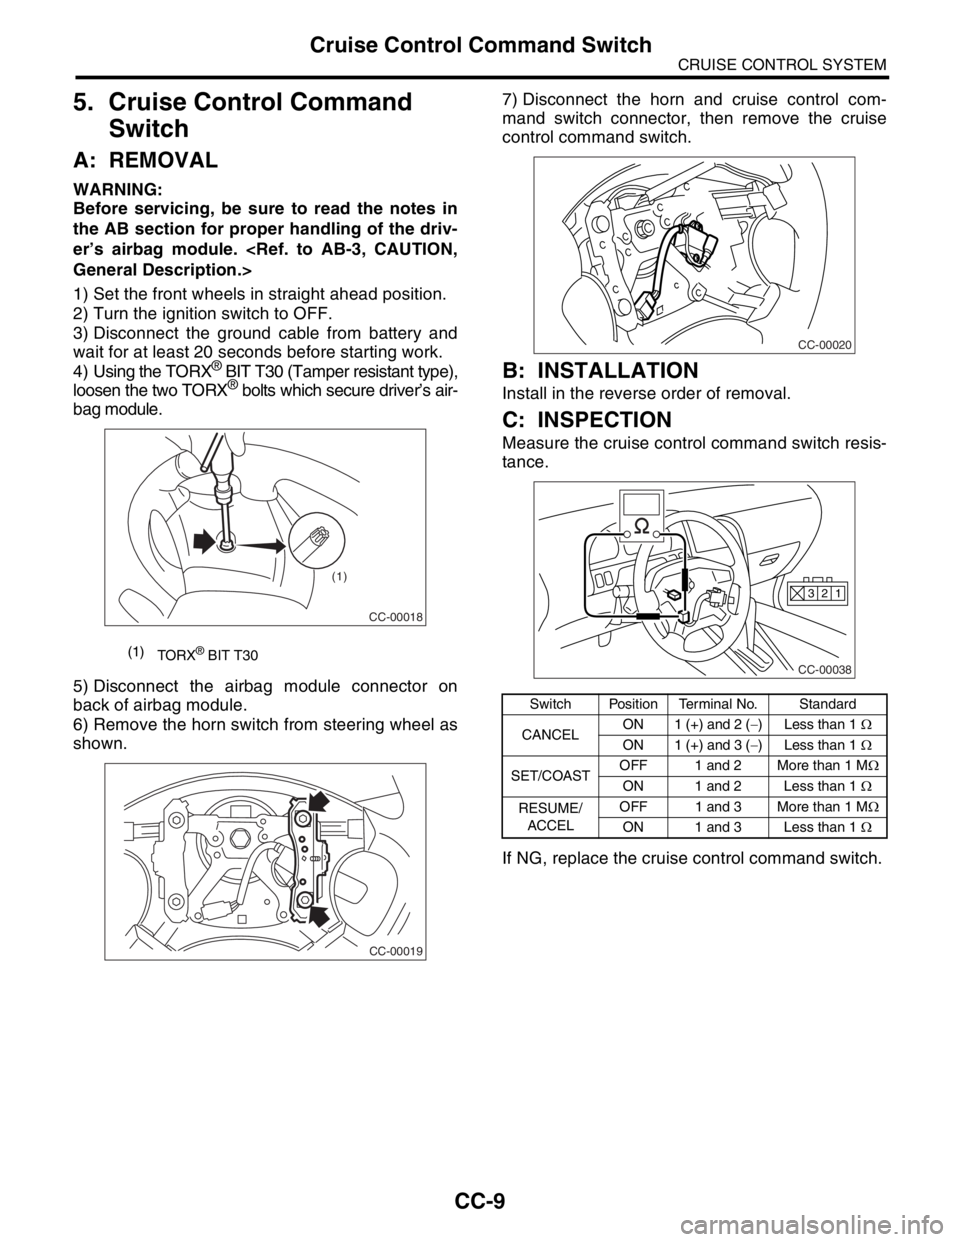
4) Using the TORX
® BIT T30 (Tamper resistant type),
loosen the two TORX® bolts which secure driver’s air-
bag module.
5) Disconnect the airbag module connector on
back of airbag module.
6) Remove the horn switch from steering wheel as
shown.7) Disconnect the horn and cruise control com-
mand switch connector, then remove the cruise
control command switch.
B: INSTALLATION
Install in the reverse order of removal.
C: INSPECTION
Measure the cruise control command switch resis-
tance.
If NG, replace the cruise control command switch.
(1)
TORX® BIT T30
CC-00018
(1)
CC-00019
Switch Position Terminal No. Standard
CANCELON 1 (+) and 2 (−) Less than 1 Ω
ON 1 (+) and 3 (−) Less than 1 Ω
SET/COASTOFF 1 and 2 More than 1 MΩ
ON 1 and 2 Less than 1 Ω
RESUME/
ACCELOFF 1 and 3 More than 1 MΩ
ON 1 and 3 Less than 1 Ω
CC-00020
CC-00038
1 2 3
Page 562 of 2870
CC-10
CRUISE CONTROL SYSTEM
Stop and Brake Switch
6. Stop and Brake Switch
A: REMOVAL
1) Disconnect the ground cable from battery.
2) Disconnect the connector from stop and brake
switch, and then remove the switch.
B: INSTALLATION
Install in the reverse order of removal.
C: INSPECTION
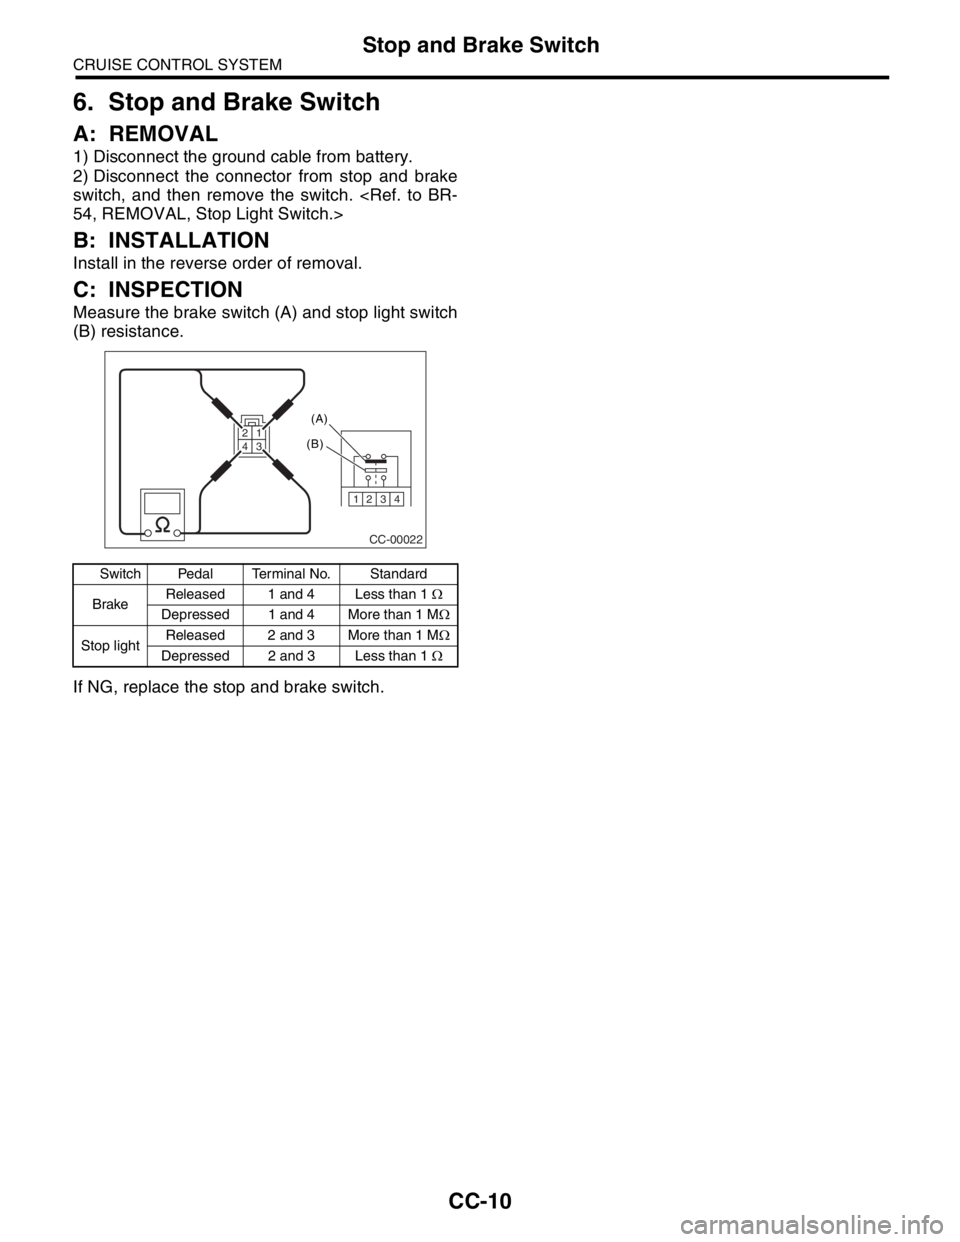
Measure the brake switch (A) and stop light switch
(B) resistance.
If NG, replace the stop and brake switch.
Switch Pedal Terminal No. Standard
BrakeReleased 1 and 4 Less than 1 Ω
Depressed 1 and 4 More than 1 MΩ
Stop lightReleased 2 and 3 More than 1 MΩ
Depressed 2 and 3 Less than 1 Ω
CC-00022
1234
(A)
(B)
3 2 14
Page 563 of 2870
CC-11
CRUISE CONTROL SYSTEM
Clutch Switch
7. Clutch Switch
A: REMOVAL
1) Disconnect the ground cable from battery.
2) Disconnect the connector from clutch switch,
and then remove the switch.
B: INSTALLATION
Install in the reverse order of removal.
C: INSPECTION
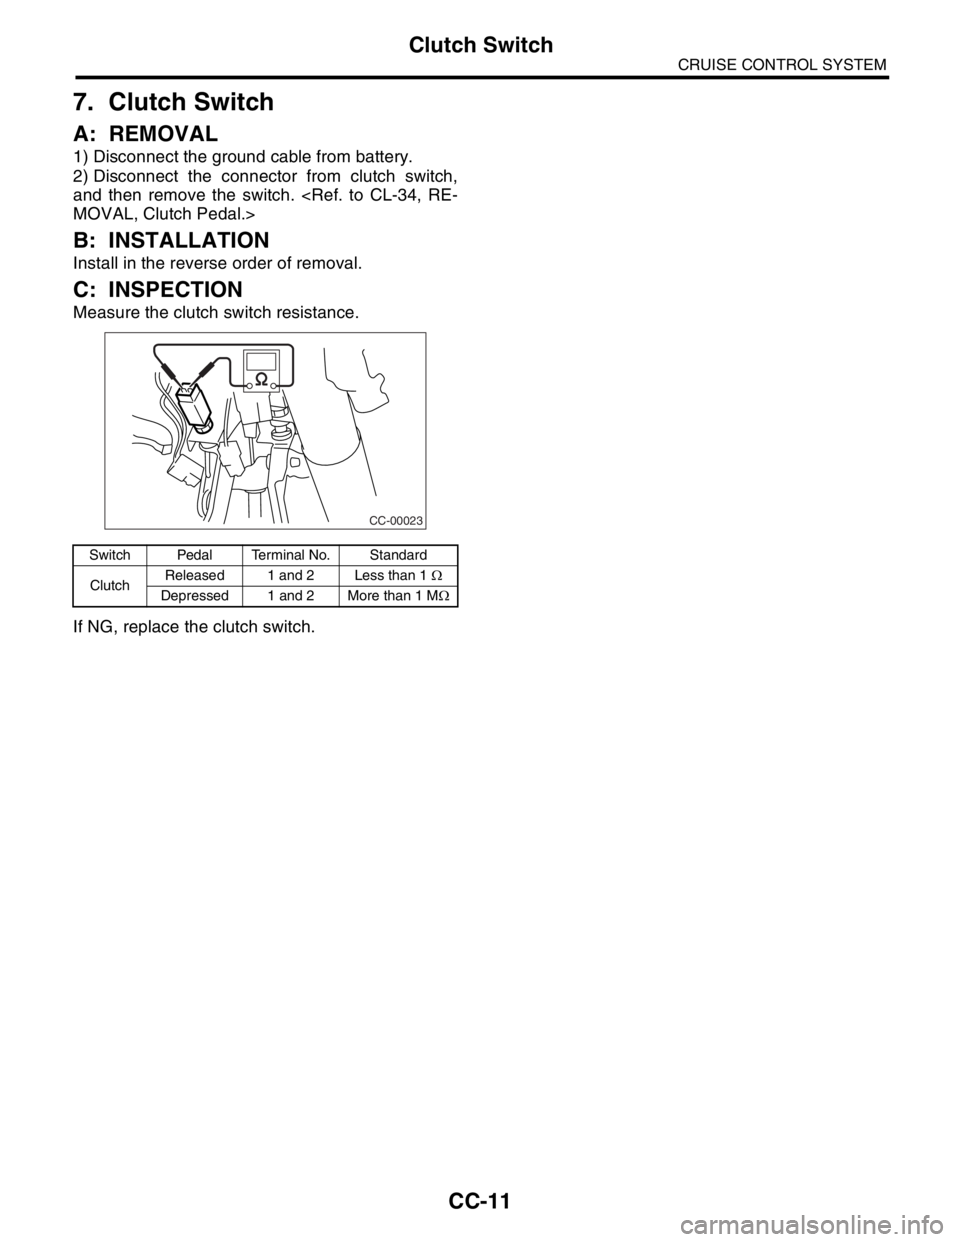
Measure the clutch switch resistance.
If NG, replace the clutch switch.
Switch Pedal Terminal No. Standard
ClutchReleased 1 and 2 Less than 1 Ω
Depressed 1 and 2 More than 1 MΩ
CC-00023
Page 564 of 2870
CC-12
CRUISE CONTROL SYSTEM
Inhibitor Switch (AT model)
8. Inhibitor Switch (AT model)
A: REMOVAL
1) Disconnect the ground cable from battery.
2) Disconnect the connector from inhibitor switch,
and then remove the switch.
B: INSTALLATION
Install in the reverse order of removal.
C: INSPECTION
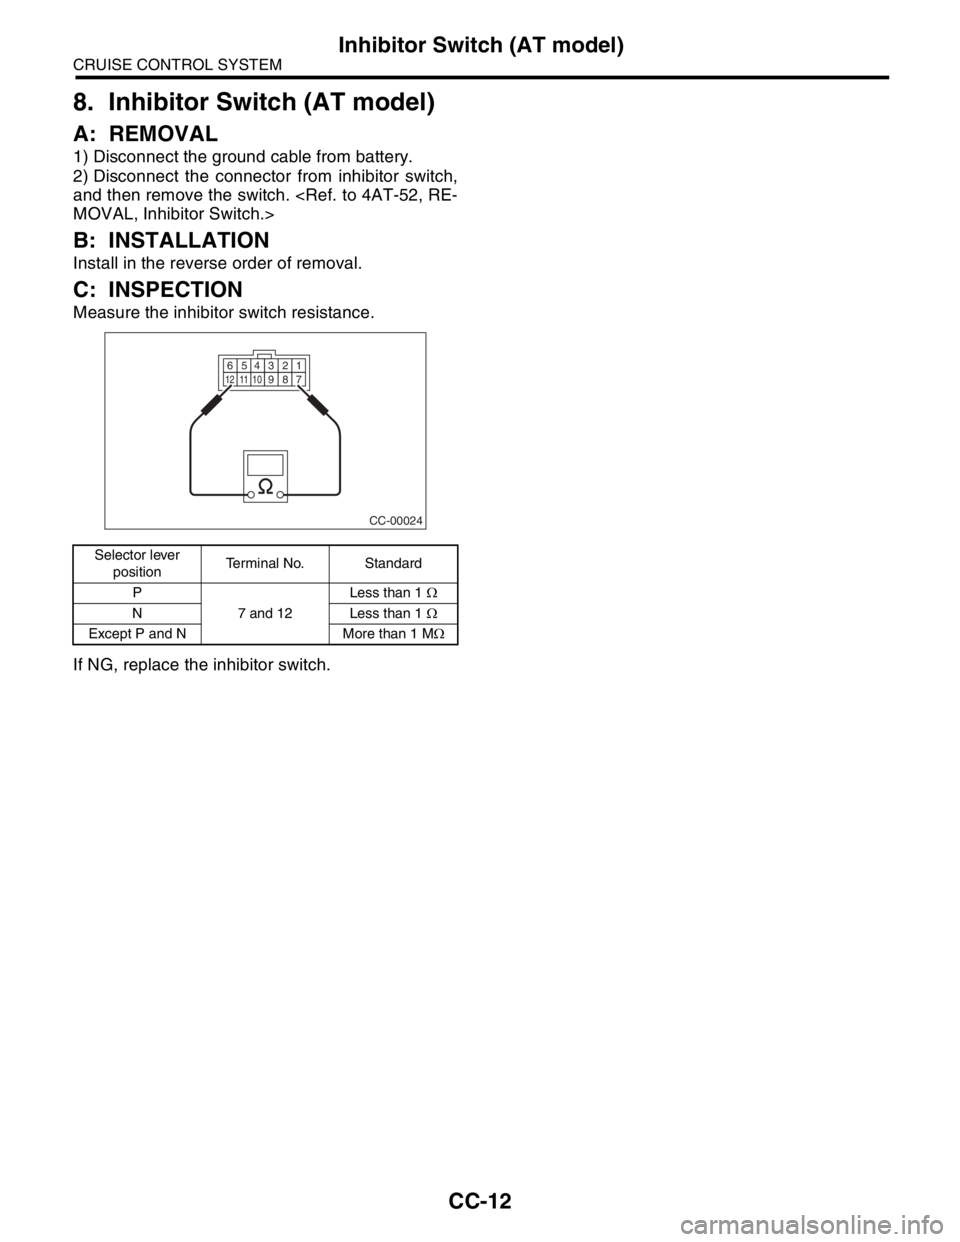
Measure the inhibitor switch resistance.
If NG, replace the inhibitor switch.
Selector lever
positionTerminal No. Standard
P
7 and 12Less than 1 Ω
N Less than 1 Ω
Except P and N More than 1 MΩ
CC-00024
123456789101112
Page 565 of 2870
CC-13
CRUISE CONTROL SYSTEM
Neutral Position Switch (MT model)
9. Neutral Position Switch (MT
model)
A: REMOVAL
1) Disconnect the ground cable from battery.
2) Disconnect the connector from neutral position
switch, and then remove the switch.
SWITCH, REMOVAL, Switches and Harness.>
B: INSTALLATION
Install in the reverse order of removal.
C: INSPECTION
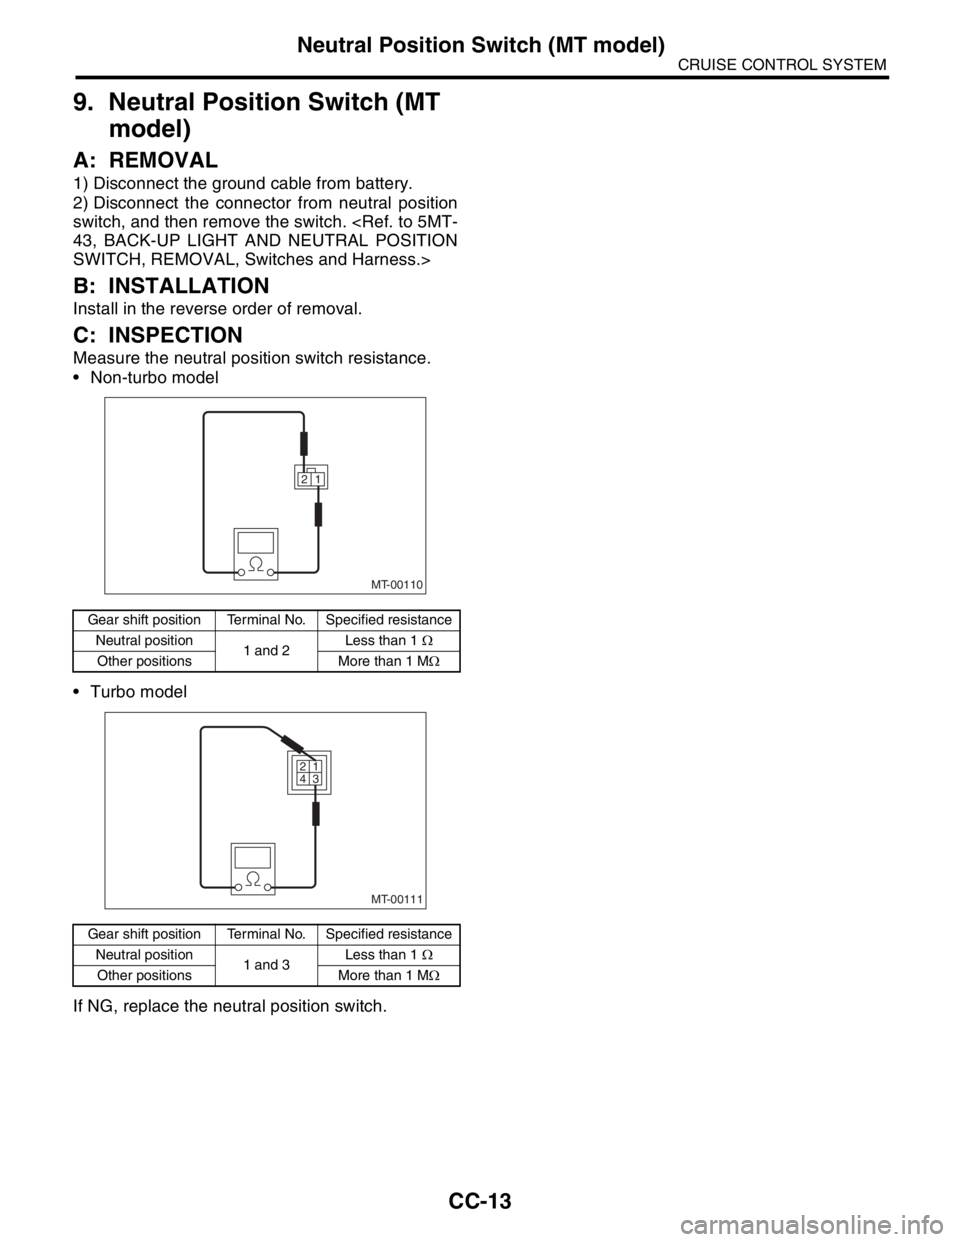
Measure the neutral position switch resistance.
Non-turbo model
Turbo model
If NG, replace the neutral position switch.
Gear shift position Terminal No. Specified resistance
Neutral position
1 and 2Less than 1 Ω
Other positions More than 1 MΩ
Gear shift position Terminal No. Specified resistance
Neutral position
1 and 3Less than 1 Ω
Other positions More than 1 MΩ
MT-00110
1 2
MT-00111
1 2
3 4
Page 567 of 2870
FUJI HEAVY INDUSTRIES LTD. G8080GE7
2004 FORESTER SERVICE MANUAL QUICK REFERENCE INDEX
BODY SECTION
This service manual has been prepared
to provide SUBARU service personnel
with the necessary information and data
for the correct maintenance and repair
of SUBARU vehicles.
This manual includes the procedures
for maintenance, disassembling, reas-
sembling, inspection and adjustment of
components and diagnostics for guid-
ance of experienced mechanics.
Please peruse and utilize this manual
fully to ensure complete repair work for
satisfying our customers by keeping
their vehicle in optimum condition.
When replacement of parts during
repair work is needed, be sure to use
SUBARU genuine parts.
All information, illustration and specifi-
cations contained in this manual are
based on the latest product information
available at the time of publication
approval.HVAC SYSTEM
(HEATER, VENTILATOR AND A/C)AC
HVAC SYSTEM (AUTO A/C)
(DIAGNOSTIC)AC
AIRBAG SYSTEM AB
AIRBAG SYSTEM (DIAGNOSTIC) AB
SEAT BELT SYSTEM SB
LIGHTING SYSTEM LI
WIPER AND WASHER SYSTEM WW
ENTERTAINMENT ET
COMMUNICATION SYSTEM COM
GLASS/WINDOW/MIRROR GW
BODY STRUCTURE BS
INSTRUMENTATION/DRIVER INFO IDI
SEAT SE
SECURITY AND LOCK SL
SUNROOF/T-TOP/CONVERTIBLE TOP
(SUNROOF)SR
EXTERIOR/INTERIOR TRIM EI
EXTERIOR BODY PANEL EB
Page 584 of 2870

CC(H4SO)-16
CRUISE CONTROL SYSTEM (DIAGNOSTIC)
Diagnostic Procedure with Symptom
Step Check Yes No
1 CHECK CRUISE CONTROL MAIN SWITCH
CIRCUIT.
1) Turn the ignition switch to OFF.
2) Disconnect the cruise control main switch
harness connector.
3) Turn the ignition switch to ON.
4) Measure the voltage between harness con-
nector terminal and chassis ground.
Connector & terminal
With indicator built in combination
meter:
(B161) No. 3 (+) — Chassis ground (
−):
With indicator built in main switch:
(B161) No. 2 (+) — Chassis ground (
−):Is the voltage more than 10 V? Go to step 2. Check the fuse
No. 18 (in fuse &
relay box).
Check the har-
ness for open or
short between
cruise control main
switch and fuse &
relay box.
2 CHECK CRUISE CONTROL MAIN SWITCH
CIRCUIT.
1) Turn the ignition switch OFF.
2) Disconnect the cruise control module har-
ness connector.
3) Measure the resistance between cruise
control module harness connector terminal
and cruise control main switch harness con-
nector terminal.
Connector & terminal
With indicator built in combination
meter:
(B94) No. 15 — (B161) No. 5:
With indicator built in main switch:
(B94) No. 15 — (B161) No. 1:Is the resistance less than 10
Ω?Go to step 3.Repair the har-
ness.
3 CHECK CRUISE CONTROL MAIN SWITCH.
Remove and check the cruise control main
switch.
switch OK?Replace the cruise
control module.Replace the cruise
control main
switch.
Page 586 of 2870

CC(H4SO)-18
CRUISE CONTROL SYSTEM (DIAGNOSTIC)
Diagnostic Procedure with Symptom
Step Check Yes No
1 CHECK CRUISE INDICATOR LIGHT CIR-
CUIT.
1) Turn the ignition switch to OFF.
2) With indicator built in combination meter:
Disconnect the combination meter harness
connector.
With indicator built in main switch:
Disconnect the cruise control main switch har-
ness connector.
3) Turn the ignition switch to ON.
4) Measure the voltage between harness con-
nector terminal and chassis ground.
Connector & terminal
With indicator built in combination
meter:
(i10) No. 9 (+) — Chassis ground (
−):
With indicator built in main switch:
(B161) No. 3 (+) — Chassis ground (
−):Is the voltage more than 10 V? Go to step 2. Check the fuse
No. 13 (in fuse &
relay box).
Check the har-
ness for open or
short between
combination meter
and fuse & relay
box.
2 CHECK CRUISE INDICATOR LIGHT CIR-
CUIT.
1) Turn the ignition switch to OFF.
2) Disconnect the cruise control module har-
ness connector.
3) Measure the resistance between cruise
control module harness connector terminal
and combination meter harness connector ter-
minal.
Connector & terminal
With indicator built in combination
meter:
(B94) No. 1 (+) — (i10) No. 16:
With indicator built in main switch:
(B94) No. 1 (+) — (B161) No. 4:Is the resistance less than 10
Ω?Go to step 3.Repair the har-
ness.
3 CHECK CRUISE INDICATOR LIGHT CIR-
CUIT.
Ground the cruise control module harness
connector terminal with a suitable wire.
Connector & terminal
(B94) No. 1 — Chassis ground:Does the cruise indicator light
illuminate?Replace the cruise
control module. With indicator
built in combina-
tion meter: Check
the cruise indicator
light bulb in combi-
nation meter, and
replace it if mal-
function
occurred.No mal-
function found,
replace the printed
circuit of combina-
tion meter.
With indicator
built in main
switch: Replace
the cruise control
main switch.