replace SUBARU FORESTER 2004 Service Owner's Manual
[x] Cancel search | Manufacturer: SUBARU, Model Year: 2004, Model line: FORESTER, Model: SUBARU FORESTER 2004Pages: 2870, PDF Size: 38.67 MB
Page 81 of 2870
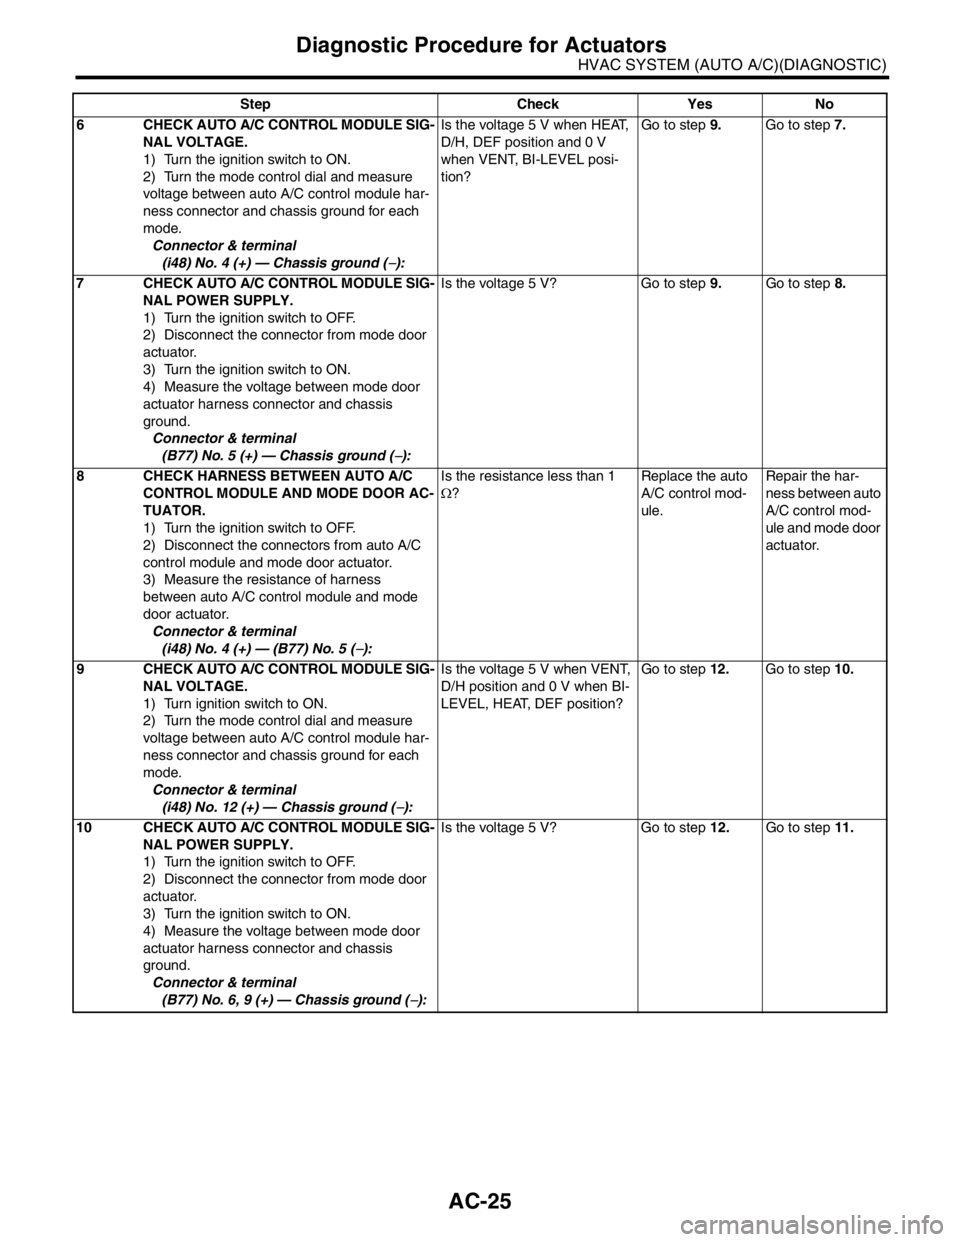
AC-25
HVAC SYSTEM (AUTO A/C)(DIAGNOSTIC)
Diagnostic Procedure for Actuators
6 CHECK AUTO A/C CONTROL MODULE SIG-
NAL VOLTAGE.
1) Turn the ignition switch to ON.
2) Turn the mode control dial and measure
voltage between auto A/C control module har-
ness connector and chassis ground for each
mode.
Connector & terminal
(i48) No. 4 (+) — Chassis ground (
−):Is the voltage 5 V when HEAT,
D/H, DEF position and 0 V
when VENT, BI-LEVEL posi-
tion?Go to step 9.Go to step 7.
7 CHECK AUTO A/C CONTROL MODULE SIG-
NAL POWER SUPPLY.
1) Turn the ignition switch to OFF.
2) Disconnect the connector from mode door
actuator.
3) Turn the ignition switch to ON.
4) Measure the voltage between mode door
actuator harness connector and chassis
ground.
Connector & terminal
(B77) No. 5 (+) — Chassis ground (
−):Is the voltage 5 V? Go to step 9.Go to step 8.
8 CHECK HARNESS BETWEEN AUTO A/C
CONTROL MODULE AND MODE DOOR AC-
TUATOR.
1) Turn the ignition switch to OFF.
2) Disconnect the connectors from auto A/C
control module and mode door actuator.
3) Measure the resistance of harness
between auto A/C control module and mode
door actuator.
Connector & terminal
(i48) No. 4 (+) — (B77) No. 5 (
−):Is the resistance less than 1
Ω?Replace the auto
A/C control mod-
ule.Repair the har-
ness between auto
A/C control mod-
ule and mode door
actuator.
9 CHECK AUTO A/C CONTROL MODULE SIG-
NAL VOLTAGE.
1) Turn ignition switch to ON.
2) Turn the mode control dial and measure
voltage between auto A/C control module har-
ness connector and chassis ground for each
mode.
Connector & terminal
(i48) No. 12 (+) — Chassis ground (
−):Is the voltage 5 V when VENT,
D/H position and 0 V when BI-
LEVEL, HEAT, DEF position?Go to step 12.Go to step 10.
10 CHECK AUTO A/C CONTROL MODULE SIG-
NAL POWER SUPPLY.
1) Turn the ignition switch to OFF.
2) Disconnect the connector from mode door
actuator.
3) Turn the ignition switch to ON.
4) Measure the voltage between mode door
actuator harness connector and chassis
ground.
Connector & terminal
(B77) No. 6, 9 (+) — Chassis ground (
−):Is the voltage 5 V? Go to step 12.Go to step 11. Step Check Yes No
Page 82 of 2870
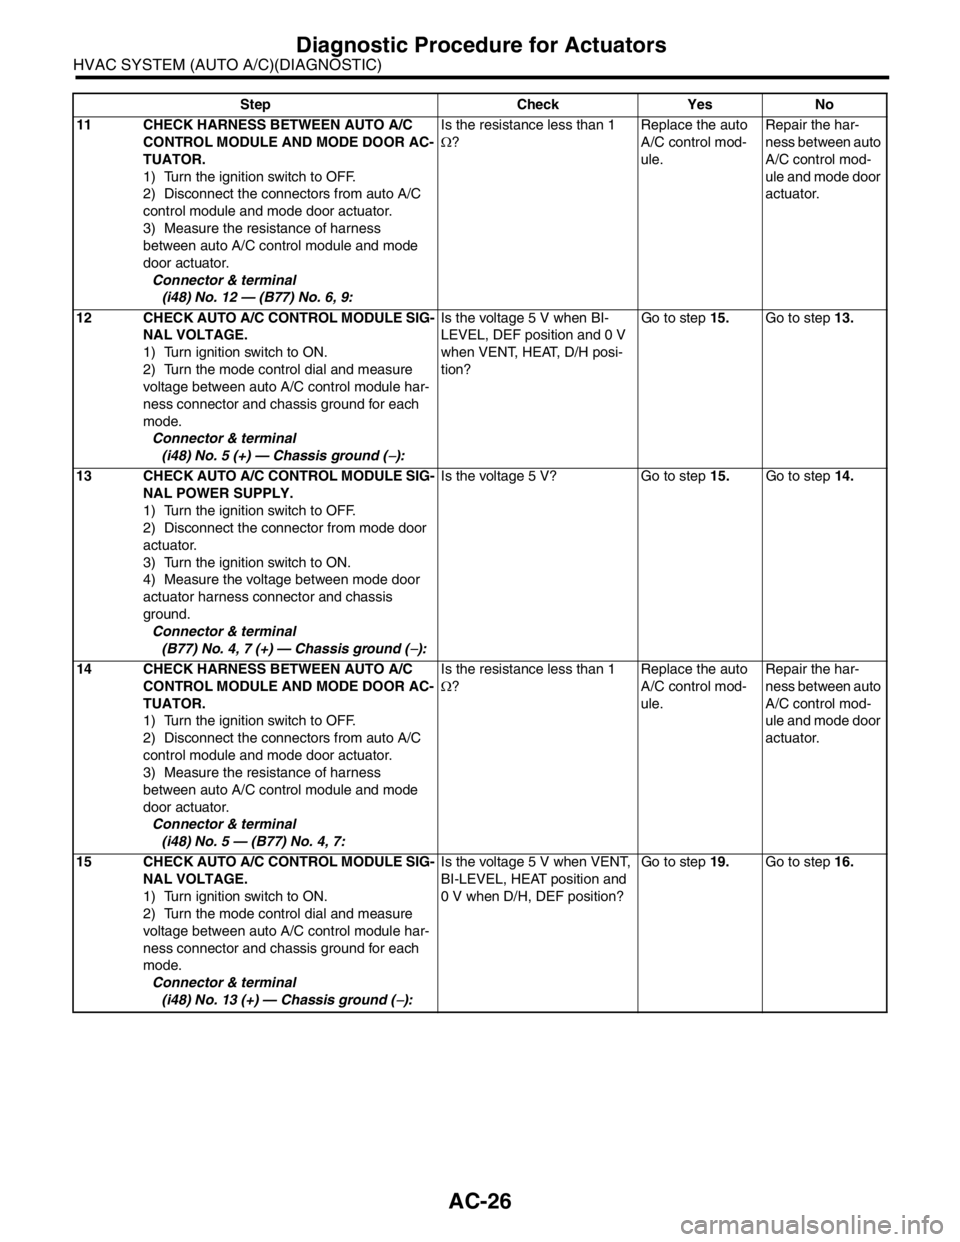
AC-26
HVAC SYSTEM (AUTO A/C)(DIAGNOSTIC)
Diagnostic Procedure for Actuators
11 CHECK HARNESS BETWEEN AUTO A/C
CONTROL MODULE AND MODE DOOR AC-
TUATOR.
1) Turn the ignition switch to OFF.
2) Disconnect the connectors from auto A/C
control module and mode door actuator.
3) Measure the resistance of harness
between auto A/C control module and mode
door actuator.
Connector & terminal
(i48) No. 12 — (B77) No. 6, 9:Is the resistance less than 1
Ω?Replace the auto
A/C control mod-
ule.Repair the har-
ness between auto
A/C control mod-
ule and mode door
actuator.
12 CHECK AUTO A/C CONTROL MODULE SIG-
NAL VOLTAGE.
1) Turn ignition switch to ON.
2) Turn the mode control dial and measure
voltage between auto A/C control module har-
ness connector and chassis ground for each
mode.
Connector & terminal
(i48) No. 5 (+) — Chassis ground (
−):Is the voltage 5 V when BI-
LEVEL, DEF position and 0 V
when VENT, HEAT, D/H posi-
tion?Go to step 15.Go to step 13.
13 CHECK AUTO A/C CONTROL MODULE SIG-
NAL POWER SUPPLY.
1) Turn the ignition switch to OFF.
2) Disconnect the connector from mode door
actuator.
3) Turn the ignition switch to ON.
4) Measure the voltage between mode door
actuator harness connector and chassis
ground.
Connector & terminal
(B77) No. 4, 7 (+) — Chassis ground (
−):Is the voltage 5 V? Go to step 15.Go to step 14.
14 CHECK HARNESS BETWEEN AUTO A/C
CONTROL MODULE AND MODE DOOR AC-
TUATOR.
1) Turn the ignition switch to OFF.
2) Disconnect the connectors from auto A/C
control module and mode door actuator.
3) Measure the resistance of harness
between auto A/C control module and mode
door actuator.
Connector & terminal
(i48) No. 5 — (B77) No. 4, 7:Is the resistance less than 1
Ω?Replace the auto
A/C control mod-
ule.Repair the har-
ness between auto
A/C control mod-
ule and mode door
actuator.
15 CHECK AUTO A/C CONTROL MODULE SIG-
NAL VOLTAGE.
1) Turn ignition switch to ON.
2) Turn the mode control dial and measure
voltage between auto A/C control module har-
ness connector and chassis ground for each
mode.
Connector & terminal
(i48) No. 13 (+) — Chassis ground (
−):Is the voltage 5 V when VENT,
BI-LEVEL, HEAT position and
0 V when D/H, DEF position?Go to step 19.Go to step 16. Step Check Yes No
Page 83 of 2870
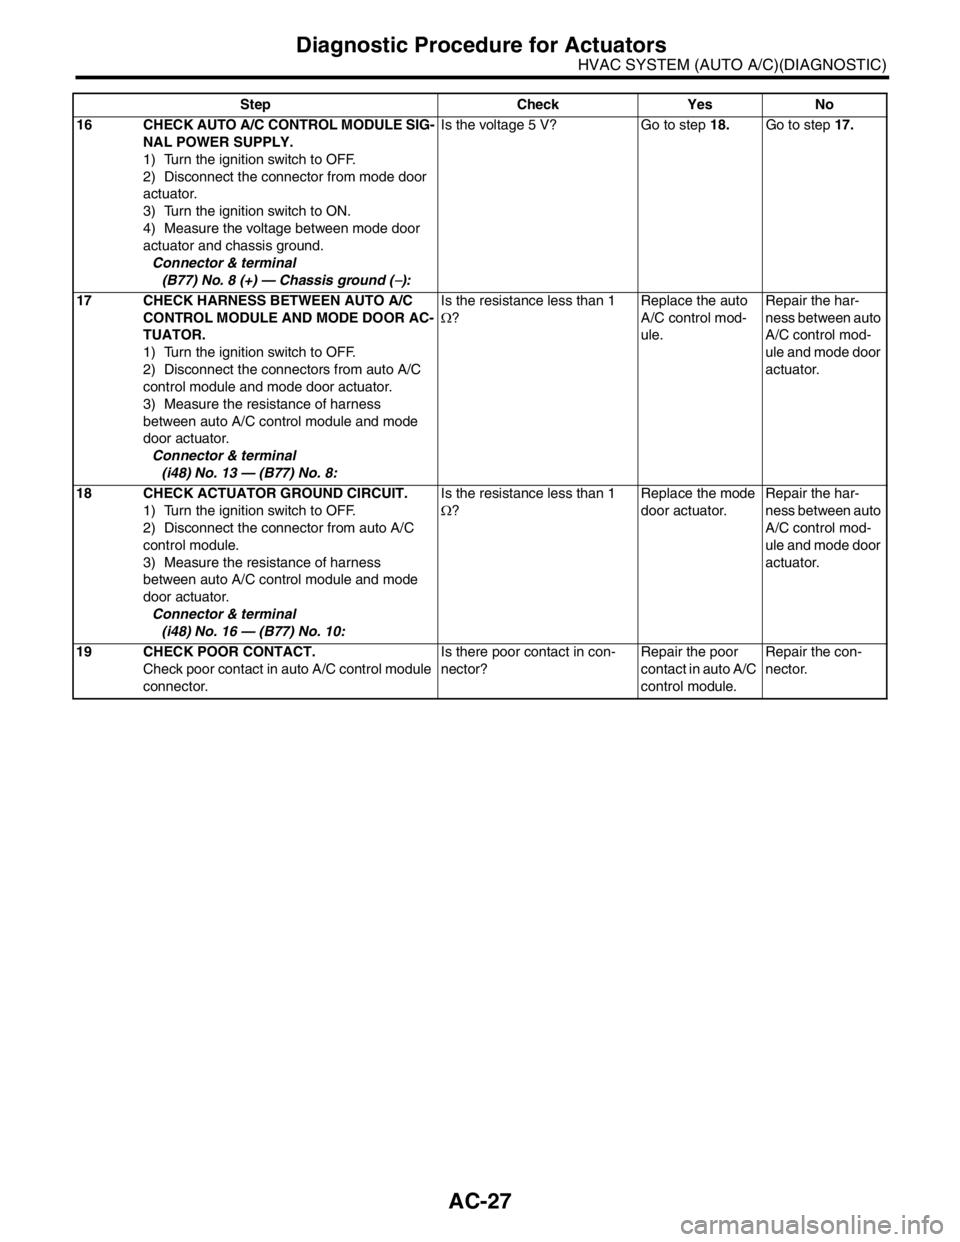
AC-27
HVAC SYSTEM (AUTO A/C)(DIAGNOSTIC)
Diagnostic Procedure for Actuators
16 CHECK AUTO A/C CONTROL MODULE SIG-
NAL POWER SUPPLY.
1) Turn the ignition switch to OFF.
2) Disconnect the connector from mode door
actuator.
3) Turn the ignition switch to ON.
4) Measure the voltage between mode door
actuator and chassis ground.
Connector & terminal
(B77) No. 8 (+) — Chassis ground (
−):Is the voltage 5 V? Go to step 18.Go to step 17.
17 CHECK HARNESS BETWEEN AUTO A/C
CONTROL MODULE AND MODE DOOR AC-
TUATOR.
1) Turn the ignition switch to OFF.
2) Disconnect the connectors from auto A/C
control module and mode door actuator.
3) Measure the resistance of harness
between auto A/C control module and mode
door actuator.
Connector & terminal
(i48) No. 13 — (B77) No. 8:Is the resistance less than 1
Ω?Replace the auto
A/C control mod-
ule.Repair the har-
ness between auto
A/C control mod-
ule and mode door
actuator.
18 CHECK ACTUATOR GROUND CIRCUIT.
1) Turn the ignition switch to OFF.
2) Disconnect the connector from auto A/C
control module.
3) Measure the resistance of harness
between auto A/C control module and mode
door actuator.
Connector & terminal
(i48) No. 16 — (B77) No. 10:Is the resistance less than 1
Ω?Replace the mode
door actuator.Repair the har-
ness between auto
A/C control mod-
ule and mode door
actuator.
19 CHECK POOR CONTACT.
Check poor contact in auto A/C control module
connector.Is there poor contact in con-
nector?Repair the poor
contact in auto A/C
control module.Repair the con-
nector. Step Check Yes No
Page 86 of 2870
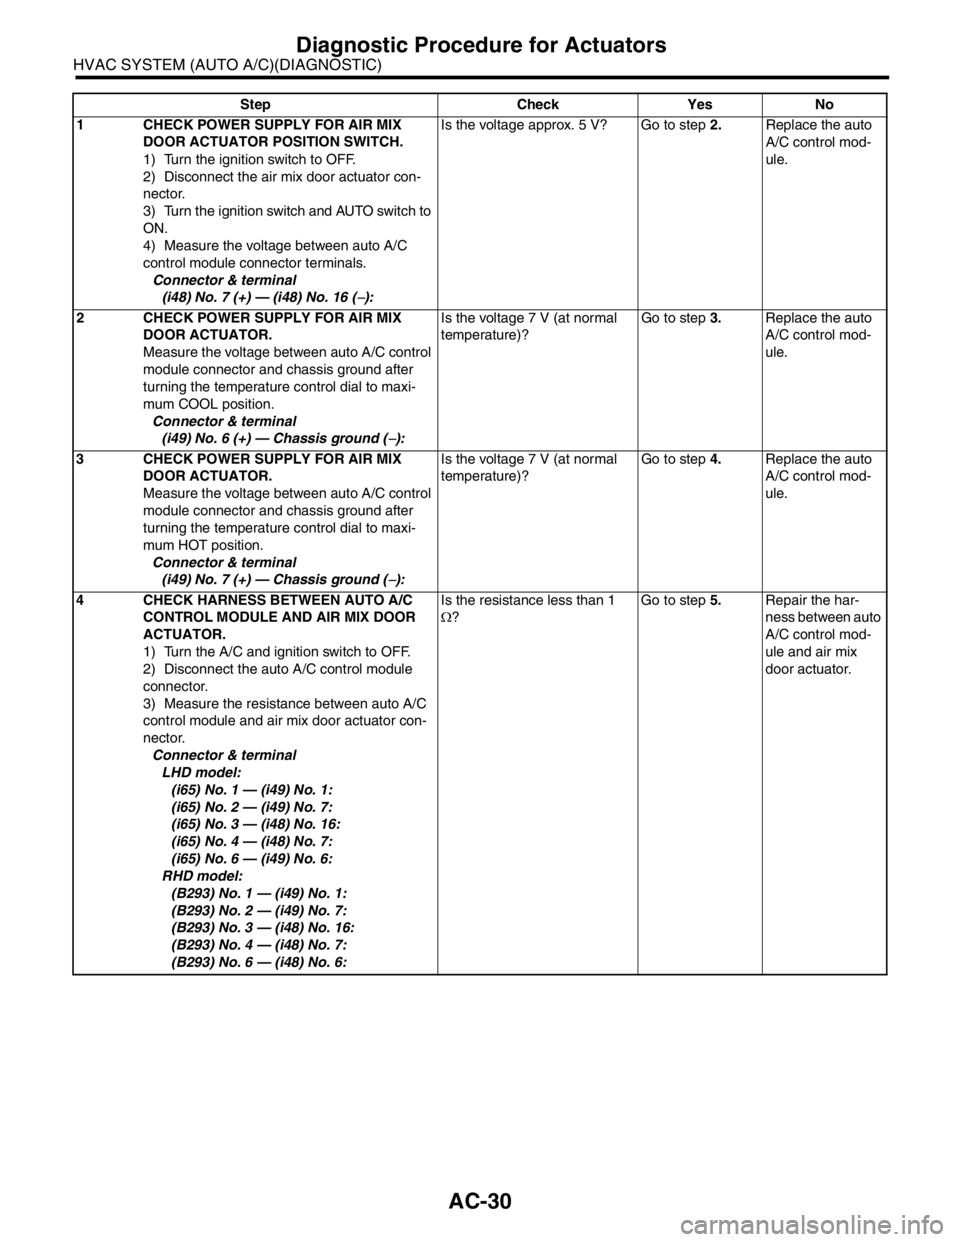
AC-30
HVAC SYSTEM (AUTO A/C)(DIAGNOSTIC)
Diagnostic Procedure for Actuators
Step Check Yes No
1 CHECK POWER SUPPLY FOR AIR MIX
DOOR ACTUATOR POSITION SWITCH.
1) Turn the ignition switch to OFF.
2) Disconnect the air mix door actuator con-
nector.
3) Turn the ignition switch and AUTO switch to
ON.
4) Measure the voltage between auto A/C
control module connector terminals.
Connector & terminal
(i48) No. 7 (+) — (i48) No. 16 (
−):Is the voltage approx. 5 V? Go to step 2.Replace the auto
A/C control mod-
ule.
2 CHECK POWER SUPPLY FOR AIR MIX
DOOR ACTUATOR.
Measure the voltage between auto A/C control
module connector and chassis ground after
turning the temperature control dial to maxi-
mum COOL position.
Connector & terminal
(i49) No. 6 (+) — Chassis ground (
−):Is the voltage 7 V (at normal
temperature)?Go to step 3.Replace the auto
A/C control mod-
ule.
3 CHECK POWER SUPPLY FOR AIR MIX
DOOR ACTUATOR.
Measure the voltage between auto A/C control
module connector and chassis ground after
turning the temperature control dial to maxi-
mum HOT position.
Connector & terminal
(i49) No. 7 (+) — Chassis ground (
−):Is the voltage 7 V (at normal
temperature)?Go to step 4.Replace the auto
A/C control mod-
ule.
4 CHECK HARNESS BETWEEN AUTO A/C
CONTROL MODULE AND AIR MIX DOOR
ACTUATOR.
1) Turn the A/C and ignition switch to OFF.
2) Disconnect the auto A/C control module
connector.
3) Measure the resistance between auto A/C
control module and air mix door actuator con-
nector.
Connector & terminal
LHD model:
(i65) No. 1 — (i49) No. 1:
(i65) No. 2 — (i49) No. 7:
(i65) No. 3 — (i48) No. 16:
(i65) No. 4 — (i48) No. 7:
(i65) No. 6 — (i49) No. 6:
RHD model:
(B293) No. 1 — (i49) No. 1:
(B293) No. 2 — (i49) No. 7:
(B293) No. 3 — (i48) No. 16:
(B293) No. 4 — (i48) No. 7:
(B293) No. 6 — (i48) No. 6:Is the resistance less than 1
Ω?Go to step 5.Repair the har-
ness between auto
A/C control mod-
ule and air mix
door actuator.
Page 87 of 2870
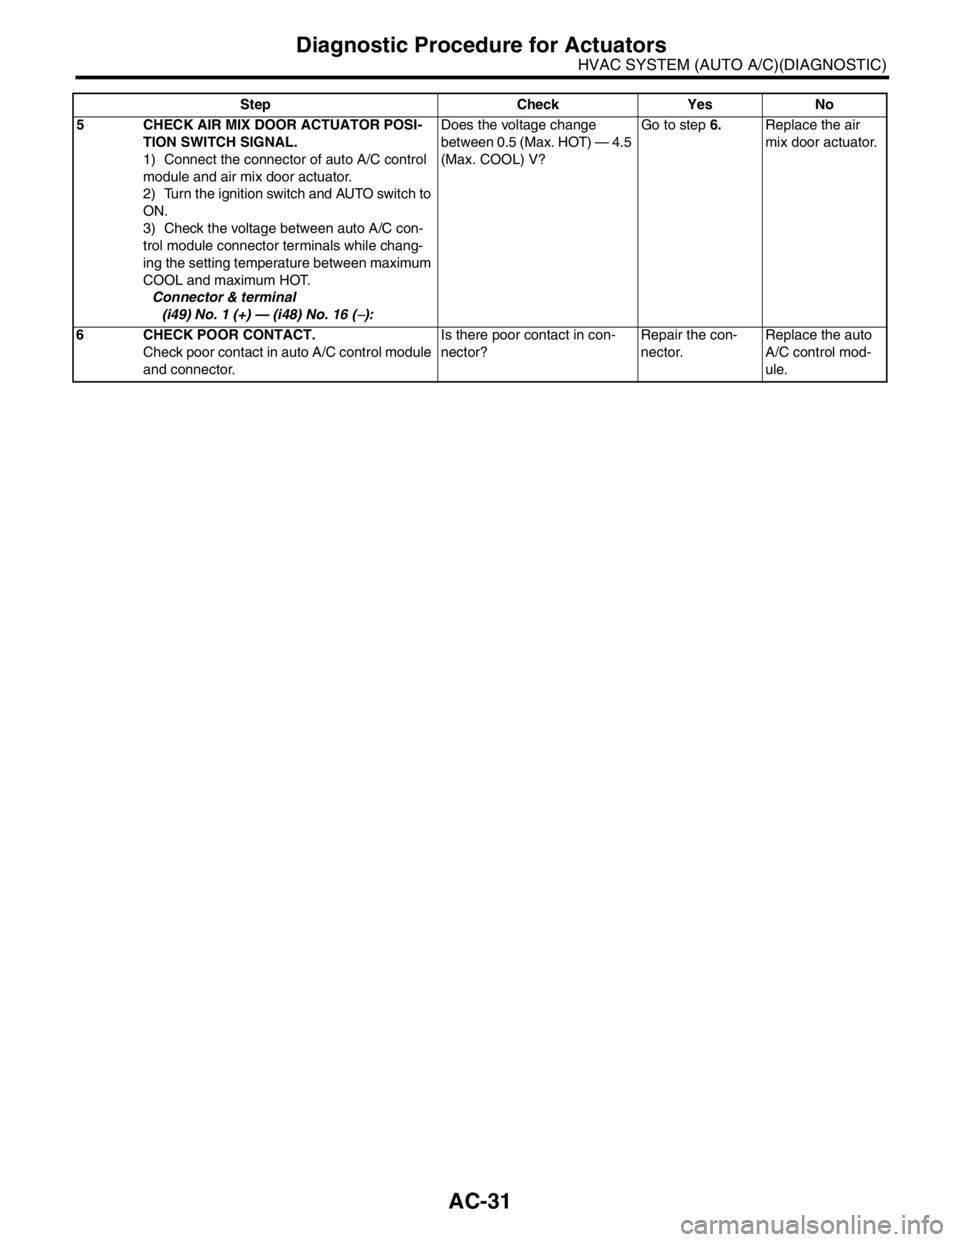
AC-31
HVAC SYSTEM (AUTO A/C)(DIAGNOSTIC)
Diagnostic Procedure for Actuators
5 CHECK AIR MIX DOOR ACTUATOR POSI-
TION SWITCH SIGNAL.
1) Connect the connector of auto A/C control
module and air mix door actuator.
2) Turn the ignition switch and AUTO switch to
ON.
3) Check the voltage between auto A/C con-
trol module connector terminals while chang-
ing the setting temperature between maximum
COOL and maximum HOT.
Connector & terminal
(i49) No. 1 (+) — (i48) No. 16 (
−):Does the voltage change
between 0.5 (Max. HOT) — 4.5
(Max. COOL) V?Go to step 6.Replace the air
mix door actuator.
6 CHECK POOR CONTACT.
Check poor contact in auto A/C control module
and connector.Is there poor contact in con-
nector?Repair the con-
nector.Replace the auto
A/C control mod-
ule. Step Check Yes No
Page 90 of 2870
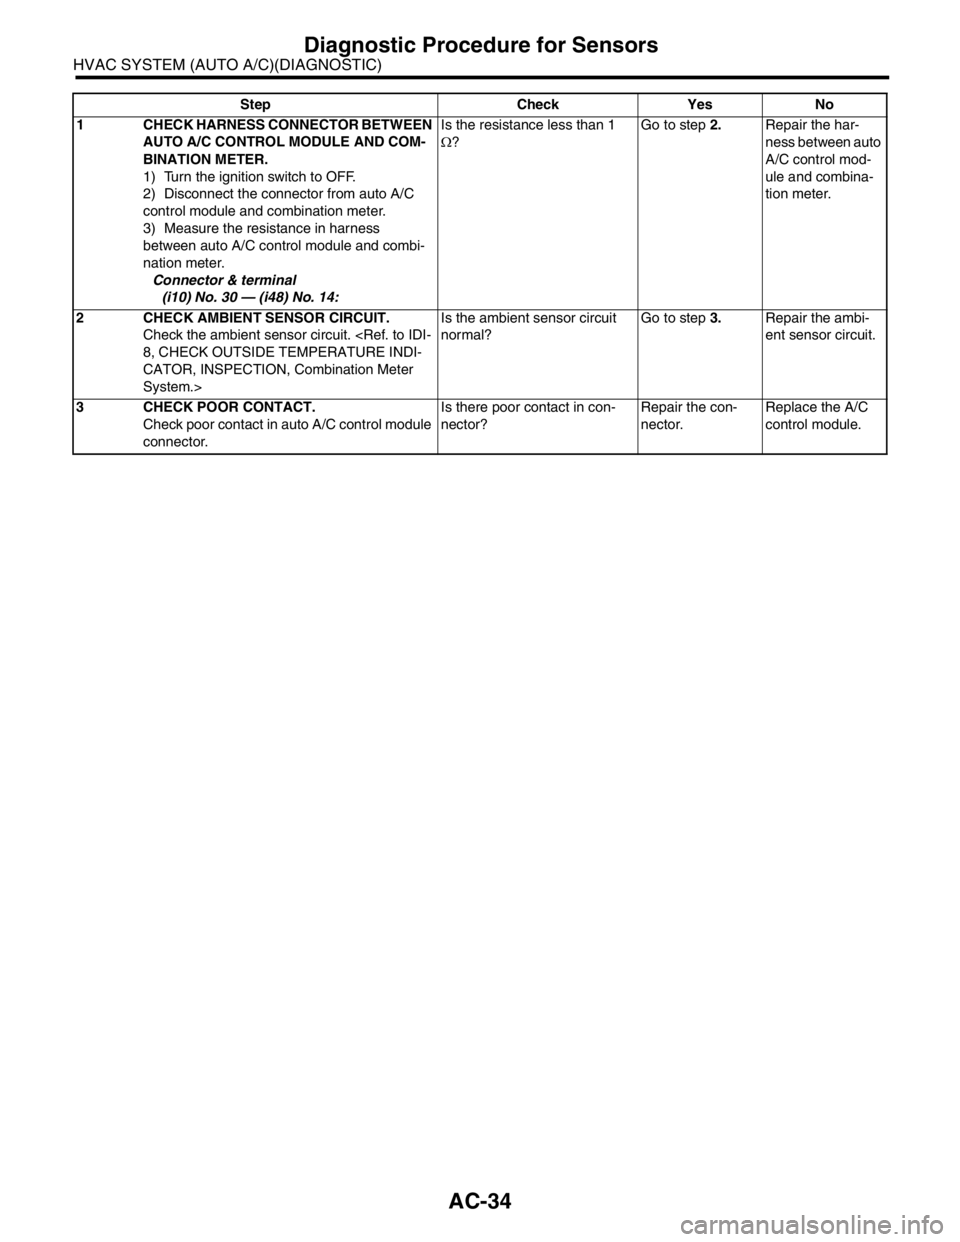
AC-34
HVAC SYSTEM (AUTO A/C)(DIAGNOSTIC)
Diagnostic Procedure for Sensors
Step Check Yes No
1 CHECK HARNESS CONNECTOR BETWEEN
AUTO A/C CONTROL MODULE AND COM-
BINATION METER.
1) Turn the ignition switch to OFF.
2) Disconnect the connector from auto A/C
control module and combination meter.
3) Measure the resistance in harness
between auto A/C control module and combi-
nation meter.
Connector & terminal
(i10) No. 30 — (i48) No. 14:Is the resistance less than 1
Ω?Go to step 2.Repair the har-
ness between auto
A/C control mod-
ule and combina-
tion meter.
2 CHECK AMBIENT SENSOR CIRCUIT.
Check the ambient sensor circuit.
CATOR, INSPECTION, Combination Meter
System.>Is the ambient sensor circuit
normal?Go to step 3.Repair the ambi-
ent sensor circuit.
3 CHECK POOR CONTACT.
Check poor contact in auto A/C control module
connector.Is there poor contact in con-
nector?Repair the con-
nector.Replace the A/C
control module.
Page 92 of 2870
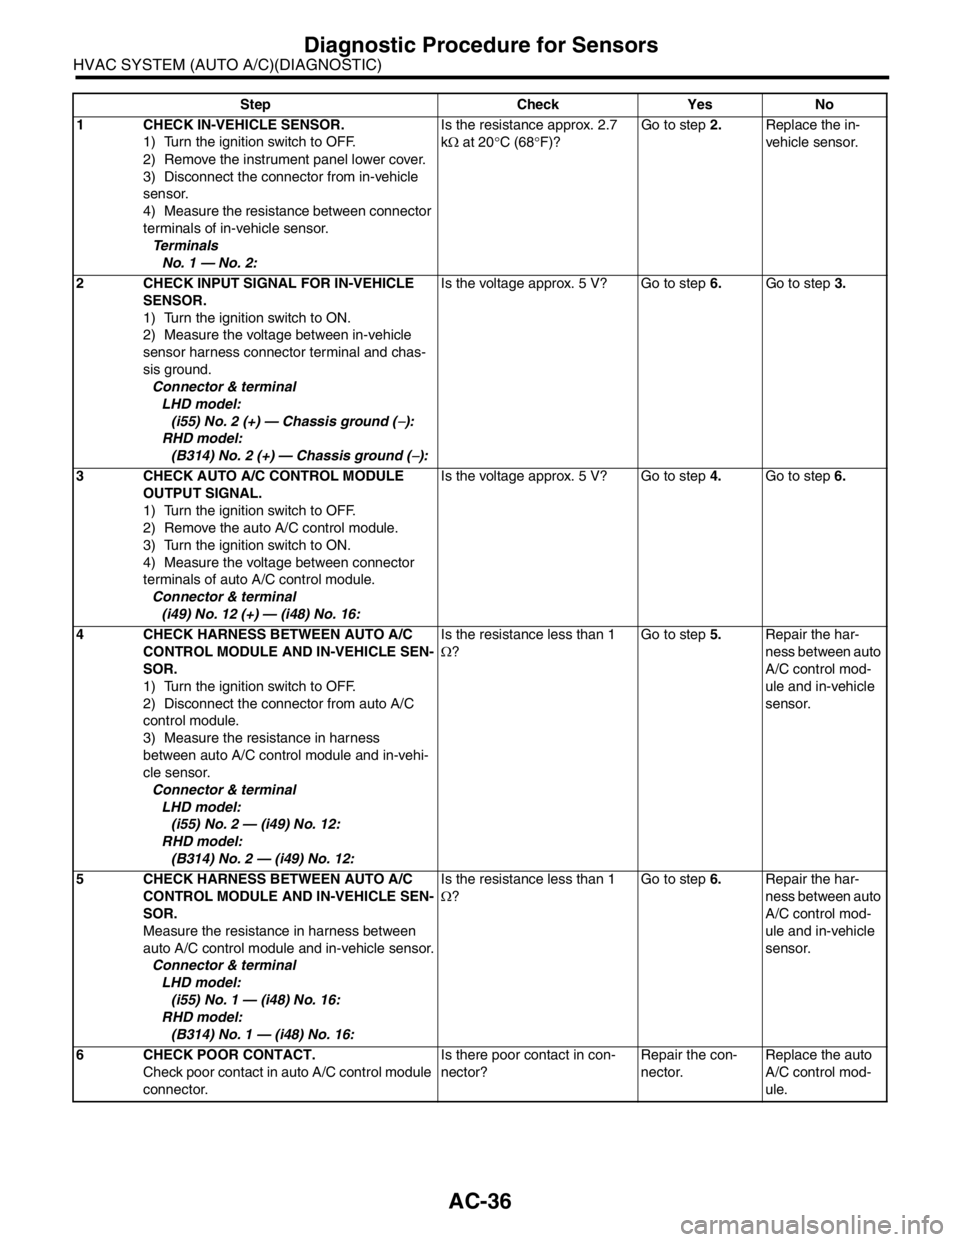
AC-36
HVAC SYSTEM (AUTO A/C)(DIAGNOSTIC)
Diagnostic Procedure for Sensors
Step Check Yes No
1 CHECK IN-VEHICLE SENSOR.
1) Turn the ignition switch to OFF.
2) Remove the instrument panel lower cover.
3) Disconnect the connector from in-vehicle
sensor.
4) Measure the resistance between connector
terminals of in-vehicle sensor.
Te r m i n a l s
No. 1 — No. 2:Is the resistance approx. 2.7
kΩ at 20°C (68°F)?Go to step 2.Replace the in-
vehicle sensor.
2 CHECK INPUT SIGNAL FOR IN-VEHICLE
SENSOR.
1) Turn the ignition switch to ON.
2) Measure the voltage between in-vehicle
sensor harness connector terminal and chas-
sis ground.
Connector & terminal
LHD model:
(i55) No. 2 (+) — Chassis ground (
−):
RHD model:
(B314) No. 2 (+) — Chassis ground (
−):Is the voltage approx. 5 V? Go to step 6.Go to step 3.
3 CHECK AUTO A/C CONTROL MODULE
OUTPUT SIGNAL.
1) Turn the ignition switch to OFF.
2) Remove the auto A/C control module.
3) Turn the ignition switch to ON.
4) Measure the voltage between connector
terminals of auto A/C control module.
Connector & terminal
(i49) No. 12 (+) — (i48) No. 16:Is the voltage approx. 5 V? Go to step 4.Go to step 6.
4 CHECK HARNESS BETWEEN AUTO A/C
CONTROL MODULE AND IN-VEHICLE SEN-
SOR.
1) Turn the ignition switch to OFF.
2) Disconnect the connector from auto A/C
control module.
3) Measure the resistance in harness
between auto A/C control module and in-vehi-
cle sensor.
Connector & terminal
LHD model:
(i55) No. 2 — (i49) No. 12:
RHD model:
(B314) No. 2 — (i49) No. 12:Is the resistance less than 1
Ω?Go to step 5.Repair the har-
ness between auto
A/C control mod-
ule and in-vehicle
sensor.
5 CHECK HARNESS BETWEEN AUTO A/C
CONTROL MODULE AND IN-VEHICLE SEN-
SOR.
Measure the resistance in harness between
auto A/C control module and in-vehicle sensor.
Connector & terminal
LHD model:
(i55) No. 1 — (i48) No. 16:
RHD model:
(B314) No. 1 — (i48) No. 16:Is the resistance less than 1
Ω?Go to step 6.Repair the har-
ness between auto
A/C control mod-
ule and in-vehicle
sensor.
6 CHECK POOR CONTACT.
Check poor contact in auto A/C control module
connector.Is there poor contact in con-
nector?Repair the con-
nector.Replace the auto
A/C control mod-
ule.
Page 94 of 2870
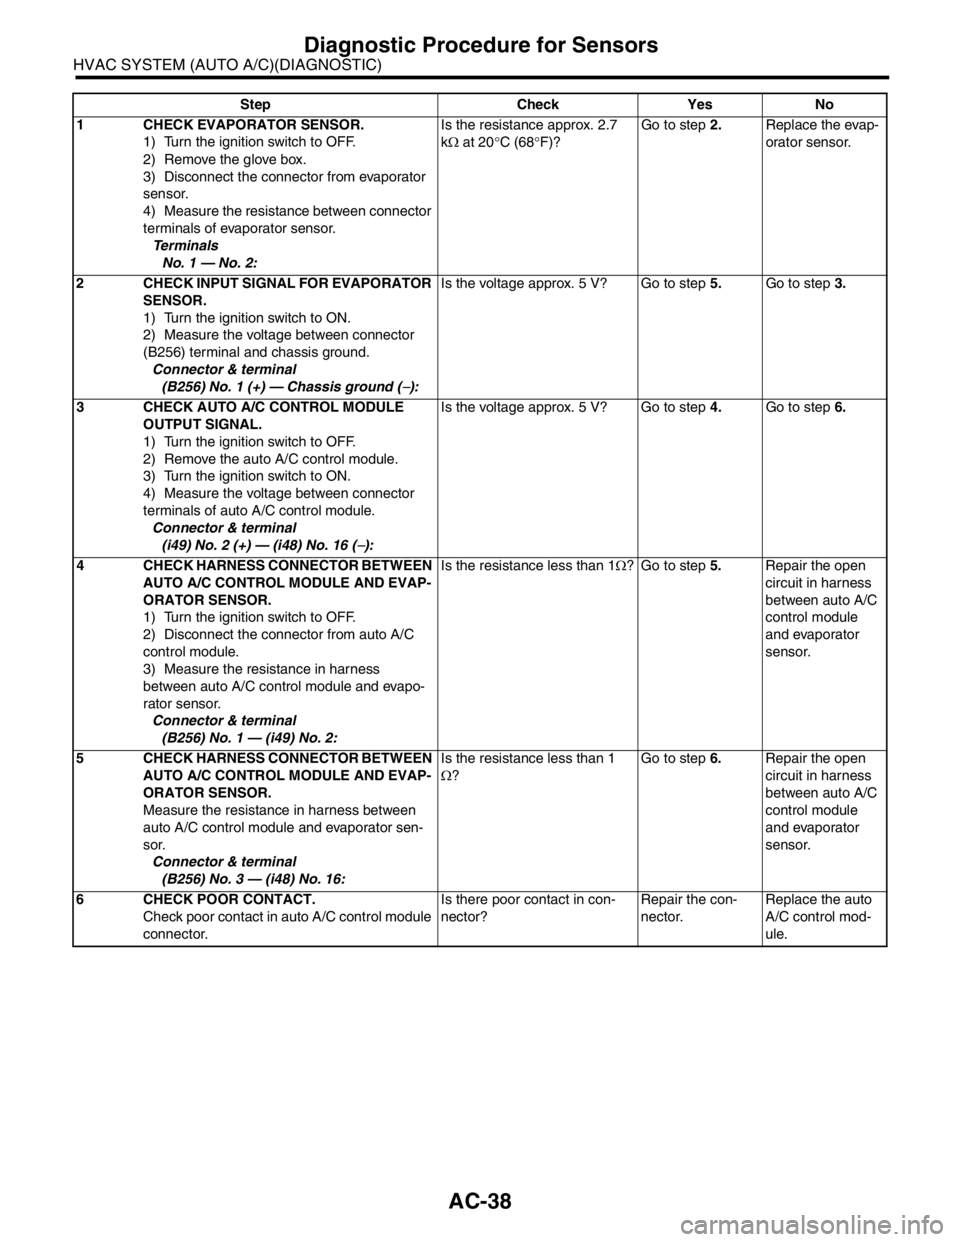
AC-38
HVAC SYSTEM (AUTO A/C)(DIAGNOSTIC)
Diagnostic Procedure for Sensors
Step Check Yes No
1 CHECK EVAPORATOR SENSOR.
1) Turn the ignition switch to OFF.
2) Remove the glove box.
3) Disconnect the connector from evaporator
sensor.
4) Measure the resistance between connector
terminals of evaporator sensor.
Te r m i n a l s
No. 1 — No. 2:Is the resistance approx. 2.7
kΩ at 20°C (68°F)?Go to step 2.Replace the evap-
orator sensor.
2 CHECK INPUT SIGNAL FOR EVAPORATOR
SENSOR.
1) Turn the ignition switch to ON.
2) Measure the voltage between connector
(B256) terminal and chassis ground.
Connector & terminal
(B256) No. 1 (+) — Chassis ground (
−):Is the voltage approx. 5 V? Go to step 5.Go to step 3.
3 CHECK AUTO A/C CONTROL MODULE
OUTPUT SIGNAL.
1) Turn the ignition switch to OFF.
2) Remove the auto A/C control module.
3) Turn the ignition switch to ON.
4) Measure the voltage between connector
terminals of auto A/C control module.
Connector & terminal
(i49) No. 2 (+) — (i48) No. 16 (
−):Is the voltage approx. 5 V? Go to step 4.Go to step 6.
4 CHECK HARNESS CONNECTOR BETWEEN
AUTO A/C CONTROL MODULE AND EVAP-
ORATOR SENSOR.
1) Turn the ignition switch to OFF.
2) Disconnect the connector from auto A/C
control module.
3) Measure the resistance in harness
between auto A/C control module and evapo-
rator sensor.
Connector & terminal
(B256) No. 1 — (i49) No. 2:Is the resistance less than 1Ω? Go to step 5.Repair the open
circuit in harness
between auto A/C
control module
and evaporator
sensor.
5 CHECK HARNESS CONNECTOR BETWEEN
AUTO A/C CONTROL MODULE AND EVAP-
ORATOR SENSOR.
Measure the resistance in harness between
auto A/C control module and evaporator sen-
sor.
Connector & terminal
(B256) No. 3 — (i48) No. 16:Is the resistance less than 1
Ω?Go to step 6.Repair the open
circuit in harness
between auto A/C
control module
and evaporator
sensor.
6 CHECK POOR CONTACT.
Check poor contact in auto A/C control module
connector.Is there poor contact in con-
nector?Repair the con-
nector.Replace the auto
A/C control mod-
ule.
Page 96 of 2870
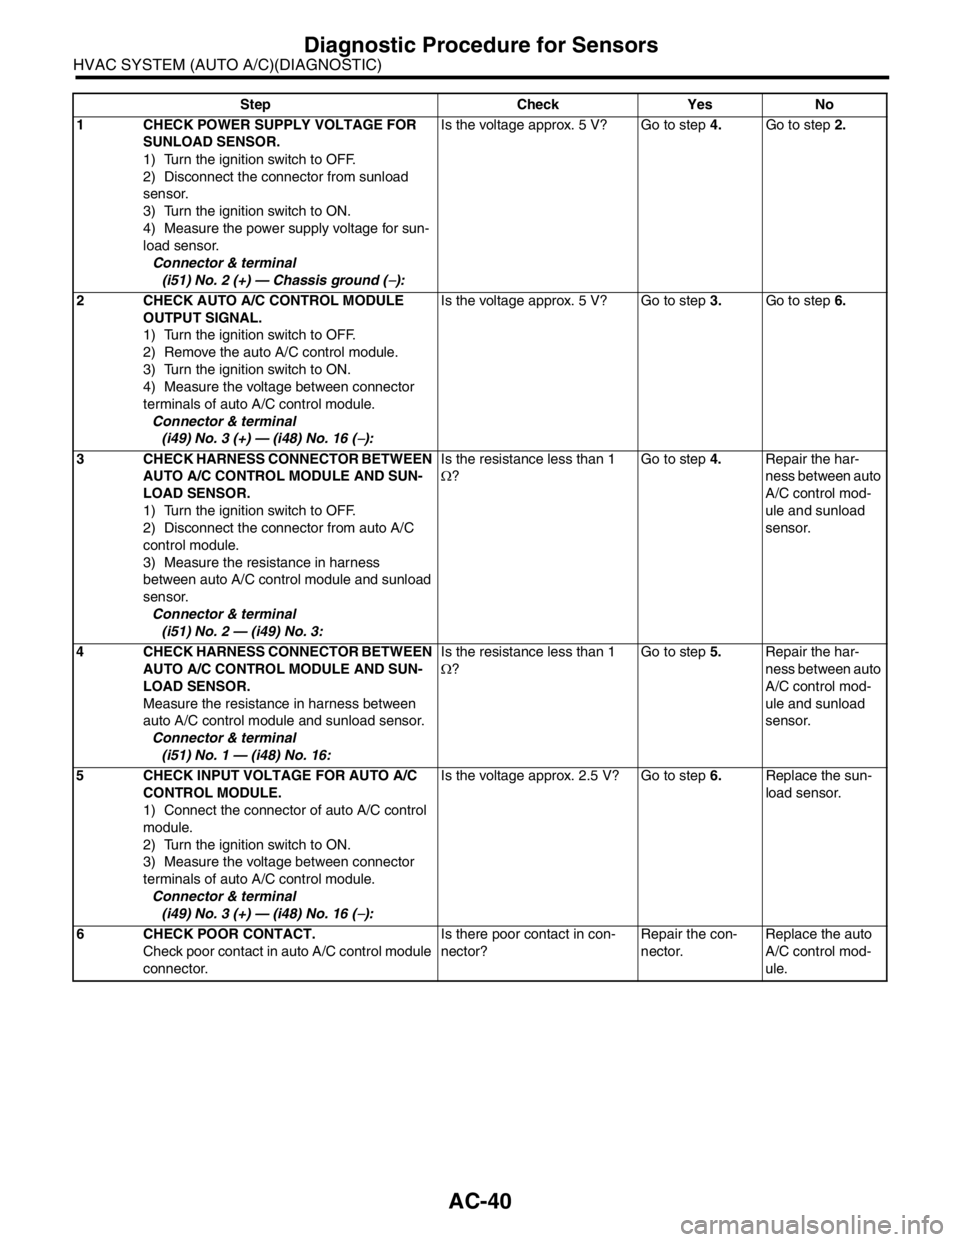
AC-40
HVAC SYSTEM (AUTO A/C)(DIAGNOSTIC)
Diagnostic Procedure for Sensors
Step Check Yes No
1 CHECK POWER SUPPLY VOLTAGE FOR
SUNLOAD SENSOR.
1) Turn the ignition switch to OFF.
2) Disconnect the connector from sunload
sensor.
3) Turn the ignition switch to ON.
4) Measure the power supply voltage for sun-
load sensor.
Connector & terminal
(i51) No. 2 (+) — Chassis ground (
−):Is the voltage approx. 5 V? Go to step 4.Go to step 2.
2 CHECK AUTO A/C CONTROL MODULE
OUTPUT SIGNAL.
1) Turn the ignition switch to OFF.
2) Remove the auto A/C control module.
3) Turn the ignition switch to ON.
4) Measure the voltage between connector
terminals of auto A/C control module.
Connector & terminal
(i49) No. 3 (+) — (i48) No. 16 (
−):Is the voltage approx. 5 V? Go to step 3.Go to step 6.
3 CHECK HARNESS CONNECTOR BETWEEN
AUTO A/C CONTROL MODULE AND SUN-
LOAD SENSOR.
1) Turn the ignition switch to OFF.
2) Disconnect the connector from auto A/C
control module.
3) Measure the resistance in harness
between auto A/C control module and sunload
sensor.
Connector & terminal
(i51) No. 2 — (i49) No. 3:Is the resistance less than 1
Ω?Go to step 4.Repair the har-
ness between auto
A/C control mod-
ule and sunload
sensor.
4 CHECK HARNESS CONNECTOR BETWEEN
AUTO A/C CONTROL MODULE AND SUN-
LOAD SENSOR.
Measure the resistance in harness between
auto A/C control module and sunload sensor.
Connector & terminal
(i51) No. 1 — (i48) No. 16:Is the resistance less than 1
Ω?Go to step 5.Repair the har-
ness between auto
A/C control mod-
ule and sunload
sensor.
5 CHECK INPUT VOLTAGE FOR AUTO A/C
CONTROL MODULE.
1) Connect the connector of auto A/C control
module.
2) Turn the ignition switch to ON.
3) Measure the voltage between connector
terminals of auto A/C control module.
Connector & terminal
(i49) No. 3 (+) — (i48) No. 16 (
−):Is the voltage approx. 2.5 V? Go to step 6.Replace the sun-
load sensor.
6 CHECK POOR CONTACT.
Check poor contact in auto A/C control module
connector.Is there poor contact in con-
nector?Repair the con-
nector.Replace the auto
A/C control mod-
ule.
Page 99 of 2870
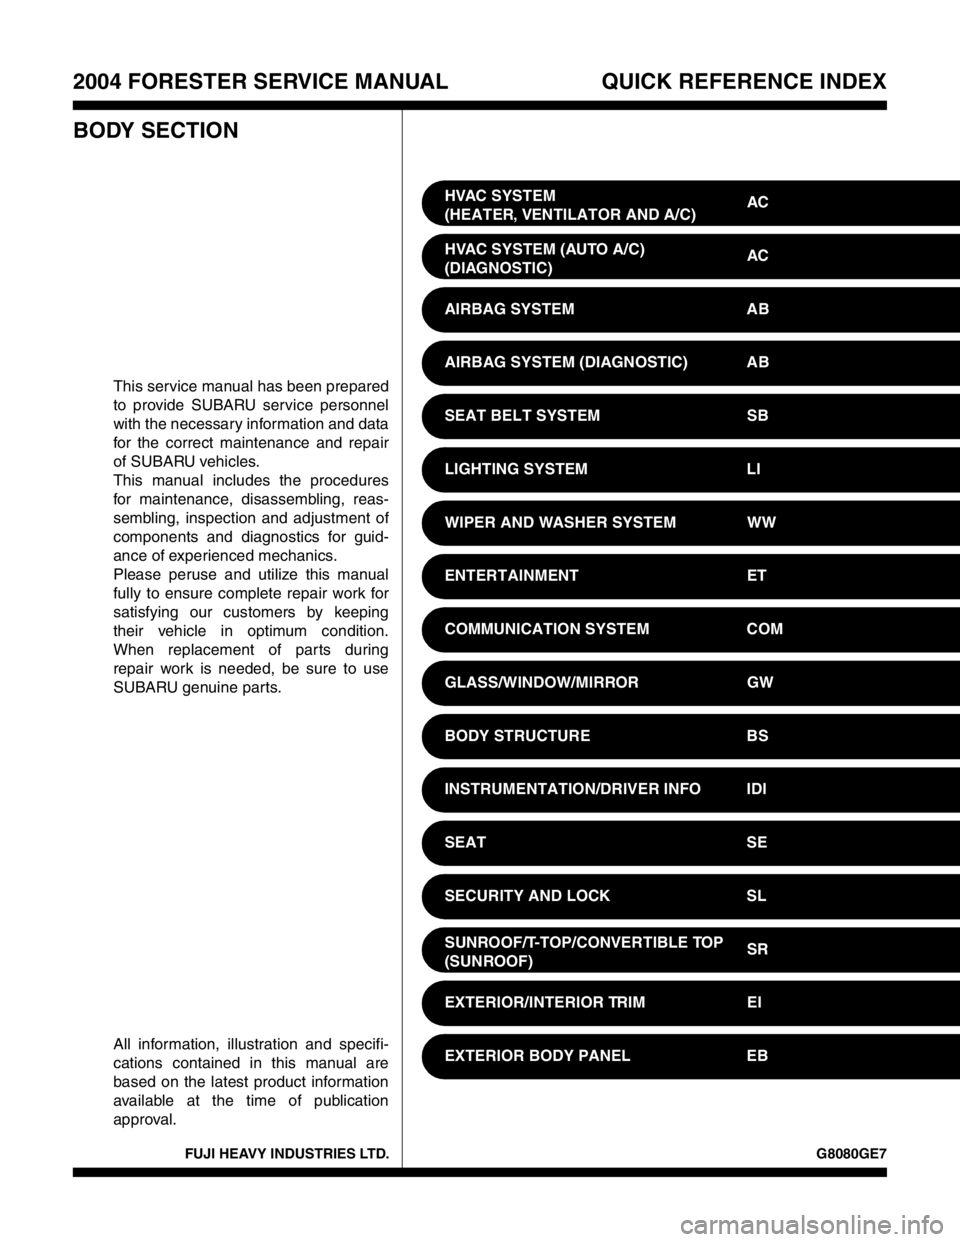
FUJI HEAVY INDUSTRIES LTD. G8080GE7
2004 FORESTER SERVICE MANUAL QUICK REFERENCE INDEX
BODY SECTION
This service manual has been prepared
to provide SUBARU service personnel
with the necessary information and data
for the correct maintenance and repair
of SUBARU vehicles.
This manual includes the procedures
for maintenance, disassembling, reas-
sembling, inspection and adjustment of
components and diagnostics for guid-
ance of experienced mechanics.
Please peruse and utilize this manual
fully to ensure complete repair work for
satisfying our customers by keeping
their vehicle in optimum condition.
When replacement of parts during
repair work is needed, be sure to use
SUBARU genuine parts.
All information, illustration and specifi-
cations contained in this manual are
based on the latest product information
available at the time of publication
approval.HVAC SYSTEM
(HEATER, VENTILATOR AND A/C)AC
HVAC SYSTEM (AUTO A/C)
(DIAGNOSTIC)AC
AIRBAG SYSTEM AB
AIRBAG SYSTEM (DIAGNOSTIC) AB
SEAT BELT SYSTEM SB
LIGHTING SYSTEM LI
WIPER AND WASHER SYSTEM WW
ENTERTAINMENT ET
COMMUNICATION SYSTEM COM
GLASS/WINDOW/MIRROR GW
BODY STRUCTURE BS
INSTRUMENTATION/DRIVER INFO IDI
SEAT SE
SECURITY AND LOCK SL
SUNROOF/T-TOP/CONVERTIBLE TOP
(SUNROOF)SR
EXTERIOR/INTERIOR TRIM EI
EXTERIOR BODY PANEL EB