replace SUBARU FORESTER 2004 Service Owner's Guide
[x] Cancel search | Manufacturer: SUBARU, Model Year: 2004, Model line: FORESTER, Model: SUBARU FORESTER 2004Pages: 2870, PDF Size: 38.67 MB
Page 103 of 2870
AB-3
AIRBAG SYSTEM
General Description
B: CAUTION
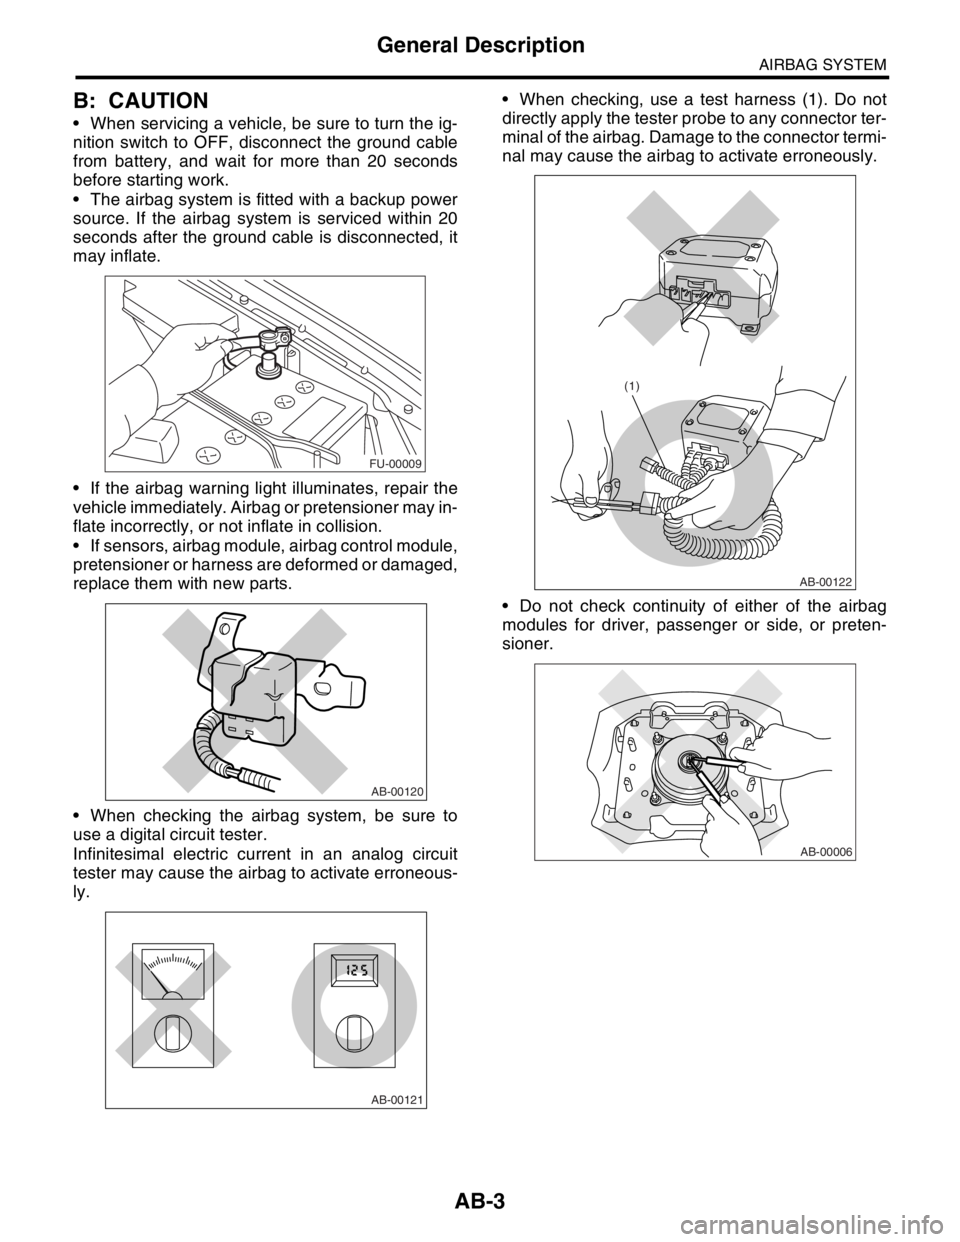
When servicing a vehicle, be sure to turn the ig-
nition switch to OFF, disconnect the ground cable
from battery, and wait for more than 20 seconds
before starting work.
The airbag system is fitted with a backup power
source. If the airbag system is serviced within 20
seconds after the ground cable is disconnected, it
may inflate.
If the airbag warning light illuminates, repair the
vehicle immediately. Airbag or pretensioner may in-
flate incorrectly, or not inflate in collision.
If sensors, airbag module, airbag control module,
pretensioner or harness are deformed or damaged,
replace them with new parts.
When checking the airbag system, be sure to
use a digital circuit tester.
Infinitesimal electric current in an analog circuit
tester may cause the airbag to activate erroneous-
ly. When checking, use a test harness (1). Do not
directly apply the tester probe to any connector ter-
minal of the airbag. Damage to the connector termi-
nal may cause the airbag to activate erroneously.
Do not check continuity of either of the airbag
modules for driver, passenger or side, or preten-
sioner.
FU-00009
AB-00120
AB-00121
AB-00122
(1)
AB-00006
Page 104 of 2870
AB-4
AIRBAG SYSTEM
General Description
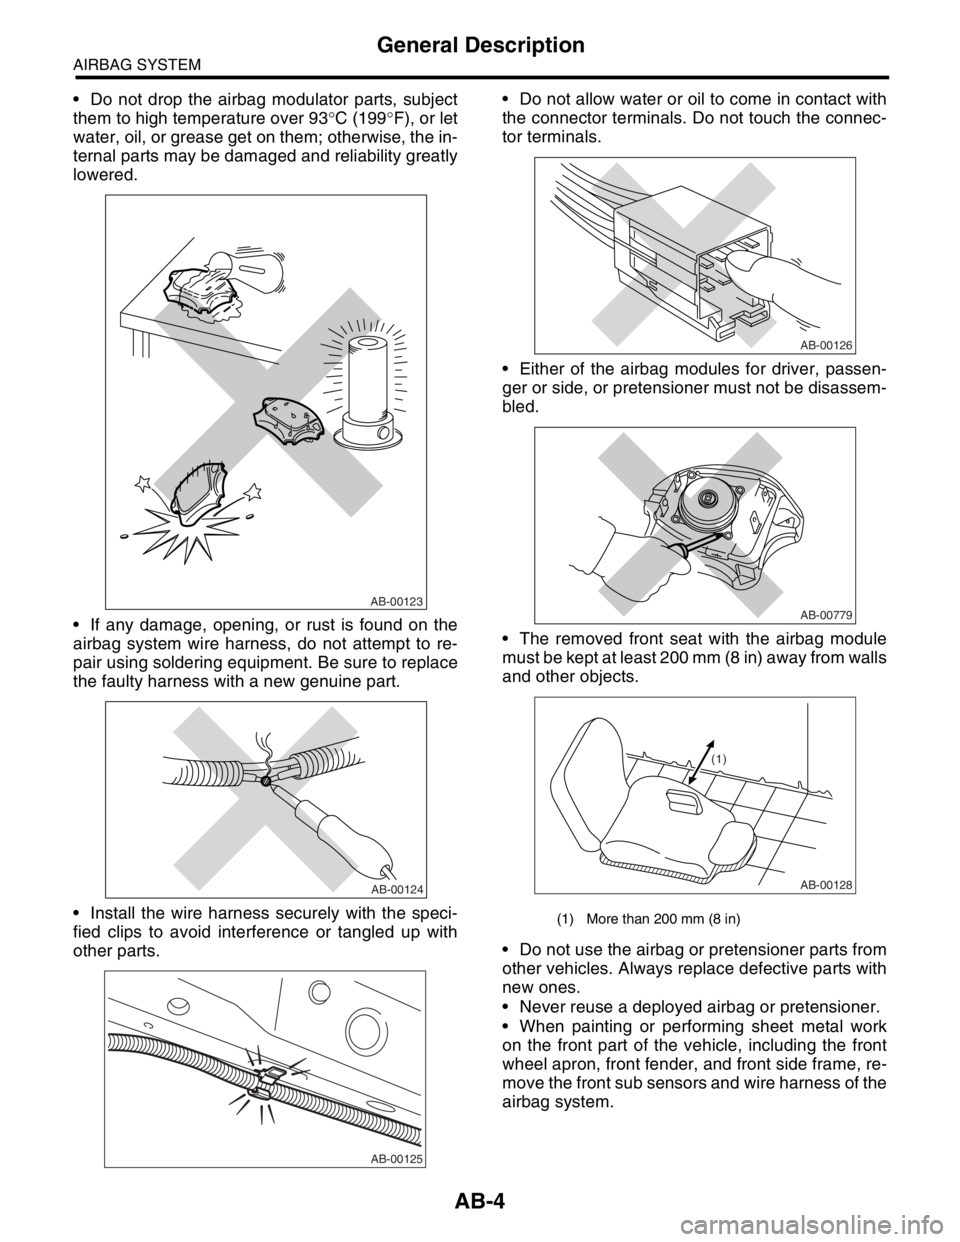
Do not drop the airbag modulator parts, subject
them to high temperature over 93°C (199°F), or let
water, oil, or grease get on them; otherwise, the in-
ternal parts may be damaged and reliability greatly
lowered.
If any damage, opening, or rust is found on the
airbag system wire harness, do not attempt to re-
pair using soldering equipment. Be sure to replace
the faulty harness with a new genuine part.
Install the wire harness securely with the speci-
fied clips to avoid interference or tangled up with
other parts. Do not allow water or oil to come in contact with
the connector terminals. Do not touch the connec-
tor terminals.
Either of the airbag modules for driver, passen-
ger or side, or pretensioner must not be disassem-
bled.
The removed front seat with the airbag module
must be kept at least 200 mm (8 in) away from walls
and other objects.
Do not use the airbag or pretensioner parts from
other vehicles. Always replace defective parts with
new ones.
Never reuse a deployed airbag or pretensioner.
When painting or performing sheet metal work
on the front part of the vehicle, including the front
wheel apron, front fender, and front side frame, re-
move the front sub sensors and wire harness of the
airbag system.
AB-00123
AB-00124
AB-00125
(1) More than 200 mm (8 in)
AB-00126
AB-00779
AB-00128
(1)
Page 112 of 2870

AB-12
AIRBAG SYSTEM
Inspection Locations After a Collision
3. Inspection Locations After a
Collision
A: REPLACEMENT
When airbag system is deployed, replace the fol-
lowing parts.
1. FRONT COLLISION
1) Driver’s airbag module
2) Passenger’s airbag module
3) Driver’s seat belt (pretensioner, lap seat belt pre-
tensioner)
4) Passenger’s seat belt (pretensioner)
5) Airbag control module
6) Front sub-sensor
7) Roll connector
2. SIDE COLLISION
1) Airbag control module
2) Side airbag module (operating side seat bag)
3) Side airbag sensor (operating side)
3. INSPECTION OF OTHER PARTS
Check for the following parts, replace the damaged
parts with new ones.
1) Steering wheel and steering shaft
Check the steering wheel and steering shaft for
mounting condition and deflection of axial and radi-
al direction. Check the steering shaft for deflection
of axial direction with tilt lever released. (After a col-
lision, absorbing part of steering shaft may inflate.)
2) Check the direct type connector of driver’s air-
bag module, pretensioner, etc. for damage, and
also check each harness for pinch and connector
damage. If damage is found, replace the harness
as a unit.
B: INSPECTION
If the vehicle is involved in a collision on any side,
even if it is a slight collision, be sure to check the
following system parts.
1. DRIVER’S AIRBAG MODULE
1) Check for the following, and replace damaged
parts with new ones.
Airbag module is cracked or deformed.
Harness and/or connector is cracked, deformed
or open. Lead wire is exposed.
The module surface is fouled with grease, oil,
water or cleaning solvent.
2) When installing a new driver’s airbag module,
check the following. If necessary, install a new air-
bag module and steering wheel.
The steering wheel is in the way, making it diffi-
cult to install the airbag module. The clearance between the driver’s airbag mod-
ule and steering wheel is not constant.
The steering wheel deformation in axial and radi-
al directions exceed limits.
Specifications:
Height deflection A
Less than 6 mm (0.24 in)
O.D. deflection L
Less than 17 mm (0.67 in)
2. PASSENGER’S AIRBAG MODULE
Check for the following, and replace damaged
parts with new ones.
Airbag module is cracked or deformed.
Harness and/or connector is cracked, deformed
or open. Lead wire is exposed.
Mounting bracket is cracked or deformed.
3. SIDE AIRBAG MODULE
Check for the following, and replace damaged
parts with new ones.
Front seat is damaged or deformed.
Harness and/or connector is cracked, deformed
or open.
Lead wire is exposed.
4. AIRBAG CONTROL MODULE
Check for the following, and replace damaged
parts with new ones.
Control module is cracked or deformed.
Mounting bracket is cracked or deformed.
Connector is scratched or deformed.
Airbag is deployed.
Side airbag is deployed.
AB-00028
L
A
Page 113 of 2870
AB-13
AIRBAG SYSTEM
Inspection Locations After a Collision
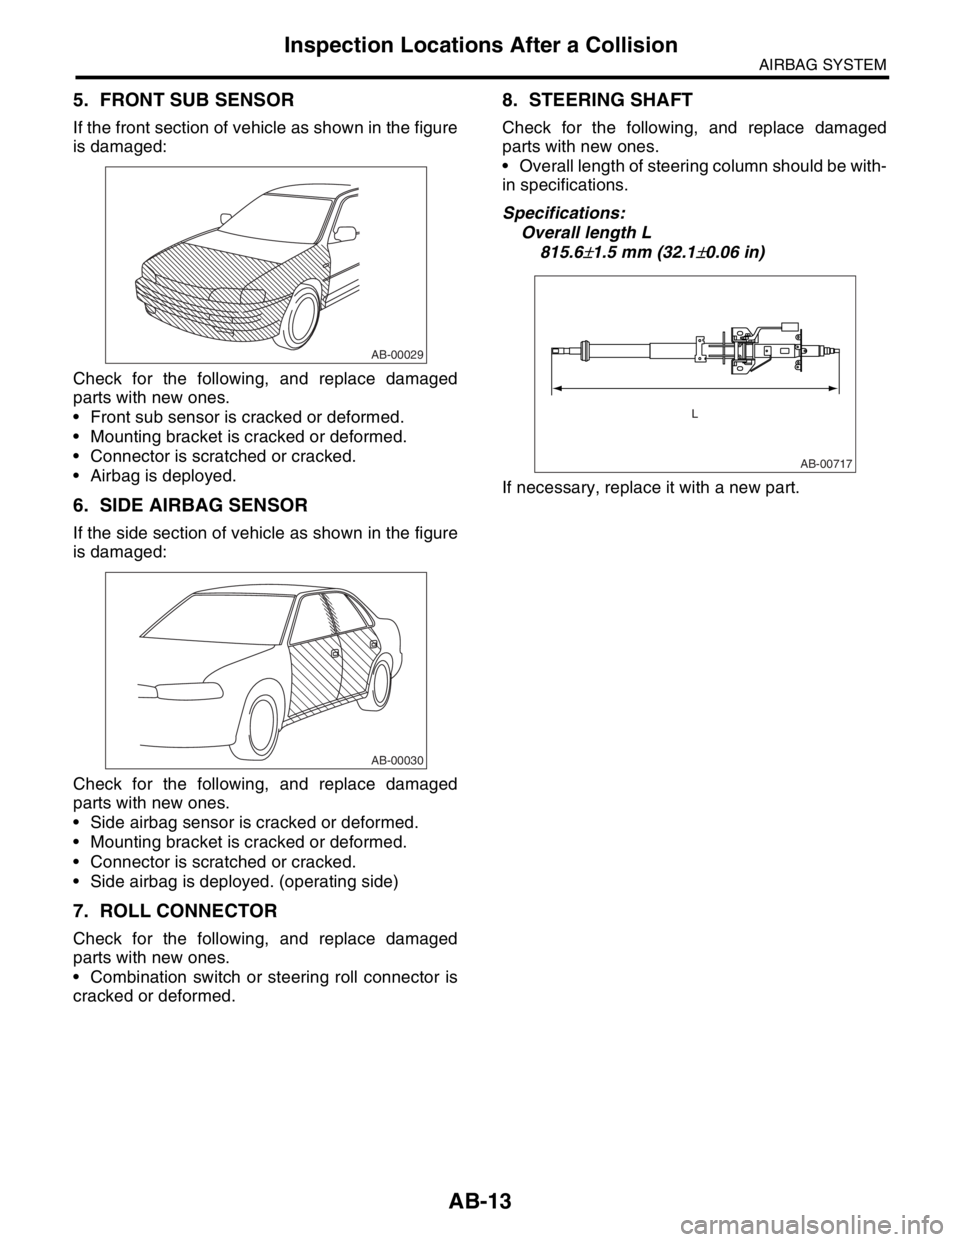
5. FRONT SUB SENSOR
If the front section of vehicle as shown in the figure
is damaged:
Check for the following, and replace damaged
parts with new ones.
Front sub sensor is cracked or deformed.
Mounting bracket is cracked or deformed.
Connector is scratched or cracked.
Airbag is deployed.
6. SIDE AIRBAG SENSOR
If the side section of vehicle as shown in the figure
is damaged:
Check for the following, and replace damaged
parts with new ones.
Side airbag sensor is cracked or deformed.
Mounting bracket is cracked or deformed.
Connector is scratched or cracked.
Side airbag is deployed. (operating side)
7. ROLL CONNECTOR
Check for the following, and replace damaged
parts with new ones.
Combination switch or steering roll connector is
cracked or deformed.
8. STEERING SHAFT
Check for the following, and replace damaged
parts with new ones.
Overall length of steering column should be with-
in specifications.
Specifications:
Overall length L
815.6
±1.5 mm (32.1±0.06 in)
If necessary, replace it with a new part.
AB-00029
AB-00030
AB-00717
L
Page 114 of 2870
AB-14
AIRBAG SYSTEM
Driver’s Airbag Module
4. Driver’s Airbag Module
A: REMOVAL
CAUTION:
Refer to “CAUTION” in General Description be-
fore handing the airbag module.
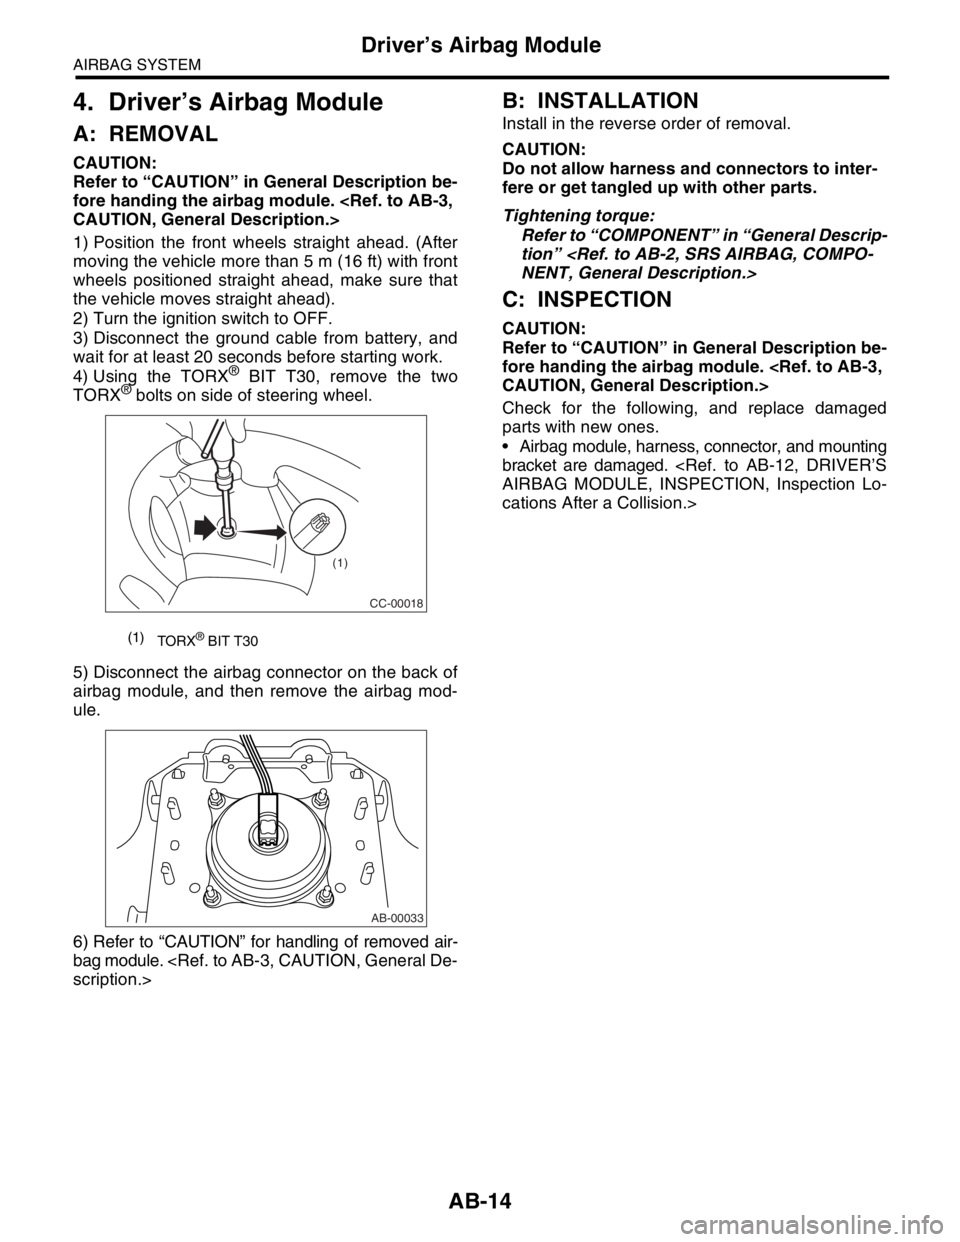
1) Position the front wheels straight ahead. (After
moving the vehicle more than 5 m (16 ft) with front
wheels positioned straight ahead, make sure that
the vehicle moves straight ahead).
2) Turn the ignition switch to OFF.
3) Disconnect the ground cable from battery, and
wait for at least 20 seconds before starting work.
4) Using the TORX
® BIT T30, remove the two
TORX® bolts on side of steering wheel.
5) Disconnect the airbag connector on the back of
airbag module, and then remove the airbag mod-
ule.
6) Refer to “CAUTION” for handling of removed air-
bag module.
B: INSTALLATION
Install in the reverse order of removal.
CAUTION:
Do not allow harness and connectors to inter-
fere or get tangled up with other parts.
Tightening torque:
Refer to “COMPONENT” in “General Descrip-
tion”
C: INSPECTION
CAUTION:
Refer to “CAUTION” in General Description be-
fore handing the airbag module.
Check for the following, and replace damaged
parts with new ones.
Airbag module, harness, connector, and mounting
bracket are damaged.
cations After a Collision.>
(1)
TORX® BIT T30
CC-00018
(1)
AB-00033
Page 115 of 2870
AB-15
AIRBAG SYSTEM
Passenger’s Airbag Module
5. Passenger’s Airbag Module
A: REMOVAL
CAUTION:
Refer to “CAUTION” in General Description be-
fore handing the airbag module.
1) Turn the ignition switch to OFF.
2) Disconnect the ground cable from battery, and
wait for at least 20 seconds before starting work.
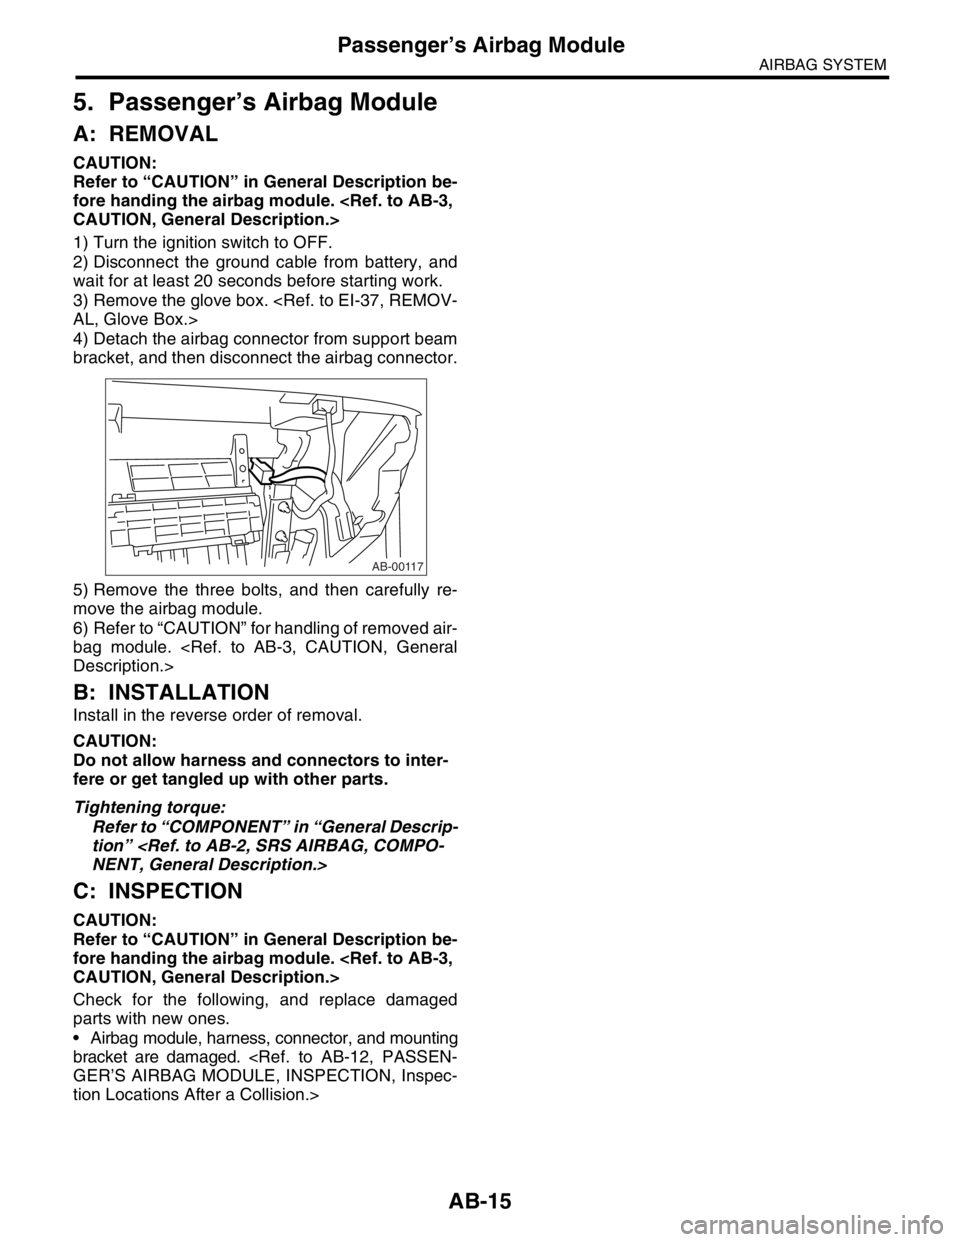
3) Remove the glove box.
4) Detach the airbag connector from support beam
bracket, and then disconnect the airbag connector.
5) Remove the three bolts, and then carefully re-
move the airbag module.
6) Refer to “CAUTION” for handling of removed air-
bag module.
B: INSTALLATION
Install in the reverse order of removal.
CAUTION:
Do not allow harness and connectors to inter-
fere or get tangled up with other parts.
Tightening torque:
Refer to “COMPONENT” in “General Descrip-
tion”
C: INSPECTION
CAUTION:
Refer to “CAUTION” in General Description be-
fore handing the airbag module.
Check for the following, and replace damaged
parts with new ones.
Airbag module, harness, connector, and mounting
bracket are damaged.
tion Locations After a Collision.>
AB-00117
Page 117 of 2870
AB-17
AIRBAG SYSTEM
Side Airbag Module
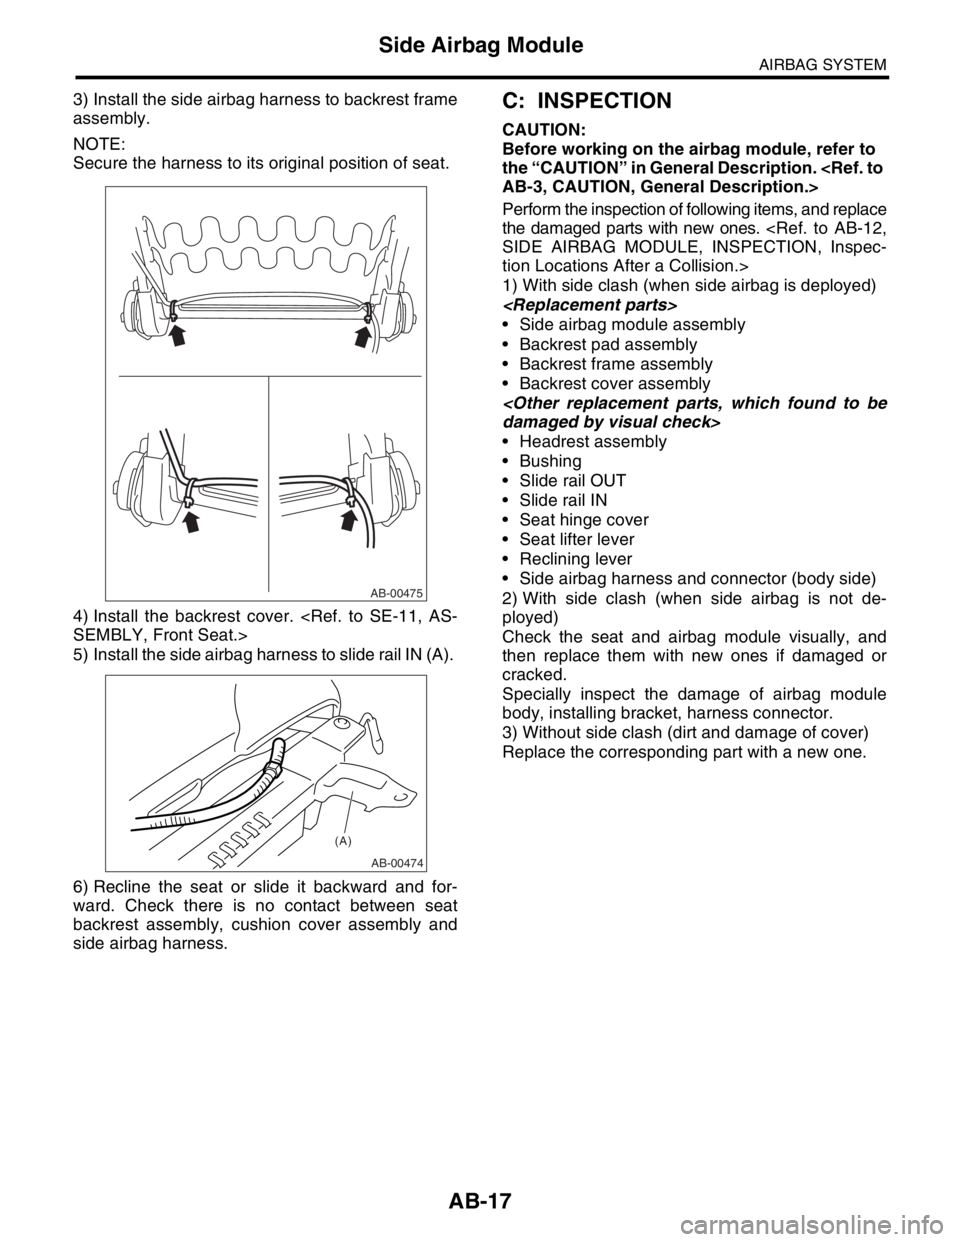
3) Install the side airbag harness to backrest frame
assembly.
NOTE:
Secure the harness to its original position of seat.
4) Install the backrest cover.
5) Install the side airbag harness to slide rail IN (A).
6) Recline the seat or slide it backward and for-
ward. Check there is no contact between seat
backrest assembly, cushion cover assembly and
side airbag harness. C: INSPECTION
CAUTION:
Before working on the airbag module, refer to
the “CAUTION” in General Description.
Perform the inspection of following items, and replace
the damaged parts with new ones.
tion Locations After a Collision.>
1) With side clash (when side airbag is deployed)
Side airbag module assembly
Backrest pad assembly
Backrest frame assembly
Backrest cover assembly
Headrest assembly
Bushing
Slide rail OUT
Slide rail IN
Seat hinge cover
Seat lifter lever
Reclining lever
Side airbag harness and connector (body side)
2) With side clash (when side airbag is not de-
ployed)
Check the seat and airbag module visually, and
then replace them with new ones if damaged or
cracked.
Specially inspect the damage of airbag module
body, installing bracket, harness connector.
3) Without side clash (dirt and damage of cover)
Replace the corresponding part with a new one.
AB-00475
AB-00474
(A)
Page 118 of 2870
AB-18
AIRBAG SYSTEM
Airbag Control Module
7. Airbag Control Module
A: REMOVAL
CAUTION:
Do not disassemble the airbag control mod-
ule.
If the airbag control module is deformed or if
water damage is suspected, replace the airbag
control module with a new part.
Do not drop the airbag control module.
After removal, keep the airbag control mod-
ule on a dry, clean surface away from moisture,
heat, and dust.
1) Turn the ignition switch to OFF.
2) Disconnect the ground cable from battery, and
wait for at least 20 seconds before starting work.
3) Remove the console cover.
4) Remove the center console panel.
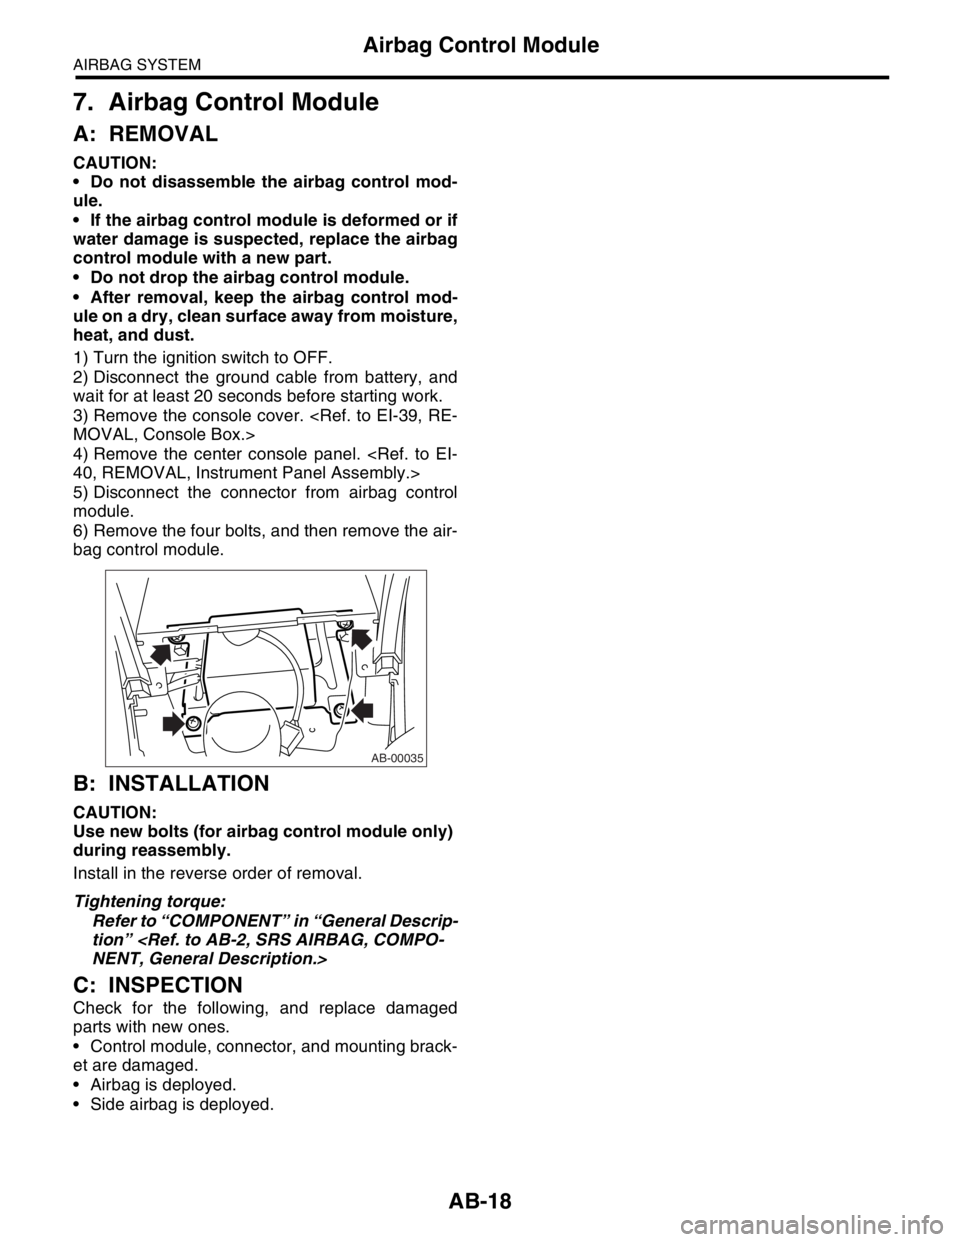
5) Disconnect the connector from airbag control
module.
6) Remove the four bolts, and then remove the air-
bag control module.
B: INSTALLATION
CAUTION:
Use new bolts (for airbag control module only)
during reassembly.
Install in the reverse order of removal.
Tightening torque:
Refer to “COMPONENT” in “General Descrip-
tion”
C: INSPECTION
Check for the following, and replace damaged
parts with new ones.
Control module, connector, and mounting brack-
et are damaged.
Airbag is deployed.
Side airbag is deployed.
AB-00035
Page 119 of 2870
AB-19
AIRBAG SYSTEM
Side Airbag Sensor
8. Side Airbag Sensor
A: REMOVAL
1) Turn the ignition switch to OFF.
2) Disconnect the ground cable from battery, and
wait for at least 20 seconds before starting work.
3) Remove the outer belt (FRONT).
Belt.>
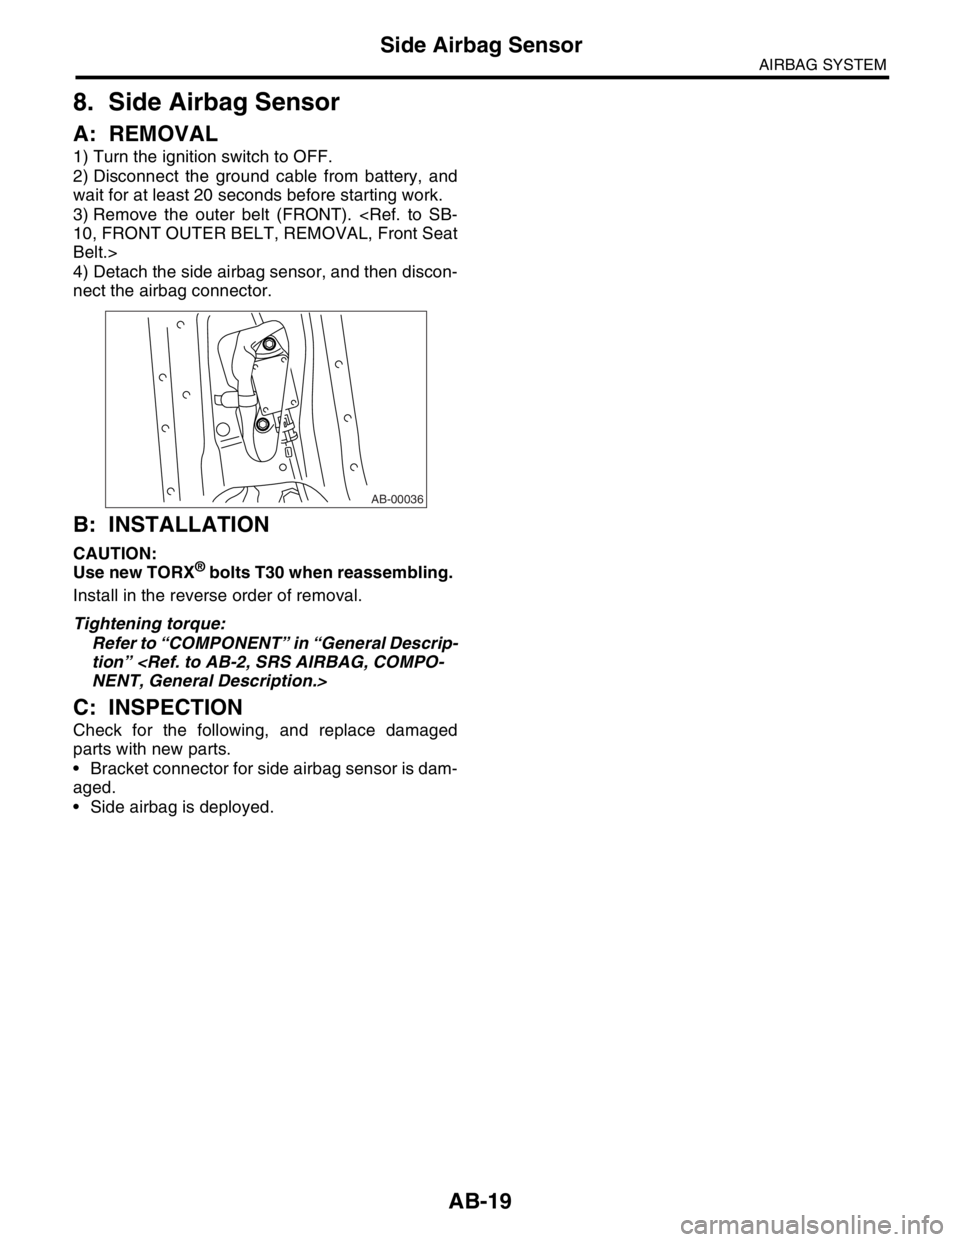
4) Detach the side airbag sensor, and then discon-
nect the airbag connector.
B: INSTALLATION
CAUTION:
Use new TORX® bolts T30 when reassembling.
Install in the reverse order of removal.
Tightening torque:
Refer to “COMPONENT” in “General Descrip-
tion”
C: INSPECTION
Check for the following, and replace damaged
parts with new parts.
Bracket connector for side airbag sensor is dam-
aged.
Side airbag is deployed.
AB-00036
Page 120 of 2870
AB-20
AIRBAG SYSTEM
Roll Connector
9. Roll Connector
A: REMOVAL
1) Turn the ignition switch to OFF.
2) Disconnect the ground cable from battery, and
wait for at least 20 seconds before starting work.
3) Remove the driver’s airbag module.
4) Remove the steering wheel.
5) Remove the steering column cover.
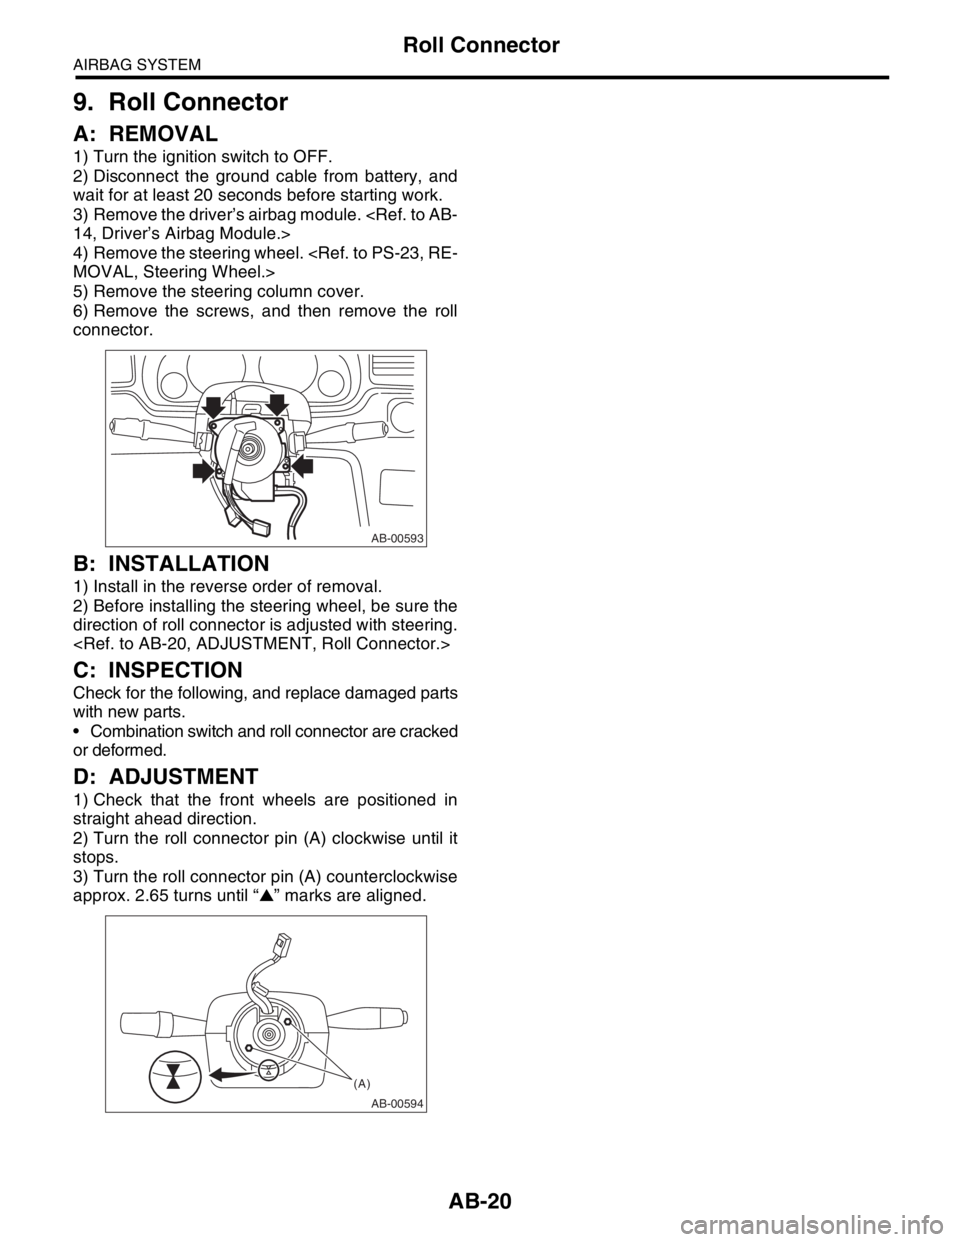
6) Remove the screws, and then remove the roll
connector.
B: INSTALLATION
1) Install in the reverse order of removal.
2) Before installing the steering wheel, be sure the
direction of roll connector is adjusted with steering.
C: INSPECTION
Check for the following, and replace damaged parts
with new parts.
Combination switch and roll connector are cracked
or deformed.
D: ADJUSTMENT
1) Check that the front wheels are positioned in
straight ahead direction.
2) Turn the roll connector pin (A) clockwise until it
stops.
3) Turn the roll connector pin (A) counterclockwise
approx. 2.65 turns until “▲” marks are aligned.
AB-00593
AB-00594
(A)