SUBARU LEGACY 1999 Service Repair Manual
LEGACY 1999
SUBARU
SUBARU
https://www.carmanualsonline.info/img/17/57435/w960_57435-0.png
SUBARU LEGACY 1999 Service Repair Manual
Trending: roof rack, ESP, radio antenna, power steering fluid, change time, brake fluid, rear view mirror
Page 881 of 1456
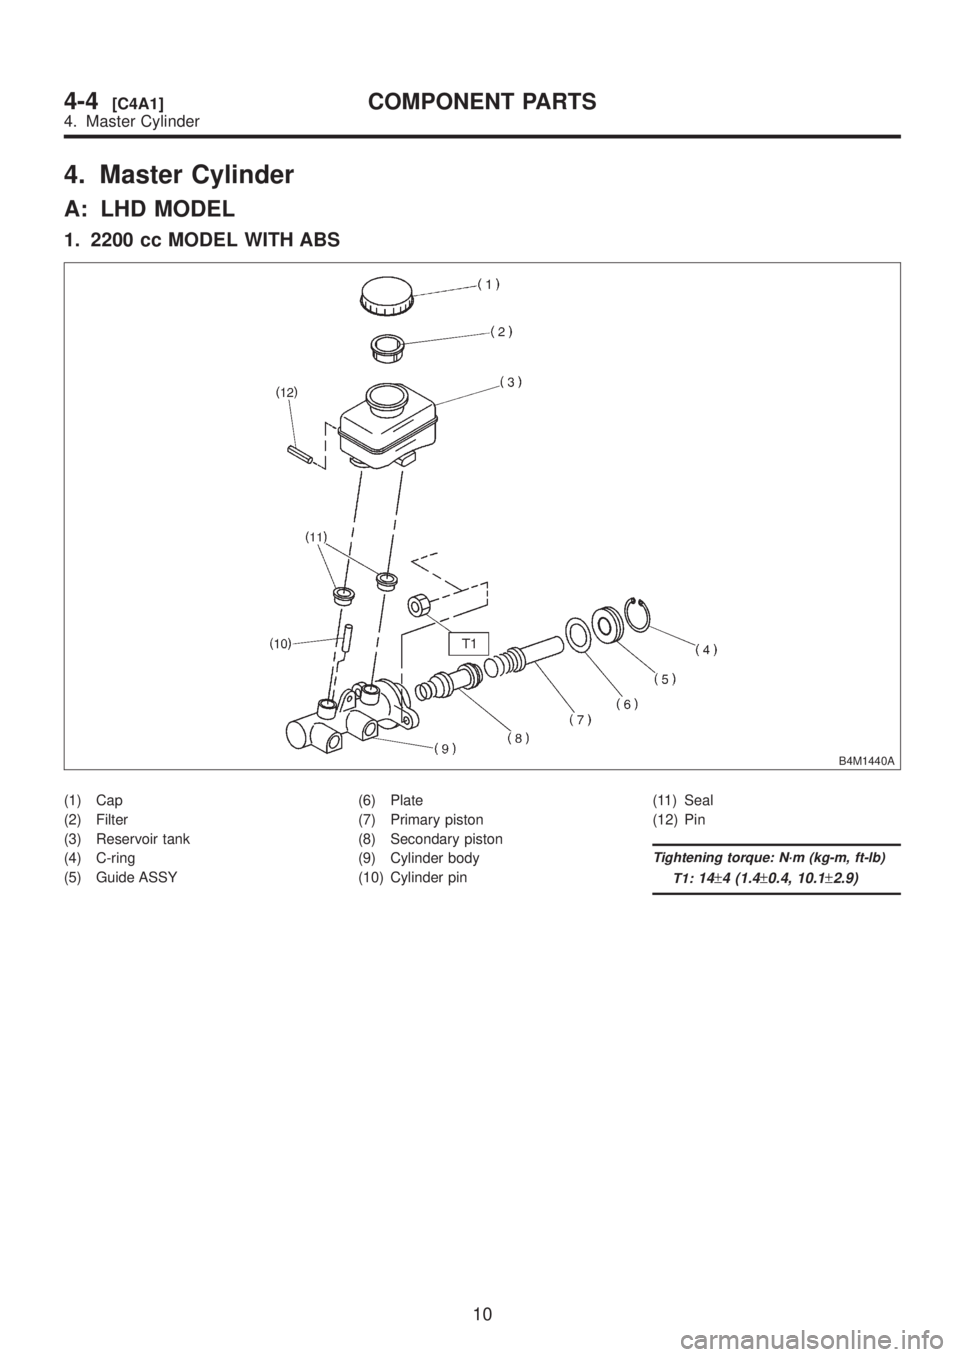
4. Master Cylinder
A: LHD MODEL
1. 2200 cc MODEL WITH ABS
B4M1440A
(1) Cap
(2) Filter
(3) Reservoir tank
(4) C-ring
(5) Guide ASSY(6) Plate
(7) Primary piston
(8) Secondary piston
(9) Cylinder body
(10) Cylinder pin(11) Seal
(12) Pin
Tightening torque: N´m (kg-m, ft-lb)
T1:
14±4 (1.4±0.4, 10.1±2.9)
10
4-4[C4A1]COMPONENT PARTS
4. Master Cylinder
Page 882 of 1456
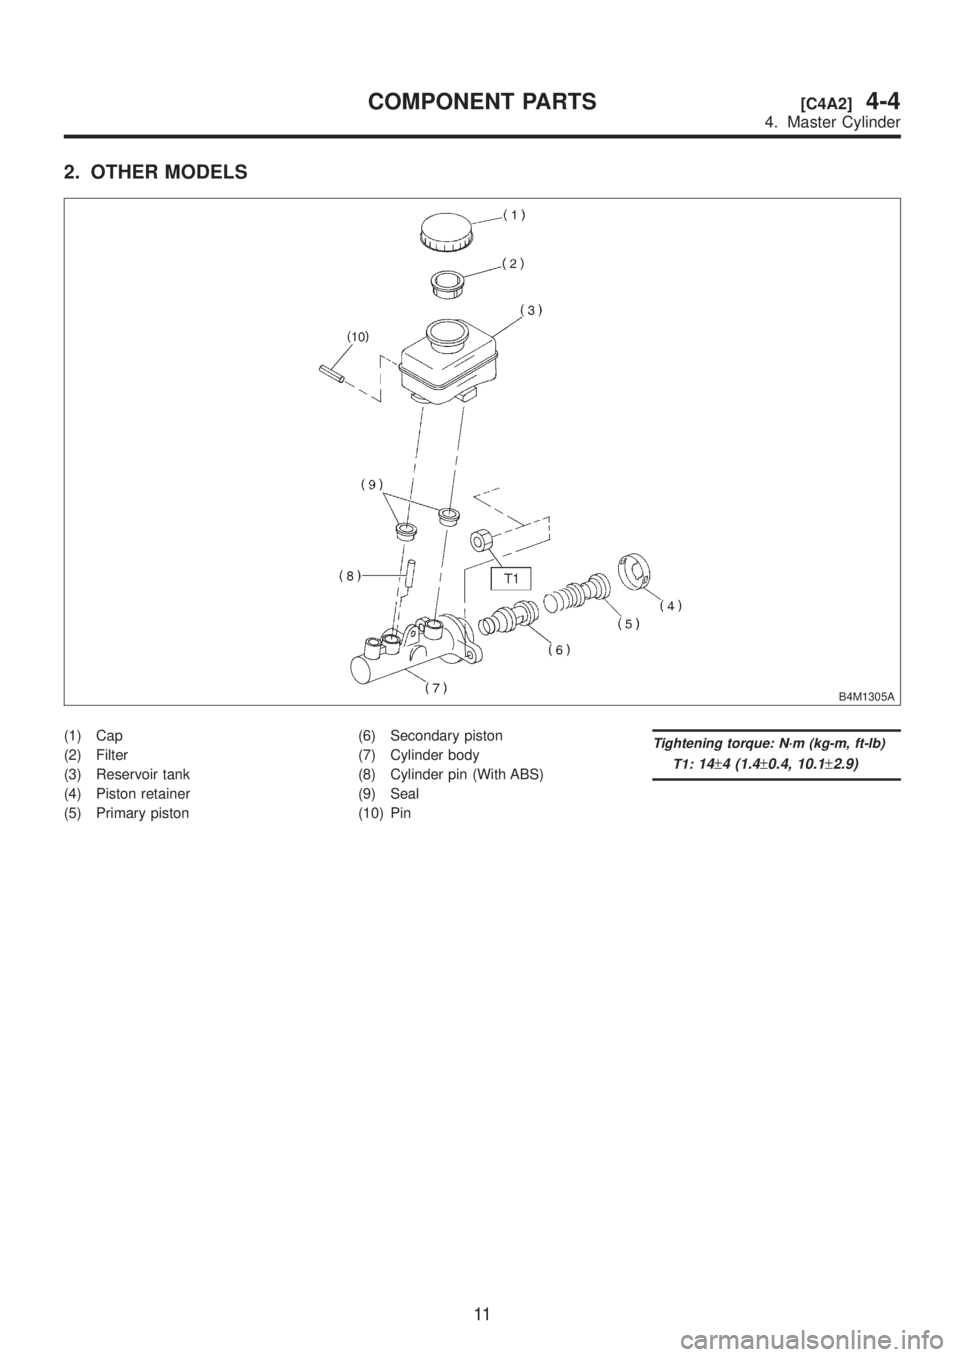
2. OTHER MODELS
B4M1305A
(1) Cap
(2) Filter
(3) Reservoir tank
(4) Piston retainer
(5) Primary piston(6) Secondary piston
(7) Cylinder body
(8) Cylinder pin (With ABS)
(9) Seal
(10) PinTightening torque: N´m (kg-m, ft-lb)
T1:
14±4 (1.4±0.4, 10.1±2.9)
11
[C4A2]4-4COMPONENT PARTS
4. Master Cylinder
Page 883 of 1456
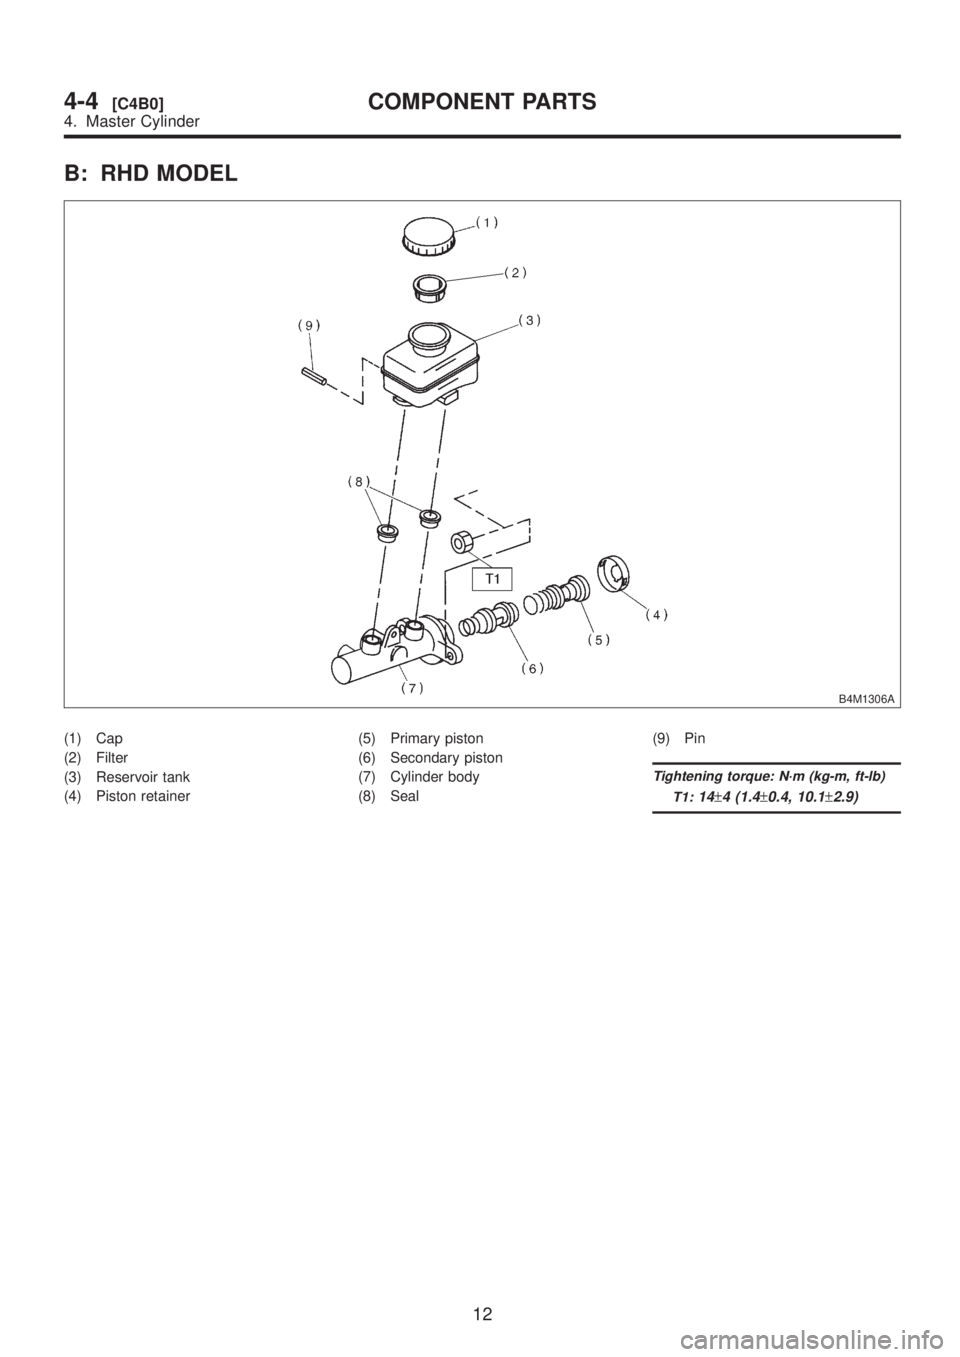
B: RHD MODEL
B4M1306A
(1) Cap
(2) Filter
(3) Reservoir tank
(4) Piston retainer(5) Primary piston
(6) Secondary piston
(7) Cylinder body
(8) Seal(9) Pin
Tightening torque: N´m (kg-m, ft-lb)
T1:
14±4 (1.4±0.4, 10.1±2.9)
12
4-4[C4B0]COMPONENT PARTS
4. Master Cylinder
Page 884 of 1456
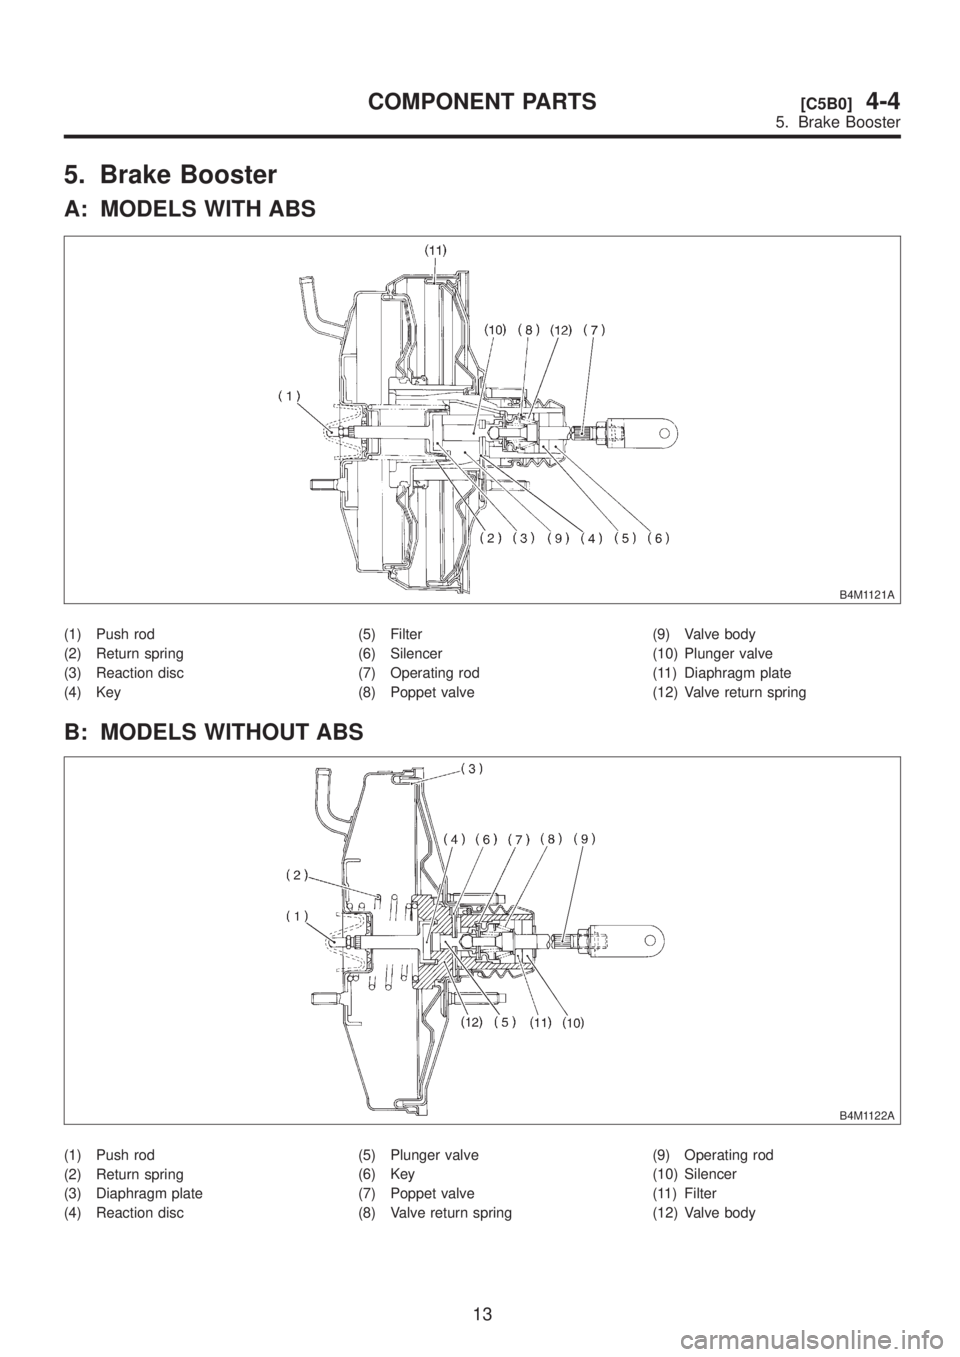
5. Brake Booster
A: MODELS WITH ABS
B4M1121A
(1) Push rod
(2) Return spring
(3) Reaction disc
(4) Key(5) Filter
(6) Silencer
(7) Operating rod
(8) Poppet valve(9) Valve body
(10) Plunger valve
(11) Diaphragm plate
(12) Valve return spring
B: MODELS WITHOUT ABS
B4M1122A
(1) Push rod
(2) Return spring
(3) Diaphragm plate
(4) Reaction disc(5) Plunger valve
(6) Key
(7) Poppet valve
(8) Valve return spring(9) Operating rod
(10) Silencer
(11) Filter
(12) Valve body
13
[C5B0]4-4COMPONENT PARTS
5. Brake Booster
Page 885 of 1456
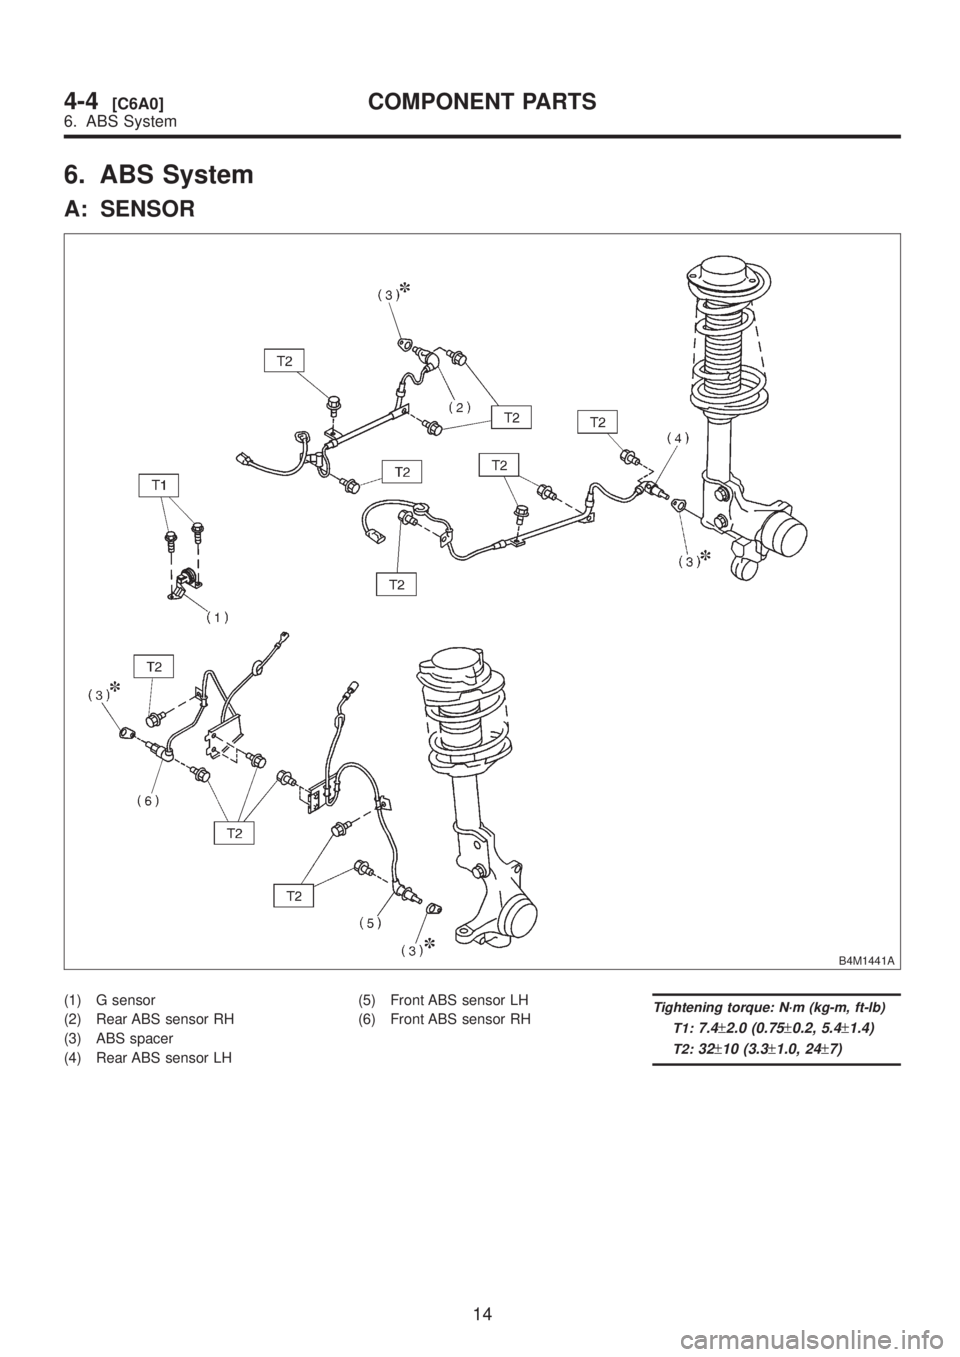
6. ABS System
A: SENSOR
B4M1441A
(1) G sensor
(2) Rear ABS sensor RH
(3) ABS spacer
(4) Rear ABS sensor LH(5) Front ABS sensor LH
(6) Front ABS sensor RHTightening torque: N´m (kg-m, ft-lb)
T1:
7.4±2.0 (0.75±0.2, 5.4±1.4)
T2:32±10 (3.3±1.0, 24±7)
14
4-4[C6A0]COMPONENT PARTS
6. ABS System
Page 886 of 1456
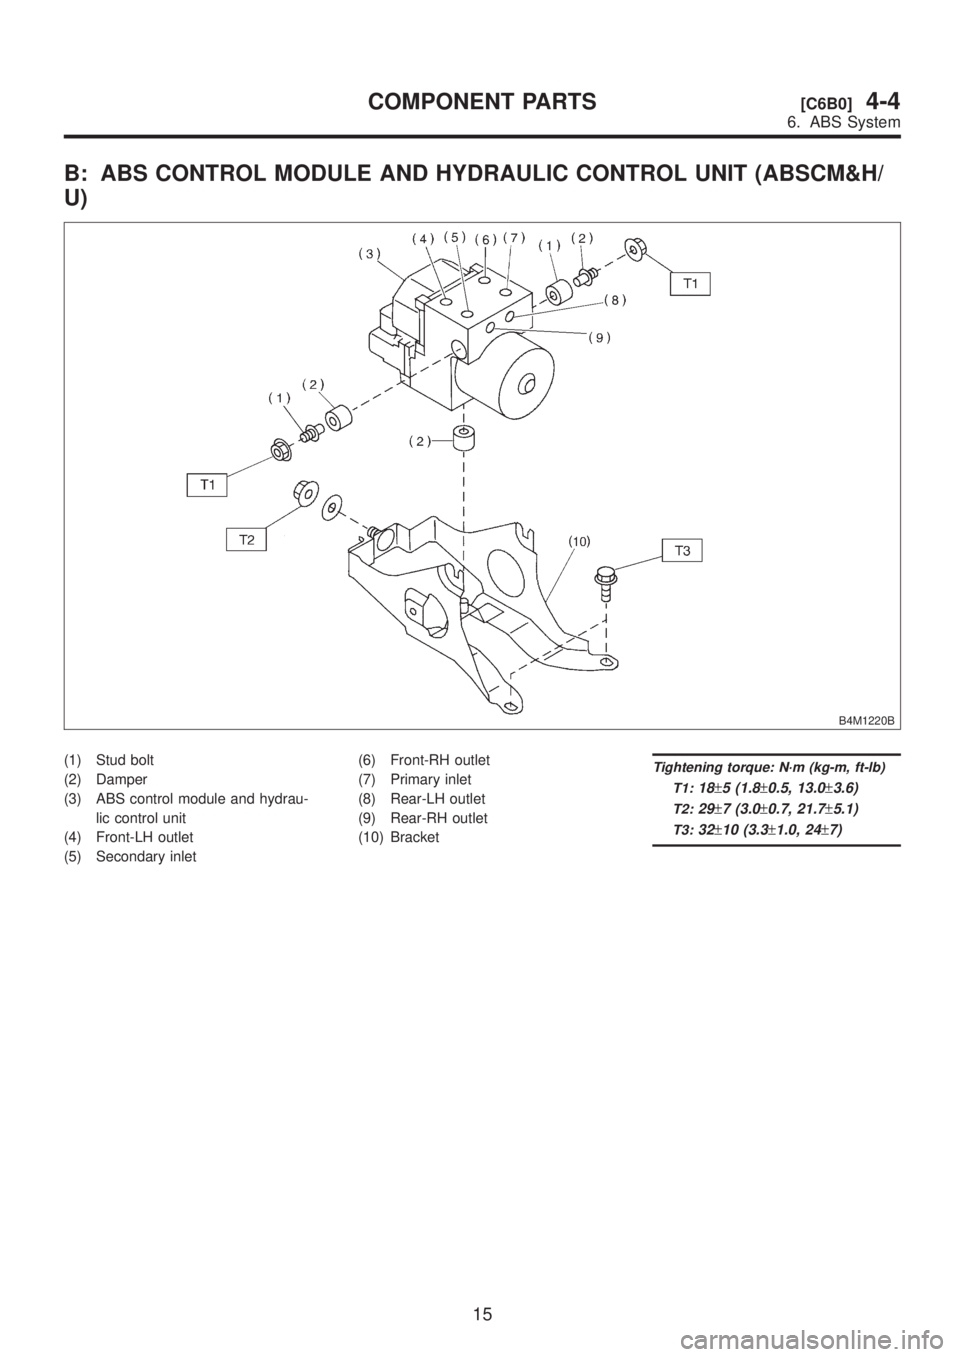
B: ABS CONTROL MODULE AND HYDRAULIC CONTROL UNIT (ABSCM&H/
U)
B4M1220B
(1) Stud bolt
(2) Damper
(3) ABS control module and hydrau-
lic control unit
(4) Front-LH outlet
(5) Secondary inlet(6) Front-RH outlet
(7) Primary inlet
(8) Rear-LH outlet
(9) Rear-RH outlet
(10) BracketTightening torque: N´m (kg-m, ft-lb)
T1:
18±5 (1.8±0.5, 13.0±3.6)
T2:29±7 (3.0±0.7, 21.7±5.1)
T3:32±10 (3.3±1.0, 24±7)
15
[C6B0]4-4COMPONENT PARTS
6. ABS System
Page 887 of 1456
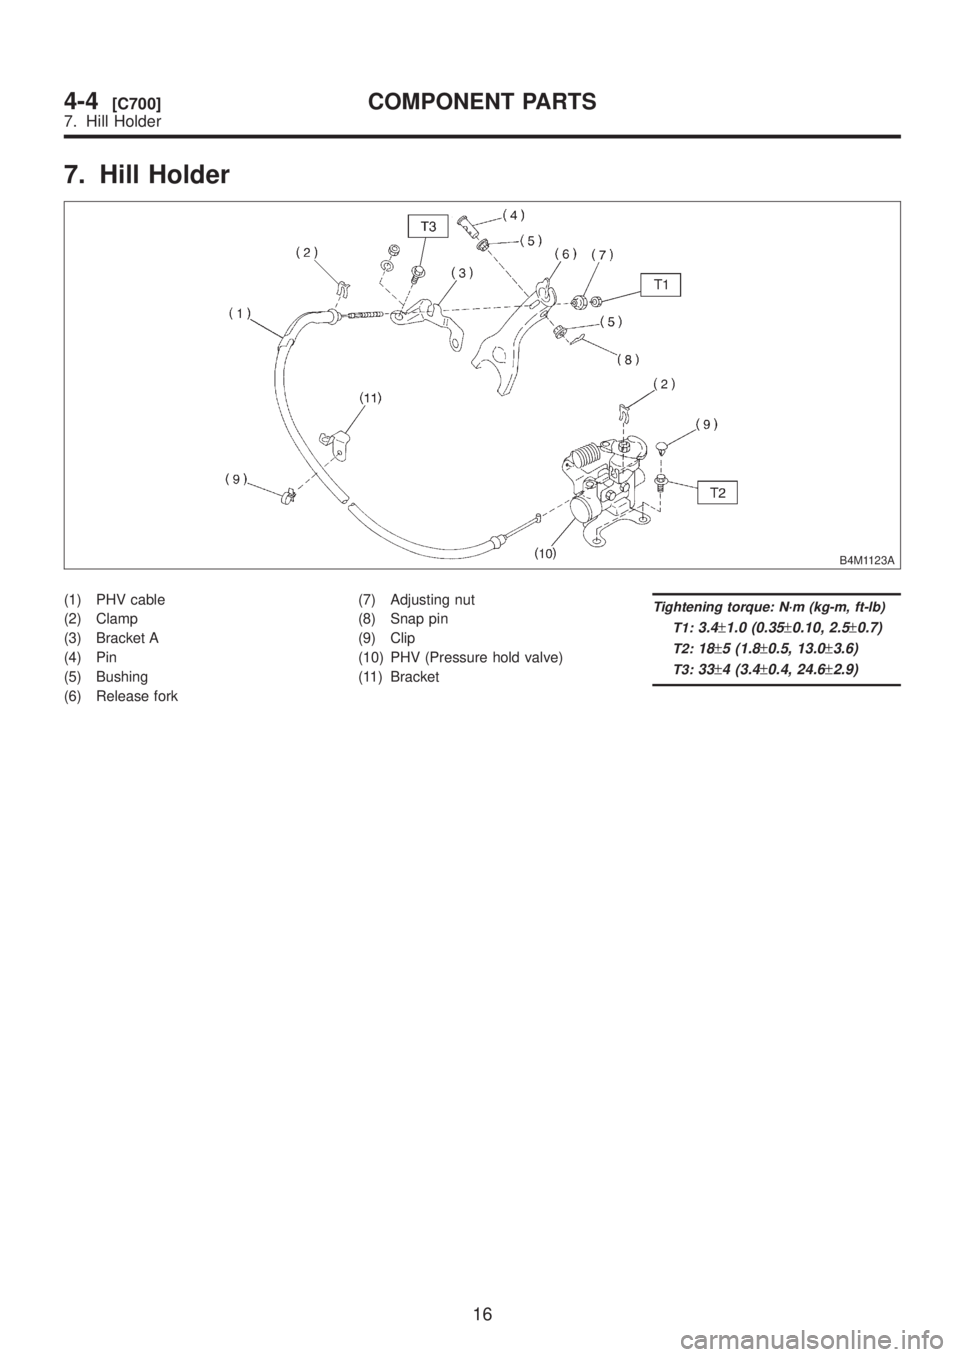
7. Hill Holder
B4M1123A
(1) PHV cable
(2) Clamp
(3) Bracket A
(4) Pin
(5) Bushing
(6) Release fork(7) Adjusting nut
(8) Snap pin
(9) Clip
(10) PHV (Pressure hold valve)
(11) BracketTightening torque: N´m (kg-m, ft-lb)
T1:
3.4±1.0 (0.35±0.10, 2.5±0.7)
T2:18±5 (1.8±0.5, 13.0±3.6)
T3:33±4 (3.4±0.4, 24.6±2.9)
16
4-4[C700]COMPONENT PARTS
7. Hill Holder
Page 888 of 1456
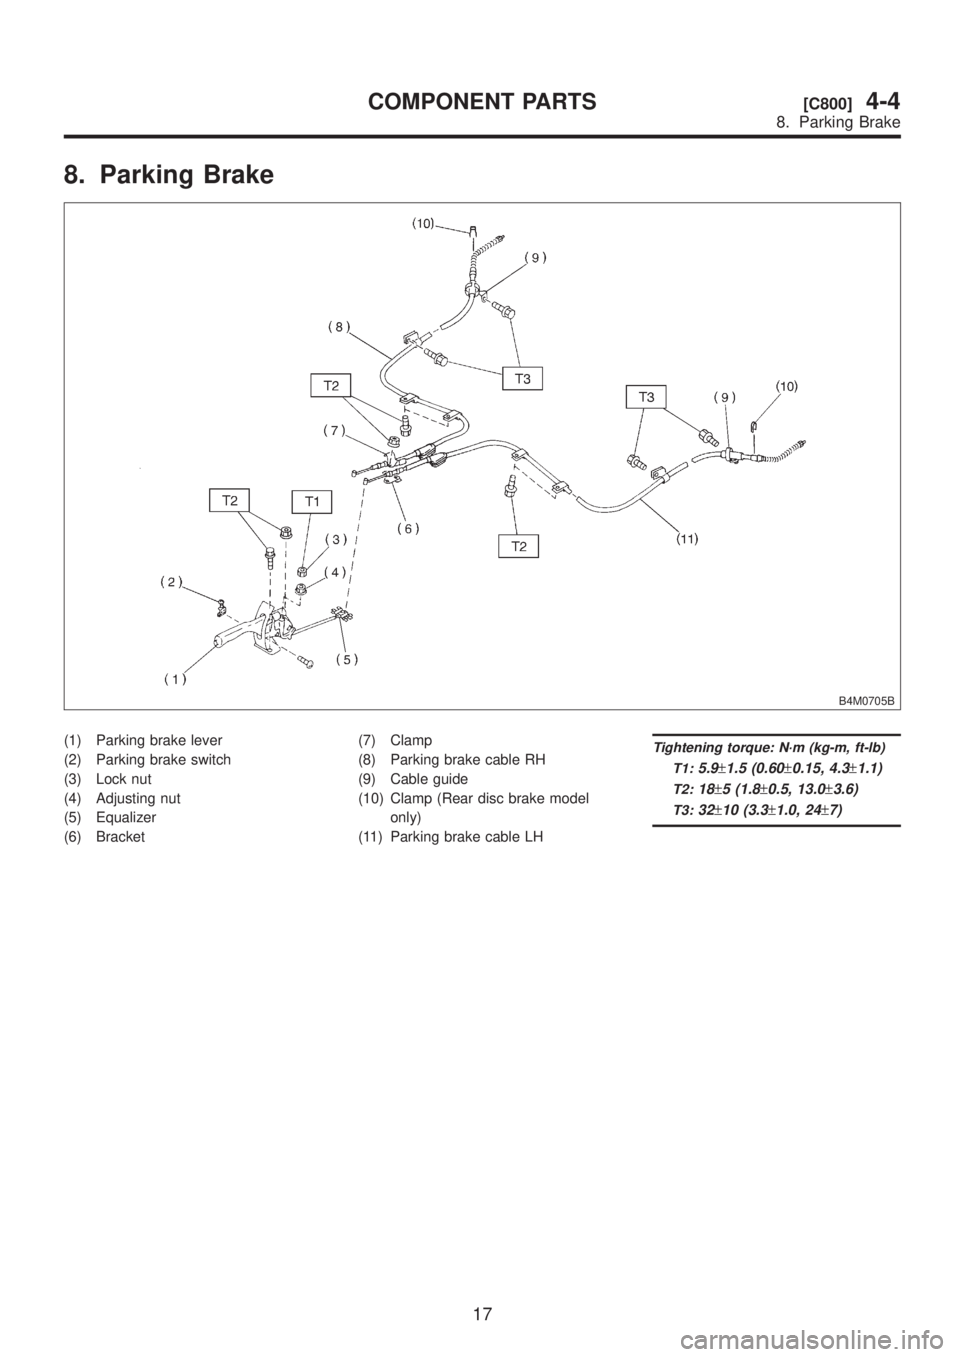
8. Parking Brake
B4M0705B
(1) Parking brake lever
(2) Parking brake switch
(3) Lock nut
(4) Adjusting nut
(5) Equalizer
(6) Bracket(7) Clamp
(8) Parking brake cable RH
(9) Cable guide
(10) Clamp (Rear disc brake model
only)
(11) Parking brake cable LHTightening torque: N´m (kg-m, ft-lb)
T1:
5.9±1.5 (0.60±0.15, 4.3±1.1)
T2:18±5 (1.8±0.5, 13.0±3.6)
T3:32±10 (3.3±1.0, 24±7)
17
[C800]4-4COMPONENT PARTS
8. Parking Brake
Page 889 of 1456
1. Front Disc Brake
A: ON-CAR SERVICE
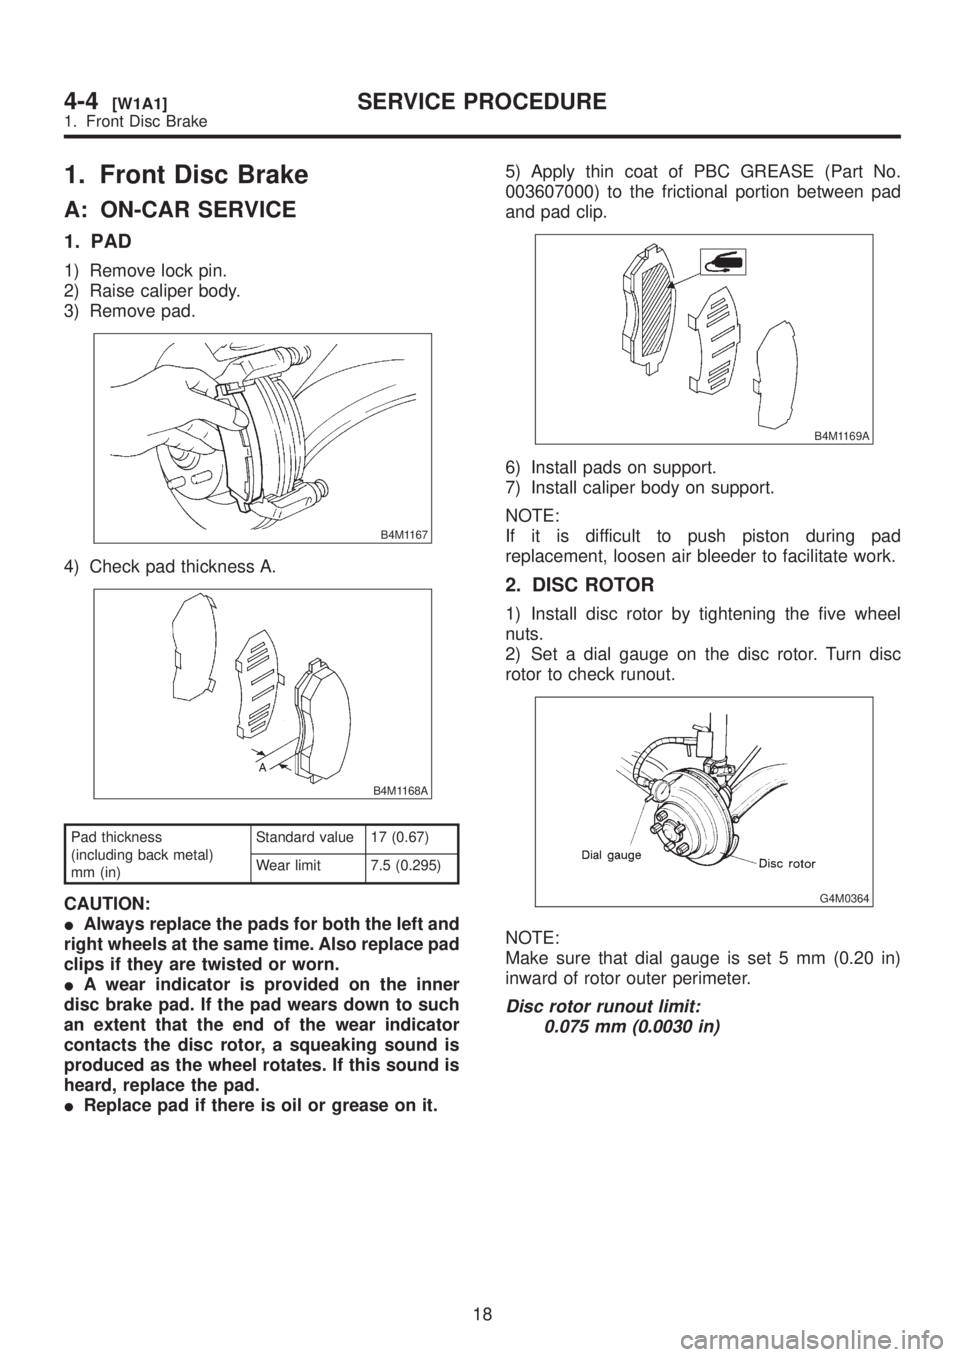
1. PAD
1) Remove lock pin.
2) Raise caliper body.
3) Remove pad.
B4M1167
4) Check pad thickness A.
B4M1168A
Pad thickness
(including back metal)
mm (in)Standard value 17 (0.67)
Wear limit 7.5 (0.295)
CAUTION:
IAlways replace the pads for both the left and
right wheels at the same time. Also replace pad
clips if they are twisted or worn.
IA wear indicator is provided on the inner
disc brake pad. If the pad wears down to such
an extent that the end of the wear indicator
contacts the disc rotor, a squeaking sound is
produced as the wheel rotates. If this sound is
heard, replace the pad.
IReplace pad if there is oil or grease on it.5) Apply thin coat of PBC GREASE (Part No.
003607000) to the frictional portion between pad
and pad clip.
B4M1169A
6) Install pads on support.
7) Install caliper body on support.
NOTE:
If it is difficult to push piston during pad
replacement, loosen air bleeder to facilitate work.
2. DISC ROTOR
1) Install disc rotor by tightening the five wheel
nuts.
2) Set a dial gauge on the disc rotor. Turn disc
rotor to check runout.
G4M0364
NOTE:
Make sure that dial gauge is set 5 mm (0.20 in)
inward of rotor outer perimeter.
Disc rotor runout limit:
0.075 mm (0.0030 in)
18
4-4[W1A1]SERVICE PROCEDURE
1. Front Disc Brake
Page 890 of 1456
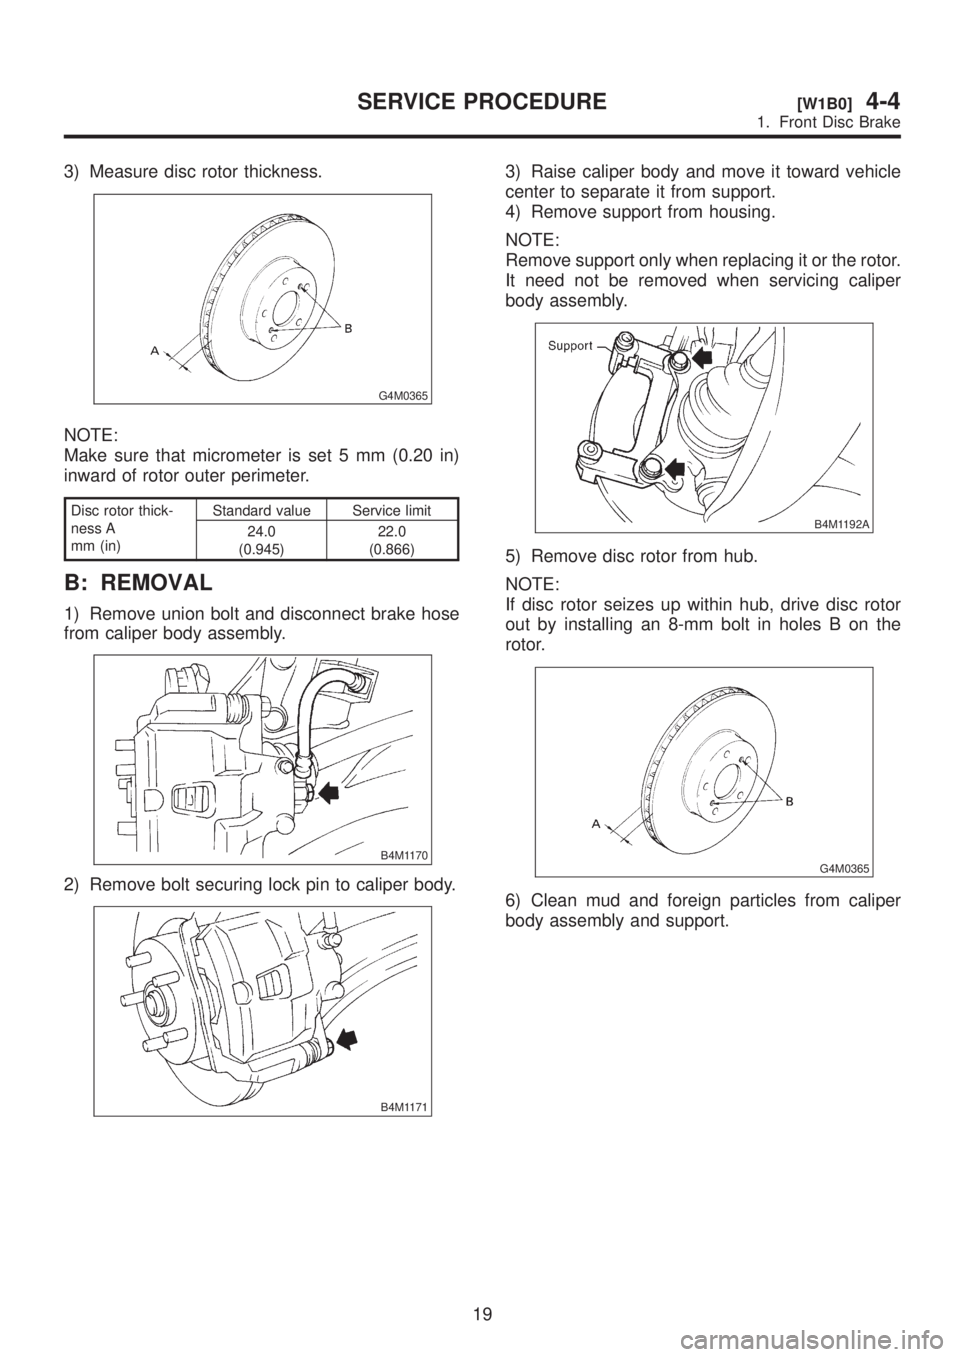
3) Measure disc rotor thickness.
G4M0365
NOTE:
Make sure that micrometer is set 5 mm (0.20 in)
inward of rotor outer perimeter.
Disc rotor thick-
ness A
mm (in)Standard value Service limit
24.0
(0.945)22.0
(0.866)
B: REMOVAL
1) Remove union bolt and disconnect brake hose
from caliper body assembly.
B4M1170
2) Remove bolt securing lock pin to caliper body.
B4M1171
3) Raise caliper body and move it toward vehicle
center to separate it from support.
4) Remove support from housing.
NOTE:
Remove support only when replacing it or the rotor.
It need not be removed when servicing caliper
body assembly.
B4M1192A
5) Remove disc rotor from hub.
NOTE:
If disc rotor seizes up within hub, drive disc rotor
out by installing an 8-mm bolt in holes B on the
rotor.
G4M0365
6) Clean mud and foreign particles from caliper
body assembly and support.
19
[W1B0]4-4SERVICE PROCEDURE
1. Front Disc Brake
Trending: compressor, fog light, charging, seat belt, index, wiring, ad blue
