SUBARU LEGACY 1999 Service Repair Manual
Manufacturer: SUBARU, Model Year: 1999, Model line: LEGACY, Model: SUBARU LEGACY 1999Pages: 1456, PDF Size: 59.93 MB
Page 851 of 1456
![SUBARU LEGACY 1999 Service Repair Manual 12) Feed the specified fluid and discharge air.
NOTE:
Never start the engine before feeding the fluid; otherwise vane pump might be seized up.
B4M0674A
58
4-3[W7C2]SERVICE PROCEDURE
7. Pipe Assembly ( SUBARU LEGACY 1999 Service Repair Manual 12) Feed the specified fluid and discharge air.
NOTE:
Never start the engine before feeding the fluid; otherwise vane pump might be seized up.
B4M0674A
58
4-3[W7C2]SERVICE PROCEDURE
7. Pipe Assembly (](/img/17/57435/w960_57435-850.png)
12) Feed the specified fluid and discharge air.
NOTE:
Never start the engine before feeding the fluid; otherwise vane pump might be seized up.
B4M0674A
58
4-3[W7C2]SERVICE PROCEDURE
7. Pipe Assembly (Power Steering System)
Page 852 of 1456
8. Oil Pump (Power Steering
System)
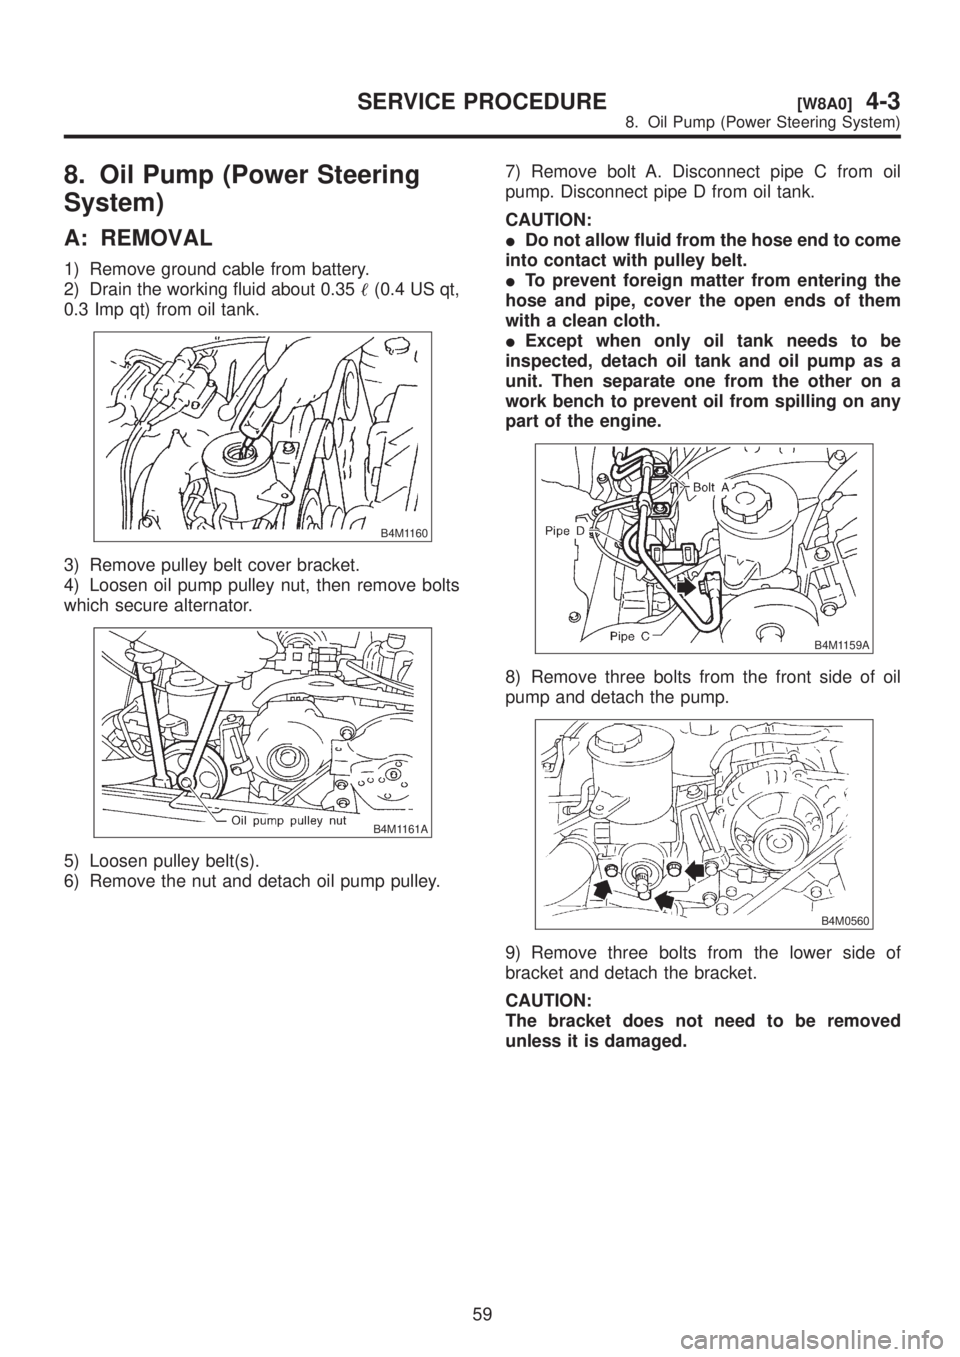
A: REMOVAL
1) Remove ground cable from battery.
2) Drain the working fluid about 0.35(0.4 US qt,
0.3 Imp qt) from oil tank.
B4M1160
3) Remove pulley belt cover bracket.
4) Loosen oil pump pulley nut, then remove bolts
which secure alternator.
B4M1161A
5) Loosen pulley belt(s).
6) Remove the nut and detach oil pump pulley.7) Remove bolt A. Disconnect pipe C from oil
pump. Disconnect pipe D from oil tank.
CAUTION:
IDo not allow fluid from the hose end to come
into contact with pulley belt.
ITo prevent foreign matter from entering the
hose and pipe, cover the open ends of them
with a clean cloth.
IExcept when only oil tank needs to be
inspected, detach oil tank and oil pump as a
unit. Then separate one from the other on a
work bench to prevent oil from spilling on any
part of the engine.
B4M1159A
8) Remove three bolts from the front side of oil
pump and detach the pump.
B4M0560
9) Remove three bolts from the lower side of
bracket and detach the bracket.
CAUTION:
The bracket does not need to be removed
unless it is damaged.
59
[W8A0]4-3SERVICE PROCEDURE
8. Oil Pump (Power Steering System)
Page 853 of 1456
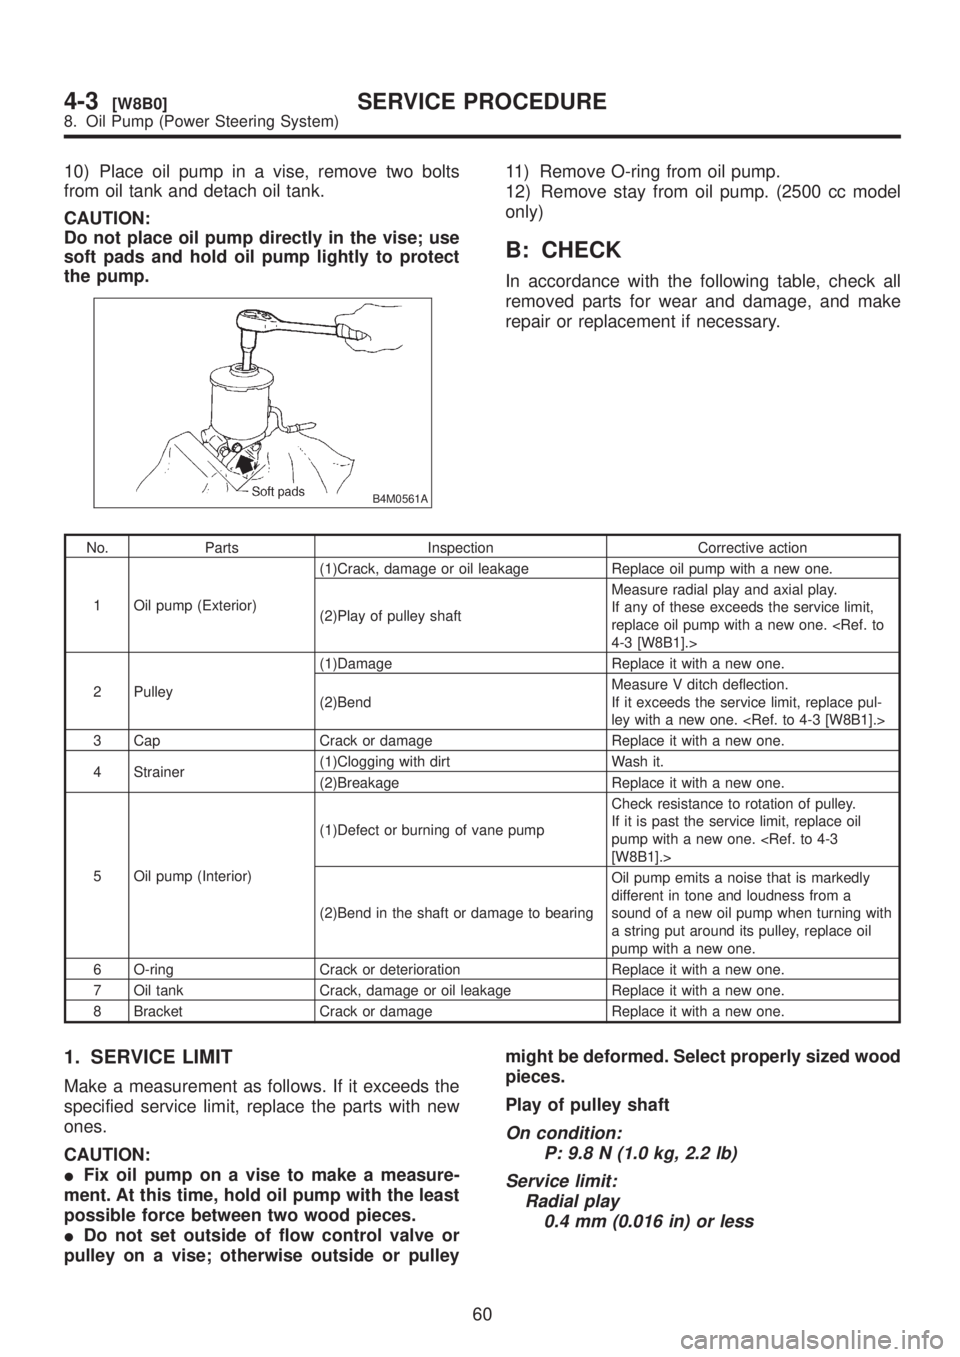
10) Place oil pump in a vise, remove two bolts
from oil tank and detach oil tank.
CAUTION:
Do not place oil pump directly in the vise; use
soft pads and hold oil pump lightly to protect
the pump.
B4M0561A
11) Remove O-ring from oil pump.
12) Remove stay from oil pump. (2500 cc model
only)
B: CHECK
In accordance with the following table, check all
removed parts for wear and damage, and make
repair or replacement if necessary.
No. Parts Inspection Corrective action
1 Oil pump (Exterior)(1)Crack, damage or oil leakage Replace oil pump with a new one.
(2)Play of pulley shaftMeasure radial play and axial play.
If any of these exceeds the service limit,
replace oil pump with a new one.
2 Pulley(1)Damage Replace it with a new one.
(2)BendMeasure V ditch deflection.
If it exceeds the service limit, replace pul-
ley with a new one.
3 Cap Crack or damage Replace it with a new one.
4 Strainer(1)Clogging with dirt Wash it.
(2)Breakage Replace it with a new one.
5 Oil pump (Interior)(1)Defect or burning of vane pumpCheck resistance to rotation of pulley.
If it is past the service limit, replace oil
pump with a new one.
(2)Bend in the shaft or damage to bearingOil pump emits a noise that is markedly
different in tone and loudness from a
sound of a new oil pump when turning with
a string put around its pulley, replace oil
pump with a new one.
6 O-ring Crack or deterioration Replace it with a new one.
7 Oil tank Crack, damage or oil leakage Replace it with a new one.
8 Bracket Crack or damage Replace it with a new one.
1. SERVICE LIMIT
Make a measurement as follows. If it exceeds the
specified service limit, replace the parts with new
ones.
CAUTION:
IFix oil pump on a vise to make a measure-
ment. At this time, hold oil pump with the least
possible force between two wood pieces.
IDo not set outside of flow control valve or
pulley on a vise; otherwise outside or pulleymight be deformed. Select properly sized wood
pieces.
Play of pulley shaft
On condition:
P: 9.8 N (1.0 kg, 2.2 lb)
Service limit:
Radial play
0.4 mm (0.016 in) or less
60
4-3[W8B0]SERVICE PROCEDURE
8. Oil Pump (Power Steering System)
Page 854 of 1456
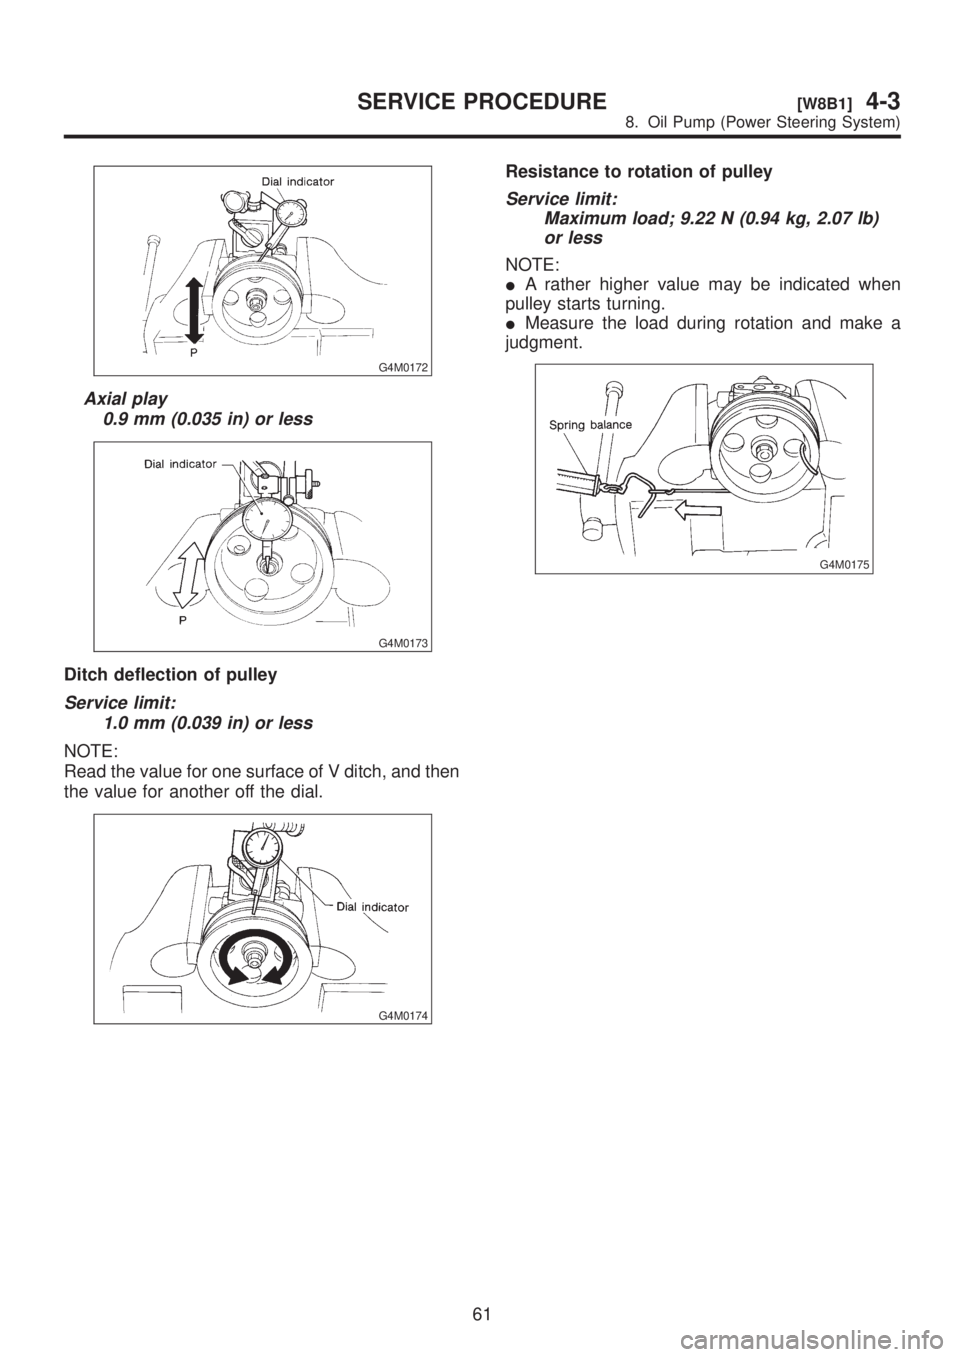
G4M0172
Axial play
0.9 mm (0.035 in) or less
G4M0173
Ditch deflection of pulley
Service limit:
1.0 mm (0.039 in) or less
NOTE:
Read the value for one surface of V ditch, and then
the value for another off the dial.
G4M0174
Resistance to rotation of pulley
Service limit:
Maximum load; 9.22 N (0.94 kg, 2.07 lb)
or less
NOTE:
IA rather higher value may be indicated when
pulley starts turning.
IMeasure the load during rotation and make a
judgment.
G4M0175
61
[W8B1]4-3SERVICE PROCEDURE
8. Oil Pump (Power Steering System)
Page 855 of 1456
C: DISASSEMBLY
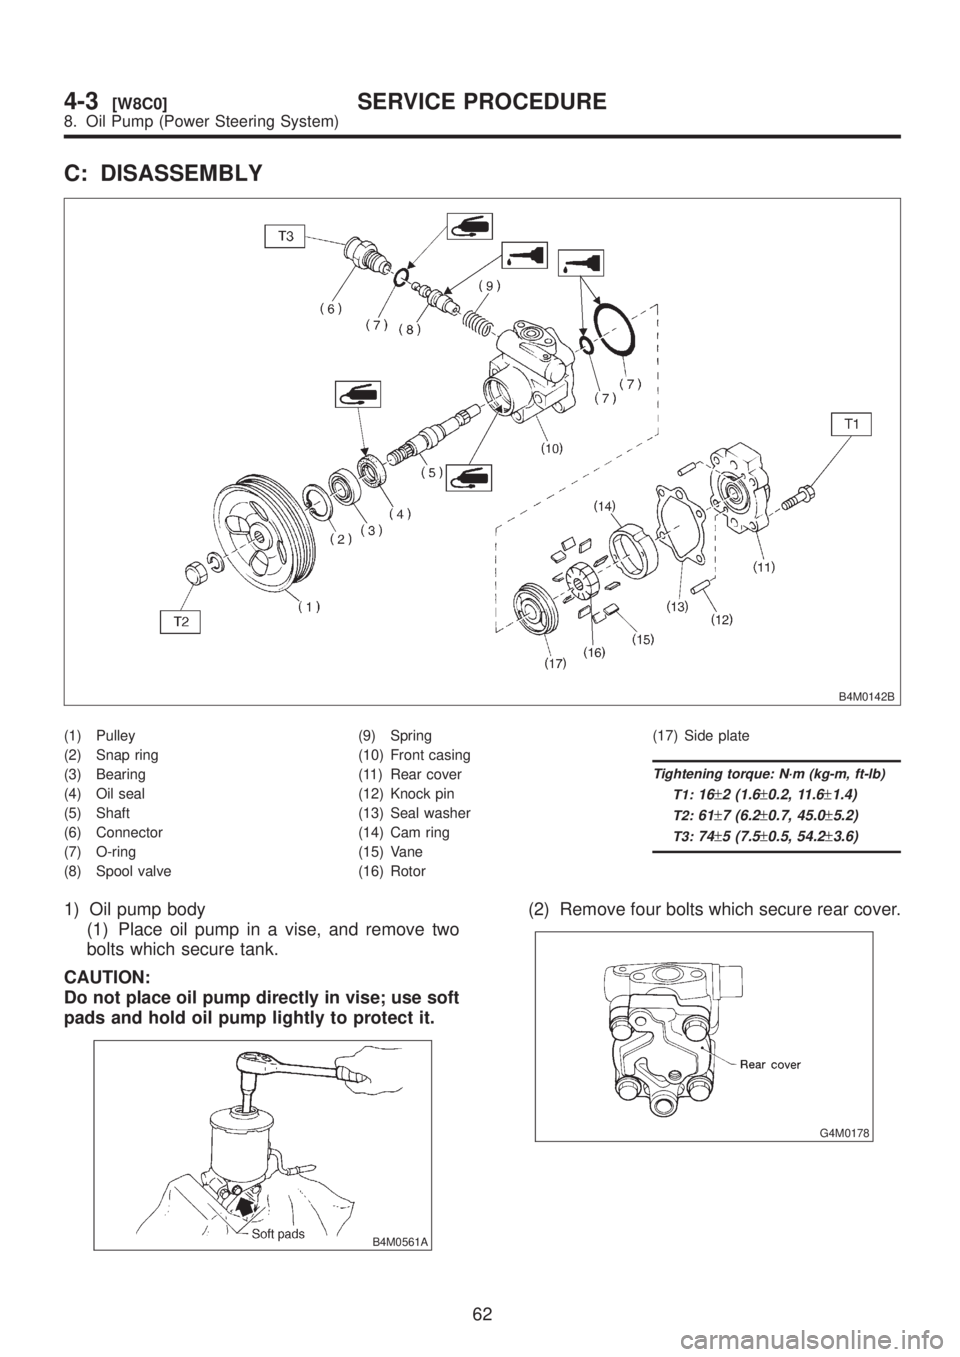
B4M0142B
(1) Pulley
(2) Snap ring
(3) Bearing
(4) Oil seal
(5) Shaft
(6) Connector
(7) O-ring
(8) Spool valve(9) Spring
(10) Front casing
(11) Rear cover
(12) Knock pin
(13) Seal washer
(14) Cam ring
(15) Vane
(16) Rotor(17) Side plate
Tightening torque: N´m (kg-m, ft-lb)
T1:
16±2 (1.6±0.2, 11.6±1.4)
T2:61±7 (6.2±0.7, 45.0±5.2)
T3:74±5 (7.5±0.5, 54.2±3.6)
1) Oil pump body
(1) Place oil pump in a vise, and remove two
bolts which secure tank.
CAUTION:
Do not place oil pump directly in vise; use soft
pads and hold oil pump lightly to protect it.
B4M0561A
(2) Remove four bolts which secure rear cover.
G4M0178
62
4-3[W8C0]SERVICE PROCEDURE
8. Oil Pump (Power Steering System)
Page 856 of 1456
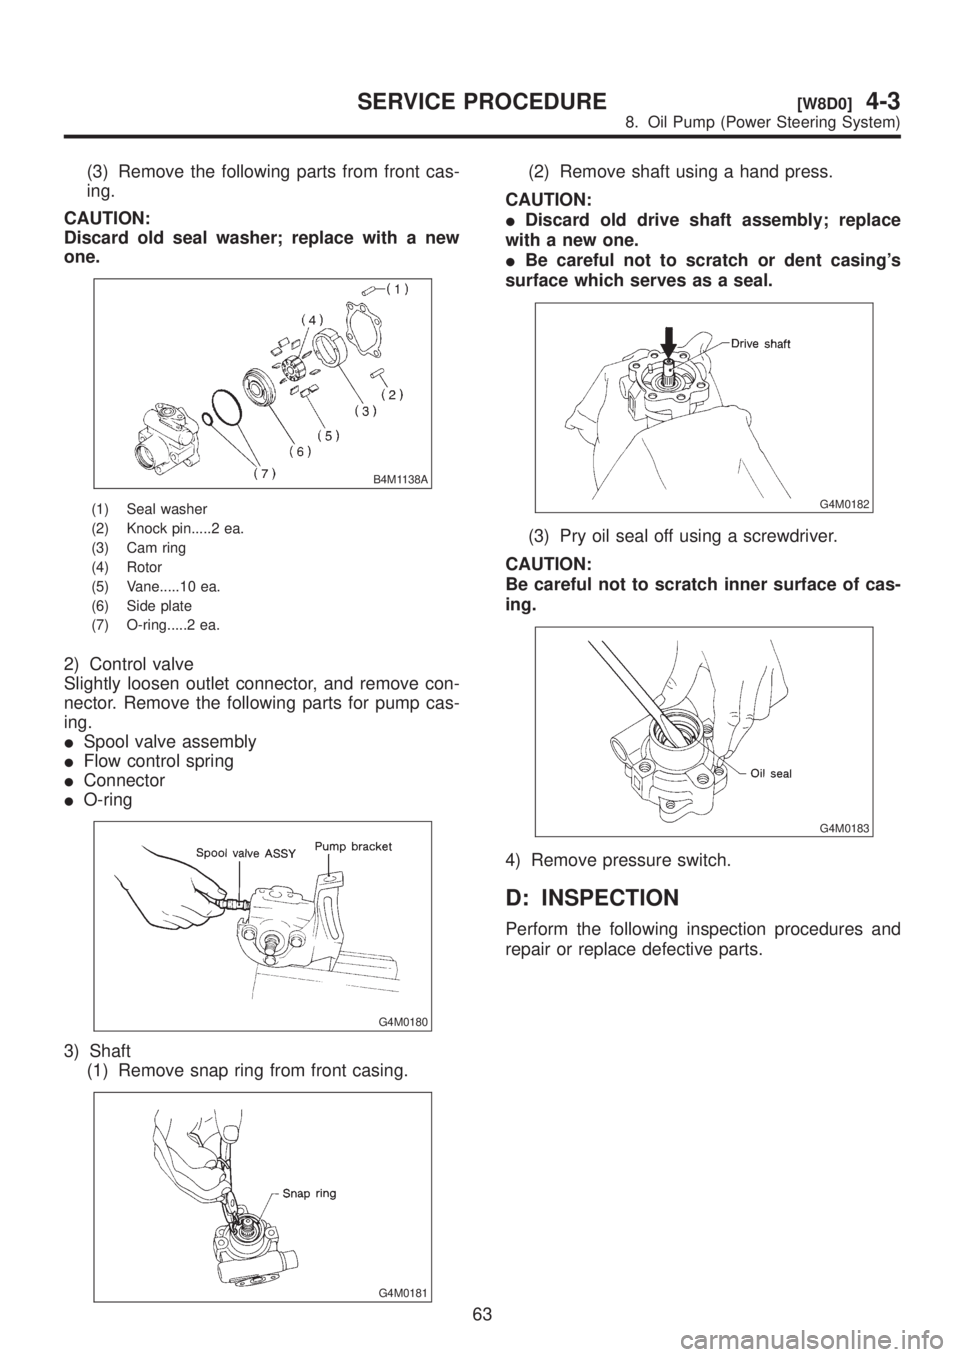
(3) Remove the following parts from front cas-
ing.
CAUTION:
Discard old seal washer; replace with a new
one.
B4M1138A
(1) Seal washer
(2) Knock pin.....2 ea.
(3) Cam ring
(4) Rotor
(5) Vane.....10 ea.
(6) Side plate
(7) O-ring.....2 ea.
2) Control valve
Slightly loosen outlet connector, and remove con-
nector. Remove the following parts for pump cas-
ing.
ISpool valve assembly
IFlow control spring
IConnector
IO-ring
G4M0180
3) Shaft
(1) Remove snap ring from front casing.
G4M0181
(2) Remove shaft using a hand press.
CAUTION:
IDiscard old drive shaft assembly; replace
with a new one.
IBe careful not to scratch or dent casing's
surface which serves as a seal.
G4M0182
(3) Pry oil seal off using a screwdriver.
CAUTION:
Be careful not to scratch inner surface of cas-
ing.
G4M0183
4) Remove pressure switch.
D: INSPECTION
Perform the following inspection procedures and
repair or replace defective parts.
63
[W8D0]4-3SERVICE PROCEDURE
8. Oil Pump (Power Steering System)
Page 857 of 1456
Part name Description Remedy
1. Front casing(1) Damage on body surfaces
(2) Excessive wear on hole, into which spool
valve is inserted.
(3) Wear and damage on cartridge assembly
mounting surface
(4) Wear and damage on surfaces in contact
with shaft and oil sealReplace with a new one together with spool valve
as selective fit is made.
2. Rear cover(1) Damage on body surfaces
(2) Wear and damage on sliding surfacesReplace with a new one.
3. Shaft(1) Shaft bend
(2) Wear and damage on surfaces in contact
with bushing and oil seal
(3) Wear and damage on rotor mounting sur-
faces
(4) Bearing damageReplace with a new one.
4. Side plate Wear and damage on sliding surfaces Replace with a new one.
5. Cam ring Ridge wear on sliding surfaces
If damage is serious, replace with a new car-
tridge assembly. 6. Vane Excessive wear on nose radius and side surfaces
7. Rotor(1) Wear and damage on sliding surfaces
(2) Ridge wear on vane sliding grooves (If light
leaks with vane in slit against light source)
(3) Damage resulting from snap ring removalCorrect with oil stone. If damage is serious,
replace with a new cartridge assembly.
8. Spool valve Damage or burrs on sliding surface peripheryReplace with a new one together with front cas-
ing as selective fit is made.
9. Connector Damage on threads Replace with a new one.
10. Spring Damage Replace with a new one.
11. Bolts and nuts Damage on threads Replace with a new one.
E: ASSEMBLY
1) Reassembly precautions
(1) Whenever O-rings, oil seals, and snap rings
are removed, they must be replaced with new
ones.
(2) Thoroughly wash parts and allow to dry.
They must be kept free from cleaning oil and
dust.
(3) Reassembly procedure must be performed
in clean place. Ensure that parts are kept away
from waste threads or other dust particles.
(4) Cleaning oil tends to stay inside the front
casing. Remove it completely by blowing com-
pressed air.
(5) Ensure that parts are free from rust. (Use
specified power steering fluid for rust prevention
after cleaning and drying.)
(6) Reverse the sequence of disassembly pro-
cedures.
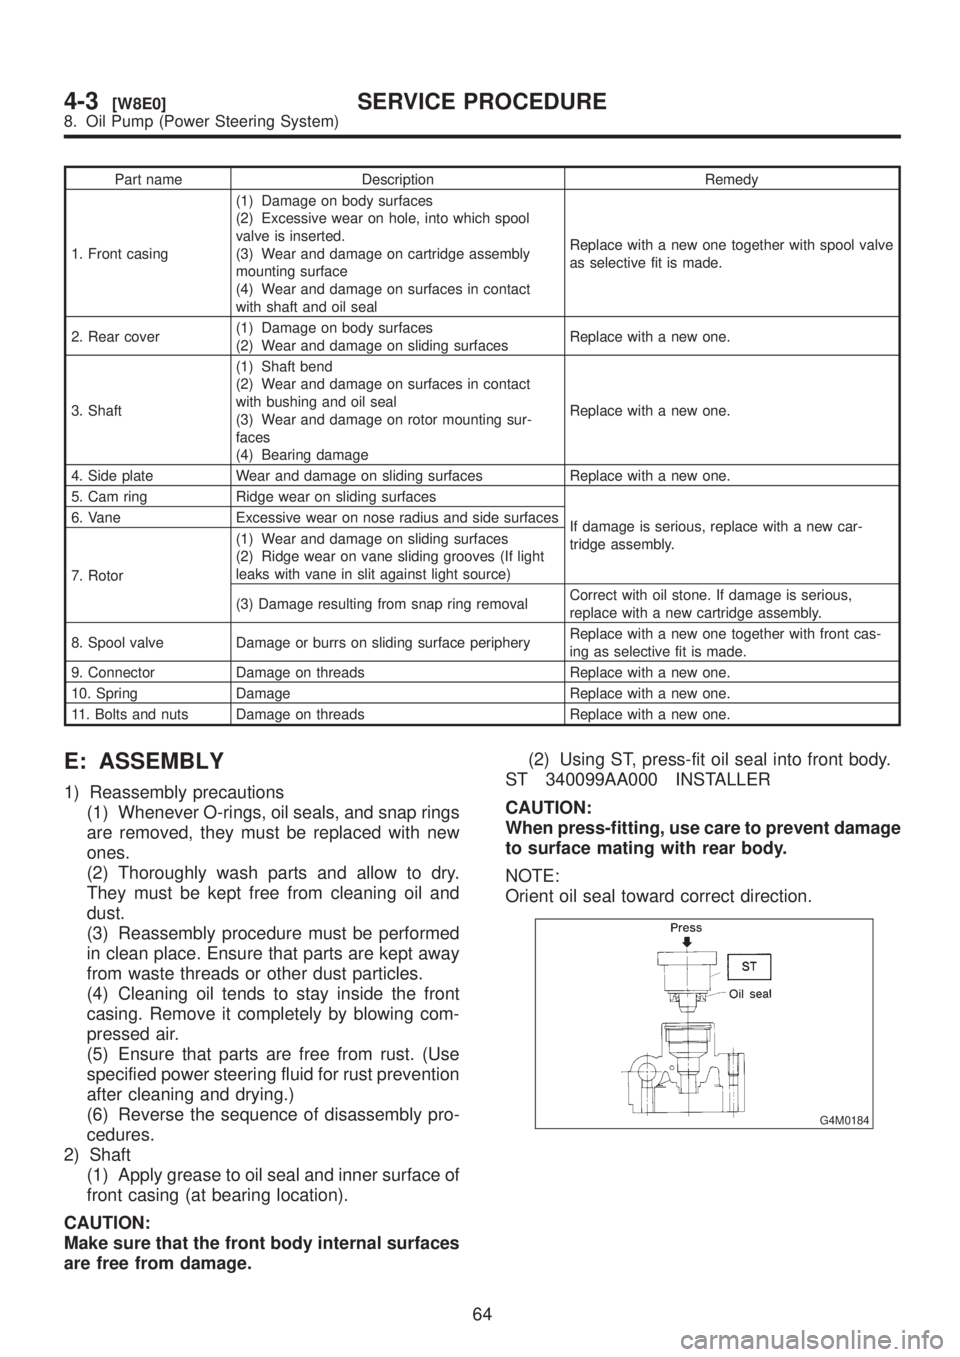
2) Shaft
(1) Apply grease to oil seal and inner surface of
front casing (at bearing location).
CAUTION:
Make sure that the front body internal surfaces
are free from damage.(2) Using ST, press-fit oil seal into front body.
ST 340099AA000 INSTALLER
CAUTION:
When press-fitting, use care to prevent damage
to surface mating with rear body.
NOTE:
Orient oil seal toward correct direction.
G4M0184
64
4-3[W8E0]SERVICE PROCEDURE
8. Oil Pump (Power Steering System)
Page 858 of 1456
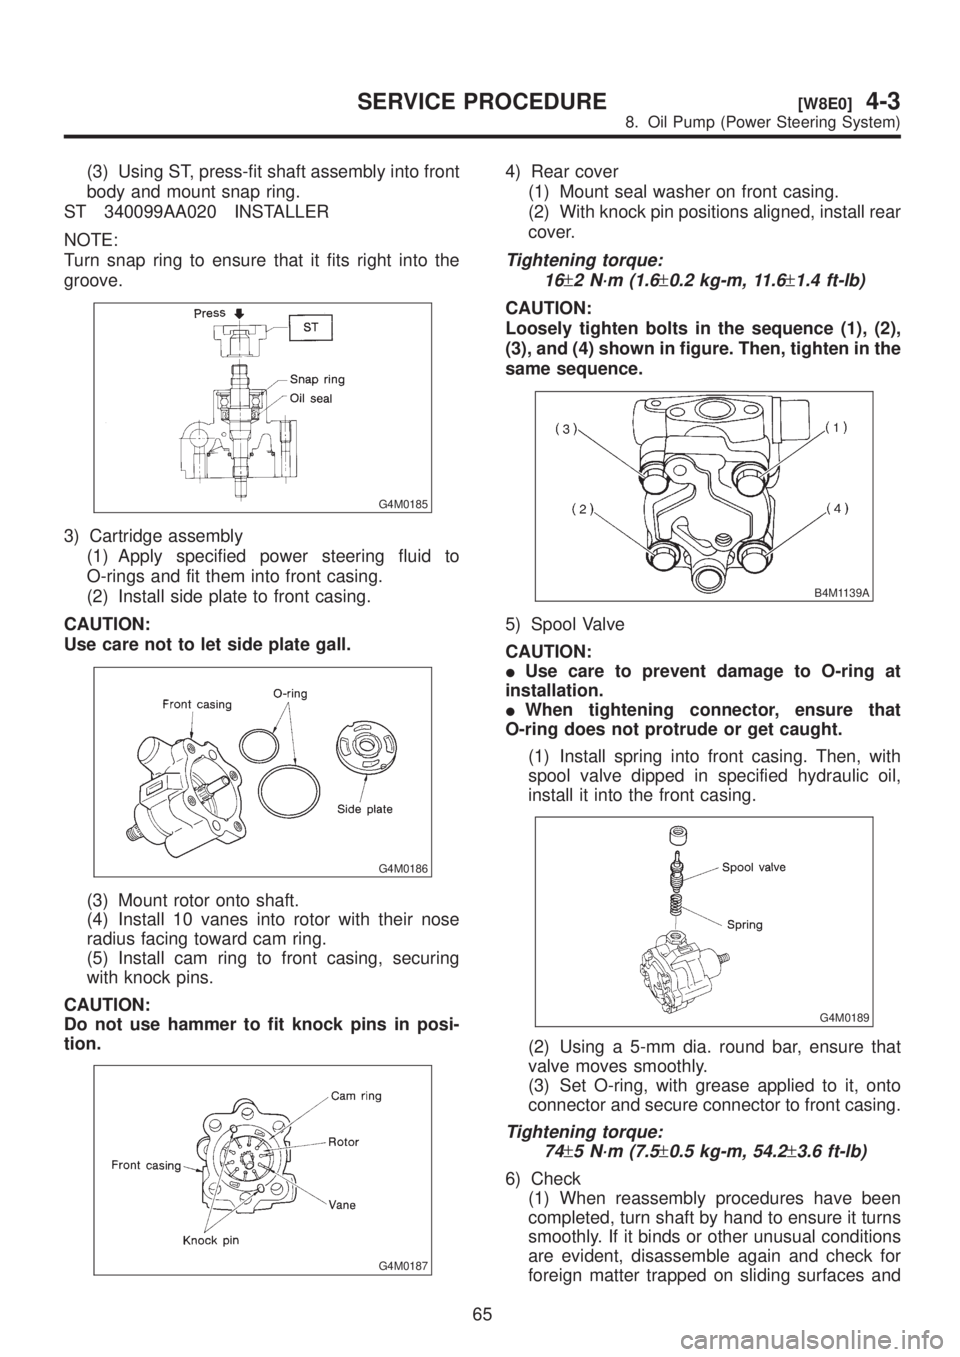
(3) Using ST, press-fit shaft assembly into front
body and mount snap ring.
ST 340099AA020 INSTALLER
NOTE:
Turn snap ring to ensure that it fits right into the
groove.
G4M0185
3) Cartridge assembly
(1) Apply specified power steering fluid to
O-rings and fit them into front casing.
(2) Install side plate to front casing.
CAUTION:
Use care not to let side plate gall.
G4M0186
(3) Mount rotor onto shaft.
(4) Install 10 vanes into rotor with their nose
radius facing toward cam ring.
(5) Install cam ring to front casing, securing
with knock pins.
CAUTION:
Do not use hammer to fit knock pins in posi-
tion.
G4M0187
4) Rear cover
(1) Mount seal washer on front casing.
(2) With knock pin positions aligned, install rear
cover.
Tightening torque:
16
±2 N´m (1.6±0.2 kg-m, 11.6±1.4 ft-lb)
CAUTION:
Loosely tighten bolts in the sequence (1), (2),
(3), and (4) shown in figure. Then, tighten in the
same sequence.
B4M1139A
5) Spool Valve
CAUTION:
IUse care to prevent damage to O-ring at
installation.
IWhen tightening connector, ensure that
O-ring does not protrude or get caught.
(1) Install spring into front casing. Then, with
spool valve dipped in specified hydraulic oil,
install it into the front casing.
G4M0189
(2) Using a 5-mm dia. round bar, ensure that
valve moves smoothly.
(3) Set O-ring, with grease applied to it, onto
connector and secure connector to front casing.
Tightening torque:
74
±5 N´m (7.5±0.5 kg-m, 54.2±3.6 ft-lb)
6) Check
(1) When reassembly procedures have been
completed, turn shaft by hand to ensure it turns
smoothly. If it binds or other unusual conditions
are evident, disassemble again and check for
foreign matter trapped on sliding surfaces and
65
[W8E0]4-3SERVICE PROCEDURE
8. Oil Pump (Power Steering System)
Page 859 of 1456
improper installation. Eliminate the cause of
trouble.
(2) Check followings by referring to ªCHECKº
article.
IExcessive play in pulley shaft
IDitch deflection of pulley
IResistance to rotation of pulley
IMeasurement of generated oil pressure
F: INSTALLATION
1) Install bracket on engine.
Tightening torque:
22
±2 N´m (2.2±0.2 kg-m, 15.9±1.4 ft-lb)
2) Install oil pump on oil tank as follows outside
the vehicle:
NOTE:
Prior to installation, make sure that all oil is
removed from oil pump, oil tank and pipe.
3) Place oil pump in vise.
CAUTION:
Do not place oil pump directly in vise; use soft
pads and hold oil pump lightly to protect it.
4) Install O-ring on oil pump.
CAUTION:
Discard old O-ring and replace with a new one.
5) Install oil tank on oil pump.
Tightening torque:
Bolt C: 15.7
±2.4 N´m (1.60±0.24 kg-m,
11.58
±1.77 ft-lb)
Bolt D: 18.1
±2.5 N´m (1.85±0.25 kg-m,
13.35
±1.84 ft-lb)
CAUTION:
Discard old seal washer and replace with a new
one.
B4M0562A
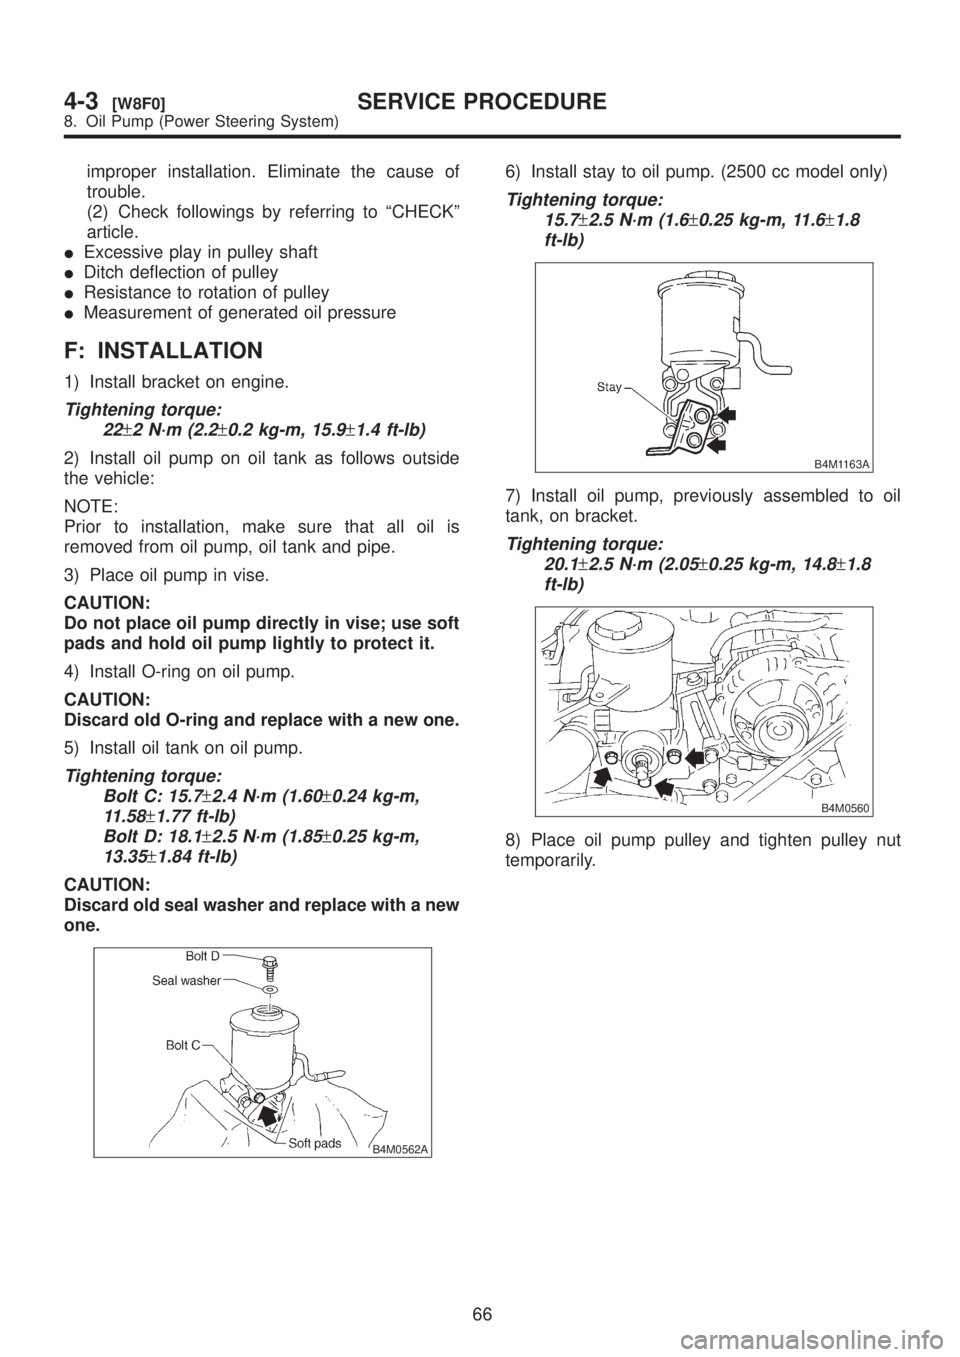
6) Install stay to oil pump. (2500 cc model only)
Tightening torque:
15.7
±2.5 N´m (1.6±0.25 kg-m, 11.6±1.8
ft-lb)
B4M1163A
7) Install oil pump, previously assembled to oil
tank, on bracket.
Tightening torque:
20.1
±2.5 N´m (2.05±0.25 kg-m, 14.8±1.8
ft-lb)
B4M0560
8) Place oil pump pulley and tighten pulley nut
temporarily.
66
4-3[W8F0]SERVICE PROCEDURE
8. Oil Pump (Power Steering System)
Page 860 of 1456
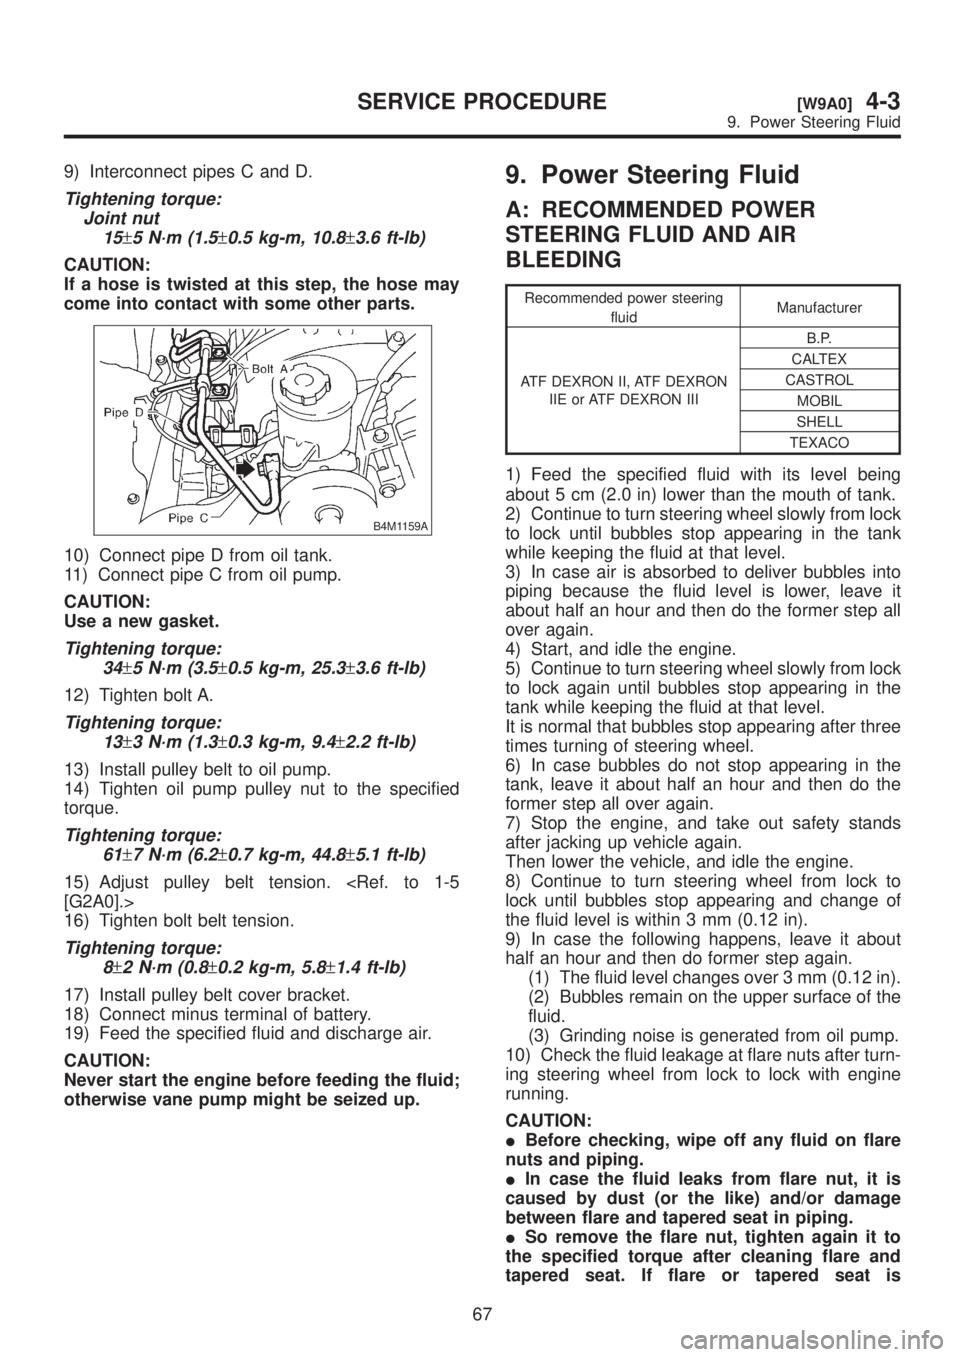
9) Interconnect pipes C and D.
Tightening torque:
Joint nut
15
±5 N´m (1.5±0.5 kg-m, 10.8±3.6 ft-lb)
CAUTION:
If a hose is twisted at this step, the hose may
come into contact with some other parts.
B4M1159A
10) Connect pipe D from oil tank.
11) Connect pipe C from oil pump.
CAUTION:
Use a new gasket.
Tightening torque:
34
±5 N´m (3.5±0.5 kg-m, 25.3±3.6 ft-lb)
12) Tighten bolt A.
Tightening torque:
13
±3 N´m (1.3±0.3 kg-m, 9.4±2.2 ft-lb)
13) Install pulley belt to oil pump.
14) Tighten oil pump pulley nut to the specified
torque.
Tightening torque:
61
±7 N´m (6.2±0.7 kg-m, 44.8±5.1 ft-lb)
15) Adjust pulley belt tension.
16) Tighten bolt belt tension.
Tightening torque:
8
±2 N´m (0.8±0.2 kg-m, 5.8±1.4 ft-lb)
17) Install pulley belt cover bracket.
18) Connect minus terminal of battery.
19) Feed the specified fluid and discharge air.
CAUTION:
Never start the engine before feeding the fluid;
otherwise vane pump might be seized up.
9. Power Steering Fluid
A: RECOMMENDED POWER
STEERING FLUID AND AIR
BLEEDING
Recommended power steering
fluidManufacturer
ATF DEXRON II, ATF DEXRON
IIE or ATF DEXRON IIIB.P.
CALTEX
CASTROL
MOBIL
SHELL
TEXACO
1) Feed the specified fluid with its level being
about 5 cm (2.0 in) lower than the mouth of tank.
2) Continue to turn steering wheel slowly from lock
to lock until bubbles stop appearing in the tank
while keeping the fluid at that level.
3) In case air is absorbed to deliver bubbles into
piping because the fluid level is lower, leave it
about half an hour and then do the former step all
over again.
4) Start, and idle the engine.
5) Continue to turn steering wheel slowly from lock
to lock again until bubbles stop appearing in the
tank while keeping the fluid at that level.
It is normal that bubbles stop appearing after three
times turning of steering wheel.
6) In case bubbles do not stop appearing in the
tank, leave it about half an hour and then do the
former step all over again.
7) Stop the engine, and take out safety stands
after jacking up vehicle again.
Then lower the vehicle, and idle the engine.
8) Continue to turn steering wheel from lock to
lock until bubbles stop appearing and change of
the fluid level is within 3 mm (0.12 in).
9) In case the following happens, leave it about
half an hour and then do former step again.
(1) The fluid level changes over 3 mm (0.12 in).
(2) Bubbles remain on the upper surface of the
fluid.
(3) Grinding noise is generated from oil pump.
10) Check the fluid leakage at flare nuts after turn-
ing steering wheel from lock to lock with engine
running.
CAUTION:
IBefore checking, wipe off any fluid on flare
nuts and piping.
IIn case the fluid leaks from flare nut, it is
caused by dust (or the like) and/or damage
between flare and tapered seat in piping.
ISo remove the flare nut, tighten again it to
the specified torque after cleaning flare and
tapered seat. If flare or tapered seat is
67
[W9A0]4-3SERVICE PROCEDURE
9. Power Steering Fluid