turn SUBARU OUTBACK 2022 Getting Started Guide
[x] Cancel search | Manufacturer: SUBARU, Model Year: 2022, Model line: OUTBACK, Model: SUBARU OUTBACK 2022Pages: 172, PDF Size: 58.6 MB
Page 51 of 172
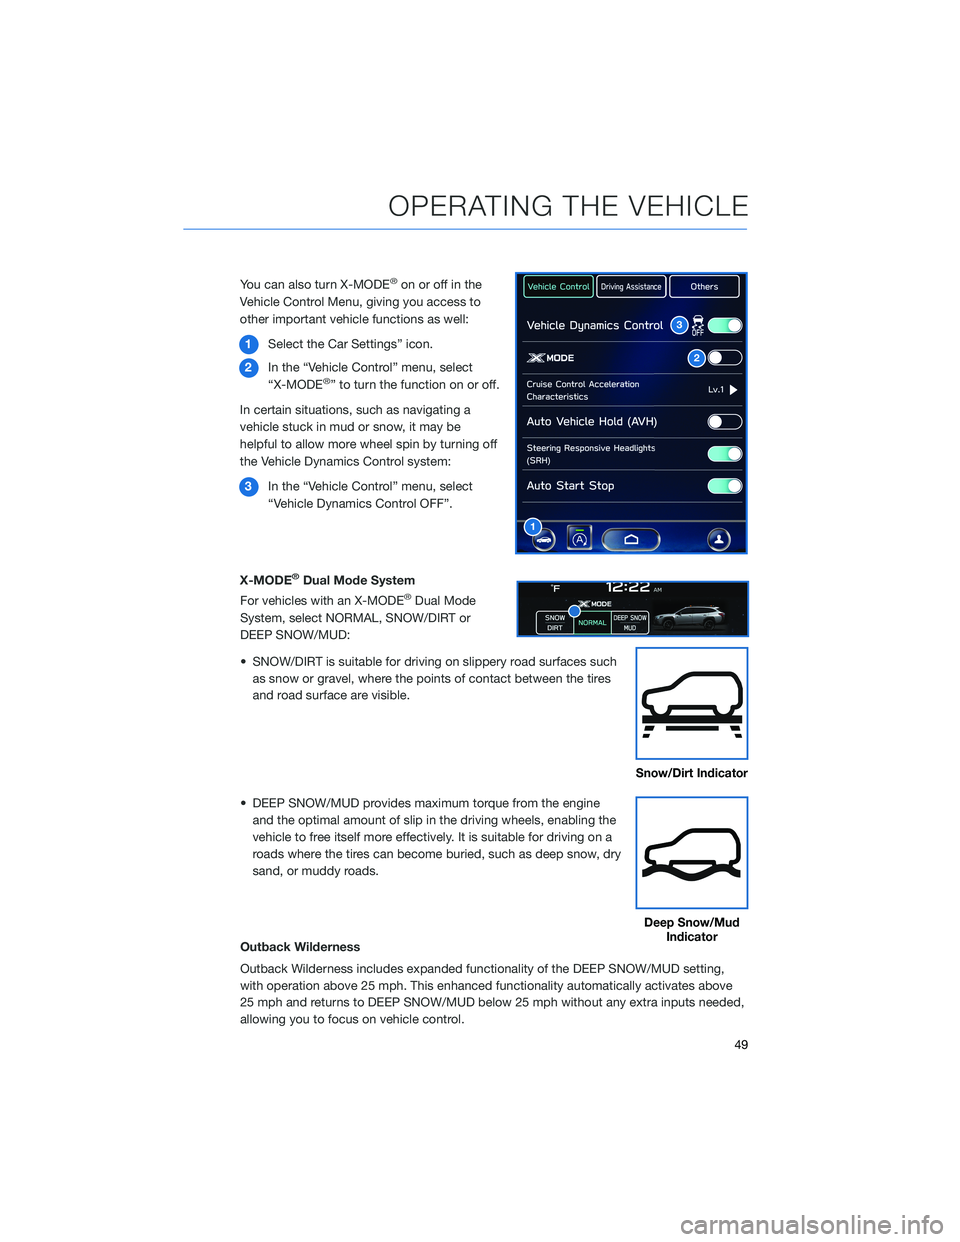
You can also turn X-MODE®on or off in the
Vehicle Control Menu, giving you access to
other important vehicle functions as well:
1Select the Car Settings” icon.
2In the “Vehicle Control” menu, select
“X-MODE
®” to turn the function on or off.
In certain situations, such as navigating a
vehicle stuck in mud or snow, it may be
helpful to allow more wheel spin by turning off
the Vehicle Dynamics Control system:
3In the “Vehicle Control” menu, select
“Vehicle Dynamics Control OFF”.
X-MODE
®Dual Mode System
For vehicles with an X-MODE®Dual Mode
System, select NORMAL, SNOW/DIRT or
DEEP SNOW/MUD:
• SNOW/DIRT is suitable for driving on slippery road surfaces such
as snow or gravel, where the points of contact between the tires
and road surface are visible.
• DEEP SNOW/MUD provides maximum torque from the engine
and the optimal amount of slip in the driving wheels, enabling the
vehicle to free itself more effectively. It is suitable for driving on a
roads where the tires can become buried, such as deep snow, dry
sand, or muddy roads.
Outback Wilderness
Outback Wilderness includes expanded functionality of the DEEP SNOW/MUD setting,
with operation above 25 mph. This enhanced functionality automatically activates above
25 mph and returns to DEEP SNOW/MUD below 25 mph without any extra inputs needed,
allowing you to focus on vehicle control.
2
3
1
Snow/Dirt Indicator
Deep Snow/Mud
Indicator
OPERATING THE VEHICLE
49
Page 52 of 172
Hill Descent Control (HDC)
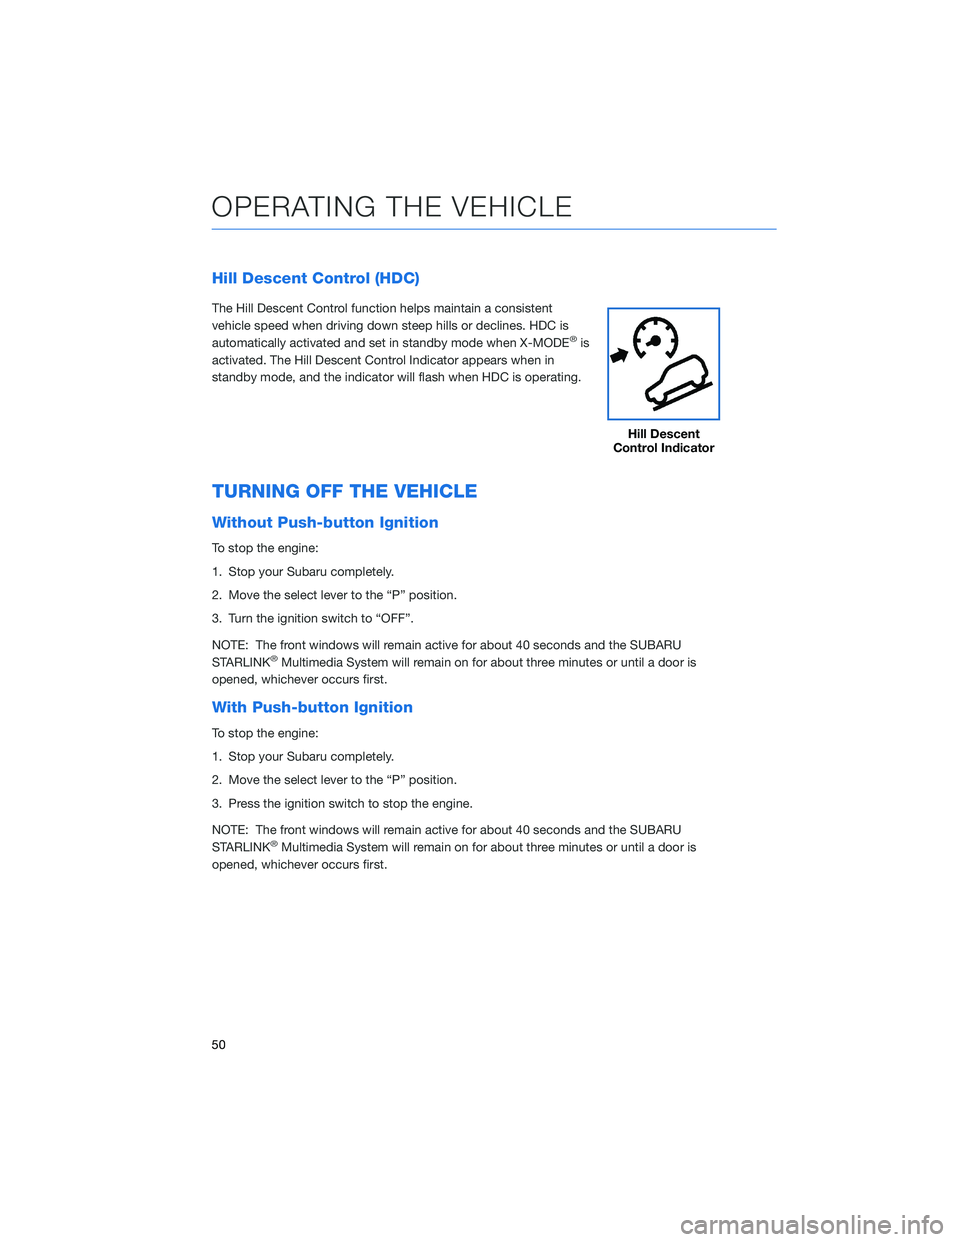
The Hill Descent Control function helps maintain a consistent
vehicle speed when driving down steep hills or declines. HDC is
automatically activated and set in standby mode when X-MODE
®is
activated. The Hill Descent Control Indicator appears when in
standby mode, and the indicator will flash when HDC is operating.
TURNING OFF THE VEHICLE
Without Push-button Ignition
To stop the engine:
1. Stop your Subaru completely.
2. Move the select lever to the “P” position.
3. Turn the ignition switch to “OFF”.
NOTE: The front windows will remain active for about 40 seconds and the SUBARU
STARLINK
®Multimedia System will remain on for about three minutes or until a door is
opened, whichever occurs first.
With Push-button Ignition
To stop the engine:
1. Stop your Subaru completely.
2. Move the select lever to the “P” position.
3. Press the ignition switch to stop the engine.
NOTE: The front windows will remain active for about 40 seconds and the SUBARU
STARLINK
®Multimedia System will remain on for about three minutes or until a door is
opened, whichever occurs first.
Hill Descent
Control Indicator
OPERATING THE VEHICLE
50
Page 53 of 172
FUEL FILLER LID
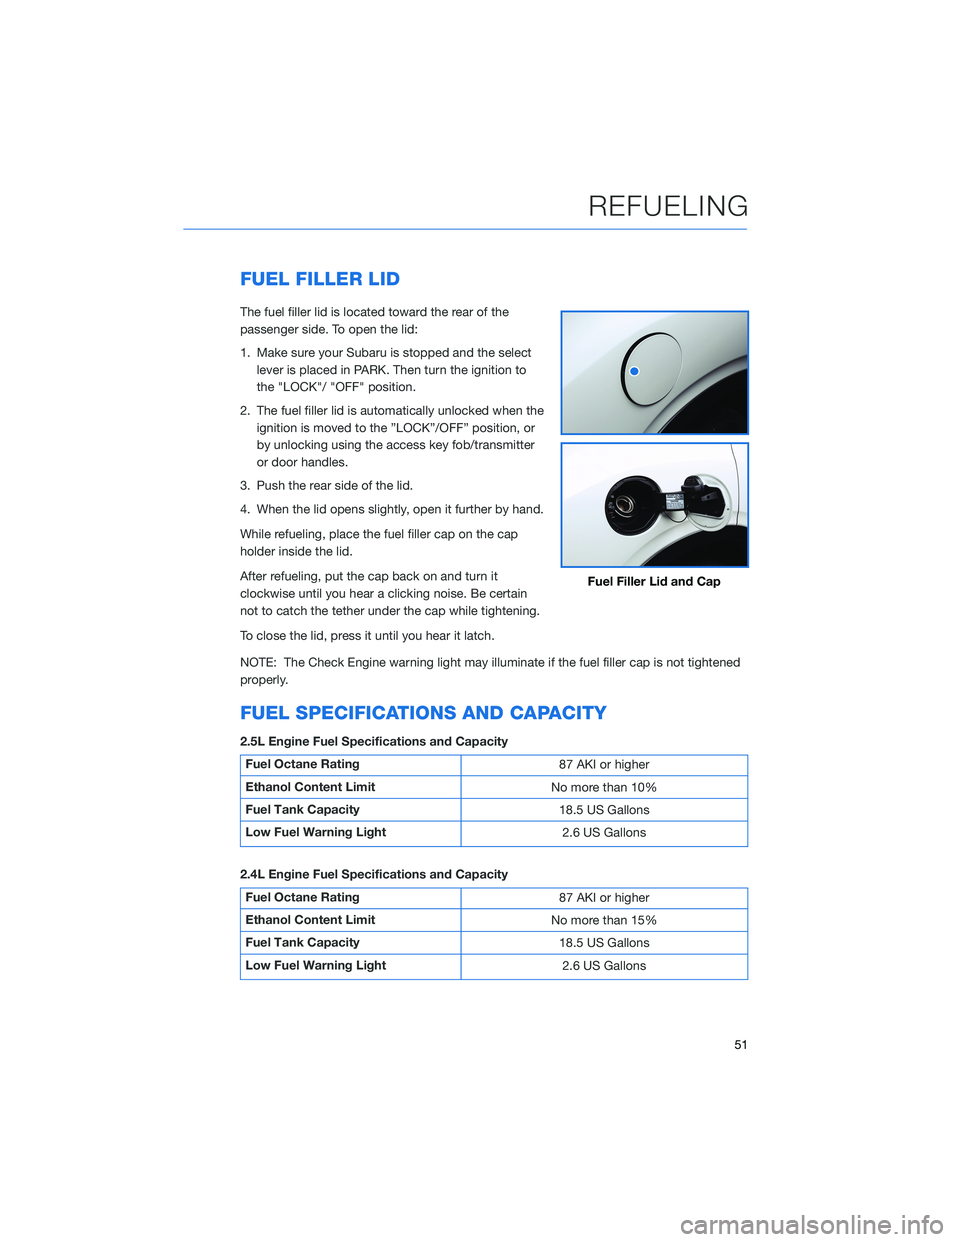
The fuel filler lid is located toward the rear of the
passenger side. To open the lid:
1. Make sure your Subaru is stopped and the select
lever is placed in PARK. Then turn the ignition to
the "LOCK"/ "OFF" position.
2. The fuel filler lid is automatically unlocked when the
ignition is moved to the ”LOCK”/OFF” position, or
by unlocking using the access key fob/transmitter
or door handles.
3. Push the rear side of the lid.
4. When the lid opens slightly, open it further by hand.
While refueling, place the fuel filler cap on the cap
holder inside the lid.
After refueling, put the cap back on and turn it
clockwise until you hear a clicking noise. Be certain
not to catch the tether under the cap while tightening.
To close the lid, press it until you hear it latch.
NOTE: The Check Engine warning light may illuminate if the fuel filler cap is not tightened
properly.
FUEL SPECIFICATIONS AND CAPACITY
2.5L Engine Fuel Specifications and Capacity
Fuel Octane Rating
87 AKI or higher
Ethanol Content Limit
No more than 10%
Fuel Tank Capacity
18.5 US Gallons
Low Fuel Warning Light
2.6 US Gallons
2.4L Engine Fuel Specifications and Capacity
Fuel Octane Rating
87 AKI or higher
Ethanol Content Limit
No more than 15%
Fuel Tank Capacity
18.5 US Gallons
Low Fuel Warning Light
2.6 US Gallons
Fuel Filler Lid and Cap
REFUELING
51
Page 54 of 172
FOLDING THE REAR SEATS
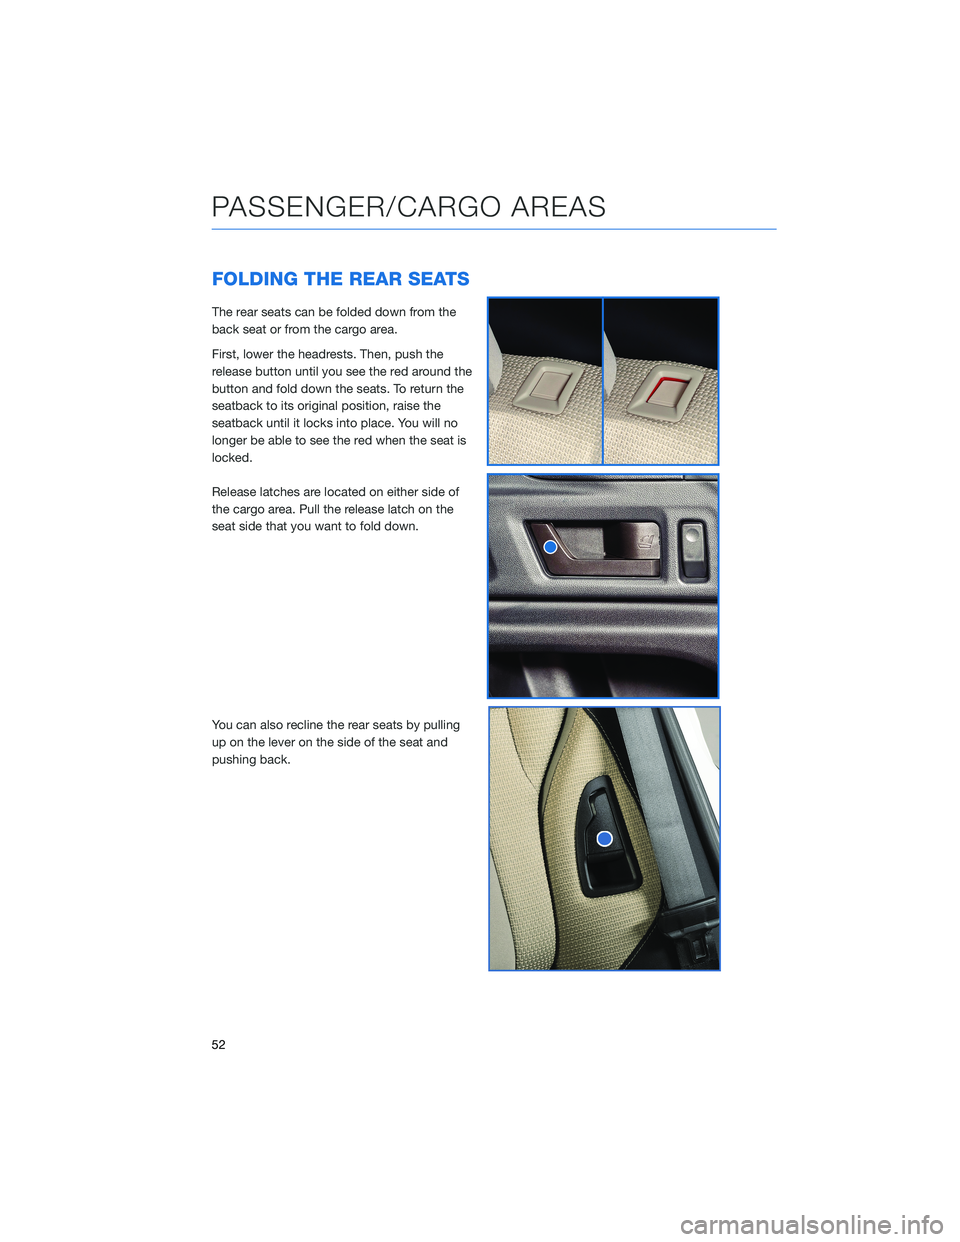
The rear seats can be folded down from the
back seat or from the cargo area.
First, lower the headrests. Then, push the
release button until you see the red around the
button and fold down the seats. To return the
seatback to its original position, raise the
seatback until it locks into place. You will no
longer be able to see the red when the seat is
locked.
Release latches are located on either side of
the cargo area. Pull the release latch on the
seat side that you want to fold down.
You can also recline the rear seats by pulling
up on the lever on the side of the seat and
pushing back.
PASSENGER/CARGO AREAS
52
Page 57 of 172
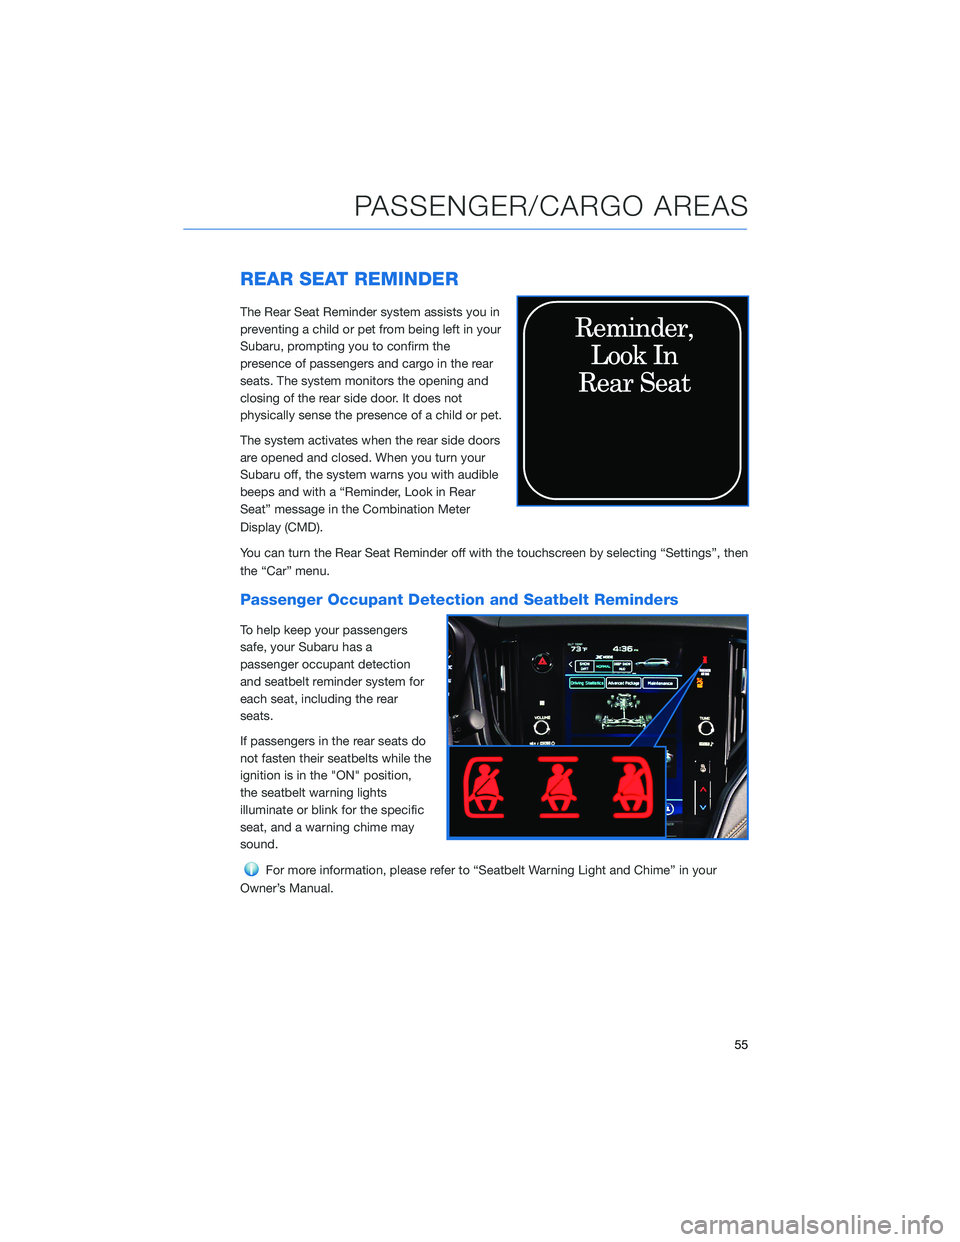
REAR SEAT REMINDER
The Rear Seat Reminder system assists you in
preventing a child or pet from being left in your
Subaru, prompting you to confirm the
presence of passengers and cargo in the rear
seats. The system monitors the opening and
closing of the rear side door. It does not
physically sense the presence of a child or pet.
The system activates when the rear side doors
are opened and closed. When you turn your
Subaru off, the system warns you with audible
beeps and with a “Reminder, Look in Rear
Seat” message in the Combination Meter
Display (CMD).
You can turn the Rear Seat Reminder off with the touchscreen by selecting “Settings”, then
the “Car” menu.
Passenger Occupant Detection and Seatbelt Reminders
To help keep your passengers
safe, your Subaru has a
passenger occupant detection
and seatbelt reminder system for
each seat, including the rear
seats.
If passengers in the rear seats do
not fasten their seatbelts while the
ignition is in the "ON" position,
the seatbelt warning lights
illuminate or blink for the specific
seat, and a warning chime may
sound.
For more information, please refer to “Seatbelt Warning Light and Chime” in your
Owner’s Manual.
PASSENGER/CARGO AREAS
55
Page 64 of 172
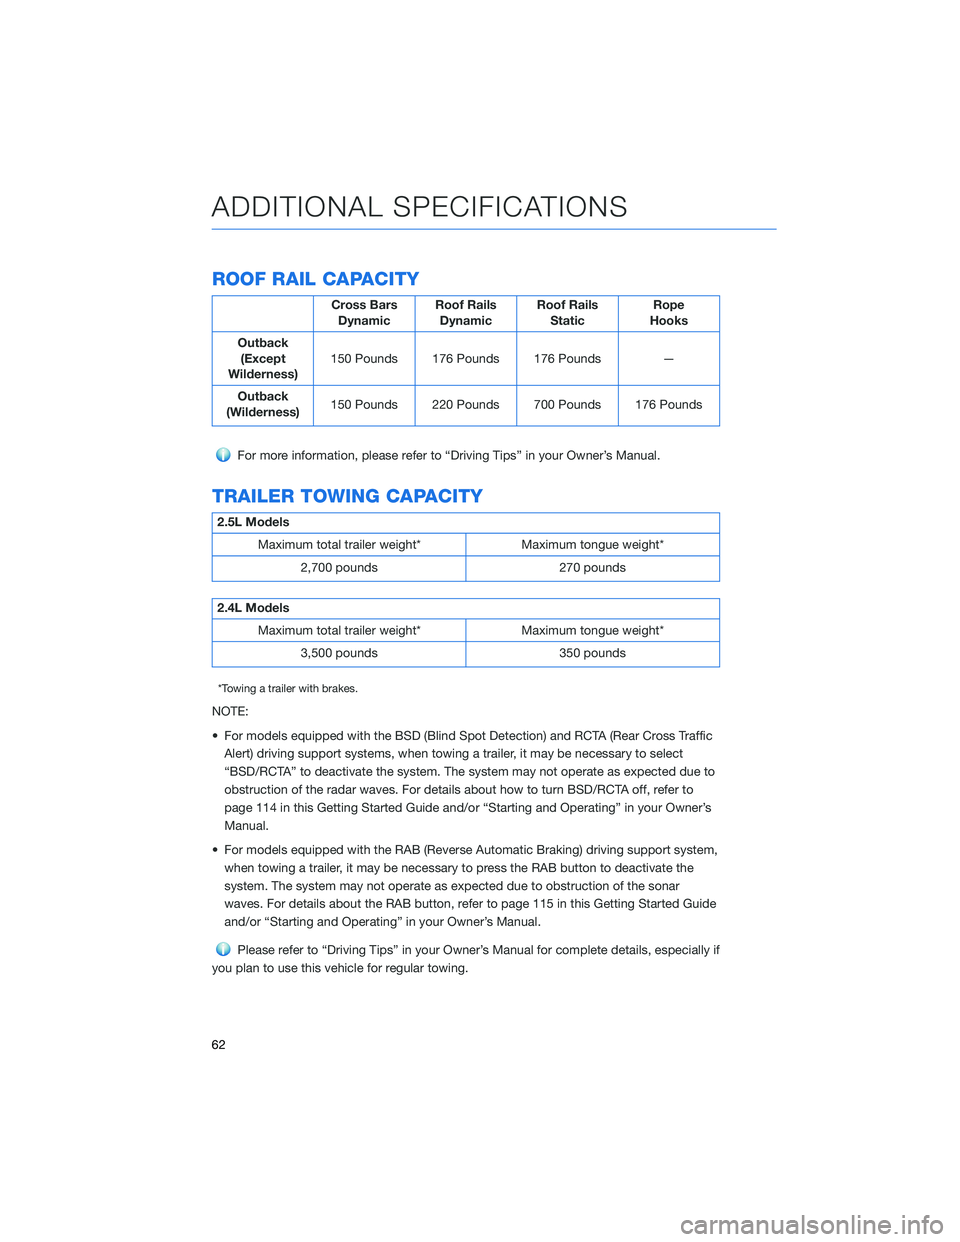
ROOF RAIL CAPACITY
Cross Bars
DynamicRoof Rails
DynamicRoof Rails
StaticRope
Hooks
Outback
(Except
Wilderness)150 Pounds 176 Pounds 176 Pounds —
Outback
(Wilderness)150 Pounds 220 Pounds 700 Pounds 176 Pounds
For more information, please refer to “Driving Tips” in your Owner’s Manual.
TRAILER TOWING CAPACITY
2.5L Models
Maximum total trailer weight* Maximum tongue weight*
2,700 pounds 270 pounds
2.4L Models
Maximum total trailer weight* Maximum tongue weight*
3,500 pounds 350 pounds
*Towing a trailer with brakes.
NOTE:
• For models equipped with the BSD (Blind Spot Detection) and RCTA (Rear Cross Traffic
Alert) driving support systems, when towing a trailer, it may be necessary to select
“BSD/RCTA” to deactivate the system. The system may not operate as expected due to
obstruction of the radar waves. For details about how to turn BSD/RCTA off, refer to
page 114 in this Getting Started Guide and/or “Starting and Operating” in your Owner’s
Manual.
• For models equipped with the RAB (Reverse Automatic Braking) driving support system,
when towing a trailer, it may be necessary to press the RAB button to deactivate the
system. The system may not operate as expected due to obstruction of the sonar
waves. For details about the RAB button, refer to page 115 in this Getting Started Guide
and/or “Starting and Operating” in your Owner’s Manual.
Please refer to “Driving Tips” in your Owner’s Manual for complete details, especially if
you plan to use this vehicle for regular towing.
ADDITIONAL SPECIFICATIONS
62
Page 69 of 172
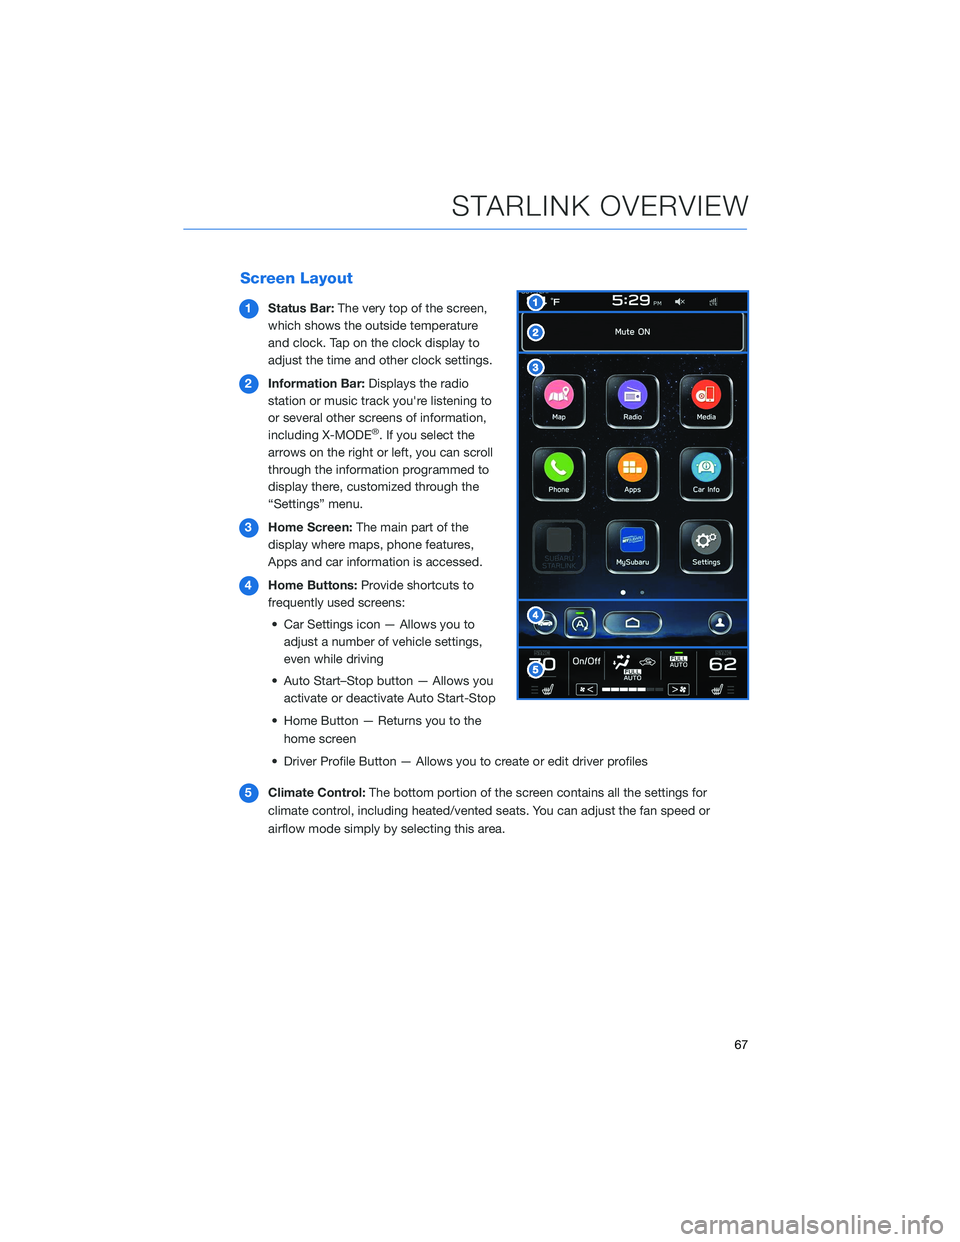
Screen Layout
1Status Bar:The very top of the screen,
which shows the outside temperature
and clock. Tap on the clock display to
adjust the time and other clock settings.
2Information Bar:Displays the radio
station or music track you're listening to
or several other screens of information,
including X-MODE
®. If you select the
arrows on the right or left, you can scroll
through the information programmed to
display there, customized through the
“Settings” menu.
3Home Screen:The main part of the
display where maps, phone features,
Apps and car information is accessed.
4Home Buttons:Provide shortcuts to
frequently used screens:
• Car Settings icon — Allows you to
adjust a number of vehicle settings,
even while driving
• Auto Start–Stop button — Allows you
activate or deactivate Auto Start-Stop
• Home Button — Returns you to the
home screen
• Driver Profile Button — Allows you to create or edit driver profiles
5Climate Control:The bottom portion of the screen contains all the settings for
climate control, including heated/vented seats. You can adjust the fan speed or
airflow mode simply by selecting this area.
STARLINK OVERVIEW
67
Page 70 of 172
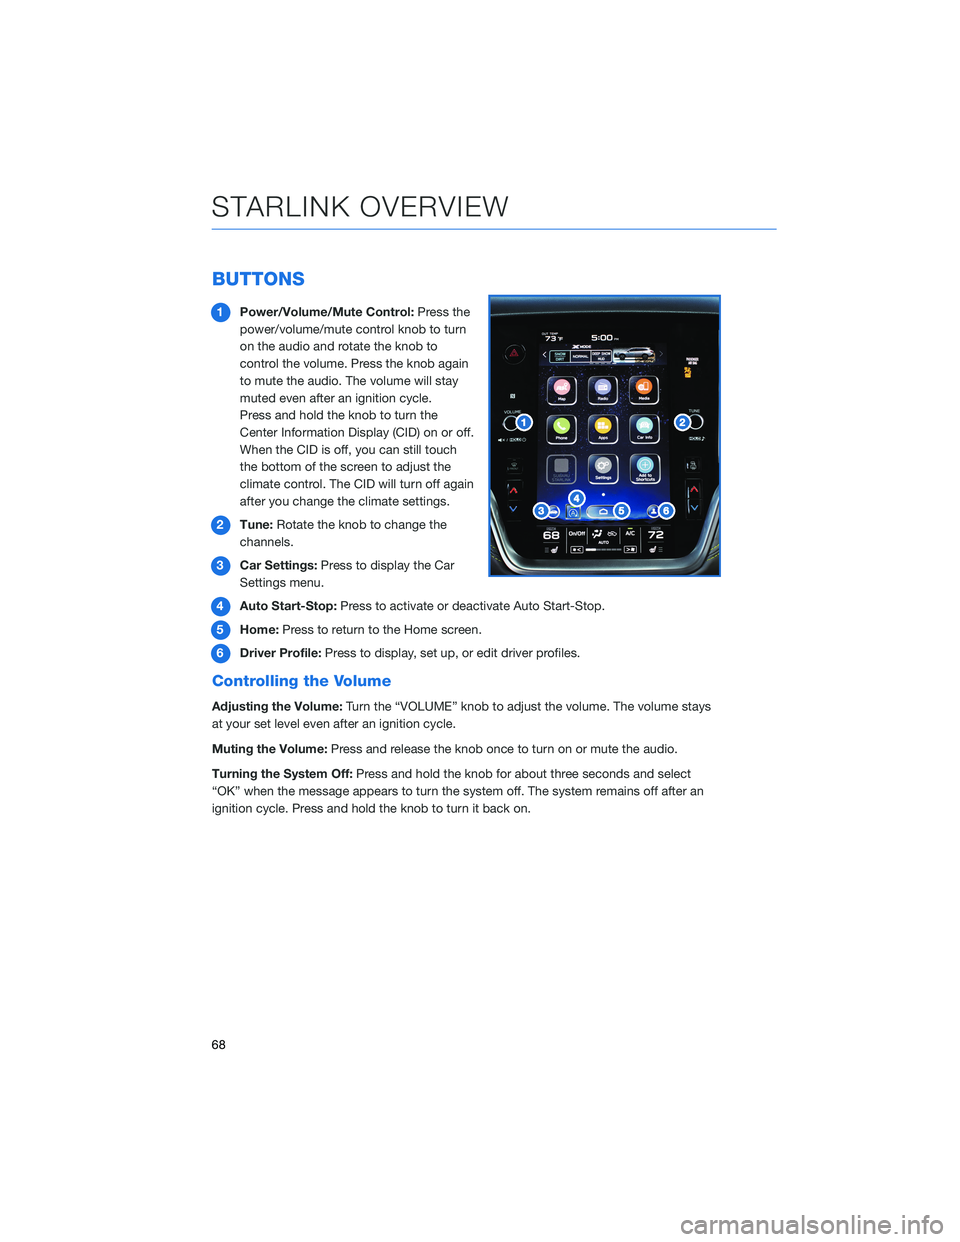
BUTTONS
1Power/Volume/Mute Control:Press the
power/volume/mute control knob to turn
on the audio and rotate the knob to
control the volume. Press the knob again
to mute the audio. The volume will stay
muted even after an ignition cycle.
Press and hold the knob to turn the
Center Information Display (CID) on or off.
When the CID is off, you can still touch
the bottom of the screen to adjust the
climate control. The CID will turn off again
after you change the climate settings.
2Tune:Rotate the knob to change the
channels.
3Car Settings:Press to display the Car
Settings menu.
4Auto Start-Stop:Press to activate or deactivate Auto Start-Stop.
5Home:Press to return to the Home screen.
6Driver Profile:Press to display, set up, or edit driver profiles.
Controlling the Volume
Adjusting the Volume:Turn the “VOLUME” knob to adjust the volume. The volume stays
at your set level even after an ignition cycle.
Muting the Volume:Press and release the knob once to turn on or mute the audio.
Turning the System Off:Press and hold the knob for about three seconds and select
“OK” when the message appears to turn the system off. The system remains off after an
ignition cycle. Press and hold the knob to turn it back on.
STARLINK OVERVIEW
68
Page 74 of 172
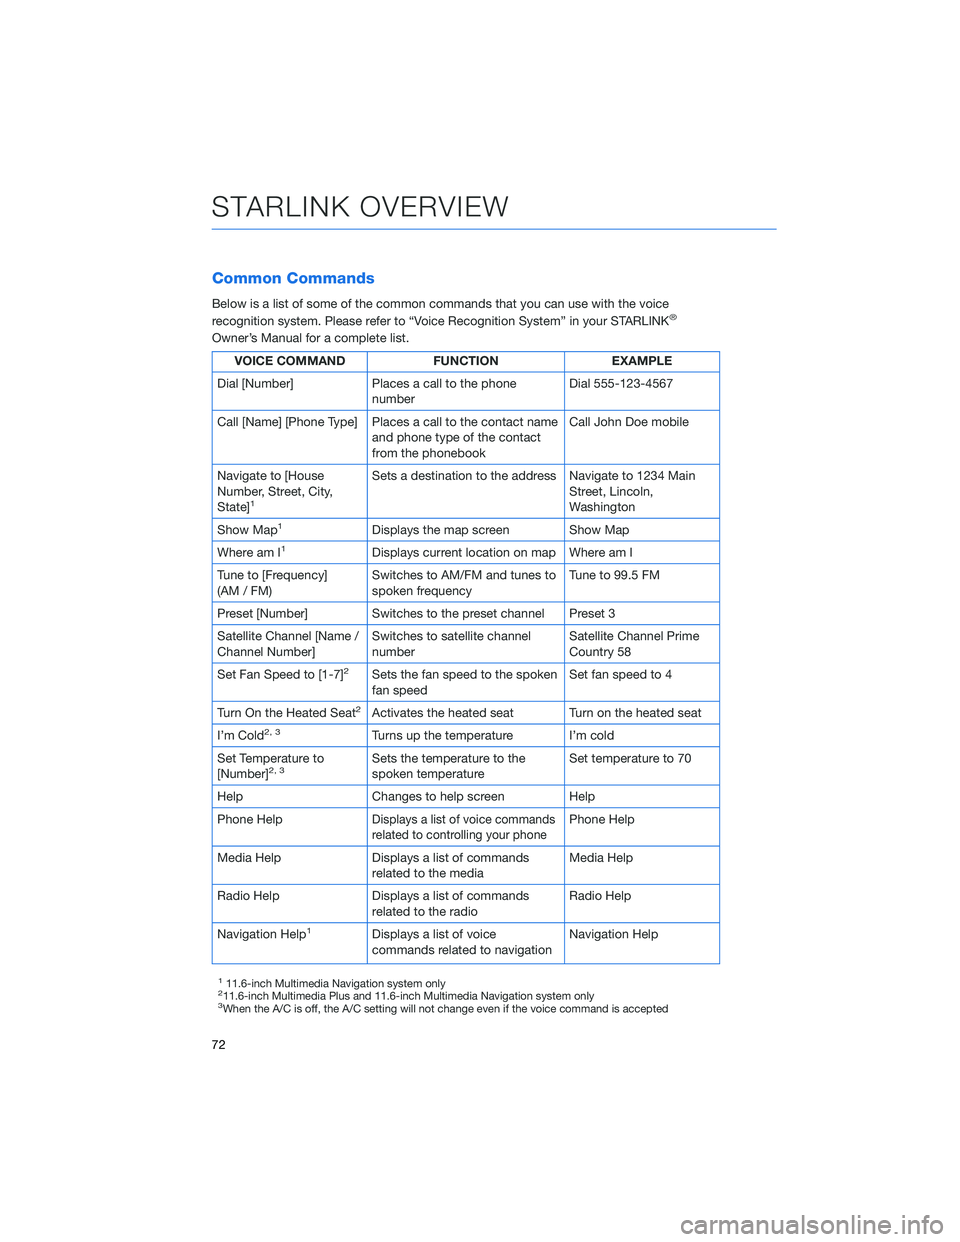
Common Commands
Below is a list of some of the common commands that you can use with the voice
recognition system. Please refer to “Voice Recognition System” in your STARLINK®
Owner’s Manual for a complete list.
VOICE COMMAND FUNCTION EXAMPLE
Dial [Number] Places a call to the phone
numberDial 555-123-4567
Call [Name] [Phone Type] Places a call to the contact name
and phone type of the contact
from the phonebookCall John Doe mobile
Navigate to [House
Number, Street, City,
State]
1
Sets a destination to the address Navigate to 1234 Main
Street, Lincoln,
Washington
Show Map
1Displays the map screen Show Map
Where am I
1Displays current location on map Where am I
Tune to [Frequency]
(AM / FM)Switches to AM/FM and tunes to
spoken frequencyTune to 99.5 FM
Preset [Number] Switches to the preset channel Preset 3
Satellite Channel [Name /
Channel Number]Switches to satellite channel
numberSatellite Channel Prime
Country 58
Set Fan Speed to [1-7]
2Sets the fan speed to the spoken
fan speedSet fan speed to 4
Turn On the Heated Seat
2Activates the heated seat Turn on the heated seat
I’m Cold
2, 3Turns up the temperature I’m cold
Set Temperature to
[Number]
2, 3Sets the temperature to the
spoken temperatureSet temperature to 70
Help Changes to help screen Help
Phone Help
Displays a list of voice commands
related to controlling your phonePhone Help
Media Help Displays a list of commands
related to the mediaMedia Help
Radio Help Displays a list of commands
related to the radioRadio Help
Navigation Help
1Displays a list of voice
commands related to navigationNavigation Help
111.6-inch Multimedia Navigation system only211.6-inch Multimedia Plus and 11.6-inch Multimedia Navigation system only3When the A/C is off, the A/C setting will not change even if the voice command is accepted
STARLINK OVERVIEW
72
Page 77 of 172
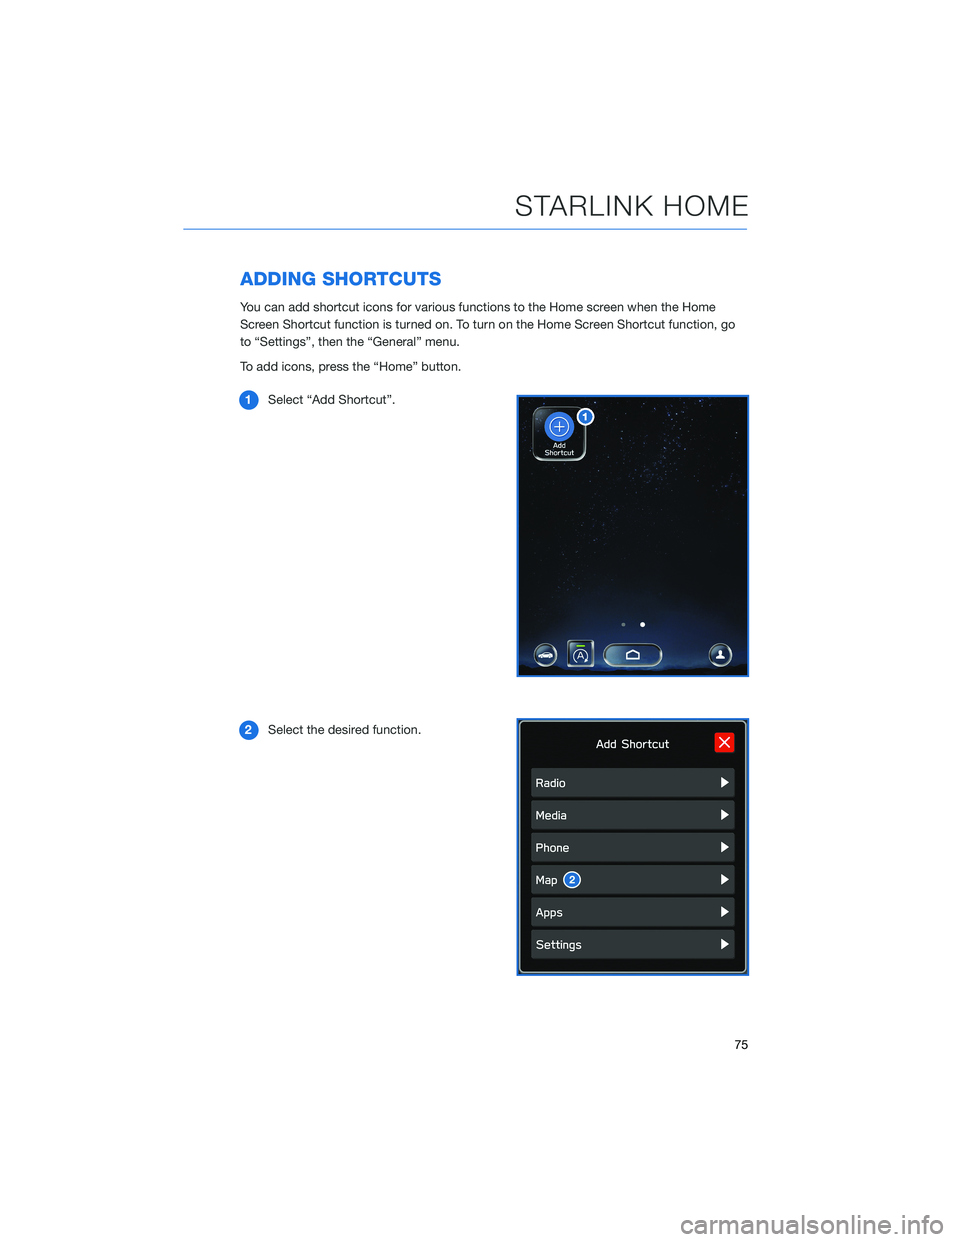
ADDING SHORTCUTS
You can add shortcut icons for various functions to the Home screen when the Home
Screen Shortcut function is turned on. To turn on the Home Screen Shortcut function, go
to “Settings”, then the “General” menu.
To add icons, press the “Home” button.
1Select “Add Shortcut”.
2Select the desired function.
STARLINK HOME
75