turn SUBARU OUTBACK 2022 Getting Started Guide
[x] Cancel search | Manufacturer: SUBARU, Model Year: 2022, Model line: OUTBACK, Model: SUBARU OUTBACK 2022Pages: 172, PDF Size: 58.6 MB
Page 38 of 172
LIGHT CONTROLS
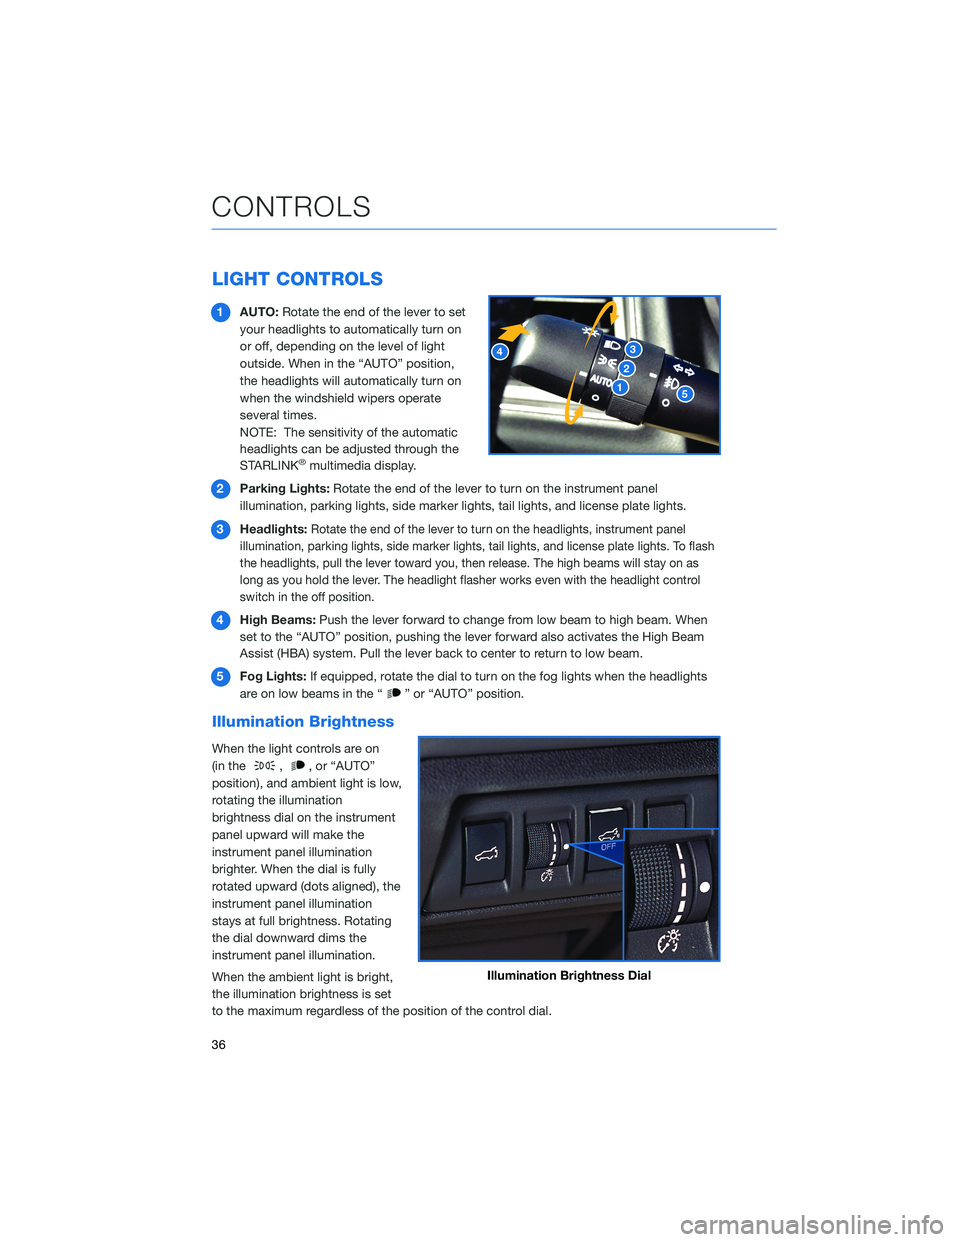
1AUTO:Rotate the end of the lever to set
your headlights to automatically turn on
or off, depending on the level of light
outside. When in the “AUTO” position,
the headlights will automatically turn on
when the windshield wipers operate
several times.
NOTE: The sensitivity of the automatic
headlights can be adjusted through the
STARLINK
®multimedia display.
2Parking Lights:Rotate the end of the lever to turn on the instrument panel
illumination, parking lights, side marker lights, tail lights, and license plate lights.
3Headlights:
Rotate the end of the lever to turn on the headlights, instrument panel
illumination, parking lights, side marker lights, tail lights, and license plate lights. To flash
the headlights, pull the lever toward you, then release. The high beams will stay on as
long as you hold the lever. The headlight flasher works even with the headlight control
switch in the off position.
4High Beams:Push the lever forward to change from low beam to high beam. When
set to the “AUTO” position, pushing the lever forward also activates the High Beam
Assist (HBA) system. Pull the lever back to center to return to low beam.
5Fog Lights:If equipped, rotate the dial to turn on the fog lights when the headlights
are on low beams in the “
” or “AUTO” position.
Illumination Brightness
When the light controls are on
(in the
,, or “AUTO”
position), and ambient light is low,
rotating the illumination
brightness dial on the instrument
panel upward will make the
instrument panel illumination
brighter. When the dial is fully
rotated upward (dots aligned), the
instrument panel illumination
stays at full brightness. Rotating
the dial downward dims the
instrument panel illumination.
When the ambient light is bright,
the illumination brightness is set
to the maximum regardless of the position of the control dial.
Illumination Brightness Dial
CONTROLS
36
Page 39 of 172
Daytime Running Lights
The daytime running lights automatically turn on when the engine is running, the parking
brake is fully released, the select lever is out of the “P” position, and the light switch is set
to Off, “AUTO”, or “
”. Always turn on the headlights when it’s dark outside by rotating
the dial to the “
” or “AUTO” position.
TURN SIGNALS
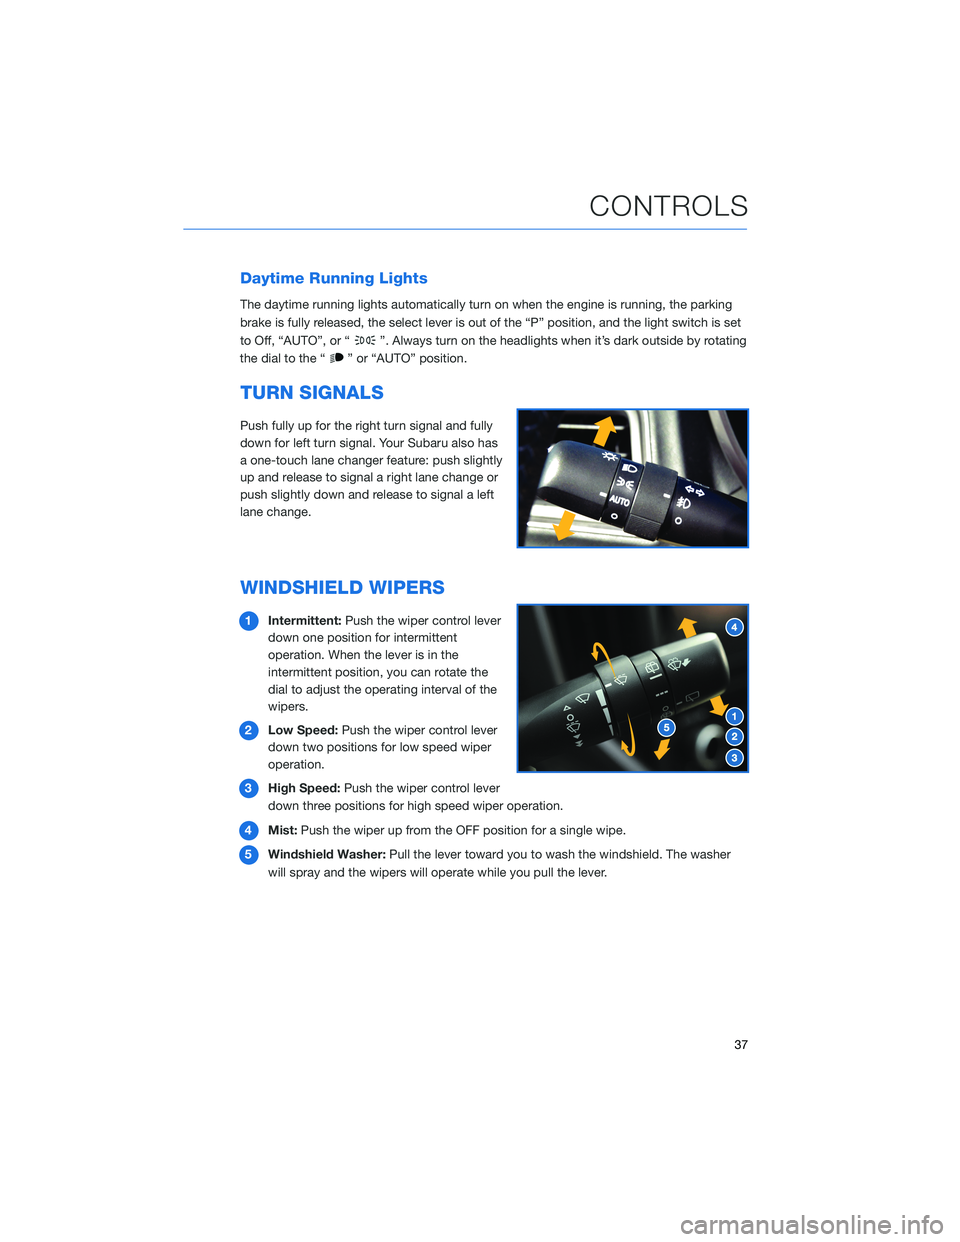
Push fully up for the right turn signal and fully
down for left turn signal. Your Subaru also has
a one-touch lane changer feature: push slightly
up and release to signal a right lane change or
push slightly down and release to signal a left
lane change.
WINDSHIELD WIPERS
1Intermittent:Push the wiper control lever
down one position for intermittent
operation. When the lever is in the
intermittent position, you can rotate the
dial to adjust the operating interval of the
wipers.
2Low Speed:Push the wiper control lever
down two positions for low speed wiper
operation.
3High Speed:Push the wiper control lever
down three positions for high speed wiper operation.
4Mist:Push the wiper up from the OFF position for a single wipe.
5Windshield Washer:Pull the lever toward you to wash the windshield. The washer
will spray and the wipers will operate while you pull the lever.
CONTROLS
37
Page 40 of 172
REAR WINDOW WIPER
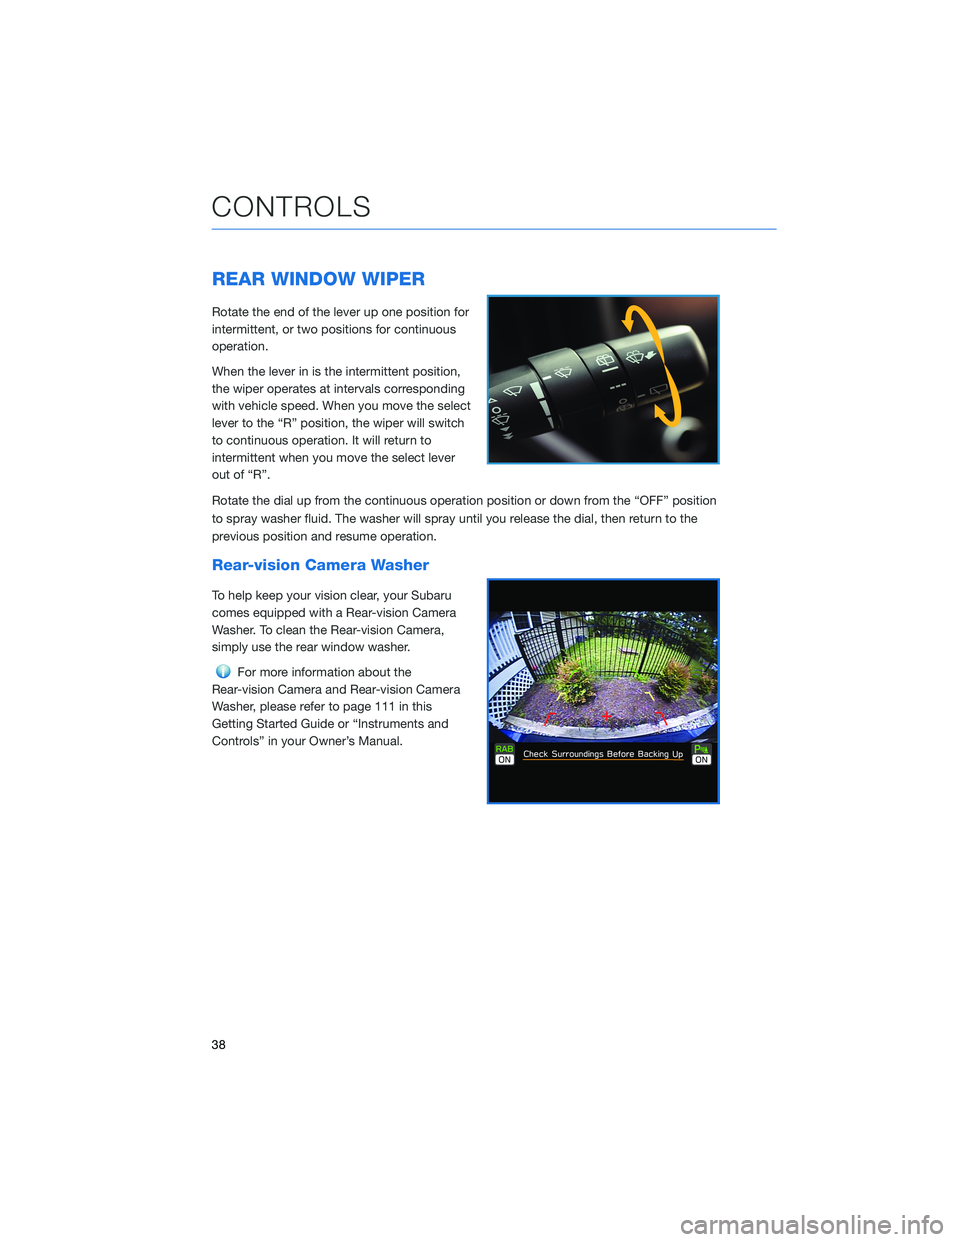
Rotate the end of the lever up one position for
intermittent, or two positions for continuous
operation.
When the lever in is the intermittent position,
the wiper operates at intervals corresponding
with vehicle speed. When you move the select
lever to the “R” position, the wiper will switch
to continuous operation. It will return to
intermittent when you move the select lever
out of “R”.
Rotate the dial up from the continuous operation position or down from the “OFF” position
to spray washer fluid. The washer will spray until you release the dial, then return to the
previous position and resume operation.
Rear-vision Camera Washer
To help keep your vision clear, your Subaru
comes equipped with a Rear-vision Camera
Washer. To clean the Rear-vision Camera,
simply use the rear window washer.
For more information about the
Rear-vision Camera and Rear-vision Camera
Washer, please refer to page 111 in this
Getting Started Guide or “Instruments and
Controls” in your Owner’s Manual.
CONTROLS
38
Page 41 of 172
OVERHEAD CONSOLE
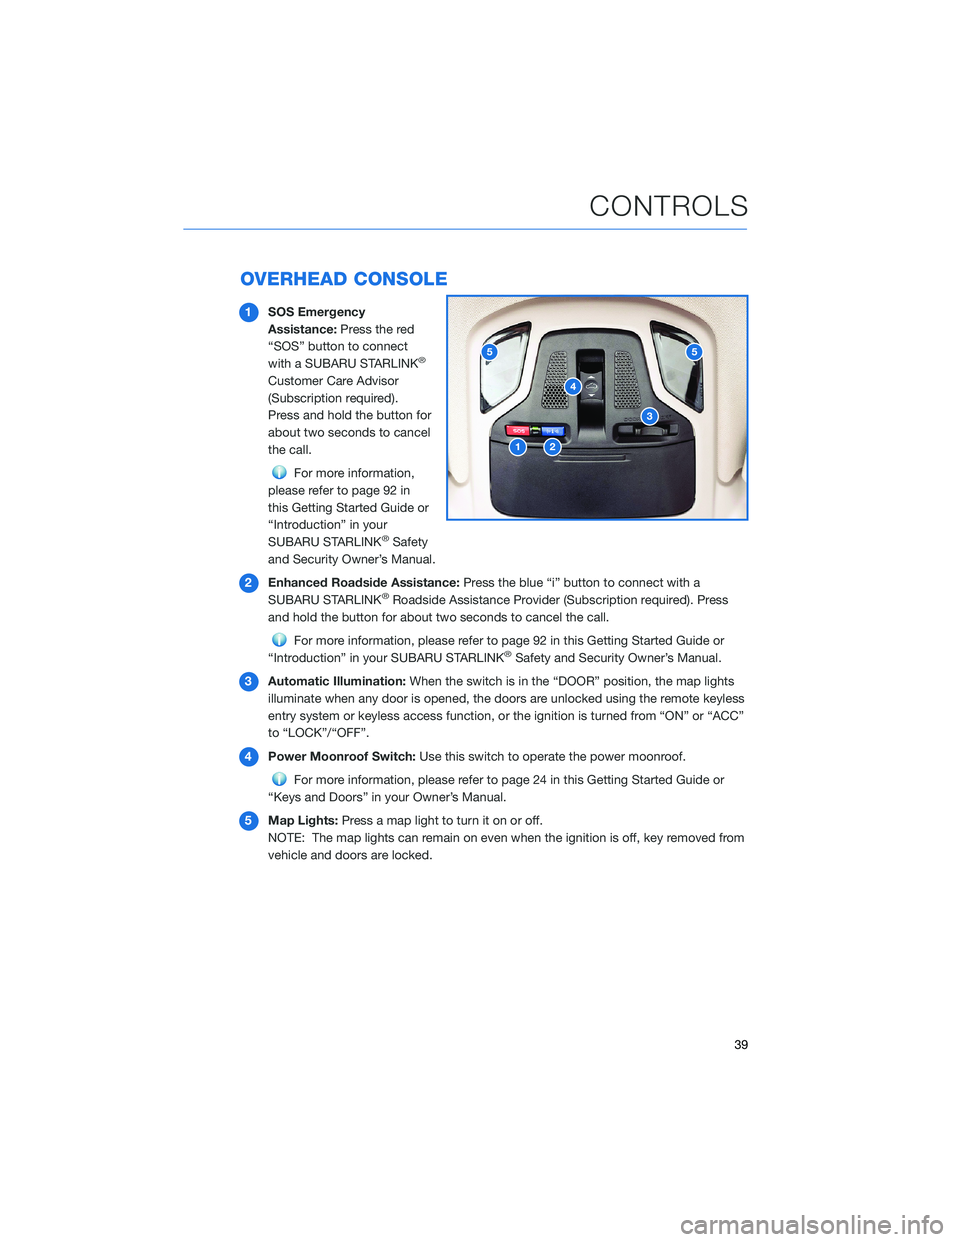
1SOS Emergency
Assistance:Press the red
“SOS” button to connect
with a SUBARU STARLINK
®
Customer Care Advisor
(Subscription required).
Press and hold the button for
about two seconds to cancel
the call.
For more information,
please refer to page 92 in
this Getting Started Guide or
“Introduction” in your
SUBARU STARLINK
®Safety
and Security Owner’s Manual.
2Enhanced Roadside Assistance:Press the blue “i” button to connect with a
SUBARU STARLINK
®Roadside Assistance Provider (Subscription required). Press
and hold the button for about two seconds to cancel the call.
For more information, please refer to page 92 in this Getting Started Guide or
“Introduction” in your SUBARU STARLINK®Safety and Security Owner’s Manual.
3Automatic Illumination:When the switch is in the “DOOR” position, the map lights
illuminate when any door is opened, the doors are unlocked using the remote keyless
entry system or keyless access function, or the ignition is turned from “ON” or “ACC”
to “LOCK”/“OFF”.
4Power Moonroof Switch:Use this switch to operate the power moonroof.
For more information, please refer to page 24 in this Getting Started Guide or
“Keys and Doors” in your Owner’s Manual.
5Map Lights:Press a map light to turn it on or off.
NOTE: The map lights can remain on even when the ignition is off, key removed from
vehicle and doors are locked.
12
3
4
55
CONTROLS
39
Page 44 of 172
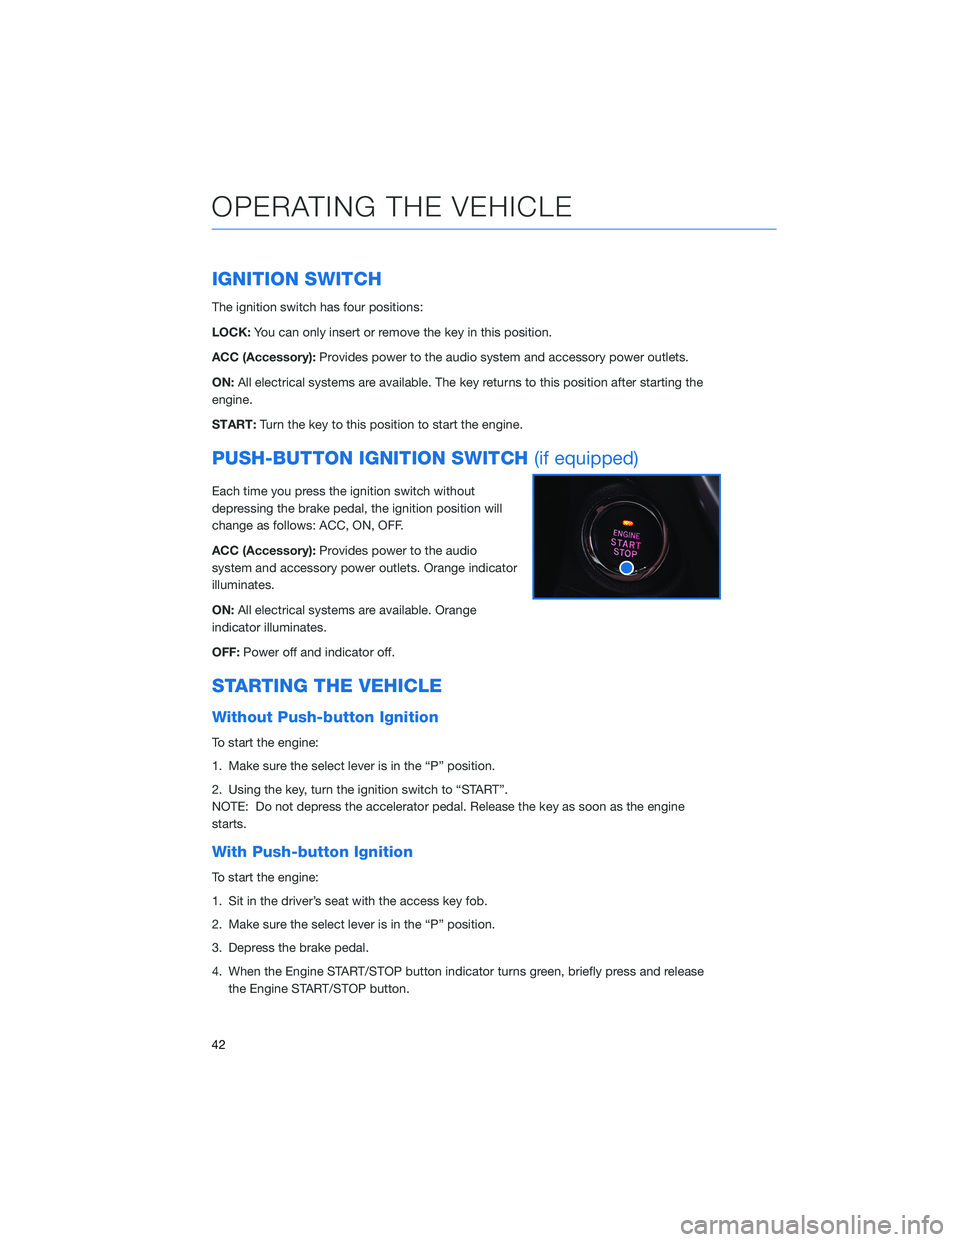
IGNITION SWITCH
The ignition switch has four positions:
LOCK:You can only insert or remove the key in this position.
ACC (Accessory):Provides power to the audio system and accessory power outlets.
ON:All electrical systems are available. The key returns to this position after starting the
engine.
START:Turn the key to this position to start the engine.
PUSH-BUTTON IGNITION SWITCH(if equipped)
Each time you press the ignition switch without
depressing the brake pedal, the ignition position will
change as follows: ACC, ON, OFF.
ACC (Accessory):Provides power to the audio
system and accessory power outlets. Orange indicator
illuminates.
ON:All electrical systems are available. Orange
indicator illuminates.
OFF:Power off and indicator off.
STARTING THE VEHICLE
Without Push-button Ignition
To start the engine:
1. Make sure the select lever is in the “P” position.
2. Using the key, turn the ignition switch to “START”.
NOTE: Do not depress the accelerator pedal. Release the key as soon as the engine
starts.
With Push-button Ignition
To start the engine:
1. Sit in the driver’s seat with the access key fob.
2. Make sure the select lever is in the “P” position.
3. Depress the brake pedal.
4. When the Engine START/STOP button indicator turns green, briefly press and release
the Engine START/STOP button.
OPERATING THE VEHICLE
42
Page 46 of 172
AUTO START–STOP
The Auto Start-Stop system is designed to automatically stop and
restart the engine when the vehicle is stationary for a short period of
time (while waiting for a traffic light or in a traffic jam) after the
engine has warmed up. The system operates in order to reduce fuel
consumption, exhaust emissions and undesired idling noise. You
can learn more about using the Auto Start-Stop system from the
how-to video linked in the QR code and from the sections below.
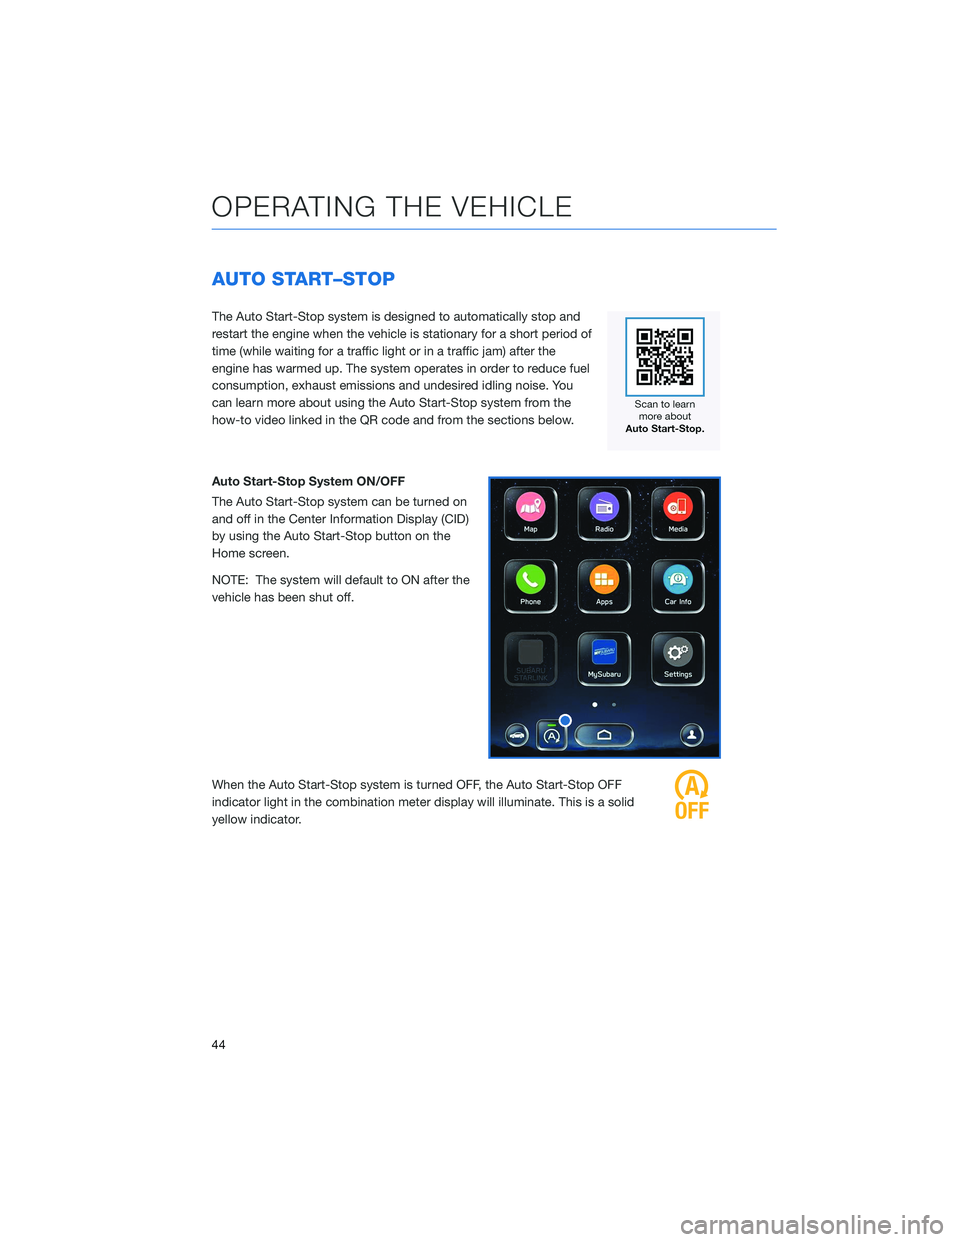
Auto Start-Stop System ON/OFF
The Auto Start-Stop system can be turned on
and off in the Center Information Display (CID)
by using the Auto Start-Stop button on the
Home screen.
NOTE: The system will default to ON after the
vehicle has been shut off.
When the Auto Start-Stop system is turned OFF, the Auto Start-Stop OFF
indicator light in the combination meter display will illuminate. This is a solid
yellow indicator.
OPERATING THE VEHICLE
44
Page 47 of 172
System Operation
So that it can be used safely and comfortably, in addition to driver operations, the Auto
Start-Stop system is designed to constantly monitor the vehicle conditions as well as the
environment inside and outside the vehicle, in order to control stopping and restarting of
the engine.
After the vehicle has been completely stopped by depressing the brake pedal with the select
lever in the “D” position, the engine will be automatically stopped. When you release the brake
pedal with the select lever kept in the “D” position, the engine will be automatically restarted.
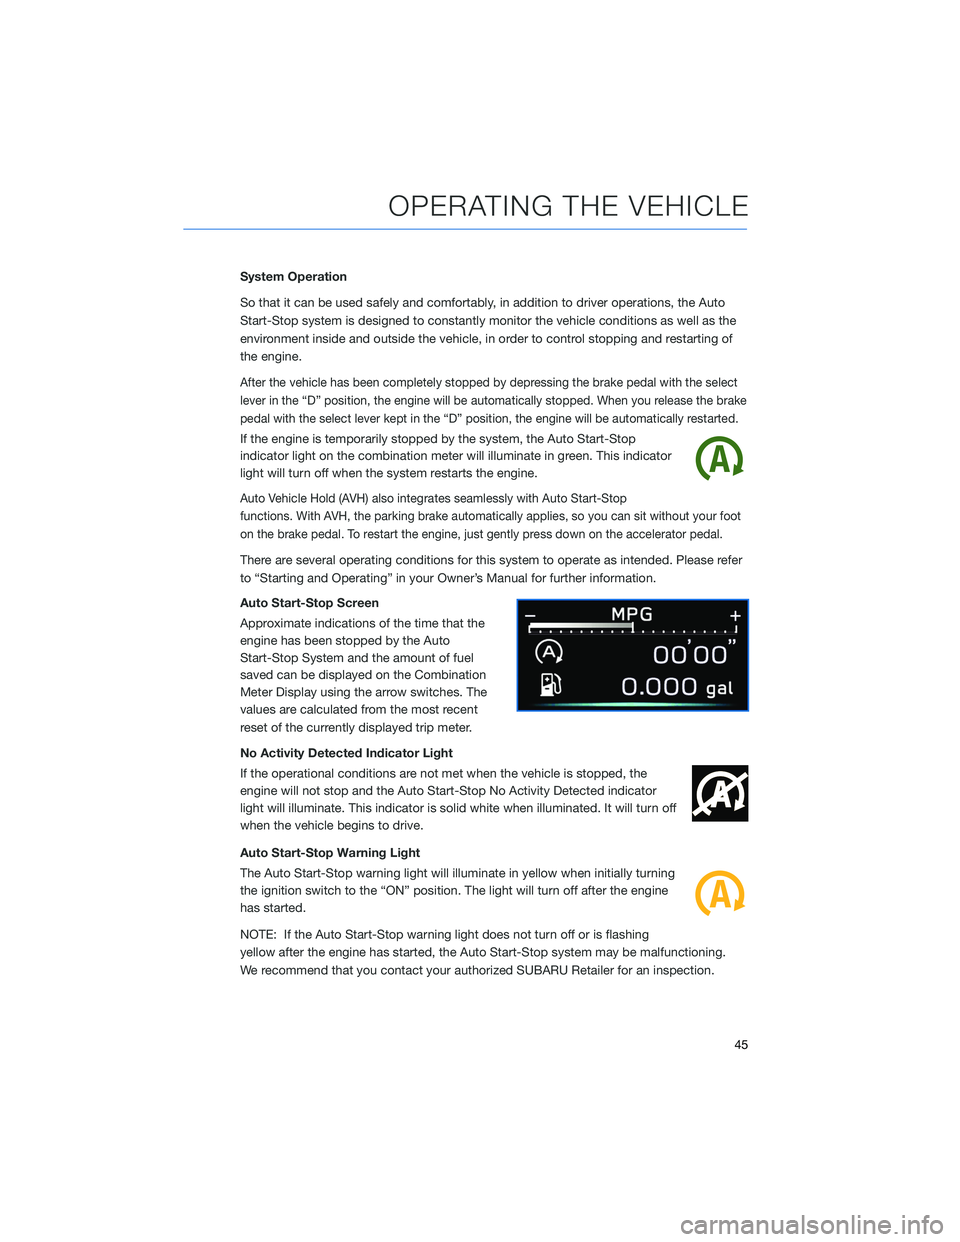
If the engine is temporarily stopped by the system, the Auto Start-Stop
indicator light on the combination meter will illuminate in green. This indicator
light will turn off when the system restarts the engine.
Auto Vehicle Hold (AVH) also integrates seamlessly with Auto Start-Stop
functions. With AVH, the parking brake automatically applies, so you can sit without your foot
on the brake pedal. To restart the engine, just gently press down on the accelerator pedal.
There are several operating conditions for this system to operate as intended. Please refer
to “Starting and Operating” in your Owner’s Manual for further information.
Auto Start-Stop Screen
Approximate indications of the time that the
engine has been stopped by the Auto
Start-Stop System and the amount of fuel
saved can be displayed on the Combination
Meter Display using the arrow switches. The
values are calculated from the most recent
reset of the currently displayed trip meter.
No Activity Detected Indicator Light
If the operational conditions are not met when the vehicle is stopped, the
engine will not stop and the Auto Start-Stop No Activity Detected indicator
light will illuminate. This indicator is solid white when illuminated. It will turn off
when the vehicle begins to drive.
Auto Start-Stop Warning Light
The Auto Start-Stop warning light will illuminate in yellow when initially turning
the ignition switch to the “ON” position. The light will turn off after the engine
has started.
NOTE: If the Auto Start-Stop warning light does not turn off or is flashing
yellow after the engine has started, the Auto Start-Stop system may be malfunctioning.
We recommend that you contact your authorized SUBARU Retailer for an inspection.
OPERATING THE VEHICLE
45
Page 48 of 172
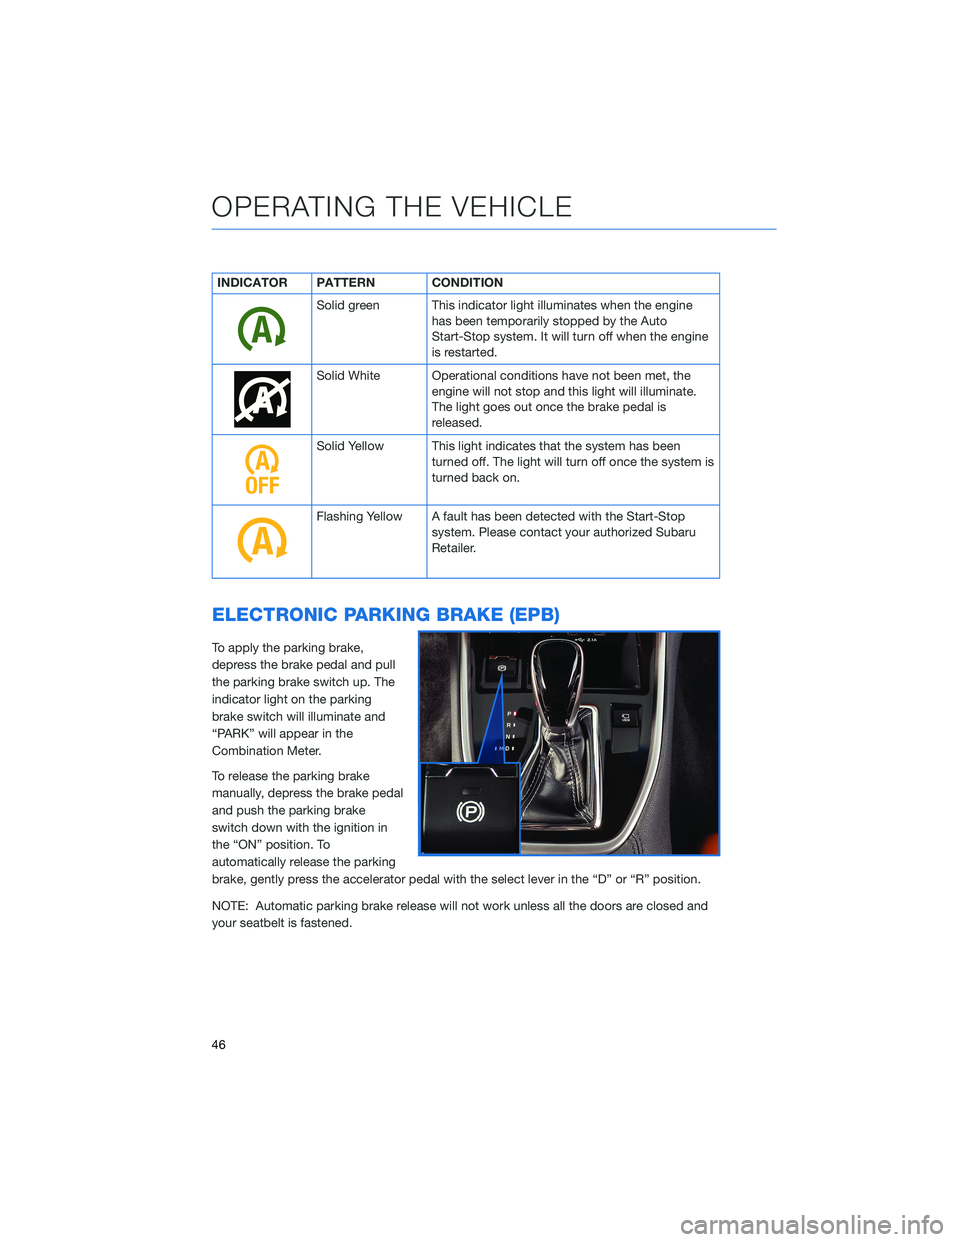
INDICATOR PATTERN CONDITION
Solid green This indicator light illuminates when the engine
has been temporarily stopped by the Auto
Start-Stop system. It will turn off when the engine
is restarted.
Solid White Operational conditions have not been met, the
engine will not stop and this light will illuminate.
The light goes out once the brake pedal is
released.
Solid Yellow This light indicates that the system has been
turned off. The light will turn off once the system is
turned back on.
Flashing Yellow A fault has been detected with the Start-Stop
system. Please contact your authorized Subaru
Retailer.
ELECTRONIC PARKING BRAKE (EPB)
To apply the parking brake,
depress the brake pedal and pull
the parking brake switch up. The
indicator light on the parking
brake switch will illuminate and
“PARK” will appear in the
Combination Meter.
To release the parking brake
manually, depress the brake pedal
and push the parking brake
switch down with the ignition in
the “ON” position. To
automatically release the parking
brake, gently press the accelerator pedal with the select lever in the “D” or “R” position.
NOTE: Automatic parking brake release will not work unless all the doors are closed and
your seatbelt is fastened.
OPERATING THE VEHICLE
46
Page 49 of 172
Auto Vehicle Hold (AVH)
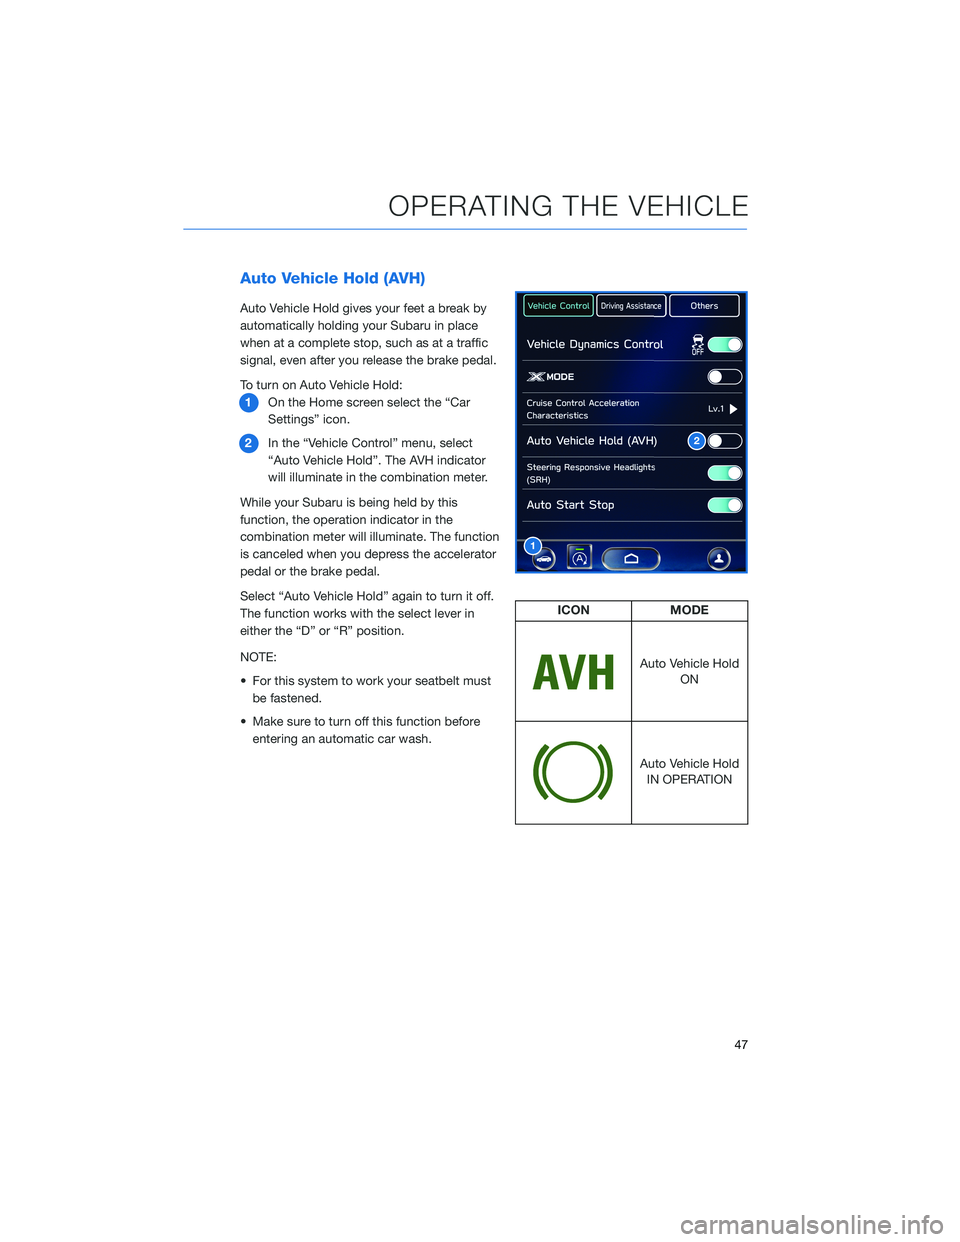
Auto Vehicle Hold gives your feet a break by
automatically holding your Subaru in place
when at a complete stop, such as at a traffic
signal, even after you release the brake pedal.
To turn on Auto Vehicle Hold:
1On the Home screen select the “Car
Settings” icon.
2In the “Vehicle Control” menu, select
“Auto Vehicle Hold”. The AVH indicator
will illuminate in the combination meter.
While your Subaru is being held by this
function, the operation indicator in the
combination meter will illuminate. The function
is canceled when you depress the accelerator
pedal or the brake pedal.
Select “Auto Vehicle Hold” again to turn it off.
The function works with the select lever in
either the “D” or “R” position.
NOTE:
• For this system to work your seatbelt must
be fastened.
• Make sure to turn off this function before
entering an automatic car wash.
2
1
ICON MODE
Auto Vehicle Hold
ON
Auto Vehicle Hold
IN OPERATION
OPERATING THE VEHICLE
47
Page 50 of 172
X-MODE®
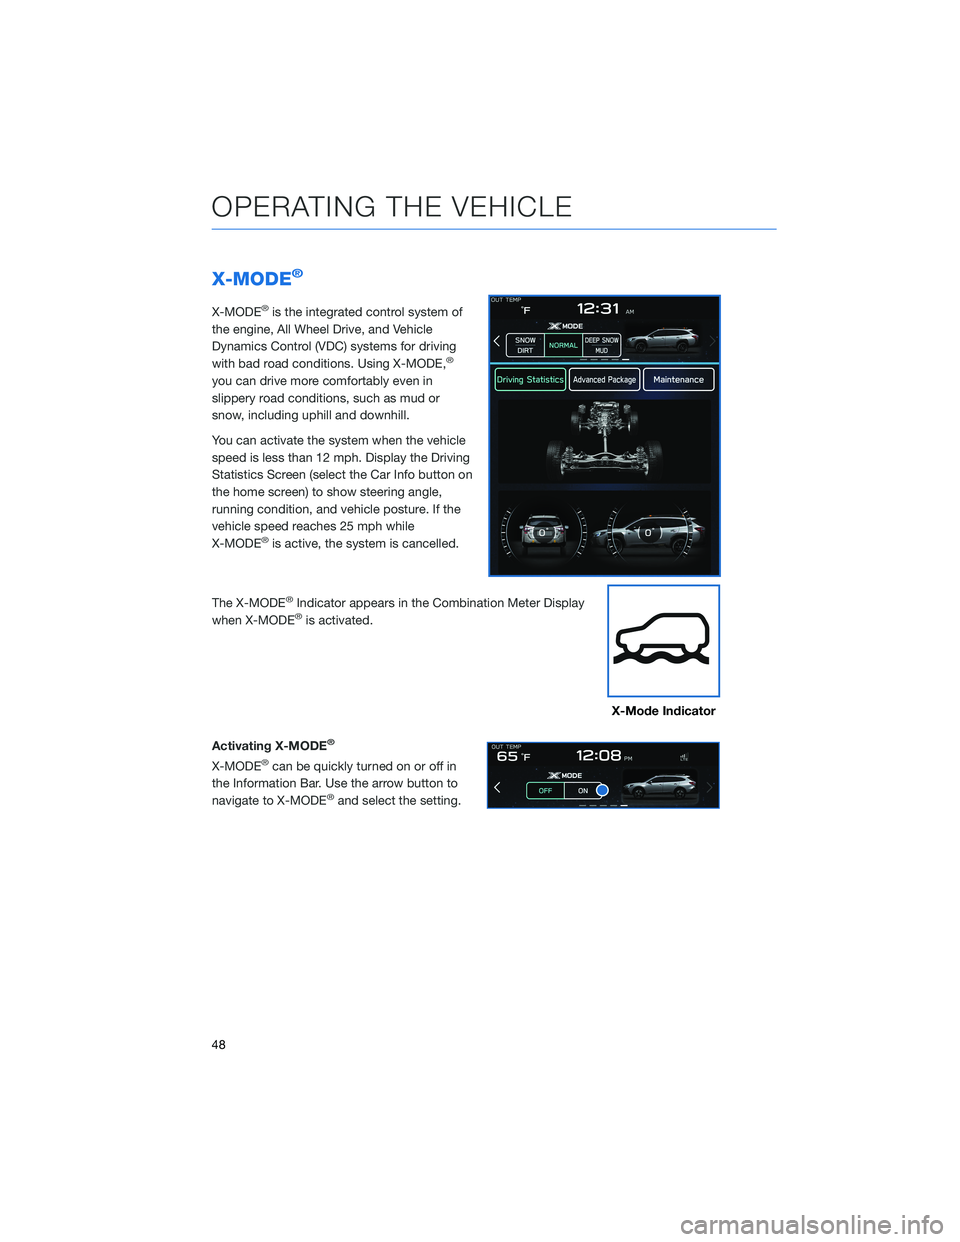
X-MODE®is the integrated control system of
the engine, All Wheel Drive, and Vehicle
Dynamics Control (VDC) systems for driving
with bad road conditions. Using X-MODE,
®
you can drive more comfortably even in
slippery road conditions, such as mud or
snow, including uphill and downhill.
You can activate the system when the vehicle
speed is less than 12 mph. Display the Driving
Statistics Screen (select the Car Info button on
the home screen) to show steering angle,
running condition, and vehicle posture. If the
vehicle speed reaches 25 mph while
X-MODE
®is active, the system is cancelled.
The X-MODE
®Indicator appears in the Combination Meter Display
when X-MODE®is activated.
Activating X-MODE
®
X-MODE®can be quickly turned on or off in
the Information Bar. Use the arrow button to
navigate to X-MODE
®and select the setting.
X-Mode Indicator
OPERATING THE VEHICLE
48