turn SUBARU OUTBACK 2022 Getting Started Guide
[x] Cancel search | Manufacturer: SUBARU, Model Year: 2022, Model line: OUTBACK, Model: SUBARU OUTBACK 2022Pages: 172, PDF Size: 58.6 MB
Page 115 of 172
BLIND SPOT DETECTION (BSD) / REAR CROSS
TRAFFIC ALERT (RCTA)(if equipped)
This system uses radar sensors mounted behind the rear bumper on the left and right
sides that warn you if another vehicle is sensed in your blind spots. These functions
provide additional awareness when changing lanes or driving in reverse.
Blind Spot Detection (BSD)
Blind Spot Detection senses if a vehicle is traveling at the same
relative speed in your blind spot and provides a visual warning.
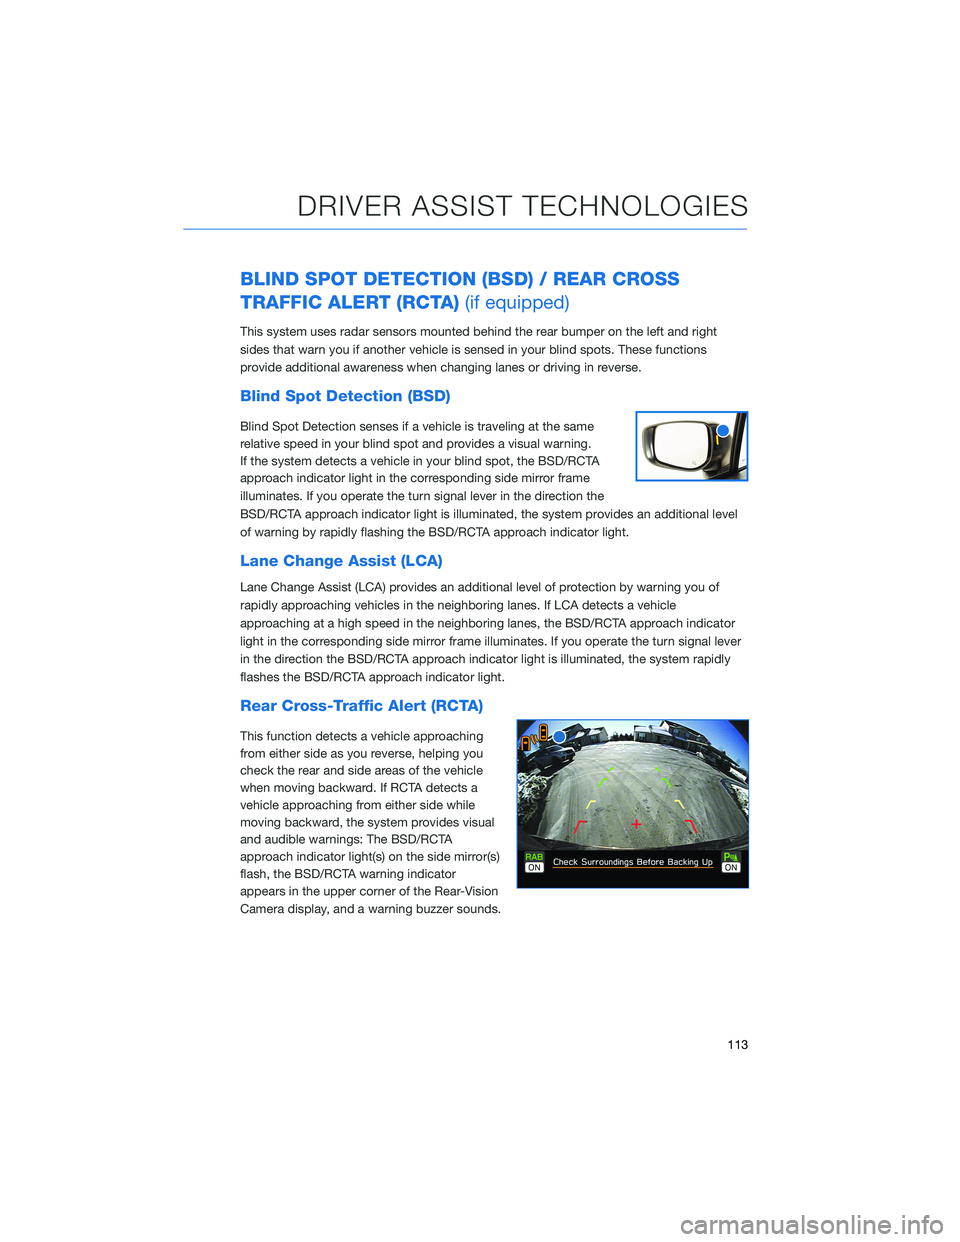
If the system detects a vehicle in your blind spot, the BSD/RCTA
approach indicator light in the corresponding side mirror frame
illuminates. If you operate the turn signal lever in the direction the
BSD/RCTA approach indicator light is illuminated, the system provides an additional level
of warning by rapidly flashing the BSD/RCTA approach indicator light.
Lane Change Assist (LCA)
Lane Change Assist (LCA) provides an additional level of protection by warning you of
rapidly approaching vehicles in the neighboring lanes. If LCA detects a vehicle
approaching at a high speed in the neighboring lanes, the BSD/RCTA approach indicator
light in the corresponding side mirror frame illuminates. If you operate the turn signal lever
in the direction the BSD/RCTA approach indicator light is illuminated, the system rapidly
flashes the BSD/RCTA approach indicator light.
Rear Cross-Traffic Alert (RCTA)
This function detects a vehicle approaching
from either side as you reverse, helping you
check the rear and side areas of the vehicle
when moving backward. If RCTA detects a
vehicle approaching from either side while
moving backward, the system provides visual
and audible warnings: The BSD/RCTA
approach indicator light(s) on the side mirror(s)
flash, the BSD/RCTA warning indicator
appears in the upper corner of the Rear-Vision
Camera display, and a warning buzzer sounds.
DRIVER ASSIST TECHNOLOGIES
113
Page 116 of 172
Blind Spot Detection / Rear Cross Traffic Alert OFF
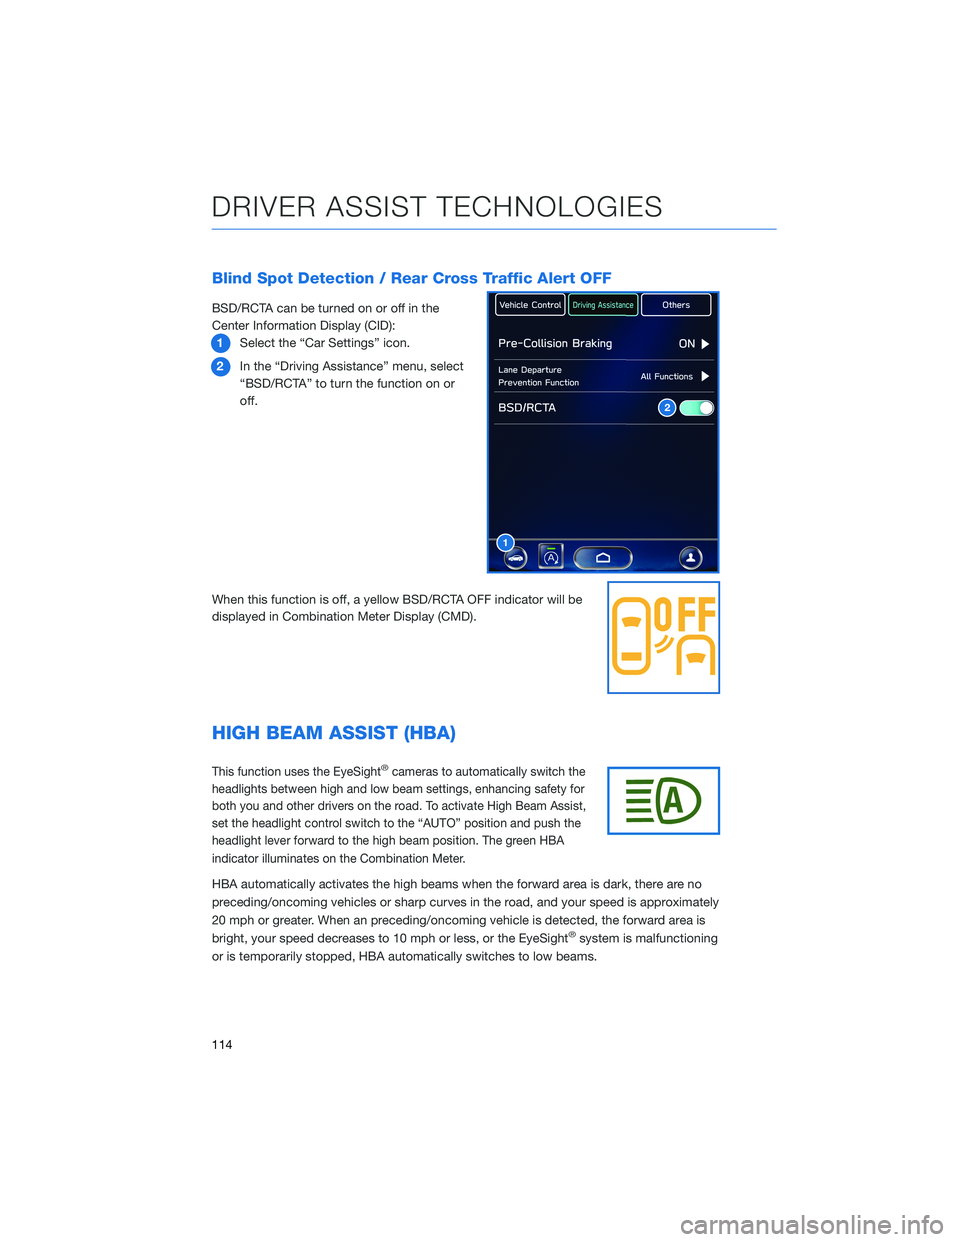
BSD/RCTA can be turned on or off in the
Center Information Display (CID):
1Select the “Car Settings” icon.
2In the “Driving Assistance” menu, select
“BSD/RCTA” to turn the function on or
off.
When this function is off, a yellow BSD/RCTA OFF indicator will be
displayed in Combination Meter Display (CMD).
HIGH BEAM ASSIST (HBA)
This function uses the EyeSight®cameras to automatically switch the
headlights between high and low beam settings, enhancing safety for
both you and other drivers on the road. To activate High Beam Assist,
set the headlight control switch to the “AUTO” position and push the
headlight lever forward to the high beam position. The green HBA
indicator illuminates on the Combination Meter.
HBA automatically activates the high beams when the forward area is dark, there are no
preceding/oncoming vehicles or sharp curves in the road, and your speed is approximately
20 mph or greater. When an preceding/oncoming vehicle is detected, the forward area is
bright, your speed decreases to 10 mph or less, or the EyeSight
®system is malfunctioning
or is temporarily stopped, HBA automatically switches to low beams.
1
2
DRIVER ASSIST TECHNOLOGIES
114
Page 117 of 172
STEERING RESPONSIVE HEADLIGHTS (SRH)
The Steering Responsive Headlights (SRH) system aims the headlight beams in the
direction you are steering, improving visibility at corners and intersections when driving at
night. You can turn the SRH system on or off in the Center Information Display through the
“Car Settings” icon.
REVERSE AUTOMATIC BRAKING (RAB)(if equipped)
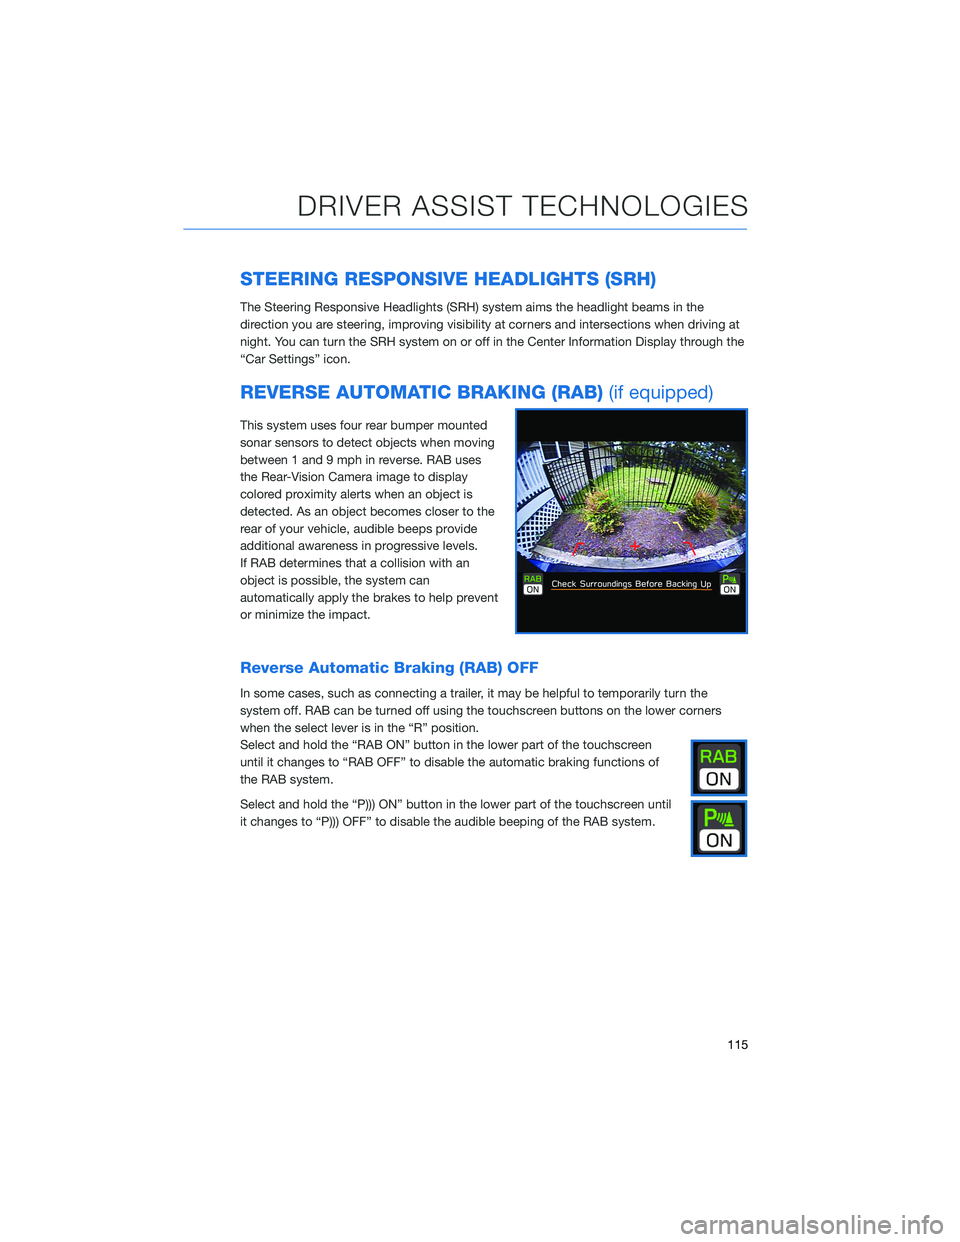
This system uses four rear bumper mounted
sonar sensors to detect objects when moving
between 1 and 9 mph in reverse. RAB uses
the Rear-Vision Camera image to display
colored proximity alerts when an object is
detected. As an object becomes closer to the
rear of your vehicle, audible beeps provide
additional awareness in progressive levels.
If RAB determines that a collision with an
object is possible, the system can
automatically apply the brakes to help prevent
or minimize the impact.
Reverse Automatic Braking (RAB) OFF
In some cases, such as connecting a trailer, it may be helpful to temporarily turn the
system off. RAB can be turned off using the touchscreen buttons on the lower corners
when the select lever is in the “R” position.
Select and hold the “RAB ON” button in the lower part of the touchscreen
until it changes to “RAB OFF” to disable the automatic braking functions of
the RAB system.
Select and hold the “P))) ON” button in the lower part of the touchscreen until
it changes to “P))) OFF” to disable the audible beeping of the RAB system.
DRIVER ASSIST TECHNOLOGIES
115
Page 120 of 172
DROWSY/INATTENTIVE WARNINGS
DriverFocus®detects when the driver is possibly not paying
attention or is becoming drowsy while driving. It works whether you
are a registered user or not. The system does not provide alerts
when the turn signals are operating or when the select lever is in the
“R” position.
When the system perceives the driver is not paying attention, the
“Keep Eyes on Road” warning will appear in the CMD along with
three rapid beeps.
When the system perceives drowsy driving, various warnings will
appear in the CMD along with beeps.
DRIVER PROFILE/CONVENIENCE SETTINGS
You can take advantage of convenience settings by becoming a registered driver.
Preferences such as seat and side mirror memory settings, as well as some features in the
Center Information Display (CID) and climate control, are uniquely linked to you.
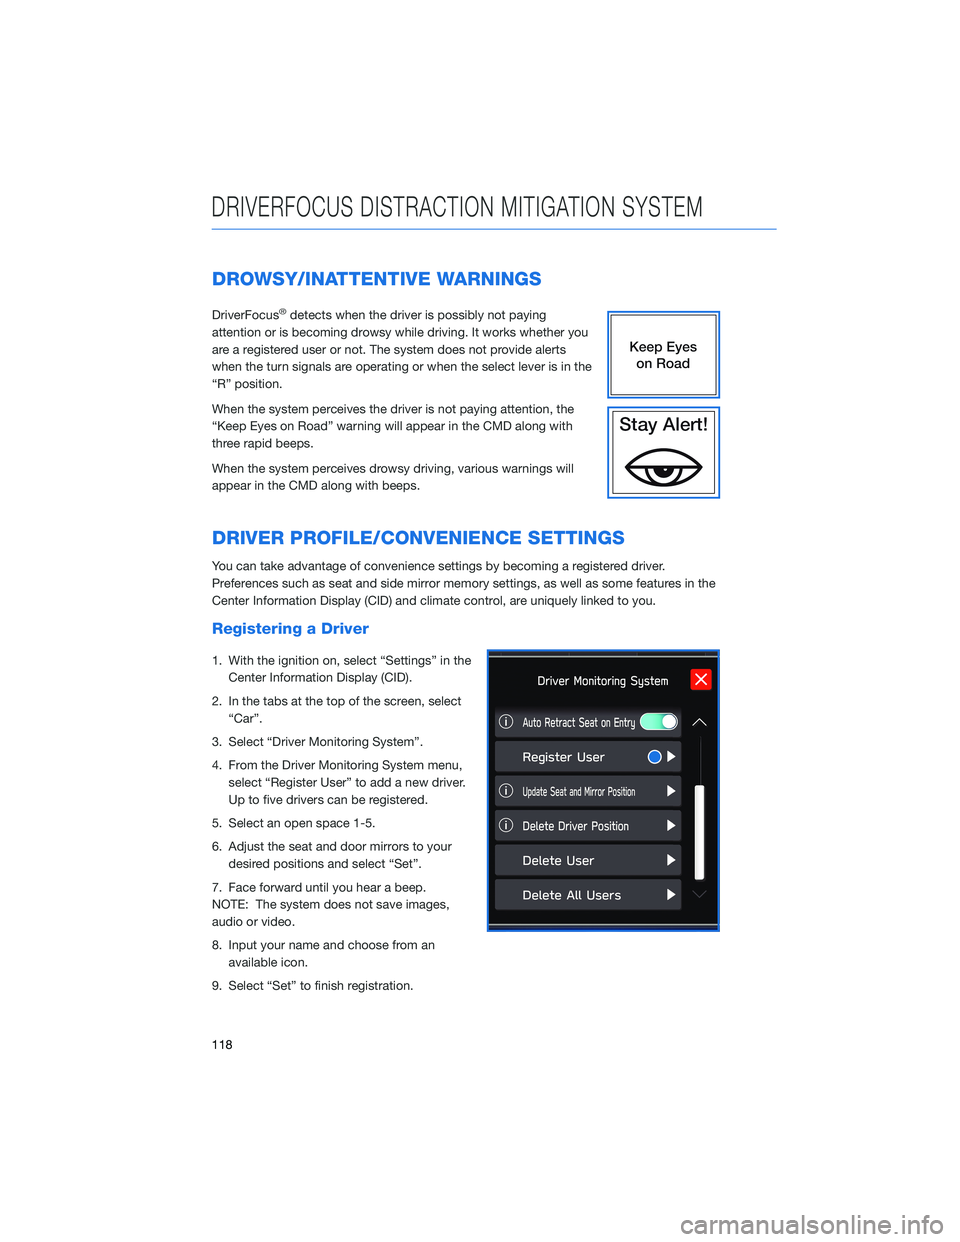
Registering a Driver
1. With the ignition on, select “Settings” in the
Center Information Display (CID).
2. In the tabs at the top of the screen, select
“Car”.
3. Select “Driver Monitoring System”.
4. From the Driver Monitoring System menu,
select “Register User” to add a new driver.
Up to five drivers can be registered.
5. Select an open space 1-5.
6. Adjust the seat and door mirrors to your
desired positions and select “Set”.
7. Face forward until you hear a beep.
NOTE: The system does not save images,
audio or video.
8. Input your name and choose from an
available icon.
9. Select “Set” to finish registration.
DRIVERFOCUS DISTRACTION MITIGATION SYSTEM
118
Page 122 of 172
DRIVER MONITORING SYSTEM OFF
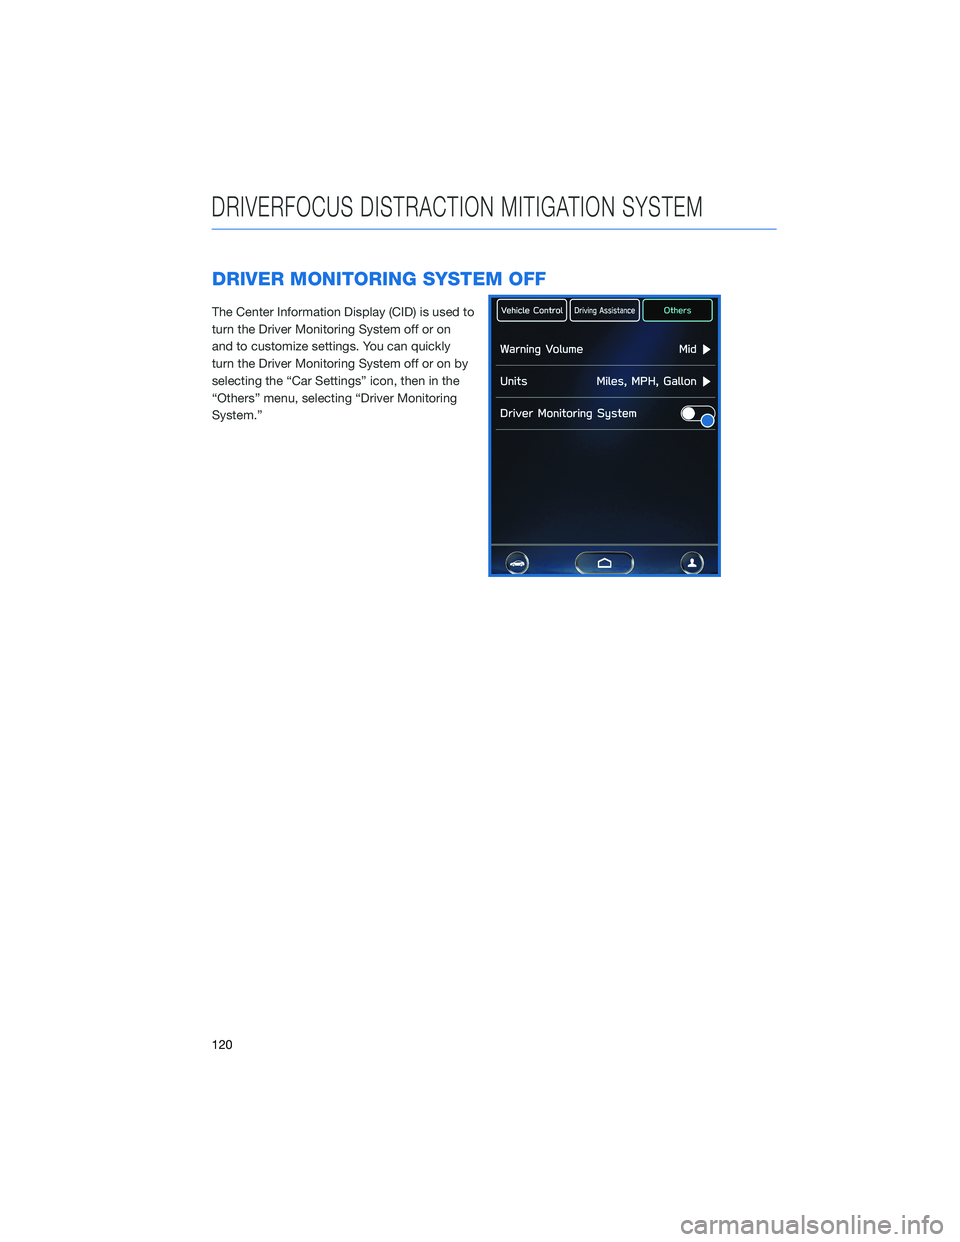
The Center Information Display (CID) is used to
turn the Driver Monitoring System off or on
and to customize settings. You can quickly
turn the Driver Monitoring System off or on by
selecting the “Car Settings” icon, then in the
“Others” menu, selecting “Driver Monitoring
System.”
DRIVERFOCUS DISTRACTION MITIGATION SYSTEM
120
Page 125 of 172
EYESIGHT®DISCLAIMER
EyeSight®is a driver assist technology which may not operate optimally under all driving
conditions. The driver is always responsible for safe and attentive driving. System
effectiveness depends on many factors such as vehicle maintenance, weather and road
conditions. See Owner’s Manual for complete details on system operations and limitations.
The Pre-Collision Braking system is designed to provide automatic braking that either
prevents a collision or reduces the severity of a frontal impact.
The Pre-Collision Throttle Management system is designed to reduce acceleration and
minimize the severity of certain frontal impacts.
Advanced Adaptive Cruise Control and Brake Light Recognition are designed to assist the
driver and are not substitutes for safe and attentive driving.
Lane Centering function operates only when used in conjunction with Advanced Adaptive
Cruise Control.
Lane Departure Prevention operates only when the lane markings are visible, and system
effectiveness depends on many factors.
Blind-Spot Detection, Lane Change Assist and Rear Cross Traffic Alert are systems
designed to assist the driver by monitoring the rear and side areas of the vehicle during a
lane change or reversing and are not a substitute for safe and attentive driving.
The Reverse Automatic Braking System is not a substitute for safe and attentive driving.
System effectiveness depends on many factors, such as vehicle maintenance, weather
and road conditions. Always exercise caution and use vehicle mirrors and the Rear-Vision
Camera when backing up. See Owner’s Manual for complete details on system operation
and limitations.
The Driver Focus Distraction Mitigation System is a driver recognition technology designed
to alert drivers if their attention to the road wavers or if the driver’s face appears to turn
away. The driver is always responsible for safe and attentive driving. System effectiveness
may be affected by articles of clothing worn on the head or face. See Owner’s Manual for
complete details on system operation and limitations.
EYESIGHT DISCLAIMER
123
Page 130 of 172
MEMORY HEIGHT(if equipped)
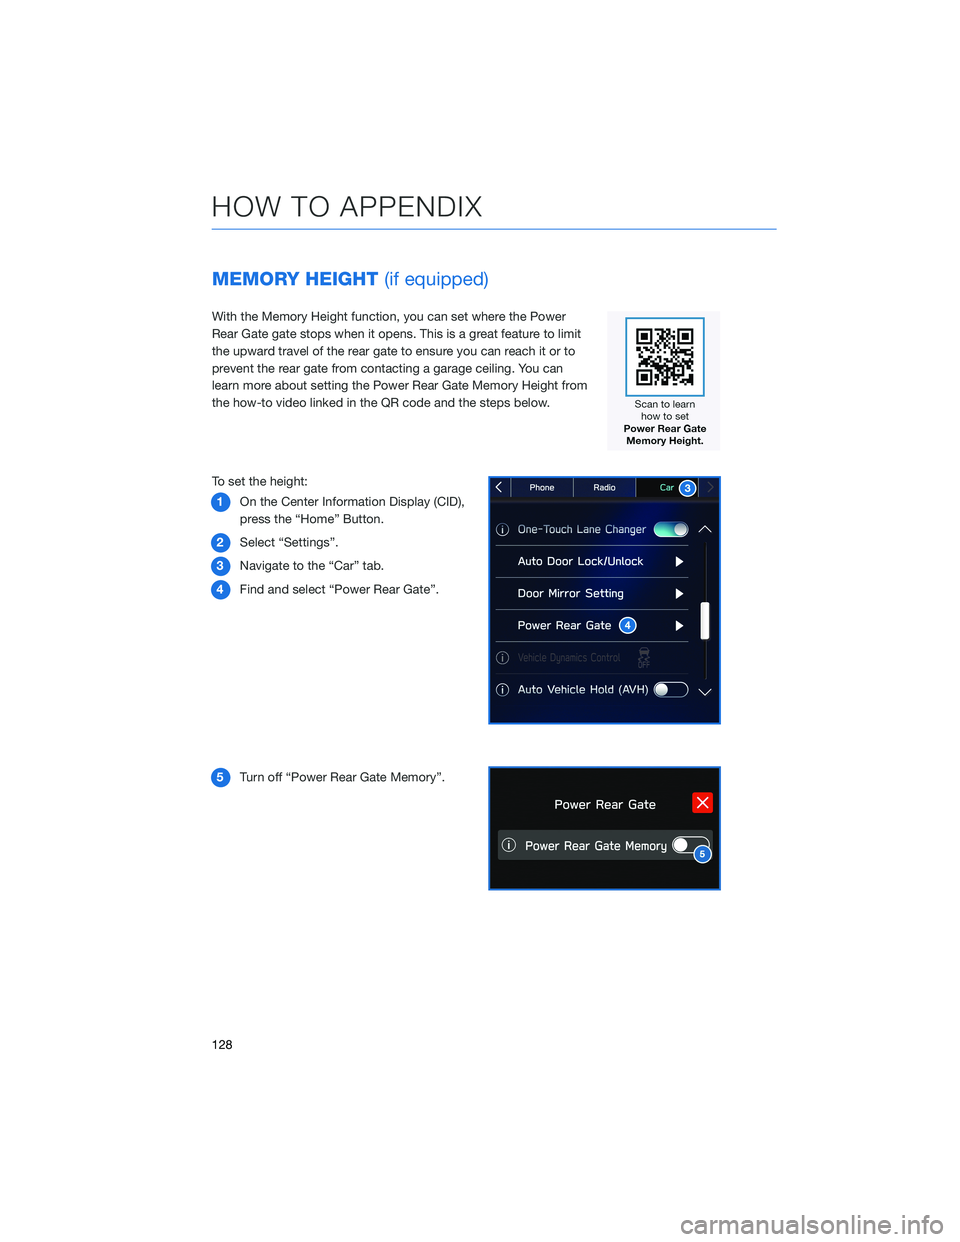
With the Memory Height function, you can set where the Power
Rear Gate gate stops when it opens. This is a great feature to limit
the upward travel of the rear gate to ensure you can reach it or to
prevent the rear gate from contacting a garage ceiling. You can
learn more about setting the Power Rear Gate Memory Height from
the how-to video linked in the QR code and the steps below.
To set the height:
1On the Center Information Display (CID),
press the “Home” Button.
2Select “Settings”.
3Navigate to the “Car” tab.
4Find and select “Power Rear Gate”.
5Turn off “Power Rear Gate Memory”.
HOW TO APPENDIX
128
Page 132 of 172
MEMORY DRIVER’S SEAT(if equipped)
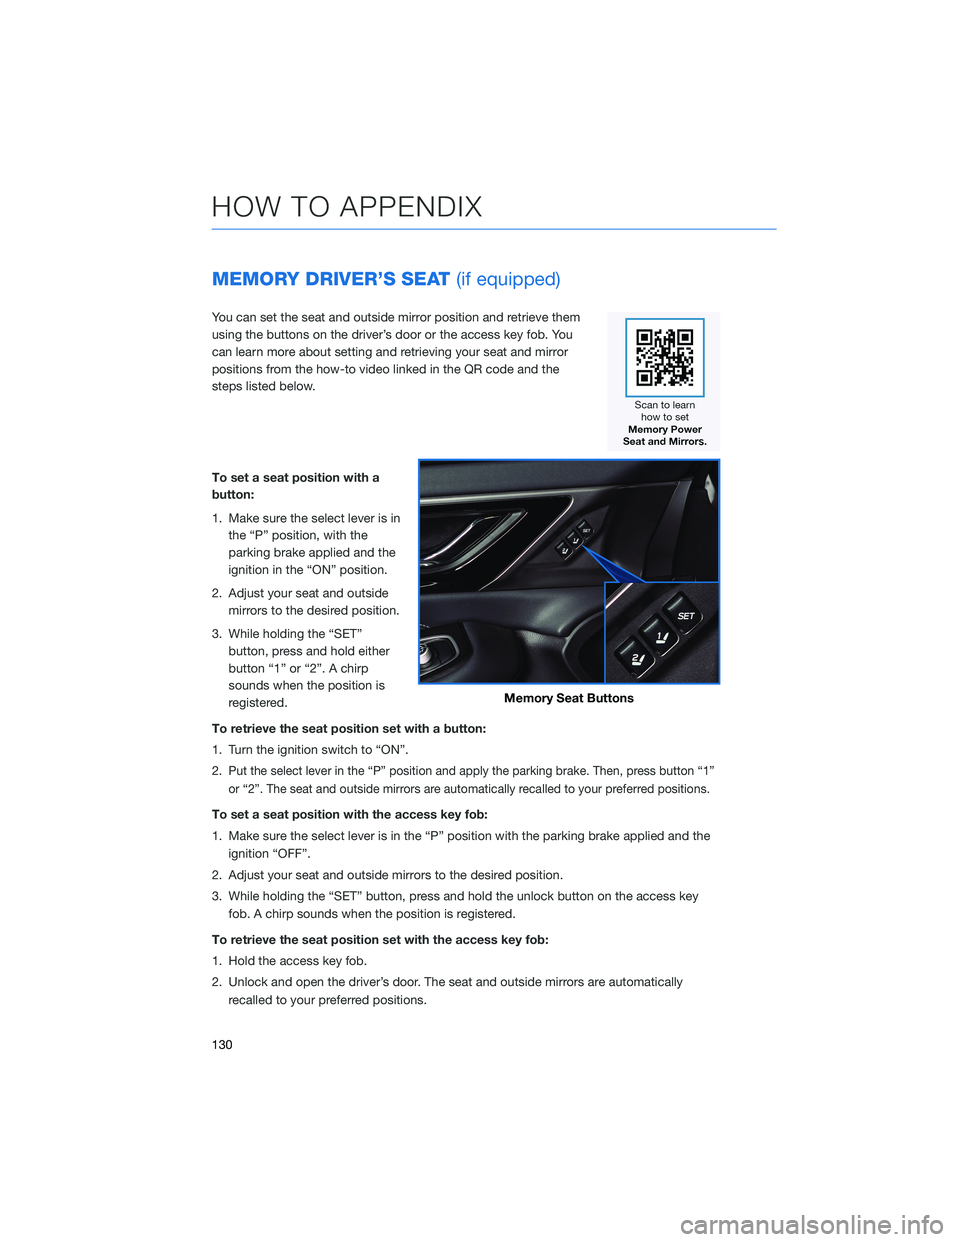
You can set the seat and outside mirror position and retrieve them
using the buttons on the driver’s door or the access key fob. You
can learn more about setting and retrieving your seat and mirror
positions from the how-to video linked in the QR code and the
steps listed below.
To set a seat position with a
button:
1. Make sure the select lever is in
the “P” position, with the
parking brake applied and the
ignition in the “ON” position.
2. Adjust your seat and outside
mirrors to the desired position.
3. While holding the “SET”
button, press and hold either
button “1” or “2”. A chirp
sounds when the position is
registered.
To retrieve the seat position set with a button:
1. Turn the ignition switch to “ON”.
2.
Put the select lever in the “P” position and apply the parking brake. Then, press button “1”
or “2”. The seat and outside mirrors are automatically recalled to your preferred positions.
To set a seat position with the access key fob:
1. Make sure the select lever is in the “P” position with the parking brake applied and the
ignition “OFF”.
2. Adjust your seat and outside mirrors to the desired position.
3. While holding the “SET” button, press and hold the unlock button on the access key
fob. A chirp sounds when the position is registered.
To retrieve the seat position set with the access key fob:
1. Hold the access key fob.
2. Unlock and open the driver’s door. The seat and outside mirrors are automatically
recalled to your preferred positions.
Memory Seat Buttons
HOW TO APPENDIX
130
Page 142 of 172
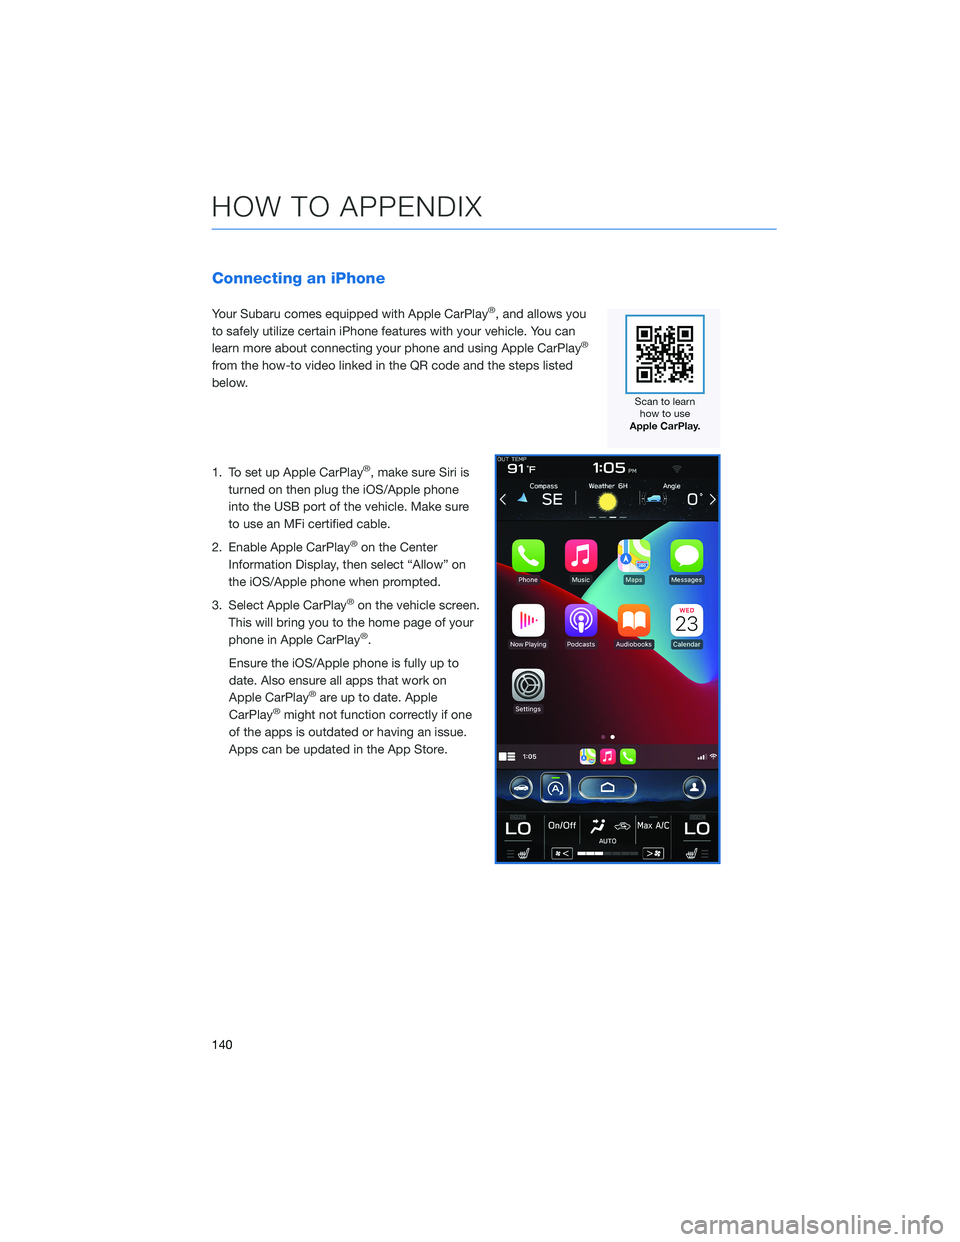
Connecting an iPhone
Your Subaru comes equipped with Apple CarPlay®, and allows you
to safely utilize certain iPhone features with your vehicle. You can
learn more about connecting your phone and using Apple CarPlay
®
from the how-to video linked in the QR code and the steps listed
below.
1. To set up Apple CarPlay
®, make sure Siri is
turned on then plug the iOS/Apple phone
into the USB port of the vehicle. Make sure
to use an MFi certified cable.
2. Enable Apple CarPlay
®on the Center
Information Display, then select “Allow” on
the iOS/Apple phone when prompted.
3. Select Apple CarPlay
®on the vehicle screen.
This will bring you to the home page of your
phone in Apple CarPlay
®.
Ensure the iOS/Apple phone is fully up to
date. Also ensure all apps that work on
Apple CarPlay
®are up to date. Apple
CarPlay®might not function correctly if one
of the apps is outdated or having an issue.
Apps can be updated in the App Store.
HOW TO APPENDIX
140
Page 145 of 172
Wi-Fi Hotspot Subscription
Internet access is purchased separately through AT&T with monthly,
per gigabyte, and unlimited data options available. Existing AT&T
customers have the option to add an additional line to their AT&T
Mobile Share plan. Available on select models.
Shortly after you take delivery of your new Subaru, you will receive
an email from AT&T for a one month free trial and how to activate
your free trial. To set up and enroll:
1. Select “Settings” on the Home screen.
2. Select “Wi-Fi Hotspot” to turn it on (if the Wi-Fi Hotpot is already
on then proceed to the next step).
3. Select Wi-Fi Hotspot Settings to view or update the following settings:
• Wi-Fi Network Name (SSID)
• SSID Broadcast (Network ON / OFF)
• Security Type (WPA / WPA2)
• Password
• Connected Devices (Maximum of 8 devices)
• Broadcast Frequency
How to enroll:
1. Connect your tablet, smartphone or laptop to the SUBARU STARLINK
®Wi-Fi Hotspot
network listed in the settings menu and open your preferred web browser on the device
connected.
2. Once the SUBARU STARLINK
®Wi-Fi Hotspot homepage loads, follow the on-screen
instructions to create a new account or to add your vehicle to an already existing AT&T
Wireless account. You can also subscribe to the Wi-Fi Hotspot from the MySubaru
website or Mobile App.
You can also visit an AT&T store or their website for more information at:
https://www.att.com/plans/connected-car/subaru.html
HOW TO APPENDIX
143