key SUBARU TRIBECA 2009 1.G Service Owner's Manual
[x] Cancel search | Manufacturer: SUBARU, Model Year: 2009, Model line: TRIBECA, Model: SUBARU TRIBECA 2009 1.GPages: 2453, PDF Size: 46.32 MB
Page 439 of 2453
IM (diag)-23
Diagnostic Procedure with Diagnostic Trouble Code (DTC)
IMMOBILIZER (DIAGNOSTICS)
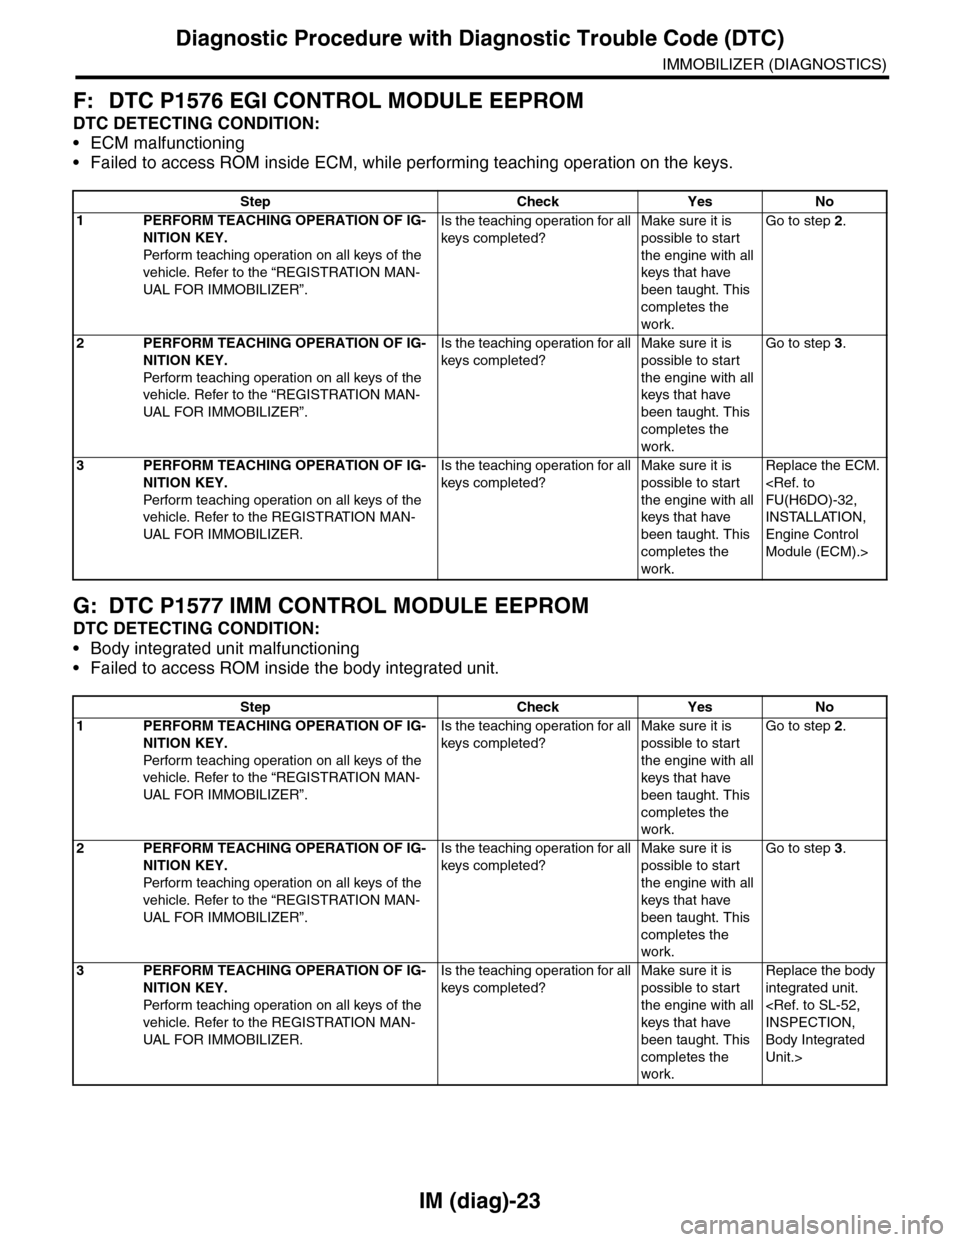
F: DTC P1576 EGI CONTROL MODULE EEPROM
DTC DETECTING CONDITION:
•ECM malfunctioning
•Failed to access ROM inside ECM, while performing teaching operation on the keys.
G: DTC P1577 IMM CONTROL MODULE EEPROM
DTC DETECTING CONDITION:
•Body integrated unit malfunctioning
•Failed to access ROM inside the body integrated unit.
Step Check Yes No
1PERFORM TEACHING OPERATION OF IG-
NITION KEY.
Perfor m teaching operation on all keys of the
vehicle. Refer to the “REGISTRATION MAN-
UAL FOR IMMO BILIZER”.
Is the teaching operation for all
keys completed?
Make sure it is
possible to start
the engine with all
keys that have
been taught. This
completes the
work.
Go to step 2.
2PERFORM TEACHING OPERATION OF IG-
NITION KEY.
Perfor m teaching operation on all keys of the
vehicle. Refer to the “REGISTRATION MAN-
UAL FOR IMMO BILIZER”.
Is the teaching operation for all
keys completed?
Make sure it is
possible to start
the engine with all
keys that have
been taught. This
completes the
work.
Go to step 3.
3PERFORM TEACHING OPERATION OF IG-
NITION KEY.
Perfor m teaching operation on all keys of the
vehicle. Refer to the REGISTRATION MAN-
UAL FOR IMMO BILIZER.
Is the teaching operation for all
keys completed?
Make sure it is
possible to start
the engine with all
keys that have
been taught. This
completes the
work.
Replace the ECM.
INSTALLATION,
Engine Control
Module (ECM).>
Step Check Yes No
1PERFORM TEACHING OPERATION OF IG-
NITION KEY.
Perfor m teaching operation on all keys of the
vehicle. Refer to the “REGISTRATION MAN-
UAL FOR IMMO BILIZER”.
Is the teaching operation for all
keys completed?
Make sure it is
possible to start
the engine with all
keys that have
been taught. This
completes the
work.
Go to step 2.
2PERFORM TEACHING OPERATION OF IG-
NITION KEY.
Perfor m teaching operation on all keys of the
vehicle. Refer to the “REGISTRATION MAN-
UAL FOR IMMO BILIZER”.
Is the teaching operation for all
keys completed?
Make sure it is
possible to start
the engine with all
keys that have
been taught. This
completes the
work.
Go to step 3.
3PERFORM TEACHING OPERATION OF IG-
NITION KEY.
Perfor m teaching operation on all keys of the
vehicle. Refer to the REGISTRATION MAN-
UAL FOR IMMO BILIZER.
Is the teaching operation for all
keys completed?
Make sure it is
possible to start
the engine with all
keys that have
been taught. This
completes the
work.
Replace the body
integrated unit.
Body Integrated
Unit.>
Page 459 of 2453
LAN(diag)-3
Check List for Interview
LAN SYSTEM (DIAGNOSTICS)
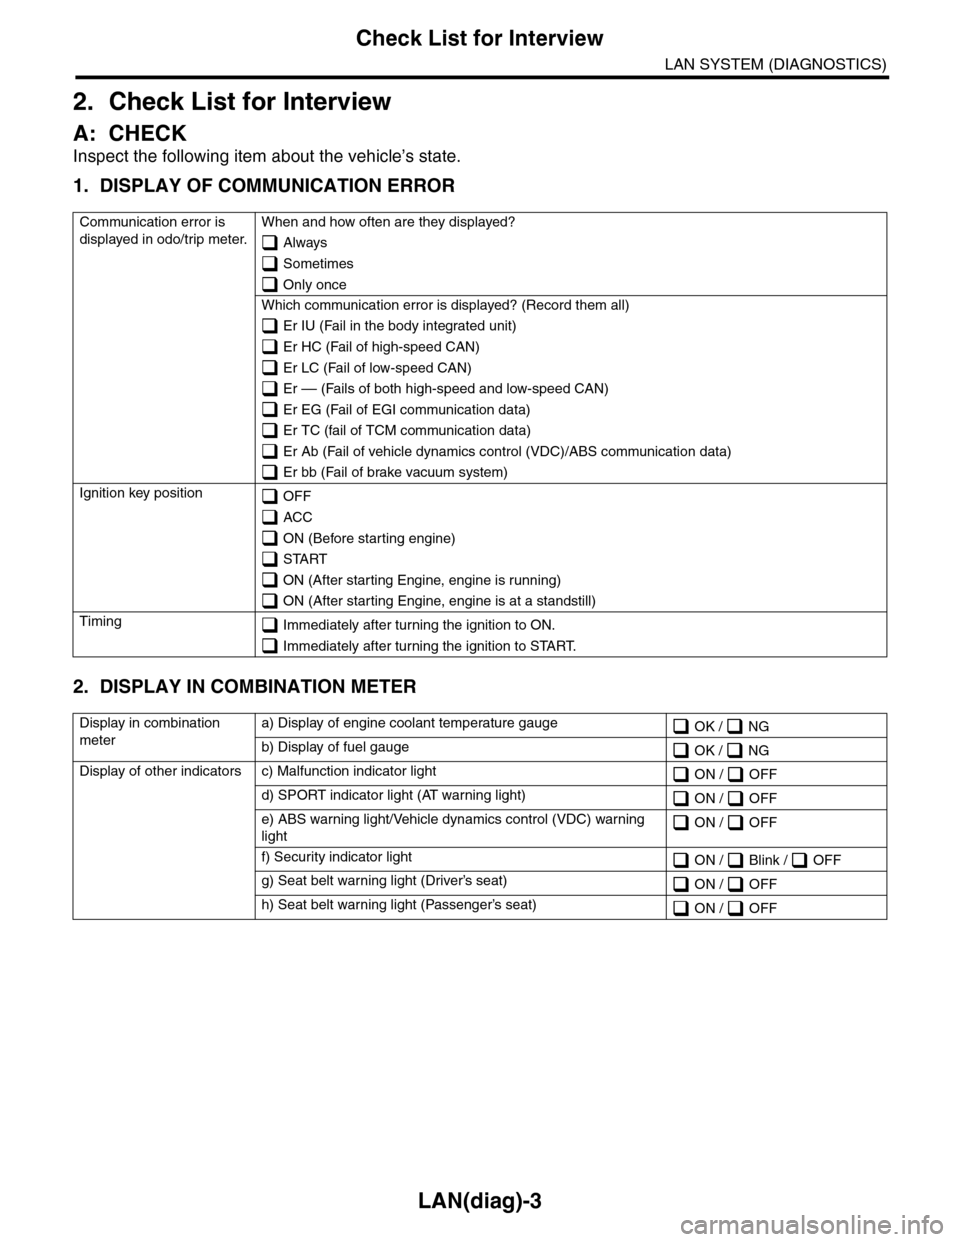
2. Check List for Interview
A: CHECK
Inspect the following item about the vehicle’s state.
1. DISPLAY OF COMMUNICATION ERROR
2. DISPLAY IN COMBINATION METER
Communication error is
displayed in odo/trip meter.
When and how often are they displayed?
Always
Sometimes
Only once
Which communication error is displayed? (Record them all)
Er IU (Fail in the body integrated unit)
Er HC (Fail of high-speed CAN)
Er LC (Fail of low-speed CAN)
Er –– (Fails of both high-speed and low-speed CAN)
Er EG (Fail of EGI communication data)
Er TC (fail of TCM communication data)
Er Ab (Fail of vehicle dynamics control (VDC)/ABS communication data)
Er bb (Fail of brake vacuum system)
Ignition key position OFF
ACC
ON (Before starting engine)
START
ON (After starting Engine, engine is running)
ON (After starting Engine, engine is at a standstill)
Timing Immediately after turning the ignition to ON.
Immediately after turning the ignition to START.
Display in combination
meter
a) Display of engine coolant temperature gauge OK / NG
b) Display of fuel gauge OK / NG
Display of other indicators c) Malfunction indicator light ON / OFF
d) SPORT indicator light (AT warning light) ON / OFF
e) ABS warning light/Vehicle dynamics control (VDC) warning
light ON / OFF
f) Security indicator light ON / Blink / OFF
g) Seat belt warning light (Driver’s seat) ON / OFF
h) Seat belt warning light (Passenger’s seat) ON / OFF
Page 460 of 2453
LAN(diag)-4
Check List for Interview
LAN SYSTEM (DIAGNOSTICS)
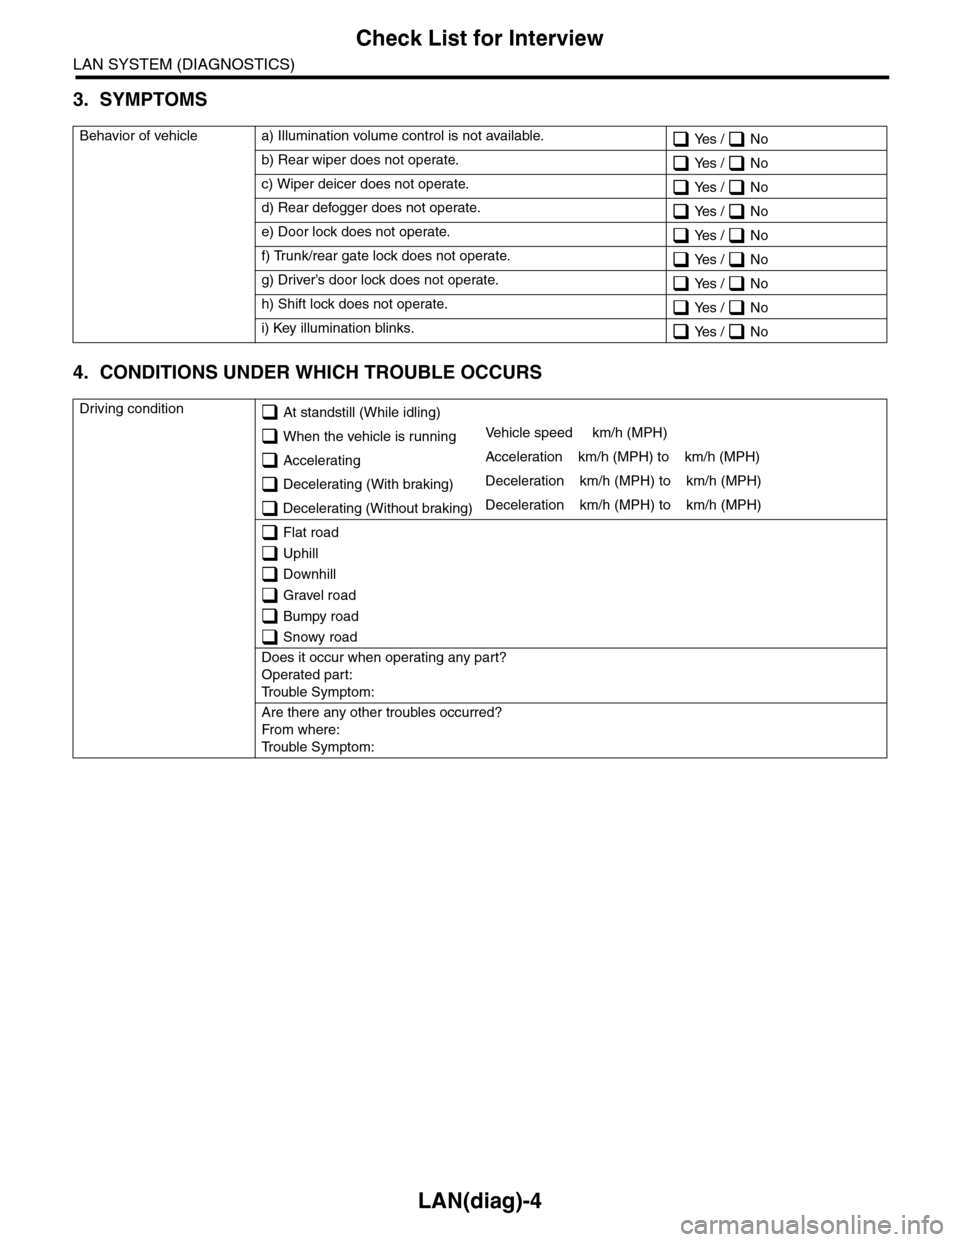
3. SYMPTOMS
4. CONDITIONS UNDER WHICH TROUBLE OCCURS
Behavior of vehicle a) Illumination volume control is not available. Yes / No
b) Rear wiper does not operate. Yes / No
c) Wiper deicer does not operate. Yes / No
d) Rear defogger does not operate. Yes / No
e) Door lock does not operate. Yes / No
f) Trunk/rear gate lock does not operate. Yes / No
g) Driver’s door lock does not operate. Yes / No
h) Shift lock does not operate. Yes / No
i) Key illumination blinks. Yes / No
Driving condition At standstill (While idling)
When the vehicle is runningVe h i c l e s p e e d k m / h ( M P H )
AcceleratingAcceleration km/h (MPH) to km/h (MPH)
Decelerating (With braking)Deceleration km/h (MPH) to km/h (MPH)
Decelerating (Without braking)Deceleration km/h (MPH) to km/h (MPH)
Flat road
Uphill
Downhill
Gravel road
Bumpy road
Snowy road
Does it occur when operating any part?
Operated part:
Tr o u b l e S y m p t o m :
Are there any other troubles occurred?
Fr o m wh er e :
Tr o u b l e S y m p t o m :
Page 461 of 2453
LAN(diag)-5
General Description
LAN SYSTEM (DIAGNOSTICS)
3. General Description
A: CAUTION
1. SRS AIRBAG SYSTEM
Airbag system wiring harness is routed near the
body integrated unit and twisted pair line.
CAUTION:
•All airbag system wiring harness and con-
nectors are colored yellow. Do not use the elec-
trical test equipment on these circuits.
•Be careful not to damage the airbag system
wiring harness when servicing the body inte-
grated unit and LAN system.
•Refer to “Airbag System” when disconnect-
ing the air bag system connector.
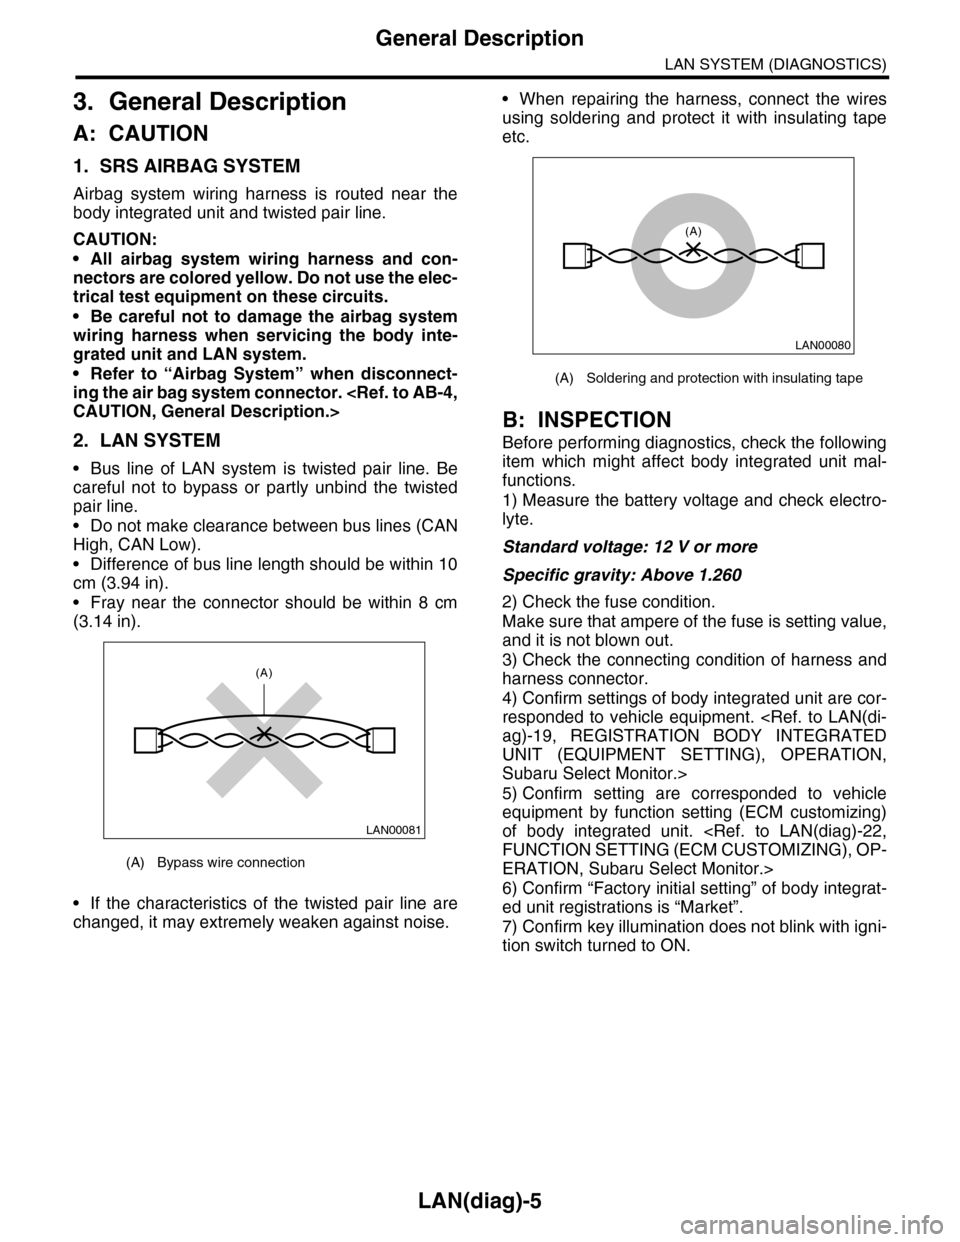
2. LAN SYSTEM
•Bus line of LAN system is twisted pair line. Be
careful not to bypass or partly unbind the twisted
pair line.
•Do not make clearance between bus lines (CAN
High, CAN Low).
•Difference of bus line length should be within 10
cm (3.94 in).
•Fray near the connector should be within 8 cm
(3.14 in).
•If the characteristics of the twisted pair line are
changed, it may extremely weaken against noise.
•When repairing the harness, connect the wires
using soldering and protect it with insulating tape
etc.
B: INSPECTION
Before performing diagnostics, check the following
item which might affect body integrated unit mal-
functions.
1) Measure the battery voltage and check electro-
lyte.
Standard voltage: 12 V or more
Specific gravity: Above 1.260
2) Check the fuse condition.
Make sure that ampere of the fuse is setting value,
and it is not blown out.
3) Check the connecting condition of harness and
harness connector.
4) Confirm settings of body integrated unit are cor-
responded to vehicle equipment.
UNIT (EQUIPMENT SETTING), OPERATION,
Subaru Select Monitor.>
5) Confirm setting are corresponded to vehicle
equipment by function setting (ECM customizing)
of body integrated unit.
ERATION, Subaru Select Monitor.>
6) Confirm “Factory initial setting” of body integrat-
ed unit registrations is “Market”.
7) Confirm key illumination does not blink with igni-
tion switch turned to ON.
(A) Bypass wire connection
LAN00081
(A)
(A) Soldering and protection with insulating tape
LAN00080
(A)
Page 463 of 2453
LAN(diag)-7
Electrical Component Location
LAN SYSTEM (DIAGNOSTICS)
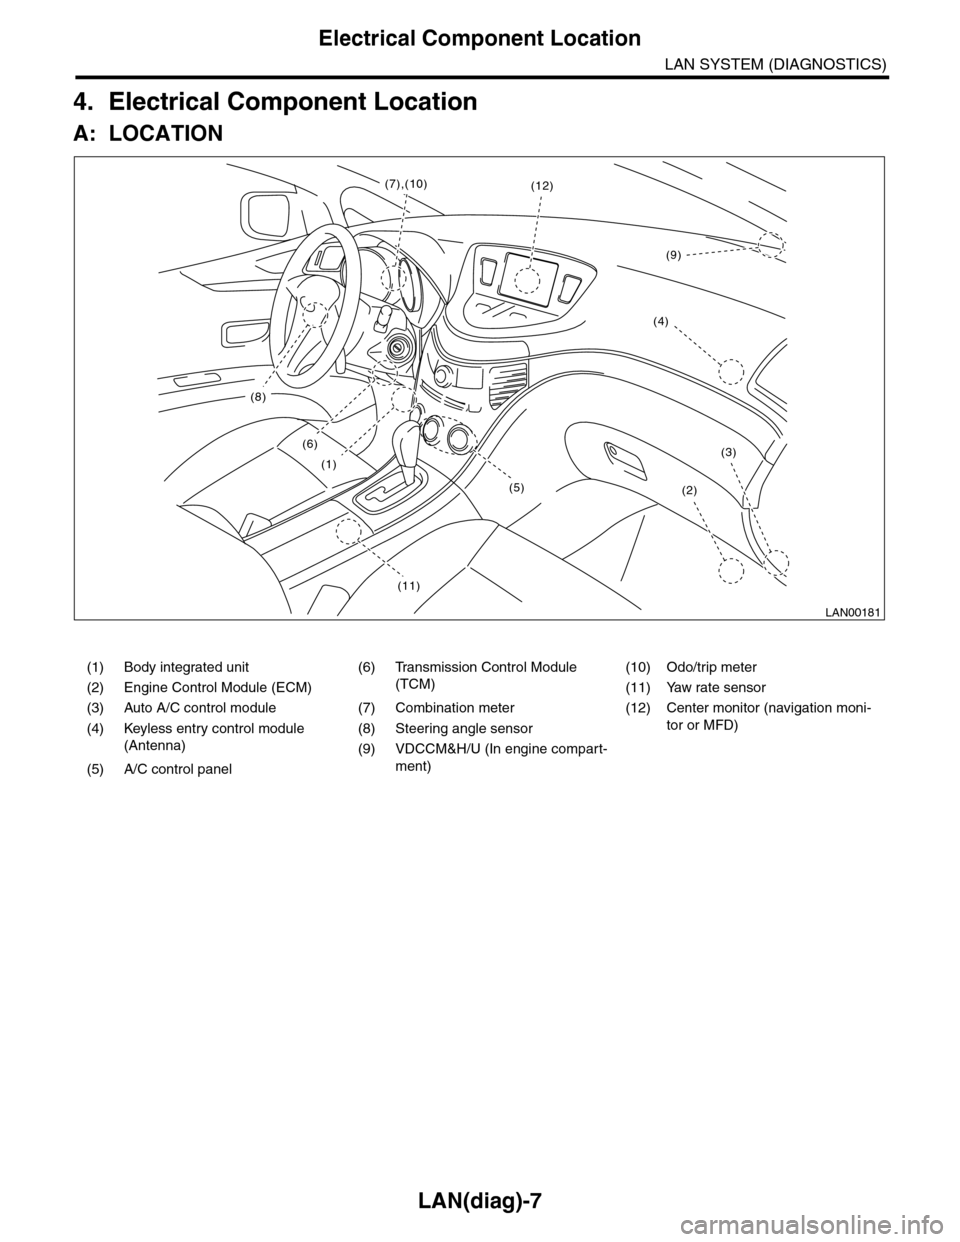
4. Electrical Component Location
A: LOCATION
(1) Body integrated unit (6) Transmission Control Module
(TCM)
(10) Odo/trip meter
(2) Engine Control Module (ECM) (11) Yaw rate sensor
(3) Auto A/C control module (7) Combination meter (12) Center monitor (navigation moni-
tor or MFD)(4) Keyless entry control module
(Antenna)
(8) Steering angle sensor
(9) VDCCM&H/U (In engine compart-
ment)(5) A/C control panel
LAN00181
(8)
(6)
(1)
(11)
(2)
(3)
(12)(7),(10)
(4)
(9)
(5)
Page 465 of 2453
LAN(diag)-9
Control Module I/O Signal
LAN SYSTEM (DIAGNOSTICS)
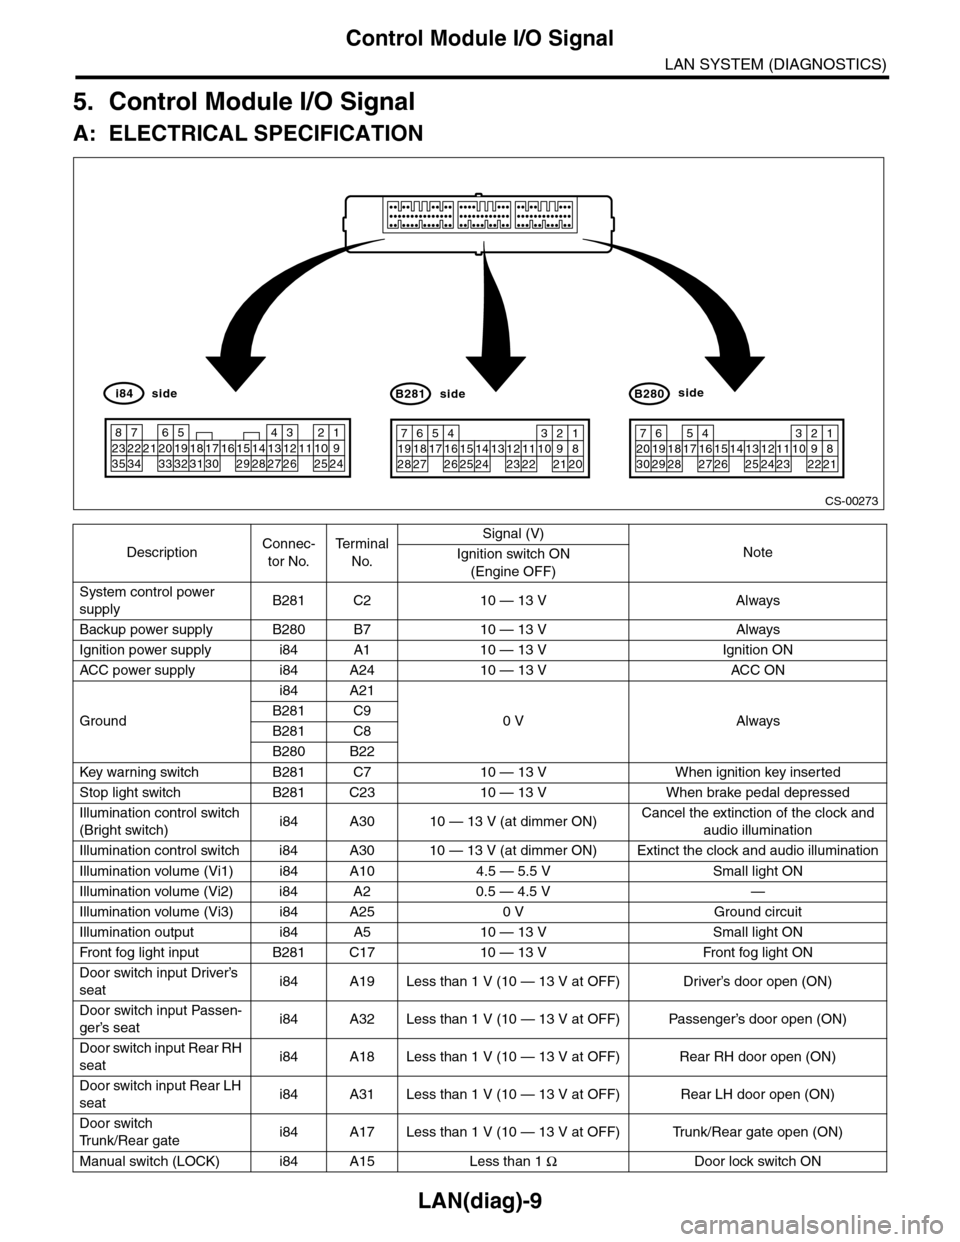
5. Control Module I/O Signal
A: ELECTRICAL SPECIFICATION
DescriptionConnec-
tor No.
Te r m i n a l
No.
Signal (V)
NoteIgnition switch ON
(Engine OFF)
System control power
supplyB281 C2 10 — 13 V Always
Backup power supply B280 B7 10 — 13 V Always
Ignition power supply i84 A1 10 — 13 V Ignition ON
ACC power supply i84 A24 10 — 13 V AC C ON
Ground
i84 A21
0 V AlwaysB281 C9
B281 C8
B280 B22
Key war ning switch B281 C7 10 — 13 V When ignition key inser ted
Stop light switch B281 C23 10 — 13 V When brake pedal depressed
Illumination control switch
(Bright switch)i84 A30 10 — 13 V (at dimmer ON)Cancel the extinction of the clock and
audio illumination
Illumination control switch i84 A30 10 — 13 V (at dimmer ON) Extinct the clock and audio illumination
Illumination volume (Vi1) i84 A10 4.5 — 5.5 V Small light ON
Illumination volume (Vi2) i84 A2 0.5 — 4.5 V —
Illumination volume (Vi3) i84 A25 0 V Ground circuit
Illumination output i84 A5 10 — 13 V Small light ON
Fr o nt fog li g ht in p ut B 28 1 C1 7 1 0 — 1 3 V Fr o nt fo g l i gh t ON
Door switch input Driver’s
seati84 A19 Less than 1 V (10 — 13 V at OFF) Driver’s door open (ON)
Door switch input Passen-
ger’s seati84 A32 Less than 1 V (10 — 13 V at OFF) Passenger’s door open (ON)
Door switch input Rear RH
seati84 A18 Less than 1 V (10 — 13 V at OFF) Rear RH door open (ON)
Door switch input Rear LH
seati84 A31 Less than 1 V (10 — 13 V at OFF) Rear LH door open (ON)
Door switch
Tr u n k / R e a r g a t ei84 A17 Less than 1 V (10 — 13 V at OFF) Trunk/Rear gate open (ON)
Manual switch (LOCK) i84 A15 Less than 1 ΩDoor lock switch ON
CS-00273
71928
61827
51741626152514241312231122
3102921
1820
B281side
72030
619291828
51741627152614132512241123
3102922
1821
B280side
82335
722342162033
51932183117301615291428
41327
312261121025
1924
i84side
Page 466 of 2453
LAN(diag)-10
Control Module I/O Signal
LAN SYSTEM (DIAGNOSTICS)
Manual switch (UNLOCK) i84 A29 Less than 1 ΩDoor unlock switch ON
Door lock power supply i84 A34 10 — 13 V Always
All door lock output i84 A7 10 — 13 V Manual lock switch, door key switch ON
Driver’s door UNLOCK
outputi84 A23 10 — 13 V Driver’s seat unlock signal ON
All door UNLOCK output i84 A8 10 — 13 V ALL door unlock signals ON
Rear gate UNLOCK out-
puti84 A22 10 — 13 VWhen rear gate release switch ON with
all seats unlocked
Rear gate release switch B281 C22 0 V Rear gate release switch ON
Key/shift lock power sup-
plyB281 C1 10 — 13 V Always
Shift lock output B280 B6 10 — 13 VIgnition switch ON, shift position “P”
range, foot brake ON (Only AT)
Key locking output B280 B5 10 — 13 VOther than “P” range, ignition switch
ON
Wiper deicer switch i84 A14 0 V Wiper deicer switch ON
Wiper deicer relay output B280 B14 0 V Wiper deicer relay ON
Rear defogger switch i84 A28 0 V Rear defogger switch ON
Rear defogger relay out-
putB281 B16 0 V Rear defogger relay ON
Shift switch (ON) B281 C26 0 V At Manual mode
Shift switch (UP) B281 C15 0 V At Manual mode UP
Shift switch (DOWN) B281 C25 0 V At Manual mode DOWN
Shift button switch B281 C24 0 VWhen shift lever release button is oper-
ated
P range switch B281 C13 0 V Shift range P position
Impact sensor B281 C5 8 V or moreImpact sensor ON (Model with impact
sensor)
Fuel level sensor B281 C19 0 — 102.3 Ω
Resistance differs according to the fuel
level (displays resistance combining
level gauge main and sub)
Ambient temperature sen-
sor
B281 C3 0.5 — 4.5 V SIG
B281 C10 0 V GND
Seat belt switch (driver’s
seat)i84 A4 0 V When driver’s seat belt is worn
Seat belt switch (Passen-
ger’s seat)i84 A13 0 V When passenger’s seat belt is worn
Seat belt warning light
(driver’s seat)i84 A20 0 V When driver’s seat belt is worn
Seat belt warning light
(Passenger’s seat)B280 C27 0 V When passenger’s seat belt is worn
Rear wiper switch (ON) B281 C6 0 V Rear wiper switch ON
Rear wiper switch (INT) B281 C18 0 V Rear wiper switch ON
Rear washer switch B281 C27 0 V Rear washer switch ON
Rear wiper power supply B280 B21 10 — 13 V Ignition switch ON
Rear wiper ON output B280 B1 10 — 13 V Rear wiper switch ON
Rear wiper return B280B8 0 VAt wiper reversingB1 — B8 0 V
Room lamp output B280 B3 0 VWhen LOCK, UNLOCK with keyless
entry
Map lamp output B280D2 0 V When using map lamp
D9 0 V When using map lamp
DescriptionConnec-
tor No.
Te r m i n a l
No.
Signal (V)
NoteIgnition switch ON
(Engine OFF)
Page 467 of 2453
LAN(diag)-11
Control Module I/O Signal
LAN SYSTEM (DIAGNOSTICS)
B: WIRING DIAGRAM
Refer to the electrical wiring diagram.
Key r ing illumination out-
putB280 B4 0 VIgnition key removed, driver’s door
open
Tu r n h a z a r d o u t p u t B 2 8 0 B 1 2 0 VWhen operating keyless entry answer
back
Keyless Buzzer Output i84 A6 10 — 13 VWhen operating keyless entry answer
back
Security horn output B280 B11 0 V When operating security horn
Security indicator light i84 A33 0 VAt ignition key removed, immobilizer
operating
TPMS registration check
signal inputB281 C4 0 VWhen inputting registration check sig-
nal
Keyless communication i84 A9 Ser ial communication At keyless entr y signal received
High-speed CAN circuit
(Hi)B280 B20Between B20 — B30
Serial communication
At communicating (sending and receiv-
ing)High-speed CAN circuit
(Lo)B280 B30
Low-speed CAN circuit 1
(Hi)i84 A27Between A25 — A26
Serial communication
At communicating (sending and receiv-
ing)Low-speed CAN circuit 1
(Lo)i84 A26
Low-speed CAN circuit 2
(Hi)B280 B26Between B25 — B27
Serial communication
At communicating (sending and receiv-
ing)
(Model with auto A/C)Low-speed CAN circuit 2
(Lo)B280 B25
Immobilizer antenna B281C20 —
C21Serial communication
Immobilizer communica-
tion (Main)B280
B18
(Back-up
B28)
Serial communication
Subaru Select Monitor
communicationB280 B19 Serial communication
DescriptionConnec-
tor No.
Te r m i n a l
No.
Signal (V)
NoteIgnition switch ON
(Engine OFF)
Page 468 of 2453
LAN(diag)-12
Subaru Select Monitor
LAN SYSTEM (DIAGNOSTICS)
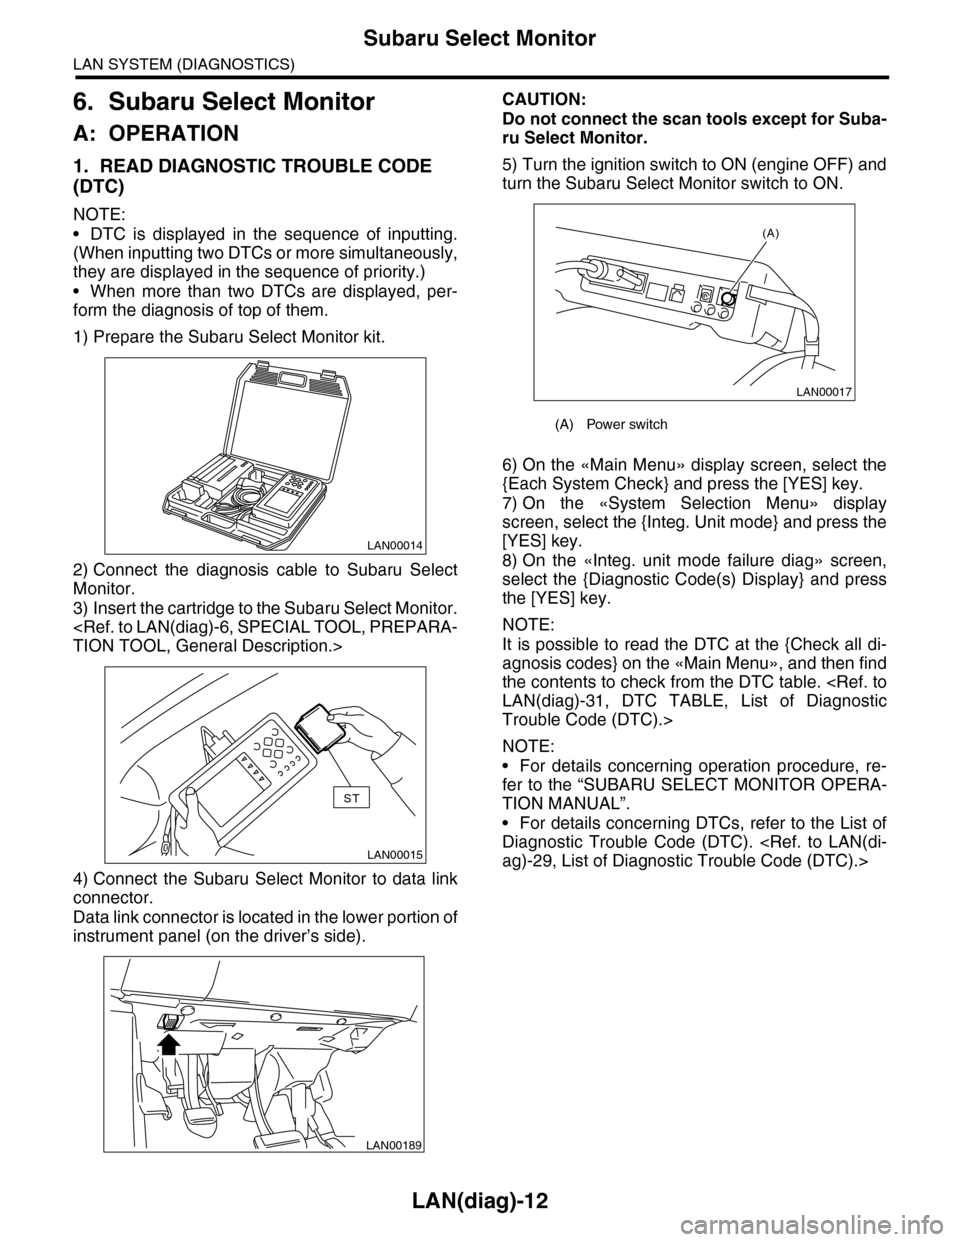
6. Subaru Select Monitor
A: OPERATION
1. READ DIAGNOSTIC TROUBLE CODE
(DTC)
NOTE:
•DTC is displayed in the sequence of inputting.
(When inputting two DTCs or more simultaneously,
they are displayed in the sequence of priority.)
•When more than two DTCs are displayed, per-
form the diagnosis of top of them.
1) Prepare the Subaru Select Monitor kit.
2) Connect the diagnosis cable to Subaru Select
Monitor.
3) Insert the cartridge to the Subaru Select Monitor.
4) Connect the Subaru Select Monitor to data link
connector.
Data link connector is located in the lower portion of
instrument panel (on the driver’s side).
CAUTION:
Do not connect the scan tools except for Suba-
ru Select Monitor.
5) Turn the ignition switch to ON (engine OFF) and
turn the Subaru Select Monitor switch to ON.
6) On the «Main Menu» display screen, select the
{Each System Check} and press the [YES] key.
7) On the «System Selection Menu» display
screen, select the {Integ. Unit mode} and press the
[YES] key.
8) On the «Integ. unit mode failure diag» screen,
select the {Diagnostic Code(s) Display} and press
the [YES] key.
NOTE:
It is possible to read the DTC at the {Check all di-
agnosis codes} on the «Main Menu», and then find
the contents to check from the DTC table.
Trouble Code (DTC).>
NOTE:
•For details concerning operation procedure, re-
fer to the “SUBARU SELECT MONITOR OPERA-
TION MANUAL”.
•For details concerning DTCs, refer to the List of
Diagnostic Trouble Code (DTC).
LAN00014
LAN00015
ST
LAN00189
(A) Power switch
LAN00017
(A)
Page 469 of 2453
![SUBARU TRIBECA 2009 1.G Service Owners Manual LAN(diag)-13
Subaru Select Monitor
LAN SYSTEM (DIAGNOSTICS)
2. READ CURRENT DATA
1) On the «Main Menu» display screen, select the {Each System Check} and press the [YES] key.
2) On the «System Sele SUBARU TRIBECA 2009 1.G Service Owners Manual LAN(diag)-13
Subaru Select Monitor
LAN SYSTEM (DIAGNOSTICS)
2. READ CURRENT DATA
1) On the «Main Menu» display screen, select the {Each System Check} and press the [YES] key.
2) On the «System Sele](/img/17/7322/w960_7322-468.png)
LAN(diag)-13
Subaru Select Monitor
LAN SYSTEM (DIAGNOSTICS)
2. READ CURRENT DATA
1) On the «Main Menu» display screen, select the {Each System Check} and press the [YES] key.
2) On the «System Selection Menu» display screen, select the {Integ. Unit mode} and press the [YES] key.
3) On the «Integ. unit mode failure diag» display screen, select the {Current Data Display & Save} and press
the [YES] key.
4) On the «Current Data Display & Save» display screen, select the {12 Data Display} and press the [YES]
key.
5) Using the scroll key, scroll the display screen up or down until the desired data is shown.
•A support list contains both of analog and digital data, and they are shown in the following table.
3. DISPLAY OF ANALOG DATA
Items to be displayed Unit of measure Description Note
BATT Voltage (Control) 10 — 15 VBody integrated unit input
valueAlways
BATT Voltage (BACK UP) 10 — 15 VBody integrated unit input
valueAlways
IG power supply voltage 10 — 15 VBody integrated unit input
valueIgnition switch ON
ACC voltage 10 — 15 VBody integrated unit input
valueIgnition switch ACC
Illumination VR voltage 0 — 5 VBody integrated unit out-
put valueSmall light switch ON
Illumi. output d-ratio 0 — 100%Body integrated unit input
value
Small light ON
Illumination volume is other than bright.
Ambient temp sensor V 0 — 5 VBody integrated unit out-
put valueIgnition switch ON
Ambient temperature –40 — 87.5°CBody integrated unit out-
put valueIgnition switch ON
Fuel level voltage 0 — 8 VBody integrated unit input
valueIgnition switch ON
Fuel level resistance 0 — 102.3 ΩBody integrated unit input
valueIgnition switch ON
key-lock solenoid V 6 — 12 VBody integrated unit out-
put value
Other than parking range
Ignition ON
number of regist. 0 — 4 Key No. to register
Fr o nt W he e l S p ee d km / h C A N d a t a i np u t val u e R ec ep t io n f r o m V DC u ni t
VDC/ABS latest f-codeDTC display (Tempo-
rarily)CAN data input value
It is normal when DTC is not been input
even if this code is displayed.
Reception from VDC
Blower fan steps 0 — 2 levels CAN data input value0: OFF, 1: Low, 2: 2 levels or more
Reception from air conditioner ECM
Fuel level resistance2 0 — 102.3 ΩCAN data output value Reception from body integrated unit
Fuel consumption cc/s CAN data input valueReception from ECM and transmission to
center monitor
Coolant Temp. 40 — 130°C CAN data input value Reception from ECM
Ve h i c l e l a t e r a l Gm/s2CAN data input value Reception from VDC unit
SPORT Shift Stages 0 — 7 levels CAN data input value
(0: Light OFF; 1 — 5: Gear display; 6: Fail; 7:
AT F t e m p e r a t u r e H i g h / L o w )
Reception from TCM
Shift Position 0 — 7 levels CAN data input value
0: 1; 1: 2; 2: 3; 3: 4; 4: D; 5: N; 6: R; 7: P shift
position (There is no 8 input.)
Reception from TCM
Off delay timeOFF, Short, Normal,
Long
Body integrated unit set-
ting itemsCustomize setting
Auto lock time20, 30, 40, 50, 60 sec-
onds
Body integrated unit set-
ting itemsCustomize setting