Oil spec SUBARU TRIBECA 2009 1.G Service Repair Manual
[x] Cancel search | Manufacturer: SUBARU, Model Year: 2009, Model line: TRIBECA, Model: SUBARU TRIBECA 2009 1.GPages: 2453, PDF Size: 46.32 MB
Page 926 of 2453

PS-46
Oil Pump
POWER ASSISTED SYSTEM (POWER STEERING)
2) Measure the relief pressure.
(1) Using the STs, measure the relief pressure.
(2) Close the valve.
(3) Measure the relief pressure.
ST1 925711000 PRESSURE GAUGE
ST2 34099AC020 ADAPTER HOSE B
ST3 34099AC010 ADAPTER HOSE A
Service limit:
8,800 — 9,400 kPa (90 — 96 kg/cm2, 1,276 —
1,363 psi)
(4) If it is not within the specification, replace the
oil pump.
3) Measure the working pressure.
(1) Using the ST, measure the working pres-
sure.
(2) Open the valve.
(3) Measure the working pressure of control
valve by turning steering wheel from stop to
stop.
NOTE:
Because of the power steering system setup, there
are conditions where the pressure will not rise to
the repair limit value even if the steering wheel is
turned to the maximum steering angle. In this case,
turn the steering wheel further than the maximum
steering angle to measure the operational pres-
sure.
ST1 925711000 PRESSURE GAUGE
ST2 34099AC020 ADAPTER HOSE B
ST3 34099AC010 ADAPTER HOSE A
Service limit:
8,800 — 9,400 kPa (90 — 96 kg/cm2, 1,276 —
1,363 psi)
(4) If it is out of specification, measure the steer-
ing effort.
Diagnostic Table.> If it is not within specifica-
tion, replace the control valve itself or control
valve and pinion as a single unit, using new
parts.
(1) Valve
PS-00153
(1) Valve
PS-00152
Page 928 of 2453
PS-48
Power Steering Fluid
POWER ASSISTED SYSTEM (POWER STEERING)
9. Power Steering Fluid
A: SPECIFICATION
B: INSPECTION
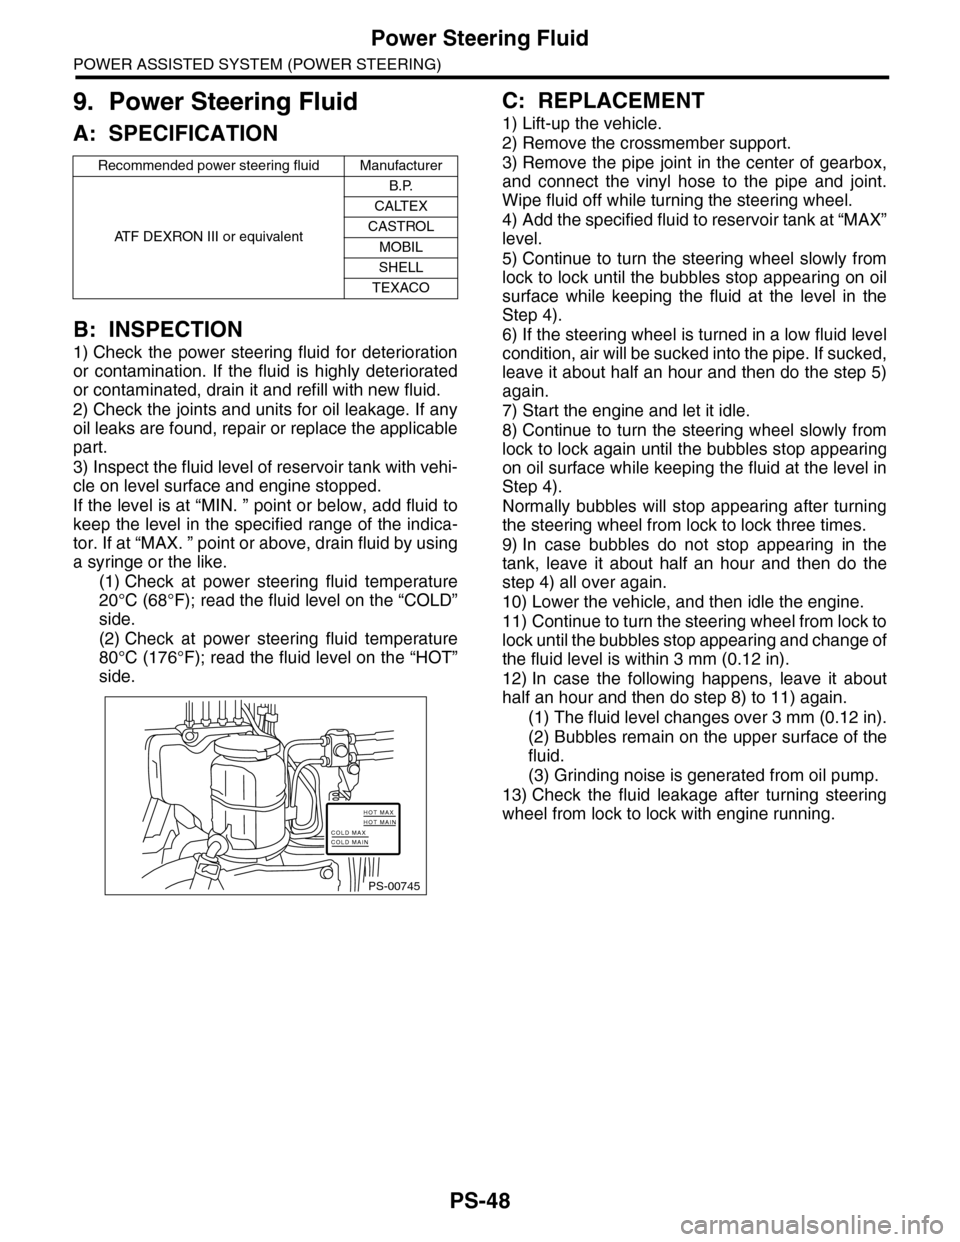
1) Check the power steering fluid for deterioration
or contamination. If the fluid is highly deteriorated
or contaminated, drain it and refill with new fluid.
2) Check the joints and units for oil leakage. If any
oil leaks are found, repair or replace the applicable
part.
3) Inspect the fluid level of reservoir tank with vehi-
cle on level surface and engine stopped.
If the level is at “MIN. ” point or below, add fluid to
keep the level in the specified range of the indica-
tor. If at “MAX. ” point or above, drain fluid by using
a syringe or the like.
(1) Check at power steering fluid temperature
20°C (68°F); read the fluid level on the “COLD”
side.
(2) Check at power steering fluid temperature
80°C (176°F); read the fluid level on the “HOT”
side.
C: REPLACEMENT
1) Lift-up the vehicle.
2) Remove the crossmember support.
3) Remove the pipe joint in the center of gearbox,
and connect the vinyl hose to the pipe and joint.
Wipe fluid off while turning the steering wheel.
4) Add the specified fluid to reservoir tank at “MAX”
level.
5) Continue to turn the steering wheel slowly from
lock to lock until the bubbles stop appearing on oil
surface while keeping the fluid at the level in the
Step 4).
6) If the steering wheel is turned in a low fluid level
condition, air will be sucked into the pipe. If sucked,
leave it about half an hour and then do the step 5)
again.
7) Start the engine and let it idle.
8) Continue to turn the steering wheel slowly from
lock to lock again until the bubbles stop appearing
on oil surface while keeping the fluid at the level in
Step 4).
Normally bubbles will stop appearing after turning
the steering wheel from lock to lock three times.
9) In case bubbles do not stop appearing in the
tank, leave it about half an hour and then do the
step 4) all over again.
10) Lower the vehicle, and then idle the engine.
11) Continue to turn the steering wheel from lock to
lock until the bubbles stop appearing and change of
the fluid level is within 3 mm (0.12 in).
12) In case the following happens, leave it about
half an hour and then do step 8) to 11) again.
(1) The fluid level changes over 3 mm (0.12 in).
(2) Bubbles remain on the upper surface of the
fluid.
(3) Grinding noise is generated from oil pump.
13) Check the fluid leakage after turning steering
wheel from lock to lock with engine running.
Recommended power steering fluid Manufacturer
AT F D E X R O N I I I o r e q u i v a l e n t
B.P.
CALTEX
CASTROL
MOBIL
SHELL
TEXACO
PS-00745
HOT MAXHOT MAINCOLD MAXCOLD MAIN
Page 929 of 2453
PS-49
General Diagnostic Table
POWER ASSISTED SYSTEM (POWER STEERING)
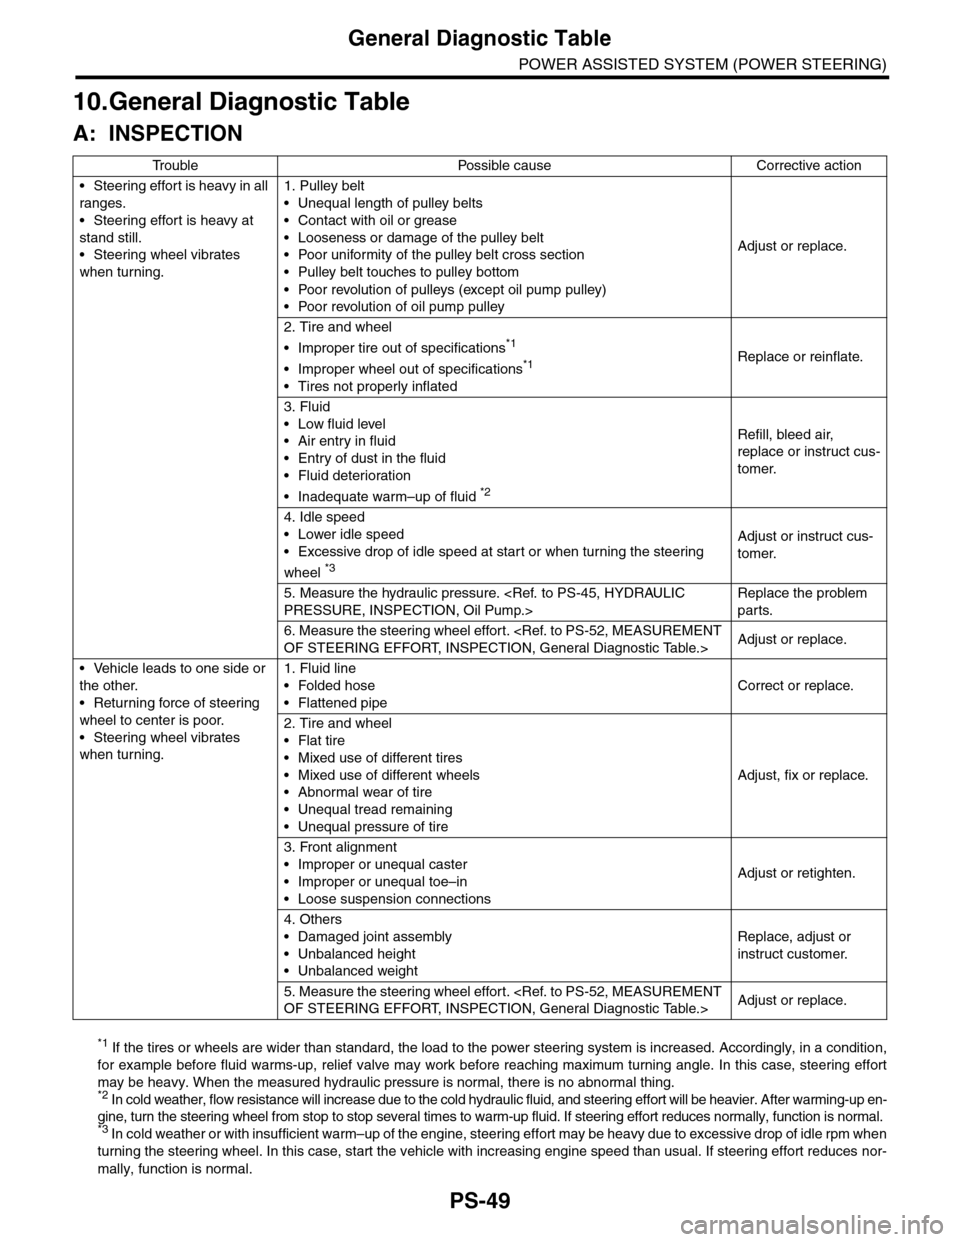
10.General Diagnostic Table
A: INSPECTION
*1 If the tires or wheels are wider than standard, the load to the power steering system is increased. Accordingly, in a condition,
for example before fluid warms-up, relief valve may work before reaching maximum turning angle. In this case, steering effort
may be heavy. When the measured hydraulic pressure is normal, there is no abnormal thing. *2 In cold weather, flow resistance will increase due to the cold hydraulic fluid, and steering effort will be heavier. After warming-up en-
gine, turn the steering wheel from stop to stop several times to warm-up fluid. If steering effort reduces normally, function is normal. *3 I n c o l d w e a t h e r o r w i t h i n s u f f i c i e n t w a r m – u p o f t h e e n g i n e , s t e e r i n g e f f o r t m a y b e h e a v y d u e t o e x c e s s i v e d r o p o f i d l e r p m w h en
turning the steering wheel. In this case, start the vehicle with increasing engine speed than usual. If steering effort reduces nor-
mally, function is normal.
Tr o u b l e P o s s i b l e c a u s e C o r r e c t i v e a c t i o n
•Steering effort is heavy in all
ranges.
•Steering effort is heavy at
stand still.
•Steering wheel vibrates
when turning.
1. Pulley belt
•Unequal length of pulley belts
•Contact with oil or grease
•Looseness or damage of the pulley belt
•Poor uniformity of the pulley belt cross section
•Pulley belt touches to pulley bottom
•Poor revolution of pulleys (except oil pump pulley)
•Poor revolution of oil pump pulley
Adjust or replace.
2. Tire and wheel
•Improper tire out of specifications*1
•Improper wheel out of specifications*1
•Tires not properly inflated
Replace or reinflate.
3. Fluid
•Low fluid level
•Air entry in fluid
•Entry of dust in the fluid
•Fluid deterioration
•Inadequate warm–up of fluid *2
Refill, bleed air,
replace or instruct cus-
tomer.
4. Idle speed
•Lower idle speed
•Excessive drop of idle speed at start or when turning the steering
wheel *3
Adjust or instruct cus-
tomer.
5. Measure the hydraulic pressure.
Replace the problem
parts.
6. Measure the steering wheel effort.
•Vehicle leads to one side or
the other.
•Returning force of steering
wheel to center is poor.
•Steering wheel vibrates
when turning.
1. Fluid line
•Folded hose
•Flattened pipe
Correct or replace.
2. Tire and wheel
•Flat tire
•Mixed use of different tires
•Mixed use of different wheels
•Abnormal wear of tire
•Unequal tread remaining
•Unequal pressure of tire
Adjust, fix or replace.
3. Front alignment
•Improper or unequal caster
•Improper or unequal toe–in
•Loose suspension connections
Adjust or retighten.
4. Others
•Damaged joint assembly
•Unbalanced height
•Unbalanced weight
Replace, adjust or
instruct customer.
5. Measure the steering wheel effort.
Page 930 of 2453
PS-50
General Diagnostic Table
POWER ASSISTED SYSTEM (POWER STEERING)
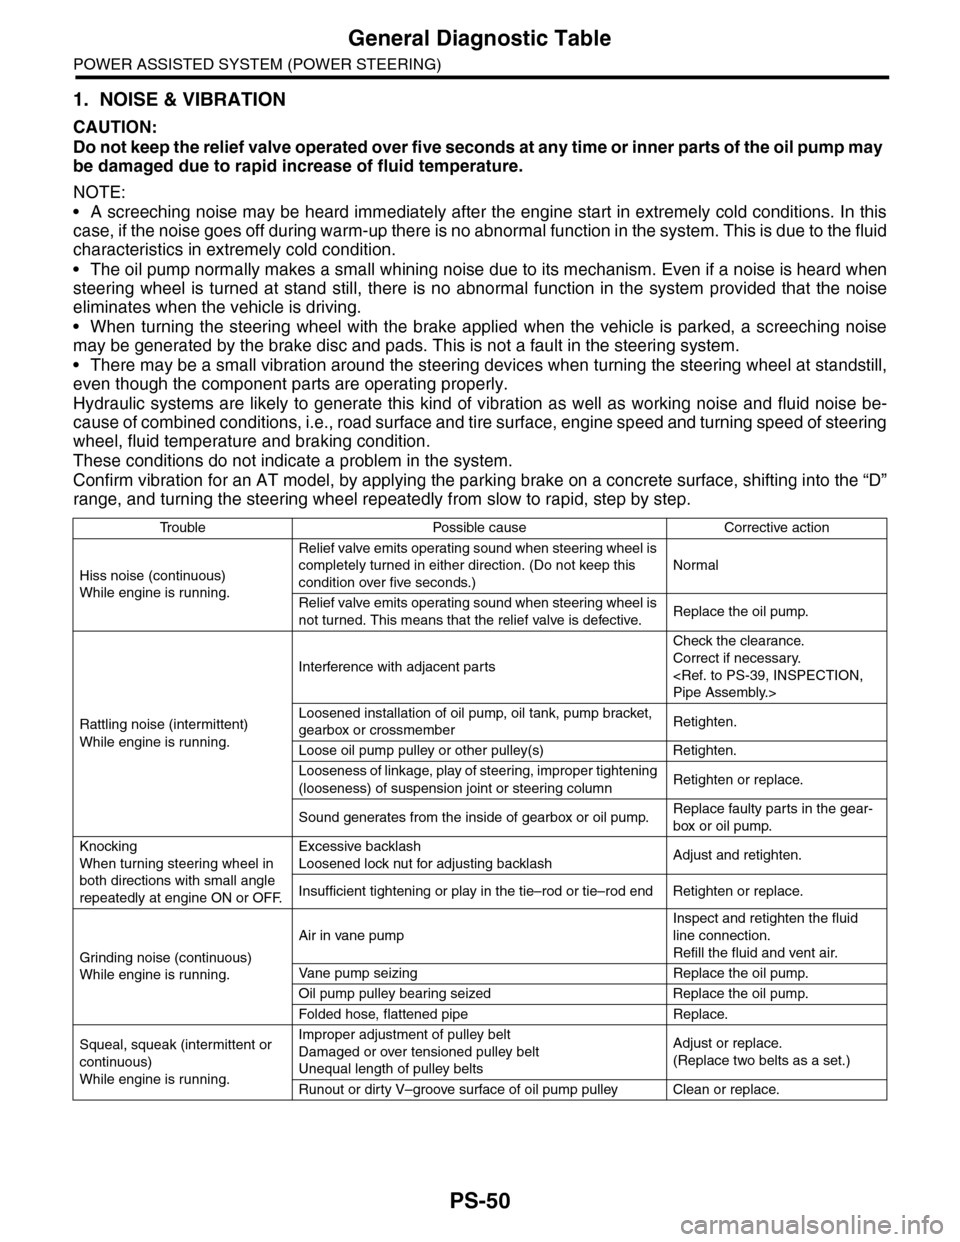
1. NOISE & VIBRATION
CAUTION:
Do not keep the relief valve operated over five seconds at any time or inner parts of the oil pump may
be damaged due to rapid increase of fluid temperature.
NOTE:
•A screeching noise may be heard immediately after the engine start in extremely cold conditions. In this
case, if the noise goes off during warm-up there is no abnormal function in the system. This is due to the fluid
characteristics in extremely cold condition.
•The oil pump normally makes a small whining noise due to its mechanism. Even if a noise is heard when
steering wheel is turned at stand still, there is no abnormal function in the system provided that the noise
eliminates when the vehicle is driving.
•When turning the steering wheel with the brake applied when the vehicle is parked, a screeching noise
may be generated by the brake disc and pads. This is not a fault in the steering system.
•There may be a small vibration around the steering devices when turning the steering wheel at standstill,
even though the component parts are operating properly.
Hydraulic systems are likely to generate this kind of vibration as well as working noise and fluid noise be-
cause of combined conditions, i.e., road surface and tire surface, engine speed and turning speed of steering
wheel, fluid temperature and braking condition.
These conditions do not indicate a problem in the system.
Confirm vibration for an AT model, by applying the parking brake on a concrete surface, shifting into the “D”
range, and turning the steering wheel repeatedly from slow to rapid, step by step.
Tr o u b l e P o s s i b l e c a u s e C o r r e c t i v e a c t i o n
Hiss noise (continuous)
While engine is running.
Relief valve emits operating sound when steering wheel is
completely turned in either direction. (Do not keep this
condition over five seconds.)
Normal
Relief valve emits operating sound when steering wheel is
not turned. This means that the relief valve is defective. Replace the oil pump.
Rattling noise (intermittent)
While engine is running.
Interference with adjacent parts
Check the clearance.
Correct if necessary.
Loosened installation of oil pump, oil tank, pump bracket,
gearbox or crossmemberRetighten.
Loose oil pump pulley or other pulley(s) Retighten.
Looseness of linkage, play of steering, improper tightening
(looseness) of suspension joint or steering columnRetighten or replace.
Sound generates from the inside of gearbox or oil pump.Replace faulty parts in the gear-
box or oil pump.
Knocking
When turning steering wheel in
both directions with small angle
repeatedly at engine ON or OFF.
Excessive backlash
Loosened lock nut for adjusting backlashAdjust and retighten.
Insufficient tightening or play in the tie–rod or tie–rod end Retighten or replace.
Grinding noise (continuous)
While engine is running.
Air in vane pump
Inspect and retighten the fluid
line connection.
Refill the fluid and vent air.
Va n e p u m p s e i z i n g R e p l a c e t h e o i l p u m p.
Oil pump pulley bearing seized Replace the oil pump.
Folded hose, flattened pipe Replace.
Squeal, squeak (intermittent or
continuous)
While engine is running.
Improper adjustment of pulley belt
Damaged or over tensioned pulley belt
Unequal length of pulley belts
Adjust or replace.
(Replace two belts as a set.)
Runout or dirty V–groove surface of oil pump pulley Clean or replace.
Page 932 of 2453
PS-52
General Diagnostic Table
POWER ASSISTED SYSTEM (POWER STEERING)
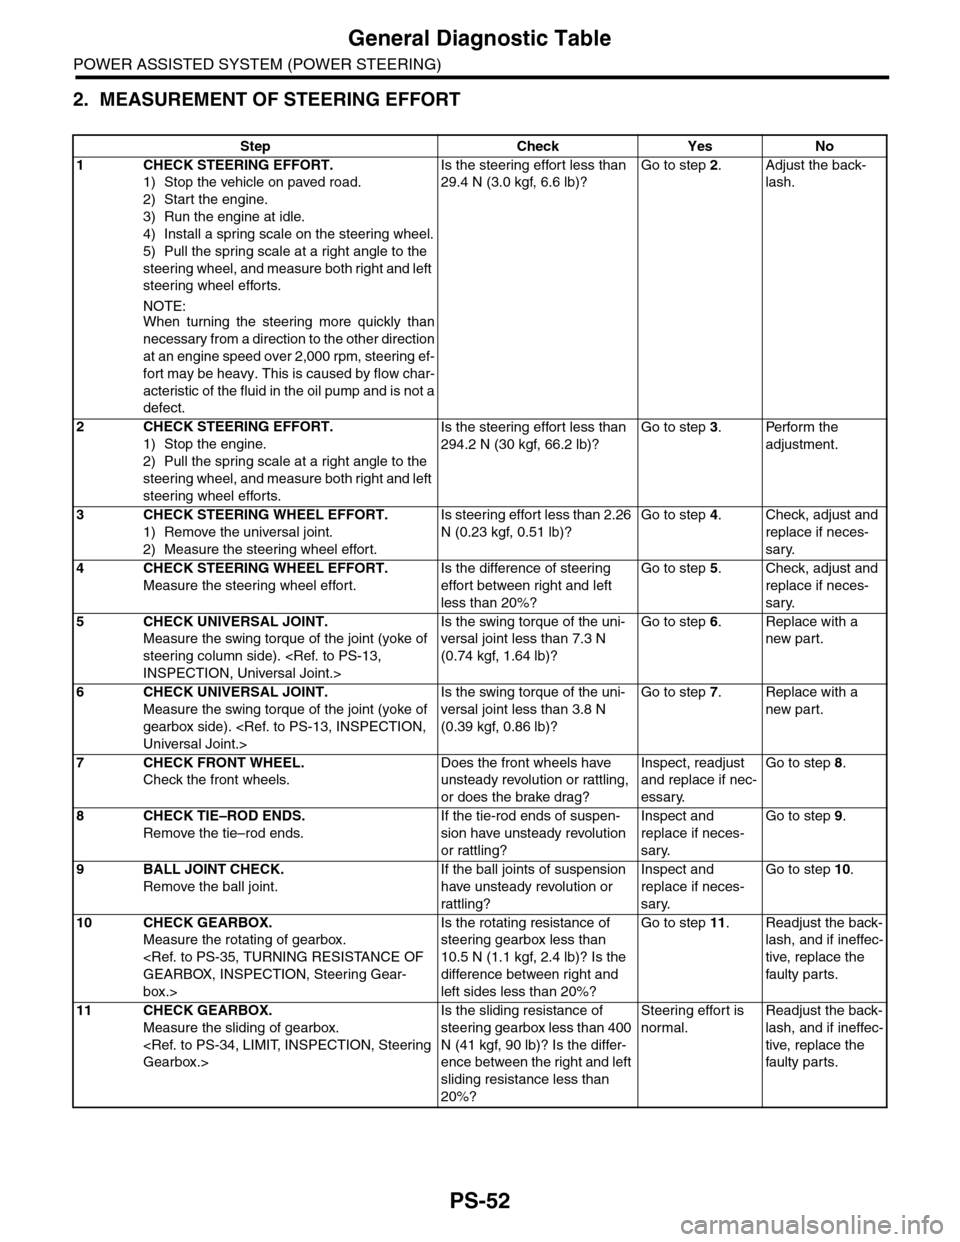
2. MEASUREMENT OF STEERING EFFORT
Step Check Yes No
1CHECK STEERING EFFORT.
1) Stop the vehicle on paved road.
2) Start the engine.
3) Run the engine at idle.
4) Install a spring scale on the steering wheel.
5) Pull the spring scale at a right angle to the
steering wheel, and measure both right and left
steering wheel efforts.
NOTE:When turning the steering more quickly than
necessary from a direction to the other direction
at an engine speed over 2,000 rpm, steering ef-
fort may be heavy. This is caused by flow char-
acteristic of the fluid in the oil pump and is not a
defect.
Is the steering effort less than
29.4 N (3.0 kgf, 6.6 lb)?
Go to step 2.Adjust the back-
lash.
2CHECK STEERING EFFORT.
1) Stop the engine.
2) Pull the spring scale at a right angle to the
steering wheel, and measure both right and left
steering wheel efforts.
Is the steering effort less than
294.2 N (30 kgf, 66.2 lb)?
Go to step 3.Perform the
adjustment.
3CHECK STEERING WHEEL EFFORT.
1) Remove the universal joint.
2) Measure the steering wheel effort.
Is steering effort less than 2.26
N (0.23 kgf, 0.51 lb)?
Go to step 4.Check, adjust and
replace if neces-
sary.
4CHECK STEERING WHEEL EFFORT.
Measure the steering wheel effort.
Is the difference of steering
effort between right and left
less than 20%?
Go to step 5.Check, adjust and
replace if neces-
sary.
5CHECK UNIVERSAL JOINT.
Measure the swing torque of the joint (yoke of
steering column side).
Is the swing torque of the uni-
versal joint less than 7.3 N
(0.74 kgf, 1.64 lb)?
Go to step 6.Replace with a
new part.
6CHECK UNIVERSAL JOINT.
Measure the swing torque of the joint (yoke of
gearbox side).
Is the swing torque of the uni-
versal joint less than 3.8 N
(0.39 kgf, 0.86 lb)?
Go to step 7.Replace with a
new part.
7CHECK FRONT WHEEL.
Check the front wheels.
Does the front wheels have
unsteady revolution or rattling,
or does the brake drag?
Inspect, readjust
and replace if nec-
essary.
Go to step 8.
8CHECK TIE–ROD ENDS.
Remove the tie–rod ends.
If the tie-rod ends of suspen-
sion have unsteady revolution
or rattling?
Inspect and
replace if neces-
sary.
Go to step 9.
9BALL JOINT CHECK.
Remove the ball joint.
If the ball joints of suspension
have unsteady revolution or
rattling?
Inspect and
replace if neces-
sary.
Go to step 10.
10 CHECK GEARBOX.
Measure the rotating of gearbox.
box.>
Is the rotating resistance of
steering gearbox less than
10.5 N (1.1 kgf, 2.4 lb)? Is the
difference between right and
left sides less than 20%?
Go to step 11.Readjust the back-
lash, and if ineffec-
tive, replace the
faulty par ts.
11 CHECK GEARBOX.
Measure the sliding of gearbox.
Is the sliding resistance of
steering gearbox less than 400
N (41 kgf, 90 lb)? Is the differ-
ence between the right and left
sliding resistance less than
20%?
Steering effort is
normal.
Readjust the back-
lash, and if ineffec-
tive, replace the
faulty par ts.
Page 933 of 2453
PS-53
General Diagnostic Table
POWER ASSISTED SYSTEM (POWER STEERING)
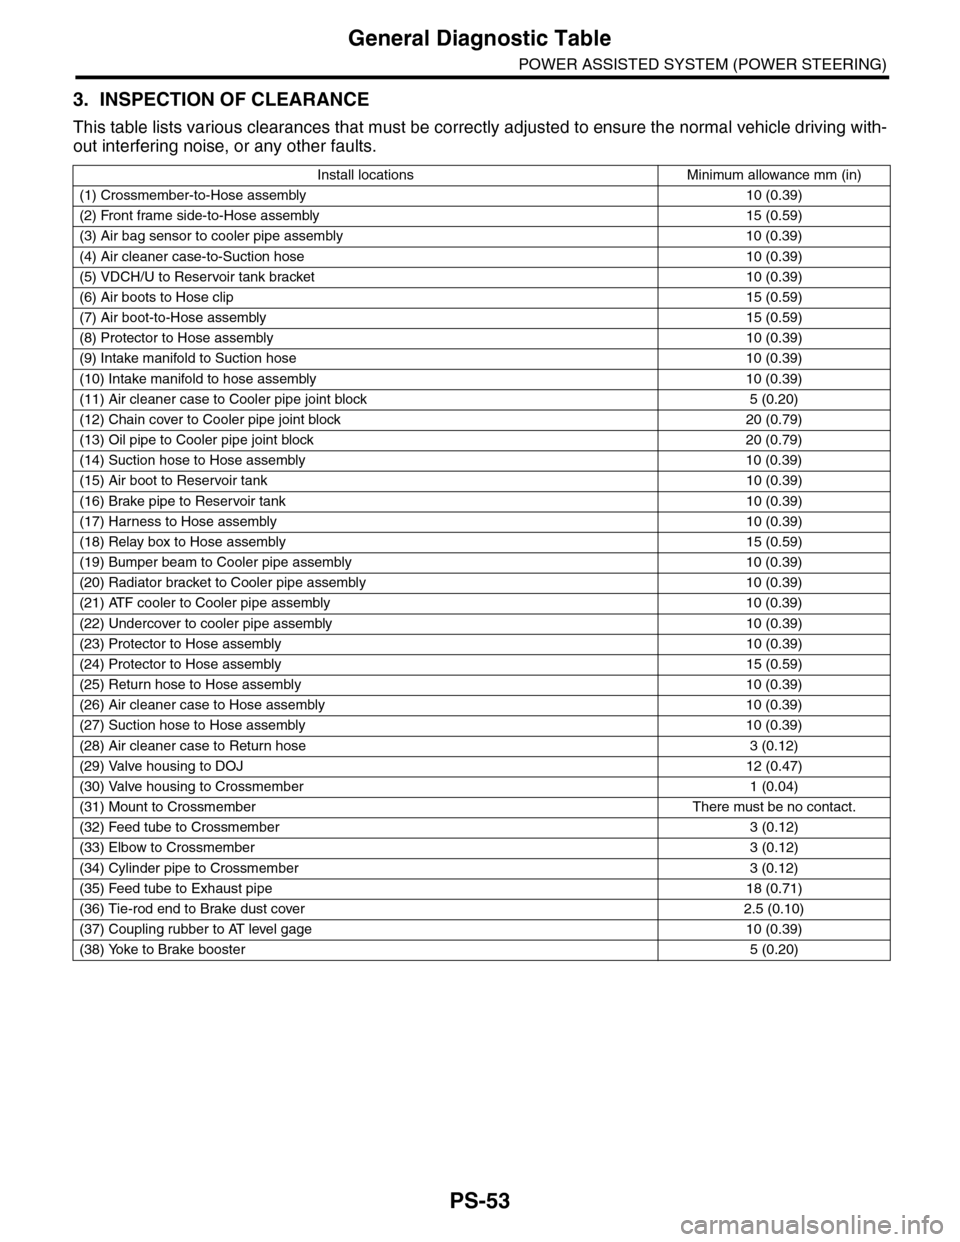
3. INSPECTION OF CLEARANCE
This table lists various clearances that must be correctly adjusted to ensure the normal vehicle driving with-
out interfering noise, or any other faults.
Install locations Minimum allowance mm (in)
(1) Crossmember-to-Hose assembly 10 (0.39)
(2) Front frame side-to-Hose assembly 15 (0.59)
(3) Air bag sensor to cooler pipe assembly 10 (0.39)
(4) Air cleaner case-to-Suction hose 10 (0.39)
(5) VDCH/U to Reservoir tank bracket 10 (0.39)
(6) Air boots to Hose clip15 (0.59)
(7) Air boot-to-Hose assembly15 (0.59)
(8) Protector to Hose assembly10 (0.39)
(9) Intake manifold to Suction hose 10 (0.39)
(10) Intake manifold to hose assembly 10 (0.39)
(11) Air cleaner case to Cooler pipe joint block 5 (0.20)
(12) Chain cover to Cooler pipe joint block 20 (0.79)
(13) Oil pipe to Cooler pipe joint block 20 (0.79)
(14) Suction hose to Hose assembly 10 (0.39)
(15) Air boot to Reservoir tank10 (0.39)
(16) Brake pipe to Reservoir tank10 (0.39)
(17) Harness to Hose assembly10 (0.39)
(18) Relay box to Hose assembly15 (0.59)
(19) Bumper beam to Cooler pipe assembly 10 (0.39)
(20) Radiator bracket to Cooler pipe assembly 10 (0.39)
(21) ATF cooler to Cooler pipe assembly 10 (0.39)
(22) Undercover to cooler pipe assembly 10 (0.39)
(23) Protector to Hose assembly10 (0.39)
(24) Protector to Hose assembly15 (0.59)
(25) Return hose to Hose assembly 10 (0.39)
(26) Air cleaner case to Hose assembly 10 (0.39)
(27) Suction hose to Hose assembly 10 (0.39)
(28) Air cleaner case to Return hose 3 (0.12)
(29) Valve housing to DOJ12 (0.47)
(30) Valve housing to Crossmember 1 (0.04)
(31) Mount to Crossmember There must be no contact.
(32) Feed tube to Crossmember3 (0.12)
(33) Elbow to Crossmember3 (0.12)
(34) Cylinder pipe to Crossmember 3 (0.12)
(35) Feed tube to Exhaust pipe18 (0.71)
(36) Tie-rod end to Brake dust cover 2.5 (0.10)
(37) Coupling rubber to AT level gage 10 (0.39)
(38) Yoke to Brake booster5 (0.20)
Page 937 of 2453
RS-4
General Description
REAR SUSPENSION
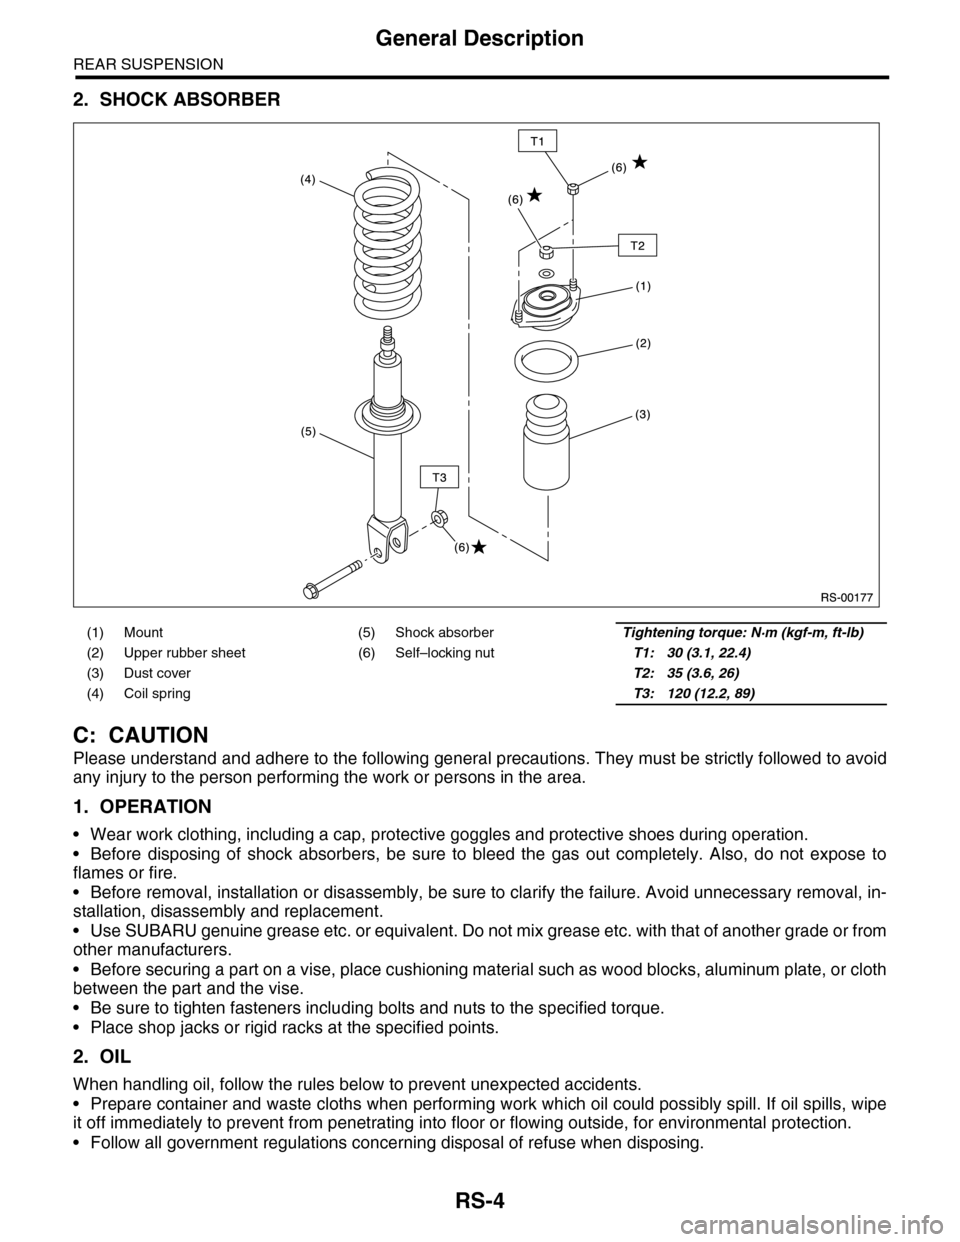
2. SHOCK ABSORBER
C: CAUTION
Please understand and adhere to the following general precautions. They must be strictly followed to avoid
any injury to the person performing the work or persons in the area.
1. OPERATION
•Wear work clothing, including a cap, protective goggles and protective shoes during operation.
•Before disposing of shock absorbers, be sure to bleed the gas out completely. Also, do not expose to
flames or fire.
•Before removal, installation or disassembly, be sure to clarify the failure. Avoid unnecessary removal, in-
stallation, disassembly and replacement.
•Use SUBARU genuine grease etc. or equivalent. Do not mix grease etc. with that of another grade or from
other manufacturers.
•Before securing a part on a vise, place cushioning material such as wood blocks, aluminum plate, or cloth
between the part and the vise.
•Be sure to tighten fasteners including bolts and nuts to the specified torque.
•Place shop jacks or rigid racks at the specified points.
2. OIL
When handling oil, follow the rules below to prevent unexpected accidents.
•Prepare container and waste cloths when performing work which oil could possibly spill. If oil spills, wipe
it off immediately to prevent from penetrating into floor or flowing outside, for environmental protection.
•Follow all government regulations concerning disposal of refuse when disposing.
(1) Mount (5) Shock absorberTightening torque: N·m (kgf-m, ft-lb)
(2) Upper rubber sheet (6) Self–locking nutT1: 30 (3.1, 22.4)
(3) Dust cover T2: 35 (3.6, 26)
(4) Coil spring T3: 120 (12.2, 89)
Page 946 of 2453
RS-13
Rear Shock Absorber
REAR SUSPENSION
F: DISPOSAL
CAUTION:
•Before handling the shock absorber, be sure
to wear goggles to protect eyes from gas, oil
and cutting powder.
•Do not disassemble the shock absorber or
place it into a fire.
•Drill a hole into shock absorbers in case of
discarding shock absorbers filled with gas.
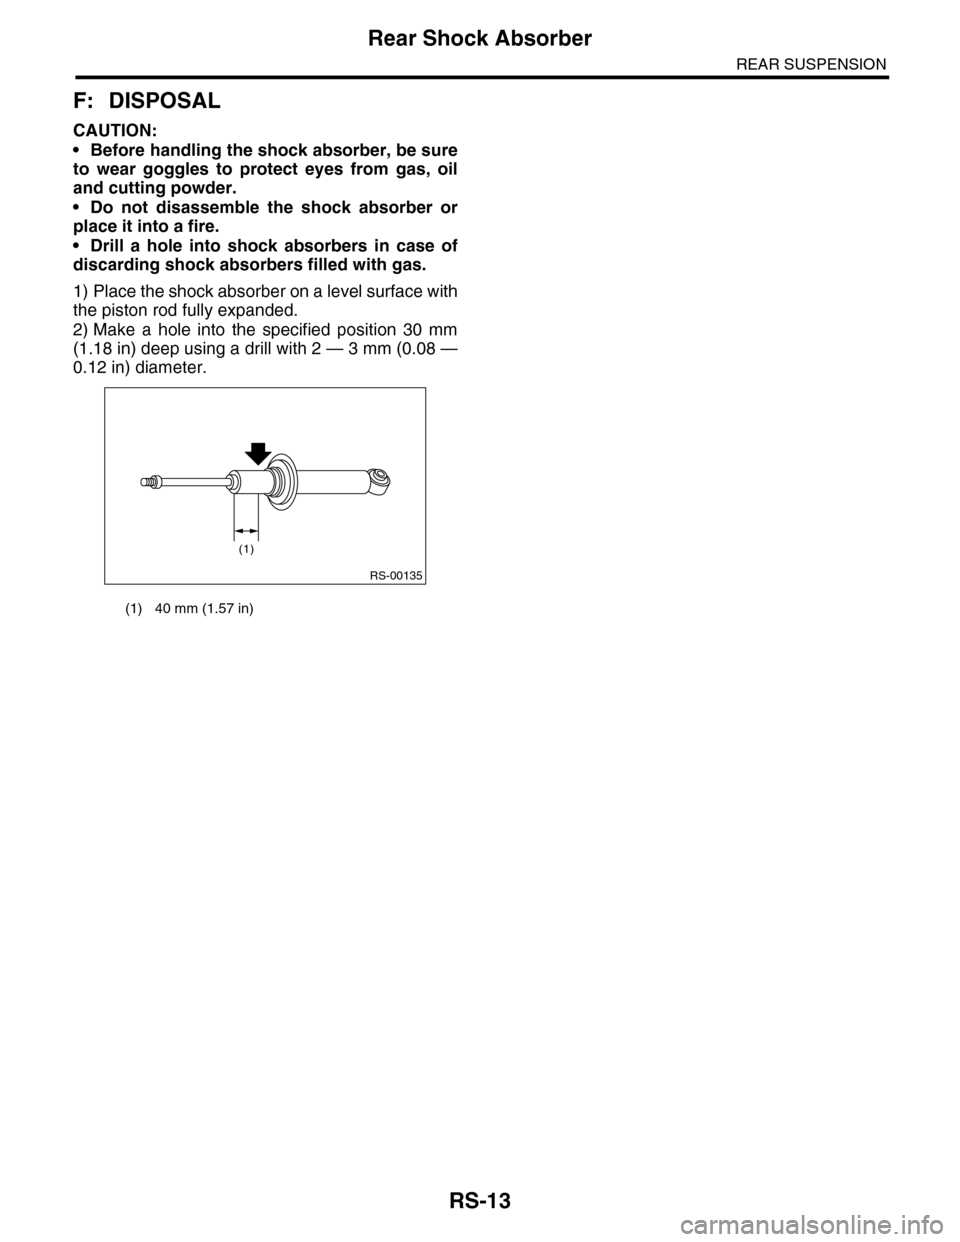
1) Place the shock absorber on a level surface with
the piston rod fully expanded.
2) Make a hole into the specified position 30 mm
(1.18 in) deep using a drill with 2 — 3 mm (0.08 —
0.12 in) diameter.
(1) 40 mm (1.57 in)
RS-00135
(1)
Page 950 of 2453
RS-17
General Diagnostic Table
REAR SUSPENSION
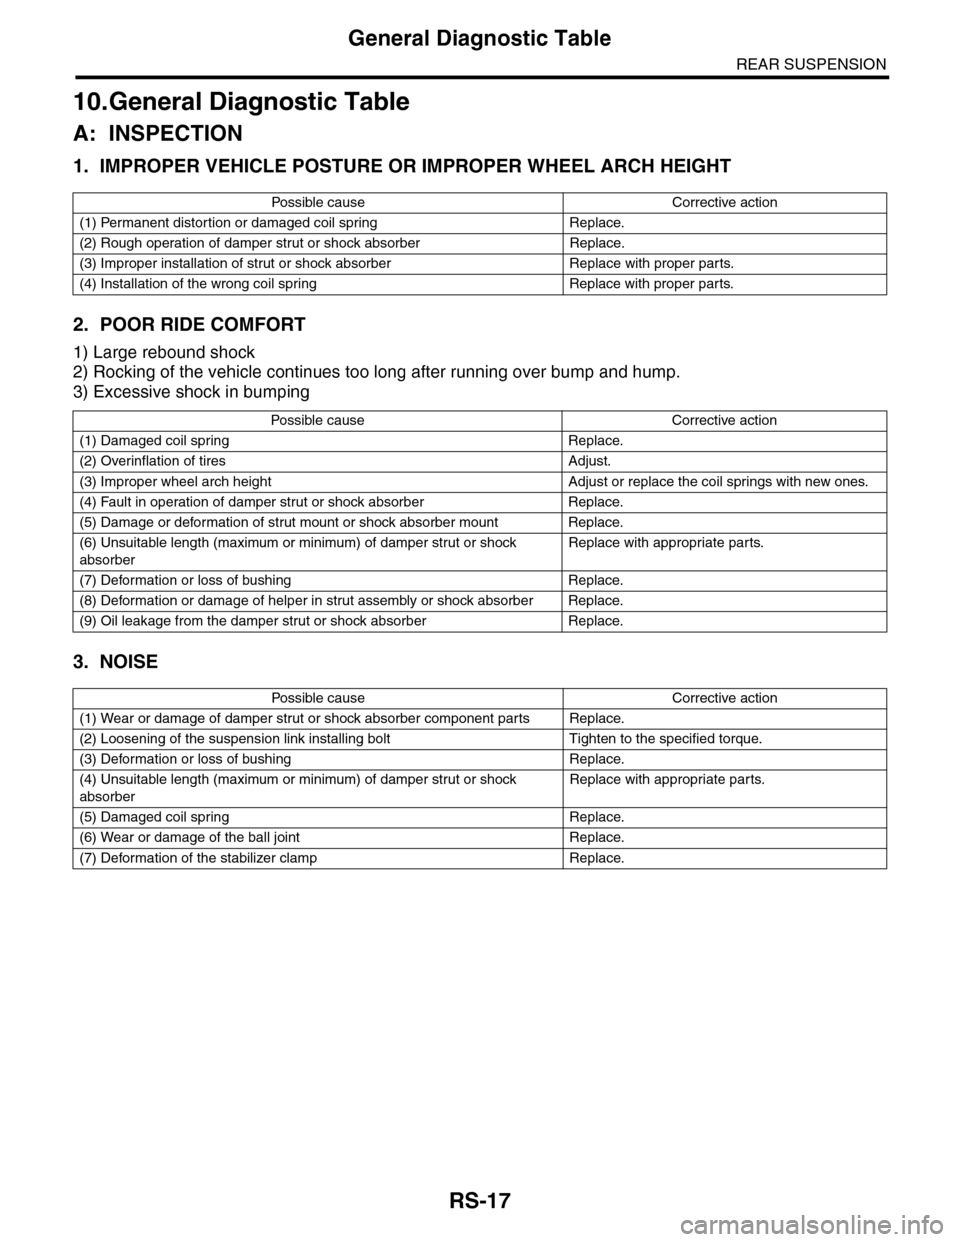
10.General Diagnostic Table
A: INSPECTION
1. IMPROPER VEHICLE POSTURE OR IMPROPER WHEEL ARCH HEIGHT
2. POOR RIDE COMFORT
1) Large rebound shock
2) Rocking of the vehicle continues too long after running over bump and hump.
3) Excessive shock in bumping
3. NOISE
Po ss ibl e c a us e C o r r e ct ive ac ti o n
(1) Permanent distortion or damaged coil spring Replace.
(2) Rough operation of damper strut or shock absorber Replace.
(3) Improper installation of strut or shock absorber Replace with proper parts.
(4) Installation of the wrong coil spring Replace with proper parts.
Po ss ibl e ca us e C or r e ct i ve a ct io n
(1) Damaged coil spring Replace.
(2) Overinflation of tires Adjust.
(3) Improper wheel arch height Adjust or replace the coil springs with new ones.
(4) Fault in operation of damper strut or shock absorber Replace.
(5) Damage or deformation of strut mount or shock absorber mount Replace.
(6) Unsuitable length (maximum or minimum) of damper strut or shock
absorber
Replace with appropriate parts.
(7) Deformation or loss of bushing Replace.
(8) Deformation or damage of helper in strut assembly or shock absorber Replace.
(9) Oil leakage from the damper strut or shock absorber Replace.
Po ss ibl e c a us e C o r r e ct ive ac ti o n
(1) Wear or damage of damper strut or shock absorber component parts Replace.
(2) Loosening of the suspension link installing bolt Tighten to the specified torque.
(3) Deformation or loss of bushing Replace.
(4) Unsuitable length (maximum or minimum) of damper strut or shock
absorber
Replace with appropriate parts.
(5) Damaged coil spring Replace.
(6) Wear or damage of the ball joint Replace.
(7) Deformation of the stabilizer clamp Replace.
Page 952 of 2453
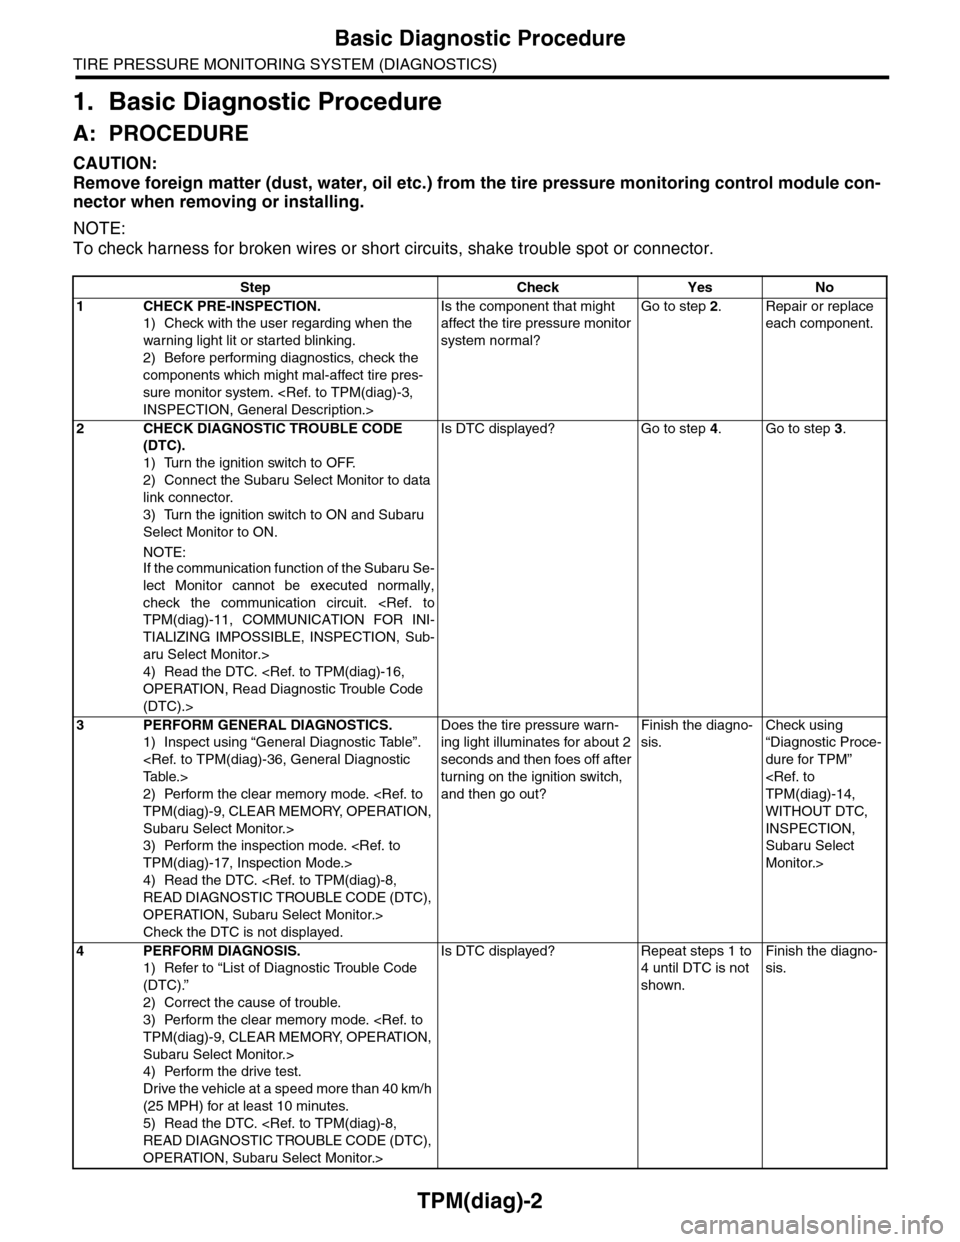
TPM(diag)-2
Basic Diagnostic Procedure
TIRE PRESSURE MONITORING SYSTEM (DIAGNOSTICS)
1. Basic Diagnostic Procedure
A: PROCEDURE
CAUTION:
Remove foreign matter (dust, water, oil etc.) from the tire pressure monitoring control module con-
nector when removing or installing.
NOTE:
To check harness for broken wires or short circuits, shake trouble spot or connector.
Step Check Yes No
1CHECK PRE-INSPECTION.
1) Check with the user regarding when the
warning light lit or started blinking.
2) Before performing diagnostics, check the
components which might mal-affect tire pres-
sure monitor system.
Is the component that might
affect the tire pressure monitor
system normal?
Go to step 2.Repair or replace
each component.
2CHECK DIAGNOSTIC TROUBLE CODE
(DTC).
1) Turn the ignition switch to OFF.
2) Connect the Subaru Select Monitor to data
link connector.
3) Turn the ignition switch to ON and Subaru
Select Monitor to ON.
NOTE:If the communication function of the Subaru Se-
lect Monitor cannot be executed normally,
check the communication circuit.
TIALIZING IMPOSSIBLE, INSPECTION, Sub-
aru Select Monitor.>
4) Read the DTC.
(DTC).>
Is DTC displayed? Go to step 4.Go to step 3.
3PERFORM GENERAL DIAGNOSTICS.
1) Inspect using “General Diagnostic Table”.
2) Perform the clear memory mode.
Subaru Select Monitor.>
3) Perform the inspection mode.
4) Read the DTC.
OPERATION, Subaru Select Monitor.>
Check the DTC is not displayed.
Does the tire pressure warn-
ing light illuminates for about 2
seconds and then foes off after
turning on the ignition switch,
and then go out?
Finish the diagno-
sis.
Check using
“Diagnostic Proce-
dure for TPM”
WITHOUT DTC,
INSPECTION,
Subaru Select
Monitor.>
4PERFORM DIAGNOSIS.
1) Refer to “List of Diagnostic Trouble Code
(DTC).”
2) Correct the cause of trouble.
3) Perform the clear memory mode.
Subaru Select Monitor.>
4) Perform the drive test.
Drive the vehicle at a speed more than 40 km/h
(25 MPH) for at least 10 minutes.
5) Read the DTC.
OPERATION, Subaru Select Monitor.>
Is DTC displayed? Repeat steps 1 to
4 until DTC is not
shown.
Finish the diagno-
sis.