width SUBARU TRIBECA 2009 1.G Service Workshop Manual
[x] Cancel search | Manufacturer: SUBARU, Model Year: 2009, Model line: TRIBECA, Model: SUBARU TRIBECA 2009 1.GPages: 2453, PDF Size: 46.32 MB
Page 275 of 2453
EI-33
Side Garnish
EXTERIOR/INTERIOR TRIM
(3) Apply masking tape around the double-sid-
ed tape remaining on the surface of body or
spoiler.
(4) Apply solvent uniformly on the double-sided
tape using a brush.
CAUTION:
•Do not use solvent to the body which has
been repaired with lacquer paint.
•Wipe off immediately when the solvent is at-
tached on surface of the body or spoiler.
Solvent:
3M 8907 or equivalent
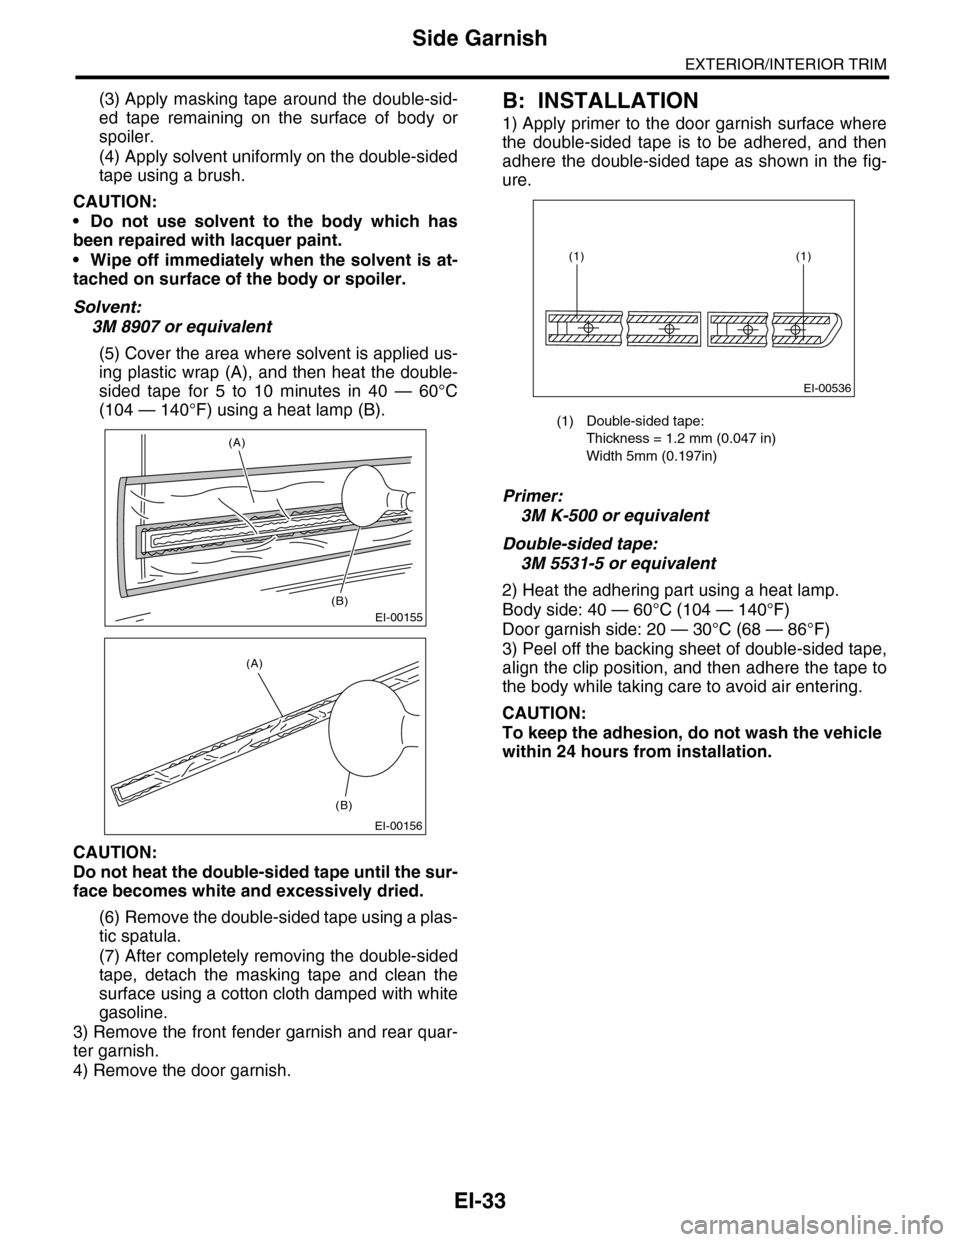
(5) Cover the area where solvent is applied us-
ing plastic wrap (A), and then heat the double-
sided tape for 5 to 10 minutes in 40 — 60°C
(104 — 140°F) using a heat lamp (B).
CAUTION:
Do not heat the double-sided tape until the sur-
face becomes white and excessively dried.
(6) Remove the double-sided tape using a plas-
tic spatula.
(7) After completely removing the double-sided
tape, detach the masking tape and clean the
surface using a cotton cloth damped with white
gasoline.
3) Remove the front fender garnish and rear quar-
ter garnish.
4) Remove the door garnish.
B: INSTALLATION
1) Apply primer to the door garnish surface where
the double-sided tape is to be adhered, and then
adhere the double-sided tape as shown in the fig-
ure.
Primer:
3M K-500 or equivalent
Double-sided tape:
3M 5531-5 or equivalent
2) Heat the adhering part using a heat lamp.
Body side: 40 — 60°C (104 — 140°F)
Door garnish side: 20 — 30°C (68 — 86°F)
3) Peel off the backing sheet of double-sided tape,
align the clip position, and then adhere the tape to
the body while taking care to avoid air entering.
CAUTION:
To keep the adhesion, do not wash the vehicle
within 24 hours from installation.
EI-00155
(A)
(B)
EI-00156
(A)
(B)
(1) Double-sided tape:
Thickness = 1.2 mm (0.047 in)
Width 5mm (0.197in)
EI-00536
(1)(1)
Page 328 of 2453
AC-2
General Description
HVAC SYSTEM (HEATER, VENTILATOR AND A/C)
1. General Description
A: SPECIFICATION
1. HEATER SYSTEM
2. A/C SYSTEM
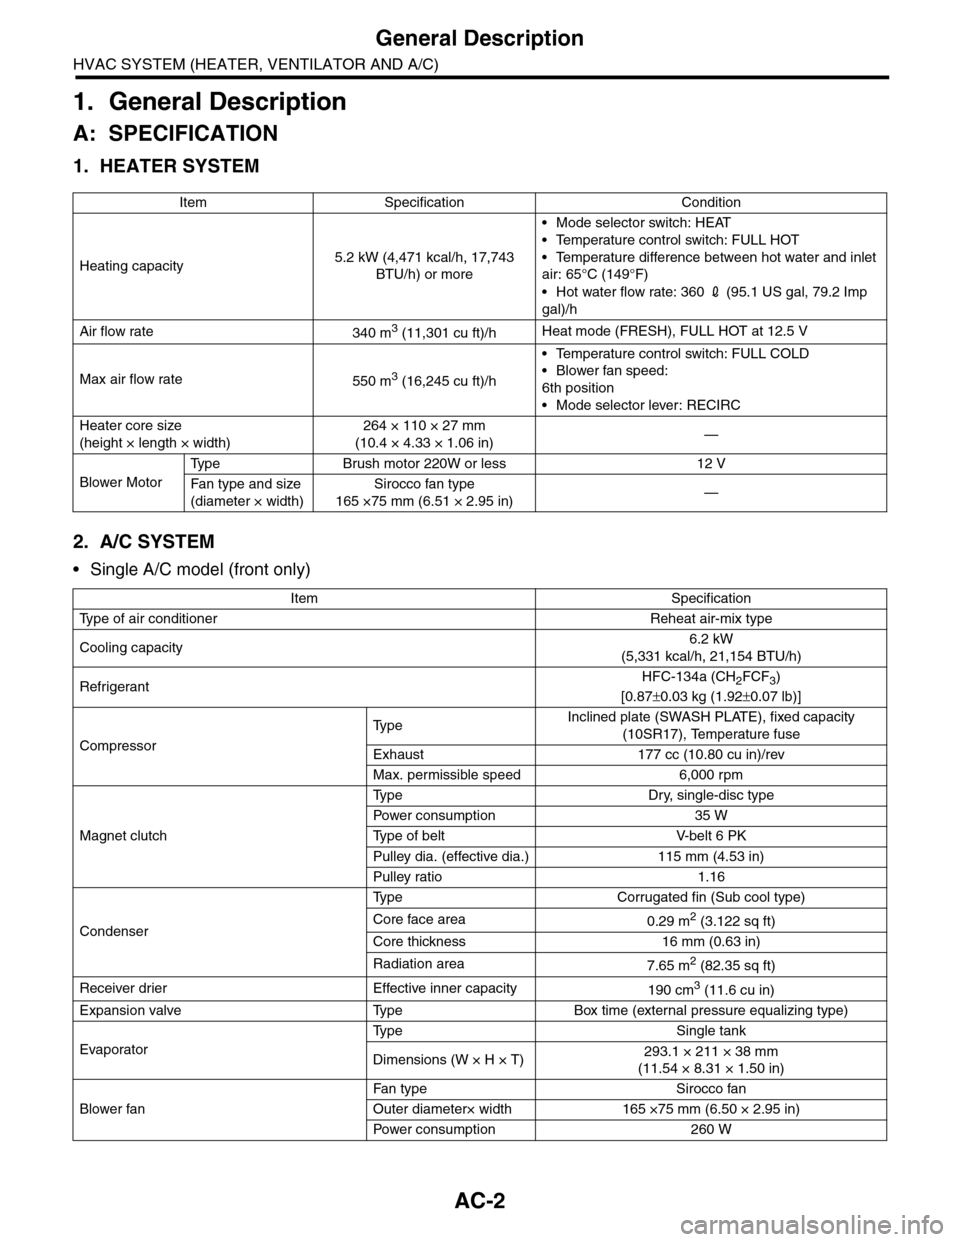
•Single A/C model (front only)
Item Specification Condition
Heating capacity5.2 kW (4,471 kcal/h, 17,743
BTU/h) or more
•Mode selector switch: HEAT
•Temperature control switch: FULL HOT
•Temperature difference between hot water and inlet
air: 65°C (149°F)
•Hot water flow rate: 360 2 (95.1 US gal, 79.2 Imp
gal)/h
Air flow rate340 m3 (11,301 cu ft)/hHeat mode (FRESH), FULL HOT at 12.5 V
Max air flow rate550 m3 (16,245 cu ft)/h
•Temperature control switch: FULL COLD
•Blower fan speed:
6th position
•Mode selector lever: RECIRC
Heater core size
(height × length × width)
264 × 110 × 27 mm
(10.4 × 4.33 × 1.06 in)—
Blower Motor
Ty p e B r u s h m o t o r 2 2 0 W o r l e s s 1 2 V
Fa n t y pe an d si ze
(diameter × width)
Sirocco fan type
165 ×75 mm (6.51 × 2.95 in)—
Item Specification
Ty p e o f a i r c o n d i t i o n e r R e h e a t a i r - m i x t y p e
Cooling capacity6.2 kW
(5,331 kcal/h, 21,154 BTU/h)
RefrigerantHFC-134a (CH2FCF3)
[0.87±0.03 kg (1.92±0.07 lb)]
Compressor
Ty p eInclined plate (SWASH PLATE), fixed capacity
(10SR17), Temperature fuse
Exhaust 177 cc (10.80 cu in)/rev
Max. permissible speed 6,000 rpm
Magnet clutch
Ty p e D r y, s i n g l e - d i s c t y p e
Powe r c on su mp t i on 35 W
Ty p e o f b e l t V- b e l t 6 P K
Pulley dia. (effective dia.) 115 mm (4.53 in)
Pulley ratio 1.16
Condenser
Ty p e C o r r u g a t e d f i n ( S u b c o o l t y p e )
Core face area0.29 m2 (3.122 sq ft)
Core thickness 16 mm (0.63 in)
Radiation area7.65 m2 (82.35 sq ft)
Receiver drier Effective inner capacity190 cm3 (11.6 cu in)
Expansion valve Type Box time (external pressure equalizing type)
Evaporator
Ty p e S i n g l e t a n k
Dimensions (W × H × T)293.1 × 211 × 38 mm
(11.54 × 8.31 × 1.50 in)
Blower fan
Fan t yp e S i r oc co fa n
Outer diameter× width 165 ×75 mm (6.50 × 2.95 in)
Powe r c on su mp t i on 2 60 W
Page 330 of 2453
AC-4
General Description
HVAC SYSTEM (HEATER, VENTILATOR AND A/C)
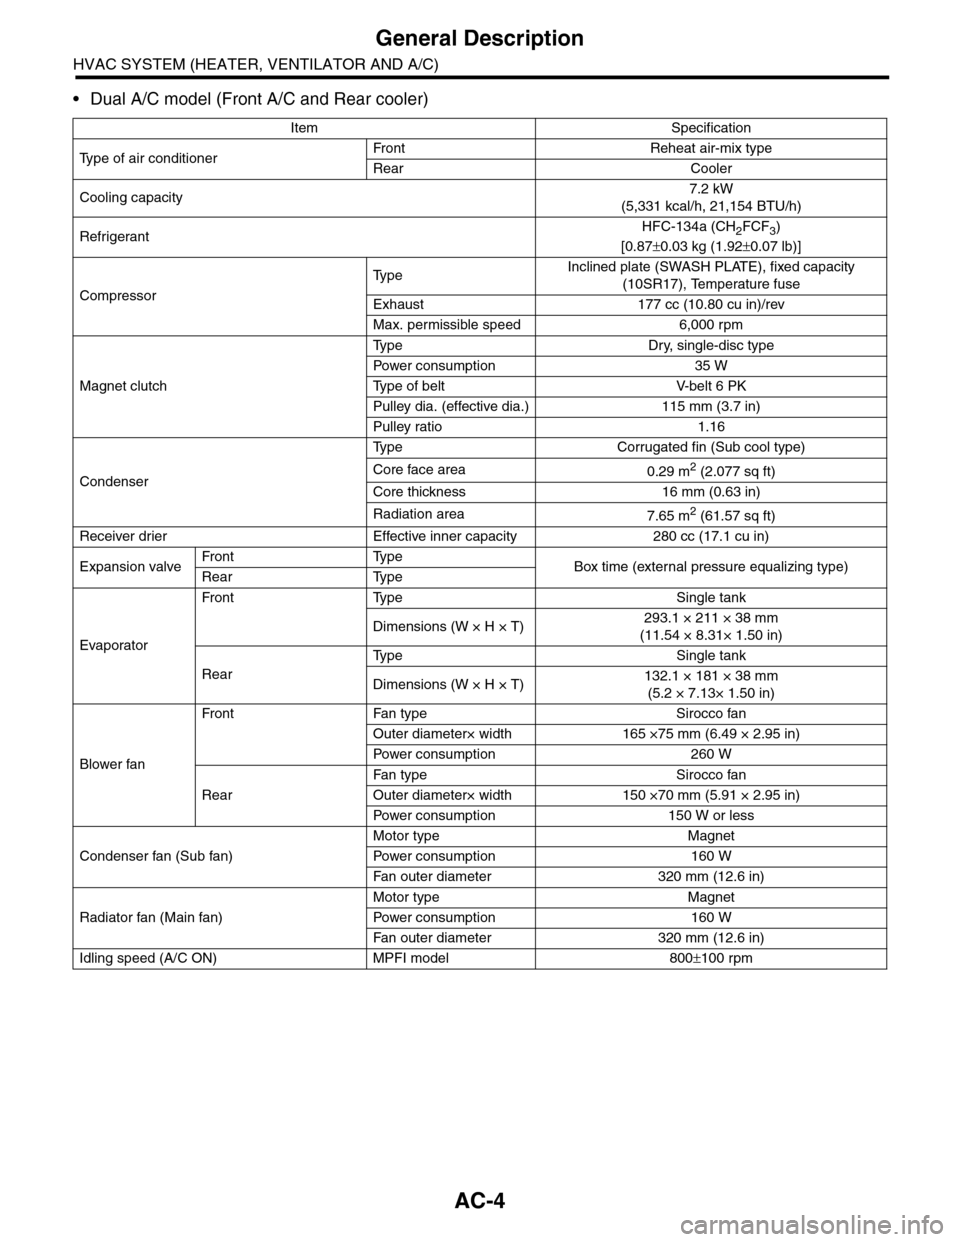
•Dual A/C model (Front A/C and Rear cooler)
Item Specification
Ty p e o f a i r c o n d i t i o n e rFr o nt Reh e at a ir - mi x t y pe
Rear Cooler
Cooling capacity7.2 kW
(5,331 kcal/h, 21,154 BTU/h)
RefrigerantHFC-134a (CH2FCF3)
[0.87±0.03 kg (1.92±0.07 lb)]
Compressor
Ty p eInclined plate (SWASH PLATE), fixed capacity
(10SR17), Temperature fuse
Exhaust 177 cc (10.80 cu in)/rev
Max. permissible speed 6,000 rpm
Magnet clutch
Ty p e D r y, s i n g l e - d i s c t y p e
Powe r c on su mp t i on 35 W
Ty p e o f b e l t V- b e l t 6 P K
Pulley dia. (effective dia.) 115 mm (3.7 in)
Pulley ratio 1.16
Condenser
Ty p e C o r r u g a t e d f i n ( S u b c o o l t y p e )
Core face area0.29 m2 (2.077 sq ft)
Core thickness 16 mm (0.63 in)
Radiation area7.65 m2 (61.57 sq ft)
Receiver drier Effective inner capacity 280 cc (17.1 cu in)
Expansion valveFront TypeBox time (external pressure equalizing type)Rear Type
Evaporator
Front Type Single tank
Dimensions (W × H × T)293.1 × 211 × 38 mm
(11.54 × 8.31× 1.50 in)
Rear
Ty p e S i n g l e t a n k
Dimensions (W × H × T)132.1 × 181 × 38 mm
(5.2 × 7.13× 1.50 in)
Blower fan
Front Fan type Sirocco fan
Outer diameter× width 165 ×75 mm (6.49 × 2.95 in)
Powe r c on su mp t i on 2 60 W
Rear
Fan t yp e S i r oc co fa n
Outer diameter× width 150 ×70 mm (5.91 × 2.95 in)
Powe r c on su mp t i on 1 5 0 W or l es s
Condenser fan (Sub fan)
Motor type Magnet
Powe r c on su mp t i on 1 60 W
Fan o ut e r d i am et e r 3 20 mm (1 2 . 6 i n)
Radiator fan (Main fan)
Motor type Magnet
Powe r c on su mp t i on 1 60 W
Fan o ut e r d i am et e r 3 20 mm (1 2 . 6 i n)
Idling speed (A/C ON) MPFI model 800±100 rpm
Page 690 of 2453
SR-6
Glass Lid
SUNROOF/T-TOP/CONVERTIBLE TOP (SUNROOF)
D: FORCED DRIVE
If glass lid dose not operate or is not supplied with
power, move the glass lid using the hexagon
wrench *.
*: L shape universal purpose hexagon wrench
bolt width 4 mm (0.16 in)
1) Remove the spot map light.
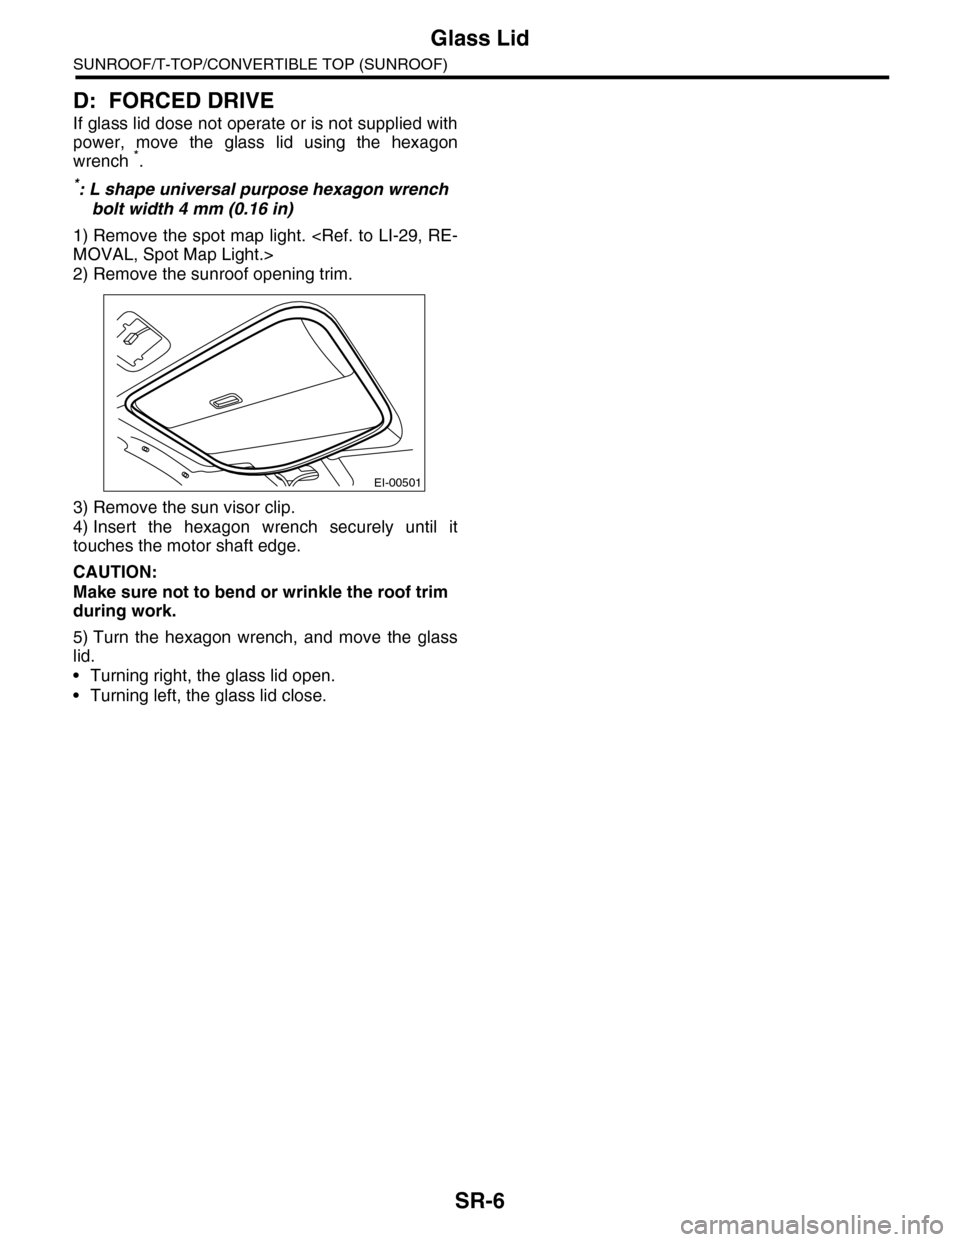
2) Remove the sunroof opening trim.
3) Remove the sun visor clip.
4) Insert the hexagon wrench securely until it
touches the motor shaft edge.
CAUTION:
Make sure not to bend or wrinkle the roof trim
during work.
5) Turn the hexagon wrench, and move the glass
lid.
•Turning right, the glass lid open.
•Turning left, the glass lid close.
EI-00501
Page 716 of 2453
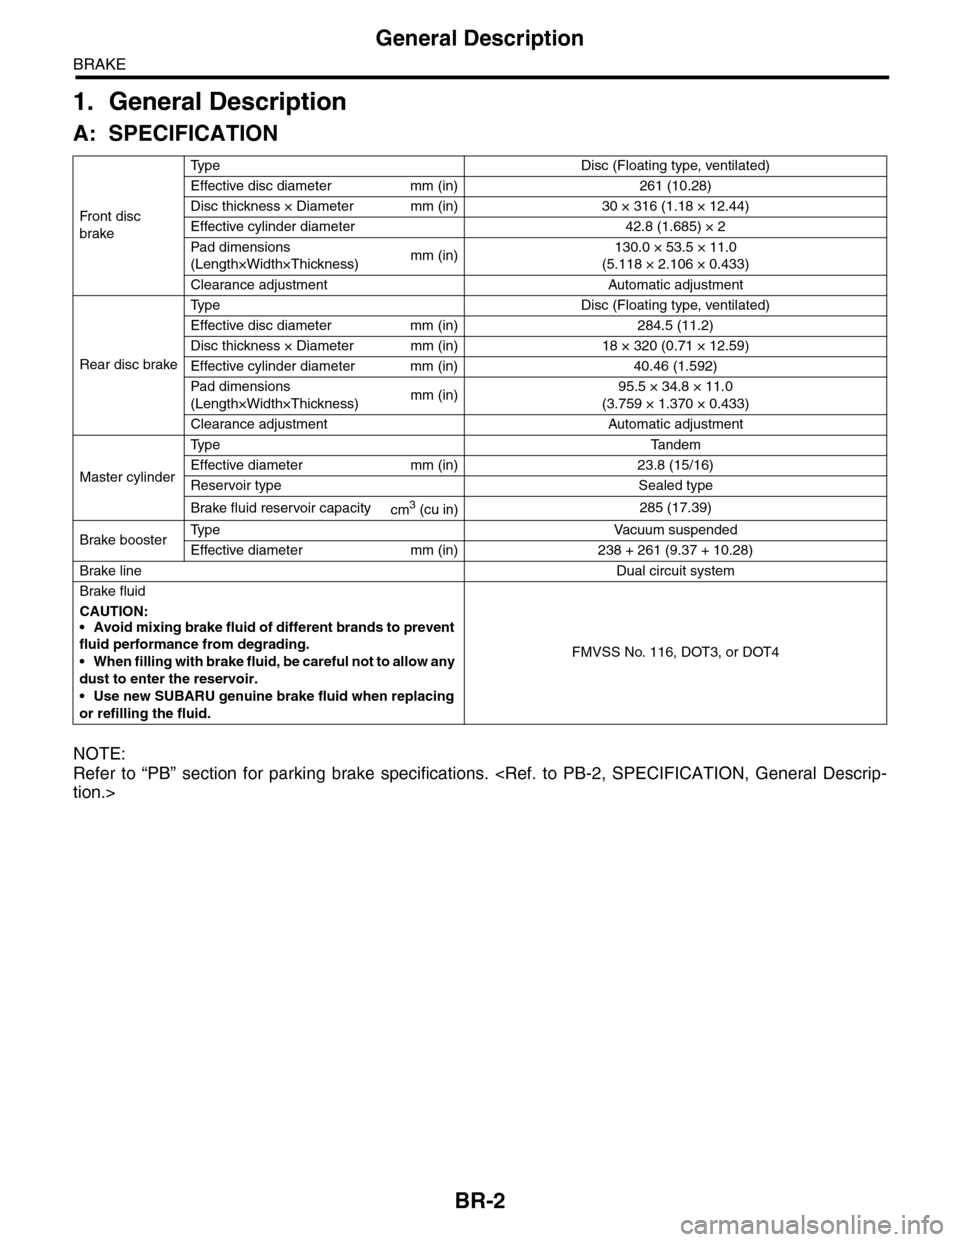
BR-2
General Description
BRAKE
1. General Description
A: SPECIFICATION
NOTE:
Refer to “PB” section for parking brake specifications.
Fr o nt d is c
brake
Ty p e D i s c ( F l o a t i n g t y p e , v e n t i l a t e d )
Effective disc diameter mm (in) 261 (10.28)
Disc thickness × Diameter mm (in) 30 × 316 (1.18 × 12.44)
Effective cylinder diameter 42.8 (1.685) × 2
Pad dimensions
(Length×Width×Thickness)mm (in)130.0 × 53.5 × 11.0
(5.118 × 2.106 × 0.433)
Clearance adjustment Automatic adjustment
Rear disc brake
Ty p e D i s c ( F l o a t i n g t y p e , v e n t i l a t e d )
Effective disc diameter mm (in) 284.5 (11.2)
Disc thickness × Diameter mm (in) 18 × 320 (0.71 × 12.59)
Effective cylinder diameter mm (in) 40.46 (1.592)
Pad dimensions
(Length×Width×Thickness)mm (in)95.5 × 34.8 × 11.0
(3.759 × 1.370 × 0.433)
Clearance adjustment Automatic adjustment
Master cylinder
Ty p e Ta n d e m
Effective diameter mm (in) 23.8 (15/16)
Reservoir type Sealed type
Brake fluid reservoir capacitycm3 (cu in)285 (17.39)
Brake boosterTy p e V a c u u m s u s p e n d e d
Effective diameter mm (in) 238 + 261 (9.37 + 10.28)
Brake lineDual circuit system
Brake fluid
CAUTION:
•Avoid mixing brake fluid of different brands to prevent
fluid performance from degrading.
•When filling with brake fluid, be careful not to allow any
dust to enter the reservoir.
•Use new SUBARU genuine brake fluid when replacing
or refilling the fluid.
FMVSS No. 116, DOT3, or DOT4
Page 731 of 2453
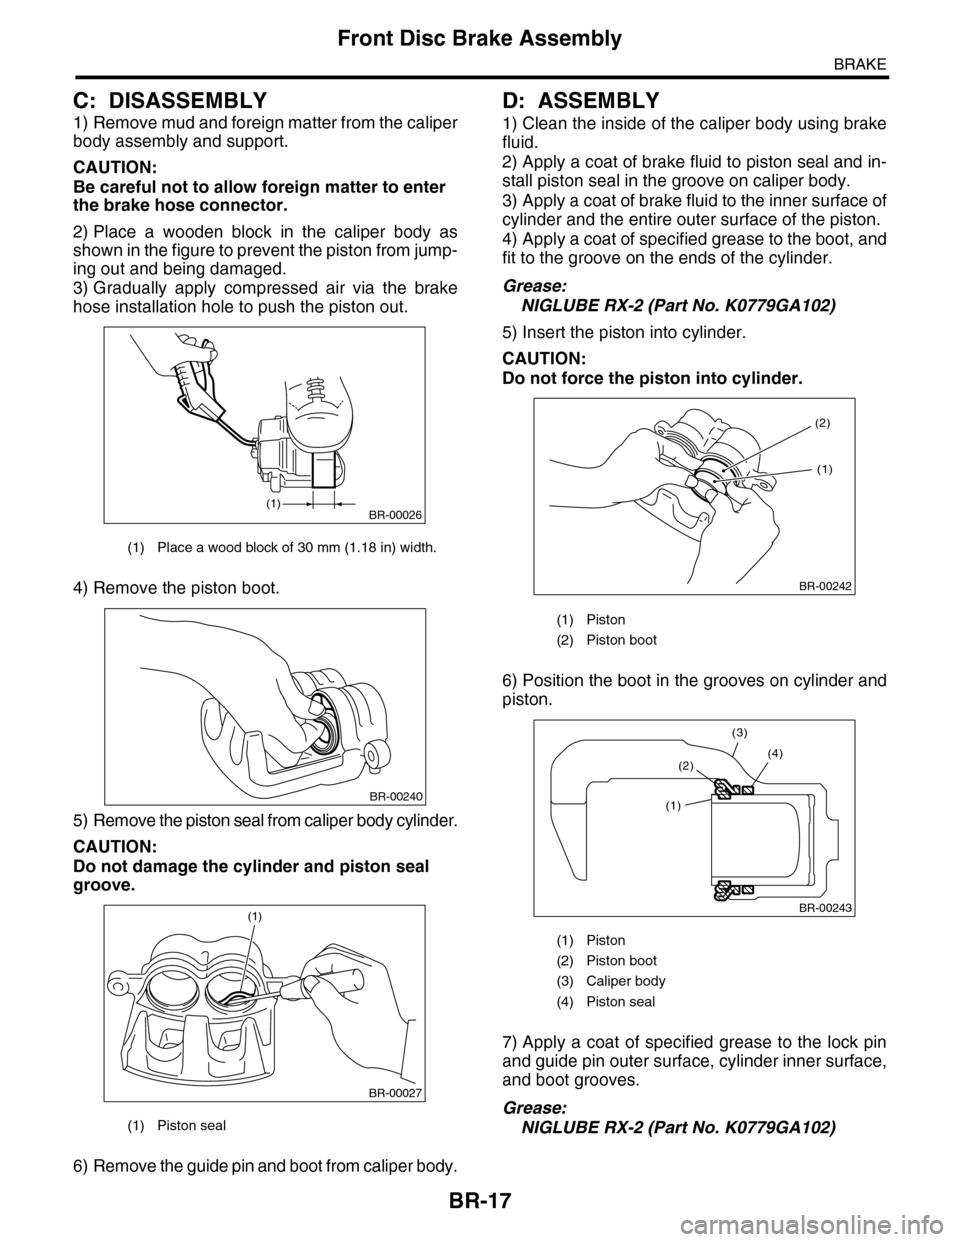
BR-17
Front Disc Brake Assembly
BRAKE
C: DISASSEMBLY
1) Remove mud and foreign matter from the caliper
body assembly and support.
CAUTION:
Be careful not to allow foreign matter to enter
the brake hose connector.
2) Place a wooden block in the caliper body as
shown in the figure to prevent the piston from jump-
ing out and being damaged.
3) Gradually apply compressed air via the brake
hose installation hole to push the piston out.
4) Remove the piston boot.
5) Remove the piston seal from caliper body cylinder.
CAUTION:
Do not damage the cylinder and piston seal
groove.
6) Remove the guide pin and boot from caliper body.
D: ASSEMBLY
1) Clean the inside of the caliper body using brake
fluid.
2) Apply a coat of brake fluid to piston seal and in-
stall piston seal in the groove on caliper body.
3) Apply a coat of brake fluid to the inner surface of
cylinder and the entire outer surface of the piston.
4) Apply a coat of specified grease to the boot, and
fit to the groove on the ends of the cylinder.
Grease:
NIGLUBE RX-2 (Part No. K0779GA102)
5) Insert the piston into cylinder.
CAUTION:
Do not force the piston into cylinder.
6) Position the boot in the grooves on cylinder and
piston.
7) Apply a coat of specified grease to the lock pin
and guide pin outer surface, cylinder inner surface,
and boot grooves.
Grease:
NIGLUBE RX-2 (Part No. K0779GA102)
(1) Place a wood block of 30 mm (1.18 in) width.
(1) Piston seal
(1)BR-00026
BR-00240
(1)
BR-00027
(1) Piston
(2) Piston boot
(1) Piston
(2) Piston boot
(3) Caliper body
(4) Piston seal
BR-00242
(1)
(2)
BR-00243
(1)
(2)
(3)
(4)
Page 736 of 2453
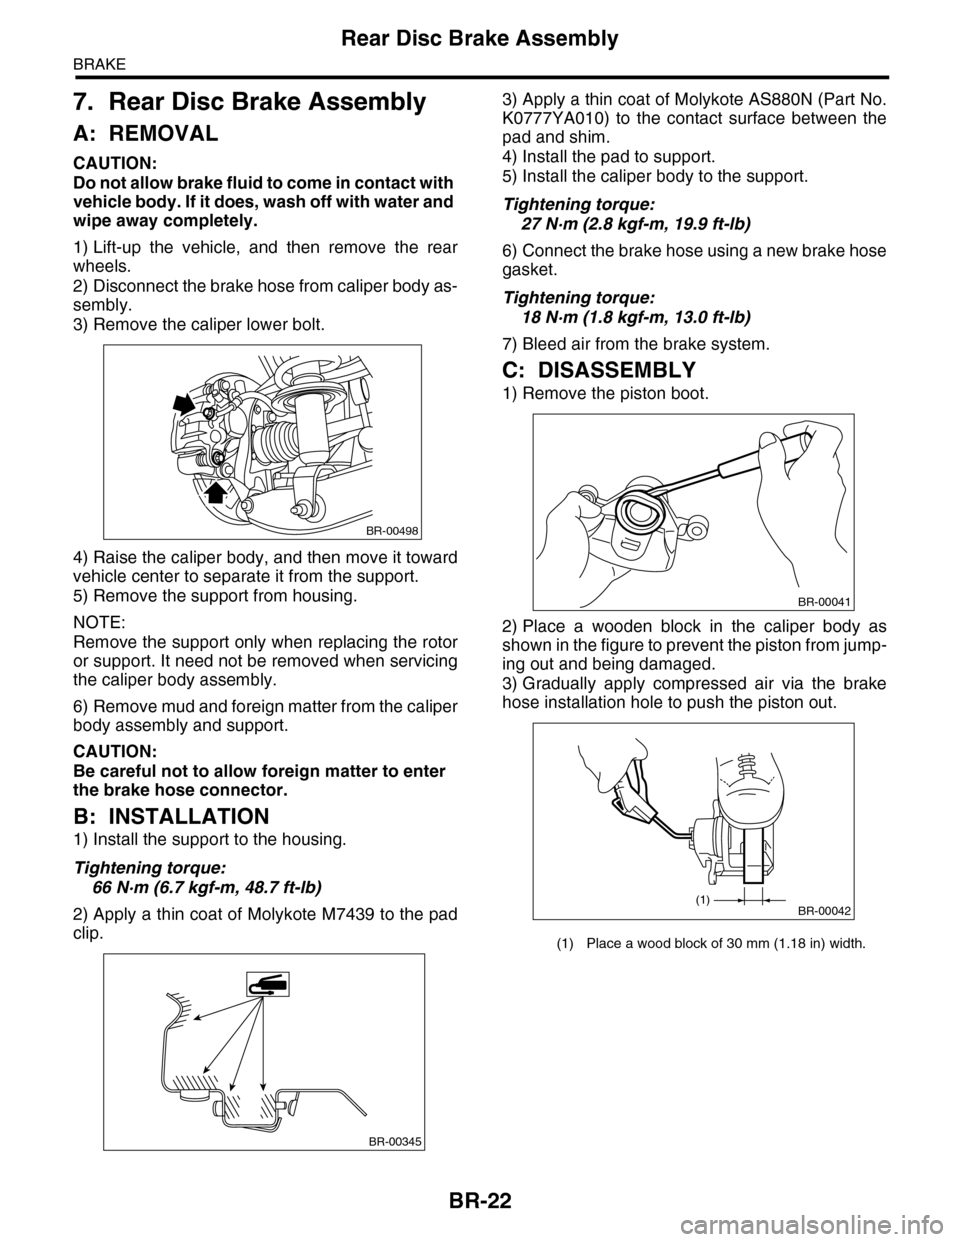
BR-22
Rear Disc Brake Assembly
BRAKE
7. Rear Disc Brake Assembly
A: REMOVAL
CAUTION:
Do not allow brake fluid to come in contact with
vehicle body. If it does, wash off with water and
wipe away completely.
1) Lift-up the vehicle, and then remove the rear
wheels.
2) Disconnect the brake hose from caliper body as-
sembly.
3) Remove the caliper lower bolt.
4) Raise the caliper body, and then move it toward
vehicle center to separate it from the support.
5) Remove the support from housing.
NOTE:
Remove the support only when replacing the rotor
or support. It need not be removed when servicing
the caliper body assembly.
6) Remove mud and foreign matter from the caliper
body assembly and support.
CAUTION:
Be careful not to allow foreign matter to enter
the brake hose connector.
B: INSTALLATION
1) Install the support to the housing.
Tightening torque:
66 N·m (6.7 kgf-m, 48.7 ft-lb)
2) Apply a thin coat of Molykote M7439 to the pad
clip.
3) Apply a thin coat of Molykote AS880N (Part No.
K0777YA010) to the contact surface between the
pad and shim.
4) Install the pad to support.
5) Install the caliper body to the support.
Tightening torque:
27 N·m (2.8 kgf-m, 19.9 ft-lb)
6) Connect the brake hose using a new brake hose
gasket.
Tightening torque:
18 N·m (1.8 kgf-m, 13.0 ft-lb)
7) Bleed air from the brake system.
C: DISASSEMBLY
1) Remove the piston boot.
2) Place a wooden block in the caliper body as
shown in the figure to prevent the piston from jump-
ing out and being damaged.
3) Gradually apply compressed air via the brake
hose installation hole to push the piston out.
BR-00498
BR-00345
(1) Place a wood block of 30 mm (1.18 in) width.
BR-00041
(1)BR-00042
Page 873 of 2453
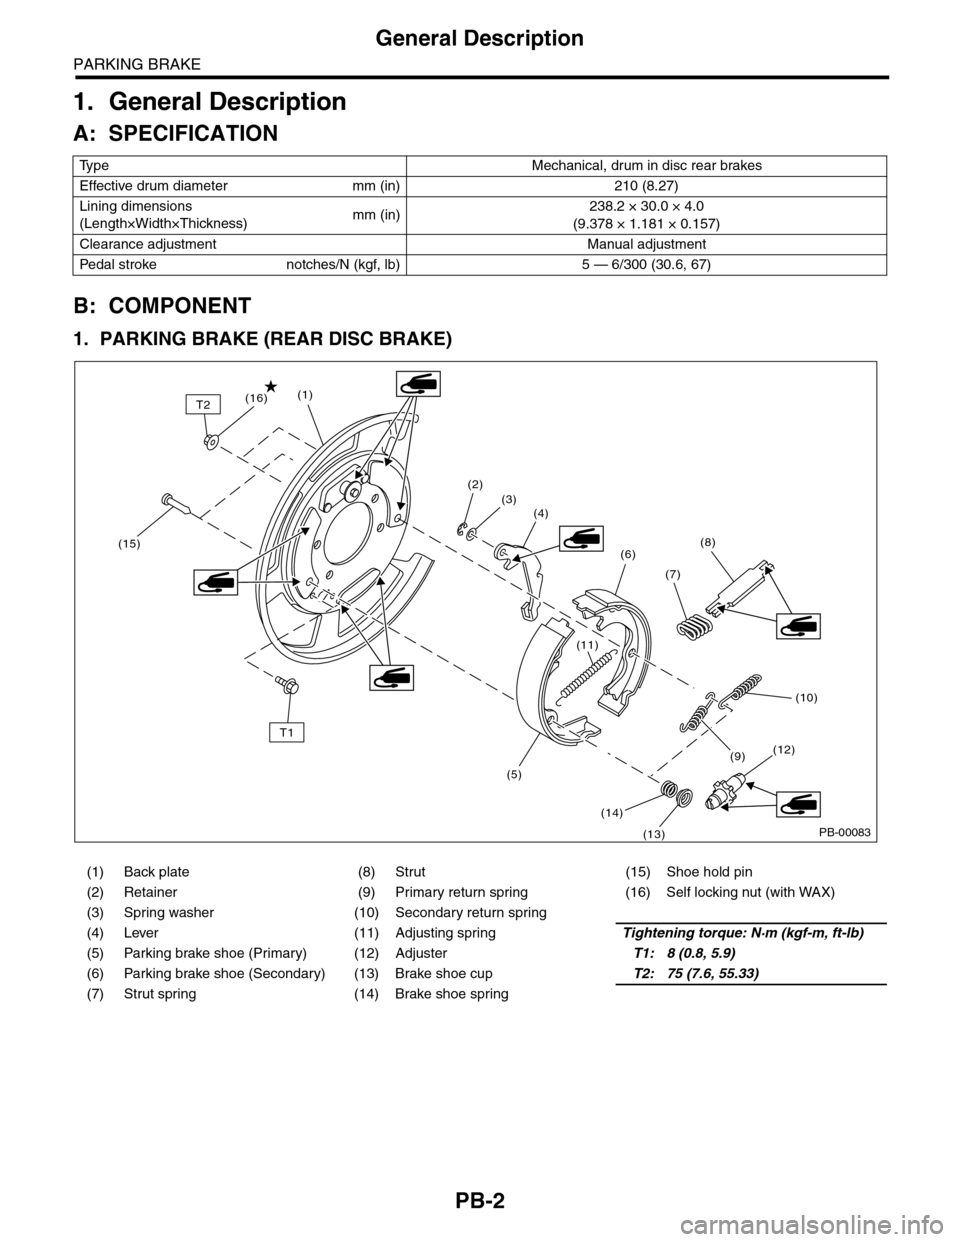
PB-2
General Description
PARKING BRAKE
1. General Description
A: SPECIFICATION
B: COMPONENT
1. PARKING BRAKE (REAR DISC BRAKE)
Ty p e M e c h a n i c a l , d r u m i n d i s c r e a r b r a k e s
Effective drum diameter mm (in) 210 (8.27)
Lining dimensions
(Length×Width×Thickness)mm (in)238.2 × 30.0 × 4.0
(9.378 × 1.181 × 0.157)
Clearance adjustment Manual adjustment
Pe da l s t ro ke n o tc he s /N ( k gf, lb ) 5 — 6 / 3 00 ( 30 . 6, 6 7)
(1) Back plate (8) Strut (15) Shoe hold pin
(2) Retainer (9) Primary return spring (16) Self locking nut (with WAX)
(3) Spring washer (10) Secondary return spring
(4) Lever (11) Adjusting springTightening torque: N·m (kgf-m, ft-lb)
(5) Parking brake shoe (Primary) (12) AdjusterT1: 8 (0.8, 5.9)
(6) Parking brake shoe (Secondary) (13) Brake shoe cupT2: 75 (7.6, 55.33)
(7) Strut spring (14) Brake shoe spring
PB-00083
(5)
(14)
(13)
(12)(9)
(11)
(10)
(8)
(7)
(6)
(4)(3)(2)
(1)
(15)
(16)
T1
T2
Page 1121 of 2453
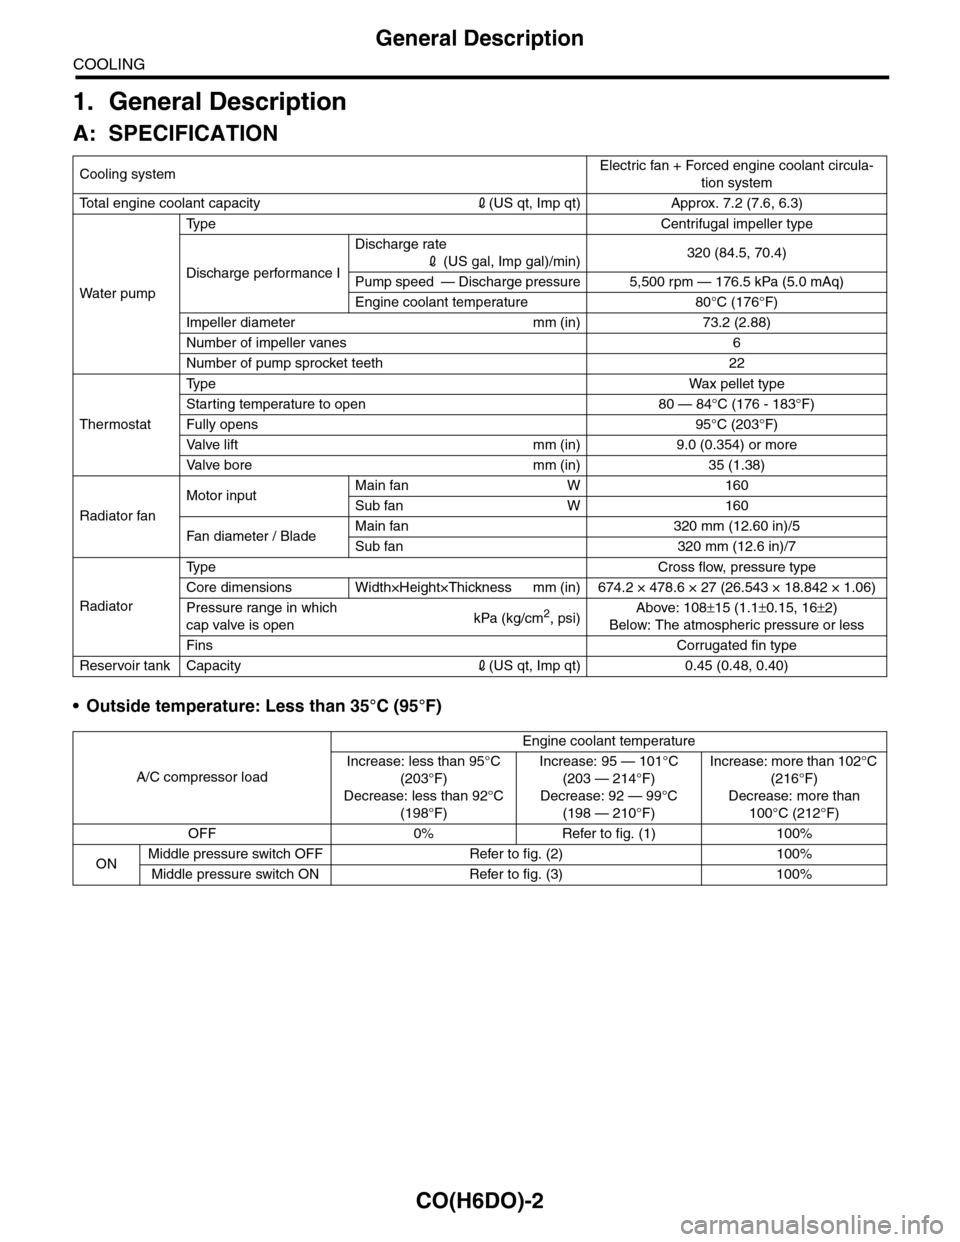
CO(H6DO)-2
General Description
COOLING
1. General Description
A: SPECIFICATION
•Outside temperature: Less than 35°C (95°F)
Cooling systemElectric fan + Forced engine coolant circula-
tion system
To t a l e n g i n e c o o l a n t c a p a c i t y2(US qt, Imp qt) Approx. 7.2 (7.6, 6.3)
Wa t er p u mp
Ty p e C e n t r i f u g a l i m p e l l e r t y p e
Discharge performance I
Discharge rate
2 (US gal, Imp gal)/min)320 (84.5, 70.4)
Pump speed — Discharge pressure 5,500 rpm — 176.5 kPa (5.0 mAq)
Engine coolant temperature 80°C (176°F)
Impeller diameter mm (in) 73.2 (2.88)
Number of impeller vanes 6
Number of pump sprocket teeth 22
Thermostat
Ty p eWa x p el l et t yp e
Starting temperature to open 80 — 84°C (176 - 183°F)
Fully opens 95°C (203°F)
Va l ve l i f t m m ( i n ) 9 . 0 ( 0 . 3 5 4 ) o r m o r e
Va l ve b o r e m m ( i n ) 3 5 ( 1 . 3 8 )
Radiator fan
Motor inputMain fan W 160
Sub fan W 160
Fan di a me t er / B la deMain fan 320 mm (12.60 in)/5
Sub fan 320 mm (12.6 in)/7
Radiator
Ty p e C r o s s f l o w , p r e s s u r e t y p e
Core dimensions Width×Height×Thickness mm (in) 674.2 × 478.6 × 27 (26.543 × 18.842 × 1.06)
Pressure range in which
cap valve is openkPa (kg/cm2, psi)Above: 108±15 (1.1±0.15, 16±2)
Below: The atmospheric pressure or less
FinsCorrugated fin type
Reservoir tank Capacity2(US qt, Imp qt) 0.45 (0.48, 0.40)
A/C compressor load
Engine coolant temperature
Increase: less than 95°C
(203°F)
Decrease: less than 92°C
(198°F)
Increase: 95 — 101°C
(203 — 214°F)
Decrease: 92 — 99°C
(198 — 210°F)
Increase: more than 102°C
(216°F)
Decrease: more than
100°C (212°F)
OFF 0% Refer to fig. (1) 100%
ONMiddle pressure switch OFF Refer to fig. (2) 100%
Middle pressure switch ON Refer to fig. (3) 100%
Page 1188 of 2453
![SUBARU TRIBECA 2009 1.G Service Workshop Manual EN(H6DO)(diag)-27
Subaru Select Monitor
ENGINE (DIAGNOSTICS)
4. READ CURRENT DATA FOR ENGINE (NORMAL MODE)
1) On the «Main Menu» display screen, select the {Each System Check} and press the [YES] ke SUBARU TRIBECA 2009 1.G Service Workshop Manual EN(H6DO)(diag)-27
Subaru Select Monitor
ENGINE (DIAGNOSTICS)
4. READ CURRENT DATA FOR ENGINE (NORMAL MODE)
1) On the «Main Menu» display screen, select the {Each System Check} and press the [YES] ke](/img/17/7322/w960_7322-1187.png)
EN(H6DO)(diag)-27
Subaru Select Monitor
ENGINE (DIAGNOSTICS)
4. READ CURRENT DATA FOR ENGINE (NORMAL MODE)
1) On the «Main Menu» display screen, select the {Each System Check} and press the [YES] key.
2) On the «System Selection Menu» display screen, select the {Engine} and press the [YES] key.
3) Press the [YES] key after the information of engine type has been displayed.
4) On the «Engine Diagnosis» display screen, select the {Current Data Display/Save}, and then press the
[YES] key.
5) On the «Data Display Menu» screen, select the {Data Display} and press the [YES] key.
6) Using the scroll key, scroll the display screen up or down until the desired data is shown.
•A list of the support data is shown in the following table.
Description Display Unit of measure Note (at idling)
Engine load Engine load % 3.5%
Engine coolant temperature signal Coolant Temp. °C or °F≥ 75°C or 167°F (After
engine is warmed-up.)
A/F compensation 1 A/F Compensation 1 % 3.1%
A/F learning 1 A/F learning 1 % 0.0%
A/F compensation 2 A/F Compensation 2 % 4.7%
A/F learning 2 A/F learning 2 % 0.0%
Intake manifold absolute pressure Mani. Absolute PressuremmHg, kPa,
inHg or psig
200 — 300 mmHg, 26.7 —
40 kPa, 7.8 — 11.8 inHg or
3.8 — 5.8 psig
Engine speed signal Engine speed rpm 600 — 800 rpm
Meter vehicle speed signal Meter vehicle speed km/h or MPH 0 km/h or 0 MPH
Ignition timing signal Ignition timing deg 13 — 15 deg
Intake air temperature signal Intake air temperature °C or °F (Ambient air temperature)
Amount of intake air Mass Air Flow g/s or lb/m 3.8 g/s or 0.5 lb/m
Throttle opening angle signal Throttle valve angle % 1.2 — 1.6%
Fr o nt ox yg e n se n so r vo lt a g e val ue 1Fr o n t oxy ge n s en s or vol t ag e
value 1V0.035 V
Fr o nt ox yg e n se n so r vo lt a g e val ue 2Fr o n t oxy ge n s en s or vol t ag e
value 2V0.020 V
Battery voltage Battery Voltage V 12 — 14 V
Mass air flow voltage Mass air flow voltage V 1.1 — 1.2 V
Injection 1 pulse width Injection 1 pulse width ms 2.82 ms
Injection 2 pulse width Injection 2 pulse width ms 2.82 ms
Knock sensor compensation Knock correction deg 0 deg
Atmospheric pressure signal Atmospheric pressuremmHg, kPa,
inHg or psig(Atmospheric pressure)
Intake manifold relative pressureIntake manifold relative pres-
sure
mmHg, kPa,
inHg or psig
(Intake manifold absolute
pressure — atmospheric
pressure)
Acceleration opening angle signal Acceleration opening angle % 0%
Radiator fan output Radiator fan output % 0%
Purge control solenoid valve duty ratio CPC Duty % 0 — 3%
Generator duty ALT duty % 0%
Fuel pump duty Fuel pump duty % 33%
Va r i a b l e va l v e t i m i n g a d v a n c e a n g l e a m o u n t R V V T a d va n c e a n g l e a m o u n t R d e g 0 d e g
Va r i a b l e va l v e t i m i n g a d v a n c e a n g l e a m o u n t L V V T a d va n c e a n g l e a m o u n t L d e g 0 d e g
Oil flow control solenoid valve duty R OCV duty R % 9.4%
Oil flow control solenoid valve duty L OCV duty L % 9.4%
Oil flow control solenoid valve current R OCV current R mA 64 mA
Oil flow control solenoid valve current L OCV current L mA 64 mA
Fr o nt ox yg e n ( A / F) s en so r cu r r en t va l ue 1 A / F s en s or cu r r e nt va l ue 1 mA 0 . 0 m A
Fr o nt ox yg e n ( A / F) s en so r cu r r en t va l ue 2 A / F s en s or cu r r e nt va l ue 2 mA 0 . 0 m A
Fr o nt ox yg e n ( A / F) s en so r r es is t an ce val ue 1 A / F s en s or r e si st a nc e val u e 1Ω31 Ω