wheel alignment SUBARU TRIBECA 2009 1.G Service Workshop Manual
[x] Cancel search | Manufacturer: SUBARU, Model Year: 2009, Model line: TRIBECA, Model: SUBARU TRIBECA 2009 1.GPages: 2453, PDF Size: 46.32 MB
Page 755 of 2453
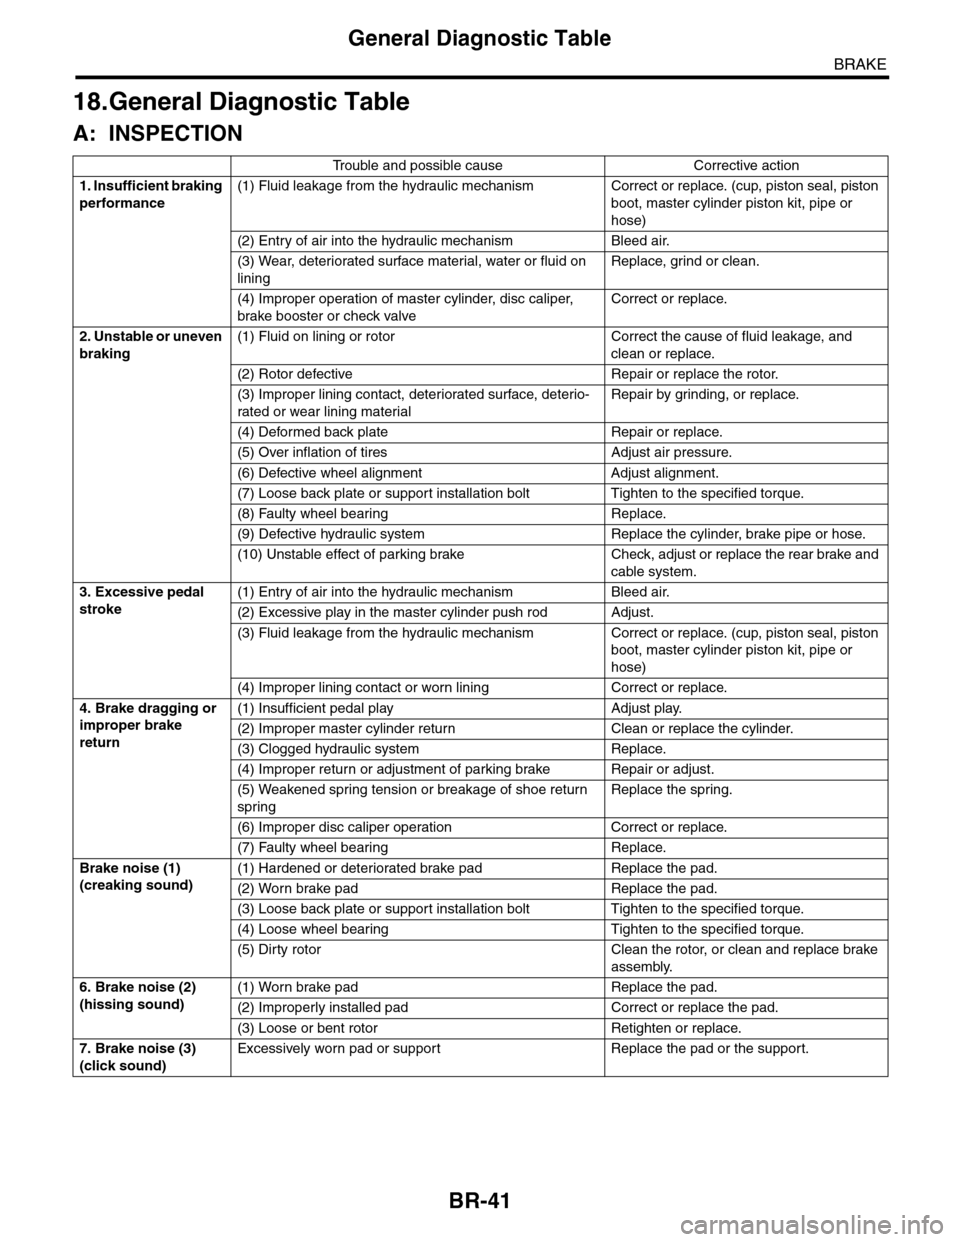
BR-41
General Diagnostic Table
BRAKE
18.General Diagnostic Table
A: INSPECTION
Trouble and possible causeCorrective action
1. Insufficient braking
performance
(1) Fluid leakage from the hydraulic mechanism Correct or replace. (cup, piston seal, piston
boot, master cylinder piston kit, pipe or
hose)
(2) Entry of air into the hydraulic mechanism Bleed air.
(3) Wear, deteriorated surface material, water or fluid on
lining
Replace, grind or clean.
(4) Improper operation of master cylinder, disc caliper,
brake booster or check valve
Correct or replace.
2. Unstable or uneven
braking
(1) Fluid on lining or rotor Correct the cause of fluid leakage, and
clean or replace.
(2) Rotor defective Repair or replace the rotor.
(3) Improper lining contact, deteriorated surface, deterio-
rated or wear lining material
Repair by grinding, or replace.
(4) Deformed back plate Repair or replace.
(5) Over inflation of tires Adjust air pressure.
(6) Defective wheel alignment Adjust alignment.
(7) Loose back plate or suppor t installation bolt Tighten to the specified torque.
(8) Faulty wheel bearing Replace.
(9) Defective hydraulic system Replace the cylinder, brake pipe or hose.
(10) Unstable effect of parking brake Check, adjust or replace the rear brake and
cable system.
3. Excessive pedal
stroke
(1) Entry of air into the hydraulic mechanism Bleed air.
(2) Excessive play in the master cylinder push rod Adjust.
(3) Fluid leakage from the hydraulic mechanism Correct or replace. (cup, piston seal, piston
boot, master cylinder piston kit, pipe or
hose)
(4) Improper lining contact or worn lining Correct or replace.
4. Brake dragging or
improper brake
return
(1) Insufficient pedal play Adjust play.
(2) Improper master cylinder return Clean or replace the cylinder.
(3) Clogged hydraulic system Replace.
(4) Improper return or adjustment of parking brake Repair or adjust.
(5) Weakened spring tension or breakage of shoe return
spring
Replace the spring.
(6) Improper disc caliper operation Correct or replace.
(7) Faulty wheel bearing Replace.
Brake noise (1)
(creaking sound)
(1) Hardened or deteriorated brake pad Replace the pad.
(2) Worn brake pad Replace the pad.
(3) Loose back plate or suppor t installation bolt Tighten to the specified torque.
(4) Loose wheel bearing Tighten to the specified torque.
(5) Dir ty rotor Clean the rotor, or clean and replace brake
assembly.
6. Brake noise (2)
(hissing sound)
(1) Worn brake pad Replace the pad.
(2) Improperly installed pad Correct or replace the pad.
(3) Loose or bent rotor Retighten or replace.
7. Brake noise (3)
(click sound)
Excessively worn pad or suppor t Replace the pad or the suppor t.
Page 831 of 2453
DS-14
Front Axle
DRIVE SHAFT SYSTEM
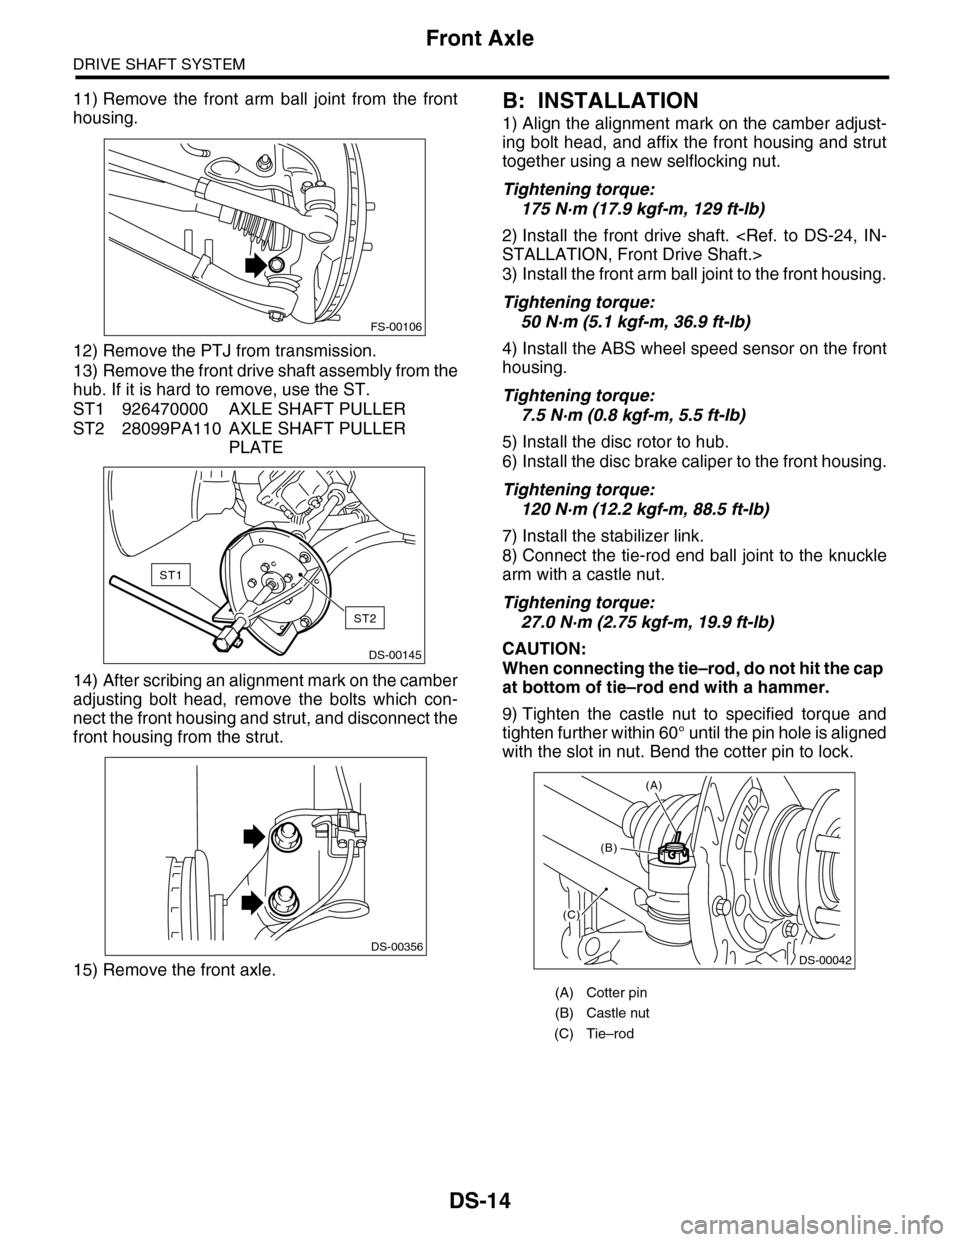
11) Remove the front arm ball joint from the front
housing.
12) Remove the PTJ from transmission.
13) Remove the front drive shaft assembly from the
hub. If it is hard to remove, use the ST.
ST1 926470000 AXLE SHAFT PULLER
ST2 28099PA110 AXLE SHAFT PULLER
PLATE
14) After scribing an alignment mark on the camber
adjusting bolt head, remove the bolts which con-
nect the front housing and strut, and disconnect the
front housing from the strut.
15) Remove the front axle.
B: INSTALLATION
1) Align the alignment mark on the camber adjust-
ing bolt head, and affix the front housing and strut
together using a new selflocking nut.
Tightening torque:
175 N·m (17.9 kgf-m, 129 ft-lb)
2) Install the front drive shaft.
3) Install the front arm ball joint to the front housing.
Tightening torque:
50 N·m (5.1 kgf-m, 36.9 ft-lb)
4) Install the ABS wheel speed sensor on the front
housing.
Tightening torque:
7.5 N·m (0.8 kgf-m, 5.5 ft-lb)
5) Install the disc rotor to hub.
6) Install the disc brake caliper to the front housing.
Tightening torque:
120 N·m (12.2 kgf-m, 88.5 ft-lb)
7) Install the stabilizer link.
8) Connect the tie-rod end ball joint to the knuckle
arm with a castle nut.
Tightening torque:
27.0 N·m (2.75 kgf-m, 19.9 ft-lb)
CAUTION:
When connecting the tie–rod, do not hit the cap
at bottom of tie–rod end with a hammer.
9) Tighten the castle nut to specified torque and
tighten further within 60° until the pin hole is aligned
with the slot in nut. Bend the cotter pin to lock.
FS-00106
DS-00145
ST2
ST1
DS-00356
(A) Cotter pin
(B) Castle nut
(C) Tie–rod
DS-00042
(C)
(B)
(A)
Page 842 of 2453
DS-25
Front Drive Shaft
DRIVE SHAFT SYSTEM
8) While depressing the brake pedal, tighten a new
axle nut (olive color) to the specified torque and
lock it securely.
Tightening torque:
240 N·m (24.5 kgf-m, 177 ft-lb)
CAUTION:
•Install the wheel after installation of axle nut.
Failure to follow this rule may damage the
wheel bearing.
•Be sure to tighten axle nut to specified
torque. Do not overtighten it as this may dam-
age the wheel bearing.
9) After tightening axle nut, lock it securely.
C: DISASSEMBLY
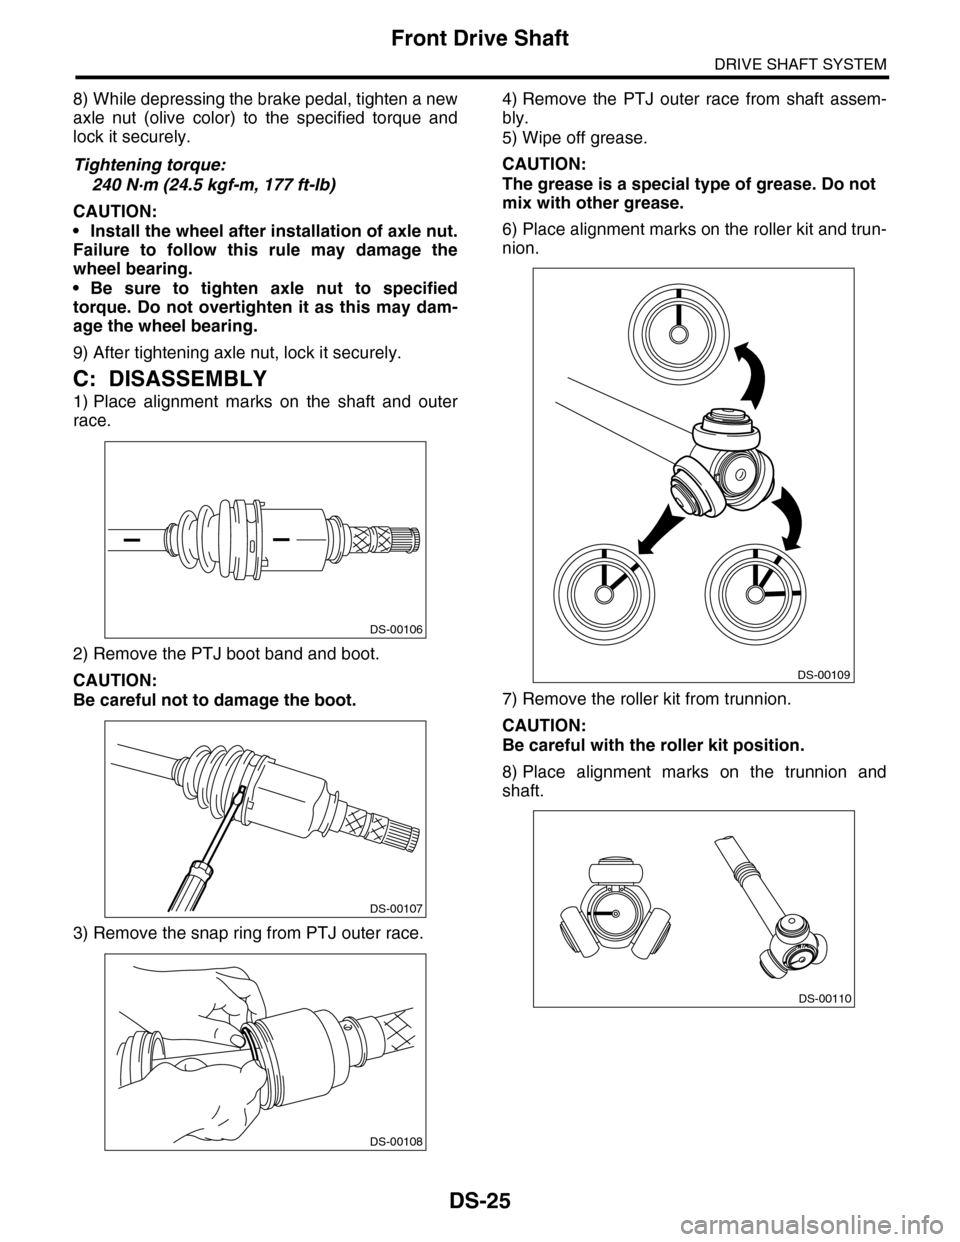
1) Place alignment marks on the shaft and outer
race.
2) Remove the PTJ boot band and boot.
CAUTION:
Be careful not to damage the boot.
3) Remove the snap ring from PTJ outer race.
4) Remove the PTJ outer race from shaft assem-
bly.
5) Wipe off grease.
CAUTION:
The grease is a special type of grease. Do not
mix with other grease.
6) Place alignment marks on the roller kit and trun-
nion.
7) Remove the roller kit from trunnion.
CAUTION:
Be careful with the roller kit position.
8) Place alignment marks on the trunnion and
shaft.
DS-00106
DS-00107
DS-00108
DS-00109
DS-00110
Page 849 of 2453
DS-32
General Diagnostic Table
DRIVE SHAFT SYSTEM
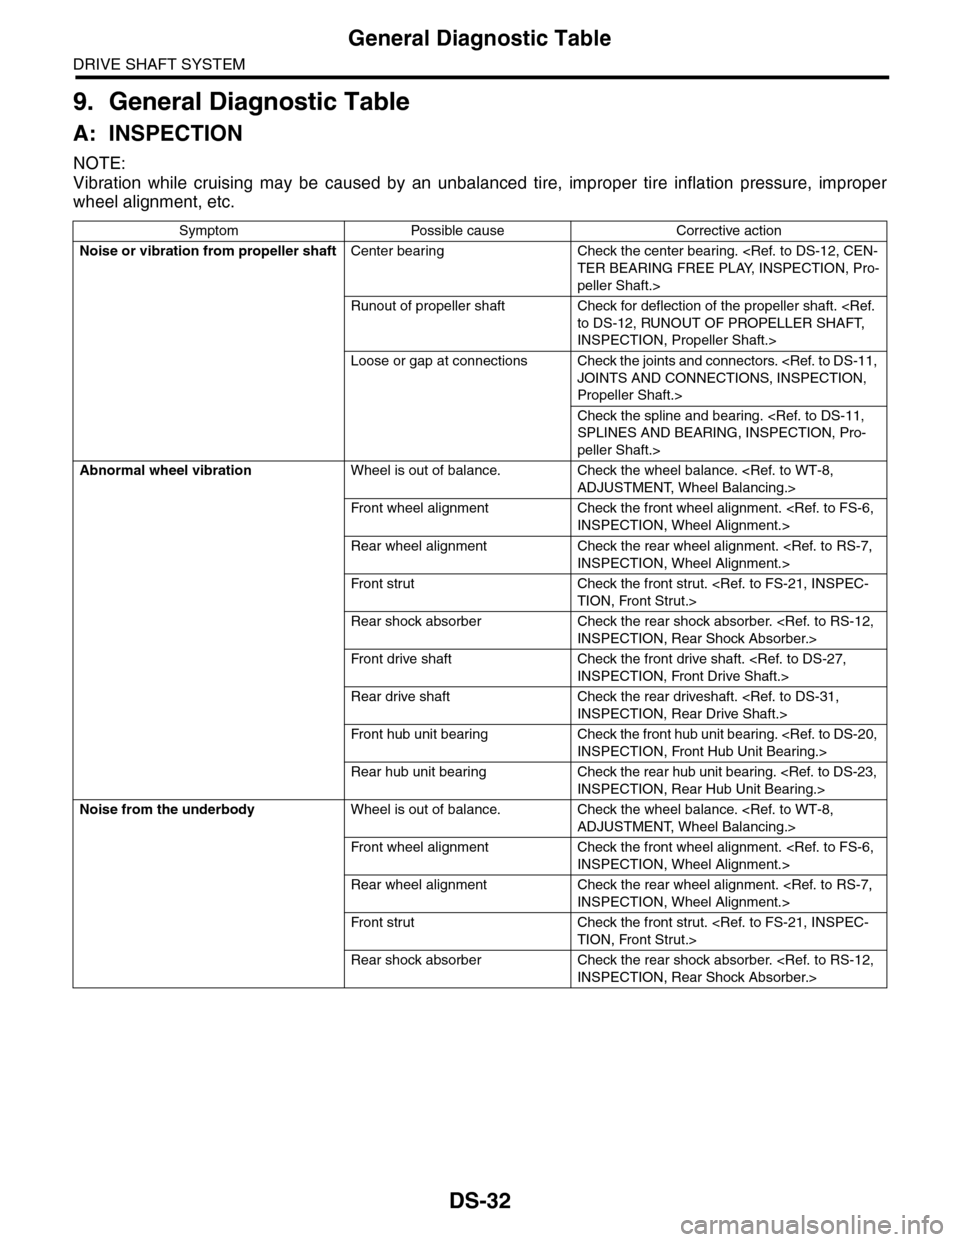
9. General Diagnostic Table
A: INSPECTION
NOTE:
Vibration while cruising may be caused by an unbalanced tire, improper tire inflation pressure, improper
wheel alignment, etc.
Symptom Possible cause Corrective action
Noise or vibration from propeller shaftCenter bearing Check the center bearing.
peller Shaft.>
Runout of propeller shaft Check for deflection of the propeller shaft.
INSPECTION, Propeller Shaft.>
Loose or gap at connections Check the joints and connectors.
Propeller Shaft.>
Check the spline and bearing.
peller Shaft.>
Abnormal wheel vibrationWheel is out of balance. Check the wheel balance.
Fr o n t wh e el al i gn me n t Che ck t h e f r on t whe e l a li g nm en t .
Rear wheel alignment Check the rear wheel alignment.
Fr o n t s tr ut Che ck t h e f r on t st r u t . < R e f. t o F S - 21 , I N S P EC -
TION, Front Strut.>
Rear shock absorber Check the rear shock absorber.
Fr o n t d r i ve sh af t Che ck t h e f r on t dr i ve s ha f t. < R e f. t o D S - 2 7,
INSPECTION, Front Drive Shaft.>
Rear drive shaft Check the rear driveshaft.
Fr o n t h ub u ni t b e ar i n g Che ck th e f r on t h ub u n it b e ar i n g. < Re f. to DS - 2 0 ,
INSPECTION, Front Hub Unit Bearing.>
Rear hub unit bearing Check the rear hub unit bearing.
Noise from the underbodyWheel is out of balance. Check the wheel balance.
Fr o n t wh e el al i gn me n t Che ck t h e f r on t whe e l a li g nm en t .
Rear wheel alignment Check the rear wheel alignment.
Fr o n t s tr ut Che ck t h e f r on t st r u t . < R e f. t o F S - 21 , I N S P EC -
TION, Front Strut.>
Rear shock absorber Check the rear shock absorber.
Page 853 of 2453
FS-5
General Description
FRONT SUSPENSION
2. GENERAL TOOL
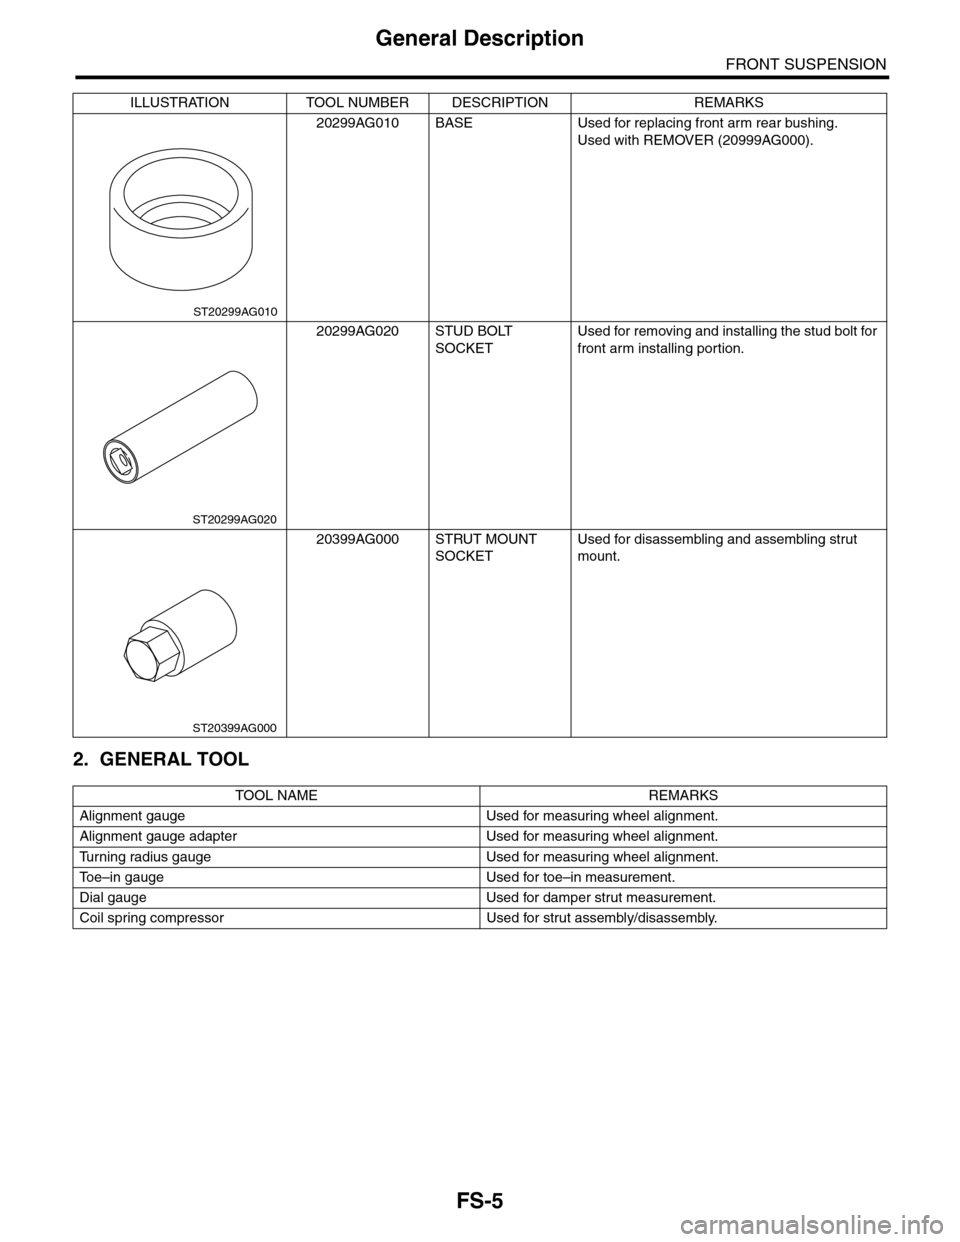
20299AG010 BASE Used for replacing front arm rear bushing.
Used with REMOVER (20999AG000).
20299AG020 STUD BOLT
SOCKET
Used for removing and installing the stud bolt for
front arm installing portion.
20399AG000 STRUT MOUNT
SOCKET
Used for disassembling and assembling strut
mount.
TOOL NAME REMARKS
Alignment gauge Used for measuring wheel alignment.
Alignment gauge adapter Used for measuring wheel alignment.
Tu r n i n g r a d i u s g a u g e U s e d f o r m e a s u r i n g w h e e l a l i g n m e n t .
To e – i n g a u g e U s e d f o r t o e – i n m e a s u r e m e n t .
Dial gauge Used for damper strut measurement.
Coil spring compressor Used for strut assembly/disassembly.
ILLUSTRATION TOOL NUMBER DESCRIPTION REMARKS
ST20299AG010
ST20299AG020
ST20399AG000
Page 854 of 2453
FS-6
Wheel Alignment
FRONT SUSPENSION
2. Wheel Alignment
A: INSPECTION
Check the following items before performing the wheel alignment measurement.
Check items before measuring wheel alignment:
•Tire inflation pressure
•Uneven wear of RH and LH tires, or difference of sizes
•Tire runout
•Excessive play and wear of ball joint
•Excessive play and wear of tie rod end
•Excessive play of wheel bearing
•Right and left wheel base imbalance
•Deformation and excessive play of steering link
•Deformation and excessive play of suspension parts
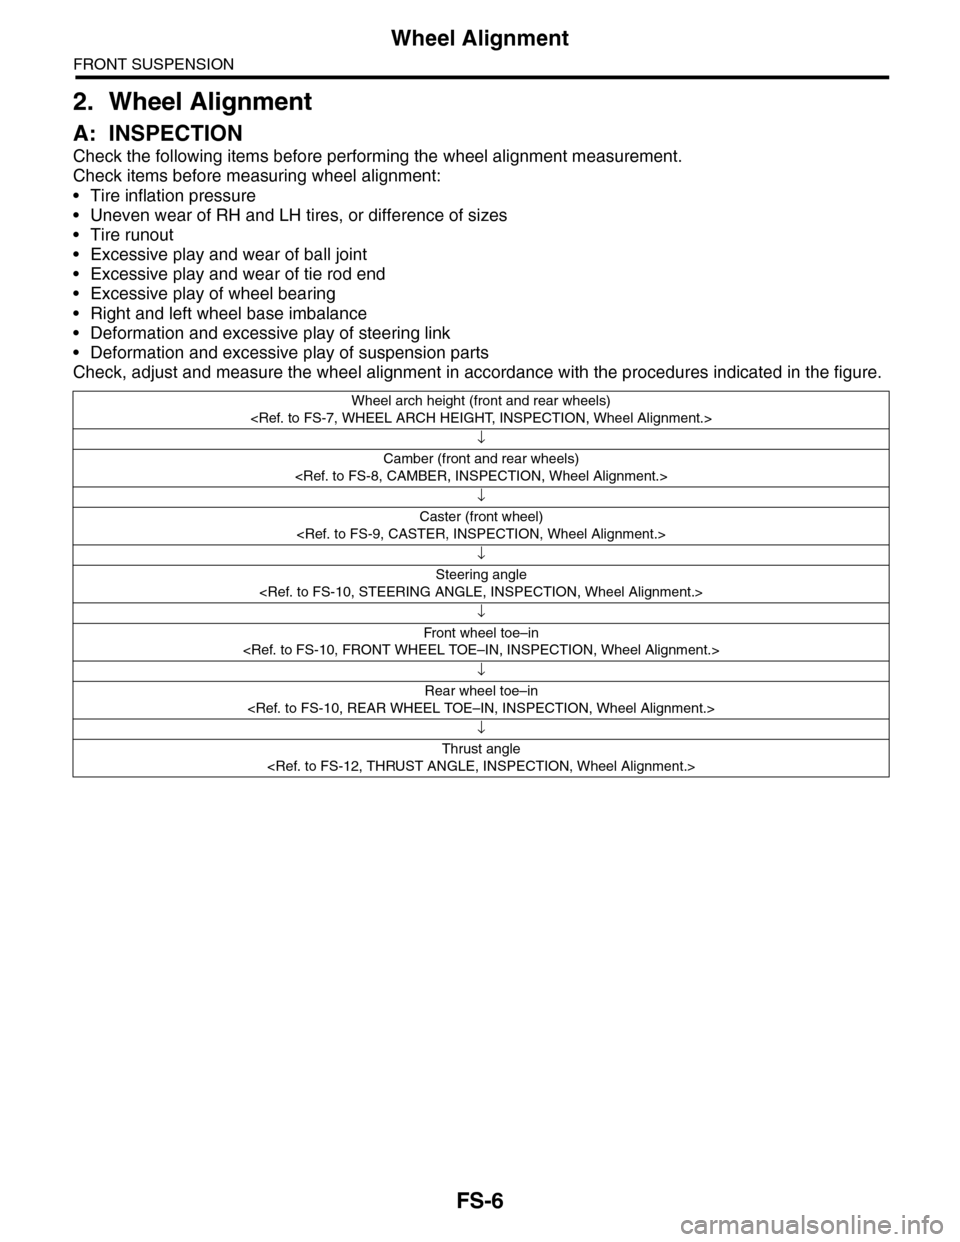
Check, adjust and measure the wheel alignment in accordance with the procedures indicated in the figure.
Wheel arch height (front and rear wheels)
↓
Camber (front and rear wheels)
↓
Caster (front wheel)
↓
Steering angle
↓
Fr o nt wh ee l to e –i n
↓
Rear wheel toe–in
↓
Thrust angle
Page 855 of 2453
FS-7
Wheel Alignment
FRONT SUSPENSION
1. WHEEL ARCH HEIGHT
1) Park the vehicle on a level surface.
2) Empty the vehicle so that it is at “curb weight”. (Empty the luggage compartment, load the spare tire, jack
and service tools, and fill up the fuel tank.)
3) Set the steering wheel in a straight–ahead position, and stabilize the suspension by moving the vehicle in
a straight line for more than 5 m (16 ft).
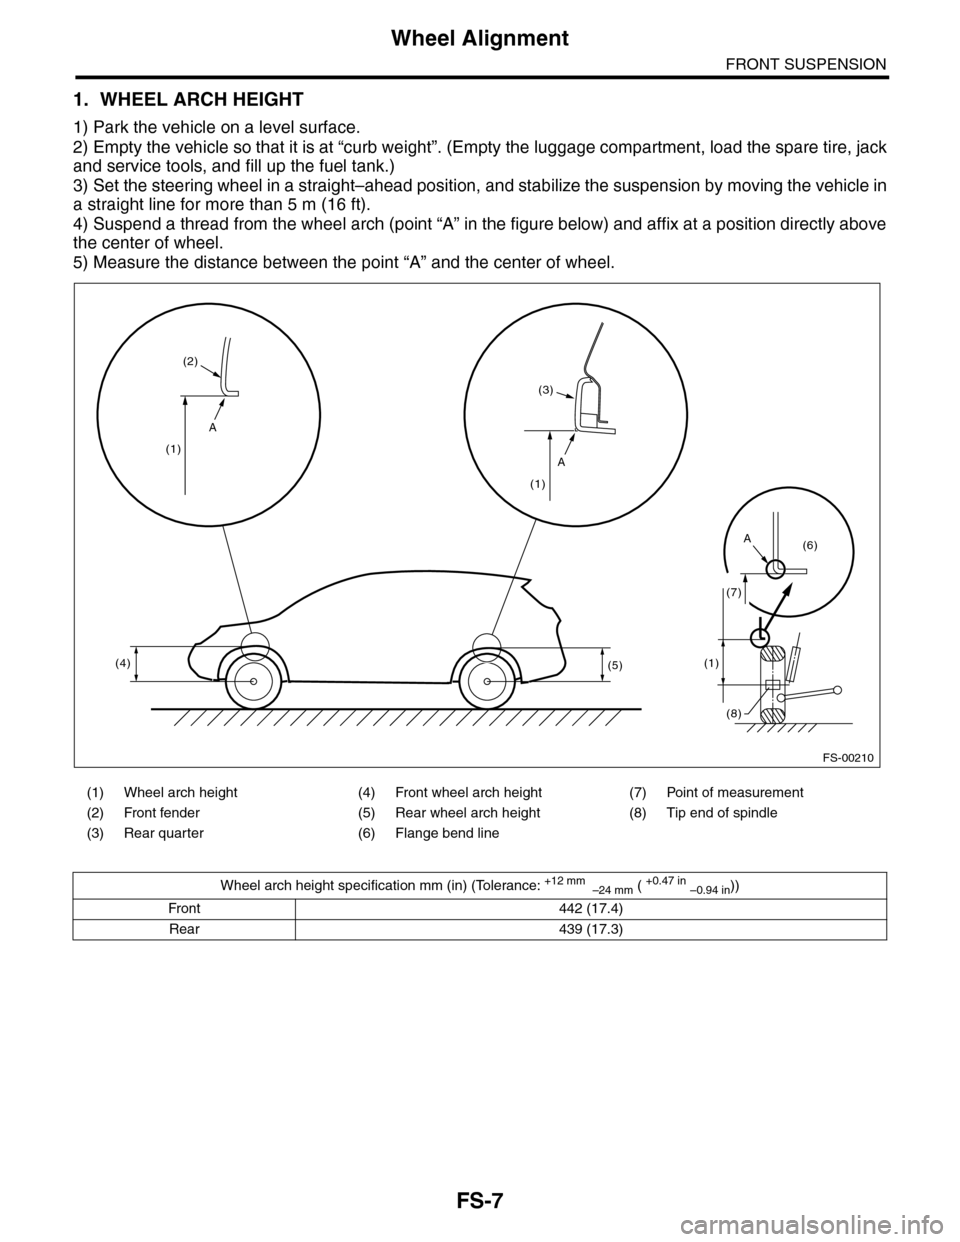
4) Suspend a thread from the wheel arch (point “A” in the figure below) and affix at a position directly above
the center of wheel.
5) Measure the distance between the point “A” and the center of wheel.
(1) Wheel arch height (4) Front wheel arch height (7) Point of measurement
(2) Front fender (5) Rear wheel arch height (8) Tip end of spindle
(3) Rear quarter (6) Flange bend line
Wheel arch height specification mm (in) (Tolerance: +12 mm –24 mm ( +0.47 in –0.94 in))
Front 442 (17.4)
Rear 439 (17.3)
A
A
A
(4)
(1)
(2)
(3)
(1)
(5)(1)
(7)
(6)
(8)
FS-00210
Page 856 of 2453
FS-8
Wheel Alignment
FRONT SUSPENSION
2. CAMBER
•INSPECTION
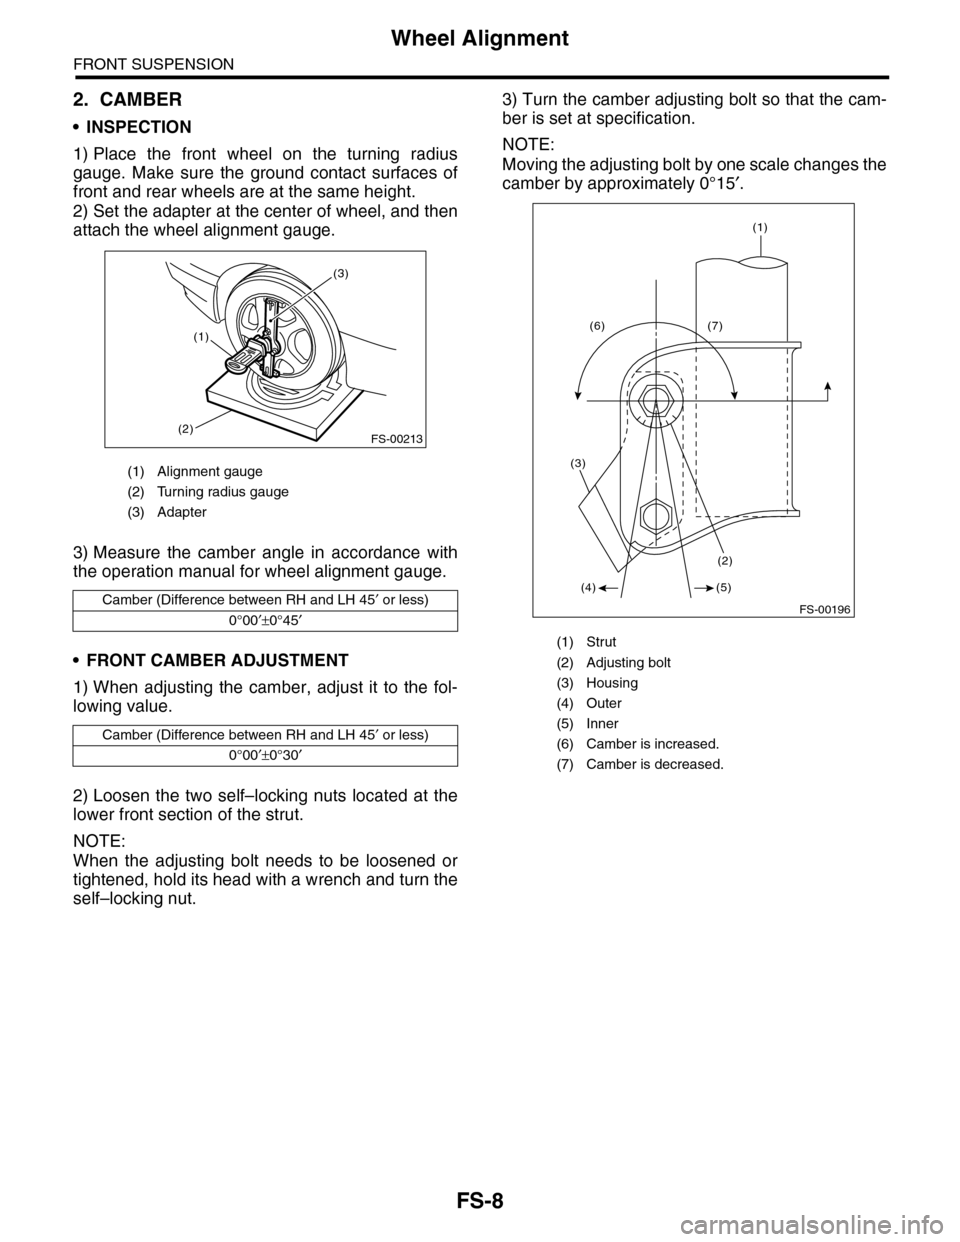
1) Place the front wheel on the turning radius
gauge. Make sure the ground contact surfaces of
front and rear wheels are at the same height.
2) Set the adapter at the center of wheel, and then
attach the wheel alignment gauge.
3) Measure the camber angle in accordance with
the operation manual for wheel alignment gauge.
•FRONT CAMBER ADJUSTMENT
1) When adjusting the camber, adjust it to the fol-
lowing value.
2) Loosen the two self–locking nuts located at the
lower front section of the strut.
NOTE:
When the adjusting bolt needs to be loosened or
tightened, hold its head with a wrench and turn the
self–locking nut.
3) Turn the camber adjusting bolt so that the cam-
ber is set at specification.
NOTE:
Moving the adjusting bolt by one scale changes the
camber by approximately 0°15′.
(1) Alignment gauge
(2) Turning radius gauge
(3) Adapter
Camber (Difference between RH and LH 45′ or less)
0°00′±0°45′
Camber (Difference between RH and LH 45′ or less)
0°00′±0°30′
FS-00213
(1)
(2)
(3)
(1) Strut
(2) Adjusting bolt
(3) Housing
(4) Outer
(5) Inner
(6) Camber is increased.
(7) Camber is decreased.
(1)
(4)
(6) (7)
(2)
(3)
(5)
FS-00196
Page 857 of 2453
FS-9
Wheel Alignment
FRONT SUSPENSION
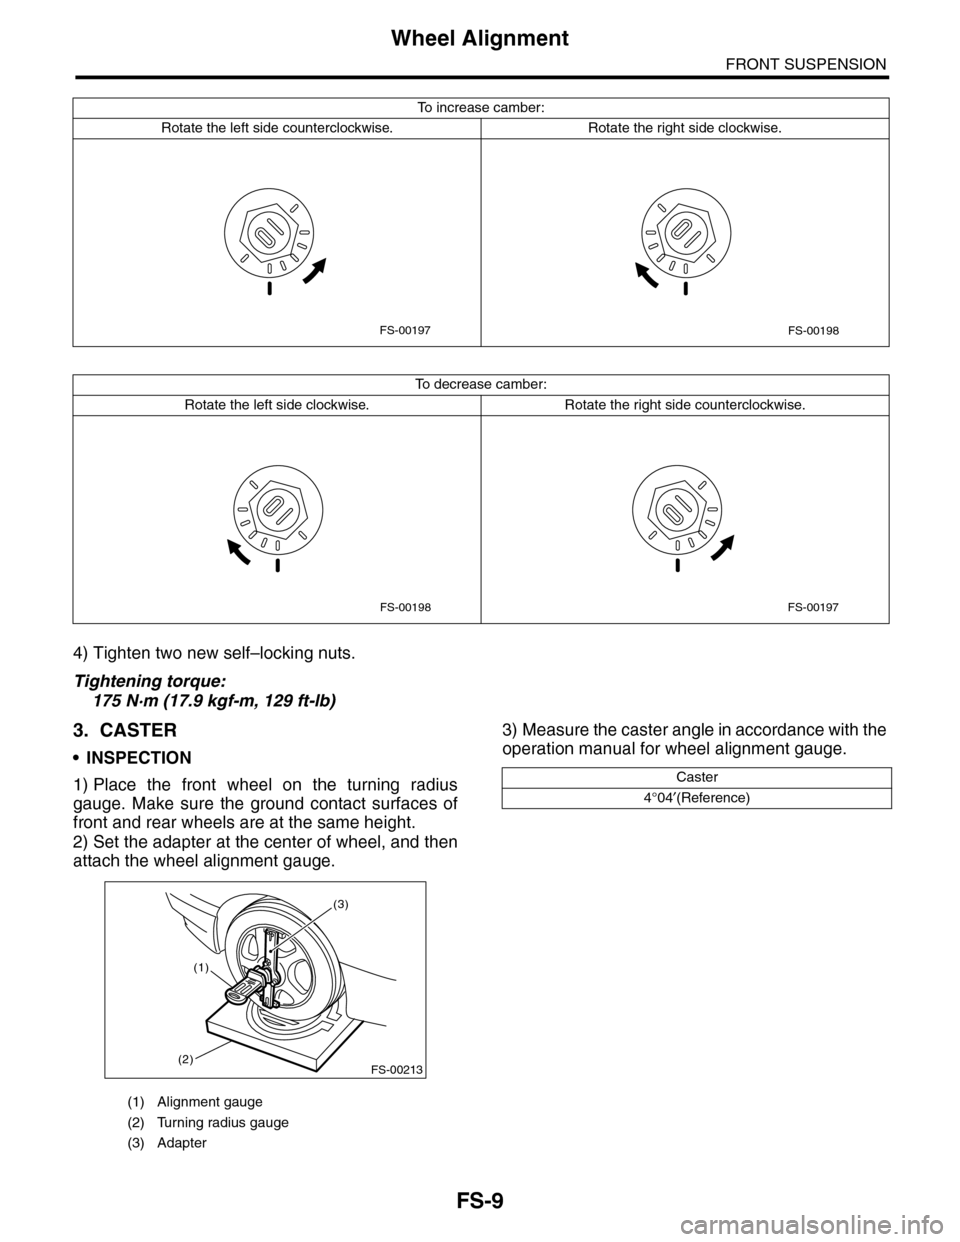
4) Tighten two new self–locking nuts.
Tightening torque:
175 N·m (17.9 kgf-m, 129 ft-lb)
3. CASTER
•INSPECTION
1) Place the front wheel on the turning radius
gauge. Make sure the ground contact surfaces of
front and rear wheels are at the same height.
2) Set the adapter at the center of wheel, and then
attach the wheel alignment gauge.
3) Measure the caster angle in accordance with the
operation manual for wheel alignment gauge.
To i n c r e a s e c a m b e r :
Rotate the left side counterclockwise. Rotate the right side clockwise.
To d e c r e a s e c a m b e r :
Rotate the left side clockwise. Rotate the right side counterclockwise.
FS-00197FS-00198
FS-00198FS-00197
(1) Alignment gauge
(2) Turning radius gauge
(3) Adapter
FS-00213
(1)
(2)
(3)
Caster
4°04′(Reference)
Page 858 of 2453
FS-10
Wheel Alignment
FRONT SUSPENSION
4. STEERING ANGLE
•INSPECTION
•ADJUSTMENT
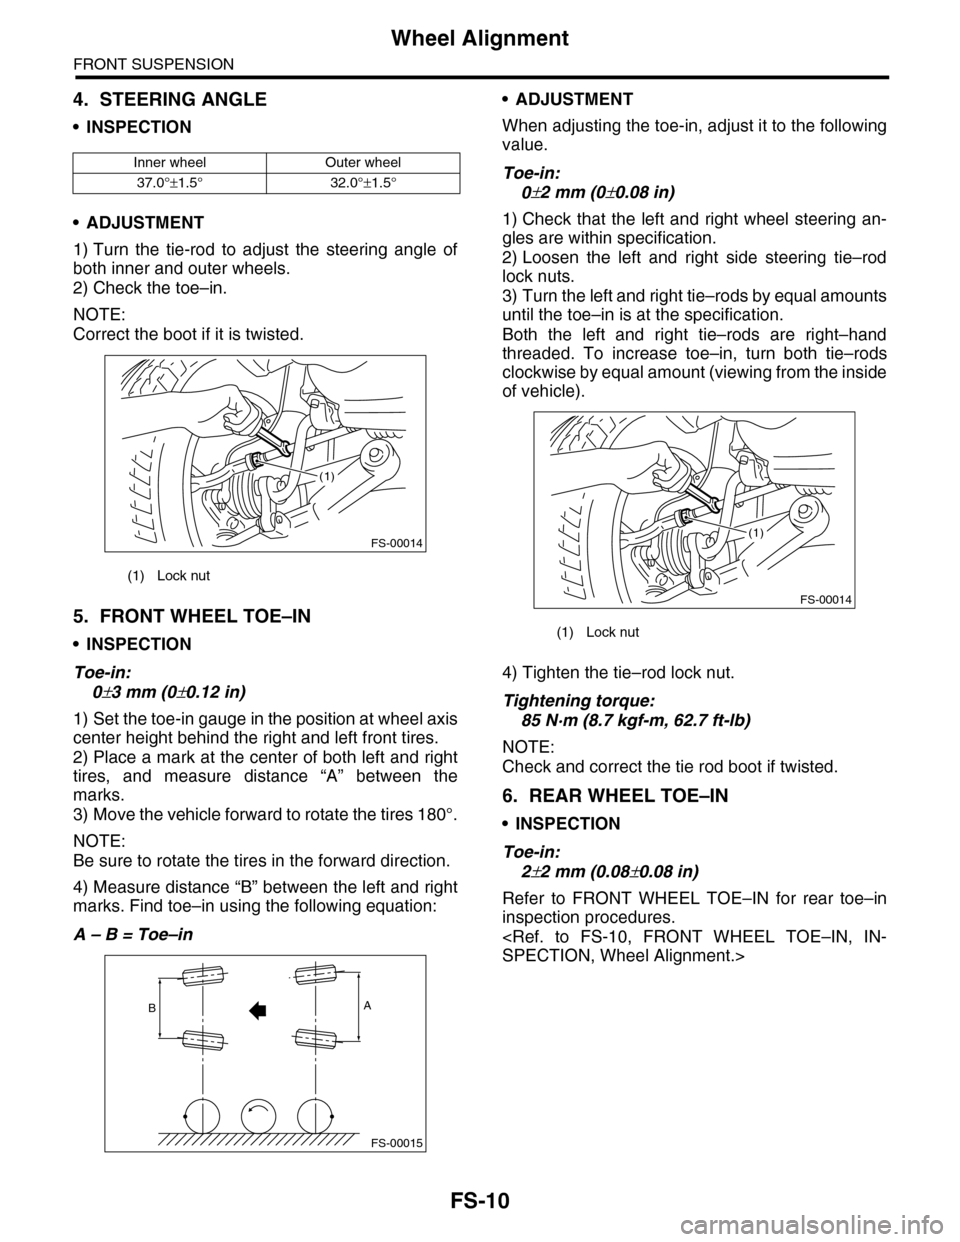
1) Turn the tie-rod to adjust the steering angle of
both inner and outer wheels.
2) Check the toe–in.
NOTE:
Correct the boot if it is twisted.
5. FRONT WHEEL TOE–IN
•INSPECTION
Toe-in:
0±3 mm (0±0.12 in)
1) Set the toe-in gauge in the position at wheel axis
center height behind the right and left front tires.
2) Place a mark at the center of both left and right
tires, and measure distance “A” between the
marks.
3) Move the vehicle forward to rotate the tires 180°.
NOTE:
Be sure to rotate the tires in the forward direction.
4) Measure distance “B” between the left and right
marks. Find toe–in using the following equation:
A – B = Toe–in
•ADJUSTMENT
When adjusting the toe-in, adjust it to the following
value.
Toe-in:
0±2 mm (0±0.08 in)
1) Check that the left and right wheel steering an-
gles are within specification.
2) Loosen the left and right side steering tie–rod
lock nuts.
3) Turn the left and right tie–rods by equal amounts
until the toe–in is at the specification.
Both the left and right tie–rods are right–hand
threaded. To increase toe–in, turn both tie–rods
clockwise by equal amount (viewing from the inside
of vehicle).
4) Tighten the tie–rod lock nut.
Tightening torque:
85 N·m (8.7 kgf-m, 62.7 ft-lb)
NOTE:
Check and correct the tie rod boot if twisted.
6. REAR WHEEL TOE–IN
•INSPECTION
Toe-in:
2±2 mm (0.08±0.08 in)
Refer to FRONT WHEEL TOE–IN for rear toe–in
inspection procedures.
Inner wheel Outer wheel
37.0°±1.5° 32.0°±1.5°
(1) Lock nut
FS-00014
(1)
FS-00015
AB
(1) Lock nut
FS-00014
(1)