SUZUKI GRAND VITARA 1987 Service Repair Manual
Manufacturer: SUZUKI, Model Year: 1987, Model line: GRAND VITARA, Model: SUZUKI GRAND VITARA 1987Pages: 962, PDF Size: 27.87 MB
Page 431 of 962
BLEEDING BRAKES
NOTE:
Brake fluid is extremely damaging to paint. If
fluid should accidentally touch painted surface,
immediately wipe fluid from paint and clean
painted surface.
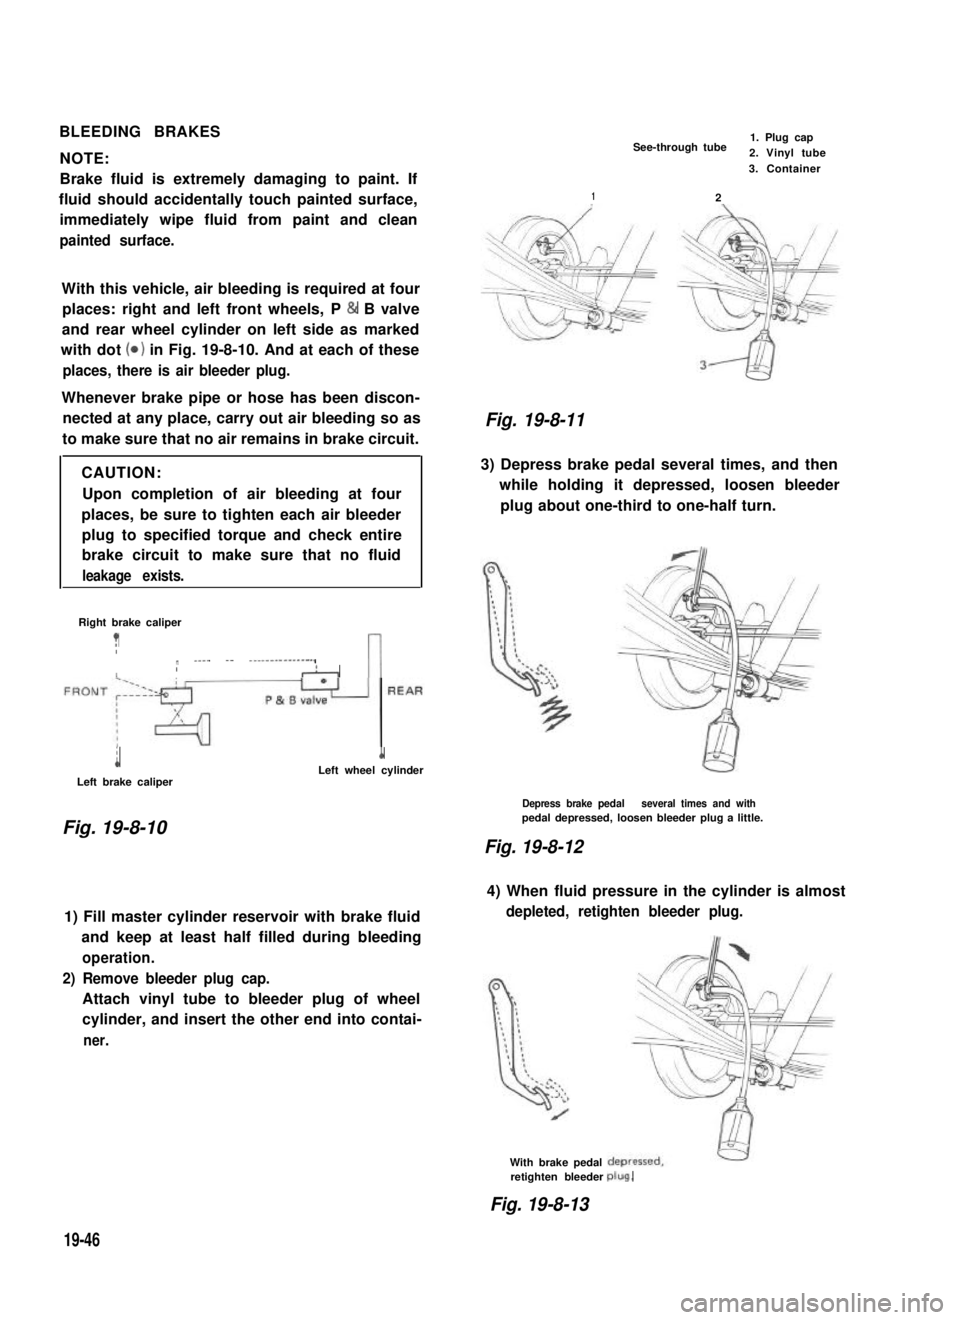
With this vehicle, air bleeding is required at four
places: right and left front wheels, P & B valve
and rear wheel cylinder on left side as marked
with dot (0) in Fig. 19-8-10. And at each of these
places, there is air bleeder plug.
Whenever brake pipe or hose has been discon-
nected at any place, carry out air bleeding so as
to make sure that no air remains in brake circuit.
CAUTION:
Upon completion of air bleeding at four
places, be sure to tighten each air bleeder
plug to specified torque and check entire
brake circuit to make sure that no fluid
leakage exists.
Right brake caliper
?Ir ____ -- ---------------,IIAn
i
Left brake caliper
1Left wheel cylinder
Fig. 19-8-10
1) Fill master cylinder reservoir with brake fluid
and keep at least half filled during bleeding
operation.
2) Remove bleeder plug cap.
Attach vinyl tube to bleeder plug of wheel
cylinder, and insert the other end into contai-
ner.
See-through tube1. Plug cap2. Vinyl tube
2
3. Container
1
Fig. 19-8-11
3) Depress brake pedal several times, and then
while holding it depressed, loosen bleeder
plug about one-third to one-half turn.
Depress brake pedal several times and withpedal depressed, loosen bleeder plug a little.
Fig. 19-8-12
4) When fluid pressure in the cylinder is almost
depleted, retighten bleeder plug.
With brake pedalretighten bleederplug.
Fig. 19-8-13
19-46
Page 432 of 962
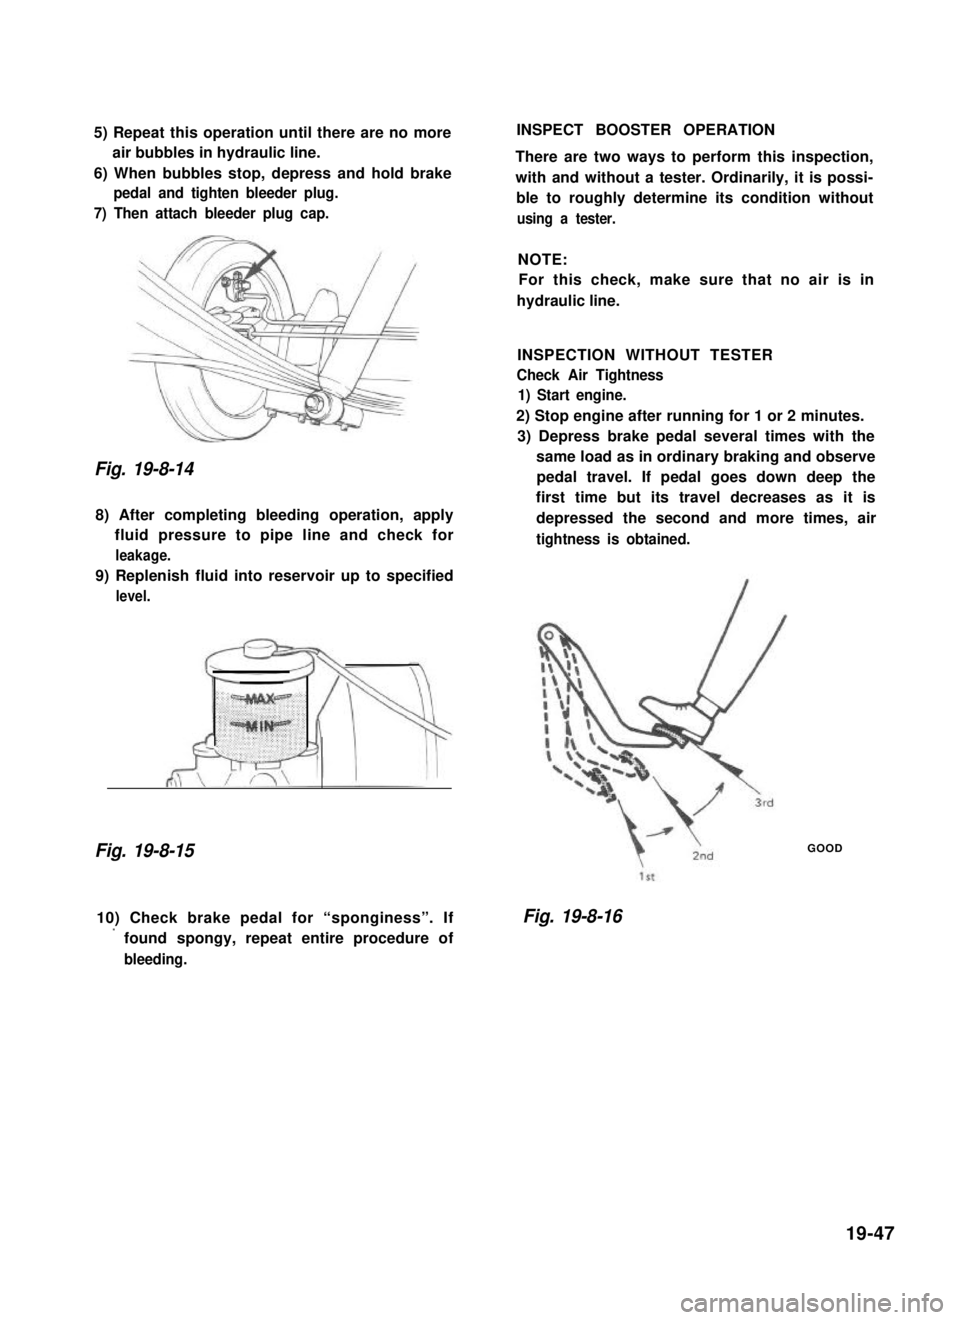
5) Repeat this operation until there are no more
air bubbles in hydraulic line.
6) When bubbles stop, depress and hold brake
pedal and tighten bleeder plug.
7) Then attach bleeder plug cap.
Fig. 19-8-14
8) After completing bleeding operation, apply
fluid pressure to pipe line and check for
leakage.
9) Replenish fluid into reservoir up to specified
level.
Fig. 19-8-15
INSPECT BOOSTER OPERATION
There are two ways to perform this inspection,
with and without a tester. Ordinarily, it is possi-
ble to roughly determine its condition without
using a tester.
NOTE:
For this check, make sure that no air is in
hydraulic line.
INSPECTION WITHOUT TESTER
Check Air Tightness
1) Start engine.
2) Stop engine after running for 1 or 2 minutes.
3) Depress brake pedal several times with the
same load as in ordinary braking and observe
pedal travel. If pedal goes down deep the
first time but its travel decreases as it is
depressed the second and more times, air
tightness is obtained.
GOOD
10) Check brake pedal for “sponginess”. If
’ found spongy, repeat entire procedure of
bleeding.
Fig. 19-8-16
19-47
Page 433 of 962
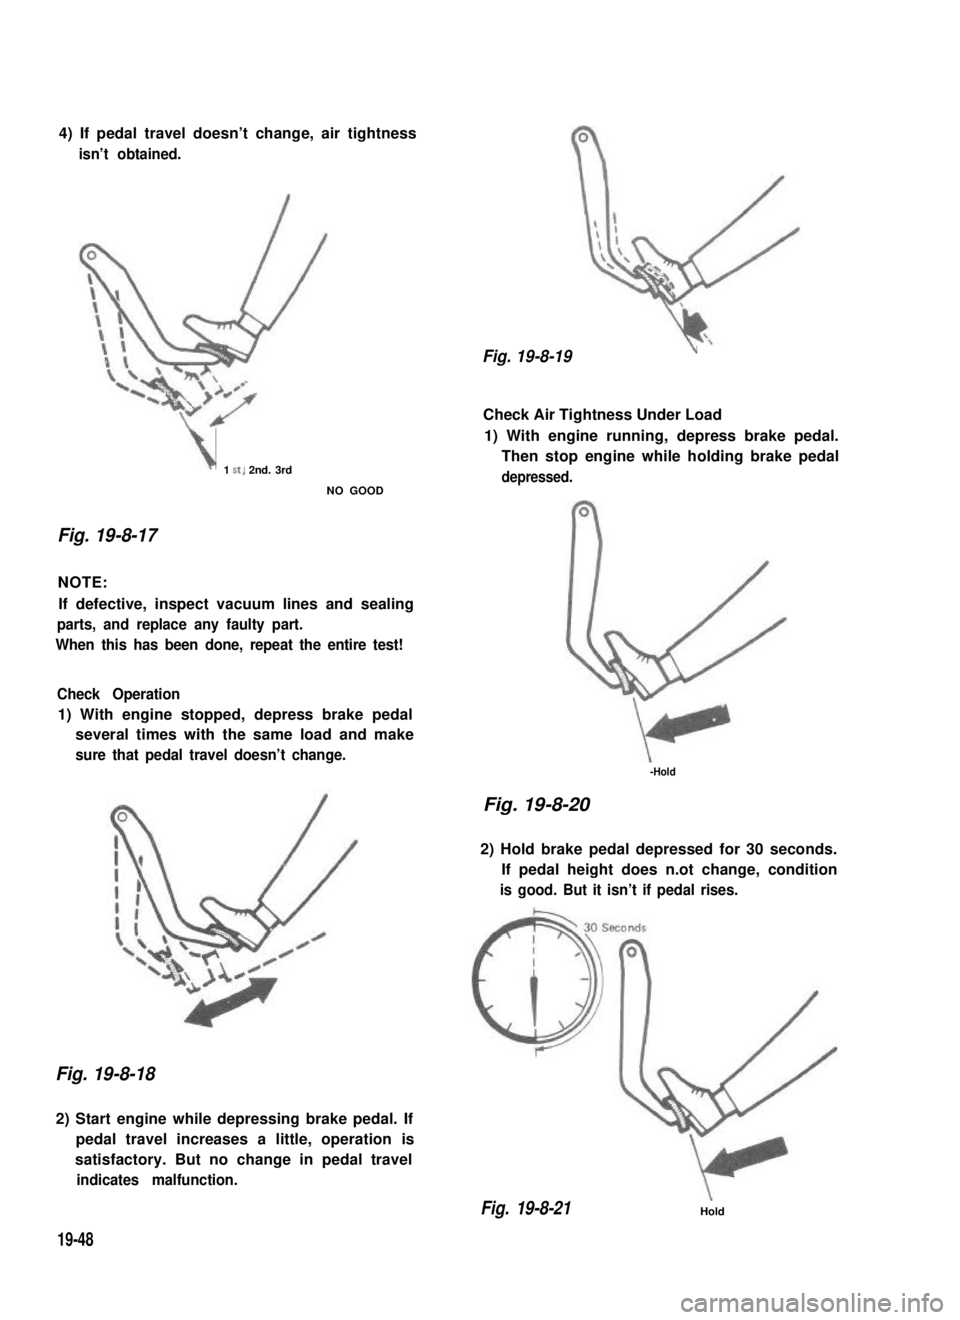
4) If pedal travel doesn’t change, air tightness
isn’t obtained.
\1 St, 2nd. 3rd
NO GOOD
Fig. 19-8-17
NOTE:
If defective, inspect vacuum lines and sealing
parts, and replace any faulty part.
When this has been done, repeat the entire test!
Check Operation
1) With engine stopped, depress brake pedal
several times with the same load and make
sure that pedal travel doesn’t change.
Fig. 19-8-19 \
Check Air Tightness Under Load
1) With engine running, depress brake pedal.
Then stop engine while holding brake pedal
depressed.
-Hold
Fig. 19-8-20
2) Hold brake pedal depressed for 30 seconds.
If pedal height does n.ot change, condition
is good. But it isn’t if pedal rises.
Fig. 19-8-18
2) Start engine while depressing brake pedal. If
pedal travel increases a little, operation is
satisfactory. But no change in pedal travel
indicates malfunction.
Fig. 19-8-21Hold
19-48
Page 434 of 962
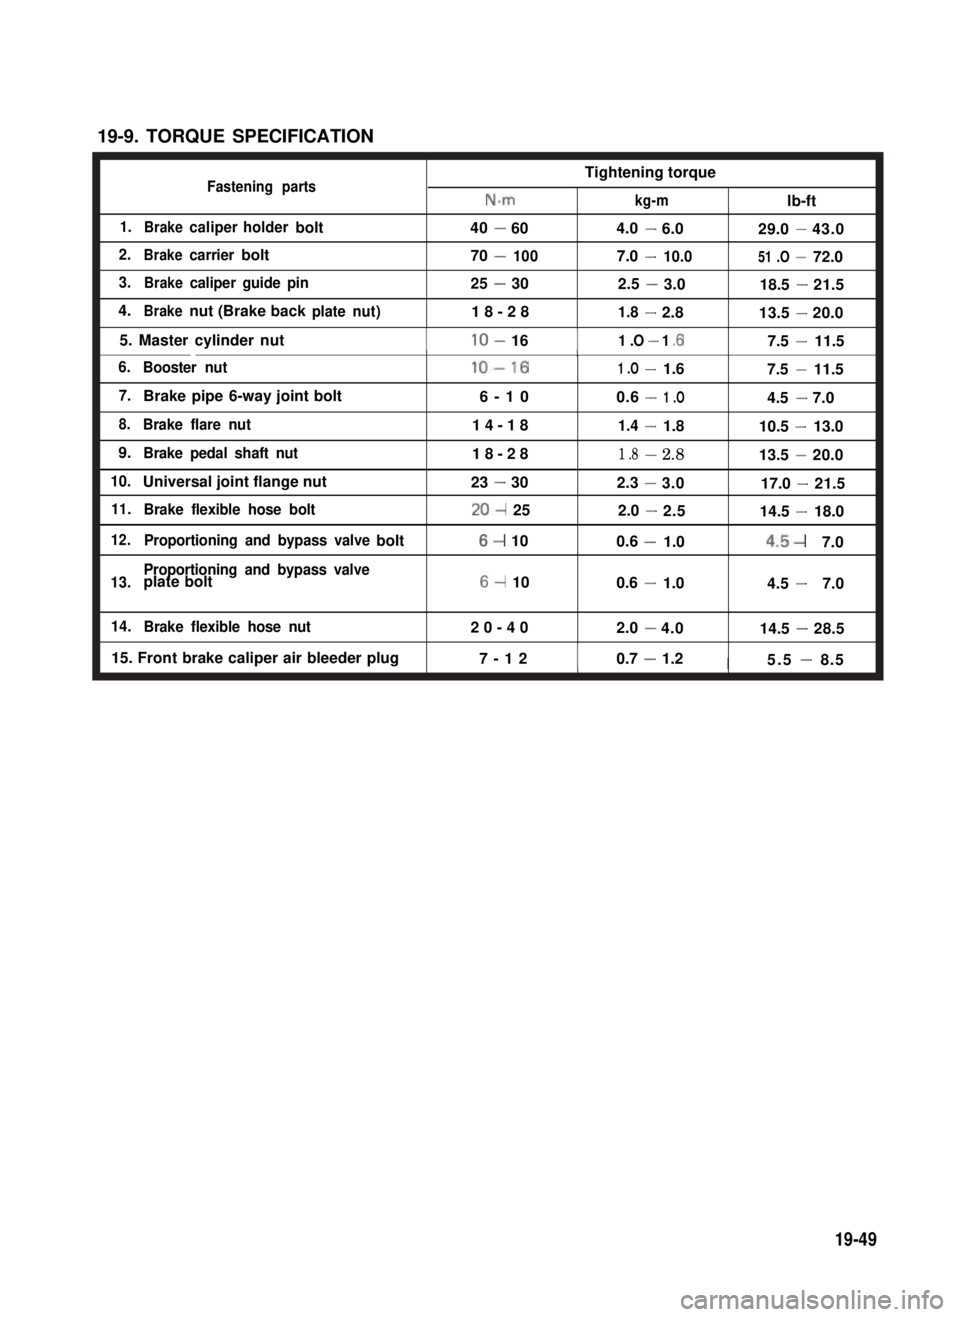
19-9. TORQUE SPECIFICATION
Tightening torqueFastening partsN.mkg-mlb-ft
1.Brakecaliperholderbolt40-604.0-6.029.0-43.0
2.Brakecarrierbolt70-1007.0-10.051 .O-72.0
3.Brakecaliper guide pin25 - 302.53.018.5--21.5
4.Brakenut (Brake backplatenut)18-281.8-2.813.5-20.0
5. Master cylinder nutIlo- 16I1 .O - 1 .6I7.5 - 11.5I
6.Booster nutlo-161 .O-1.67.5 -11.5
7.Brake pipe 6-way joint bolt6-100.6-1 .O4.5 -7.0
8.Brake flare nut14-181.4-1.810.5 -13.0
9.Brake pedal shaft nut18-281 .8-2.813.5 -20.0
10.Universal joint flange nut23 - 302.3-3.017.0 -21.5
11.Brake flexible hose bolt20- 252.0-2.514.5 -18.0
12.Proportioning and bypass valvebolt6- 100.6-1.04.5-7.0
13.Proportioning and bypass valveplate bolt6- 100.6-1.04.5-7.0
14.Brake flexible hose nut20-402.0-4.014.5 -28.5
15. Front brake caliper air bleeder plug7-12I0.7 - 1.2I5.5 - 8.5I
19-49
Page 435 of 962
SECTION 20
BODY SERVICE
CONTENTS
20-1. FRONT DOOR...........................................20-2
DESCRIPTION.........................................20-2
REMOVAL............................................2@3
INSTALLATION........................................20-5
WINDSHIELD............................................20- 8
CLEANlNG............................................20- 8
INSTALLATION........................................20-9
20-3. BACK DOOR (APPLICABLE TO HARD TOP VEHICLE).........20-11
CHASSIS DIMENSIONS...................................20-13
20-2.WINDSHIELD
20-4.
20-2
20-2
20-3
20-5
20-8
20-8
20-9
20-11
20-13
20-1
Page 436 of 962
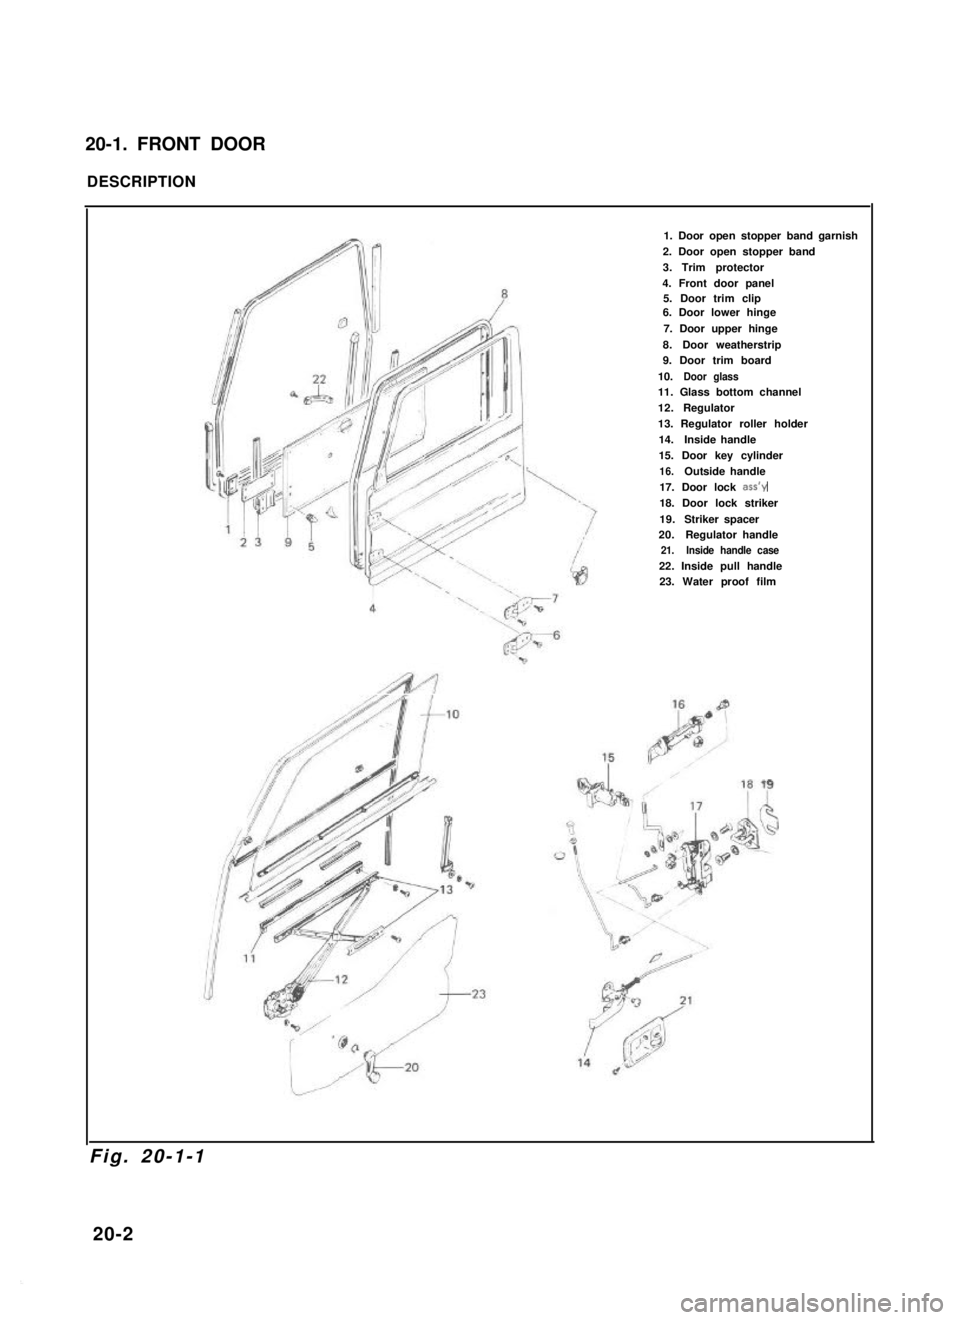
20-1. FRONT DOOR
DESCRIPTION
1. Door open stopper band garnish
2. Door open stopper band
3.Trim protector
4. Front door panel5. Door trim clip6. Door lower hinge
7. Door upper hinge
8.Door weatherstrip9. Door trim board
10.Door glass11. Glass bottom channel
12.Regulator
13. Regulator roller holder
14.Inside handle
15. Door key cylinder
16.Outside handle
17. Door lock ass’y
18. Door lock striker
19.Striker spacer20.Regulator handle 21. Inside handle case
22. Inside pull handle23. Water proof film
Fig. 20-1-1
20-2
Page 437 of 962
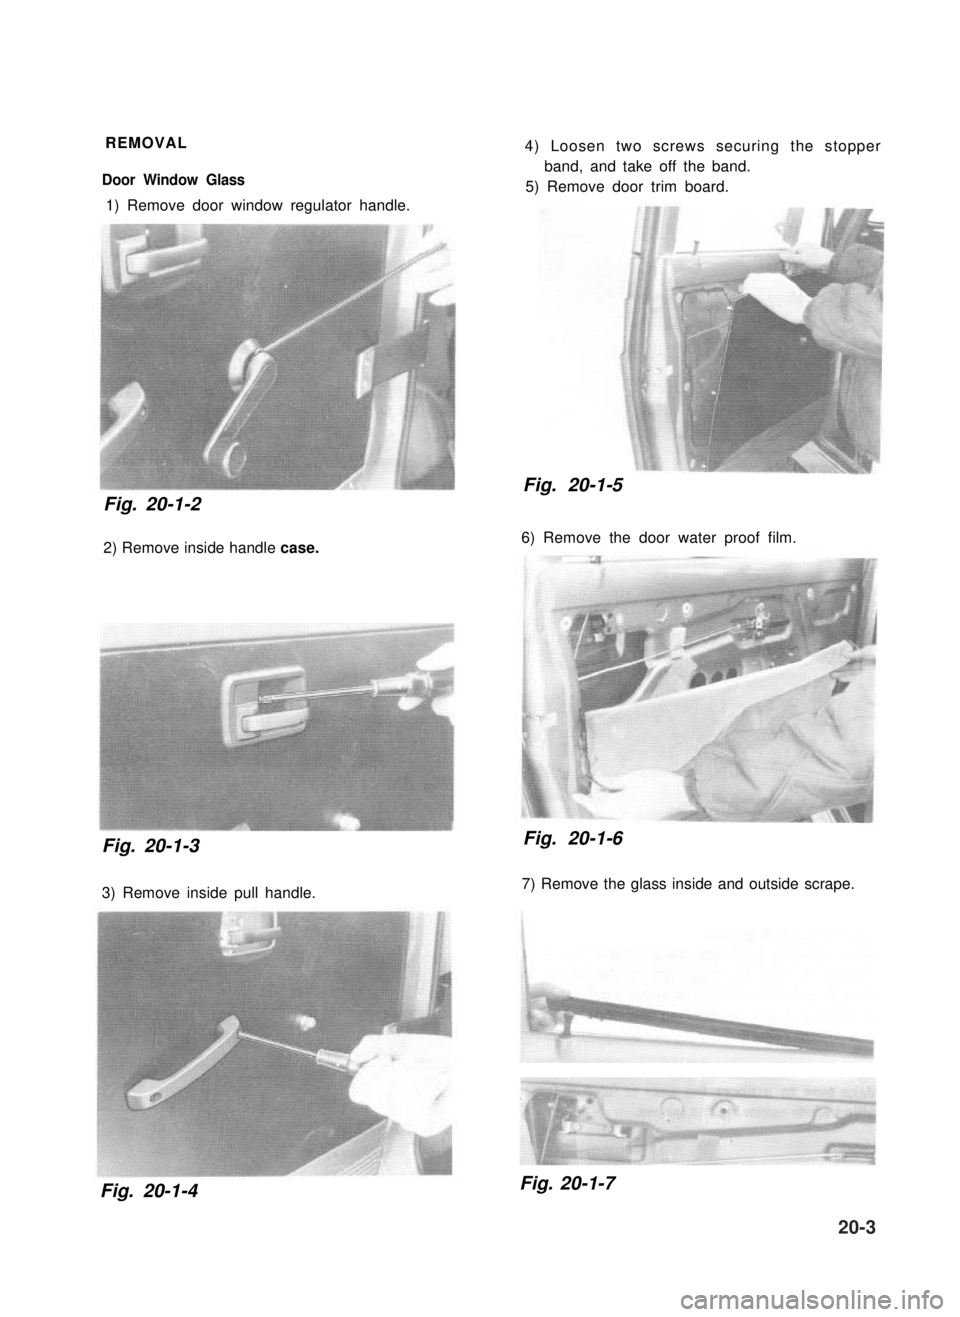
REMOVAL
Door Window Glass
1) Remove door window regulator handle.
Fig. 20-1-2
2) Remove inside handle case.
Fig. 20-1-3
3) Remove inside pull handle.
4) Loosen two screws securing the stopper
band, and take off the band.
5) Remove door trim board.
Fig. 20-1-5
6) Remove the door water proof film.
Fig. 20-1-6
7) Remove the glass inside and outside scrape.
Fig. 20-1-4 Fig. 20-1-7
20-3
Page 438 of 962
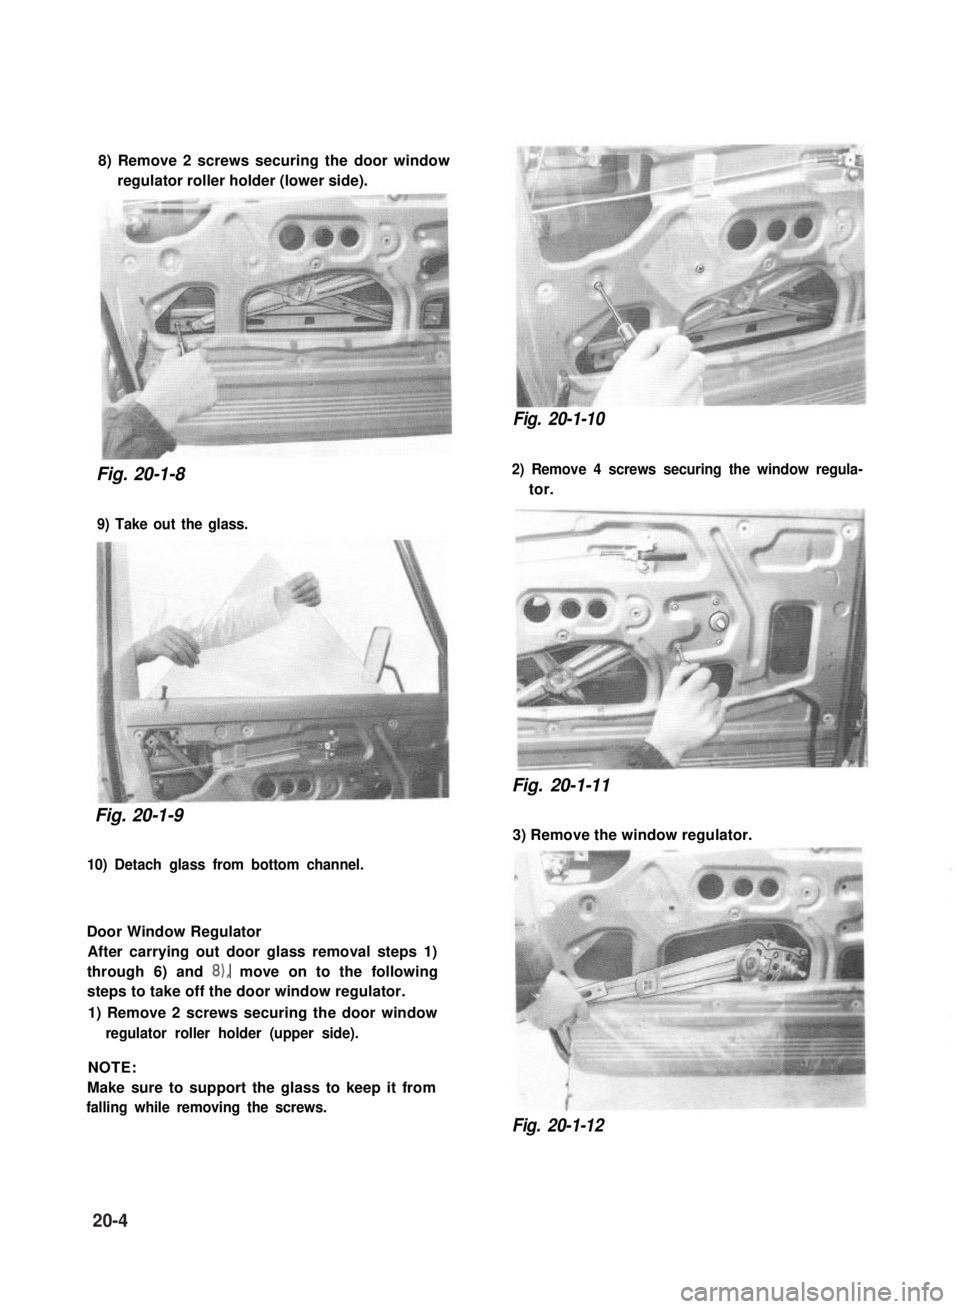
8) Remove 2 screws securing the door window
regulator roller holder (lower side).
Fig. 20-1-10
Fig. 20-1-8
9) Take out the glass.
Fig. 20-1-9
10) Detach glass from bottom channel.
Door Window Regulator
After carrying out door glass removal steps 1)
through 6) and 8), move on to the following
steps to take off the door window regulator.
1) Remove 2 screws securing the door window
regulator roller holder (upper side).
NOTE:
Make sure to support the glass to keep it from
falling while removing the screws.
2) Remove 4 screws securing the window regula-
tor.
Fig. 20-1-11
3) Remove the window regulator.
Fig. 20-1-12
20-4
Page 439 of 962
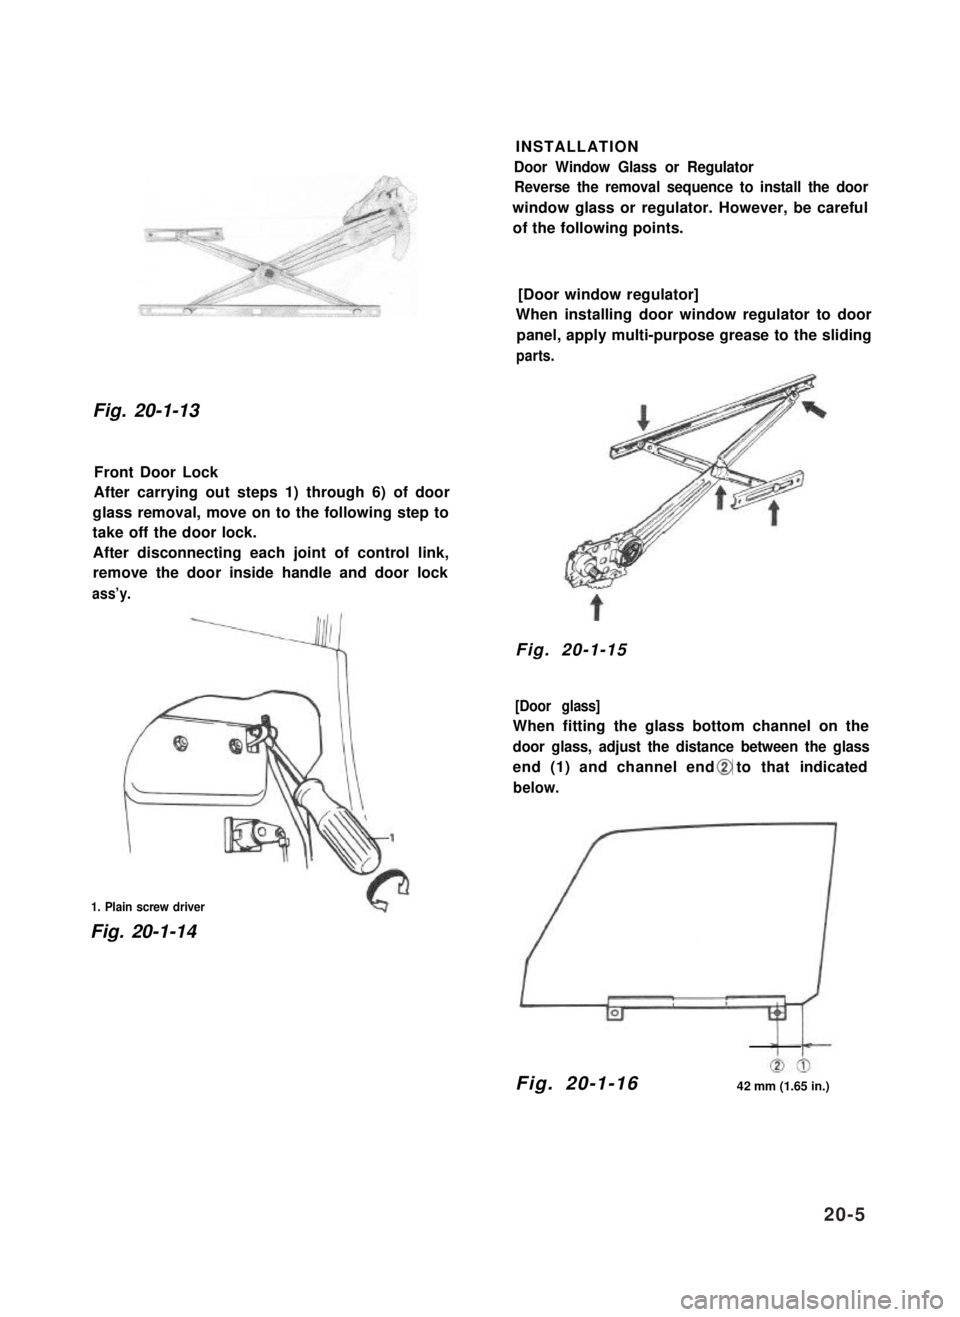
Fig. 20-1-13
Front Door Lock
After carrying out steps 1) through 6) of door
glass removal, move on to the following step to
take off the door lock.
After disconnecting each joint of control link,
remove the door inside handle and door lock
ass’y.
1. Plain screw driver
Fig. 20-1-14
INSTALLATION
Door Window Glass or Regulator
Reverse the removal sequence to install the door
window glass or regulator. However, be careful
of the following points.
[Door window regulator]
When installing door window regulator to door
panel, apply multi-purpose grease to the sliding
parts.
Fig. 20-1-15
[Door glass]
When fitting the glass bottom channel on the
door glass, adjust the distance between the glass
end (1) and channel end to that indicated
below.
Fig. 20-1-1642 mm (1.65 in.)
20-5
Page 440 of 962
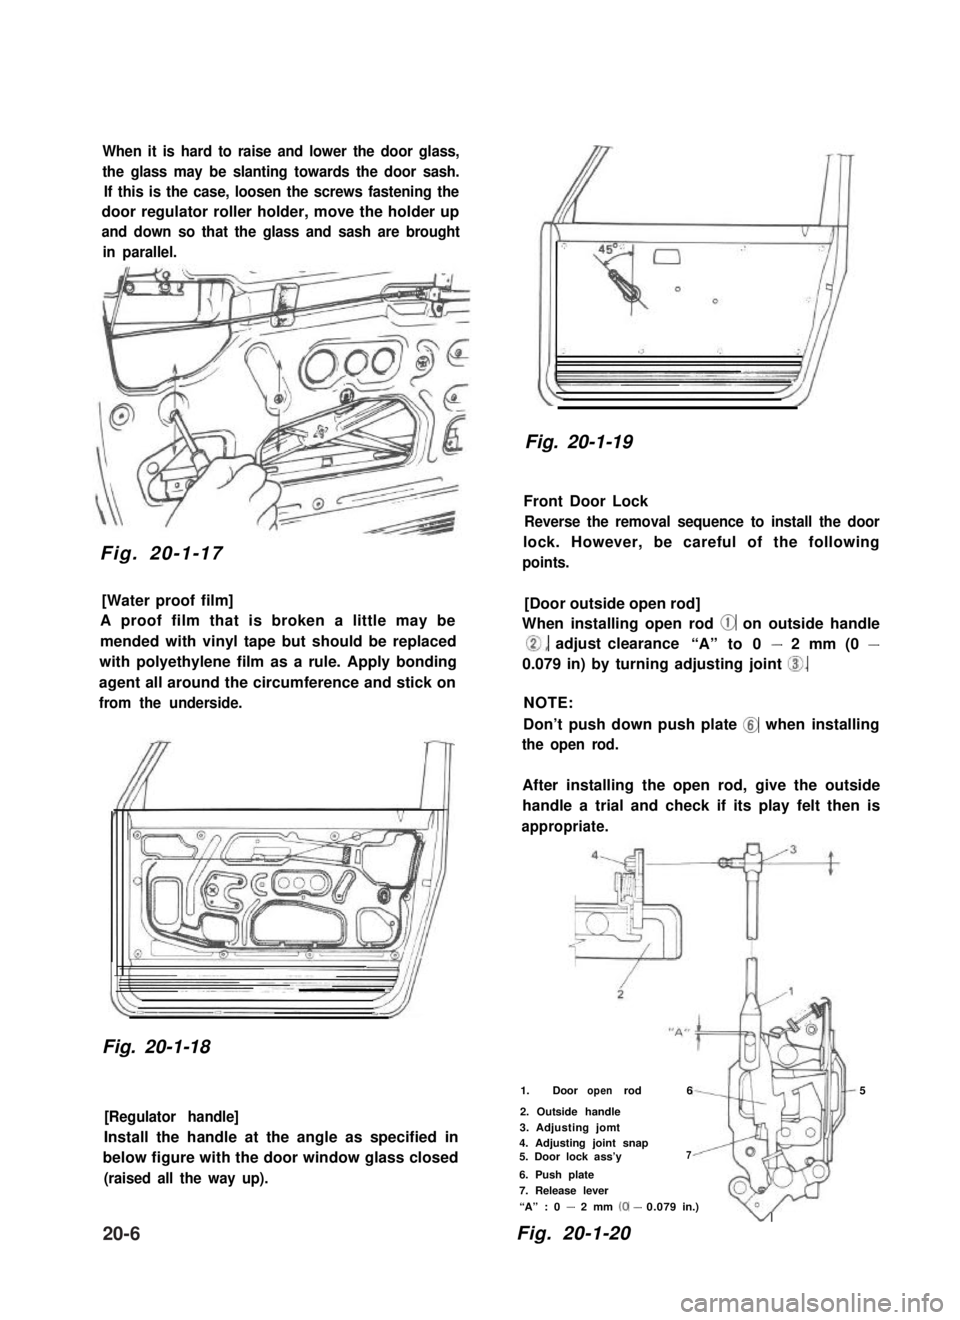
When it is hard to raise and lower the door glass,
the glass may be slanting towards the door sash.
If this is the case, loosen the screws fastening the
door regulator roller holder, move the holder up
and down so that the glass and sash are brought
in parallel.
Fig. 20-1-17
[Water proof film]
A proof film that is broken a little may be
mended with vinyl tape but should be replaced
with polyethylene film as a rule. Apply bonding
agent all around the circumference and stick on
from the underside.
Fig. 20-1-18
[Regulator handle]
Install the handle at the angle as specified in
below figure with the door window glass closed
(raised all the way up).
Fig. 20-1-19
Front Door Lock
Reverse the removal sequence to install the door
lock. However, be careful of the following
points.
[Door outside open rod]
When installing open rod @ on outside handle
0, adjust clearance“A” to 0 - 2 mm (0 -
0.079 in) by turning adjusting joint 0.
NOTE:
Don’t push down push plate @ when installing
the open rod.
After installing the open rod, give the outside
handle a trial and check if its play felt then is
appropriate.
1. Door rodopen65
2. Outside handle
3. Adjusting jomt4. Adjusting joint snap5. Door lock ass’y7
6. Push plate
7. Release lever
“A” : 0 - 2 mm (0-0.079in.)
Fig. 20-1-20
v
20-6