SUZUKI GRAND VITARA 2022 Owners Manual
Manufacturer: SUZUKI, Model Year: 2022, Model line: GRAND VITARA, Model: SUZUKI GRAND VITARA 2022Pages: 482, PDF Size: 21 MB
Page 291 of 482
5-49
OTHER CONTROLS AND EQUIPMENT
54P00-01E
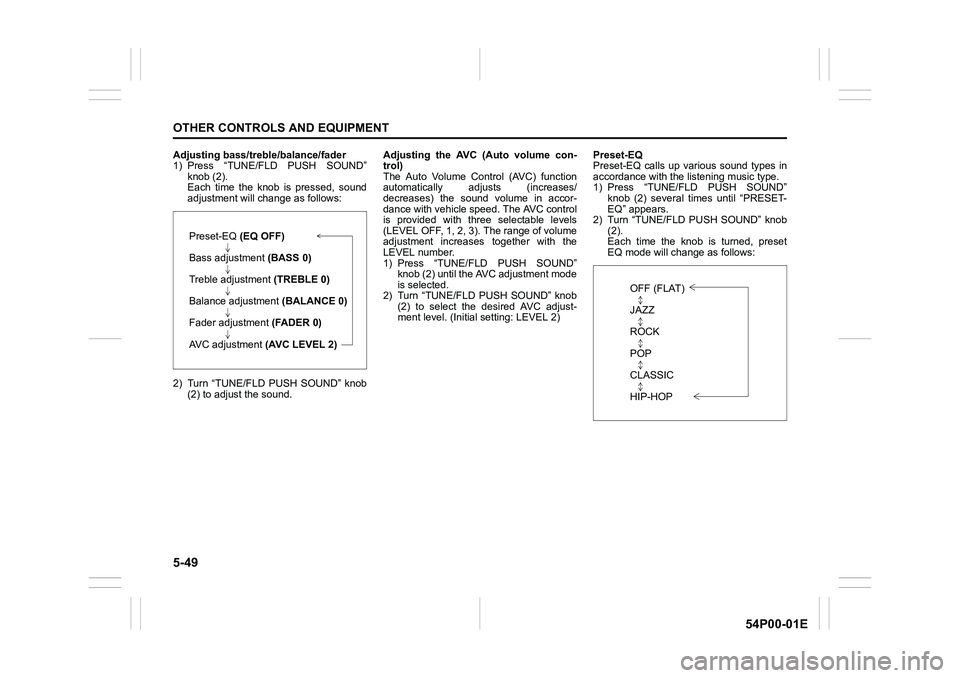
Adjusting bass/treble/balance/fader
1) Press “TUNE/FLD PUSH SOUND”
knob (2).
Each time the knob is pressed, sound
adjustment will change as follows:
2) Turn “TUNE/FLD PUSH SOUND” knob
(2) to adjust the sound.Adjusting the AVC (Auto volume con-
trol)
The Auto Volume Control (AVC) function
automatically adjusts (increases/
decreases) the sound volume in accor-
dance with vehicle speed. The AVC control
is provided with three selectable levels
(LEVEL OFF, 1, 2, 3). The range of volume
adjustment increases together with the
LEVEL number.
1) Press “TUNE/FLD PUSH SOUND”
knob (2) until the AVC adjustment mode
is selected.
2) Turn “TUNE/FLD PUSH SOUND” knob
(2) to select the desired AVC adjust-
ment level. (Initial setting: LEVEL 2)Preset-EQ
Preset-EQ calls up various sound types in
accordance with the listening music type.
1) Press “TUNE/FLD PUSH SOUND”
knob (2) several times until “PRESET-
EQ” appears.
2) Turn “TUNE/FLD PUSH SOUND” knob
(2).
Each time the knob is turned, preset
EQ mode will change as follows:
Preset-EQ (EQ OFF)
Bass adjustment (BASS 0)
Treble adjustment (TREBLE 0)
Balance adjustment (BALANCE 0)
Fader adjustment (FADER 0)
AVC adjustment (AVC LEVEL 2)
OFF (FLAT)
JAZZ
ROCK
POP
CLASSIC
HIP-HOP
Page 292 of 482
5-50
OTHER CONTROLS AND EQUIPMENT
54P00-01E
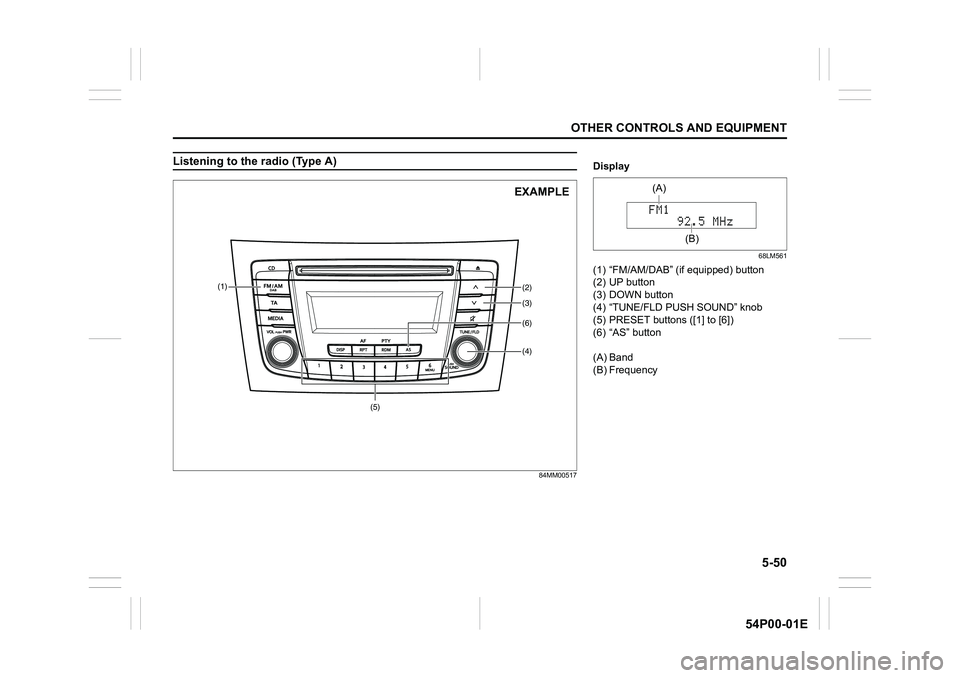
Listening to the radio (Type A)
84MM00517
(5)(4)
(2)
(3) (1)
(6)
EXAMPLE
Display
68LM561
(1) “FM/AM/DAB” (if equipped) button
(2) UP button
(3) DOWN button
(4) “TUNE/FLD PUSH SOUND” knob
(5) PRESET buttons ([1] to [6])
(6) “AS” button
(A) Band
(B) Frequency
(A)
(B)
Page 293 of 482
5-51
OTHER CONTROLS AND EQUIPMENT
54P00-01E
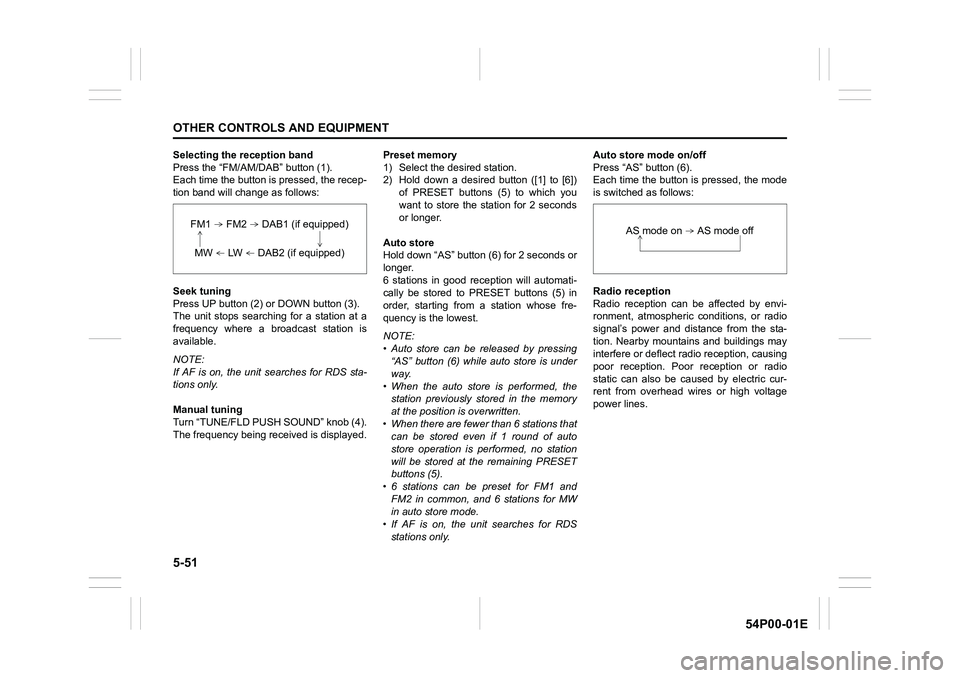
Selecting the reception band
Press the “FM/AM/DAB” button (1).
Each time the button is pressed, the recep-
tion band will change as follows:
Seek tuning
Press UP button (2) or DOWN button (3).
The unit stops searching for a station at a
frequency where a broadcast station is
available.
NOTE:
If AF is on, the unit searches for RDS sta-
tions only.
Manual tuning
Turn “TUNE/FLD PUSH SOUND” knob (4).
The frequency being received is displayed.Preset memory
1) Select the desired station.
2) Hold down a desired button ([1] to [6])
of PRESET buttons (5) to which you
want to store the station for 2 seconds
or longer.
Auto store
Hold down “AS” button (6) for 2 seconds or
longer.
6 stations in good reception will automati-
cally be stored to PRESET buttons (5) in
order, starting from a station whose fre-
quency is the lowest.
NOTE:
• Auto store can be released by pressing
“AS” button (6) while auto store is under
way.
• When the auto store is performed, the
station previously stored in the memory
at the position is overwritten.
• When there are fewer than 6 stations that
can be stored even if 1 round of auto
store operation is performed, no station
will be stored at the remaining PRESET
buttons (5).
• 6 stations can be preset for FM1 and
FM2 in common, and 6 stations for MW
in auto store mode.
• If AF is on, the unit searches for RDS
stations only.Auto store mode on/off
Press “AS” button (6).
Each time the button is pressed, the mode
is switched as follows:
Radio reception
Radio reception can be affected by envi-
ronment, atmospheric conditions, or radio
signal’s power and distance from the sta-
tion. Nearby mountains and buildings may
interfere or deflect radio reception, causing
poor reception. Poor reception or radio
static can also be caused by electric cur-
rent from overhead wires or high voltage
power lines.
FM1 FM2 DAB1 (if equipped)
MW LW DAB2 (if equipped)
AS mode on AS mode off
Page 294 of 482
5-52
OTHER CONTROLS AND EQUIPMENT
54P00-01E
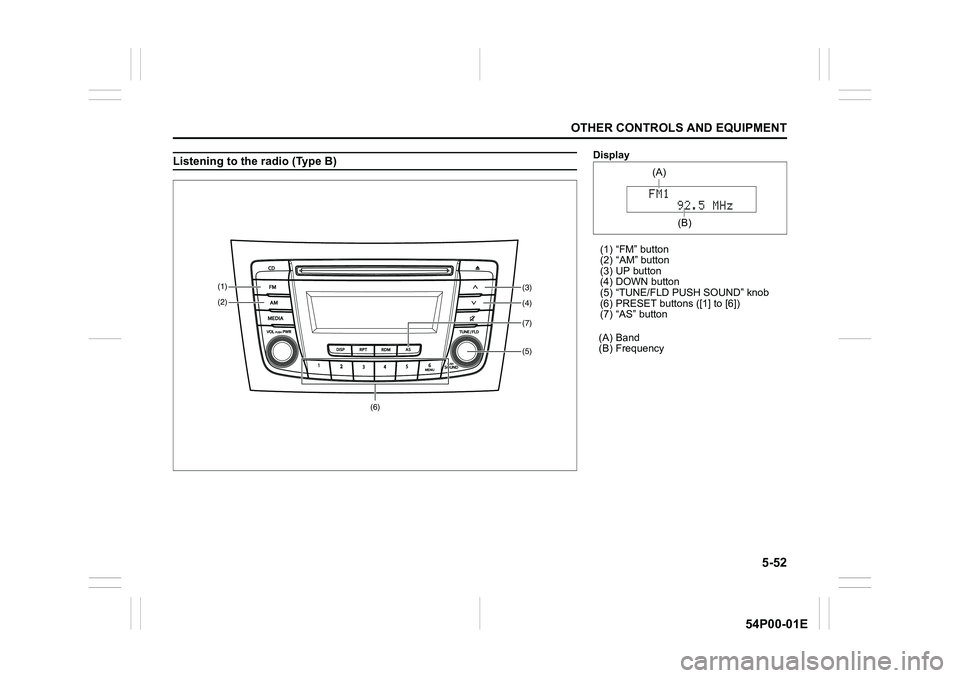
Listening to the radio (Type B)
(5) (4)
(3) (1)
(2)
(7)
(6)
Display
(1) “FM” button
(2) “AM” button
(3) UP button
(4) DOWN button
(5) “TUNE/FLD PUSH SOUND” knob
(6) PRESET buttons ([1] to [6])
(7) “AS” button
(A) Band
(B) Frequency
(A)
(B)
Page 295 of 482
5-53
OTHER CONTROLS AND EQUIPMENT
54P00-01E
Selecting the FM band
Press “FM” button (1).
Each time the button is pressed, the recep-
tion band will change as follows:
Selecting the AM band
Press “AM” button (2).
Seek tuning
Press UP button (3) or DOWN button (4).
The unit stops searching for a station at a
frequency where a broadcast station is
available.
Manual tuning
Turn “TUNE/FLD PUSH SOUND” knob (5).
The frequency being received is displayed.
Preset memory
1) Select the desired station.
2) Hold down a desired button ([1] to [6])
of the PRESET buttons (6) to which you
want to store the station for 2 seconds
or longer.Auto store
Hold down “AS” button (7) for 2 seconds or
longer.
6 stations in good reception will automati-
cally be stored to PRESET buttons (6) in
order, starting from a station whose fre-
quency is the lowest.
NOTE:
• Auto store can be released by pressing
“AS” button (7) while auto store is under
way.
• When the auto store is performed, the
station previously stored in the memory
at the position is overwritten.
• When there are fewer than 6 stations
that can be stored even if 1 round of
auto store operation is performed, no
station will be stored at the remaining
PRESET buttons (6).
• 6 stations can be preset for FM1 and
FM2 in common, and 6 stations for AM
in auto store mode.
Auto store mode on/off
Press “AS” button (7).
Each time the button is pressed, the mode
is switched as follows:Radio reception
Radio reception can be affected by envi-
ronment, atmospheric conditions, or radio
signal’s power and distance from the sta-
tion. Nearby mountains and buildings may
interfere or deflect radio reception, causing
poor reception. Poor reception or radio
static can also be caused by electric cur-
rent from overhead wires or high voltage
power lines.
FM1 FM2
AS mode on AS mode off
Page 296 of 482
5-54
OTHER CONTROLS AND EQUIPMENT
54P00-01E
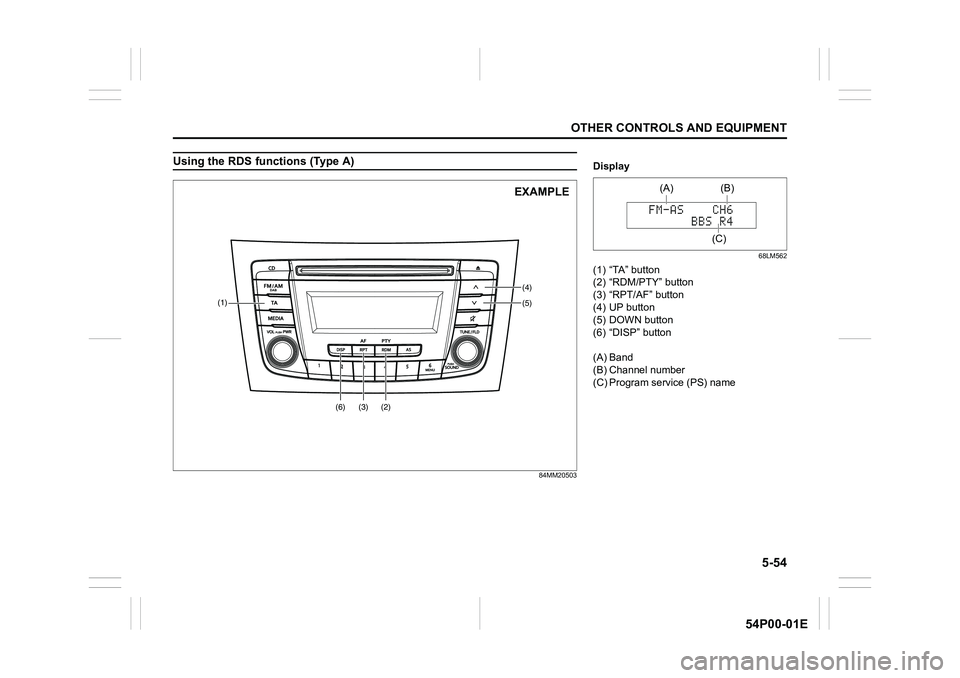
Using the RDS functions (Type A)
84MM20503
(5) (4)
(2) (3)
(1)
(6)
EXAMPLE
Display
68LM562
(1) “TA” button
(2) “RDM/PTY” button
(3) “RPT/AF” button
(4) UP button
(5) DOWN button
(6) “DISP” button
(A) Band
(B) Channel number
(C) Program service (PS) name
(A)
(C)(B)
Page 297 of 482
5-55
OTHER CONTROLS AND EQUIPMENT
54P00-01E
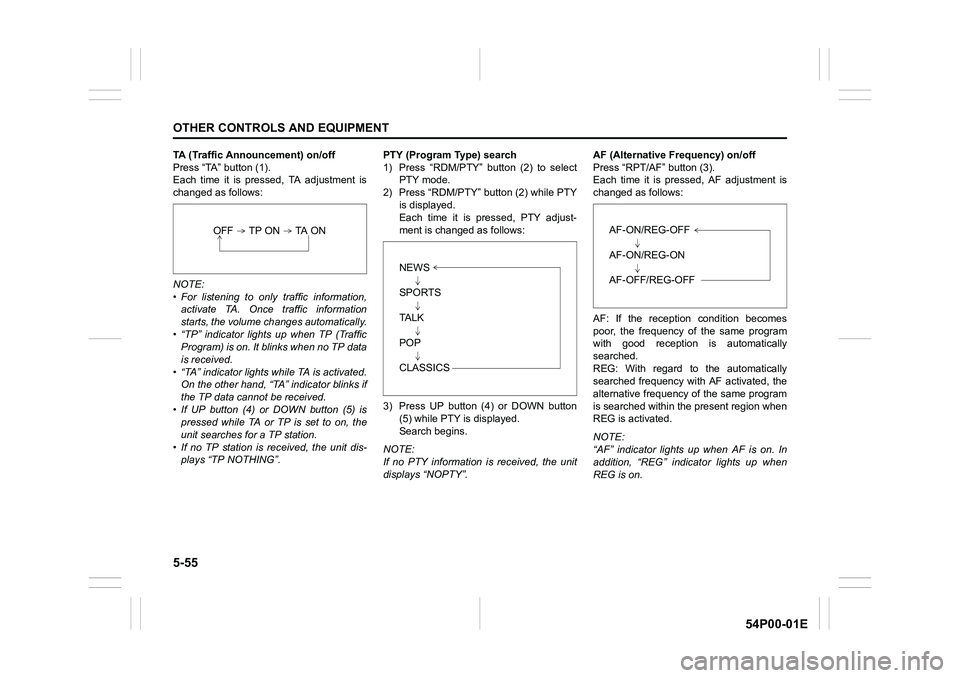
TA (Traffic Announcement) on/off
Press “TA” button (1).
Each time it is pressed, TA adjustment is
changed as follows:
NOTE:
• For listening to only traffic information,
activate TA. Once traffic information
starts, the volume changes automatically.
• “TP” indicator lights up when TP (Traffic
Program) is on. It blinks when no TP data
is received.
• “TA” indicator lights while TA is activated.
On the other hand, “TA” indicator blinks if
the TP data cannot be received.
• If UP button (4) or DOWN button (5) is
pressed while TA or TP is set to on, the
unit searches for a TP station.
• If no TP station is received, the unit dis-
plays “TP NOTHING”.PTY (Program Type) search
1) Press “RDM/PTY” button (2) to select
PTY mode.
2) Press “RDM/PTY” button (2) while PTY
is displayed.
Each time it is pressed, PTY adjust-
ment is changed as follows:
3) Press UP button (4) or DOWN button
(5) while PTY is displayed.
Search begins.
NOTE:
If no PTY information is received, the unit
displays “NOPTY”.AF (Alternative Frequency) on/off
Press “RPT/AF” button (3).
Each time it is pressed, AF adjustment is
changed as follows:
AF: If the reception condition becomes
poor, the frequency of the same program
with good reception is automatically
searched.
REG: With regard to the automatically
searched frequency with AF activated, the
alternative frequency of the same program
is searched within the present region when
REG is activated.
NOTE:
“AF” indicator lights up when AF is on. In
addition, “REG” indicator lights up when
REG is on.
OFF TP ON TA ON
NEWS
SPORTS
TA L K
POP
CLASSICS
AF-ON/REG-OFF
AF-ON/REG-ON
AF-OFF/REG-OFF
Page 298 of 482
5-56
OTHER CONTROLS AND EQUIPMENT
54P00-01E
TA standby
At the moment traffic information is
received while the source is set to CD,
USB, iPod
®, or Bluetooth®audio with TA
activated, the source is automatically
changed to radio. After reception of traffic
information, the source, which was
selected before being changed to radio,
resumes.
NOTE:
If no TP station can be received while the
unit stands by for TA, it automatically
searches for a TP station.
EON (Enhanced Other Network)
When the EON data is received with TP or
TA activated, “EON” indicator lights up,
and the traffic information from a network
other than the currently received station is
allowed to be received.
Emergency announcement reception
Emergency announcements are automati-
cally received and displayed.
Page 299 of 482
5-57
OTHER CONTROLS AND EQUIPMENT
54P00-01E
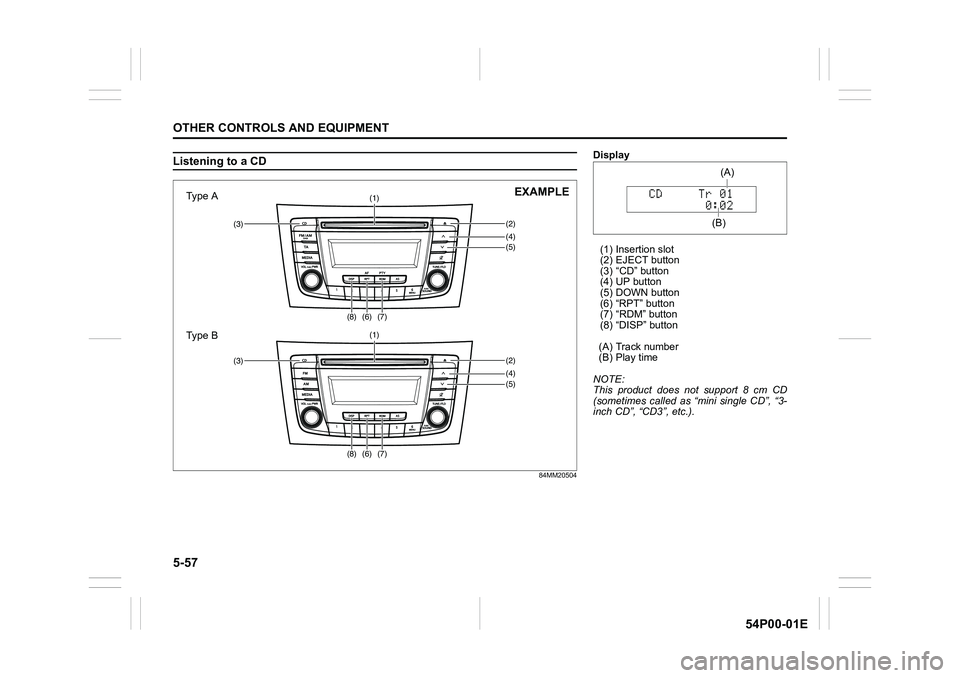
Listening to a CD
84MM20504
(4)(5) (3)(2)
(1)
(6)(7)(8)
(4)(5) (3)(2)
(1)
(6)(7)(8)
Type A
Type BEXAMPLE
Display
(1) Insertion slot
(2) EJECT button
(3) “CD” button
(4) UP button
(5) DOWN button
(6) “RPT” button
(7) “RDM” button
(8) “DISP” button
(A) Track number
(B) Play time
NOTE:
This product does not support 8 cm CD
(sometimes called as “mini single CD”, “3-
inch CD”, “CD3”, etc.).
(B)(A)
Page 300 of 482
5-58
OTHER CONTROLS AND EQUIPMENT
54P00-01E
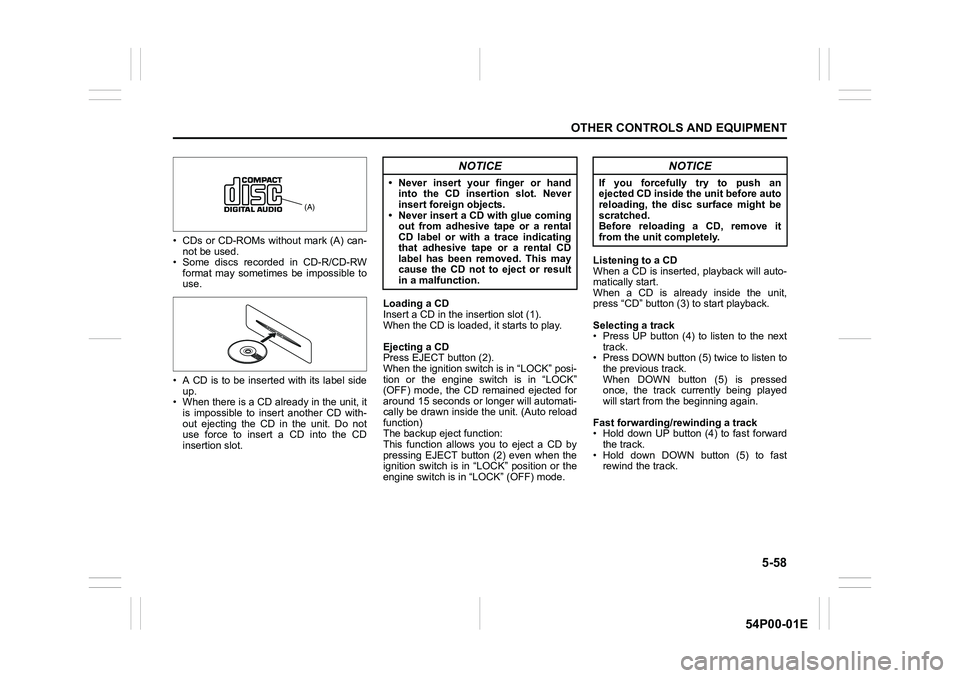
• CDs or CD-ROMs without mark (A) can-
not be used.
• Some discs recorded in CD-R/CD-RW
format may sometimes be impossible to
use.
• A CD is to be inserted with its label side
up.
• When there is a CD already in the unit, it
is impossible to insert another CD with-
out ejecting the CD in the unit. Do not
use force to insert a CD into the CD
insertion slot.Loading a CD
Insert a CD in the insertion slot (1).
When the CD is loaded, it starts to play.
Ejecting a CD
Press EJECT button (2).
When the ignition switch is in “LOCK” posi-
tion or the engine switch is in “LOCK”
(OFF) mode, the CD remained ejected for
around 15 seconds or longer will automati-
cally be drawn inside the unit. (Auto reload
function)
The backup eject function:
This function allows you to eject a CD by
pressing EJECT button (2) even when the
ignition switch is in “LOCK” position or the
engine switch is in “LOCK” (OFF) mode.Listening to a CD
When a CD is inserted, playback will auto-
matically start.
When a CD is already inside the unit,
press “CD” button (3) to start playback.
Selecting a track
• Press UP button (4) to listen to the next
track.
• Press DOWN button (5) twice to listen to
the previous track.
When DOWN button (5) is pressed
once, the track currently being played
will start from the beginning again.
Fast forwarding/rewinding a track
• Hold down UP button (4) to fast forward
the track.
• Hold down DOWN button (5) to fast
rewind the track.
(A)
NOTICE
• Never insert your finger or hand
into the CD insertion slot. Never
insert foreign objects.
• Never insert a CD with glue coming
out from adhesive tape or a rental
CD label or with a trace indicating
that adhesive tape or a rental CD
label has been removed. This may
cause the CD not to eject or result
in a malfunction.
NOTICE
If you forcefully try to push an
ejected CD inside the unit before auto
reloading, the disc surface might be
scratched.
Before reloading a CD, remove it
from the unit completely.