SUZUKI KIZASHI 2010 1.G Owners Manual
Manufacturer: SUZUKI, Model Year: 2010, Model line: KIZASHI, Model: SUZUKI KIZASHI 2010 1.GPages: 388, PDF Size: 4.94 MB
Page 251 of 388
5-72
OTHER CONTROLS AND EQUIPMENT
57L20-03E
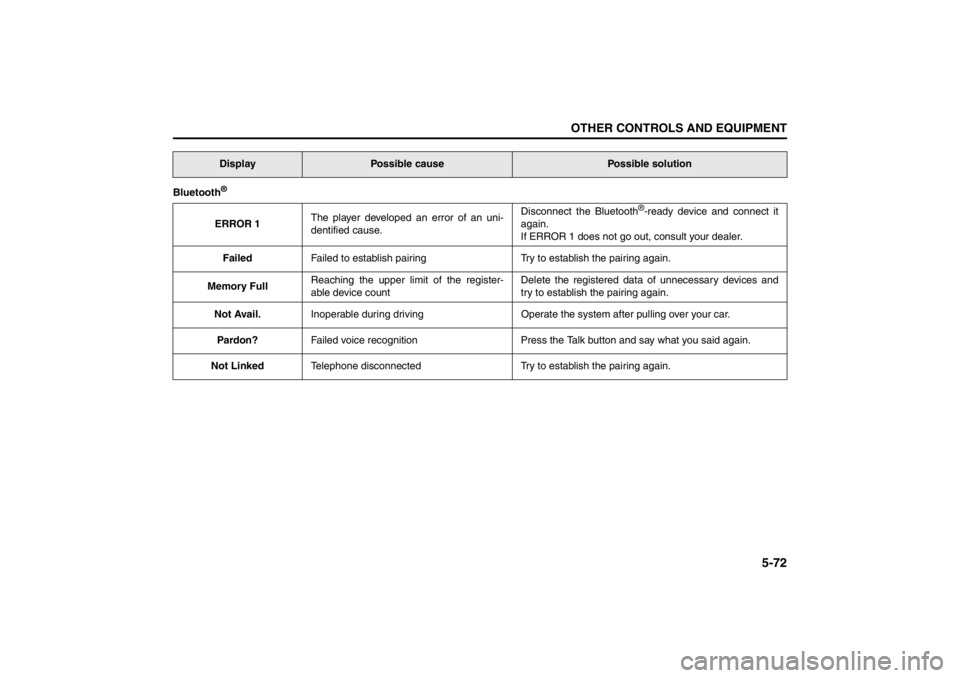
Bluetooth
®ERROR 1The player developed an error of an uni-
dentified cause.Disconnect the Bluetooth
®-ready device and connect it
again.
If ERROR 1 does not go out, consult your dealer.
FailedFailed to establish pairing Try to establish the pairing again.
Memory FullReaching the upper limit of the register-
able device countDelete the registered data of unnecessary devices and
try to establish the pairing again.
Not Avail.Inoperable during driving Operate the system after pulling over your car.
Pardon?Failed voice recognition Press the Talk button and say what you said again.
Not LinkedTelephone disconnected Try to establish the pairing again.
Display
Possible cause
Possible solution
Page 252 of 388
5-73OTHER CONTROLS AND EQUIPMENT
57L20-03E
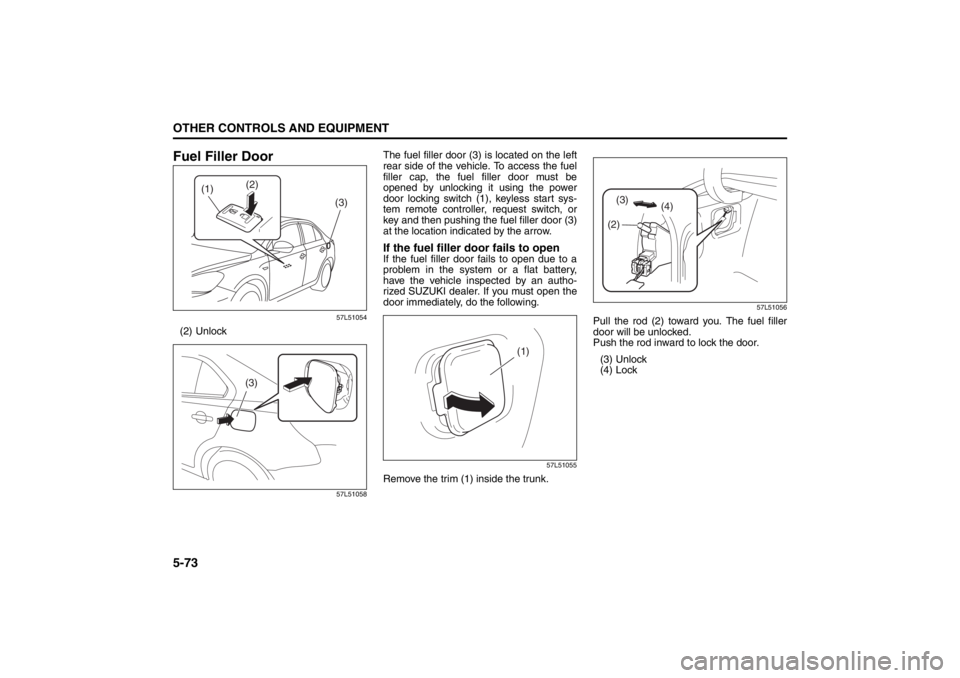
Fuel Filler Door
57L51054
(2) Unlock
57L51058
The fuel filler door (3) is located on the left
rear side of the vehicle. To access the fuel
filler cap, the fuel filler door must be
opened by unlocking it using the power
door locking switch (1), keyless start sys-
tem remote controller, request switch, or
key and then pushing the fuel filler door (3)
at the location indicated by the arrow.If the fuel filler door fails to openIf the fuel filler door fails to open due to a
problem in the system or a flat battery,
have the vehicle inspected by an autho-
rized SUZUKI dealer. If you must open the
door immediately, do the following.
57L51055
Remove the trim (1) inside the trunk.
57L51056
Pull the rod (2) toward you. The fuel filler
door will be unlocked.
Push the rod inward to lock the door.
(3) Unlock
(4) Lock
(1)
(3) (2)
(3)
(1)
(2)(3)
(4)
Page 253 of 388
5-74
OTHER CONTROLS AND EQUIPMENT
57L20-03E
57L51057
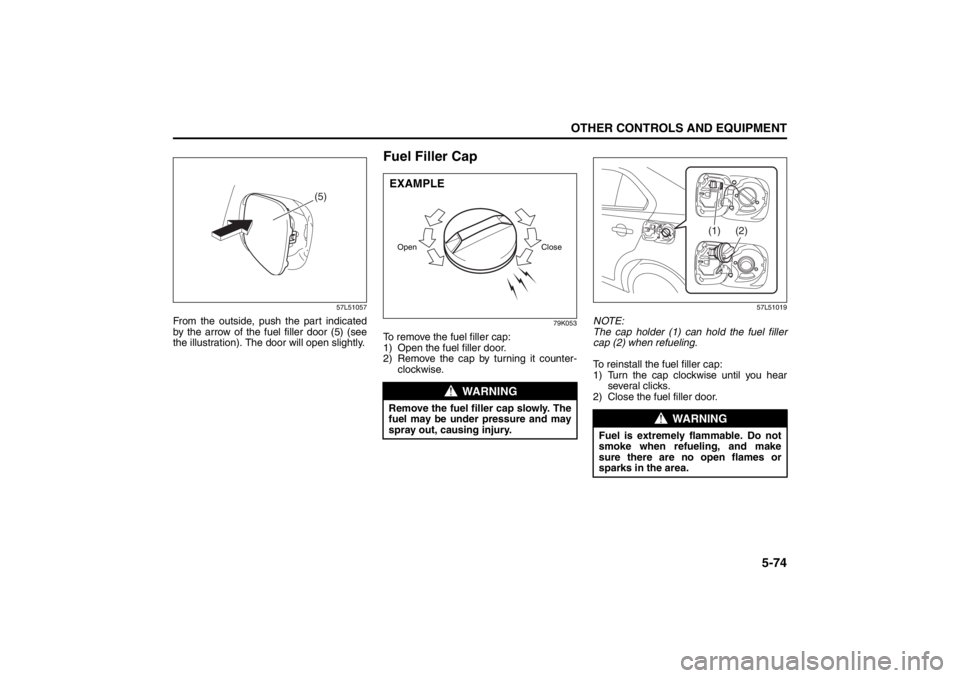
From the outside, push the part indicated
by the arrow of the fuel filler door (5) (see
the illustration). The door will open slightly.
Fuel Filler Cap
79K053
To remove the fuel filler cap:
1) Open the fuel filler door.
2) Remove the cap by turning it counter-
clockwise.
57L51019
NOTE:
The cap holder (1) can hold the fuel filler
cap (2) when refueling.
To reinstall the fuel filler cap:
1) Turn the cap clockwise until you hear
several clicks.
2) Close the fuel filler door.
(5)
WARNING
Remove the fuel filler cap slowly. The
fuel may be under pressure and may
spray out, causing injury.Open CloseEXAMPLE
WARNING
Fuel is extremely flammable. Do not
smoke when refueling, and make
sure there are no open flames or
sparks in the area.
(1) (2)
Page 254 of 388
5-75OTHER CONTROLS AND EQUIPMENT
57L20-03E
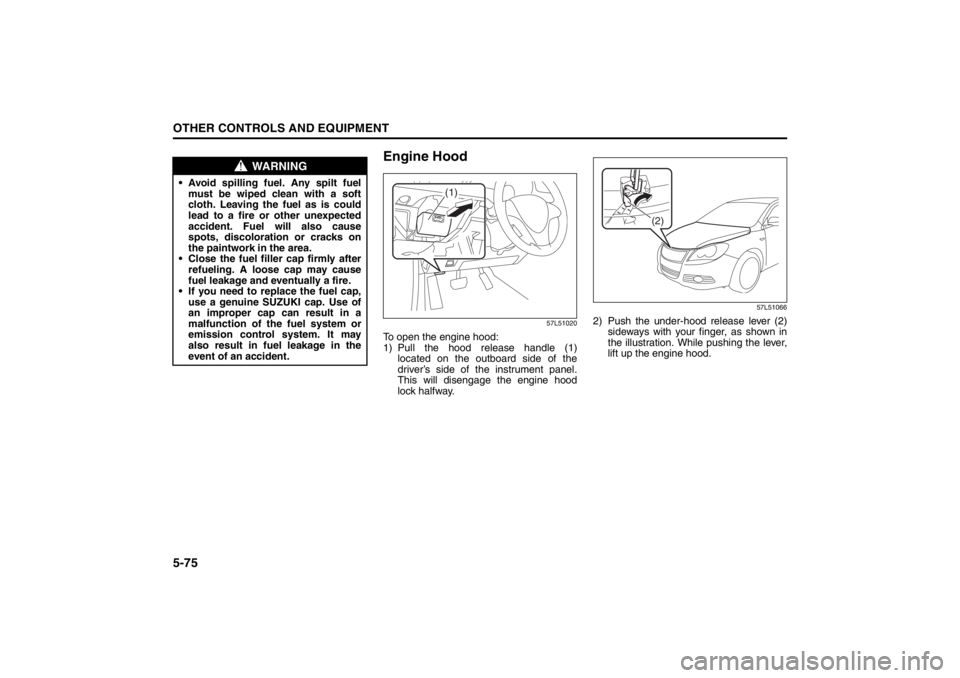
Engine Hood
57L51020
To open the engine hood:
1) Pull the hood release handle (1)located on the outboard side of the
driver’s side of the instrument panel.
This will disengage the engine hood
lock halfway.
57L51066
2) Push the under-hood release lever (2) sideways with your finger, as shown in
the illustration. While pushing the lever,
lift up the engine hood.
WARNING
• Avoid spilling fuel. Any spilt fuelmust be wiped clean with a soft
cloth. Leaving the fuel as is could
lead to a fire or other unexpected
accident. Fuel will also cause
spots, discoloration or cracks on
the paintwork in the area.
Close the fuel filler cap firmly after refueling. A loose cap may cause
fuel leakage and eventually a fire.
If you need to replace the fuel cap, use a genuine SUZUKI cap. Use of
an improper cap can result in a
malfunction of the fuel system or
emission control system. It may
also result in fuel leakage in the
event of an accident.
(1)
(2)
Page 255 of 388
5-76
OTHER CONTROLS AND EQUIPMENT
57L20-03E
57L50015
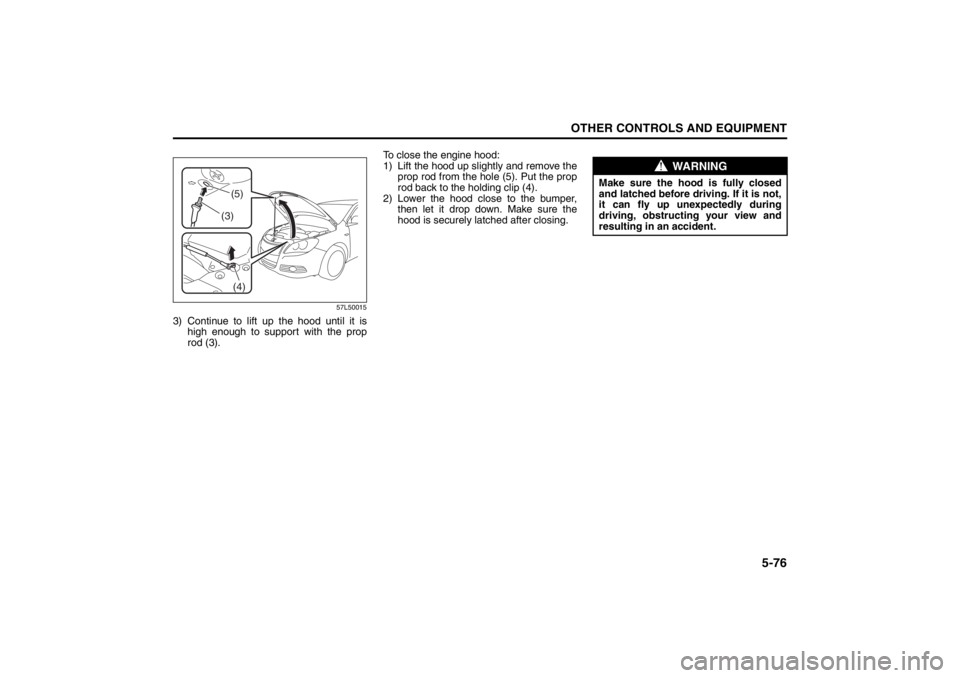
3) Continue to lift up the hood until it ishigh enough to support with the prop
rod (3). To close the engine hood:
1) Lift the hood up slightly and remove the
prop rod from the hole (5). Put the prop
rod back to the holding clip (4).
2) Lower the hood close to the bumper, then let it drop down. Make sure the
hood is securely latched after closing.
(4)
(3)(5)
WARNING
Make sure the hood is fully closed
and latched before driving. If it is not,
it can fly up unexpectedly during
driving, obstructing your view and
resulting in an accident.
Page 256 of 388
5-77OTHER CONTROLS AND EQUIPMENT
57L20-03E
Sun Visor
57L50032
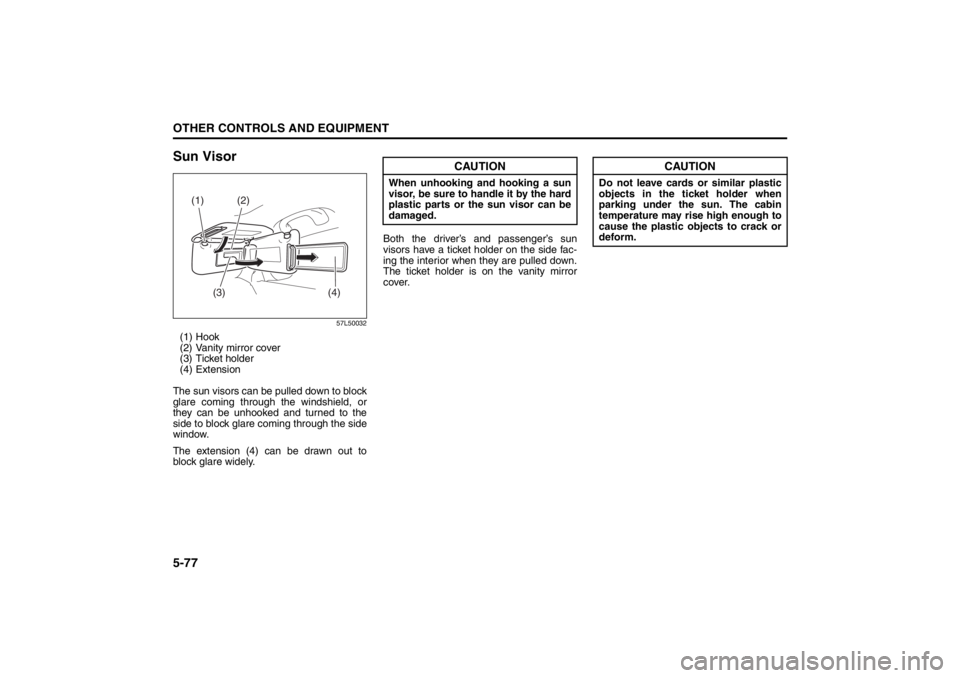
(1) Hook
(2) Vanity mirror cover
(3) Ticket holder
(4) Extension
The sun visors can be pulled down to block
glare coming through the windshield, or
they can be unhooked and turned to the
side to block glare coming through the side
window.
The extension (4) can be drawn out to
block glare widely. Both the driver’s and passenger’s sun
visors have a ticket holder on the side fac-
ing the interior when they are pulled down.
The ticket holder is on the vanity mirror
cover.
(1)
(2)
(3)
(4)
CAUTION
When unhooking and hooking a sun
visor, be sure to handle it by the hard
plastic parts or the sun visor can be
damaged.
CAUTION
Do not leave cards or similar plastic
objects in the ticket holder when
parking under the sun. The cabin
temperature may rise high enough to
cause the plastic objects to crack or
deform.
Page 257 of 388
5-78
OTHER CONTROLS AND EQUIPMENT
57L20-03E
Interior Light SwitchFront
57L51021
Rear
57L51022
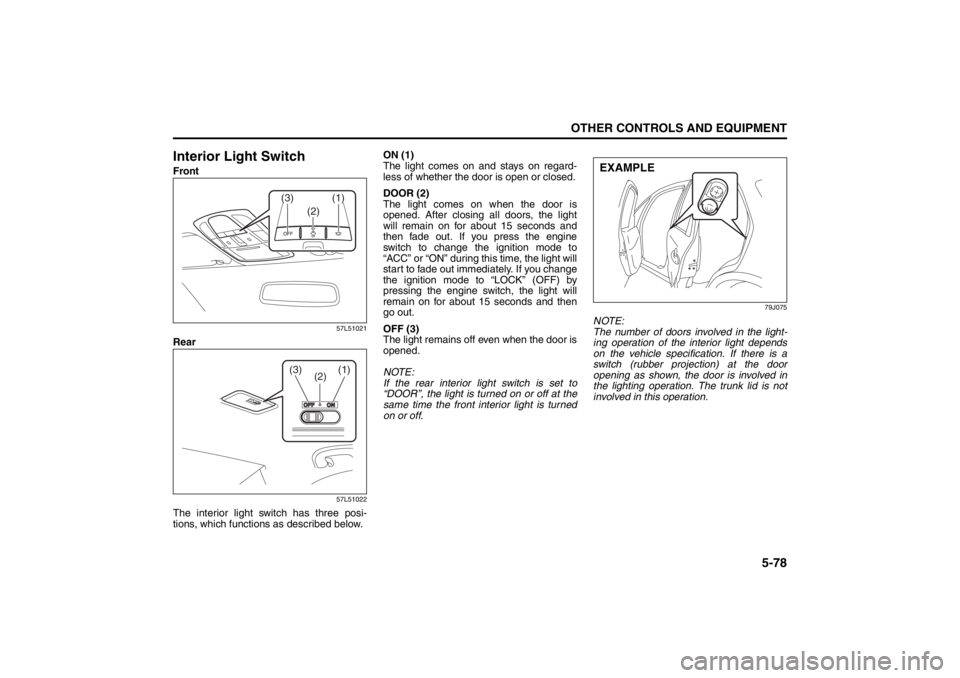
The interior light switch has three posi-
tions, which functions as described below.ON (1)
The light comes on and stays on regard-
less of whether the door is open or closed.
DOOR (2)
The light comes on when the door is
opened. After closing all doors, the light
will remain on for about 15 seconds and
then fade out. If you press the engine
switch to change the ignition mode to
“ACC” or “ON” during this time, the light will
start to fade out immediately. If you change
the ignition mode to “LOCK” (OFF) by
pressing the engine switch, the light will
remain on for about 15 seconds and then
go out.
OFF (3)
The light remains off even when the door is
opened.
NOTE:
If the rear interior light switch is set to
“DOOR”, the light is turned on or off at the
same time the front interior light is turned
on or off.
79J075
NOTE:
The number of doors involved in the light-
ing operation of the interior light depends
on the vehicle specification. If there is a
switch (rubber projection) at the door
opening as shown, the door is involved in
the lighting operation. The trunk lid is not
involved in this operation.
(2)(1) (3)
(1) (3)
(2)
EXAMPLE
Page 258 of 388
5-79OTHER CONTROLS AND EQUIPMENT
57L20-03E
Courtesy Lights
57L51023
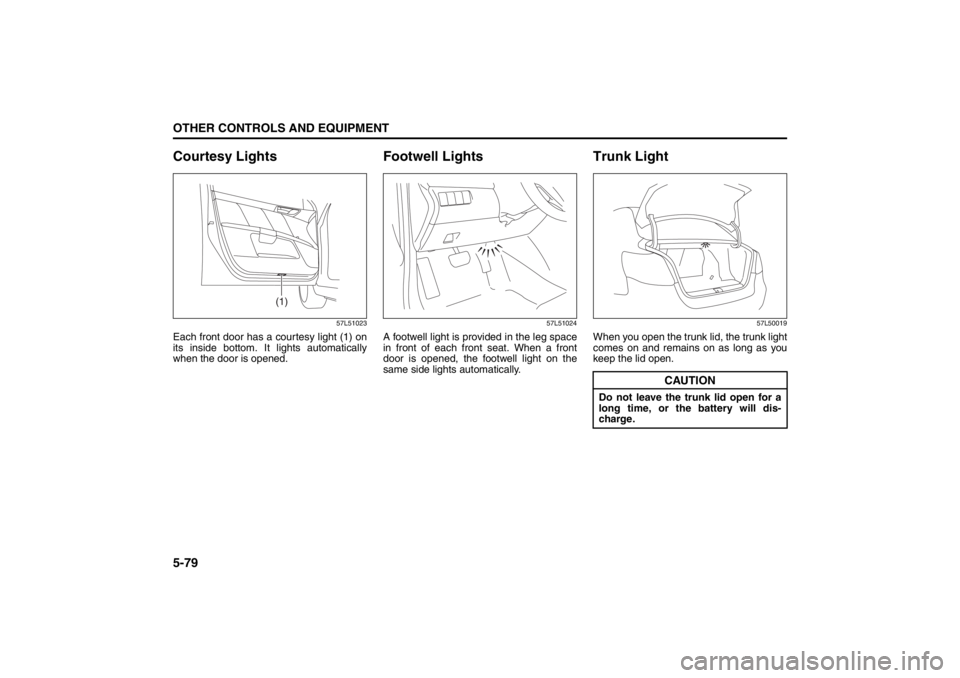
Each front door has a courtesy light (1) on
its inside bottom. It lights automatically
when the door is opened.
Footwell Lights
57L51024
A footwell light is provided in the leg space
in front of each front seat. When a front
door is opened, the footwell light on the
same side lights automatically.
Trunk Light
57L50019
When you open the trunk lid, the trunk light
comes on and remains on as long as you
keep the lid open.
(1)
CAUTION
Do not leave the trunk lid open for a
long time, or the battery will dis-
charge.
Page 259 of 388
5-80
OTHER CONTROLS AND EQUIPMENT
57L20-03E
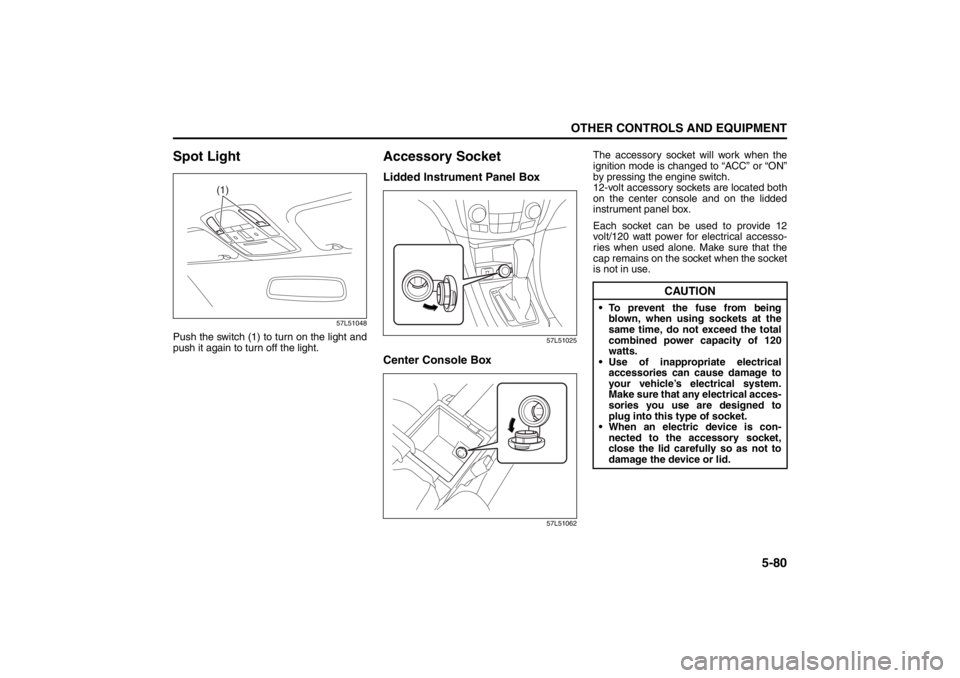
Spot Light
57L51048
Push the switch (1) to turn on the light and
push it again to turn off the light.
Accessory SocketLidded Instrument Panel Box
57L51025
Center Console Box
57L51062
The accessory socket will work when the
ignition mode is changed to “ACC” or “ON”
by pressing the engine switch.
12-volt accessory sockets are located both
on the center console and on the lidded
instrument panel box.
Each socket can be used to provide 12
volt/120 watt power for electrical accesso-
ries when used alone. Make sure that the
cap remains on the socket when the socket
is not in use.
(1)
CAUTION
To prevent the fuse from being
blown, when using sockets at the
same time, do not exceed the total
combined power capacity of 120
watts.
Use of inappropriate electrical
accessories can cause damage to
your vehicle’s electrical system.
Make sure that any electrical acces-
sories you use are designed to
plug into this type of socket.
When an electric device is con-
nected to the accessory socket,
close the lid carefully so as not to
damage the device or lid.
Page 260 of 388
5-81OTHER CONTROLS AND EQUIPMENT
57L20-03E
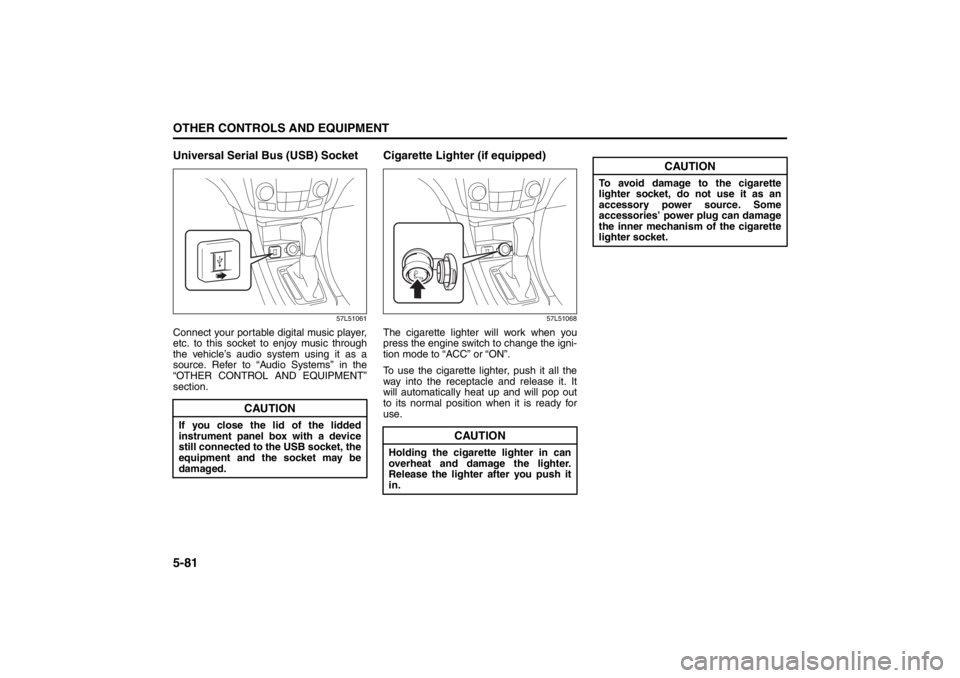
Universal Serial Bus (USB) Socket
57L51061
Connect your portable digital music player,
etc. to this socket to enjoy music through
the vehicle’s audio system using it as a
source. Refer to “Audio Systems” in the
“OTHER CONTROL AND EQUIPMENT”
section.
Cigarette Lighter (if equipped)
57L51068
The cigarette lighter will work when you
press the engine switch to change the igni-
tion mode to “ACC” or “ON”.
To use the cigarette lighter, push it all the
way into the receptacle and release it. It
will automatically heat up and will pop out
to its normal position when it is ready for
use.
CAUTION
If you close the lid of the lidded
instrument panel box with a device
still connected to the USB socket, the
equipment and the socket may be
damaged.
CAUTION
Holding the cigarette lighter in can
overheat and damage the lighter.
Release the lighter after you push it
in.
CAUTION
To avoid damage to the cigarette
lighter socket, do not use it as an
accessory power source. Some
accessories’ power plug can damage
the inner mechanism of the cigarette
lighter socket.